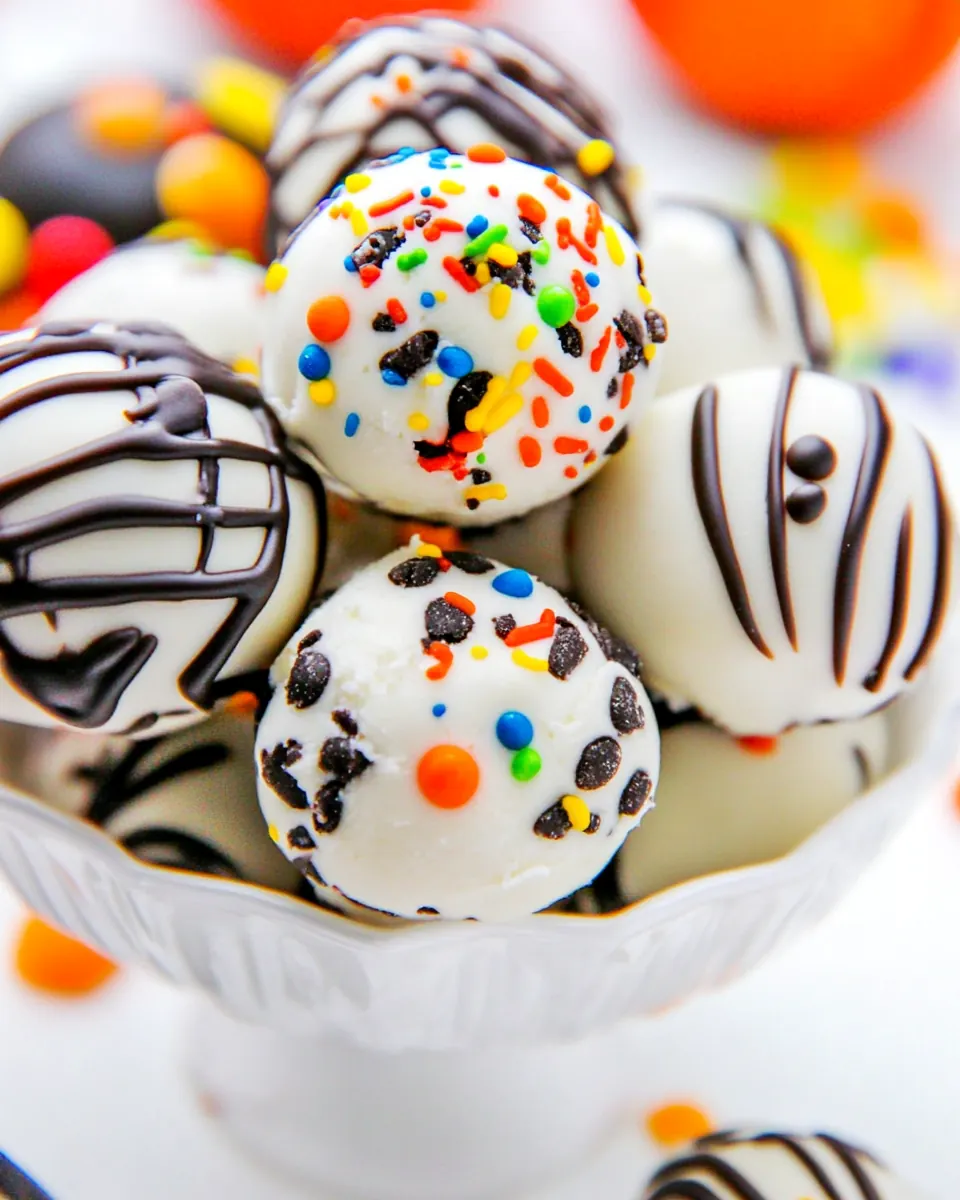
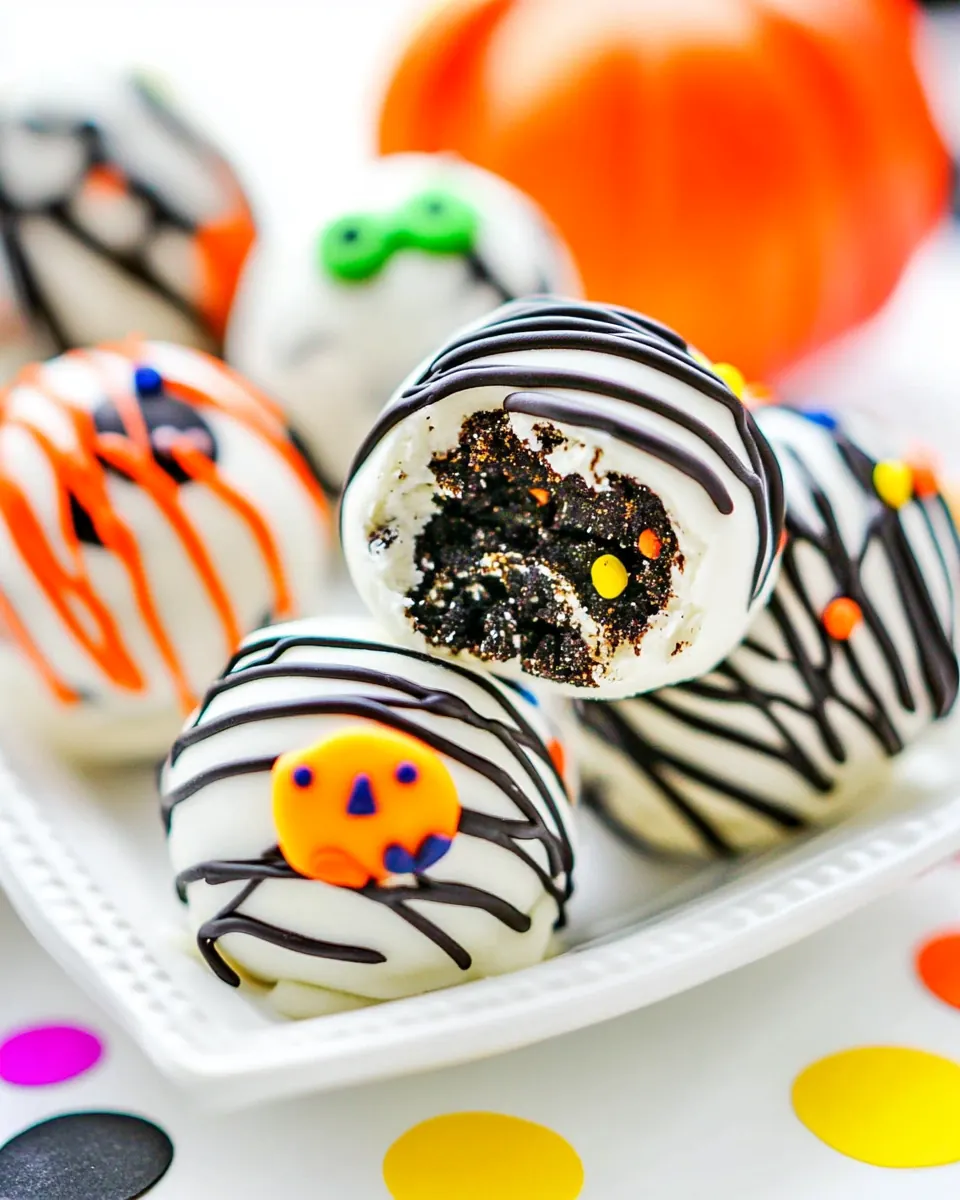
Halloween Cookie Dough Truffles
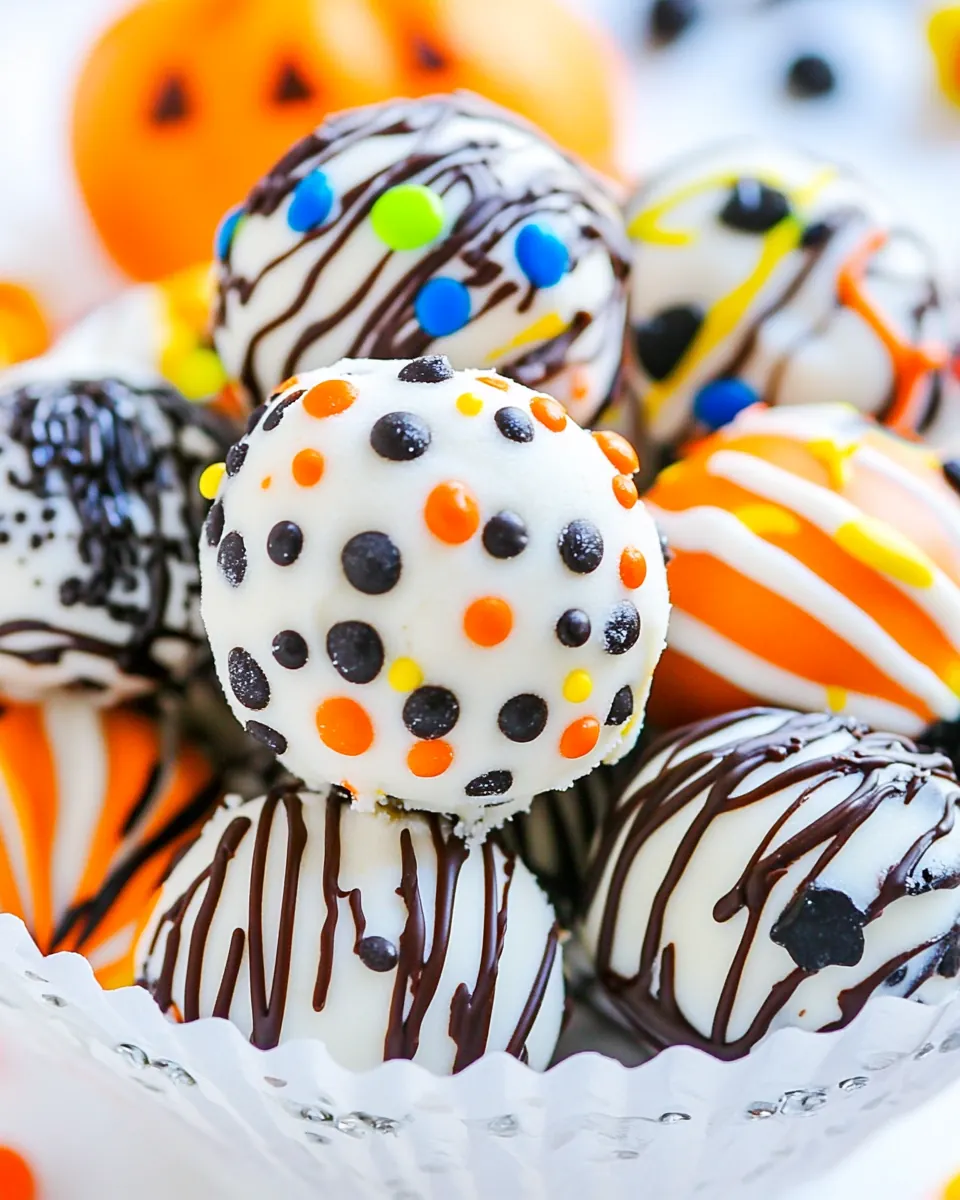
Halloween Cookie Dough Truffles started showing up in my kitchen the very first year I decided to throw a spooky little get together for friends, and they quickly became the treat everyone insisted I make again. I remember juggling a kettle, a playlist of creepy sound effects, and a mountain of candy eyes while I learned how to get the coating perfectly smooth, and that trial and error shaped the version I use now. Each bite is playful and nostalgic, and I love that these are the kind of sweet you can assemble with kids helping to decorate, or make quietly after everyone else has left the party.
There is something comforting about rolling little dough balls with your hands, then watching them transform as they are dipped in glossy melted white chocolate almond bark and drizzled with bright colored candy melts. I often find myself thinking about textures while I work, the soft, cookie dough center contrasted with the crisp snap of the chocolate shell. Over the years I adjusted the chill time and the melting method so the coating stays shiny and the centers remain tender, and now I can reliably produce truffles that look like they came from a boutique bakery.
Recipe Snapshot
1 hr 1 mins
60 mins
1 mins
Hard
150 kcal
American
Gluten-Free, Vegan
Desserts
mixing bowl, cookie scoop, baking sheet, parchment paper, microwave safe bowl, fork, plastic squeeze bottles
Why You’ll Love This Halloween Cookie Dough Truffles
Everyone gets excited to help decorate
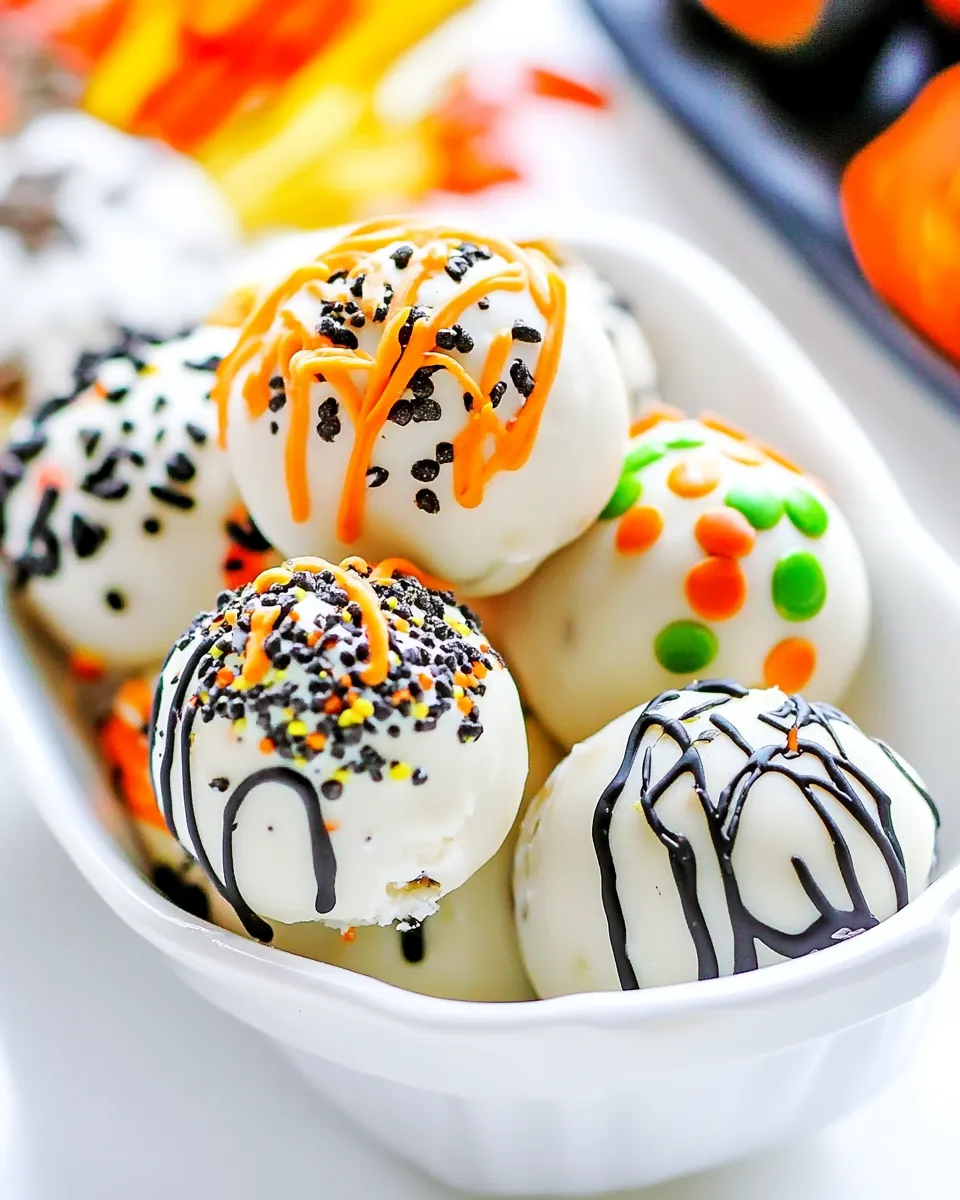
I love how hands on these Halloween Cookie Dough Truffles are. When I host, friends and family gather around the table, and everyone grabs a bottle of melted color to make silly faces and swirls. The decorating moment is social and playful, which is half the fun. It turns dessert prep into an activity, not a chore.
Flavor and texture contrast
The soft, buttery dough center paired with the crisp, chocolate shell is why I keep making these. When you bite in, you get that tender, slightly grainy cookie dough texture followed by a satisfying crack of chocolate. I purposely chill the dough and then freeze the balls briefly so the contrast is really pronounced, it makes every bite feel luxuriously layered.
Flexible for any celebration
Although these are called Halloween Cookie Dough Truffles, I frequently change the decorations to suit other holidays and parties. The base recipe is neutral and friendly to different color palettes and sprinkle mixes, so you can tailor them to birthdays, school events, or seasonal gatherings. I enjoy swapping colors and eyes for themed versions without altering the core mechanics.
Easy to scale and prep ahead
I appreciate how forgiving this recipe is when I need to make larger batches. You can prepare the dough, form the balls, and freeze them well ahead of time. When it is time to serve, a quick dip and the truffles look freshly made. I often chill a tray of coated truffles while I finish other dishes, which keeps the party flow smooth.
Kid friendly and safe to nibble
These are the kind of treats kids love to eat and to help assemble. The raw flour in the recipe is toasted briefly before mixing to reduce any concerns, and that step actually adds a subtle warm note to the dough. I find guests relax knowing a little safety step went into the process, and kids still get to enjoy the classic cookie dough experience.
Ingredients to Make Halloween Cookie Dough Truffles
I believe a great truffle starts with simple, well matched components. The recipe balances fat, sugar, and structure so the centers hold together while remaining tender, and the coatings add both flavor and visual drama. Here the star players are the buttery dough, the sweetened condensed milk that binds and sweetens, and the two types of chocolate that create a smooth, firm shell and playful colored accents.
- 1/2 cup unsalted butter softened: Soften the butter to provide rich fat and tender mouthfeel, helping bind the cookie dough base while contributing creaminess and flavor.
- 1/2 cup brown sugar packed: Pack the brown sugar to add deep molasses sweetness and moisture, enhancing chewiness and giving a warm caramel note to the truffle dough.
- 1/4 cup white sugar: Dissolve the white sugar to give balanced sweetness and slight structure, helping with texture and counteracting the brown sugar's molasses intensity.
- 1 teaspoon vanilla extract: Add vanilla extract to impart aromatic warmth and round out flavors, boosting the overall dessert profile with familiar sweet-spicy notes.
- 1 teaspoon pumpkin pie spice mix: Incorporate pumpkin pie spice mix to introduce autumnal warmth and complex spice notes, complementing the vanilla and deepening the seasonal character.
- 2 cups all-purpose flour before using heat it in the oven on a baking tray for 5 minutes at 350 degrees F: Heat the all-purpose flour briefly to remove raw taste and stabilize texture, creating a safe, neutral base that helps bind the dough without baking it fully.
- 14 oz can sweetened condensed milk: Pour in sweetened condensed milk to act as a sweet, sticky binder and concentrated milk flavor, adding creaminess while holding the dough together.
- 1/2 cup mini chocolate chips: Fold in mini chocolate chips to provide bursts of chocolate flavor and pleasant texture contrast, distributing small pockets of melted chocolate throughout the truffles.
- 1 lb white chocolate almond bark: Melt the white chocolate almond bark to form a smooth coating that hardens into a glossy shell, delivering sweet vanilla notes and an easy dipping medium.
- Colored candy melts: Melt colored candy melts to create vibrant, decorative coatings and accents, allowing for festive color and quick-setting designs on the truffles.
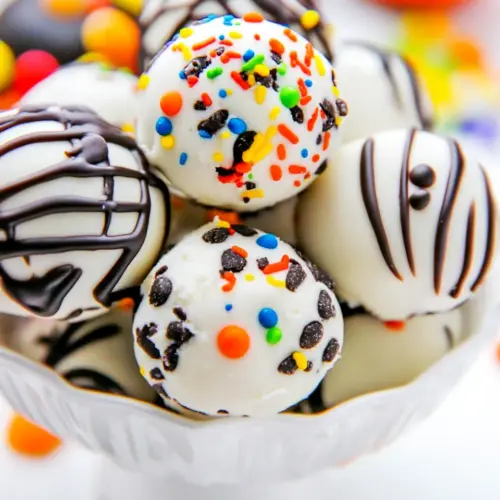
- Sprinkles: Sprinkle the sprinkles to add crunchy texture and colorful visual appeal, enhancing the festive Halloween presentation with small bursts of sugar.
- Candy eyes: Place the candy eyes to create playful, spooky faces and personality on truffles, giving an instant Halloween-themed finishing touch.
Making Halloween Cookie Dough Truffles
I like to approach the process with calm and rhythm, so I start by prepping my station and all the coatings. The method moves from creaming to chilling to dipping, and each phase affects the final texture and presentation. Keep tools ready and bowls warmed for the colored melts so you can decorate without rush.
- In a large bowl, cream together the butter and sugars until light and fluffy.: The moment you begin creaming, you will notice the texture change as the unsalted butter and both sugars lighten and incorporate air, creating a pale, creamy base. Use a paddle or a sturdy spoon, and listen for a soft, rhythmic rubbing sound as the granules break down, which signals good aeration. This step matters because it gives the dough lift and ensures the sugars are evenly distributed, avoiding gritty pockets. A common mistake is working with too cold butter, which will resist creaming and leave lumps. If that happens, let the bowl sit at room temperature for a few minutes and continue at a moderate speed.
- Beat in the vanilla extract and pumpkin spice.: When you add the vanilla extract and pumpkin pie spice mix , the bowl will fill with warm, aromatic notes that hint at the finished cookie dough. Beat them in until fully incorporated so the flavors are even throughout; a few short pulses are often enough. This matters because the added liquids and spices need to be distributed so every bite tastes balanced. Avoid overmixing at this stage, which can make the butter too soft and change the dough structure.
- Gradually whisk in the flour and milk, start with the flour, alternating with the milk, and finish with the flour.: As you introduce the toasted all-purpose flour and the sweetened condensed milk , you will see the mixture move from glossy to doughy, with the flour giving body and the condensed milk adding shine and stickiness. Alternate additions in small amounts to keep the dough uniform and prevent clumping, and pause to scrape the bowl so everything folds evenly. This technique controls hydration, which is why it matters for a cohesive, noncrumbly dough. A frequent error is dumping all the flour at once, which often leads to dry pockets or overworked dough.
- Stir in the chocolate chips. Chill the dough for about 1 hour.: Folding in the mini chocolate chips introduces tiny bursts of chocolate, and the dough will feel cool and slightly tacky when ready to chill. Place the bowl in the refrigerator so the fats firm up and the dough becomes easier to handle; chilling also deepens flavor and firms the centers. If you skip chilling, the balls will spread and the coating will not set properly. One troubleshooting tip is to cover the dough tightly so it does not dry out while chilling.
- Remove the dough from the refrigerator, and using a 1 or two tablespoons cookie scoop, form it into balls.: When you scoop the chilled dough, it should push cleanly from the scoop and hold a round shape, with the surface slightly matte from chilling. Work quickly so the dough does not warm in your hands, and gently roll any rough edges for a tidy finish. This matters because uniform balls produce even coatings and consistent serving sizes. A common mistake is handling the dough too long, which melts the fats and makes rolling sticky.
- Arrange them on a baking sheet lined with parchment paper.: Laying the balls on parchment paper prevents sticking and keeps the shapes pristine while they firm up. Space them evenly so cold air circulates and they freeze uniformly. This step helps with transfer and dipping later, because stuck or misshapen balls can tear the coating. If you skip parchment, the truffles may adhere to the tray and lose their smooth bottoms.
- Freeze for 30 minutes, or longer.: The quick freeze firms the centers so when you dip them, the dough stays intact and you get a clean shell. You will notice a chill fog and a slight hardening at the surface, which tells you they are ready. Longer freezing can help if your kitchen is warm, but beware of freezer burn if left uncovered. A mistake people make is dipping immediately from the fridge; partial chilling can cause the coating to slide off.
- Place chopped almond bark into a medium microwave-safe bowl and heat for 1 minute.: When you microwave the chopped white chocolate almond bark for a short burst, the pieces will soften and glossy streaks will appear, showing the start of melting. The initial heating step ensures you do not shock the chocolate with too much heat, which keeps it smooth. This matters because controlled melting prevents graininess. If you overheat right away, the chocolate can seize and become unusable, so heat in intervals.
- Stir and continue heating for 30 seconds or until the chocolate is almost completely melted. Stir until smooth and shiny.: As you stir the bowl, residual heat will finish melting the chunks, and the surface will become glossy and fluid. A smooth sheen indicates the proper temper and that the coating will set with a pleasant snap. Stirring also distributes heat and avoids hotspots, which can scorch. If the chocolate looks dull or grainy, stop heating and stir gently to salvage it, and avoid water contact which causes seizing.
- Remove 3-4 balls from the freezer and using a fork dip one by one in the melted chocolate bark.: When you lift a ball on a fork into the warm white chocolate almond bark , watch the shiny coating envelope the dough and hear a faint soft plopping sound as air escapes. This is a satisfying moment, and the fork helps excess chocolate drip away. The temperature contrast between frozen center and warm chocolate creates a crisp shell. If the chocolate is too cool it will thicken and clump, so keep it fluid but not hot.
- Let the excess chocolate drip into the bowl and place the coated dough ball onto another baking sheet lined with parchment paper.: Allow the excess to fall back into the bowl so the shell is thin and even, then rest the truffle on parchment to set. You will notice a slight shine that dulls as it sets, and the bottoms may be a little rough until you gently trim them after setting. Keeping the coating thin is important for a pleasant bite; thick shells can dominate the center. If the bottoms pool chocolate, gently tap the tray to level them.
- Repeat for all the remaining balls.: Continue dipping and placing each truffle methodically, keeping the bowl of melted bark accessible and the freezer nearby. The rhythmic repetition helps you maintain a steady pace and consistent coating thickness. It also prevents the chocolate from cooling and thickening too much. A common error is working too slowly, which results in uneven shells as the chocolate cools.
- Melt the colored candy melts in different microwave-safe bowls using the same heating method as above.: Each color will become glossy and fluid if heated carefully, and having separate bowls avoids color mixing and keeps hues vibrant. Warm bowls will keep the pours smooth and help you create clean lines. If a color has thickened, place the bowl over warm water briefly to loosen it, rather than overheating in bursts.
- Transfer melted colored chocolate to plastic squeeze bottles or use a fork to drizzle it.: Using squeeze bottles gives you control for faces, lines, and dots, while a fork creates whimsical streaks. The colored melts should stream in thin ribbons when ready, and movement across the truffle surface creates pretty designs. If the melt is too runny, chill briefly to firm it so you do not lose control while decorating.
- Drizzle the cookie dough balls with the colored chocolate and immediately add sprinkles or candy eyes.: The moment you drizzle, the colors contrast with the white shell and the sprinkles or candy eyes will adhere as the colored melts set. Timing is crucial, place decorations while the drizzles are still tacky to ensure they stick. Waiting too long will prevent adhesion and decorations will slide off.
- Chill the Halloween cookie dough balls for about 15 minutes.: A short chill firms all coatings and finalizes the textures so the truffles are ready to present. You will notice the sheen dull slightly as the chocolate stabilizes into a crisp shell. If you skip this step, decorations may shift and the coating can be softer to the touch.
- Gently break off any extra chocolate from the bottom and serve.: After chilling, use a small offset spatula or your fingers to remove any excess pooled chocolate from the bottoms so the truffles sit neatly. The finished pieces should have firm shells and tidy bases, making them easy to plate. Be careful when trimming not to crack the shell, use gentle pressure to avoid denting the sides.
- Store them in an airtight container in the refrigerator.: Keep the truffles chilled in a single layer or separated by parchment so they do not stick together, and refrigeration helps preserve the centers and maintain the crisp coating. When ready to serve, remove from the fridge 10 to 15 minutes beforehand for a slightly softer bite. A common storage mistake is stacking them without protection, which damages decorations and finishes.
Recipe Notes about Halloween Cookie Dough Truffles
I like to treat the tips section as my mental checklist when I prepare these truffles. Below are practical pointers I use to keep things smooth, efficient, and kid friendly. They cover prep, decorating, storage, and a little troubleshooting so you can feel confident from start to finish.
- Make ahead The dough and preformed balls can be frozen for up to a month, which means you can prepare a big batch ahead of a party and finish the dipping on the day of the event.
- Keep chocolates warm Place squeeze bottles in a bowl of hot water to maintain flow while decorating, it keeps the colored melts fluid and prevents clogs.
- Use cooled toasted flour Allow the flour to cool fully after toasting and break up any lumps, this prevents warm flour from softening the butter and changing dough texture.
- Gently trim bottoms After chilling, remove excess chocolate from the bottoms with a small spatula for neat presentation, do it carefully to avoid cracking the shell.
- Child friendly station Set up an assembly line with prefilled squeeze bottles and bowls of toppings so younger helpers can participate safely and easily.
What to Pair With Halloween Cookie Dough Truffles
These truffles are playful and rich, so I usually pair them with light drinks or bite sized nibbles to balance the sweetness. For gatherings, I set up a small dessert table where the truffles sit alongside other small pastries and seasonal fruit. They are great for casual parties, classroom celebrations, and holiday platters.
- Serving style Serve the Halloween Cookie Dough Truffles on a flat platter separated by parchment squares to keep each piece pristine. They are lovely on tiered stands for parties or arranged in paper cups for grab and go treats.
- Occasions These work well for Halloween parties, fall get togethers, school treats, or any casual gathering where playful desserts are welcome. I have also remixed decorations to match birthdays and seasonal events.
- Storage tips Store in an airtight container in the refrigerator for up to two weeks, and remove about 10 to 15 minutes before serving so the centers soften slightly for a tender bite.
- Presentation ideas Use themed liners, scatter edible confetti, or create small signs to label flavors if you offer variations. I sometimes place a few on decorative paper doilies for a vintage look.
- Portion notes The recipe yields many bite sized pieces, so plan for about two to three truffles per person for dessert buffets, or more for children who tend to take seconds.
- Transporting When transporting, pack in a flat container with a single layer, adding parchment between layers if needed, and keep chilled until arrival to maintain shape and decoration.
FAQ
Conclusion
What makes these truffles special is their playful mix of tender cookie dough and crisp chocolate shell, all dressed up with colorful drizzles and cute decorations. They are approachable to make, easy to prepare ahead, and endlessly customizable, which is why I turn to this recipe for parties and gatherings. Give them a try at your next get together, involve a few helpers for the decorating, and enjoy seeing how many smiles they inspire. They are a sweet, shareable treat that brings a little theatrical fun to dessert time.
Halloween Cookie Dough Truffles
Equipment
- Mixing Bowl
- Cookie Scoop
- Baking Sheet
- Parchment Paper
- Microwave-safe Bowl
- Fork
- plastic squeeze bottles
Ingredients
- 1/2 cup unsalted butter softened Soften the butter to provide rich fat and tender mouthfeel, helping bind the cookie dough base while contributing creaminess and flavor.
- 1/2 cup brown sugar packed Pack the brown sugar to add deep molasses sweetness and moisture, enhancing chewiness and giving a warm caramel note to the truffle dough.
- 1/4 cup white sugar Dissolve the white sugar to give balanced sweetness and slight structure, helping with texture and counteracting the brown sugar's molasses intensity.
- 1 teaspoon vanilla extract Add vanilla extract to impart aromatic warmth and round out flavors, boosting the overall dessert profile with familiar sweet-spicy notes.
- 1 teaspoon pumpkin pie spice mix Incorporate pumpkin pie spice mix to introduce autumnal warmth and complex spice notes, complementing the vanilla and deepening the seasonal character.
- 2 cups all-purpose flour before using heat it in the oven on a baking tray for 5 minutes at 350 degrees F Heat the all-purpose flour briefly to remove raw taste and stabilize texture, creating a safe, neutral base that helps bind the dough without baking it fully.
- 14 oz can sweetened condensed milk Pour in sweetened condensed milk to act as a sweet, sticky binder and concentrated milk flavor, adding creaminess while holding the dough together.
- 1/2 cup mini chocolate chips Fold in mini chocolate chips to provide bursts of chocolate flavor and pleasant texture contrast, distributing small pockets of melted chocolate throughout the truffles.
- 1 lb white chocolate almond bark Melt the white chocolate almond bark to form a smooth coating that hardens into a glossy shell, delivering sweet vanilla notes and an easy dipping medium.
- Colored candy melts Melt colored candy melts to create vibrant, decorative coatings and accents, allowing for festive color and quick-setting designs on the truffles.
- Sprinkles Sprinkle the sprinkles to add crunchy texture and colorful visual appeal, enhancing the festive Halloween presentation with small bursts of sugar.
- Candy eyes Place the candy eyes to create playful, spooky faces and personality on truffles, giving an instant Halloween-themed finishing touch.
Instructions
- In a large bowl, cream together the butter and sugars until light and fluffy.: The moment you begin creaming, you will notice the texture change as the unsalted butter and both sugars lighten and incorporate air, creating a pale, creamy base. Use a paddle or a sturdy spoon, and listen for a soft, rhythmic rubbing sound as the granules break down, which signals good aeration. This step matters because it gives the dough lift and ensures the sugars are evenly distributed, avoiding gritty pockets. A common mistake is working with too cold butter, which will resist creaming and leave lumps. If that happens, let the bowl sit at room temperature for a few minutes and continue at a moderate speed.
- Beat in the vanilla extract and pumpkin spice.: When you add the vanilla extract and pumpkin pie spice mix , the bowl will fill with warm, aromatic notes that hint at the finished cookie dough. Beat them in until fully incorporated so the flavors are even throughout; a few short pulses are often enough. This matters because the added liquids and spices need to be distributed so every bite tastes balanced. Avoid overmixing at this stage, which can make the butter too soft and change the dough structure.
- Gradually whisk in the flour and milk, start with the flour, alternating with the milk, and finish with the flour.: As you introduce the toasted all-purpose flour and the sweetened condensed milk , you will see the mixture move from glossy to doughy, with the flour giving body and the condensed milk adding shine and stickiness. Alternate additions in small amounts to keep the dough uniform and prevent clumping, and pause to scrape the bowl so everything folds evenly. This technique controls hydration, which is why it matters for a cohesive, noncrumbly dough. A frequent error is dumping all the flour at once, which often leads to dry pockets or overworked dough.
- Stir in the chocolate chips. Chill the dough for about 1 hour.: Folding in the mini chocolate chips introduces tiny bursts of chocolate, and the dough will feel cool and slightly tacky when ready to chill. Place the bowl in the refrigerator so the fats firm up and the dough becomes easier to handle; chilling also deepens flavor and firms the centers. If you skip chilling, the balls will spread and the coating will not set properly. One troubleshooting tip is to cover the dough tightly so it does not dry out while chilling.
- Remove the dough from the refrigerator, and using a 1 or two tablespoons cookie scoop, form it into balls.: When you scoop the chilled dough, it should push cleanly from the scoop and hold a round shape, with the surface slightly matte from chilling. Work quickly so the dough does not warm in your hands, and gently roll any rough edges for a tidy finish. This matters because uniform balls produce even coatings and consistent serving sizes. A common mistake is handling the dough too long, which melts the fats and makes rolling sticky.
- Arrange them on a baking sheet lined with parchment paper.: Laying the balls on parchment paper prevents sticking and keeps the shapes pristine while they firm up. Space them evenly so cold air circulates and they freeze uniformly. This step helps with transfer and dipping later, because stuck or misshapen balls can tear the coating. If you skip parchment, the truffles may adhere to the tray and lose their smooth bottoms.
- Freeze for 30 minutes, or longer.: The quick freeze firms the centers so when you dip them, the dough stays intact and you get a clean shell. You will notice a chill fog and a slight hardening at the surface, which tells you they are ready. Longer freezing can help if your kitchen is warm, but beware of freezer burn if left uncovered. A mistake people make is dipping immediately from the fridge; partial chilling can cause the coating to slide off.
- Place chopped almond bark into a medium microwave-safe bowl and heat for 1 minute.: When you microwave the chopped white chocolate almond bark for a short burst, the pieces will soften and glossy streaks will appear, showing the start of melting. The initial heating step ensures you do not shock the chocolate with too much heat, which keeps it smooth. This matters because controlled melting prevents graininess. If you overheat right away, the chocolate can seize and become unusable, so heat in intervals.
- Stir and continue heating for 30 seconds or until the chocolate is almost completely melted. Stir until smooth and shiny.: As you stir the bowl, residual heat will finish melting the chunks, and the surface will become glossy and fluid. A smooth sheen indicates the proper temper and that the coating will set with a pleasant snap. Stirring also distributes heat and avoids hotspots, which can scorch. If the chocolate looks dull or grainy, stop heating and stir gently to salvage it, and avoid water contact which causes seizing.
- Remove 3-4 balls from the freezer and using a fork dip one by one in the melted chocolate bark.: When you lift a ball on a fork into the warm white chocolate almond bark , watch the shiny coating envelope the dough and hear a faint soft plopping sound as air escapes. This is a satisfying moment, and the fork helps excess chocolate drip away. The temperature contrast between frozen center and warm chocolate creates a crisp shell. If the chocolate is too cool it will thicken and clump, so keep it fluid but not hot.
- Let the excess chocolate drip into the bowl and place the coated dough ball onto another baking sheet lined with parchment paper.: Allow the excess to fall back into the bowl so the shell is thin and even, then rest the truffle on parchment to set. You will notice a slight shine that dulls as it sets, and the bottoms may be a little rough until you gently trim them after setting. Keeping the coating thin is important for a pleasant bite; thick shells can dominate the center. If the bottoms pool chocolate, gently tap the tray to level them.
- Repeat for all the remaining balls.: Continue dipping and placing each truffle methodically, keeping the bowl of melted bark accessible and the freezer nearby. The rhythmic repetition helps you maintain a steady pace and consistent coating thickness. It also prevents the chocolate from cooling and thickening too much. A common error is working too slowly, which results in uneven shells as the chocolate cools.
- Melt the colored candy melts in different microwave-safe bowls using the same heating method as above.: Each color will become glossy and fluid if heated carefully, and having separate bowls avoids color mixing and keeps hues vibrant. Warm bowls will keep the pours smooth and help you create clean lines. If a color has thickened, place the bowl over warm water briefly to loosen it, rather than overheating in bursts.
- Transfer melted colored chocolate to plastic squeeze bottles or use a fork to drizzle it.: Using squeeze bottles gives you control for faces, lines, and dots, while a fork creates whimsical streaks. The colored melts should stream in thin ribbons when ready, and movement across the truffle surface creates pretty designs. If the melt is too runny, chill briefly to firm it so you do not lose control while decorating.
- Drizzle the cookie dough balls with the colored chocolate and immediately add sprinkles or candy eyes.: The moment you drizzle, the colors contrast with the white shell and the sprinkles or candy eyes will adhere as the colored melts set. Timing is crucial, place decorations while the drizzles are still tacky to ensure they stick. Waiting too long will prevent adhesion and decorations will slide off.
- Chill the Halloween cookie dough balls for about 15 minutes.: A short chill firms all coatings and finalizes the textures so the truffles are ready to present. You will notice the sheen dull slightly as the chocolate stabilizes into a crisp shell. If you skip this step, decorations may shift and the coating can be softer to the touch.
- Gently break off any extra chocolate from the bottom and serve.: After chilling, use a small offset spatula or your fingers to remove any excess pooled chocolate from the bottoms so the truffles sit neatly. The finished pieces should have firm shells and tidy bases, making them easy to plate. Be careful when trimming not to crack the shell, use gentle pressure to avoid denting the sides.
- Store them in an airtight container in the refrigerator.: Keep the truffles chilled in a single layer or separated by parchment so they do not stick together, and refrigeration helps preserve the centers and maintain the crisp coating. When ready to serve, remove from the fridge 10 to 15 minutes beforehand for a slightly softer bite. A common storage mistake is stacking them without protection, which damages decorations and finishes.
Notes
- Make ahead The dough and preformed balls can be frozen for up to a month, which means you can prepare a big batch ahead of a party and finish the dipping on the day of the event.
- Keep chocolates warm Place squeeze bottles in a bowl of hot water to maintain flow while decorating, it keeps the colored melts fluid and prevents clogs.
- Use cooled toasted flour Allow the flour to cool fully after toasting and break up any lumps, this prevents warm flour from softening the butter and changing dough texture.
- Gently trim bottoms After chilling, remove excess chocolate from the bottoms with a small spatula for neat presentation, do it carefully to avoid cracking the shell.
- Child friendly station Set up an assembly line with prefilled squeeze bottles and bowls of toppings so younger helpers can participate safely and easily.