Grilled Chuck Roast
Grilled Chuck Roast has a way of turning backyard weekends into memorable meals, and I still remember the first time I cooked one for a group of friends. I was nervous about grilling a cut that many people assume needs low and slow treatment, but the result was surprising, rich, and deeply satisfying. The crust developed beautifully while the interior stayed tender when sliced correctly, and folks kept asking for seconds.
That evening taught me to trust simple seasoning and technique, and I’ve since come back to this method whenever I want a straightforward, hearty centerpiece. The combination of beef, a splash of Worcestershire sauce, and a touch of Italian seasoning gives a balanced savory profile without fuss. I like that this recipe respects the ingredient, letting the natural beef flavor shine rather than masking it.
When I grill this cut now, I think of the conversation it creates, the easy prep that lets me spend more time with guests, and the satisfying ritual of resting and slicing against the grain. It is one of those dishes that looks impressive but is forgiving when you pay attention to the visual and tactile cues. Whether you are feeding a hungry family or hosting a casual cookout, this approach to Grilled Chuck Roast delivers dependable results and a warm, communal meal.
Recipe Snapshot
45 mins
5 mins
40 mins
Medium
350 kcal
American
Keto, Paleo
Dinner
Grill, Instant read thermometer, Tongs, Cutting board, Sharp knife
Why This Grilled Chuck Roast Works
1. Bold beef flavor without fuss
I love how Grilled Chuck Roast concentrates beefy flavor while staying approachable. Because the cut is marbled, you get deep savory notes that stand up to simple seasonings. I find that letting the roast sit briefly in the oil and sauce mixture allows the surface flavors to anchor, so every slice tastes purposeful and rich.
2. Simple seasoning, impressive results
This recipe leans on a few pantry staples, and that restraint is a strength. A touch of salt and pepper, brightened by Italian seasoning and umami from Worcestershire sauce, creates complexity without overworking the meat. I often prefer this minimalism, since it reveals the roast rather than covering it.
3. Quick prep, great payoff
One of the reasons I reach for this method is how quickly it comes together. With only minutes of prep and the majority of time spent gently grilling, you get a centerpiece that looks like it took hours. For busy nights or last minute guests, that speed is a game changer.
4. Versatile for gatherings
The sliceable nature of Grilled Chuck Roast makes it a crowd pleaser. You can feed a group easily, arrange slices on a platter, and watch people help themselves. I like to serve it family style, and I appreciate how leftovers reheat well for sandwiches or quick dinners.
5. Teachable sensory cues
I always teach people to watch and feel for doneness, not just rely on a timer. Paying attention to the crust color, the warmth of the meat, and the resisting give when you press it helps you nail the desired doneness. I find this makes cooks more confident and yields more consistent results.
Recipe Ingredients for Grilled Chuck Roast
These ingredients are chosen to celebrate the hearty character of the roast while keeping the prep effortless. The key players are the beef chuck itself, which provides texture and richness, the olive oil to help the seasonings cling and promote browning, and the Worcestershire sauce for savory depth. Simple herbs and a pinch of seasoning let the meat take center stage.
- 1 beef chuck roast 2-3 pounds: Provide a hearty, flavorful base and serve as the main protein for the dish, yielding rich, beefy juices when grilled. Marinate or sear to develop a savory crust while retaining tenderness inside. Slice thinly across the grain after resting to maximize juiciness and tenderness.
- 2 tablespoons olive oil: Coat the roast to promote even browning and help other seasonings adhere, adding subtle fruitiness and fat for moisture. Heat oil on the grill or in a pan before searing to create a caramelized exterior. Use just enough to lightly cover the surface without causing flare-ups.
- 1 tablespoon Worcestershire sauce: Impart deep umami and tang while enhancing beefy flavors through its savory-sweet complexity. Combine with other seasonings in a marinade or brush on during grilling to build layers of flavor. Helps tenderize slightly due to its acidity and complex seasoning profile.
- 1 teaspoon Italian seasoning: Add aromatic herbal notes and a balanced savory profile, complementing the beef without overpowering it. Sprinkle evenly over the roast to infuse flavor during resting or grilling. Works well mixed into rubs or marinades to distribute flavor consistently.
- 1/2 teaspoons salt: Enhance and balance overall taste by drawing out and amplifying the roast's natural flavors, while providing a fundamental savory backbone. Apply sparingly and adjust to taste to avoid oversalting, especially if using other salty components. Salt also helps with moisture retention and crust formation.
- 1/2 teaspoon pepper: Provide a mild heat and sharpness that contrasts the beef's richness, brightening flavors and rounding out the seasoning profile. Grind fresh for best aroma and distribute evenly to avoid concentrated spicy spots. Combine with salt and herbs for a balanced crust.
Cooking Instructions for Grilled Chuck Roast
These directions expand the original steps into vivid guidance you can rely on. I walk you through tactile cues, smells, and troubleshooting so you can grill with confidence and enjoy every slice.
- Pat dry the chuck roast. Season with salt and pepper on all sides.: When you press a clean towel to the surface, the meat should feel slightly tacky but not wet, which helps the olive oil and seasonings adhere. Drying the surface also improves browning, because excess moisture creates steam otherwise, preventing a proper crust. You should hear a subtle sizzle when the roast first hits the hot grill, a gratifying sound that signals Maillard reactions are beginning. A common mistake is skipping this step and ending up with a steamed, pale exterior. If the roast is very cold from the fridge, let it sit at room temperature for about 20 minutes before patting dry so it cooks more evenly.
- In a large bowl, whisk together the olive oil, Worcestershire sauce, and Italian seasoning.: As you sprinkle the salt and pepper , press them gently into the meat to ensure they cling. The aroma of black pepper will release as the roast warms on the grill, and the salt will start to draw out and then reabsorb juices, concentrating flavor. Visually, the surface should look evenly coated, not patchy. Over-salting is a risk here, so measure carefully to avoid a harsh taste. If you accidentally oversalt, rinse briefly and pat dry, then apply a lighter second seasoning.
- Place the seasoned raw chuck roast in the olive oil mixture and coat all sides.: As you whisk, you will notice the mixture thicken and the oil suspend the herbs, creating a glossy marinade. The scent of the Worcestershire sauce will be savory and slightly tangy, and the dried herbs will become more aromatic as they bloom in the oil. This mixture aids in browning and adds a layered flavor to the crust. A mistake to avoid is using too much liquid, which can cause flare ups on the grill. Keep the ratio balanced so the coating is wet but not dripping.
- Preheat a grill to medium-high heat. Alternatively, place a grill pan over medium-high heat.: Use tongs or clean hands to turn the roast, ensuring the herb mixture covers every surface evenly. When coated, the roast should glisten but not be drenched; you want a thin, even film so the grill can form a crust. The herbs will cling to the oil, creating those golden flecks that toast on the surface. If you press the mixture on, it helps adherence, but avoid compacting the meat. A common misstep is letting it sit in an overly acidic marinade too long, which can change texture, so if you plan to marinate longer, keep it brief or adjust accordingly.
- Grill the chuck roast, turning it every five minutes, for twenty minutes. Continue cooking until the chuck roast reaches an internal temperature of 120°F for rare, 125°F for medium-rare, 135°F for medium. My 3-pound chuck roast took exactly 40 minutes to cook.: You want the grates hot enough to sear and produce a satisfying crust, but not so hot that the exterior chars before the interior warms. On a gas grill, aim for heat that gives a quick sizzle when you hover your hand above the grates at about five to six inches. On a grill pan over the stove, the pan should shimmer and give off a faint toasty aroma. Proper preheating prevents sticking and creates those attractive grill marks. A frequent error is rushing this step and placing meat on a cold surface, which leads to sticking and poor browning. Take the extra few minutes to ensure consistent heat.
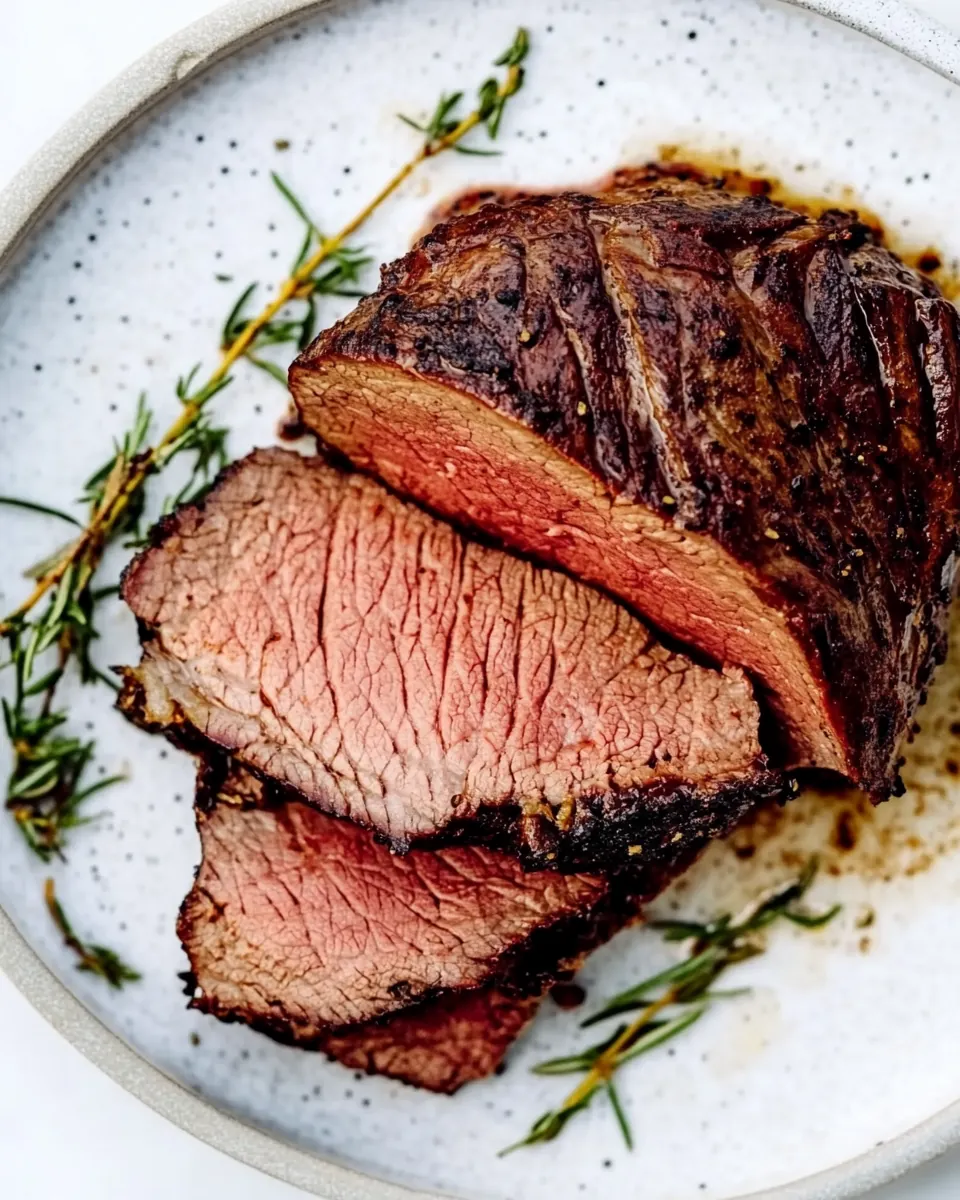
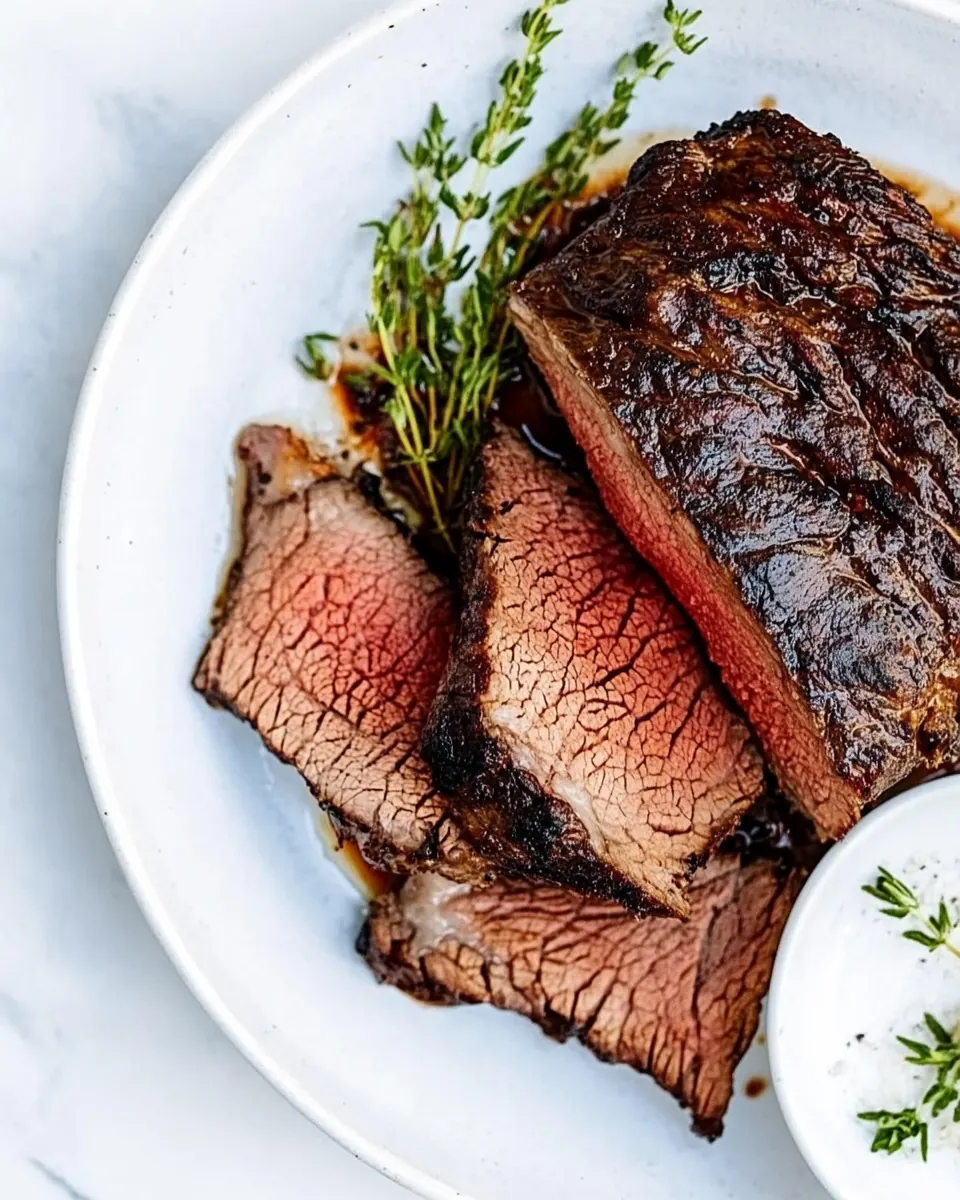
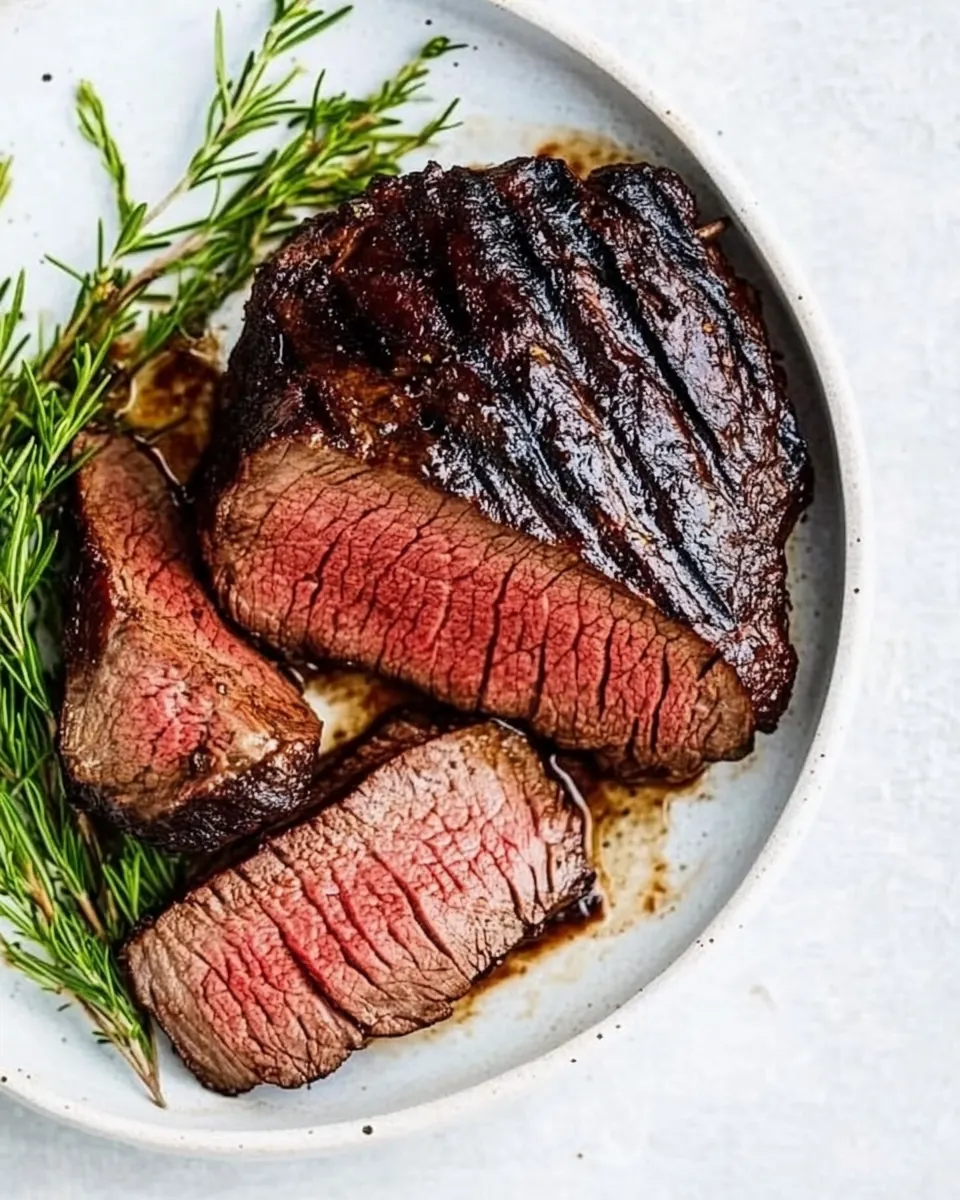
- Transfer the chuck roast to a cutting board and let the meat rest for five minutes. Thinly slice it against the grain and serve.: As you turn the roast, listen for alternating sizzling and quieter moments, which indicate the seared sides are setting. The surface should develop a deep golden brown to mahogany color, with some caramelized spots where the sugars in the Worcestershire sauce and meat have browned. Turning regularly helps cook the roast evenly and prevents one side from overcooking. Watch for flare ups from drippings, and move the roast briefly to a cooler zone if flames rise. A common mistake is leaving it untouched for too long, which can create a burned exterior while the inside remains underdone.
- Continue cooking until the chuck roast reaches an internal temperature of 120°F for rare, 125°F for medium rare, 135°F for medium: Use a reliable instant read thermometer inserted into the thickest part to check doneness, and avoid touching bone if present. As the roast approaches target temperature, you will notice juices begin to appear on the surface, and the overall firmness increases. These sensory cues help confirm timing, but the thermometer is your best friend for accuracy. If you overshoot temperature, the meat can become firmer and drier, so monitor closely near the end. Remember carry over cooking will raise the temperature slightly during resting, so aim for the lower end of your target if you want a perfect medium rare.
- My 3 pound chuck roast took exactly 40 minutes to cook: Personal experience suggests timing, but every grill and piece of meat is different, so use this as a guideline not a rule. Pay attention to how the aroma evolves, from sharp savory notes to a deeper roasted smell as cooking progresses. If your roast is thicker or thinner, adjust the total grilling time proportionally, checking the internal temperature more frequently. A trap is following time alone; instead trust the combination of feel, color, and thermometer readings. If you notice uneven browning, rotate the roast or move it to a more even heat zone.
- Transfer the chuck roast to a cutting board and let the meat rest for five minutes: Resting lets the juices redistribute, so when you slice the roast the juices remain in the fibers instead of spilling onto the board. During rest, the surface will still cool slightly, and the internal temperature will rise a few degrees, which is why you aimed for a slightly lower temperature earlier. You will notice the meat relax and the aroma deepen, and slicing too soon will cause excessive juice loss. A common mistake is skipping rest in the rush to serve, resulting in drier slices. Use this short window to gather your serving platter and a sharp slicing knife.
- Thinly slice it against the grain and serve: Cutting across the muscle fibers shortens them, producing a tender bite and an attractive plate. As you slice, observe the texture and adjust thickness to preference, but thinner slices typically feel more tender and are easier to chew. The surface will show a nice sear and a pink to slightly rosy interior depending on doneness. One pitfall is cutting with a dull knife which tears the meat and compresses the juices; always slice with a sharp blade for clean, succulent pieces. Arrange slices on a platter so each piece showcases the crust and juicy interior.
Making Adjustments
This section helps you tweak the approach to suit taste, timing, and equipment. Each tip starts with a bold phrase to highlight the adjustment, followed by detailed advice so you can adapt confidently.
- Marinate longer for deeper flavor: If you have time, let the roast sit in the olive oil and Worcestershire mixture for 20 minutes to overnight. This allows the surface flavors to penetrate and mellow, giving a more integrated taste. If you decide on a longer marination, keep the container covered and refrigerated. For extended marinating, consider adding a splash of acid as noted below, but be cautious since acids can change meat texture over very long periods.
- Add a touch of sweetness: Mixing in a tablespoon of brown sugar or basting with a bit of BBQ sauce near the end can create a glossy, caramelized surface that contrasts nicely with the savory meat. Apply sugary additions in the final 6 to 8 minutes to prevent burning during the main cook. This technique gives you a balanced sweet and savory profile, helpful if your crowd favors saucier bites.
- Try subtle seasoning variations: If you want a different aromatic profile, add 1 to 2 teaspoons of paprika or onion powder to the seasoning blend. These spices introduce mild smokiness or savory depth and still respect the core beef flavor. Sprinkle them into the oil mixture so they distribute evenly, and taste your adjustments on a small seared scrap if you are unsure of proportions.
- Control flare ups: When grilling over direct heat, keep a cooler zone or tray nearby to move the roast if fat drips cause flames. Briefly shifting the roast away from high flames preserves the crust without charring. Use tongs to reposition, and never douse flames with water, which can create ash and disrupt heat control.
- Slice thin for tenderness: After resting, slice thinly against the grain to maximize tenderness, especially with this cut. Thinner slices let the chew feel softer and make portions stretch further for gatherings. Use a sharp carving knife and steady strokes for neat, consistent pieces suitable for platters and sandwiches.
- Store leftovers properly: Let the roast cool slightly, then place in an airtight container and refrigerate for three to four days. Reheat gently to avoid drying, either in a low oven with a splash of broth or microwaving briefly covered. Proper storage preserves flavor and makes for excellent next day meals.
How to Serve Grilled Chuck Roast
This roast is versatile and welcoming. Below are thoughtful serving ideas, occasions, and storage suggestions organized so you can plan a meal that feels complete and intentional.
- Family style platter: Arrange thin slices on a large board, garnish lightly and let guests serve themselves for a relaxed dinner setting.
- Sandwiches and sliders: Use slices on crusty rolls with a smear of sauce for a hearty lunch option that stretches leftovers further.
- Simple sides: Pair with grilled vegetables or a light salad to balance richness and add color on the plate.
- Occasion suggestions: Great for weekend barbecues, summer gatherings, or casual holiday meals where a hearty main is welcome.
- Storage tips: Refrigerate leftovers in an airtight container for three to four days, and reheat gently to preserve juiciness.
- Seasonal pairings: Serve with bright, acidic condiments or pickled vegetables in warmer months to cut through the richness.
FAQ
Conclusion
Grilled Chuck Roast stands out because it transforms a humble, well marbled cut into a flavorful, sliceable centerpiece using simple ingredients and straightforward technique. Give it a try when you want a reliable weeknight dinner or an easy meal for guests, and trust the sensory cues as much as the clock. Enjoy the ritual of grilling, resting, and slicing, and take pleasure in how a few thoughtful steps can elevate a roast into something memorable.

Grilled Chuck Roast
Equipment
- Grill
- Instant read thermometer
- Tongs
- Cutting Board
- Sharp Knife
Ingredients
- 1 beef chuck roast 2-3 pounds Provide a hearty, flavorful base and serve as the main protein for the dish, yielding rich, beefy juices when grilled. Marinate or sear to develop a savory crust while retaining tenderness inside. Slice thinly across the grain after resting to maximize juiciness and tenderness.
- 2 tablespoons olive oil Coat the roast to promote even browning and help other seasonings adhere, adding subtle fruitiness and fat for moisture. Heat oil on the grill or in a pan before searing to create a caramelized exterior. Use just enough to lightly cover the surface without causing flare-ups.
- 1 tablespoon Worcestershire sauce Impart deep umami and tang while enhancing beefy flavors through its savory-sweet complexity. Combine with other seasonings in a marinade or brush on during grilling to build layers of flavor. Helps tenderize slightly due to its acidity and complex seasoning profile.
- 1 teaspoon Italian seasoning Add aromatic herbal notes and a balanced savory profile, complementing the beef without overpowering it. Sprinkle evenly over the roast to infuse flavor during resting or grilling. Works well mixed into rubs or marinades to distribute flavor consistently.
- 1/2 teaspoons salt Enhance and balance overall taste by drawing out and amplifying the roast's natural flavors, while providing a fundamental savory backbone. Apply sparingly and adjust to taste to avoid oversalting, especially if using other salty components. Salt also helps with moisture retention and crust formation.
- 1/2 teaspoon pepper Provide a mild heat and sharpness that contrasts the beef's richness, brightening flavors and rounding out the seasoning profile. Grind fresh for best aroma and distribute evenly to avoid concentrated spicy spots. Combine with salt and herbs for a balanced crust.
Instructions
- Pat dry the chuck roast. Season with salt and pepper on all sides.: When you press a clean towel to the surface, the meat should feel slightly tacky but not wet, which helps the olive oil and seasonings adhere. Drying the surface also improves browning, because excess moisture creates steam otherwise, preventing a proper crust. You should hear a subtle sizzle when the roast first hits the hot grill, a gratifying sound that signals Maillard reactions are beginning. A common mistake is skipping this step and ending up with a steamed, pale exterior. If the roast is very cold from the fridge, let it sit at room temperature for about 20 minutes before patting dry so it cooks more evenly.
- In a large bowl, whisk together the olive oil, Worcestershire sauce, and Italian seasoning.: As you sprinkle the salt and pepper , press them gently into the meat to ensure they cling. The aroma of black pepper will release as the roast warms on the grill, and the salt will start to draw out and then reabsorb juices, concentrating flavor. Visually, the surface should look evenly coated, not patchy. Over-salting is a risk here, so measure carefully to avoid a harsh taste. If you accidentally oversalt, rinse briefly and pat dry, then apply a lighter second seasoning.
- Place the seasoned raw chuck roast in the olive oil mixture and coat all sides.: As you whisk, you will notice the mixture thicken and the oil suspend the herbs, creating a glossy marinade. The scent of the Worcestershire sauce will be savory and slightly tangy, and the dried herbs will become more aromatic as they bloom in the oil. This mixture aids in browning and adds a layered flavor to the crust. A mistake to avoid is using too much liquid, which can cause flare ups on the grill. Keep the ratio balanced so the coating is wet but not dripping.
- Preheat a grill to medium-high heat. Alternatively, place a grill pan over medium-high heat.: Use tongs or clean hands to turn the roast, ensuring the herb mixture covers every surface evenly. When coated, the roast should glisten but not be drenched; you want a thin, even film so the grill can form a crust. The herbs will cling to the oil, creating those golden flecks that toast on the surface. If you press the mixture on, it helps adherence, but avoid compacting the meat. A common misstep is letting it sit in an overly acidic marinade too long, which can change texture, so if you plan to marinate longer, keep it brief or adjust accordingly.
- Grill the chuck roast, turning it every five minutes, for twenty minutes. Continue cooking until the chuck roast reaches an internal temperature of 120°F for rare, 125°F for medium-rare, 135°F for medium. My 3-pound chuck roast took exactly 40 minutes to cook.: You want the grates hot enough to sear and produce a satisfying crust, but not so hot that the exterior chars before the interior warms. On a gas grill, aim for heat that gives a quick sizzle when you hover your hand above the grates at about five to six inches. On a grill pan over the stove, the pan should shimmer and give off a faint toasty aroma. Proper preheating prevents sticking and creates those attractive grill marks. A frequent error is rushing this step and placing meat on a cold surface, which leads to sticking and poor browning. Take the extra few minutes to ensure consistent heat.
- Transfer the chuck roast to a cutting board and let the meat rest for five minutes. Thinly slice it against the grain and serve.: As you turn the roast, listen for alternating sizzling and quieter moments, which indicate the seared sides are setting. The surface should develop a deep golden brown to mahogany color, with some caramelized spots where the sugars in the Worcestershire sauce and meat have browned. Turning regularly helps cook the roast evenly and prevents one side from overcooking. Watch for flare ups from drippings, and move the roast briefly to a cooler zone if flames rise. A common mistake is leaving it untouched for too long, which can create a burned exterior while the inside remains underdone.
- Continue cooking until the chuck roast reaches an internal temperature of 120°F for rare, 125°F for medium rare, 135°F for medium: Use a reliable instant read thermometer inserted into the thickest part to check doneness, and avoid touching bone if present. As the roast approaches target temperature, you will notice juices begin to appear on the surface, and the overall firmness increases. These sensory cues help confirm timing, but the thermometer is your best friend for accuracy. If you overshoot temperature, the meat can become firmer and drier, so monitor closely near the end. Remember carry over cooking will raise the temperature slightly during resting, so aim for the lower end of your target if you want a perfect medium rare.
- My 3 pound chuck roast took exactly 40 minutes to cook: Personal experience suggests timing, but every grill and piece of meat is different, so use this as a guideline not a rule. Pay attention to how the aroma evolves, from sharp savory notes to a deeper roasted smell as cooking progresses. If your roast is thicker or thinner, adjust the total grilling time proportionally, checking the internal temperature more frequently. A trap is following time alone; instead trust the combination of feel, color, and thermometer readings. If you notice uneven browning, rotate the roast or move it to a more even heat zone.
- Transfer the chuck roast to a cutting board and let the meat rest for five minutes: Resting lets the juices redistribute, so when you slice the roast the juices remain in the fibers instead of spilling onto the board. During rest, the surface will still cool slightly, and the internal temperature will rise a few degrees, which is why you aimed for a slightly lower temperature earlier. You will notice the meat relax and the aroma deepen, and slicing too soon will cause excessive juice loss. A common mistake is skipping rest in the rush to serve, resulting in drier slices. Use this short window to gather your serving platter and a sharp slicing knife.
- Thinly slice it against the grain and serve: Cutting across the muscle fibers shortens them, producing a tender bite and an attractive plate. As you slice, observe the texture and adjust thickness to preference, but thinner slices typically feel more tender and are easier to chew. The surface will show a nice sear and a pink to slightly rosy interior depending on doneness. One pitfall is cutting with a dull knife which tears the meat and compresses the juices; always slice with a sharp blade for clean, succulent pieces. Arrange slices on a platter so each piece showcases the crust and juicy interior.
Notes
- Marinate longer for deeper flavor: If you have time, let the roast sit in the olive oil and Worcestershire mixture for 20 minutes to overnight. This allows the surface flavors to penetrate and mellow, giving a more integrated taste. If you decide on a longer marination, keep the container covered and refrigerated. For extended marinating, consider adding a splash of acid as noted below, but be cautious since acids can change meat texture over very long periods.
- Add a touch of sweetness: Mixing in a tablespoon of brown sugar or basting with a bit of BBQ sauce near the end can create a glossy, caramelized surface that contrasts nicely with the savory meat. Apply sugary additions in the final 6 to 8 minutes to prevent burning during the main cook. This technique gives you a balanced sweet and savory profile, helpful if your crowd favors saucier bites.
- Try subtle seasoning variations: If you want a different aromatic profile, add 1 to 2 teaspoons of paprika or onion powder to the seasoning blend. These spices introduce mild smokiness or savory depth and still respect the core beef flavor. Sprinkle them into the oil mixture so they distribute evenly, and taste your adjustments on a small seared scrap if you are unsure of proportions.
- Control flare ups: When grilling over direct heat, keep a cooler zone or tray nearby to move the roast if fat drips cause flames. Briefly shifting the roast away from high flames preserves the crust without charring. Use tongs to reposition, and never douse flames with water, which can create ash and disrupt heat control.
- Slice thin for tenderness: After resting, slice thinly against the grain to maximize tenderness, especially with this cut. Thinner slices let the chew feel softer and make portions stretch further for gatherings. Use a sharp carving knife and steady strokes for neat, consistent pieces suitable for platters and sandwiches.
- Store leftovers properly: Let the roast cool slightly, then place in an airtight container and refrigerate for three to four days. Reheat gently to avoid drying, either in a low oven with a splash of broth or microwaving briefly covered. Proper storage preserves flavor and makes for excellent next day meals.