Chocolate Covered Pretzel No Bake Cheesecake
Chocolate Covered Pretzel No Bake Cheesecake is the kind of dessert that makes me pause and smile the moment I open the fridge.
I first made this for a potluck when I wanted something that felt indulgent yet easy to bring along, and the mix of crunchy pretzel and creamy cream cheese won over a skeptical room of dessert lovers. I remember the way the chocolate ganache gleamed as I spooned it over the chilled filling, and how the salty snap of pretzel contrasted perfectly with the sweet filling. That night, people kept asking for the recipe, and I loved telling the story of how a last minute shortcut turned into a new favorite.
On a busy weeknight, this pie is a small luxury I give myself, because it requires almost no oven time, and the steps let you chat with guests while it sets. I like to assemble the crust while the kids do homework, then whisk the filling in a few focused minutes. When the ganache is poured, there is this satisfying, glossy finish that makes the whole dessert feel finished and special. I still grin when someone comments on the texture, saying the pretzel crust is addictively crisp against the smooth cream cheese filling. It is one of those recipes that travels well, keeps in the fridge, and always seems to make people linger a little longer at the table.
Recipe Snapshot
31 mins
30 mins
1 mins
Easy
350 kcal
American
Gluten-Free, Low FODMAP
Desserts
9 inch pie plate, Mixing bowl, Microwave safe bowl, Whisk
The Beauty of This Chocolate Covered Pretzel No Bake Cheesecake
Flavor Contrast That Delivers
I love how the recipe balances sweet and salty. The crunchy pretzel crust gives a bracing salt edge that makes every spoonful more interesting, while the creamy filling softens and rounds out that bite. Because I prefer bold contrasts in desserts, this combination always feels intentional and satisfying.
Speed and Simplicity
What sold me the first time was how quick it comes together. You do a few straightforward tasks, then let chilling do the heavy lifting. For busy cooks, the lack of baking means less babysitting and more time for conversation, and I truly appreciate recipes that free me up without sacrificing taste.
Make Ahead Friendly
I often prepare this a day ahead. The flavors meld in the fridge, the ganache sets to a perfect spreadable texture, and assembly stress vanishes. For gatherings, I like that it stays stable and looks polished when served straight from the fridge.
Textural Delight
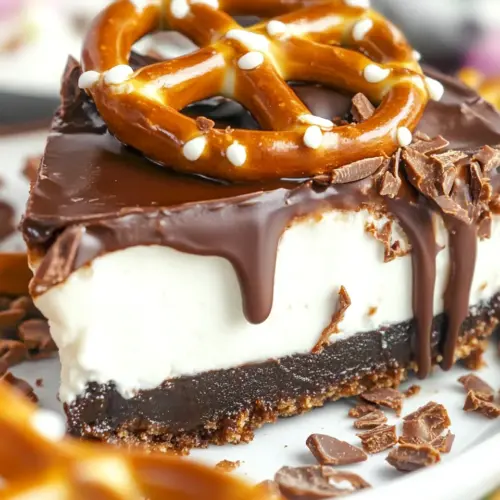
The layered textures are the star. A crisp pretzel crumb base, a velvety cream cheese filling, and a glossy chocolate top provide contrasting sensations that keep each bite interesting. I enjoy watching friends react to that first forkful, because the texture story is unmistakable.
Approachable Ingredients
This recipe uses pantry staples you can find easily. I appreciate not chasing specialty items, because that simplicity encourages me to make it on a whim. It is also flexible for presentation, whether you dress it up for guests or serve it casually at home.
Recipe Ingredients for Chocolate Covered Pretzel No Bake Cheesecake
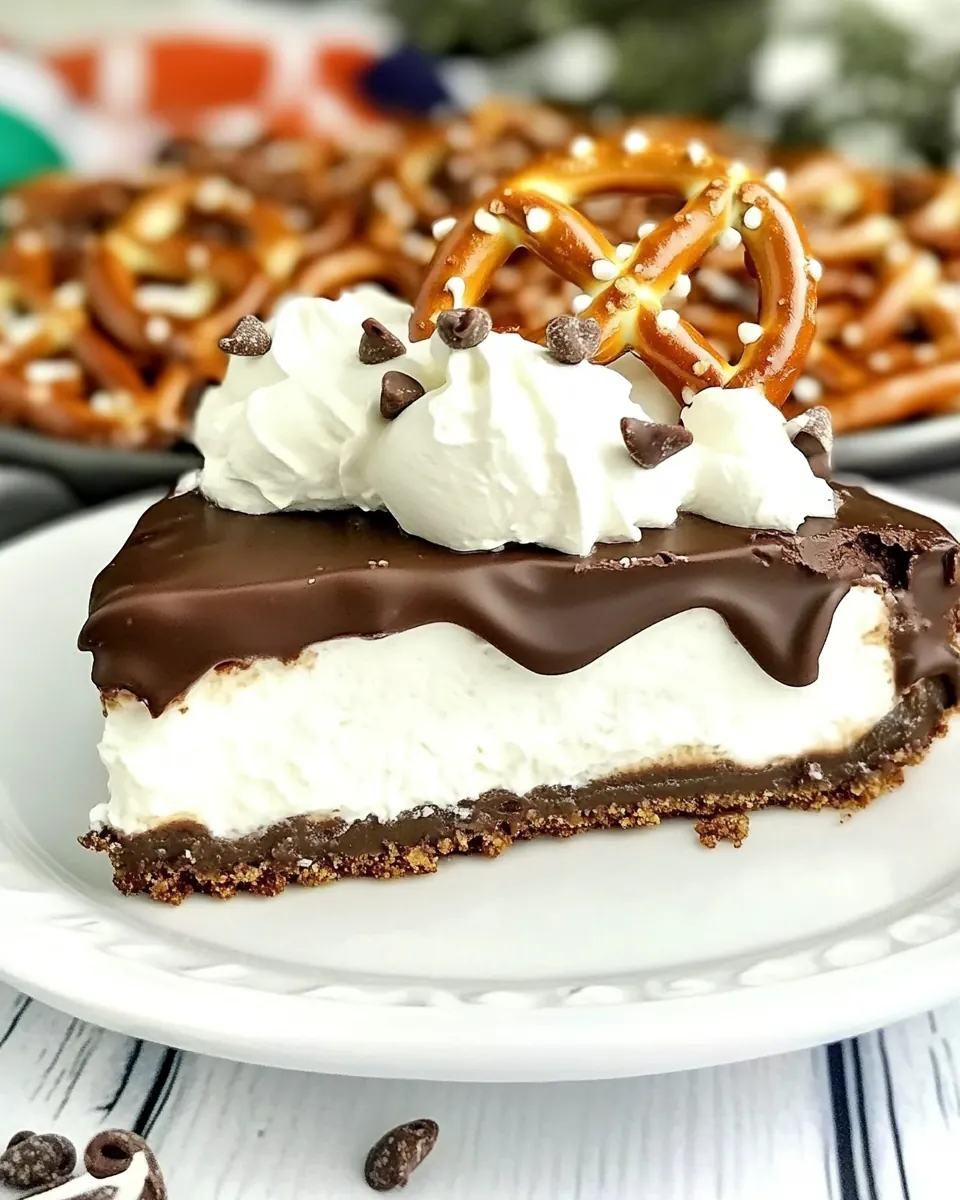
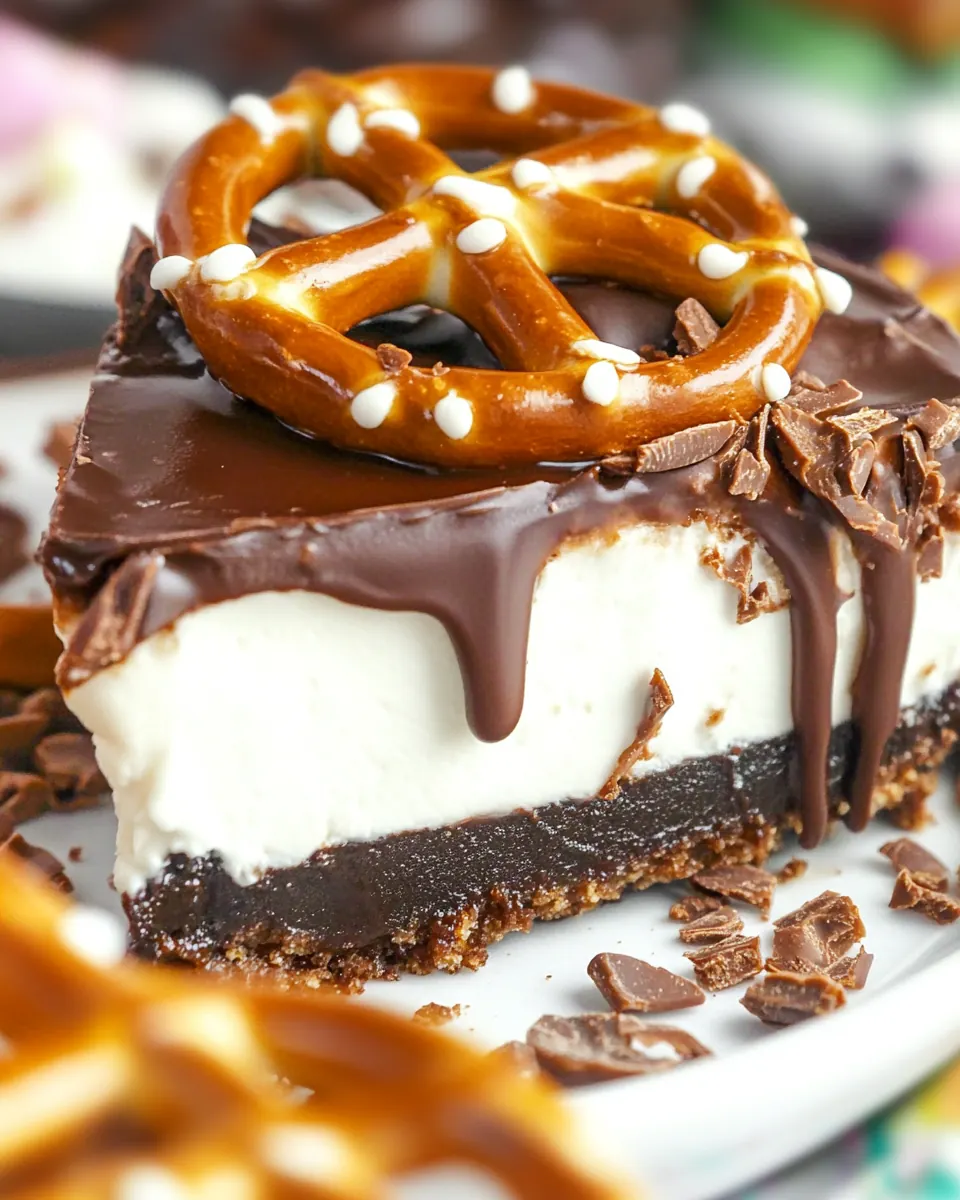
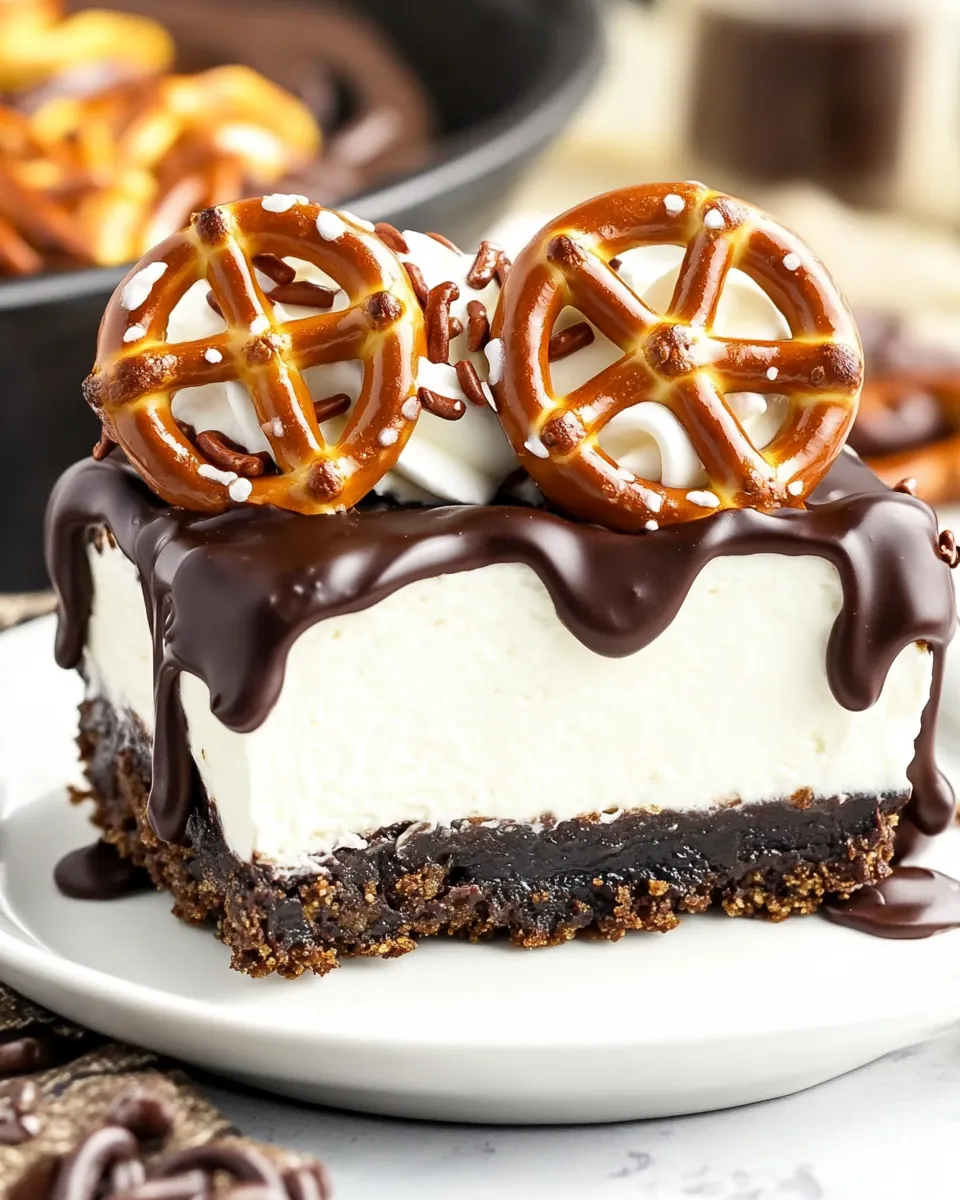
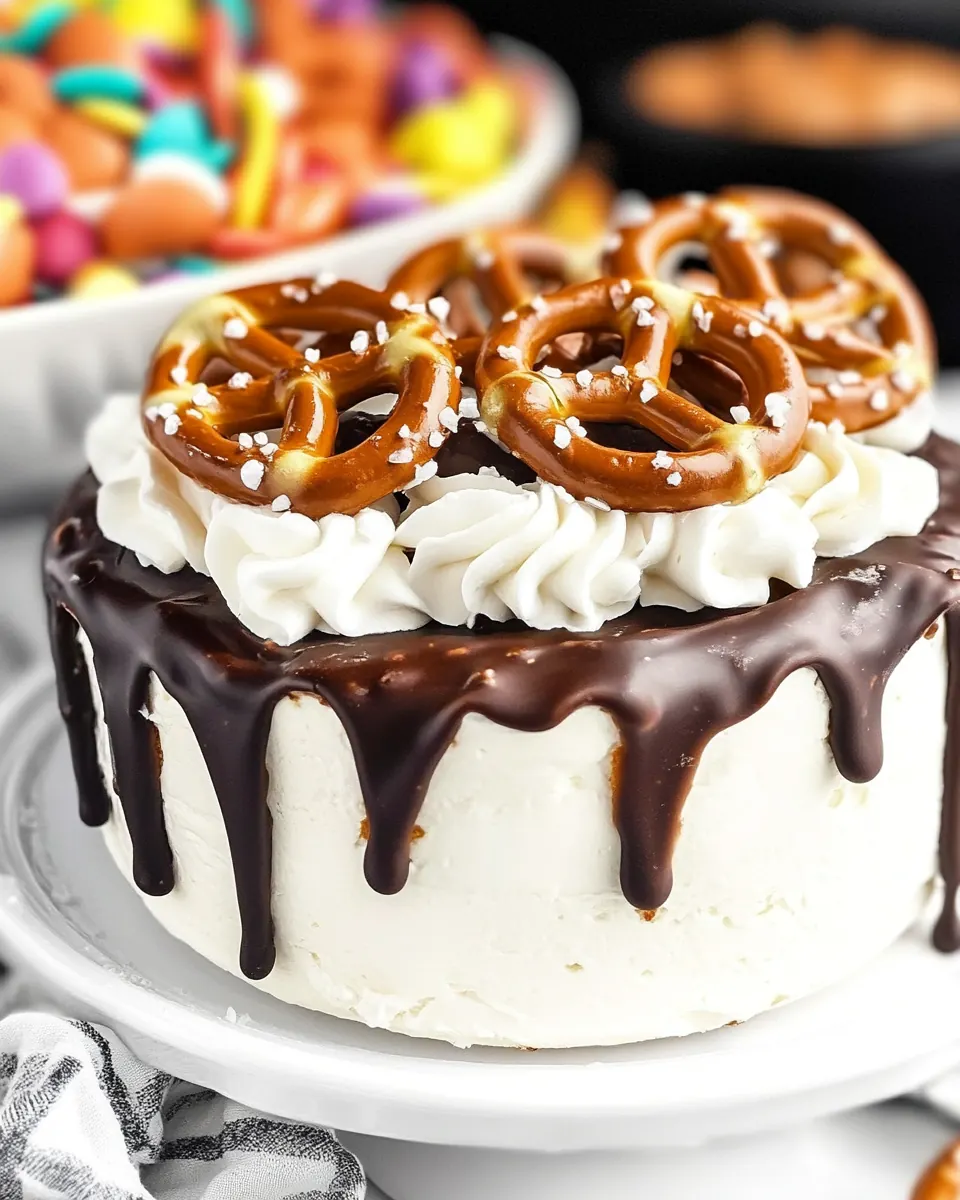
These ingredients were chosen to create a clear structure and a balanced flavor profile. The crust is built on crunchy pretzel crumbs and butter for a salty, stable base. The filling relies on whipped, tangy cream cheese and airy whipped topping to achieve a silky, scoopable texture. Finally, the chocolate and cream form a simple ganache that seals the top with a glossy finish. Each player has a role, and together they make a cheesecake that feels decadent without fuss.
- 3 cups Pretzel Twists about 1 1/2 cups finely crushed pretzel crumbs: Provide crunchy texture and a salty base for the crust; finely crushing about 1 1/2 cups of pretzel twists helps bind with butter and sugar to form a sturdy, flavor-forward crust for the no-bake cheesecake. Press evenly into the pan to create a compact layer that contrasts the creamy filling.
- 1/4 cup (50 g) granulated sugar: Add sweetness and balance the saltiness of the pretzels; granulated sugar dissolves into the crust mixture and lightly sweetens the filling if used there, enhancing overall flavor without overpowering. Measure carefully to maintain the intended sweetness level.
- 6 tablespoons (84 g) unsalted butter melted: Melt to bind the crushed pretzels and sugar into a cohesive crust; unsalted butter provides richness without adding extra salt, allowing control over the crust's texture and flavor. Cool slightly if necessary before combining with crumbs to avoid sogginess.
- 8 ounces (226 g) Cream Cheese softened: Soften to room temperature for smooth blending into the filling; cream cheese supplies the tangy, creamy body of the cheesecake and sets the structure when chilled. Beat thoroughly to remove lumps and ensure a velvety consistency.
- 1/4 cup (50 g) granulated sugar: Sweeten and lighten the cream cheese filling; granulated sugar helps stabilize and flavor the filling while balancing the cream cheese's tang. Dissolve well into softened cheese to avoid graininess in the final texture.
- 1 teaspoon vanilla extract: Enhance flavor and aroma with a sweet vanilla note; vanilla extract deepens the filling's profile and complements both chocolate and pretzel elements. Add during mixing to distribute the flavor evenly throughout the filling.
- 8 ounces (226 g) whipped topping thawed: Fold in for lightness and volume in the filling; thawed whipped topping creates an airy, mousse-like texture while reducing density compared to a baked cheesecake. Gently incorporate to preserve airiness and ensure a silky mouthfeel.
- 1 cup (170 g) chocolate chips: Melt to create a glossy chocolate topping or ganache; chocolate chips form a rich coating when combined with warm cream and provide chocolate flavor that pairs with salty pretzel crust. Use good-quality chips for smooth melt and robust taste.
- 1/2 cup (118 ml) heavy whipping cream: Warm to combine with chocolate chips into a smooth ganache; heavy whipping cream adds richness and helps the chocolate set with a silky sheen for topping or drizzling. Heat gently and pour over chips, stirring until fully emulsified.
Directions for Chocolate Covered Pretzel No Bake Cheesecake
This recipe breaks into a few clear phases: making the crust, beating the filling, melting the ganache, and finishing the pie. The following steps give detailed sensory cues and troubleshooting for each action, so you can relax and enjoy the process.
- Make the crust: stir finely crushed pretzels and sugar with melted butter. Press into a 9” pie plate. Chill until ready to fill.: stir finely crushed pretzels and sugar with melted butter. Press into a 9” pie plate. Chill until ready to fill. : You will notice the crushed pretzel crumbs smelling warm and toasty as they meet the melted butter , and when you stir the granulated sugar in the mixture it takes on a slightly glossy sheen, signaling even coating. As you press the crumbs into the 9” pie plate, aim for an even thickness so each slice holds together; the gentle pressing will produce a faint cracking sound when the crumbs settle into place. Chilling the crust firms the butter and solidifies the structure, ensuring the crust does not crumble when you slice it. A common mistake is pressing too hard and compacting the crumbs into a dense base, which will reduce the pleasant crunch; press just enough for cohesion, and check the edge for uniform height. If the crust feels greasy, it means the butter was too hot when mixed, so let the mixture cool slightly next time.
- Make the filling: Beat cream cheese, sugar, and vanilla until smooth. Whisk or fold in whipped topping until no lumps remain. Spread in prepared crust. Chill for at least 4 hours before serving.: Beat cream cheese, sugar, and vanilla until smooth. Whisk or fold in whipped topping until no lumps remain. Spread in prepared crust. Chill for at least 4 hours before serving. : The bowl will emit a rich, tangy dairy aroma when you beat the softened cream cheese with the granulated sugar and vanilla , and the texture should transform from slightly grainy to silky and glossy, which is the cue you have incorporated air. When you gently whisk or fold in the thawed whipped topping , you should see light, billowy ribbons fold into the mixture, creating a lambent pale filling that holds soft peaks. Spreading it into the chilled crust will feel cool under your fingers and should leave a smooth sheen on top; any visible lumps indicate under beating or cold cream cheese , so take a moment to scrape the bowl and beat until smooth before folding in the topping. Chilling for at least 4 hours lets the filling set to a scoopable consistency and melds flavors; slicing too soon results in a runny texture. If your filling seems watery after chilling, it likely wasn’t folded gently and air escaped, so try to fold with a light hand next time.
- Make the topping: add chocolate chips and heavy whipping cream to a microwave safe bowl or measuring cup. Heat 1 minute then whisk until smooth. Let sit until cool and thick.: add chocolate chips and heavy whipping cream to a microwave safe bowl or measuring cup. Heat 1 minute then whisk until smooth. Let sit until cool and thick. : As the heavy whipping cream warms with the chocolate chips , a warm, cocoa forward steam will rise, and when you whisk them together the mixture will become glossy and velvety, signaling a successful ganache. Letting it sit allows the ganache to thicken to a spreadable silk, which will glide over the chilled filling without sinking in. The sound of the whisk on the bowl is a quiet, steady rhythm that says the emulsion is forming; stop whisking as soon as it becomes homogeneous to avoid incorporating too much air. A typical pitfall is overheating the chocolate so it seizes into grainy clumps; if that happens, whisk in a small splash more warm cream to bring it back. Resist the urge to pour the ganache while it is hot, because that will soften the filling and cause the ganache to sink.
- When ready to serve top the pie with the cooled ganache. If the ganache gets too thick to spread, just heat it a few seconds in the microwave to thin.: Pouring the slightly cooled ganache creates a glossy mirror finish that will reflect light and invite serving, and as it spreads you will notice the silence of the kitchen break for forks. If the ganache is perfectly cooled it will hold shape on the surface, creating a clean edge where it meets the crust; if it is too fluid, it will run off and soften the filling, so take a moment to let it thicken. When you need to rewarm it, heat in short bursts so it does not overcook and become grainy. A common error is reheating repeatedly which degrades texture, so warm just enough to make it spreadable and stop. After topping, chill briefly if needed to set the ganache so slices come out neat and glossy.
Helpful Hints
These hints reflect what I have learned from making this pie multiple times. They help protect texture, flavor, and presentation, and they are written so you can reference them quickly while assembling.
- Room temperature cream cheese is essential: Allow the cream cheese to sit at room temperature for about 30 minutes so it beats smooth and avoids lumps in the filling.
- Measure crumbs by volume and weight: Crushing the pretzel twists to the specified amount ensures the crust binds correctly and the texture is consistent slice to slice.
- Test your ganache temperature: Let the ganache cool until warm to the touch before pouring, which prevents it from seeping into the filling and keeps a clean surface.
- Chill adequately: The filling needs time to firm up, so plan for at least four hours or overnight for best texture and cleaner slices.
- Short microwave bursts: When you need to thin the ganache, microwave in ten second bursts, stirring between each, to avoid overheating and seizing the chocolate.
- Use good quality chocolate: A better chocolate chip yields a smoother ganache and more complex flavor, which shows in the final bite.
Serve This Chocolate Covered Pretzel No Bake Cheesecake With
This dessert works in many settings, from casual family dinners to celebratory gatherings. Below are thoughtful serving ideas, pairings, and storage notes to help you present it beautifully and keep it tasting fresh.
- Casual gatherings: Serve chilled slices on a simple dessert plate, garnished with a few extra pretzel twists for crunch and visual cue, making it an easy conversation starter at potlucks.
- Special occasions: Present slices on a cake stand with a dusting of finely crushed pretzel around the edge to elevate the look for birthdays or brunches.
- Seasonal pairings: For warmer months, pair with a pitcher of iced coffee or cold brew; in cooler months, offer warm coffee to contrast the cold texture of the pie.
- Storage tips: Keep the pie covered in the refrigerator for up to five days to preserve texture. If you need it to travel, freeze for firm transport and thaw in the fridge before serving.
- Occasions: This pie is great for potlucks, family dinners, holiday cookie exchanges, and Ramadan if you are planning sweet treats for Iftar, providing a sweet and salty finish to the meal.
- Presentation cues: Slice with a hot, clean knife for perfect edges; wipe the blade between cuts to keep slices neat and glossy.
FAQ
Conclusion
This Chocolate Covered Pretzel No Bake Cheesecake stands out for its irresistible textural contrast and effortless assembly. It brings together a salty crunch, a silky, tangy filling, and a glossy chocolate finish that feels indulgent without requiring hours in the kitchen. Give it a try the next time you want a dessert that travels well and pleases a crowd; the combination of familiar pantry ingredients and impressive presentation makes it a reliable go to. I hope this pie becomes one of your favorites to make for gatherings or simple weeknight treats.
Chocolate Covered Pretzel No Bake Cheesecake
Equipment
- 9-inch pie plate
- Mixing Bowl
- Microwave-safe Bowl
- Whisk
Ingredients
- 3 cups Pretzel Twists about 1 1/2 cups finely crushed pretzel crumbs Provide crunchy texture and a salty base for the crust; finely crushing about 1 1/2 cups of pretzel twists helps bind with butter and sugar to form a sturdy, flavor-forward crust for the no-bake cheesecake. Press evenly into the pan to create a compact layer that contrasts the creamy filling.
- 1/4 cup (50 g) granulated sugar Add sweetness and balance the saltiness of the pretzels; granulated sugar dissolves into the crust mixture and lightly sweetens the filling if used there, enhancing overall flavor without overpowering. Measure carefully to maintain the intended sweetness level.
- 6 tablespoons (84 g) unsalted butter melted Melt to bind the crushed pretzels and sugar into a cohesive crust; unsalted butter provides richness without adding extra salt, allowing control over the crust's texture and flavor. Cool slightly if necessary before combining with crumbs to avoid sogginess.
- 8 ounces (226 g) Cream Cheese softened Soften to room temperature for smooth blending into the filling; cream cheese supplies the tangy, creamy body of the cheesecake and sets the structure when chilled. Beat thoroughly to remove lumps and ensure a velvety consistency.
- 1/4 cup (50 g) granulated sugar Sweeten and lighten the cream cheese filling; granulated sugar helps stabilize and flavor the filling while balancing the cream cheese's tang. Dissolve well into softened cheese to avoid graininess in the final texture.
- 1 teaspoon vanilla extract Enhance flavor and aroma with a sweet vanilla note; vanilla extract deepens the filling's profile and complements both chocolate and pretzel elements. Add during mixing to distribute the flavor evenly throughout the filling.
- 8 ounces (226 g) whipped topping thawed Fold in for lightness and volume in the filling; thawed whipped topping creates an airy, mousse-like texture while reducing density compared to a baked cheesecake. Gently incorporate to preserve airiness and ensure a silky mouthfeel.
- 1 cup (170 g) chocolate chips Melt to create a glossy chocolate topping or ganache; chocolate chips form a rich coating when combined with warm cream and provide chocolate flavor that pairs with salty pretzel crust. Use good-quality chips for smooth melt and robust taste.
- 1/2 cup (118 ml) heavy whipping cream Warm to combine with chocolate chips into a smooth ganache; heavy whipping cream adds richness and helps the chocolate set with a silky sheen for topping or drizzling. Heat gently and pour over chips, stirring until fully emulsified.
Instructions
- Make the crust: stir finely crushed pretzels and sugar with melted butter. Press into a 9” pie plate. Chill until ready to fill.: stir finely crushed pretzels and sugar with melted butter. Press into a 9” pie plate. Chill until ready to fill. : You will notice the crushed pretzel crumbs smelling warm and toasty as they meet the melted butter , and when you stir the granulated sugar in the mixture it takes on a slightly glossy sheen, signaling even coating. As you press the crumbs into the 9” pie plate, aim for an even thickness so each slice holds together; the gentle pressing will produce a faint cracking sound when the crumbs settle into place. Chilling the crust firms the butter and solidifies the structure, ensuring the crust does not crumble when you slice it. A common mistake is pressing too hard and compacting the crumbs into a dense base, which will reduce the pleasant crunch; press just enough for cohesion, and check the edge for uniform height. If the crust feels greasy, it means the butter was too hot when mixed, so let the mixture cool slightly next time.
- Make the filling: Beat cream cheese, sugar, and vanilla until smooth. Whisk or fold in whipped topping until no lumps remain. Spread in prepared crust. Chill for at least 4 hours before serving.: Beat cream cheese, sugar, and vanilla until smooth. Whisk or fold in whipped topping until no lumps remain. Spread in prepared crust. Chill for at least 4 hours before serving. : The bowl will emit a rich, tangy dairy aroma when you beat the softened cream cheese with the granulated sugar and vanilla , and the texture should transform from slightly grainy to silky and glossy, which is the cue you have incorporated air. When you gently whisk or fold in the thawed whipped topping , you should see light, billowy ribbons fold into the mixture, creating a lambent pale filling that holds soft peaks. Spreading it into the chilled crust will feel cool under your fingers and should leave a smooth sheen on top; any visible lumps indicate under beating or cold cream cheese , so take a moment to scrape the bowl and beat until smooth before folding in the topping. Chilling for at least 4 hours lets the filling set to a scoopable consistency and melds flavors; slicing too soon results in a runny texture. If your filling seems watery after chilling, it likely wasn’t folded gently and air escaped, so try to fold with a light hand next time.
- Make the topping: add chocolate chips and heavy whipping cream to a microwave safe bowl or measuring cup. Heat 1 minute then whisk until smooth. Let sit until cool and thick.: add chocolate chips and heavy whipping cream to a microwave safe bowl or measuring cup. Heat 1 minute then whisk until smooth. Let sit until cool and thick. : As the heavy whipping cream warms with the chocolate chips , a warm, cocoa forward steam will rise, and when you whisk them together the mixture will become glossy and velvety, signaling a successful ganache. Letting it sit allows the ganache to thicken to a spreadable silk, which will glide over the chilled filling without sinking in. The sound of the whisk on the bowl is a quiet, steady rhythm that says the emulsion is forming; stop whisking as soon as it becomes homogeneous to avoid incorporating too much air. A typical pitfall is overheating the chocolate so it seizes into grainy clumps; if that happens, whisk in a small splash more warm cream to bring it back. Resist the urge to pour the ganache while it is hot, because that will soften the filling and cause the ganache to sink.
- When ready to serve top the pie with the cooled ganache. If the ganache gets too thick to spread, just heat it a few seconds in the microwave to thin.: Pouring the slightly cooled ganache creates a glossy mirror finish that will reflect light and invite serving, and as it spreads you will notice the silence of the kitchen break for forks. If the ganache is perfectly cooled it will hold shape on the surface, creating a clean edge where it meets the crust; if it is too fluid, it will run off and soften the filling, so take a moment to let it thicken. When you need to rewarm it, heat in short bursts so it does not overcook and become grainy. A common error is reheating repeatedly which degrades texture, so warm just enough to make it spreadable and stop. After topping, chill briefly if needed to set the ganache so slices come out neat and glossy.
Notes
- Room temperature cream cheese is essential: Allow the cream cheese to sit at room temperature for about 30 minutes so it beats smooth and avoids lumps in the filling.
- Measure crumbs by volume and weight: Crushing the pretzel twists to the specified amount ensures the crust binds correctly and the texture is consistent slice to slice.
- Test your ganache temperature: Let the ganache cool until warm to the touch before pouring, which prevents it from seeping into the filling and keeps a clean surface.
- Chill adequately: The filling needs time to firm up, so plan for at least four hours or overnight for best texture and cleaner slices.
- Short microwave bursts: When you need to thin the ganache, microwave in ten second bursts, stirring between each, to avoid overheating and seizing the chocolate.
- Use good quality chocolate: A better chocolate chip yields a smoother ganache and more complex flavor, which shows in the final bite.