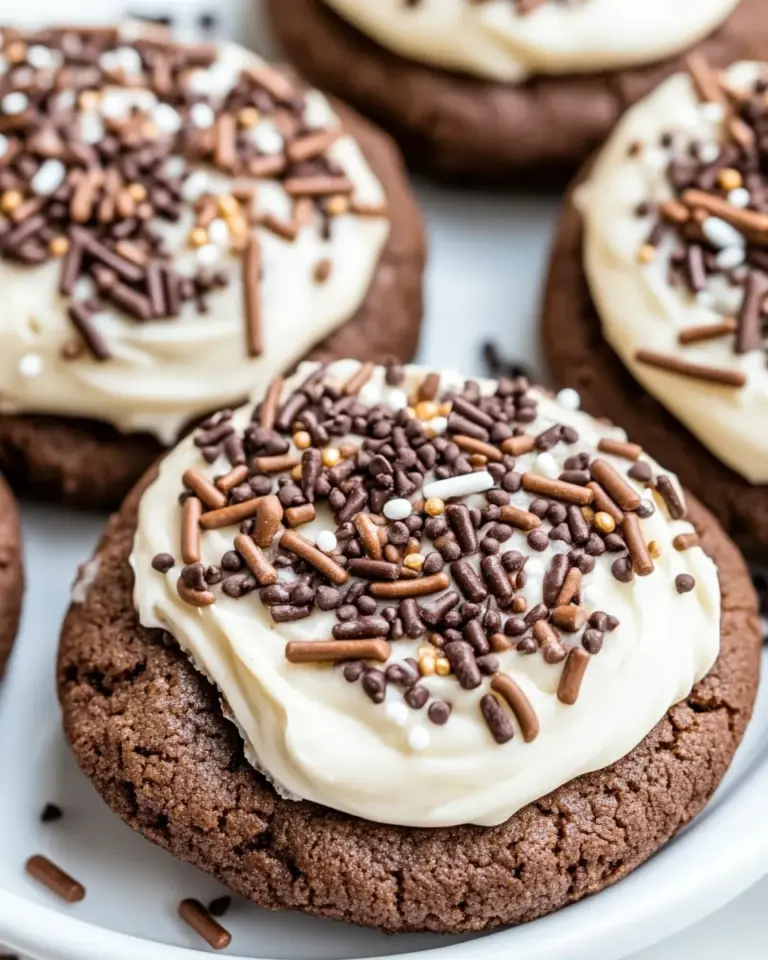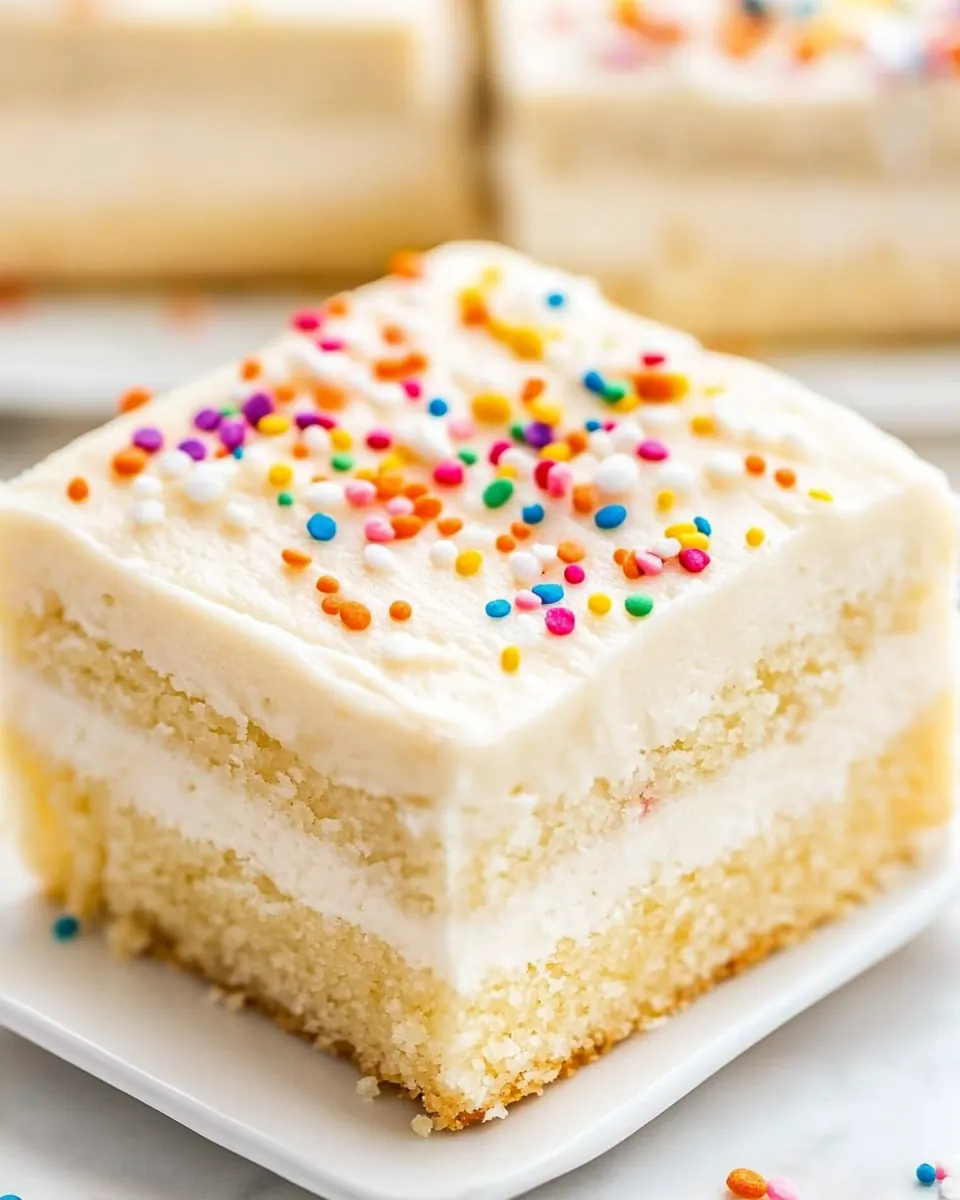
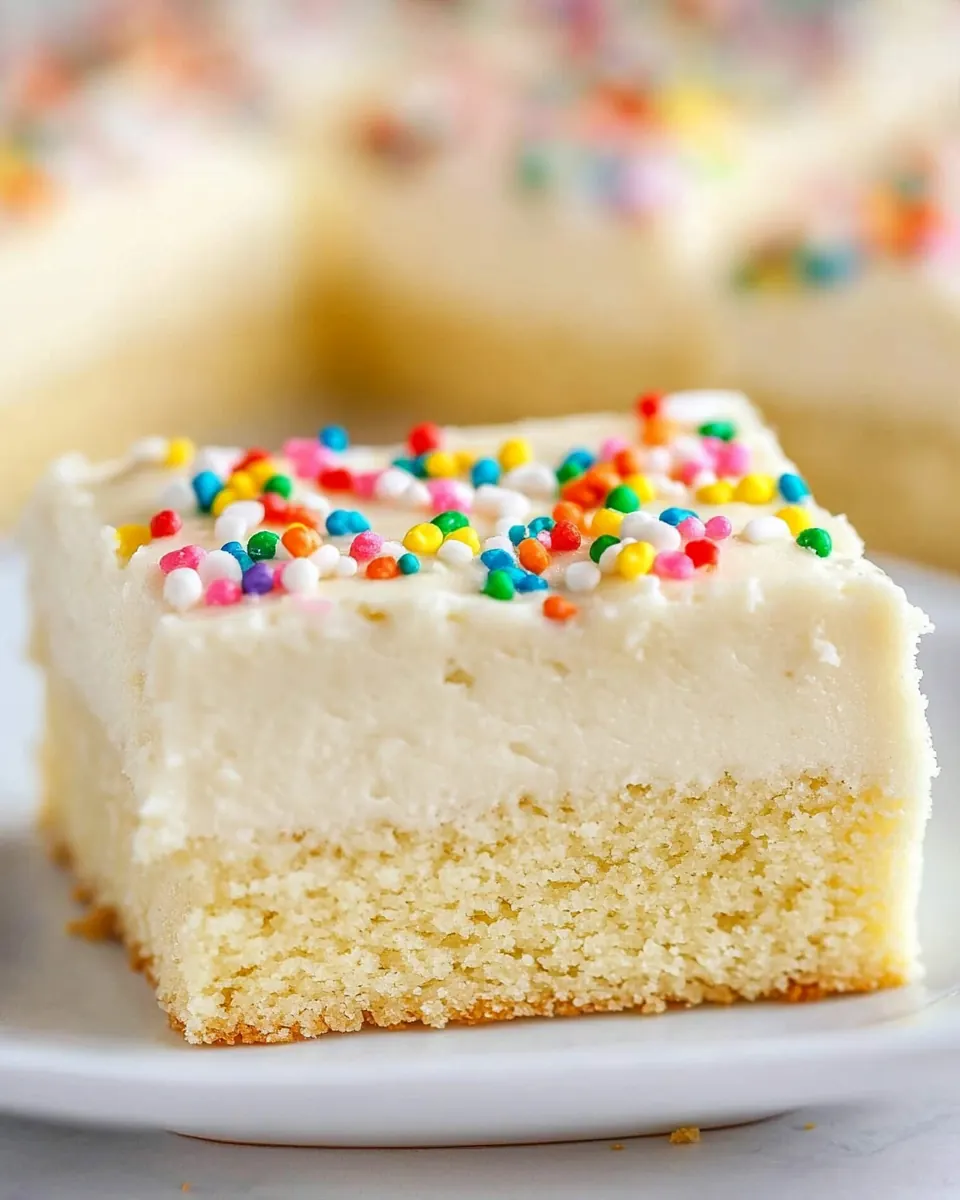
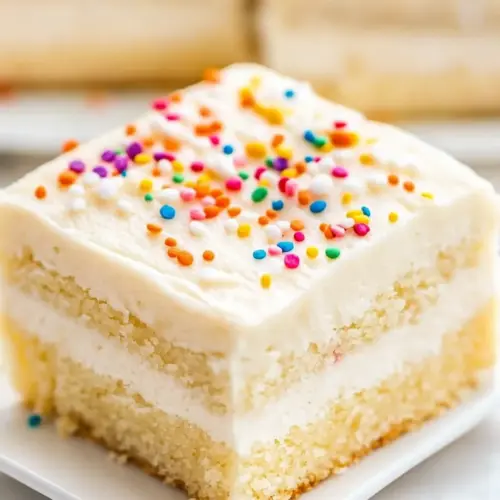
Frosted Sugar Cookie Bars
Frosted Sugar Cookie Bars started showing up in my life during a blustery holiday cookie swap, and I still remember the first bite, that tender crumb giving way to a cloud of sweet vanilla frosting. I brought a pan to that gathering on a whim, not expecting much fanfare, and ended up with a pile of sticky notes and recipe requests. Ever since then, these bars have been my go to when I want something that feels nostalgic but is shockingly simple to pull together.
I love how the recipe bridges two moods at once, plain enough for everyday comfort, and festive enough for celebrations. Over the years I have tweaked timing and technique so the texture lands reliably: slightly crisp at the edges, soft and pillowy in the center, and topped with a creamy frosting that is neither too sweet nor too heavy. On busy afternoons I’ll make a tray while the kids do homework, and on slower weekends I’ll decorate them with sprinkles in playful patterns. They travel well to potlucks, and they keep adorably in an airtight container for a few days.
Recipe Snapshot
40 mins
15 mins
25 mins
Easy
200 kcal
American
Gluten-Free, Low FODMAP
Desserts
9×13 inch baking pan, Electric mixer, Wire whisk, Wire cooling rack, Rubber spatula
Why You Need This Frosted Sugar Cookie Bars
1. Familiar flavors that comfort
I always say the charm of Frosted Sugar Cookie Bars is how they tap into childhood memories without requiring any fuss. The combination of all-purpose flour, butter, and granulated sugar reads like a classic cookie, but the bar format makes serving effortless.
2. Speed and ease
Because you press the dough into a pan instead of rolling and cutting, the mess is reduced and you can have these in the oven quickly. I appreciate that when I need a last minute dessert for guests or a school event.
3. Versatile finishing
The vanilla frosting included is creamy and smooth, and you can keep it simple or make it playful with rainbow sprinkles. I like to match sprinkles to the occasion, and the frosting holds decorations nicely.
4. Reliable texture
From experience, the balance of butter and cream cheese in the dough gives a tender bite that still browns a bit around the edges. That contrast is what keeps people coming back for another square.
5. Crowd friendly
Yielding many bars from a single 9 by 13 pan, this recipe is ideal when you need to feed a crowd. I often double the frosting for extra coverage when I know friends will be over, because more frosting means more smiles.
What’s In This Frosted Sugar Cookie Bars
These ingredients are intentionally straightforward, built around a few key players that deliver texture, flavor, and structure. The dry components provide the framework, while the fats and sugar add tenderness and lift. The frosting ingredients transform the simple bar into a celebratory treat, and the sprinkles give it that final, cheerful touch.
- 21/2 cups (312.5 g) all-purpose flour: Provide structure and bulk to the bars, forming the base of the dough while contributing tenderness when properly measured and mixed; sift or whisk for even distribution before combining with wet ingredients to avoid lumps.
- 1 teaspoon baking powder: Leaven gently by creating air pockets that help the bars rise slightly and stay tender; whisk into dry ingredients to ensure even distribution and predictable texture.
- 1/2 teaspoon (0.5 teaspoon) baking soda: React with acidic components to produce carbon dioxide for lift and a lighter crumb; measure accurately and avoid overmixing to prevent soapy flavors or excessive rising.
- 1 teaspoon salt: Enhance overall flavor balance and strengthen gluten network slightly for improved texture; dissolve evenly within dry ingredients to season the dough throughout.
- 3/4 cup (170.25 g) unsalted butter, at room temperature: Cream for richness and moisture while incorporating air when beaten with sugar; ensure it is at room temperature so it blends smoothly with cream cheese and sugars for a tender crumb.
- 4 ounces (113.4 g) cream cheese, at room temperature: Add tangy richness and contribute to a soft, tender crumb while improving moisture and flavor depth; beat with butter to create a smooth, creamy base for the cookie batter.
- 11/2 cups (300 g) granulated sugar: Sweeten and tenderize by absorbing fat and liquid, helping create a fine crumb and contributing to spread; creamed with butter and cream cheese to incorporate air into the batter.
- 1 egg: Bind ingredients together, provide moisture, emulsify fats, and contribute to structure and richness; bring to room temperature to ensure even incorporation and prevent curdling.
- 2 teaspoons vanilla extract: Impart aromatic flavor and complexity to both the bars and frosting, rounding out sweetness with a warm, floral note; add with other wet ingredients for uniform distribution.
- 1 cup (227 g) unsalted butter, at room temperature: Contribute creaminess and fat to the frosting, creating a silky texture and stable spread while carrying flavor; ensure it is softened to room temperature for smooth whipping.
- 21/2 cups (300 g) powdered sugar: Sweeten and stabilize the frosting while providing structure and pipeability; sift to remove lumps and add gradually to reach desired consistency and sweetness.
- 1 tablespoon vanilla extract: Flavor the frosting with a warm, aromatic note and enhance the overall sweetness profile; stir in toward the end of mixing to preserve vanilla character without overworking.
- Rainbow sprinkles, for decorating: Decorate and add a colorful, crunchy contrast to the soft, sweet bars; sprinkle immediately after frosting to ensure proper adhesion and an attractive finished appearance.
How to Cook Frosted Sugar Cookie Bars

These directions walk you from mixing to cooling and decorating, with attention to texture and timing so each square comes out tender and flavorful. Read through the steps first, then follow them in order for best results. I find that pacing myself during creaming and baking makes the difference between a good bar and an excellent one.
- Make the Cookie Bars: Preheat oven to 350 degrees F. Grease a 9×13-inch baking pan or line with parchment paper; set aside.: When you open the oven and hear the faint hiss of heat, the aroma of warm vanilla and butter will begin to fill the kitchen, signaling the start of caramelization and browning that gives the edges their pleasant chew. Greasing or lining your 9 by 13 inch pan ensures the bars release cleanly once baked. A common mistake is not preheating the oven fully, which can lead to uneven rise and a dense center, so give your oven the full time to reach 350 degrees F. Listen for a gentle, steady crackle from the oven as moisture escapes during the first half of baking, and look for a light golden color at the edges as your visual cue that the bars are approaching doneness.
- In a medium bowl, whisk together the flour, baking powder, baking soda, and salt; set aside.: The dry mix should look uniform, and whisking breaks up any lumps in the flour while distributing the leaveners evenly, which prevents pockets of bitter baking soda or pinched spots of baking powder. If your mixture is clumpy, sift it or press through a mesh to loosen it up. A frequent oversight is dumping the dry and wet ingredients together without first combining the dry, which can yield uneven texture and places that are overly salty or metallic from leavening agents.
- Using an electric mixer, cream together the butter and cream cheese on medium speed until smooth, about 1 minute. Add the sugar and continue to beat until light and fluffy, about 3 minutes. Add the egg and vanilla extract and beat to combine, about 1 minute. Reduce the mixer speed to low and gradually add the flour mixture, mixing only until barely combined. Use a rubber spatula to finish mixing, ensuring there are no pockets of flour remaining.: You will notice the mixture lighten in color and take on a silky sheen as air is incorporated, which helps create a tender crumb. Adding the granulated sugar and beating until light and fluffy is where you intentionally trap tiny air bubbles that expand in the oven for lift. When you add the egg and vanilla extract , the batter will become more cohesive. Reduce speed and add the flour mixture only until barely combined to avoid overworking the gluten which would make the bars tough. A common error here is overmixing on high speed, which makes the dough dense, so switch to a spatula for the final fold to ensure no streaks of flour remain.
- Using a spatula, spread the dough into an even layer in the prepared pan (the dough will be thick!). Bake until light golden brown and a toothpick inserted in the center comes out clean, 20 to 25 minutes. Place the pan on a wire rack to cool completely before frosting.: The tactile resistance of the dough should feel firm but spreadable, and smoothing it evenly ensures a uniform bake. When the dough is in the pan you might press slightly with parchment or an offset spatula to level it out; any high spots can bake faster and become too brown. Bake until light golden brown and a toothpick inserted in the center comes out clean which usually takes 20 to 25 minutes. Avoid opening the oven door repeatedly during baking as the temperature drop can cause sinking, and watch for the telltale faint pull away from the pan edges that indicates readiness.
- Make the Vanilla Frosting: Using the wire whisk attachment of your stand mixer, whip the butter on medium-high speed for 5 minutes, stopping to scrape the bowl once or twice. Reduce the speed to low and gradually add the powdered sugar. Once all of the powdered sugar is incorporated, increase the speed to medium-high and add the vanilla, mixing until incorporated. Whip at medium-high speed until light and fluffy, about 2 minutes, scraping the bowl as needed.: Cooling is essential because warm bars will cause the frosting to melt and slide, resulting in a greasy finish. As the bars cool you can smell a toasted note developing from the butter, and the center will set from a glossy to a matte appearance. A pitfall is trying to frost too soon which ruins the texture and appearance, so be patient and allow a full cool down on the rack.
- Spread the frosting over the cookie bars and decorate with sprinkles, if desired. Cut the bars into squares and serve. The cookie bars should be kept in an airtight container at room temperature for up to 3 days (you can store them in the refrigerator for up to 1 week).: Whipping unsalted butter on medium high for about 5 minutes aerates it, making the frosting light and silky; you will see it grow in volume and turn paler. Adding powdered sugar slowly prevents clouds of sugar and helps it incorporate smoothly, while the final medium high whip gives a fluffy, pipeable consistency. If your frosting feels too dense, a splash of milk can loosen it, and if it is too soft refrigerate briefly. A common mistake is rushing the whipping which leaves a heavy frosting that lacks lift and pipeability.
- Reduce the speed to low and gradually add the powdered sugar once all of the powdered sugar is incorporated increase the speed to medium high and add the vanilla mixing until incorporated: When the sugar is fully folded in the texture should be satiny and free of grit, and the vanilla will round out the flavor. Scrape the bowl often to ensure even mixing and to avoid lumps of powdered sugar hiding at the bottom. Overbeating here can make the frosting greasy, so stop when you reach a smooth, billowy texture.
- Whip at medium high speed until light and fluffy about 2 minutes scraping the bowl as needed: At this stage the frosting should hold soft peaks and spread smoothly without drooping. The visual cue is a sheen that fades to a matte finish as air is incorporated. One trap is adding liquid too soon which can make the frosting runny, so add any liquid in tiny increments and test consistency as you go.
- Spread the frosting over the cookie bars and decorate with sprinkles if desired: The feel of the frosting as you spread it should be cool and creamy, and gentle strokes with an offset spatula will create an even top. Press sprinkles lightly so they adhere, and decorate right after frosting while it is fresh. Avoid piling on sprinkles too heavily, which can overwhelm the balance of sweetness and texture.
- Cut the bars into squares and serve: A sharp knife wiped between cuts produces clean edges and neat squares. The first bite should show a contrast between the tender crumb and creamy frosting, with a slight crunch if you added sprinkles. If bars crumble when cut, chill them briefly to firm up so you get clean slices.
- The cookie bars should be kept in an airtight container at room temperature for up to 3 days: Storing at room temperature preserves the tender texture while the frosting remains spreadable. Refrigeration extends life to a week but can slightly firm the crumb and frosting, so bring to room temperature before serving. A common storage mistake is leaving them uncovered which dries them out quickly, so always use an airtight container.
Recipe Notes about Frosted Sugar Cookie Bars

I like to keep a few practical notes close at hand when making these bars, because small details around temperature and mixing transform the outcome. Below are a set of tips I use every time I pull this recipe together, expanded into actionable items to help you succeed.
- Softening dairy Make sure both the unsalted butter and cream cheese are fully softened to room temperature to ensure they cream together smoothly, which yields a light and even dough.
- Measuring flour Spoon the all-purpose flour into your measuring cup and level with a knife or better yet weigh it for accuracy to avoid a dry, dense bar.
- Mixing order Always combine the dry ingredients separately first, then add them gradually to the wet mixture to prevent overmixing which makes bars tough.
- Frosting texture Whip the frosting at medium high to incorporate air and achieve a light spreadable consistency, stopping to scrape the bowl to ensure even texture.
- Decoration timing Apply rainbow sprinkles immediately after frosting so they adhere and look vibrant, avoiding a dull, soggy appearance.
- Storage Keep the bars airtight at room temperature for up to three days, or refrigerate for up to one week and bring to room temperature before serving to restore softness.
What Goes Well With This Frosted Sugar Cookie Bars
These bars are versatile and friendly to many serving scenarios, whether you need a dessert for a casual afternoon or a festive platter for a holiday gathering. Below I outline pairing ideas, occasions, and storage guidance to help you present and preserve the bars beautifully.
- Casual gatherings Serve squares on a simple platter for potlucks or bake sales, where their portability and ready to eat format make them popular choices.
- Tea time Pair with a cup of warm tea or coffee for an afternoon treat, the mild sweetness and vanilla notes complementing the beverage without overpowering it.
- Celebrations Customize sprinkles to match holidays or birthdays, and arrange the bars on tiered stands for a charming dessert display at parties.
- Lunchboxes Wrap individual bars for an easy treat in lunchboxes, they travel well and the frosting stays intact when stored flat in an airtight container.
- Seasonal touches For winter gatherings I choose festive sprinkles and for spring events pastel decorations, using color to tie them to the season or theme.
- Storage tips Store at room temperature in an airtight container for up to three days for best texture, or refrigerate for up to one week if you need longer storage, and allow bars to come to room temperature before serving to restore their tender crumb.
- Serving size Cut into uniform squares to make plating and portion control simple, and serve slightly chilled or at room temperature depending on preference.
- Presentation idea Dust a small amount of powdered sugar around the serving tray edge for a delicate look that complements the frosting without changing flavor.
- Occasions These bars are great for school events, bake sales, breakfast meetings, family gatherings, and holiday cookie trays because they are easy to slice and distribute.
- Pairing with other desserts Combine on a sweet table with brownies and blondies for variety, offering guests different textures and flavors to enjoy.
FAQ
Conclusion
These Frosted Sugar Cookie Bars stand out because they combine the nostalgic flavors of a classic sugar cookie with the ease of a traybake, delivering tender centers and a satisfying vanilla frosting. Give them a try when you need something that travels well, serves a crowd, or simply satisfies a sweet craving with minimal fuss. I hope this recipe becomes a reliable favorite in your rotation, bringing bright smiles and easy portions to gatherings big and small.
Frosted Sugar Cookie Bars
Equipment
- 9x13-inch Baking Pan
- Electric Mixer
- Wire whisk
- wire cooling rack
- Rubber spatula
Ingredients
- 21/2 cups (312.5 g) all-purpose flour Provide structure and bulk to the bars, forming the base of the dough while contributing tenderness when properly measured and mixed; sift or whisk for even distribution before combining with wet ingredients to avoid lumps.
- 1 teaspoon baking powder Leaven gently by creating air pockets that help the bars rise slightly and stay tender; whisk into dry ingredients to ensure even distribution and predictable texture.
- 1/2 teaspoon (0.5 teaspoon) baking soda React with acidic components to produce carbon dioxide for lift and a lighter crumb; measure accurately and avoid overmixing to prevent soapy flavors or excessive rising.
- 1 teaspoon salt Enhance overall flavor balance and strengthen gluten network slightly for improved texture; dissolve evenly within dry ingredients to season the dough throughout.
- 3/4 cup (170.25 g) unsalted butter, at room temperature Cream for richness and moisture while incorporating air when beaten with sugar; ensure it is at room temperature so it blends smoothly with cream cheese and sugars for a tender crumb.
- 4 ounces (113.4 g) cream cheese, at room temperature Add tangy richness and contribute to a soft, tender crumb while improving moisture and flavor depth; beat with butter to create a smooth, creamy base for the cookie batter.
- 11/2 cups (300 g) granulated sugar Sweeten and tenderize by absorbing fat and liquid, helping create a fine crumb and contributing to spread; creamed with butter and cream cheese to incorporate air into the batter.
- 1 egg Bind ingredients together, provide moisture, emulsify fats, and contribute to structure and richness; bring to room temperature to ensure even incorporation and prevent curdling.
- 2 teaspoons vanilla extract Impart aromatic flavor and complexity to both the bars and frosting, rounding out sweetness with a warm, floral note; add with other wet ingredients for uniform distribution.
- 1 cup (227 g) unsalted butter, at room temperature Contribute creaminess and fat to the frosting, creating a silky texture and stable spread while carrying flavor; ensure it is softened to room temperature for smooth whipping.
- 21/2 cups (300 g) powdered sugar Sweeten and stabilize the frosting while providing structure and pipeability; sift to remove lumps and add gradually to reach desired consistency and sweetness.
- 1 tablespoon vanilla extract Flavor the frosting with a warm, aromatic note and enhance the overall sweetness profile; stir in toward the end of mixing to preserve vanilla character without overworking.
- Rainbow sprinkles, for decorating Decorate and add a colorful, crunchy contrast to the soft, sweet bars; sprinkle immediately after frosting to ensure proper adhesion and an attractive finished appearance.
Instructions
- Make the Cookie Bars: Preheat oven to 350 degrees F. Grease a 9×13-inch baking pan or line with parchment paper; set aside.: When you open the oven and hear the faint hiss of heat, the aroma of warm vanilla and butter will begin to fill the kitchen, signaling the start of caramelization and browning that gives the edges their pleasant chew. Greasing or lining your 9 by 13 inch pan ensures the bars release cleanly once baked. A common mistake is not preheating the oven fully, which can lead to uneven rise and a dense center, so give your oven the full time to reach 350 degrees F. Listen for a gentle, steady crackle from the oven as moisture escapes during the first half of baking, and look for a light golden color at the edges as your visual cue that the bars are approaching doneness.
- In a medium bowl, whisk together the flour, baking powder, baking soda, and salt; set aside.: The dry mix should look uniform, and whisking breaks up any lumps in the flour while distributing the leaveners evenly, which prevents pockets of bitter baking soda or pinched spots of baking powder. If your mixture is clumpy, sift it or press through a mesh to loosen it up. A frequent oversight is dumping the dry and wet ingredients together without first combining the dry, which can yield uneven texture and places that are overly salty or metallic from leavening agents.
- Using an electric mixer, cream together the butter and cream cheese on medium speed until smooth, about 1 minute. Add the sugar and continue to beat until light and fluffy, about 3 minutes. Add the egg and vanilla extract and beat to combine, about 1 minute. Reduce the mixer speed to low and gradually add the flour mixture, mixing only until barely combined. Use a rubber spatula to finish mixing, ensuring there are no pockets of flour remaining.: You will notice the mixture lighten in color and take on a silky sheen as air is incorporated, which helps create a tender crumb. Adding the granulated sugar and beating until light and fluffy is where you intentionally trap tiny air bubbles that expand in the oven for lift. When you add the egg and vanilla extract , the batter will become more cohesive. Reduce speed and add the flour mixture only until barely combined to avoid overworking the gluten which would make the bars tough. A common error here is overmixing on high speed, which makes the dough dense, so switch to a spatula for the final fold to ensure no streaks of flour remain.
- Using a spatula, spread the dough into an even layer in the prepared pan (the dough will be thick!). Bake until light golden brown and a toothpick inserted in the center comes out clean, 20 to 25 minutes. Place the pan on a wire rack to cool completely before frosting.: The tactile resistance of the dough should feel firm but spreadable, and smoothing it evenly ensures a uniform bake. When the dough is in the pan you might press slightly with parchment or an offset spatula to level it out; any high spots can bake faster and become too brown. Bake until light golden brown and a toothpick inserted in the center comes out clean which usually takes 20 to 25 minutes. Avoid opening the oven door repeatedly during baking as the temperature drop can cause sinking, and watch for the telltale faint pull away from the pan edges that indicates readiness.
- Make the Vanilla Frosting: Using the wire whisk attachment of your stand mixer, whip the butter on medium-high speed for 5 minutes, stopping to scrape the bowl once or twice. Reduce the speed to low and gradually add the powdered sugar. Once all of the powdered sugar is incorporated, increase the speed to medium-high and add the vanilla, mixing until incorporated. Whip at medium-high speed until light and fluffy, about 2 minutes, scraping the bowl as needed.: Cooling is essential because warm bars will cause the frosting to melt and slide, resulting in a greasy finish. As the bars cool you can smell a toasted note developing from the butter, and the center will set from a glossy to a matte appearance. A pitfall is trying to frost too soon which ruins the texture and appearance, so be patient and allow a full cool down on the rack.
- Spread the frosting over the cookie bars and decorate with sprinkles, if desired. Cut the bars into squares and serve. The cookie bars should be kept in an airtight container at room temperature for up to 3 days (you can store them in the refrigerator for up to 1 week).: Whipping unsalted butter on medium high for about 5 minutes aerates it, making the frosting light and silky; you will see it grow in volume and turn paler. Adding powdered sugar slowly prevents clouds of sugar and helps it incorporate smoothly, while the final medium high whip gives a fluffy, pipeable consistency. If your frosting feels too dense, a splash of milk can loosen it, and if it is too soft refrigerate briefly. A common mistake is rushing the whipping which leaves a heavy frosting that lacks lift and pipeability.
- Reduce the speed to low and gradually add the powdered sugar once all of the powdered sugar is incorporated increase the speed to medium high and add the vanilla mixing until incorporated: When the sugar is fully folded in the texture should be satiny and free of grit, and the vanilla will round out the flavor. Scrape the bowl often to ensure even mixing and to avoid lumps of powdered sugar hiding at the bottom. Overbeating here can make the frosting greasy, so stop when you reach a smooth, billowy texture.
- Whip at medium high speed until light and fluffy about 2 minutes scraping the bowl as needed: At this stage the frosting should hold soft peaks and spread smoothly without drooping. The visual cue is a sheen that fades to a matte finish as air is incorporated. One trap is adding liquid too soon which can make the frosting runny, so add any liquid in tiny increments and test consistency as you go.
- Spread the frosting over the cookie bars and decorate with sprinkles if desired: The feel of the frosting as you spread it should be cool and creamy, and gentle strokes with an offset spatula will create an even top. Press sprinkles lightly so they adhere, and decorate right after frosting while it is fresh. Avoid piling on sprinkles too heavily, which can overwhelm the balance of sweetness and texture.
- Cut the bars into squares and serve: A sharp knife wiped between cuts produces clean edges and neat squares. The first bite should show a contrast between the tender crumb and creamy frosting, with a slight crunch if you added sprinkles. If bars crumble when cut, chill them briefly to firm up so you get clean slices.
- The cookie bars should be kept in an airtight container at room temperature for up to 3 days: Storing at room temperature preserves the tender texture while the frosting remains spreadable. Refrigeration extends life to a week but can slightly firm the crumb and frosting, so bring to room temperature before serving. A common storage mistake is leaving them uncovered which dries them out quickly, so always use an airtight container.
Notes
- Softening dairy Make sure both the unsalted butter and cream cheese are fully softened to room temperature to ensure they cream together smoothly, which yields a light and even dough.
- Measuring flour Spoon the all-purpose flour into your measuring cup and level with a knife or better yet weigh it for accuracy to avoid a dry, dense bar.
- Mixing order Always combine the dry ingredients separately first, then add them gradually to the wet mixture to prevent overmixing which makes bars tough.
- Frosting texture Whip the frosting at medium high to incorporate air and achieve a light spreadable consistency, stopping to scrape the bowl to ensure even texture.
- Decoration timing Apply rainbow sprinkles immediately after frosting so they adhere and look vibrant, avoiding a dull, soggy appearance.
- Storage Keep the bars airtight at room temperature for up to three days, or refrigerate for up to one week and bring to room temperature before serving to restore softness.