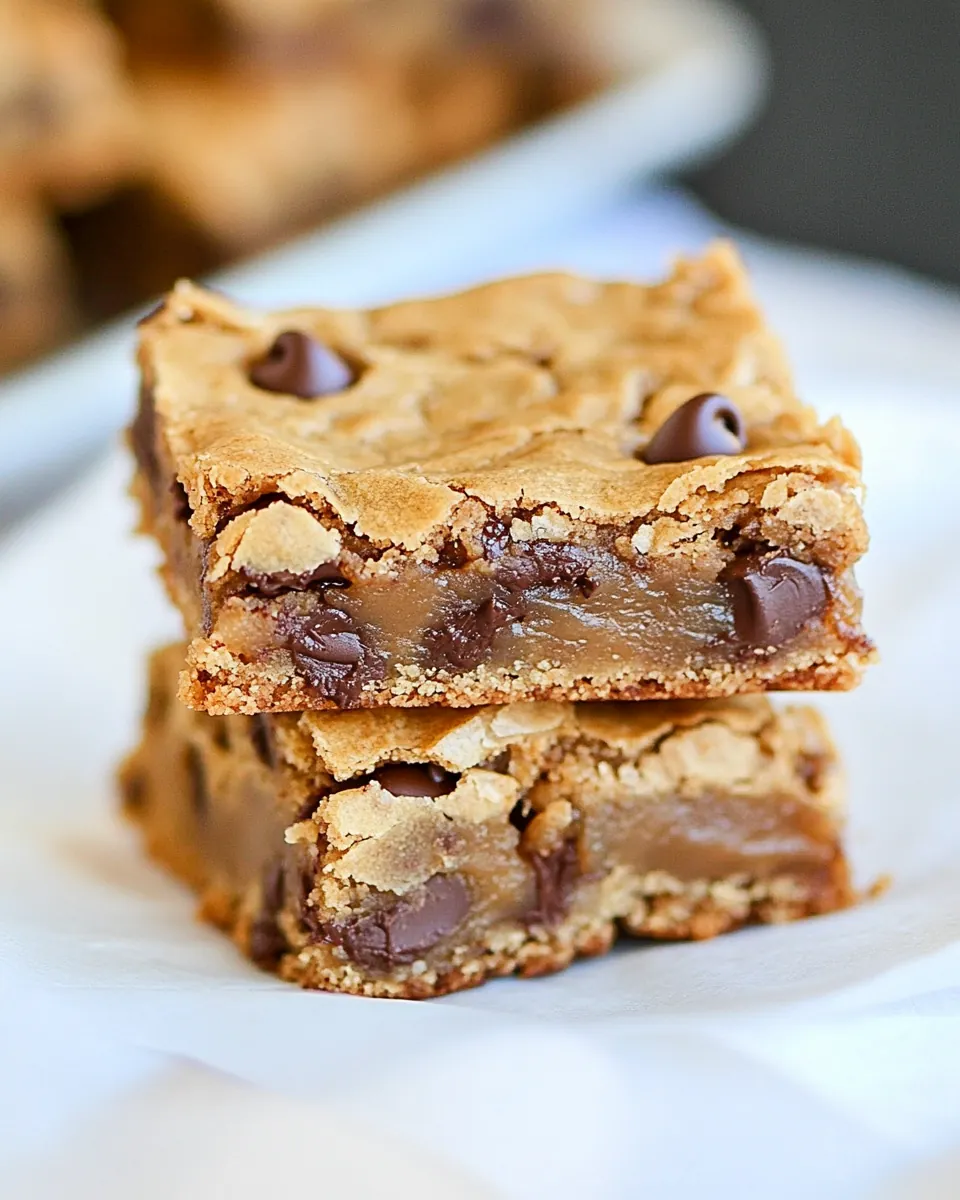
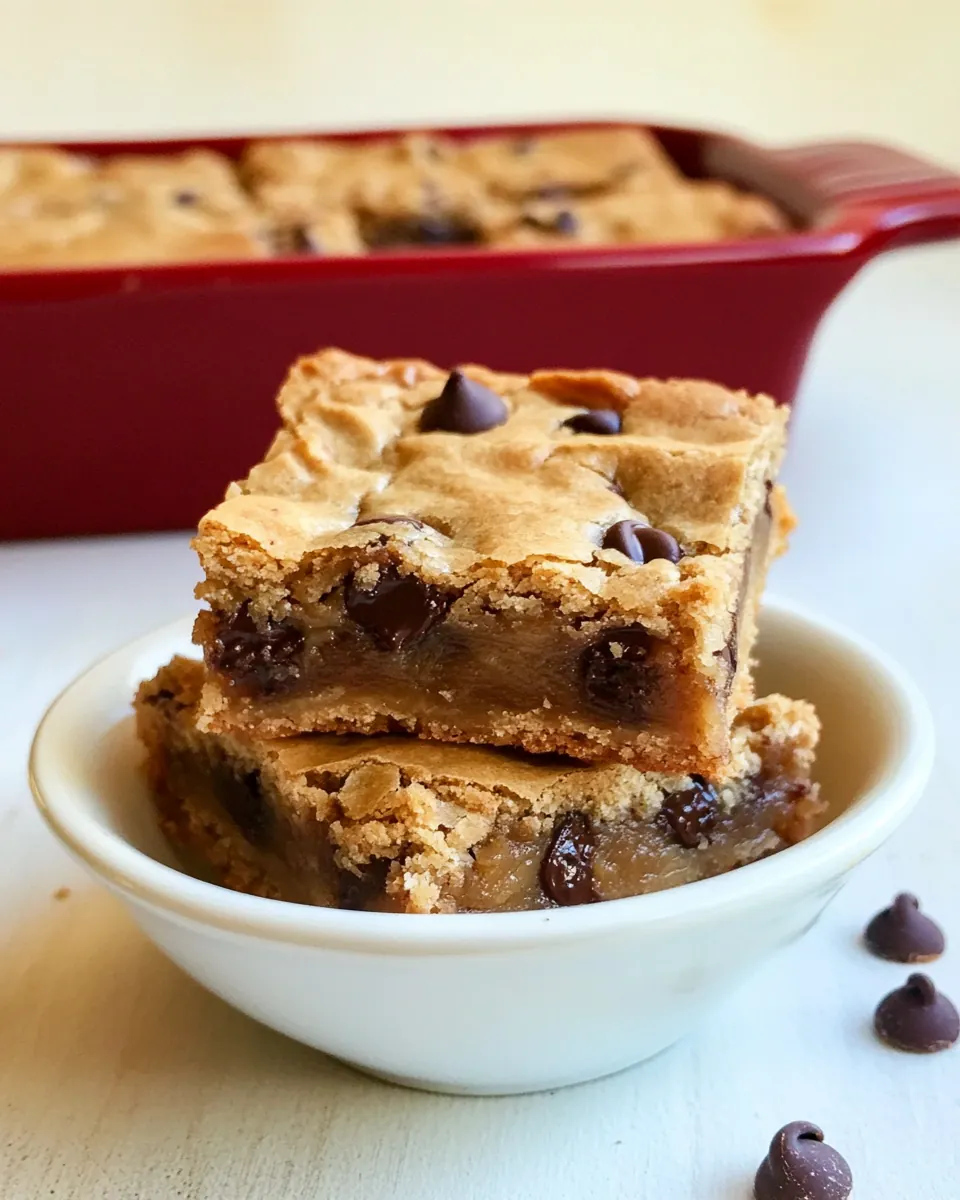
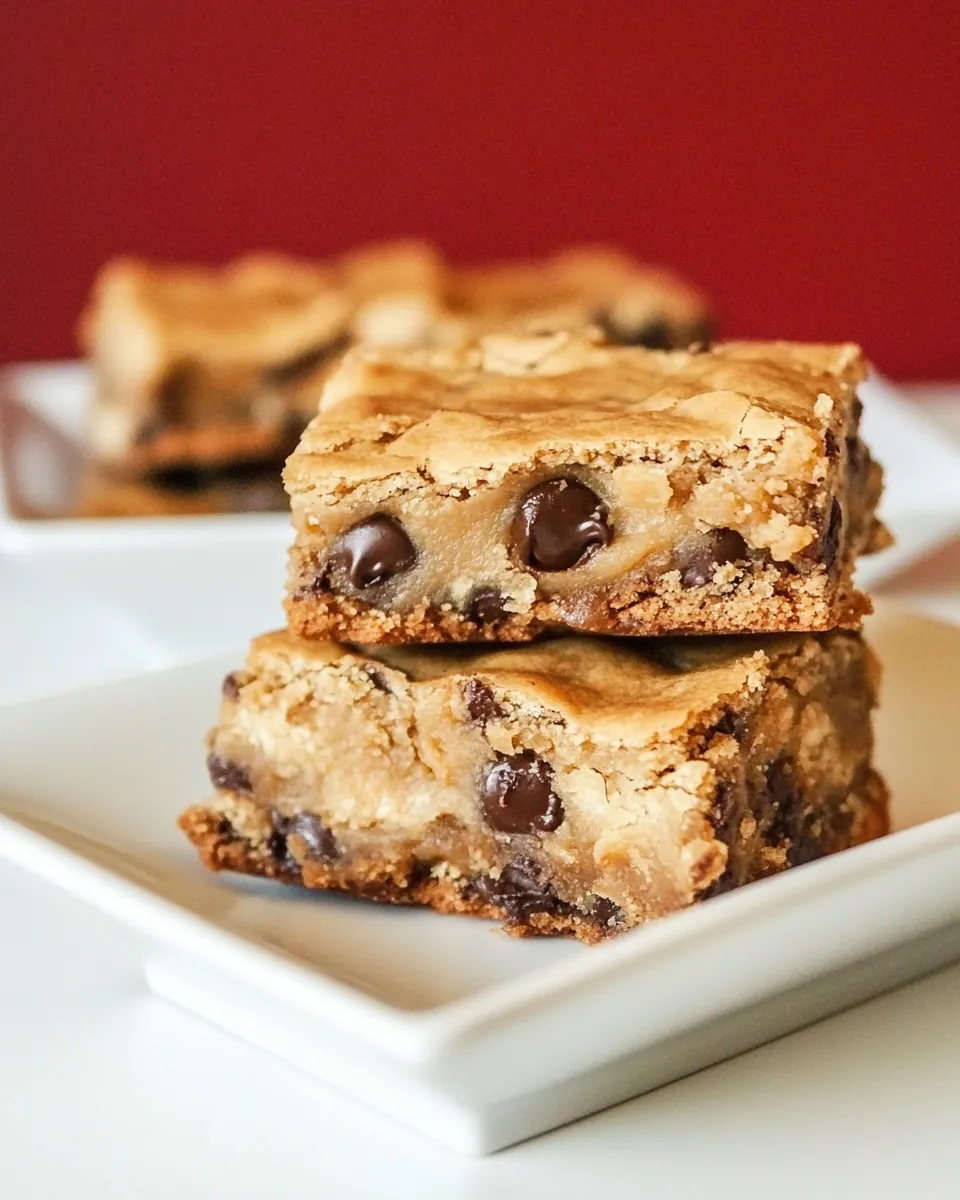
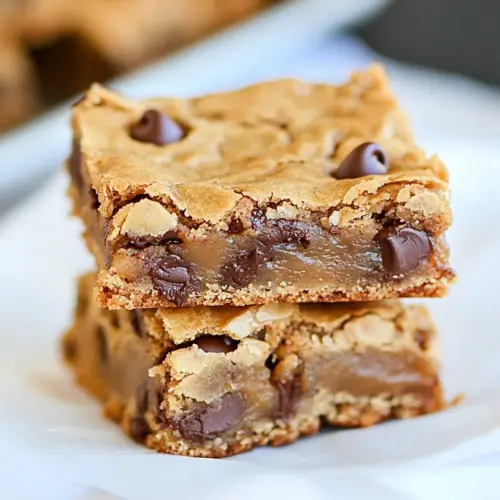
Dulce de Leche Brown Butter Chocolate Chip Cookie Bars
Dulce de Leche Brown Butter Chocolate Chip Cookie Bars have been my go to for when I want something nostalgic yet a little grown up, a sweet bar that shows up with caramel richness and toasty butter notes.
One afternoon I found myself chasing the smell of browned butter through the house while a pan of these bars cooled on the counter. I remember how the scent curled into the corners of the kitchen and how the chocolate chips glinted as I swirled the dulce de leche through the top. That moment reminded me why I keep this recipe handy for unexpected guests or when I need a quick celebration to lift the day.
Over the years I’ve tweaked little things, but the heart of the recipe never changed. The richness from the browned butter, the soft chew of the base, and the pockets of sweet, glossy dulce de leche make these bars more than the sum of their parts. I like serving them slightly warm so the chocolate chips are melty, and I also enjoy how they hold together for easy sharing.
Recipe Snapshot
40 mins
15 mins
25 mins
Medium
220 kcal
American
Gluten-Free, Low FODMAP
Desserts
8 inch square baking dish, parchment paper, medium saucepan, mixing bowl, spatula, oven
Why This Dulce de Leche Brown Butter Chocolate Chip Cookie Bars Is a Winner
Buttery depth that sings
I love how browning the butter transforms the base. That toasty aroma lifts the whole bar, adding nutty complexity that plain melted butter could never provide. You get caramel notes and a rounded mouthfeel, which makes each bite feel decadent without being cloying.
Textural balance
These bars are soft and slightly chewy, with molten pockets from the chocolate chips and silky ribbons of dulce de leche. I appreciate that they slice cleanly after cooling, so presentation is effortless whether I’m bringing them to a potluck or setting them on a dessert plate.
Accessible technique
Nothing here is fussy. You brown butter, whisk in sugar and an egg, and fold in dry ingredients. It feels fancy but is totally approachable for bakers at any level, and the pantry call up is minimal.
Flavor contrast
The deep brown sugar flavor pairs perfectly with the caramel of the dulce de leche. The semi sweet chocolate chips add a slight bitterness that keeps things balanced, so a single square feels satisfying rather than overwhelming.
Make ahead friendly
I often bake these a day before serving. They store well at room temperature, and the flavors actually meld overnight, which makes them a practical choice when I need dessert prepped ahead of time.
Recipe Ingredients for Dulce de Leche Brown Butter Chocolate Chip Cookie Bars
These ingredients come together to create a harmonious bar: the structural backbone from the flour, lift from the baking powder and baking soda, and richness from the browned butter and brown sugar. The egg binds and adds moisture, while the chocolate chips and dulce de leche provide textural contrast and pockets of sweet intensity. Each component plays a clear role, so the end result is reliably tender, chewy, and deeply flavored.
- 1 cup all-purpose unbleached flour: Provides structure and bulk to the bars by forming the dough matrix when combined with liquids and fats; sift or spoon into the measure for accuracy and avoid overmixing to keep the texture tender. Contributes gluten for chewiness and balances sweetness from sugar and dulce de leche when baked to golden edges.
- 1/2 teaspoon baking powder: Leavens slightly to give a light lift and prevent overly dense bars; react with eggs and heat to create small air pockets during baking. Use measured amounts to avoid a chemical aftertaste while achieving a gentle rise.
- 1/8 teaspoon baking soda: Acts as an additional leavening agent to fine-tune crumb texture and spread control; works with the baking powder for predictable rise and to counteract acidity. Use sparingly as too much can yield a metallic or soapy flavor in the finished bars.
- 1/2 teaspoons salt: Enhances overall flavor and strengthens dough by balancing sweetness and controlling gluten development; also helps preserve moisture for a soft interior. Measure accurately to avoid overly salty or flat-tasting bars.
- 1/2 cup unsalted butter: Adds richness and flavor complexity from nutty brown butter notes when browned; provides fat for tenderness, mouthfeel, and helps dissolve sugars for proper creaming with brown sugar. Melt and brown carefully or cream softened to incorporate air and improve texture.
- 1 cup packed dark brown sugar: Sweetens and moistens while contributing deep molasses notes that enhance caramel and dulce de leche flavors; helps create a chewy, caramelized texture in the finished bars. Pack firmly into the cup for consistent sweetness and moisture distribution.
- 1 large egg: Binds ingredients, contributes moisture, and aids in leavening by trapping steam and air; provides structure and richness for tender, cohesive bars. Use at room temperature so it incorporates smoothly into the batter.
- 1 teaspoon vanilla extract: Adds aromatic, rounded flavor that complements butter and chocolate while enhancing perceived sweetness; contributes a subtle floral-vanilla background to the bars. Stir in with wet ingredients to distribute flavor evenly.
- 1 cup semi-sweet chocolate chips or chunks: Provides pockets of melted chocolate for richness and texture contrast; contributes bittersweet balance to the sweet dulce de leche and brown sugar. Fold in toward the end of mixing to prevent excessive melting and ensure even distribution.
- 8 tablespoons dulce de leche: Delivers concentrated caramel flavor and creaminess that pairs with brown butter and chocolate; creates gooey swirls or pockets of sweetness throughout the bars for a signature dulce de leche element. Warm slightly if too thick to dollop or swirl easily into the batter.
Recipe Steps for Dulce de Leche Brown Butter Chocolate Chip Cookie Bars
I like to approach these steps with a calm kitchen rhythm. From prepping the pan to folding the batter, each stage has sensory cues that tell you when you are on track. Keep your tools close and enjoy the toasty aroma as the butter browns.
- Spray 8" square baking dish with cooking spray. Line with parchment paper and spray the paper. Set aside.: You'll notice the slick shine of the cooking spray and the crinkle of the parchment when you press it into the pan, which ensures the bars release cleanly after cooling. The parchment also gives a neat overhang for lifting the entire slab, making slicing effortless. A common mistake is skipping the parchment and relying only on spray, which can make the bars stick and break apart when removed. Make sure the paper sits flat in the pan so the batter spreads evenly.
- Preheat oven to 350 degrees F.: Preheating warms the air so the batter starts setting as soon as it hits the oven, producing even baking and proper edge development. You'll sense a consistent, balanced heat when you open the oven; the fan for standard ovens is not required. If you skip preheating, the bars can bake unevenly and either under bake or dry out. Use a reliable oven thermometer if yours runs hot or cool, to hit the correct temperature.
- In a medium mixing bowl, whisk together the dry ingredients (flour, baking powder, soda and salt).: As you whisk, you should see a uniform, pale mix with no streaks of flour, which prevents pockets of leavening. This step ensures even distribution so every bite rises the same. A common error is insufficient whisking, which can leave densest spots in the finished bars. Sift if your flour is lumpy, but a few firm stirs will usually do the trick.
- In a medium saucepan brown 8 tablespoons of butter. Take off the heat and add brown sugar. Whisk until combined. Let cool slightly.: While browning, you'll hear gentle sizzling and smell nutty, toasty notes as the milk solids turn golden. Swirl the pan to encourage even color, and remove the saucepan the moment it reaches a deep nut brown to avoid burning. Adding the brown sugar off heat melts it into the butter, creating a glossy, cohesive mixture. If you let the browned butter sit too hot it can scramble the egg later, so allow it to cool a bit. A common mistake is overheating, which creates bitterness, so keep a close eye and stir frequently.
- Add egg and whisk well.: As you whisk the warm butter and sugar with the egg , you'll feel the mixture lighten slightly and thicken into a smooth batter. This emulsification is critical, helping the fat and water phase bind for a tender crumb. If the butter is too hot it can cook the egg , creating grainy texture, so temper by whisking briskly and ensuring moderate warmth. Avoid dumping a cold egg into searing butter without mixing, as this can scramble it.
- Add vanilla extract and whisk again.: The vanilla integrates and perfumes the batter; you may notice the aroma bloom as it hits the warm sugar and butter . This small addition lifts the overall flavor profile and rounds out the sweetness. Thorough whisking ensures even distribution so every bite carries that gentle warmth. Skimping here will leave the bars tasting flat, so measure accurately and whisk until blended.
- Add the dry ingredients and chocolate chips and fold in gently with a spatula. Do not over mix. The batter will be thick and sticky.: Folding preserves tenderness by keeping gluten development minimal, and you should see ribbons of flour disappear without vigorous stirring. The batter will feel dense and tacky to the touch, and the chocolate chips should be evenly scattered. Over mixing leads to tough bars, so stop as soon as the dry streaks are gone. A common slip is using a mixer which encourages over development, so stick to a spatula.
- Spread in prepared baking dish.: As you spread, notice how the batter softens and smooths under the spatula, filling corners and creating an even thickness. An even layer bakes uniformly, so take a moment to press batter into edges. If you press too hard you can compress the texture, so be gentle and use an offset spatula for a neat finish. Skipping this will create uneven bake and some pieces may be underdone.
- Drop tablespoon-fulls of dulce de leche on top of the batter. Make swirls with a knife.: The glossy dulce de leche will sit in little mounds and pull into decorative ribbons as you swirl, creating visual contrast and molten caramel pockets once baked. Use a small knife to make figure eight motions for pretty marbling. If the dulce de leche is too stiff, warm it briefly to loosen it, making swirling easier. Rushing this step can result in clumps rather than ribbons.
- Bake 20 to 25 minutes, but no longer than that.: During baking you will see the edges set and turn lightly golden while the center remains slightly glossy. The smell of caramel and toasted sugar will intensify; the center should be just set and still slightly soft to the touch. Overbaking will dry them out, so start checking at 20 minutes. A common mistake is waiting until the center looks fully firm, which leads to a drier bar. Remove when a toothpick shows a few moist crumbs.
- Let cool completely before cutting.: Cooling lets the bars finish setting and allows the caramel and chocolate to stabilize, so slices hold their shape. You will hear a quiet settling as they come to room temperature and the flavors meld. Cutting while warm causes sticky, messy slices and uneven portions. Patience here ensures clean edges and beautiful squares for serving.
Make It Your Own

These ideas help you personalize the bars while keeping the recipe reliable. I enjoy small tweaks that enhance texture or presentation, and these tips do exactly that.
- Swap chocolate format: Use chunks for big pockets of melted chocolate, or chips for an even distribution throughout the batter.
- Adjust caramel placement: Dollop dulce de leche more sparingly for delicate ribbons, or in larger spoonfuls for gooier caramel pockets.
- Chill before slicing: Refrigerate the cooled slab for firmer, cleaner slices when you need neat presentation.
- Control chew: Slightly underbake by a minute for a softer, chewier center, but watch closely to avoid a raw middle.
- Toast nuts: If you decide to add nuts in your head, toast them first to intensify flavor, though do not add ingredients not listed in the recipe.
Perfect Pairings for Dulce de Leche Brown Butter Chocolate Chip Cookie Bars
These bars work beautifully across occasions, from casual coffee time to celebratory gatherings. Think about temperature contrasts and textural complements when serving.
- Afternoon coffee break: Pair a warm square with a cup of medium roast coffee for an afternoon pick me up.
- Casual dessert: Serve slightly warm with a small scoop of neutral ice cream for an extra indulgent treat after weeknight dinner.
- Party platter: Cut into small squares and arrange on a platter so guests can sample a sweet bite without committing to a full piece.
- Make ahead for gatherings: Bake a day in advance and store in an airtight container at room temperature to let flavors meld and save time on the event day.
- Seasonal celebrations: These bars suit holiday dessert spreads or bake sales, offering a familiar yet elevated flavor profile that travels well.
- Storage tips: Keep at room temperature for up to three days or refrigerate for up to five days, bringing to room temperature before serving for best texture.
FAQ
Conclusion
These bars stand out because of the deep, nutty brown butter and the glossy ribbons of dulce de leche that create pockets of molten caramel. I encourage you to try this recipe when you want an elevated, yet very approachable dessert that holds up for sharing and gifting. It delivers big flavor with minimal fuss, and once you smell the browned butter you will know why I keep coming back to this simple, satisfying treat.
Dulce de Leche Brown Butter Chocolate Chip Cookie Bars
Equipment
- 8-inch Square Baking Dish
- Parchment Paper
- Medium Saucepan
- Mixing Bowl
- Spatula
- Oven
Ingredients
- 1 cup all-purpose unbleached flour Provides structure and bulk to the bars by forming the dough matrix when combined with liquids and fats; sift or spoon into the measure for accuracy and avoid overmixing to keep the texture tender. Contributes gluten for chewiness and balances sweetness from sugar and dulce de leche when baked to golden edges.
- 1/2 teaspoon baking powder Leavens slightly to give a light lift and prevent overly dense bars; react with eggs and heat to create small air pockets during baking. Use measured amounts to avoid a chemical aftertaste while achieving a gentle rise.
- 1/8 teaspoon baking soda Acts as an additional leavening agent to fine-tune crumb texture and spread control; works with the baking powder for predictable rise and to counteract acidity. Use sparingly as too much can yield a metallic or soapy flavor in the finished bars.
- 1/2 teaspoons salt Enhances overall flavor and strengthens dough by balancing sweetness and controlling gluten development; also helps preserve moisture for a soft interior. Measure accurately to avoid overly salty or flat-tasting bars.
- 1/2 cup unsalted butter Adds richness and flavor complexity from nutty brown butter notes when browned; provides fat for tenderness, mouthfeel, and helps dissolve sugars for proper creaming with brown sugar. Melt and brown carefully or cream softened to incorporate air and improve texture.
- 1 cup packed dark brown sugar Sweetens and moistens while contributing deep molasses notes that enhance caramel and dulce de leche flavors; helps create a chewy, caramelized texture in the finished bars. Pack firmly into the cup for consistent sweetness and moisture distribution.
- 1 large egg Binds ingredients, contributes moisture, and aids in leavening by trapping steam and air; provides structure and richness for tender, cohesive bars. Use at room temperature so it incorporates smoothly into the batter.
- 1 teaspoon vanilla extract Adds aromatic, rounded flavor that complements butter and chocolate while enhancing perceived sweetness; contributes a subtle floral-vanilla background to the bars. Stir in with wet ingredients to distribute flavor evenly.
- 1 cup semi-sweet chocolate chips or chunks Provides pockets of melted chocolate for richness and texture contrast; contributes bittersweet balance to the sweet dulce de leche and brown sugar. Fold in toward the end of mixing to prevent excessive melting and ensure even distribution.
- 8 tablespoons dulce de leche Delivers concentrated caramel flavor and creaminess that pairs with brown butter and chocolate; creates gooey swirls or pockets of sweetness throughout the bars for a signature dulce de leche element. Warm slightly if too thick to dollop or swirl easily into the batter.
Instructions
- Spray 8" square baking dish with cooking spray. Line with parchment paper and spray the paper. Set aside.: You'll notice the slick shine of the cooking spray and the crinkle of the parchment when you press it into the pan, which ensures the bars release cleanly after cooling. The parchment also gives a neat overhang for lifting the entire slab, making slicing effortless. A common mistake is skipping the parchment and relying only on spray, which can make the bars stick and break apart when removed. Make sure the paper sits flat in the pan so the batter spreads evenly.
- Preheat oven to 350 degrees F.: Preheating warms the air so the batter starts setting as soon as it hits the oven, producing even baking and proper edge development. You'll sense a consistent, balanced heat when you open the oven; the fan for standard ovens is not required. If you skip preheating, the bars can bake unevenly and either under bake or dry out. Use a reliable oven thermometer if yours runs hot or cool, to hit the correct temperature.
- In a medium mixing bowl, whisk together the dry ingredients (flour, baking powder, soda and salt).: As you whisk, you should see a uniform, pale mix with no streaks of flour, which prevents pockets of leavening. This step ensures even distribution so every bite rises the same. A common error is insufficient whisking, which can leave densest spots in the finished bars. Sift if your flour is lumpy, but a few firm stirs will usually do the trick.
- In a medium saucepan brown 8 tablespoons of butter. Take off the heat and add brown sugar. Whisk until combined. Let cool slightly.: While browning, you'll hear gentle sizzling and smell nutty, toasty notes as the milk solids turn golden. Swirl the pan to encourage even color, and remove the saucepan the moment it reaches a deep nut brown to avoid burning. Adding the brown sugar off heat melts it into the butter, creating a glossy, cohesive mixture. If you let the browned butter sit too hot it can scramble the egg later, so allow it to cool a bit. A common mistake is overheating, which creates bitterness, so keep a close eye and stir frequently.
- Add egg and whisk well.: As you whisk the warm butter and sugar with the egg , you'll feel the mixture lighten slightly and thicken into a smooth batter. This emulsification is critical, helping the fat and water phase bind for a tender crumb. If the butter is too hot it can cook the egg , creating grainy texture, so temper by whisking briskly and ensuring moderate warmth. Avoid dumping a cold egg into searing butter without mixing, as this can scramble it.
- Add vanilla extract and whisk again.: The vanilla integrates and perfumes the batter; you may notice the aroma bloom as it hits the warm sugar and butter . This small addition lifts the overall flavor profile and rounds out the sweetness. Thorough whisking ensures even distribution so every bite carries that gentle warmth. Skimping here will leave the bars tasting flat, so measure accurately and whisk until blended.
- Add the dry ingredients and chocolate chips and fold in gently with a spatula. Do not over mix. The batter will be thick and sticky.: Folding preserves tenderness by keeping gluten development minimal, and you should see ribbons of flour disappear without vigorous stirring. The batter will feel dense and tacky to the touch, and the chocolate chips should be evenly scattered. Over mixing leads to tough bars, so stop as soon as the dry streaks are gone. A common slip is using a mixer which encourages over development, so stick to a spatula.
- Spread in prepared baking dish.: As you spread, notice how the batter softens and smooths under the spatula, filling corners and creating an even thickness. An even layer bakes uniformly, so take a moment to press batter into edges. If you press too hard you can compress the texture, so be gentle and use an offset spatula for a neat finish. Skipping this will create uneven bake and some pieces may be underdone.
- Drop tablespoon-fulls of dulce de leche on top of the batter. Make swirls with a knife.: The glossy dulce de leche will sit in little mounds and pull into decorative ribbons as you swirl, creating visual contrast and molten caramel pockets once baked. Use a small knife to make figure eight motions for pretty marbling. If the dulce de leche is too stiff, warm it briefly to loosen it, making swirling easier. Rushing this step can result in clumps rather than ribbons.
- Bake 20 to 25 minutes, but no longer than that.: During baking you will see the edges set and turn lightly golden while the center remains slightly glossy. The smell of caramel and toasted sugar will intensify; the center should be just set and still slightly soft to the touch. Overbaking will dry them out, so start checking at 20 minutes. A common mistake is waiting until the center looks fully firm, which leads to a drier bar. Remove when a toothpick shows a few moist crumbs.
- Let cool completely before cutting.: Cooling lets the bars finish setting and allows the caramel and chocolate to stabilize, so slices hold their shape. You will hear a quiet settling as they come to room temperature and the flavors meld. Cutting while warm causes sticky, messy slices and uneven portions. Patience here ensures clean edges and beautiful squares for serving.
Notes
- Swap chocolate format: Use chunks for big pockets of melted chocolate, or chips for an even distribution throughout the batter.
- Adjust caramel placement: Dollop dulce de leche more sparingly for delicate ribbons, or in larger spoonfuls for gooier caramel pockets.
- Chill before slicing: Refrigerate the cooled slab for firmer, cleaner slices when you need neat presentation.
- Control chew: Slightly underbake by a minute for a softer, chewier center, but watch closely to avoid a raw middle.
- Toast nuts: If you decide to add nuts in your head, toast them first to intensify flavor, though do not add ingredients not listed in the recipe.