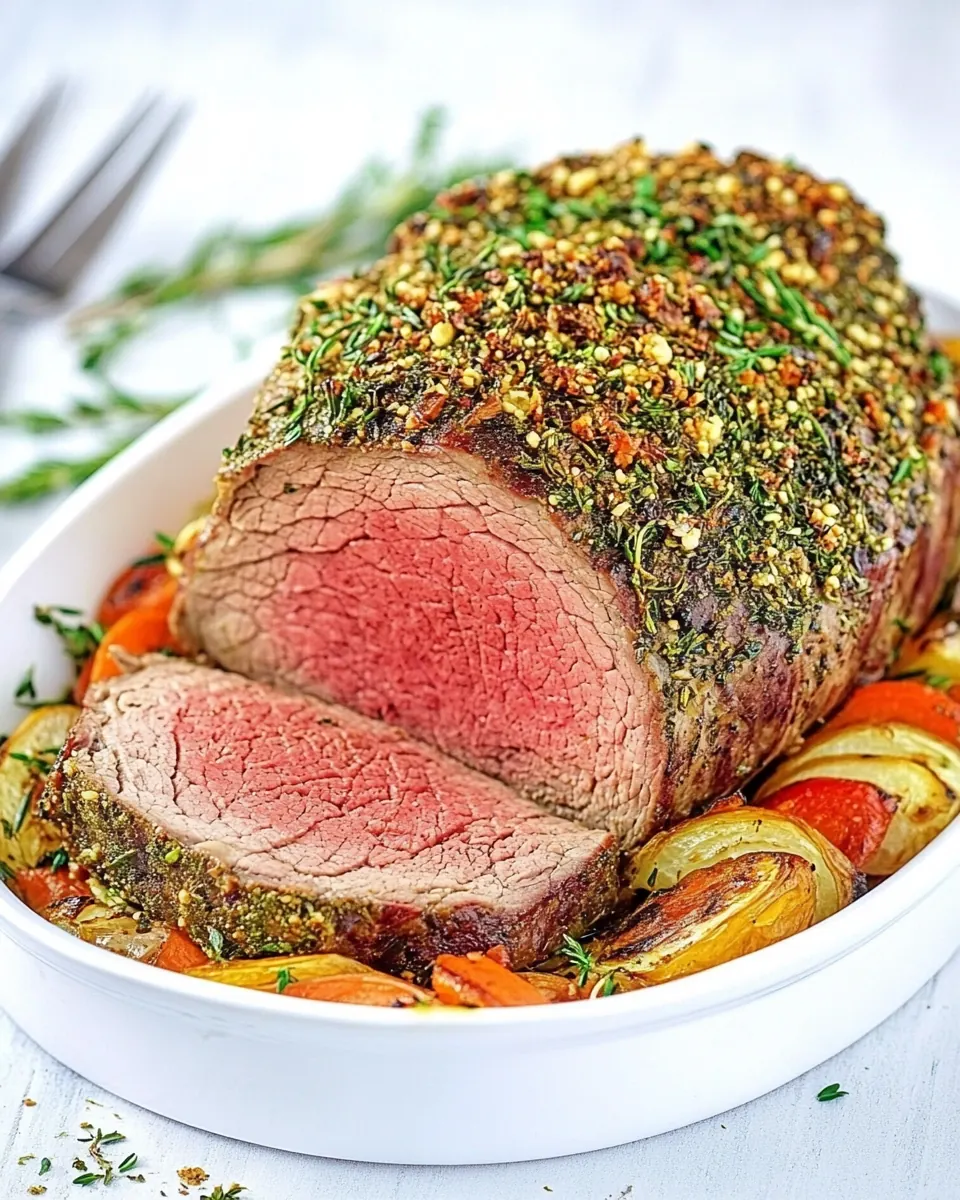
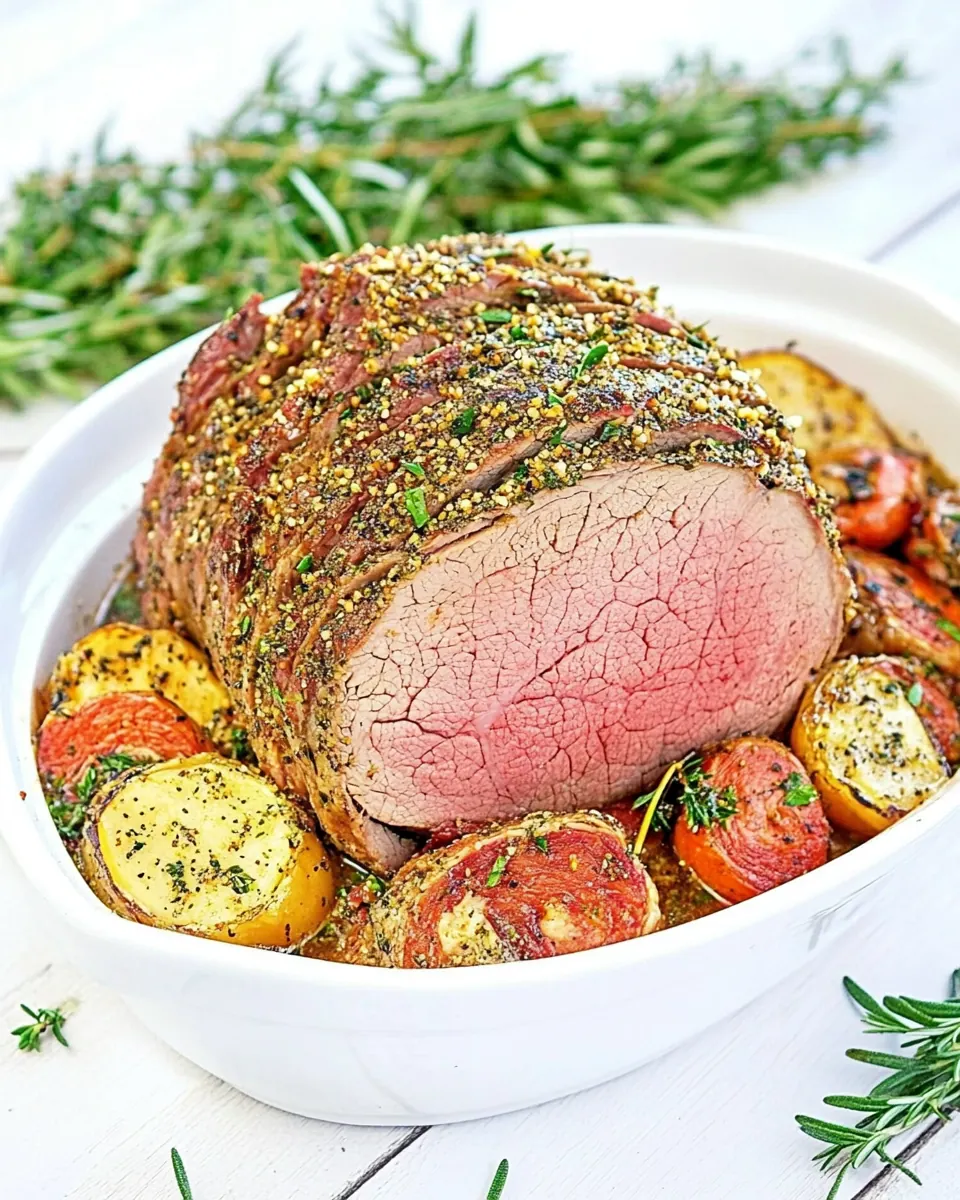
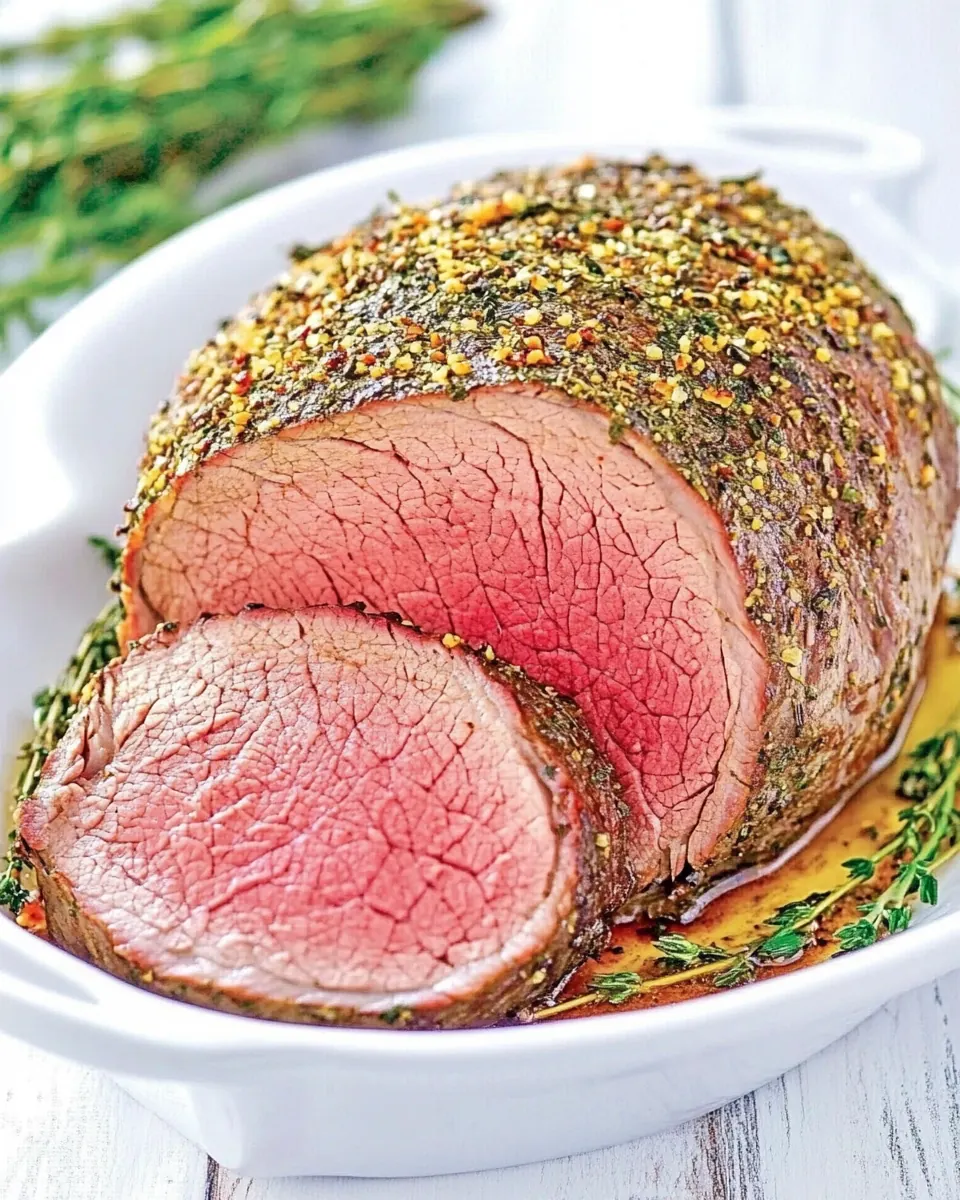
Eye of Round Roast
Eye of Round Roast is the kind of roast I turn to when I want something straightforward, comforting, and reliably impressive for a family dinner. I remember the first time I pulled a perfectly browned roast from the oven, the kitchen filling with warm, savory aromas that made everyone stop what they were doing and gather around. That moment made me a little braver in the kitchen, and since then I’ve come back to Eye of Round Roast whenever I want a centerpiece that feels both classic and homey.
Over the years I learned small habits that make a big difference, like pressing fresh garlic into a paste with rosemary and olive oil, and letting the meat rest so the juices redistribute. Those rituals are part technique and part comfort, and they change a simple roast into something you want to linger over. I often serve this when the days are colder and friends drop by unannounced, because it roasts reliably and slices beautifully for sharing. This dish has a quiet confidence, no need for fuss, and it rewards a little patience with deeply savory results.
Recipe Snapshot
1 hr 35 mins
10 mins
85 mins
Medium
300 kcal
American
Keto, Paleo
Dinner
Roasting Pan, Instant-read meat thermometer, Carving knife and fork
What Sets This Eye of Round Roast Apart
Comforting, unfussy centerpiece
I love that Eye of Round Roast is uncomplicated yet elegant. You get a bold, meaty flavor without hours of babysitting the oven, so it fits both weeknight and weekend rhythms. The roast holds together well, so carving thin slices is easy, and that makes plating feel gracious and effortless.
Bright herb and garlic paste
The combination of fresh rosemary, crushed garlic, Kosher salt, and olive oil gives the roast an aromatic crust that complements the lean beef. I find the paste penetrates just enough to season deeply without overpowering the natural beefy notes, which is why I mash it into a paste rather than just sprinkle herbs on top.
Reliable roasting method
Starting at a high temperature and then lowering the oven to finish gives a nicely seared exterior and tender interior. I trust this two stage approach because the initial blast forms a flavorful crust, while the lower temperature cooks gently so the roast stays juicy. It is a technique I return to whenever I want consistent results.
Simple gear, big results
All you really need is a roasting pan and an instant-read meat thermometer. That minimal setup lets the meat shine. I appreciate recipes that reward basic tools, because it makes pulling off a great dinner feel achievable for everyone.
Versatile for occasions
This roast works for intimate dinners, holiday tables, or cozy winter gatherings. It scales well too, so you can adjust for more people without changing the essence of the method. When I want a dish that looks special but is stress free, I reach for Eye of Round Roast.
Main Ingredients for Eye of Round Roast
The philosophy here is simple: lean, quality beef enhanced by a few bold, fragrant players. The key is balance. The eye of round roast provides a dense, beefy backbone, while the fresh rosemary and garlic add aromatic lift. Kosher salt seasons deeply and draws out flavors, and a touch of olive oil helps the herb paste adhere and promotes browning. Together these ingredients create a roast that is savory, herb kissed, and easy to carve.
- 2 1/2 pounds eye of round roast: Roast slowly to develop deep, tender flavors and allow connective tissue to break down; used as the primary protein and centerpiece of the dish. Provide the bulk of calories and savory meatiness that pairs with herbs and aromatics, benefiting from resting after cooking to retain juices.
- 2 teaspoons fresh rosemary leaves: Infuse with aromatic, pine-like notes that complement beef; chopped fresh leaves release essential oils when minced or bruised. Help brighten the roast’s flavor profile and can be combined with garlic and oil to form a simple herb crust or rub.
- 2 teaspoons Kosher salt: Season generously to enhance and balance savory flavors throughout the roast; kosher salt’s coarser crystals make it easier to distribute evenly across the meat surface. Assist in drawing out surface moisture for better browning and help proteins develop a more concentrated taste during roasting.
- 5 cloves garlic: Crush or mince to release pungent, savory compounds that add depth and a roasted garlic sweetness; multiple cloves provide enough aromatic intensity for the size of the roast. Combine with rosemary and oil to create a flavorful paste that adheres to the meat and imparts caramelized notes during cooking.
- 2 tablespoons olive oil: Coat and carry flavors while promoting even browning; olive oil helps herbs and seasonings adhere to the roast and encourages Maillard reaction on the surface. Provide a source of fat to prevent drying and contribute a subtle fruity richness that complements beef and aromatics.
Recipe Directions for Eye of Round Roast
These directions will walk you through building a fragrant herb paste, searing and roasting the meat, and resting for the juiciest slices. I like to move confidently but patiently, paying attention to visual cues and thermometer readings as I go. Keep your tools ready, and plan for a short resting period that makes a huge difference.
- Preheat the oven to 450°F.: As you put the oven to temperature you will notice the kitchen warming and the oven light glowing, which prepares the environment for a quick, high sear. This high start creates immediate browning, locking in flavors and producing a savory crust. Common mistakes include not letting the oven fully reach temperature before inserting the roast, which can leave the exterior pale, so wait until the oven indicates ready.
- Place rosemary leaves, salt, garlic, and olive oil in a mortar and pestle or food processor.: When you gather the ingredients into the bowl you will catch the bright herbal aroma of rosemary mingling with the sharpness of raw garlic . Using a mortar gives a rustic texture, while a food processor produces a smoother paste. Avoid overfilling the processor, which can prevent proper breakdown; work in small batches if needed.
- Mash or pulse until a paste is formed.: As you mash, the mixture will release fragrant oils and turn into a cohesive paste that glistens from the olive oil . The paste will spread easily across the meat and create an even coating. If you stop too early you will have chunky bits that may scorch, so aim for a smooth, spreadable consistency.
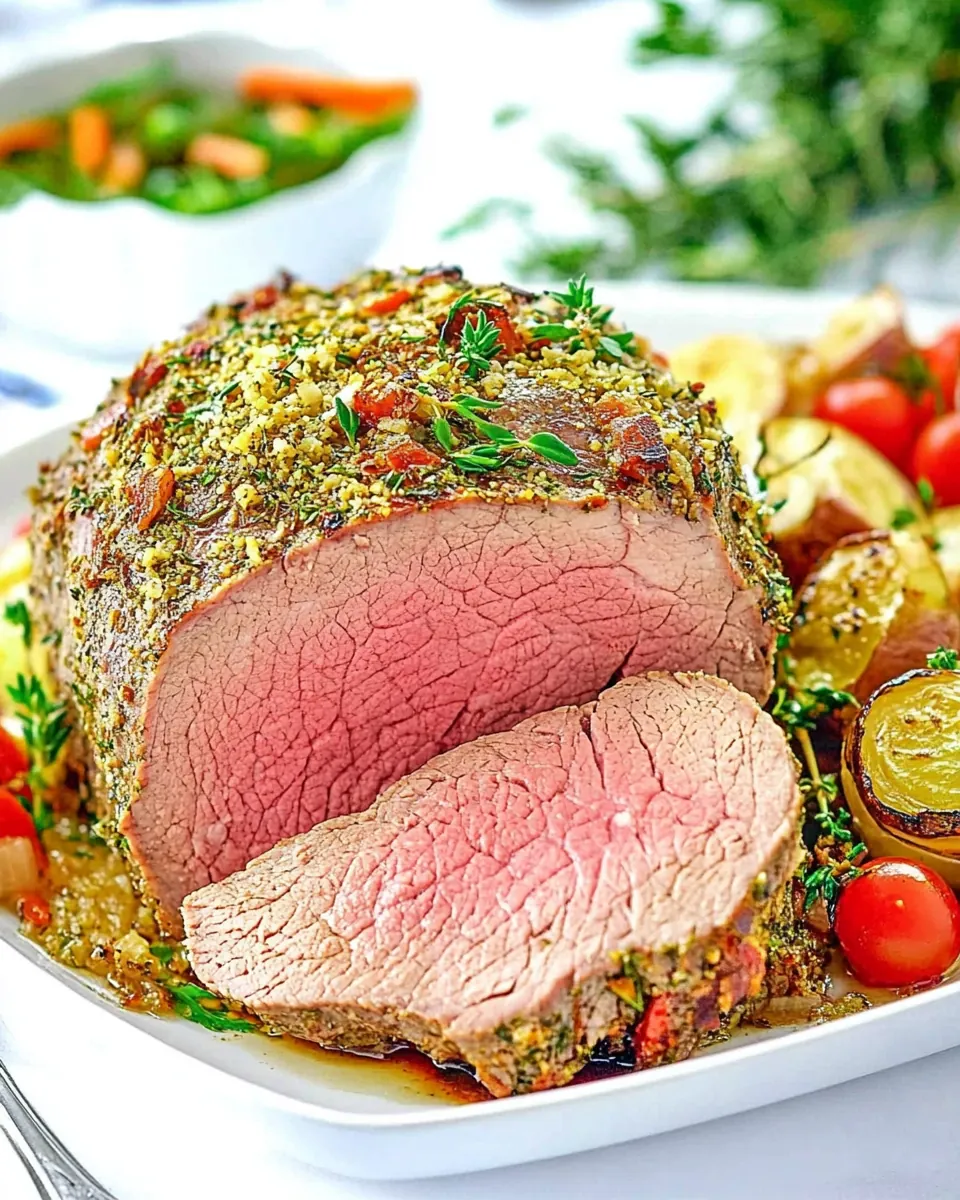
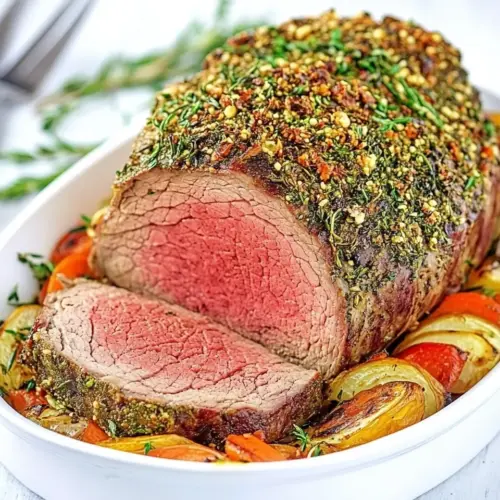
- Place the roast in a shallow roasting pan fitted with a rack or on top of potatoes, carrots, and onions in a roasting pan.: Setting the eye of round roast on a rack allows hot air to circulate and promotes even browning underneath. If you choose vegetables as a bed, they will roast and soak up juices, making a built in side. A common error is using a pan that is too small, which can crowd the roast and inhibit airflow, so ensure enough room around the meat.
- Season the roast with salt and pepper.: You will feel the texture of the roast change as the salt begins to draw surface moisture, which helps form a savory crust during the initial high heat. The seasoning builds a base layer of flavor that complements the herb paste. Over-salting can make the surface overly salty, so distribute the salt evenly and taste as you go with cautious amounts.
- Spread the paste on the roast.: As you press the herb and garlic paste onto the meat, it will adhere and form a fragrant coating that browns beautifully. The oils help the paste cling, creating an appetizing crust when roasted. One pitfall is applying too thick a layer, which can char; aim for a thin, even spread that enhances without burning.
- Roast for 15 minutes.: During this initial burst the exterior will begin to darken and sizzle slightly, releasing a deep, caramelized scent. This quick high heat jumpstarts the Maillard reaction for a richly flavored crust. A frequent issue is leaving the roast in less time and not developing enough color, so watch the surface and ensure a golden, not blackened, sear.
- Reduce the oven temperature to 325°F.: Lowering the heat after the initial sear lets the center cook gently toward medium rare without overcooking the exterior. The oven's steady warmth will produce even doneness and a tender interior. Avoid opening the oven repeatedly, which drops temperature and prolongs cooking, so keep the door closed except to check with a thermometer near the end.
- Cook approximately 70 minutes, until the roast reaches medium-rare (125-130°F).: As the roast continues, you will see juices rise and the color transition toward a rosy interior. Using an instant-read meat thermometer is essential to hit the target temperature, because visual cues alone can be misleading. A common mistake is relying solely on time, which can vary by oven and roast thickness, so check the temperature early to avoid overshooting.
- Remove the roast from the oven.: When you lift the roast out you will notice a deep, browned crust and the rich aroma of cooked meat and herbs. Taking it out at the right temperature prevents overcooking during the next step. Be careful with hot pans and escaping steam, and set the roast on a cutting board to continue the resting process safely.
- Tent the roast loosely with foil and let it rest for 10 minutes.: Resting lets the juices redistribute, so the meat becomes juicier and easier to carve. You will hear a gentle quiet as the roast cools slightly, and the residual heat will continue cooking it a few degrees. Avoid cutting too soon, which lets flavorful juices escape onto the board instead of the slices, leaving the roast drier.
- Carve the roast thinly against the grain.: As you slice, the meat should yield clean, tender ribbons when cut against the grain, producing the most tender bites. Thin slices maximize tenderness and showcase the even pink interior. A typical error is slicing with the grain, which makes the meat feel chewier, so identify the grain direction and cut perpendicular to it for best results.
Recipe Variations about Eye of Round Roast
I like to offer small variations that change the roast‘s profile without losing its simplicity. These tweaks let you tailor the dish to different occasions, from cozy family dinners to more formal gatherings. Below are practical, tested ideas that keep the technique intact while offering new flavors and textures.
- Herb twist Swap the rosemary for chopped thyme or add a teaspoon of dried herb blend to the paste for a different aromatic note.
- Garlic intensity Roast the garlic for a milder, sweeter flavor before making the paste if you prefer a softer garlic presence.
- Vegetable bed Roast on top of root vegetables so they cook in the meat juices, creating a built in side that picks up extra flavor.
- Crust add Mix a small amount of coarse mustard into the paste to create tangy depth and a slightly firmer crust.
- Make ahead You can prepare the paste up to a day ahead and refrigerate it, bringing it to room temperature before spreading to ensure even coating.
Accompaniments for Eye of Round Roast
This roast pairs well with simple side dishes and adaptable serving styles, making it suitable for many occasions. Think warm, comforting sides in winter and lighter salads if you prefer contrast. Below I outline pairing ideas, serving styles, and storage suggestions to help you present the roast beautifully.
- Classic roasted vegetables Serve the roast with roasted potatoes, carrots, and onions that have cooked in the pan juices for hearty, homey flavors.
- Fresh green salad A crisp salad with a bright vinaigrette provides contrast to the rich, meaty slices, refreshing the palate between bites.
- Evening dinner This recipe works well for a winter dinner, offering warmth and substance when the temperature drops and people want a comforting meal.
- Holiday table For a small holiday gathering, slice the roast thinly and arrange on a platter with a simple pan sauce, letting guests serve themselves.
- Storage tips Refrigerate leftovers in an airtight container for up to three days. Slice before storing for easy reheating, and reheat gently to avoid drying out the meat.
- Seasonal pairing In winter I pair this roast with roasted root vegetables and a spiced side, while in milder months I add a bright herb salad to lighten the plate.
FAQ
Conclusion
This Eye of Round Roast shines because it combines a simple herb and garlic paste with a two stage roasting method that yields flavorful crust and tender slices. Try it when you want a comforting, low fuss centerpiece that still feels special. With just a few quality ingredients and basic equipment you can produce a roast that’s both elegant and homey, perfect for winter dinners or small gatherings. Serve thinly sliced and enjoy the satisfying blend of savory meat and fragrant herbs while it brings people together around the table.
Eye of Round Roast
Equipment
- Roasting Pan
- Instant-read meat thermometer
- Carving knife and fork
Ingredients
- 2 1/2 pounds eye of round roast Roast slowly to develop deep, tender flavors and allow connective tissue to break down; used as the primary protein and centerpiece of the dish. Provide the bulk of calories and savory meatiness that pairs with herbs and aromatics, benefiting from resting after cooking to retain juices.
- 2 teaspoons fresh rosemary leaves Infuse with aromatic, pine-like notes that complement beef; chopped fresh leaves release essential oils when minced or bruised. Help brighten the roast’s flavor profile and can be combined with garlic and oil to form a simple herb crust or rub.
- 2 teaspoons Kosher salt Season generously to enhance and balance savory flavors throughout the roast; kosher salt’s coarser crystals make it easier to distribute evenly across the meat surface. Assist in drawing out surface moisture for better browning and help proteins develop a more concentrated taste during roasting.
- 5 cloves garlic Crush or mince to release pungent, savory compounds that add depth and a roasted garlic sweetness; multiple cloves provide enough aromatic intensity for the size of the roast. Combine with rosemary and oil to create a flavorful paste that adheres to the meat and imparts caramelized notes during cooking.
- 2 tablespoons olive oil Coat and carry flavors while promoting even browning; olive oil helps herbs and seasonings adhere to the roast and encourages Maillard reaction on the surface. Provide a source of fat to prevent drying and contribute a subtle fruity richness that complements beef and aromatics.
Instructions
- Preheat the oven to 450°F.: As you put the oven to temperature you will notice the kitchen warming and the oven light glowing, which prepares the environment for a quick, high sear. This high start creates immediate browning, locking in flavors and producing a savory crust. Common mistakes include not letting the oven fully reach temperature before inserting the roast, which can leave the exterior pale, so wait until the oven indicates ready.
- Place rosemary leaves, salt, garlic, and olive oil in a mortar and pestle or food processor.: When you gather the ingredients into the bowl you will catch the bright herbal aroma of rosemary mingling with the sharpness of raw garlic . Using a mortar gives a rustic texture, while a food processor produces a smoother paste. Avoid overfilling the processor, which can prevent proper breakdown; work in small batches if needed.
- Mash or pulse until a paste is formed.: As you mash, the mixture will release fragrant oils and turn into a cohesive paste that glistens from the olive oil . The paste will spread easily across the meat and create an even coating. If you stop too early you will have chunky bits that may scorch, so aim for a smooth, spreadable consistency.
- Place the roast in a shallow roasting pan fitted with a rack or on top of potatoes, carrots, and onions in a roasting pan.: Setting the eye of round roast on a rack allows hot air to circulate and promotes even browning underneath. If you choose vegetables as a bed, they will roast and soak up juices, making a built in side. A common error is using a pan that is too small, which can crowd the roast and inhibit airflow, so ensure enough room around the meat.
- Season the roast with salt and pepper.: You will feel the texture of the roast change as the salt begins to draw surface moisture, which helps form a savory crust during the initial high heat. The seasoning builds a base layer of flavor that complements the herb paste. Over-salting can make the surface overly salty, so distribute the salt evenly and taste as you go with cautious amounts.
- Spread the paste on the roast.: As you press the herb and garlic paste onto the meat, it will adhere and form a fragrant coating that browns beautifully. The oils help the paste cling, creating an appetizing crust when roasted. One pitfall is applying too thick a layer, which can char; aim for a thin, even spread that enhances without burning.
- Roast for 15 minutes.: During this initial burst the exterior will begin to darken and sizzle slightly, releasing a deep, caramelized scent. This quick high heat jumpstarts the Maillard reaction for a richly flavored crust. A frequent issue is leaving the roast in less time and not developing enough color, so watch the surface and ensure a golden, not blackened, sear.
- Reduce the oven temperature to 325°F.: Lowering the heat after the initial sear lets the center cook gently toward medium rare without overcooking the exterior. The oven's steady warmth will produce even doneness and a tender interior. Avoid opening the oven repeatedly, which drops temperature and prolongs cooking, so keep the door closed except to check with a thermometer near the end.
- Cook approximately 70 minutes, until the roast reaches medium-rare (125-130°F).: As the roast continues, you will see juices rise and the color transition toward a rosy interior. Using an instant-read meat thermometer is essential to hit the target temperature, because visual cues alone can be misleading. A common mistake is relying solely on time, which can vary by oven and roast thickness, so check the temperature early to avoid overshooting.
- Remove the roast from the oven.: When you lift the roast out you will notice a deep, browned crust and the rich aroma of cooked meat and herbs. Taking it out at the right temperature prevents overcooking during the next step. Be careful with hot pans and escaping steam, and set the roast on a cutting board to continue the resting process safely.
- Tent the roast loosely with foil and let it rest for 10 minutes.: Resting lets the juices redistribute, so the meat becomes juicier and easier to carve. You will hear a gentle quiet as the roast cools slightly, and the residual heat will continue cooking it a few degrees. Avoid cutting too soon, which lets flavorful juices escape onto the board instead of the slices, leaving the roast drier.
- Carve the roast thinly against the grain.: As you slice, the meat should yield clean, tender ribbons when cut against the grain, producing the most tender bites. Thin slices maximize tenderness and showcase the even pink interior. A typical error is slicing with the grain, which makes the meat feel chewier, so identify the grain direction and cut perpendicular to it for best results.
Notes
- Herb twist Swap the rosemary for chopped thyme or add a teaspoon of dried herb blend to the paste for a different aromatic note.
- Garlic intensity Roast the garlic for a milder, sweeter flavor before making the paste if you prefer a softer garlic presence.
- Vegetable bed Roast on top of root vegetables so they cook in the meat juices, creating a built in side that picks up extra flavor.
- Crust add Mix a small amount of coarse mustard into the paste to create tangy depth and a slightly firmer crust.
- Make ahead You can prepare the paste up to a day ahead and refrigerate it, bringing it to room temperature before spreading to ensure even coating.