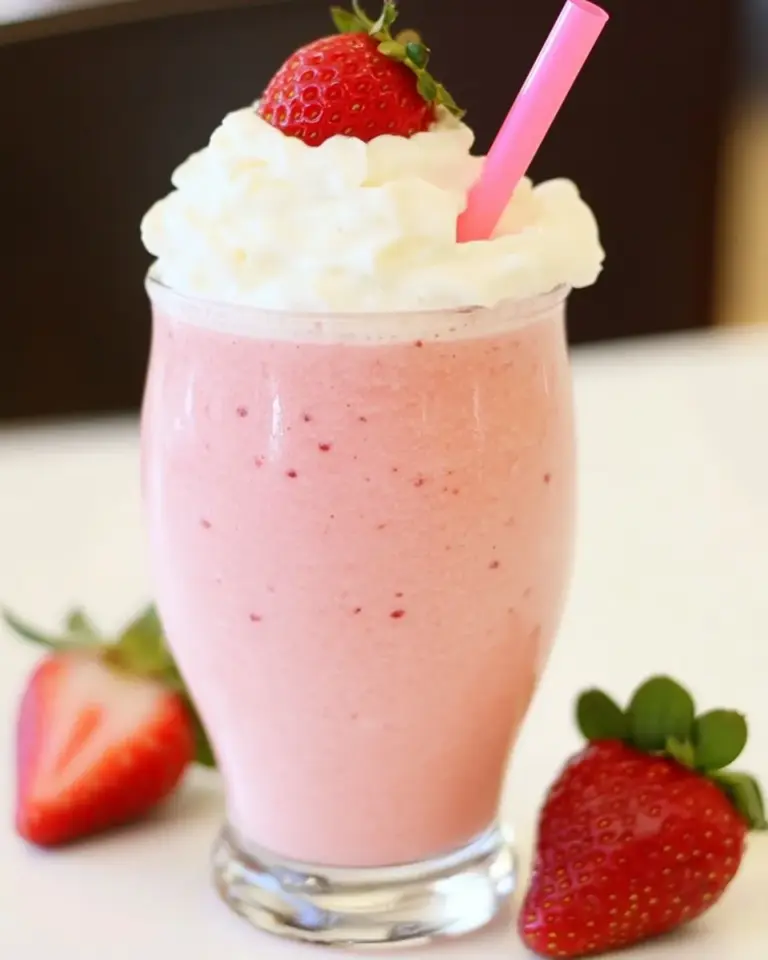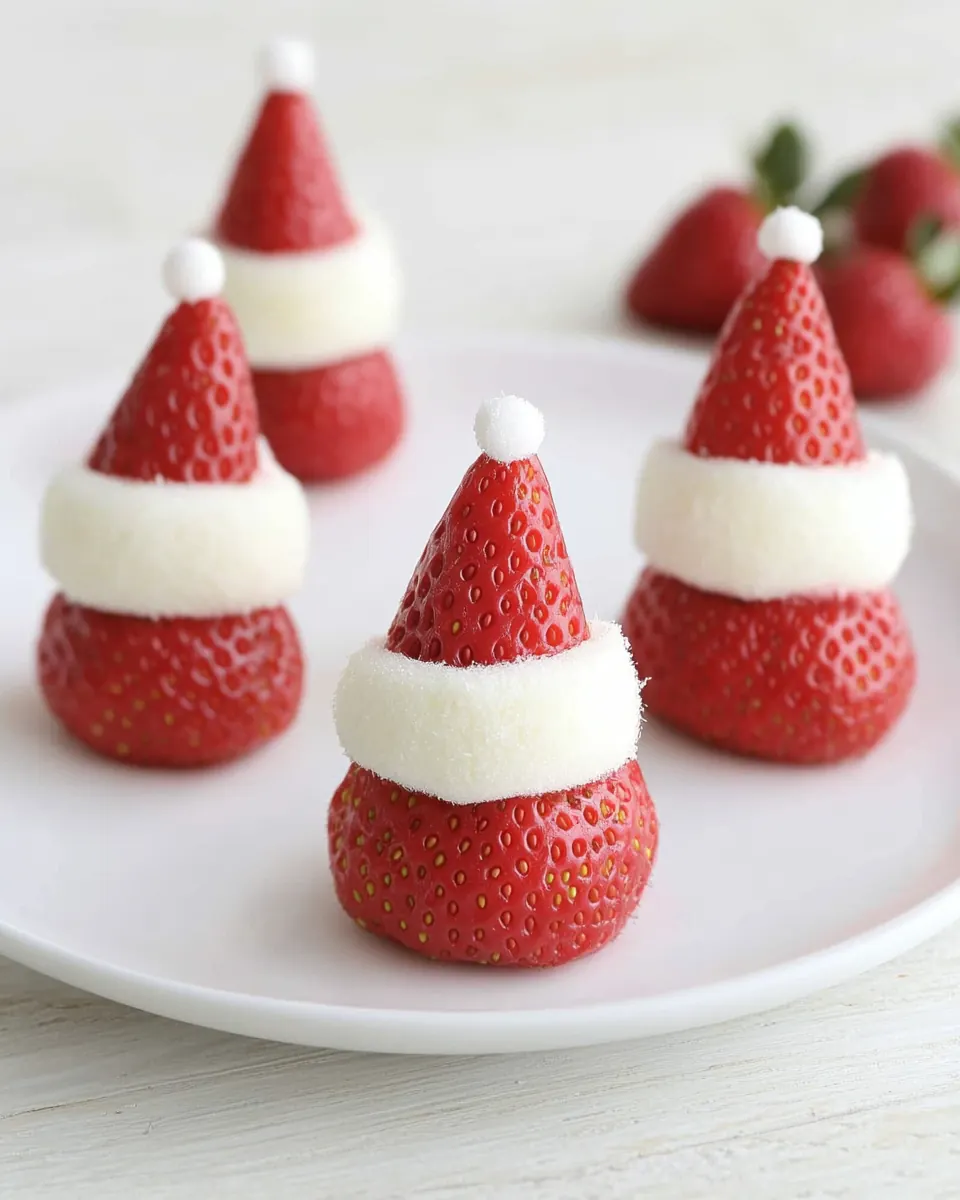
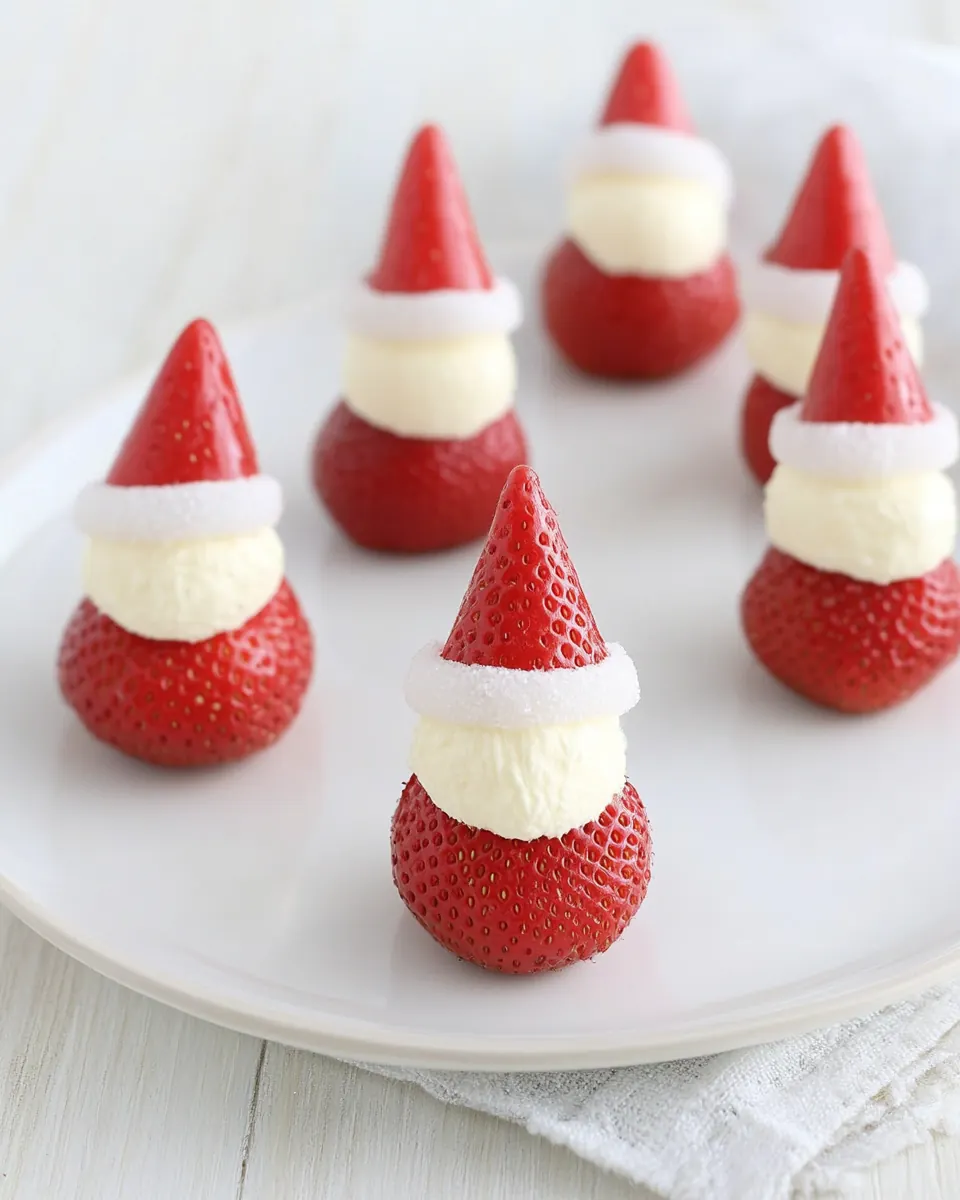
Easiest Strawberry Santas
Easiest Strawberry Santas are my go to when I want a quick, festive snack that actually gets the whole family involved. The first time I made these I was racing the clock before a holiday movie night, and the kids turned assembly into a cheerful relay. I remember how the bright strawberry red popped against the pale banana rounds, and how a tiny dollop of yogurt somehow made each one look like it had a tiny snow puff on top. It felt whimsical and completely doable, which is why this recipe stuck with me.
These treats have become our last minute party trick, the recipe I reach for when I want something healthy that still feels celebratory. We assemble them together at the table, someone trims the tops, another slices the banana, and the littlest one squeezes the yogurt from the tube. There is laughter, a bit of mess, and an immediate reward when everyone tastes that first sweet, cool bite. Over time I tweaked the order of prep so the texture stays perfect and the berries do not weep on the plate.
Recipe Snapshot
5 mins
5 mins
Easy
150 kcal
American
Gluten-Free, Low FODMAP
Desserts
Knife, Cutting Board, Plate
Why This Easiest Strawberry Santas Works
Simple assembly that kids can master
I love how Easiest Strawberry Santas turns snack time into a cooperative project. You do not need fancy tools, and the smallest hands can help place a strawberry hat on a banana round. That level of involvement makes the snack feel earned and memorable.
Fresh, whole ingredients that shine
There is no heavy prep, and each ingredient brings its own role. The juicy strawberry adds brightness, the mellow banana brings creaminess and structure, and the tiny bit of yogurt lends a soft, cool contrast. I appreciate recipes that let ingredients carry the show.
Versatile for occasions and picky eaters
These are perfect for an afternoon snack, a school party, or a light dessert after dinner. I often serve them at holiday gatherings because they look festive without being fussy. If someone prefers a dairy free option, you can choose a nondairy yogurt, though I know that is limited by the CSV rules so I usually stick with regular yogurt.
Speed without sacrificing presentation
I admire recipes that come together in minutes but still impress. Easiest Strawberry Santas delivers on both. You can prepare them just before serving so everything looks fresh, and the visual payoff is big for very little effort.
Kid friendly with minimal cleanup
Because everything is assembled on a plate, cleanup is quick. The ingredients are familiar and friendly, which reduces fuss. I find that when kids participate, they are more likely to eat fruit, and that feels like a win every time.
Ingredients You’ll Need for Easiest Strawberry Santas
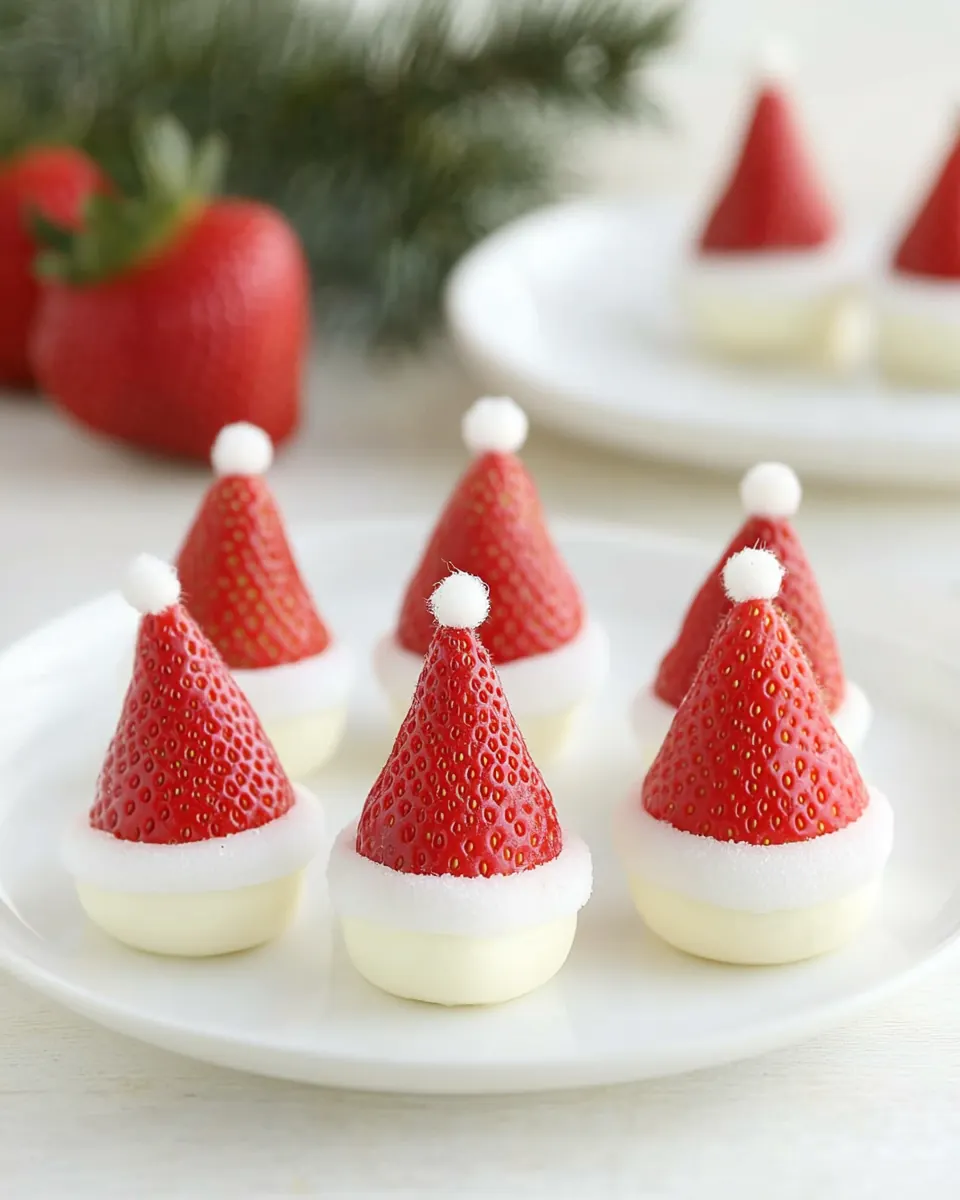
These ingredients are straightforward and complementary. I choose ripe fruit so each element contributes texture and flavor without competing. The strawberry provides a bright, slightly tart top note, the banana delivers a creamy base that holds the assembly, and a touch of yogurt gives a soft, snowy accent that finishes each bite.
- 4 cups strawberries (or 1 16 ounce container): Provides sweet, juicy body and vibrant color to form the main component of the Santa shapes; select firm, ripe berries to hold their shape when sliced and filled. Adds natural sweetness and a fresh flavor contrast to the creamy filling, while contributing vitamins and a pleasant aroma. Wash gently and pat dry before assembling to prevent sogginess and ensure attractive presentation.
- 1 large ripe banana: Contributes creamy texture and natural sweetness when mashed to create a smooth filling for sandwiching or piping; choose a ripe banana for best flavor and easy mashing. Acts as a binder that helps the yogurt or whipped cream adhere to the strawberry layers, improving overall stability. Can be mashed until very smooth to avoid lumps and to produce an even, spreadable consistency.
- 2 tablespoons yogurt any flavor or whipped cream: Adds a light, creamy element to complement the fruit and create the classic Santa trim; opt for flavored yogurt for extra taste or whipped cream for a fluffier texture. Provides moisture and richness, helping to hold the banana filling in place and enhancing mouthfeel. Use a piping bag or spoon to apply neatly for decorative effect.
Making This Easiest Strawberry Santas
This assembly is delightfully simple, and the instructions below expand each short step into a sensory rich guide so you can nail texture and presentation. Read through once, then involve helpers for the fun parts. I always remind myself to keep the toppings light and the slices even for best results.
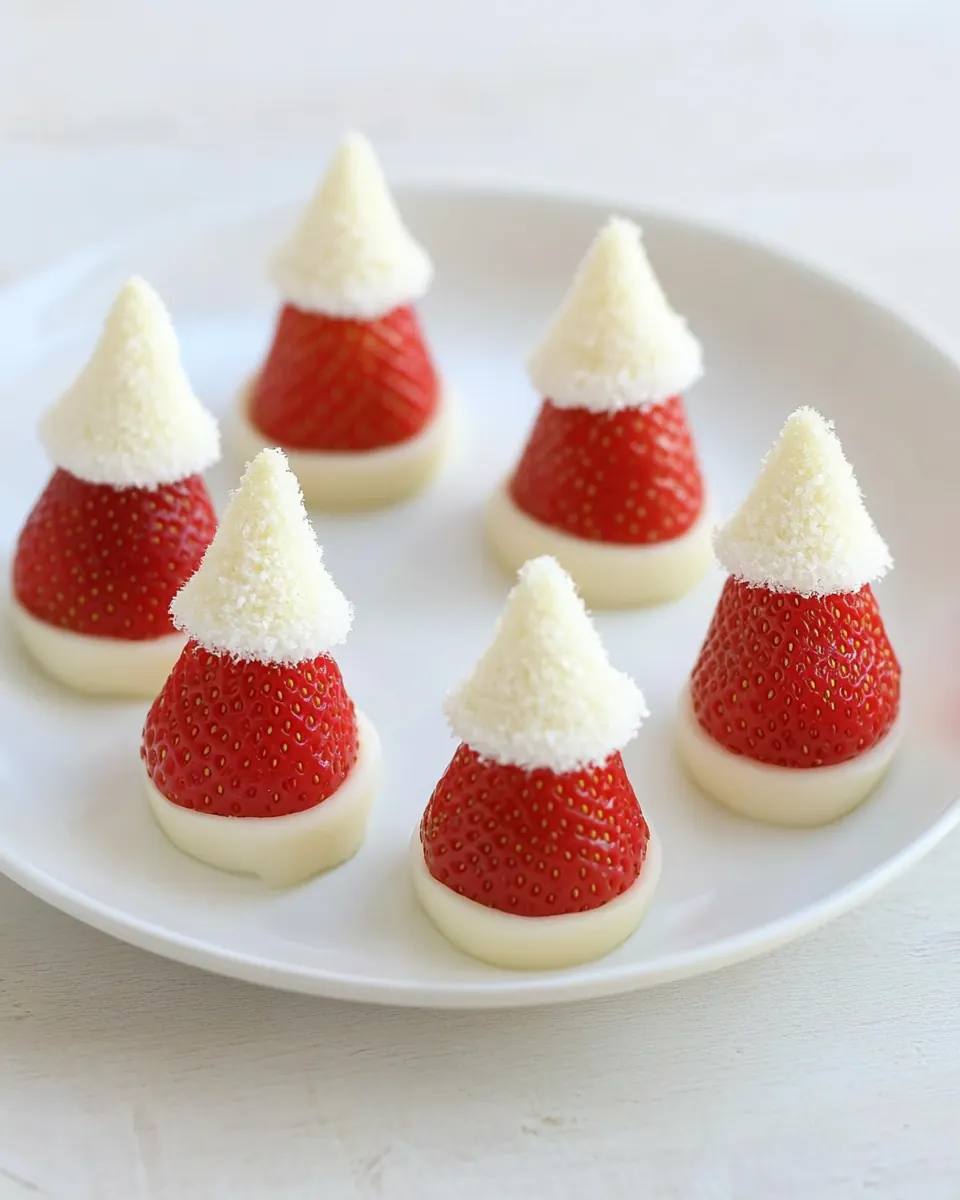
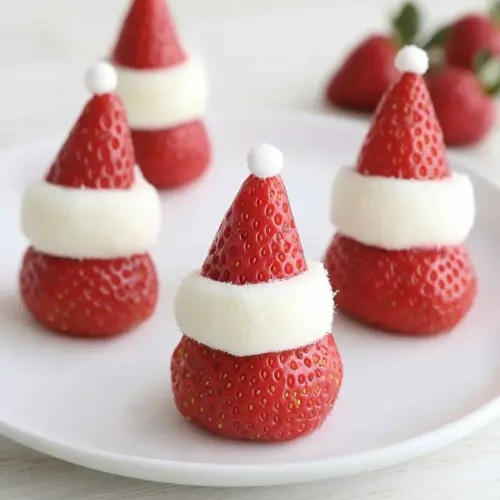
- Wash and dry the berries. Cut off the stems so the base is flat.: The scent of clean strawberry is fresh and bright, and gently patting them dry prevents extra moisture from making the yogurt slide off later. Use a soft towel to tap each strawberry and set them on a tray so they can air dry a minute or two, you want the surface slightly tacky not wet. Why this matters, the drier surface helps the little dollop of yogurt adhere and keeps colors vivid. A common mistake is skipping the drying step which results in runny plating and a less tidy look, so take that extra minute.
- Peel and cut the banana into rounds.: When you trim the stems, listen for the soft sound of the knife, and aim for a flat base so the strawberry sits upright. The visual cue is a broad, even bottom; if it tips it will topple on the banana . This matters because a stable hat makes assembly easy and prevents accidents. Avoid cutting too deep into the strawberry which wastes fruit and can make the cap too small to look like a hat.
- Place the banana rounds on a plate and top each with a berry to make a hat.: Peeling releases the sweet, familiar banana aroma, and slicing into even rounds creates little platforms that feel creamy under the bite. Aim for uniform thickness so each finished Santa looks consistent on the platter. The reason for even slices is both texture and structural balance, since thinner slices might collapse under a strawberry and thicker slices may be hard to bite through. A typical error is slicing too thin, which leads to squashed bases, so keep them firm but not thick.
- Add a little yogurt on top of each berry to make the puff ball. We like to use a kids yogurt tube, which makes squirting a small amount on the berry easy, but you can also use a little knife or spoon.: As you assemble, notice the contrast of the pale banana rounds and the glossy strawberry caps, and arrange them with a little space so they do not touch. The visual rhythm on the plate feels inviting and organized. This step matters because spacing prevents juices from one piece affecting another, keeping the presentation clean. One slip up is crowding the plate which can make the strawberry tops slide off, so give each Santa breathing room.
- Eat!: The tiny white puff of yogurt creates the Santa look, and the cold, creamy texture contrasts with the warm sweetness of the banana and the bright snap of the strawberry . If you use a squeezable tube, you will hear a gentle squeeze and see a neat dot form, while a spoon will produce a softer, rustic dollop. This finishing touch matters because it completes the character and adds a cooling note. A frequent misstep is over applying yogurt which masks the fruit, so use just a small amount.
- Eat!: Expect a burst of sweetness and coolness with each bite, and enjoy the playful textures as the crisp strawberry gives way to the smooth banana and creamy yogurt . Savor the immediate contrast and the way the flavors feel light and satisfying rather than heavy. This moment is why the recipe exists, a quick, joyful mouthful of seasonal fruit. The main pitfall is delaying too long after assembly, as the banana may brown and the plate can get juicy, so serve promptly for best results.
Tips and Tricks about Easiest Strawberry Santas
I love sharing small, practical tips that make assembly easier and presentation prettier. Below are my favorite tricks, each expanded so you can pick the ones that fit your routine and helpers.
- Choose firm but ripe berries — Look for strawberry that are bright and firm rather than soft and mushy, which keeps them from leaking juice during assembly and gives prettier hats that stay in place.
- Slice bananas evenly — Cut the banana into uniform rounds so each assembled Santa is the same height and every bite feels balanced, making the platter visually pleasing and easier for children to eat.
- Dry components well — After washing, gently pat the strawberry dry so the yogurt adheres better and the finished bites do not slide around on the plate, especially important if you are transporting them.
- Use a squeezing yogurt — A tube style yogurt or a piping bag gives you precise little puffs with minimal mess, and it is especially handy when kids are helping to assemble the Santas.
- Assemble last minute — Put these together right before serving to avoid banana browning and to maintain the fresh look of the strawberry, this preserves texture and flavor.
Serve This Easiest Strawberry Santas With
These treats work beautifully in casual or festive settings. Below are ideas for pairings, occasions, and small service notes to help you serve them with confidence and a little flair.
- Snack platter — Arrange the Santas on a wide platter with small bowls of extra yogurt for dipping, which makes them ideal for an afternoon snack or a kid friendly party station.
- Brunch accent — Place a few Santas alongside pancakes or waffles to add a playful, fruity element that brightens a brunch spread without overpowering main dishes.
- Holiday appetizer — Use them as a light, festive finger food for holiday gatherings like Christmas, where their red and white look fits the theme and they provide a refreshing contrast to heavier fare.
- School snack — Pack components separately and let kids assemble at snack time for an engaging, hands on activity that promotes eating fruit and builds fine motor skills.
- Storage tip — Keep sliced banana covered with plastic wrap in the fridge for a short time if you need to prep ahead, but assemble the Santas at the last moment to prevent browning and sogginess.
- Seasonal pairing — These shine in summer when strawberry are at their sweetest, and they also work well for spring gatherings because of their bright colors and light flavors.
FAQ
Conclusion
What makes this recipe special is its combination of speed, charm, and fresh flavor, all in a bite sized package. Give Easiest Strawberry Santas a try when you want a festive, healthy snack that doubles as an activity, and you will likely find it becomes a go to for quick celebrations. Bring the ingredients to the table, involve helpers, and enjoy the immediate payoff of a pretty, tasty treat that requires very little fuss while delivering bright, sweet satisfaction.
Easiest Strawberry Santas
Equipment
- Knife
- Cutting Board
- Plate
Ingredients
- 4 cups strawberries (or 1 16 ounce container) Provides sweet, juicy body and vibrant color to form the main component of the Santa shapes; select firm, ripe berries to hold their shape when sliced and filled. Adds natural sweetness and a fresh flavor contrast to the creamy filling, while contributing vitamins and a pleasant aroma. Wash gently and pat dry before assembling to prevent sogginess and ensure attractive presentation.
- 1 large ripe banana Contributes creamy texture and natural sweetness when mashed to create a smooth filling for sandwiching or piping; choose a ripe banana for best flavor and easy mashing. Acts as a binder that helps the yogurt or whipped cream adhere to the strawberry layers, improving overall stability. Can be mashed until very smooth to avoid lumps and to produce an even, spreadable consistency.
- 2 tablespoons yogurt any flavor or whipped cream Adds a light, creamy element to complement the fruit and create the classic Santa trim; opt for flavored yogurt for extra taste or whipped cream for a fluffier texture. Provides moisture and richness, helping to hold the banana filling in place and enhancing mouthfeel. Use a piping bag or spoon to apply neatly for decorative effect.
Instructions
- Wash and dry the berries. Cut off the stems so the base is flat.: The scent of clean strawberry is fresh and bright, and gently patting them dry prevents extra moisture from making the yogurt slide off later. Use a soft towel to tap each strawberry and set them on a tray so they can air dry a minute or two, you want the surface slightly tacky not wet. Why this matters, the drier surface helps the little dollop of yogurt adhere and keeps colors vivid. A common mistake is skipping the drying step which results in runny plating and a less tidy look, so take that extra minute.
- Peel and cut the banana into rounds.: When you trim the stems, listen for the soft sound of the knife, and aim for a flat base so the strawberry sits upright. The visual cue is a broad, even bottom; if it tips it will topple on the banana . This matters because a stable hat makes assembly easy and prevents accidents. Avoid cutting too deep into the strawberry which wastes fruit and can make the cap too small to look like a hat.
- Place the banana rounds on a plate and top each with a berry to make a hat.: Peeling releases the sweet, familiar banana aroma, and slicing into even rounds creates little platforms that feel creamy under the bite. Aim for uniform thickness so each finished Santa looks consistent on the platter. The reason for even slices is both texture and structural balance, since thinner slices might collapse under a strawberry and thicker slices may be hard to bite through. A typical error is slicing too thin, which leads to squashed bases, so keep them firm but not thick.
- Add a little yogurt on top of each berry to make the puff ball. We like to use a kids yogurt tube, which makes squirting a small amount on the berry easy, but you can also use a little knife or spoon.: As you assemble, notice the contrast of the pale banana rounds and the glossy strawberry caps, and arrange them with a little space so they do not touch. The visual rhythm on the plate feels inviting and organized. This step matters because spacing prevents juices from one piece affecting another, keeping the presentation clean. One slip up is crowding the plate which can make the strawberry tops slide off, so give each Santa breathing room.
- Eat!: The tiny white puff of yogurt creates the Santa look, and the cold, creamy texture contrasts with the warm sweetness of the banana and the bright snap of the strawberry . If you use a squeezable tube, you will hear a gentle squeeze and see a neat dot form, while a spoon will produce a softer, rustic dollop. This finishing touch matters because it completes the character and adds a cooling note. A frequent misstep is over applying yogurt which masks the fruit, so use just a small amount.
- Eat!: Expect a burst of sweetness and coolness with each bite, and enjoy the playful textures as the crisp strawberry gives way to the smooth banana and creamy yogurt . Savor the immediate contrast and the way the flavors feel light and satisfying rather than heavy. This moment is why the recipe exists, a quick, joyful mouthful of seasonal fruit. The main pitfall is delaying too long after assembly, as the banana may brown and the plate can get juicy, so serve promptly for best results.
Notes
- Choose firm but ripe berries — Look for strawberry that are bright and firm rather than soft and mushy, which keeps them from leaking juice during assembly and gives prettier hats that stay in place.
- Slice bananas evenly — Cut the banana into uniform rounds so each assembled Santa is the same height and every bite feels balanced, making the platter visually pleasing and easier for children to eat.
- Dry components well — After washing, gently pat the strawberry dry so the yogurt adheres better and the finished bites do not slide around on the plate, especially important if you are transporting them.
- Use a squeezing yogurt — A tube style yogurt or a piping bag gives you precise little puffs with minimal mess, and it is especially handy when kids are helping to assemble the Santas.
- Assemble last minute — Put these together right before serving to avoid banana browning and to maintain the fresh look of the strawberry, this preserves texture and flavor.