Crockpot Cake
Crockpot Cake has been my cozy answer to nights when I want dessert without standing over a hot oven. The first time I tried it, I was skeptical, but the way the kitchen filled with warm, chocolatey steam convinced me otherwise. I remember lifting the lid and seeing glossy bubbling pockets of topping, and that moment felt like discovering a tiny, comforting secret.
I often make Crockpot Cake when friends drop by unexpectedly, because it travels well from slow cooker to table and keeps its warmth for serving. Once, during a snowy evening when plans changed, I stirred the batter in a bowl while music played, and the whole house smelled like a bakery in soft focus. That evening the cake was paired with simple vanilla ice cream and everyone asked for the recipe.
Recipe Snapshot
2 hr 20 mins
20 mins
120 mins
Hard
300 kcal
American
Gluten-Free, Low FODMAP
Desserts
7 Qt slow cooker, Mixing bowl, Whisk
What Sets This Crockpot Cake Apart
1. Hands off, big payoff
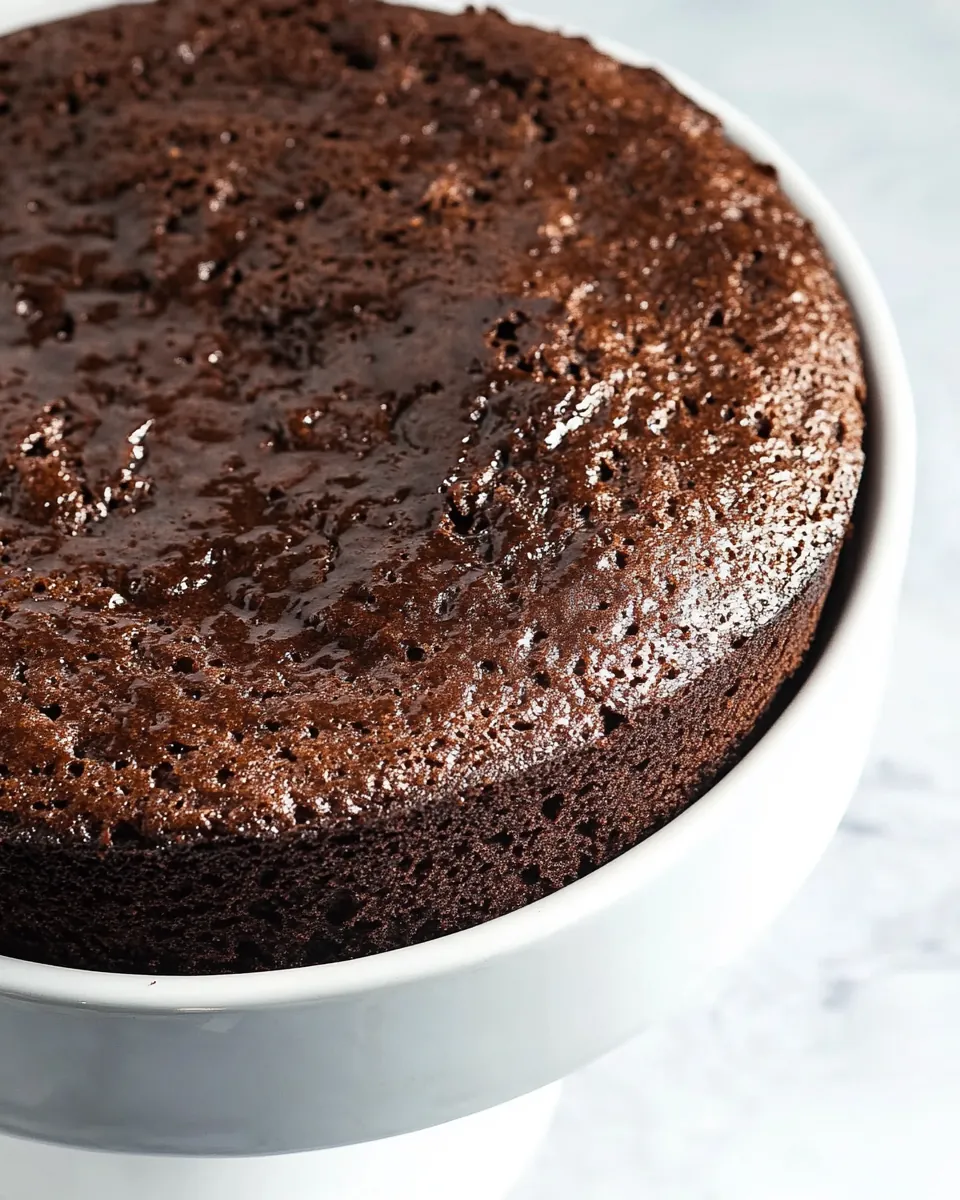
I love that Crockpot Cake asks you to do the fun part, then step away. You mix, you pour, and the slow cooker does the rest, which means you get time to set the table, chat with guests, or relax. The texture that develops from slow, moist heat is different from oven cakes, it tends to be denser and more pudding like at the edges, and that contrast is delicious.
2. Simple pantry ingredients
This recipe shines because it relies on everyday items like all purpose flour, granulated sugar, and cocoa powder. I appreciate recipes that don’t require a run to specialty shops. Because the components are common, this cake is an excellent last minute dessert or a weeknight treat.
3. Texture contrast
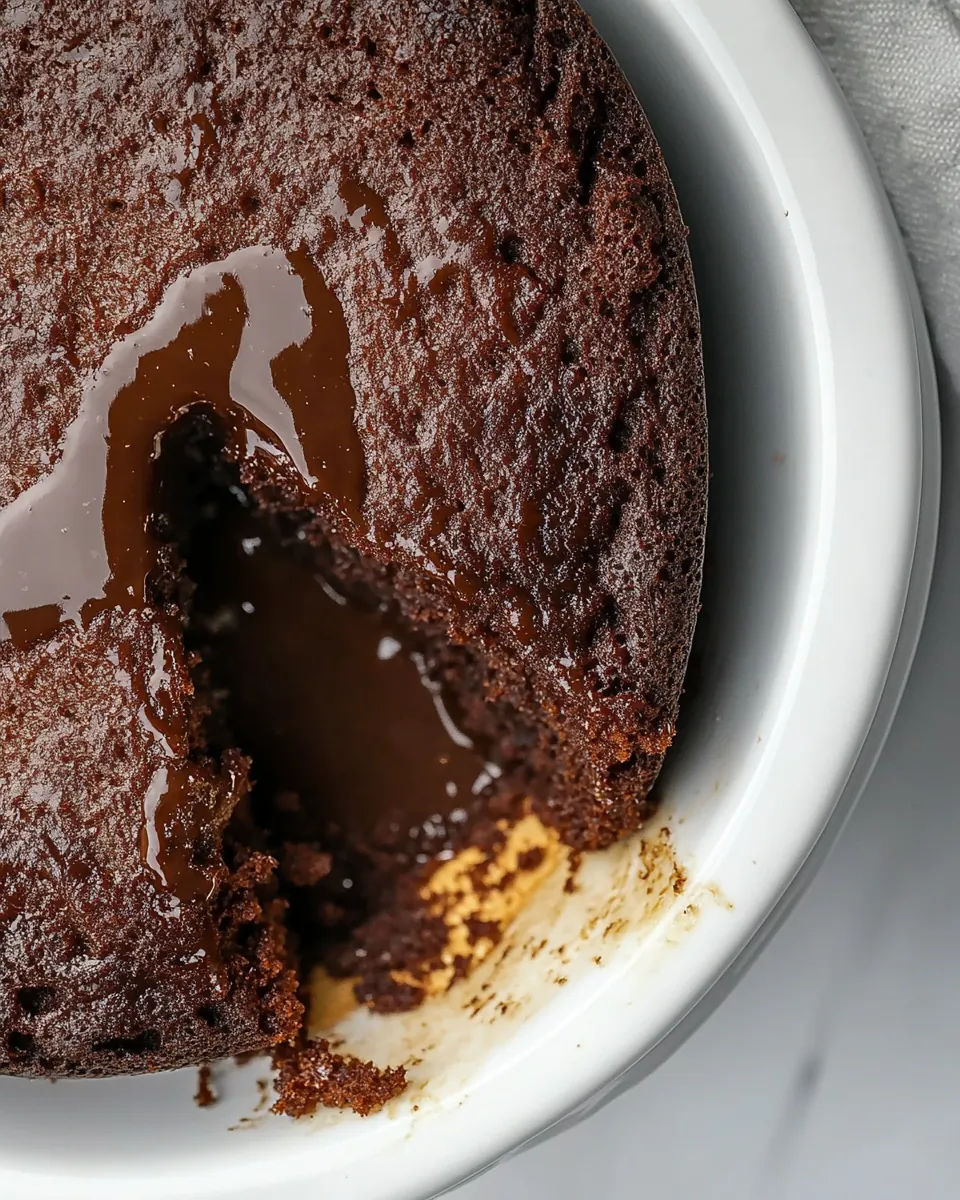
The magic comes from the hot boiling water poured over the batter, which creates a rich sauce as it sets. You get a tender cake layer with a glossy, spoonable topping, similar to a pudding cake. I always find that contrast keeps everyone coming back for seconds.
4. Flexible and forgiving
I often tweak the liquids slightly, using whatever milk I have on hand. The cake tolerates small substitutions and varying slow cooker sizes, so it’s forgiving if you change quantities a bit. That flexibility makes it one of my go to desserts for casual meals.
5. Crowd friendly
Because the recipe yields multiple servings, it works well for gatherings. You can serve slices straight from the insert or scoop portions into bowls with a scoop of ice cream. I like that it remains warm and inviting for quite some time, which is perfect when guests arrive at different times.
Shopping List for Crockpot Cake
This shopping list focuses on dependable, crowd pleasing ingredients that build both structure and flavor. The all purpose flour forms the cake crumb, while granulated sugar balances sweetness throughout. Cocoa powder appears in both the batter and topping to deepen chocolate notes, and liquids like milk and boiling water bring the batter together and create the distinctive sauce.
- 1 cup (124 g) all-purpose flour: Provides structure and body to the cake batter, supplying gluten that helps trap air for a tender crumb. Measures precisely by weight to ensure consistent texture and proper hydration for mixing with wet ingredients.
- 3/4 cup (150 g) granulated sugar: Adds sweetness and aids in browning while contributing to moistness; granulated form dissolves into the batter to create even sweetness. Also helps with caramelization during cooking in the crockpot environment.
- 1 teaspoon baking powder: Lightens the cake by releasing carbon dioxide when activated, creating lift and a softer crumb. Should be evenly distributed throughout the dry ingredients to prevent uneven rising or dense spots.
- 1/4 teaspoons salt: Enhances overall flavor by balancing sweetness and strengthening texture; a small amount helps bring out other flavors. Also can slightly tighten the crumb when combined with leavening, so use the stated quantity.
- 3 tablespoons (27 g) unsweetened cocoa powder: Contributes chocolate flavor and mild bitterness while absorbing moisture from the batter to deepen cocoa intensity. Sift or whisk with dry ingredients to prevent lumps and ensure even chocolate distribution.
- 1/3 cup (79 ml) vegetable oil: Provides fat to tenderize the crumb and add moistness; neutral-flavored vegetable oil keeps the cake soft and prevents drying. Mixes easily with other liquids for a smooth batter and helps extend shelf life.
- 1 teaspoon vanilla extract: Adds aromatic depth and rounds out flavors with a sweet, warm note; a small amount goes a long way. Stir into wet ingredients to evenly disperse flavor throughout the batter.
- 1 cup (237 ml) milk: Supplies liquid to hydrate dry ingredients and dissolve sugars, creating a smooth batter; milk adds slight richness and contributes to tenderness. Use at room temperature for best incorporation and even baking.
- 1 cup (237 ml) boiling water: Creates a hot liquid layer that helps dissolve the extra cocoa and sugar for a moist, fudgy sauce under the cake once cooked. Pour carefully over batter so the boiling water activates the cocoa to form a syrupy layer.
- 1/4 cup (20 g) unsweetened cocoa powder: Provides additional chocolate flavor to be combined with sugar and boiling water, forming the sauce beneath the cake. Sprinkle evenly to ensure consistent chocolate concentration in the bottom layer.
- 1 cup (200 g) granulated sugar: Adds a coarse amount of sweetness specifically for the bottom-layer sauce, helping create a glossy, caramelized topping when combined with boiling water. Dissolves into the hot liquid to form the syrup that contrasts the cake's texture.
- Pinch salt: Balances sweetness and enhances overall flavor; a tiny pinch improves depth without making the sauce salty. Use sparingly to accentuate chocolate and sugar in the bottom layer.
How to Cook Crockpot Cake
This slow cooker method is relaxed but precise in its moments of action. You will mix the batter, prepare the slow cooker, create the hot topping, and monitor the cake as it bakes slowly to a tender finish. Below, each step explains sensory cues and troubleshooting so you can feel confident every time.
- Make the Cake: Whisk flour, sugar, baking powder, salt, and cocoa powder in a large bowl. Add oil, vanilla, and milk and whisk until smooth.: The bowl fills with a dry, dusty aroma of flour and cocoa powder , and you will see the mixture become uniformly brown and free of lumps if whisked well. Start by whisking the dry ingredients together until they look evenly colored, which ensures an even crumb. When you add the vegetable oil , vanilla , and milk , the batter will become glossy and pourable; that sheen signals the right hydration. If the batter seems too thick, double check your measurements, especially the milk and flour . A common mistake is over mixing, which develops gluten and yields a tougher cake, so mix just until smooth and no streaks remain.
- Spray the insert of a 7-Qt slow cooker with nonstick cooking spray. Pour cake batter into insert.: You should notice a thin, even coating that prevents sticking and encourages the cake to release cleanly. Proper greasing also helps the edges brown slightly and lift away from the sides. If you skip this, the cake can cling to the insert and break when serving, so ensure full coverage. Be careful not to use too much spray, which can pool and affect the batter's edges.
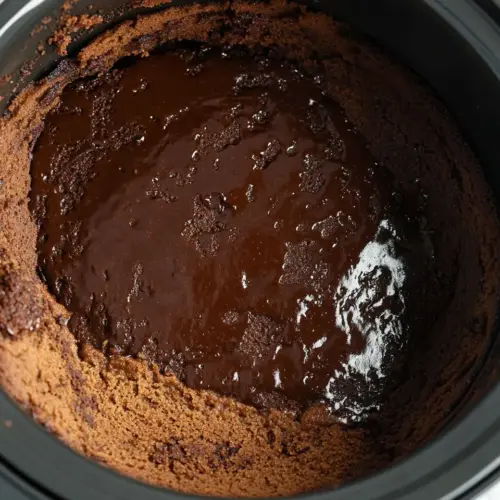
- Make the topping: add the cocoa, salt, and sugar to the boiling water and whisk to combine. Slowly pour over the cake batter in the crockpot insert.: As the batter spreads, you will hear a quiet settling sound and watch it even out into the insert, forming a level surface. Tap the insert gently on the counter to release any trapped air bubbles; a smooth top bakes more evenly. If the batter is lopsided, rotate the insert gently until it sits centered. An oversight here can cause uneven rising, so take a moment to level the batter.
- Cover the insert with paper towels, place in crockpot and place lid on top of paper towels.: When you whisk the cocoa , salt , and sugar into the boiling water, the steam will rise and the mixture will smell intensely of chocolate. The sugar should dissolve into a glossy, thin syrup; any grit indicates more whisking is needed. This hot liquid is what creates the pudding like layer, so ensure the boiling water is truly hot. If the sugar does not fully dissolve, the topping can be grainy, so whisk until silky.
- Set time for HIGH for 120 minutes. Check cake after 60 minutes and then again at 90 minutes. Cake will look wet in center but the edges will look done and a toothpick will come out clean near the edge when done. All slow cookers cook differently, mine took 90 minutes.: Pouring slowly will let the hot syrup settle into the batter rather than washing away the top layer. You may see the batter sink slightly as the liquid finds its way, and tiny bubbles may appear where the syrup contacts the batter. Pour evenly to promote a uniform topping beneath the cake. Pouring too fast can displace the batter and create pockets of sauce rather than a consistent layer.
- Serve warm with ice cream or whipped cream.: The paper towels absorb excess condensation, keeping the cake surface from becoming soggy from drips. You will notice less water pooling on the inside of the lid when you use this trick, which helps maintain the right texture. If you omit the towels, you risk a wetter top and a softer crumb. Make sure the towels do not touch the heating element or hang outside the cooker to avoid hazards.
- Set time for HIGH for 120 minutes: As the cooker heats, you will hear a gentle hum and later a faint bubbling from the syrup beneath the batter; the edges will set first and turn slightly darker. Check at 60 and 90 minutes to monitor progress, because slow cooker temps vary, and a toothpick inserted near the edge should come out clean when done. If the cake still looks raw in the center after the time, continue cooking in 15 minute increments. A frequent error is assuming all slow cookers match the labeled time, so watch visual cues rather than relying solely on the clock.
- Check cake after 60 minutes and then again at 90 minutes: The center may appear wet while the edges are fully set, and that is normal for this method; testing near the edge gives a better indication of doneness. Tap the side of the insert gently, you should hear a dull thud from the set cake as opposed to a sloshy sound. If the toothpick comes out with wet batter, give it more time. Avoid overcooking, which dries out the cake; the goal is tender, not crumbly.
- Cake will look wet in center but the edges will look done and a toothpick will come out clean near the edge when done: Expect a glossy topping and a springy edge when the cake is ready, and the scent will be deeply chocolatey with caramel notes from the syrup. Serve warm to showcase the pudding like sauce, spooning some of the topping over each portion. If the cake seems too moist in the center after cooling, a brief 10 minute rest will help the sauce settle. A common misstep is slicing too early, which can make portions collapse, so let it rest slightly before serving.
- All slow cookers cook differently mine took 90 minutes: Learn your cooker by noting how long it runs on HIGH to bake similar recipes, because temperature variations change timing. Keep a log for future reference, and adjust the set time based on previous results. If you have a cooker that runs hot, reduce the time slightly next time. Assuming your cooker matches someone else exactly often leads to inconsistent outcomes.
- Serve warm with ice cream or whipped cream: The contrast of hot cake and cool ice cream is delightful, and you will hear soft sizzling as a scoop meets the warm topping. The textures marry: tender cake, glossy sauce, and creamy coldness. If you plan to store leftovers, cover and refrigerate, then re warm gently. Serving directly from the crockpot keeps it warm for longer, which is handy for casual gatherings.
Expert Tips about Crockpot Cake
This cake benefits from practical adjustments and attention to small details. Below are expanded tips, each highlighting a clear technique or hack to improve texture, flavor, and cleanup so you can rely on great results every time.
- Use fresh baking powder, because it guarantees proper rise and a light texture; old leavening will produce a dense cake so replace it if it has been open for over six months.
- Sift cocoa powder to remove lumps and ensure a smooth batter, whisking it with the dry ingredients so the chocolate flavor distributes evenly without pockets of dry powder.
- Measure flour by weight when possible, as 1 cup can vary; weighing keeps the crumb consistent and prevents a dry or overly dense result from scooped cups.
- Pour the hot topping slowly, aiming for even coverage, because quick pouring can displace the batter and create uneven layers of sauce rather than a consistent pudding like topping.
- Grease the insert well so the cake releases cleanly; nonstick spray or a thin layer of oil prevents tearing and makes serving easier.
- Cool slightly before serving to let the sauce settle, about 10 to 15 minutes, which makes slicing or scooping neater and helps the texture stabilize.
Great Combinations for Crockpot Cake
This section outlines thoughtful serving ideas and practical pairings that enhance the experience of this dessert. Use the suggested accompaniments and contexts to make the cake fit the moment, whether a cozy family dinner or a relaxed gathering with friends.
- Serve with vanilla ice cream, the cold cream balances the hot, glossy topping and adds a silky contrast to each bite, making it ideal for casual dinners or weekend treats.
- Top with whipped cream for a lighter finish, piping a dollop onto each portion to add airy texture and a mild creaminess that complements the deep chocolate notes.
- Family style from the slow cooker, bring the insert to the table for a rustic presentation that keeps the cake warm throughout a meal, perfect for potlucks or relaxed evenings.
- Storing leftovers, cover the cooled insert tightly and refrigerate for up to three days, reheating individual portions gently in the microwave to restore warmth without overcooking.
- Occasions, this cake works beautifully for winter gatherings because it delivers comfort and warmth, and it is also suitable for casual celebrations where you want a simple, crowd pleasing dessert.
- Seasonal pairing, in colder months serve with spiced tea or coffee to echo the cake’s chocolate depth and create a cozy, cohesive dessert course.
FAQ
Conclusion
What makes this recipe special is its effortless method and the pleasing contrast between a tender cake layer and a glossy chocolate sauce beneath. It is a dessert that performs well for both everyday dinners and casual gatherings, offering warmth and comfort with minimal hands on time. I encourage you to give it a try the next time you want dessert without fuss, and enjoy the way the slow cooker transforms simple pantry ingredients into something memorable.
Crockpot Cake
Equipment
- 7 Qt slow cooker
- Mixing Bowl
- Whisk
Ingredients
- 1 cup (124 g) all-purpose flour Provides structure and body to the cake batter, supplying gluten that helps trap air for a tender crumb. Measures precisely by weight to ensure consistent texture and proper hydration for mixing with wet ingredients.
- 3/4 cup (150 g) granulated sugar Adds sweetness and aids in browning while contributing to moistness; granulated form dissolves into the batter to create even sweetness. Also helps with caramelization during cooking in the crockpot environment.
- 1 teaspoon baking powder Lightens the cake by releasing carbon dioxide when activated, creating lift and a softer crumb. Should be evenly distributed throughout the dry ingredients to prevent uneven rising or dense spots.
- 1/4 teaspoons salt Enhances overall flavor by balancing sweetness and strengthening texture; a small amount helps bring out other flavors. Also can slightly tighten the crumb when combined with leavening, so use the stated quantity.
- 3 tablespoons (27 g) unsweetened cocoa powder Contributes chocolate flavor and mild bitterness while absorbing moisture from the batter to deepen cocoa intensity. Sift or whisk with dry ingredients to prevent lumps and ensure even chocolate distribution.
- 1/3 cup (79 ml) vegetable oil Provides fat to tenderize the crumb and add moistness; neutral-flavored vegetable oil keeps the cake soft and prevents drying. Mixes easily with other liquids for a smooth batter and helps extend shelf life.
- 1 teaspoon vanilla extract Adds aromatic depth and rounds out flavors with a sweet, warm note; a small amount goes a long way. Stir into wet ingredients to evenly disperse flavor throughout the batter.
- 1 cup (237 ml) milk Supplies liquid to hydrate dry ingredients and dissolve sugars, creating a smooth batter; milk adds slight richness and contributes to tenderness. Use at room temperature for best incorporation and even baking.
- 1 cup (237 ml) boiling water Creates a hot liquid layer that helps dissolve the extra cocoa and sugar for a moist, fudgy sauce under the cake once cooked. Pour carefully over batter so the boiling water activates the cocoa to form a syrupy layer.
- 1/4 cup (20 g) unsweetened cocoa powder Provides additional chocolate flavor to be combined with sugar and boiling water, forming the sauce beneath the cake. Sprinkle evenly to ensure consistent chocolate concentration in the bottom layer.
- 1 cup (200 g) granulated sugar Adds a coarse amount of sweetness specifically for the bottom-layer sauce, helping create a glossy, caramelized topping when combined with boiling water. Dissolves into the hot liquid to form the syrup that contrasts the cake's texture.
- Pinch salt Balances sweetness and enhances overall flavor; a tiny pinch improves depth without making the sauce salty. Use sparingly to accentuate chocolate and sugar in the bottom layer.
Instructions
- Make the Cake: Whisk flour, sugar, baking powder, salt, and cocoa powder in a large bowl. Add oil, vanilla, and milk and whisk until smooth.: The bowl fills with a dry, dusty aroma of flour and cocoa powder , and you will see the mixture become uniformly brown and free of lumps if whisked well. Start by whisking the dry ingredients together until they look evenly colored, which ensures an even crumb. When you add the vegetable oil , vanilla , and milk , the batter will become glossy and pourable; that sheen signals the right hydration. If the batter seems too thick, double check your measurements, especially the milk and flour . A common mistake is over mixing, which develops gluten and yields a tougher cake, so mix just until smooth and no streaks remain.
- Spray the insert of a 7-Qt slow cooker with nonstick cooking spray. Pour cake batter into insert.: You should notice a thin, even coating that prevents sticking and encourages the cake to release cleanly. Proper greasing also helps the edges brown slightly and lift away from the sides. If you skip this, the cake can cling to the insert and break when serving, so ensure full coverage. Be careful not to use too much spray, which can pool and affect the batter's edges.
- Make the topping: add the cocoa, salt, and sugar to the boiling water and whisk to combine. Slowly pour over the cake batter in the crockpot insert.: As the batter spreads, you will hear a quiet settling sound and watch it even out into the insert, forming a level surface. Tap the insert gently on the counter to release any trapped air bubbles; a smooth top bakes more evenly. If the batter is lopsided, rotate the insert gently until it sits centered. An oversight here can cause uneven rising, so take a moment to level the batter.
- Cover the insert with paper towels, place in crockpot and place lid on top of paper towels.: When you whisk the cocoa , salt , and sugar into the boiling water, the steam will rise and the mixture will smell intensely of chocolate. The sugar should dissolve into a glossy, thin syrup; any grit indicates more whisking is needed. This hot liquid is what creates the pudding like layer, so ensure the boiling water is truly hot. If the sugar does not fully dissolve, the topping can be grainy, so whisk until silky.
- Set time for HIGH for 120 minutes. Check cake after 60 minutes and then again at 90 minutes. Cake will look wet in center but the edges will look done and a toothpick will come out clean near the edge when done. All slow cookers cook differently, mine took 90 minutes.: Pouring slowly will let the hot syrup settle into the batter rather than washing away the top layer. You may see the batter sink slightly as the liquid finds its way, and tiny bubbles may appear where the syrup contacts the batter. Pour evenly to promote a uniform topping beneath the cake. Pouring too fast can displace the batter and create pockets of sauce rather than a consistent layer.
- Serve warm with ice cream or whipped cream.: The paper towels absorb excess condensation, keeping the cake surface from becoming soggy from drips. You will notice less water pooling on the inside of the lid when you use this trick, which helps maintain the right texture. If you omit the towels, you risk a wetter top and a softer crumb. Make sure the towels do not touch the heating element or hang outside the cooker to avoid hazards.
- Set time for HIGH for 120 minutes: As the cooker heats, you will hear a gentle hum and later a faint bubbling from the syrup beneath the batter; the edges will set first and turn slightly darker. Check at 60 and 90 minutes to monitor progress, because slow cooker temps vary, and a toothpick inserted near the edge should come out clean when done. If the cake still looks raw in the center after the time, continue cooking in 15 minute increments. A frequent error is assuming all slow cookers match the labeled time, so watch visual cues rather than relying solely on the clock.
- Check cake after 60 minutes and then again at 90 minutes: The center may appear wet while the edges are fully set, and that is normal for this method; testing near the edge gives a better indication of doneness. Tap the side of the insert gently, you should hear a dull thud from the set cake as opposed to a sloshy sound. If the toothpick comes out with wet batter, give it more time. Avoid overcooking, which dries out the cake; the goal is tender, not crumbly.
- Cake will look wet in center but the edges will look done and a toothpick will come out clean near the edge when done: Expect a glossy topping and a springy edge when the cake is ready, and the scent will be deeply chocolatey with caramel notes from the syrup. Serve warm to showcase the pudding like sauce, spooning some of the topping over each portion. If the cake seems too moist in the center after cooling, a brief 10 minute rest will help the sauce settle. A common misstep is slicing too early, which can make portions collapse, so let it rest slightly before serving.
- All slow cookers cook differently mine took 90 minutes: Learn your cooker by noting how long it runs on HIGH to bake similar recipes, because temperature variations change timing. Keep a log for future reference, and adjust the set time based on previous results. If you have a cooker that runs hot, reduce the time slightly next time. Assuming your cooker matches someone else exactly often leads to inconsistent outcomes.
- Serve warm with ice cream or whipped cream: The contrast of hot cake and cool ice cream is delightful, and you will hear soft sizzling as a scoop meets the warm topping. The textures marry: tender cake, glossy sauce, and creamy coldness. If you plan to store leftovers, cover and refrigerate, then re warm gently. Serving directly from the crockpot keeps it warm for longer, which is handy for casual gatherings.
Notes
- Use fresh baking powder, because it guarantees proper rise and a light texture; old leavening will produce a dense cake so replace it if it has been open for over six months.
- Sift cocoa powder to remove lumps and ensure a smooth batter, whisking it with the dry ingredients so the chocolate flavor distributes evenly without pockets of dry powder.
- Measure flour by weight when possible, as 1 cup can vary; weighing keeps the crumb consistent and prevents a dry or overly dense result from scooped cups.
- Pour the hot topping slowly, aiming for even coverage, because quick pouring can displace the batter and create uneven layers of sauce rather than a consistent pudding like topping.
- Grease the insert well so the cake releases cleanly; nonstick spray or a thin layer of oil prevents tearing and makes serving easier.
- Cool slightly before serving to let the sauce settle, about 10 to 15 minutes, which makes slicing or scooping neater and helps the texture stabilize.