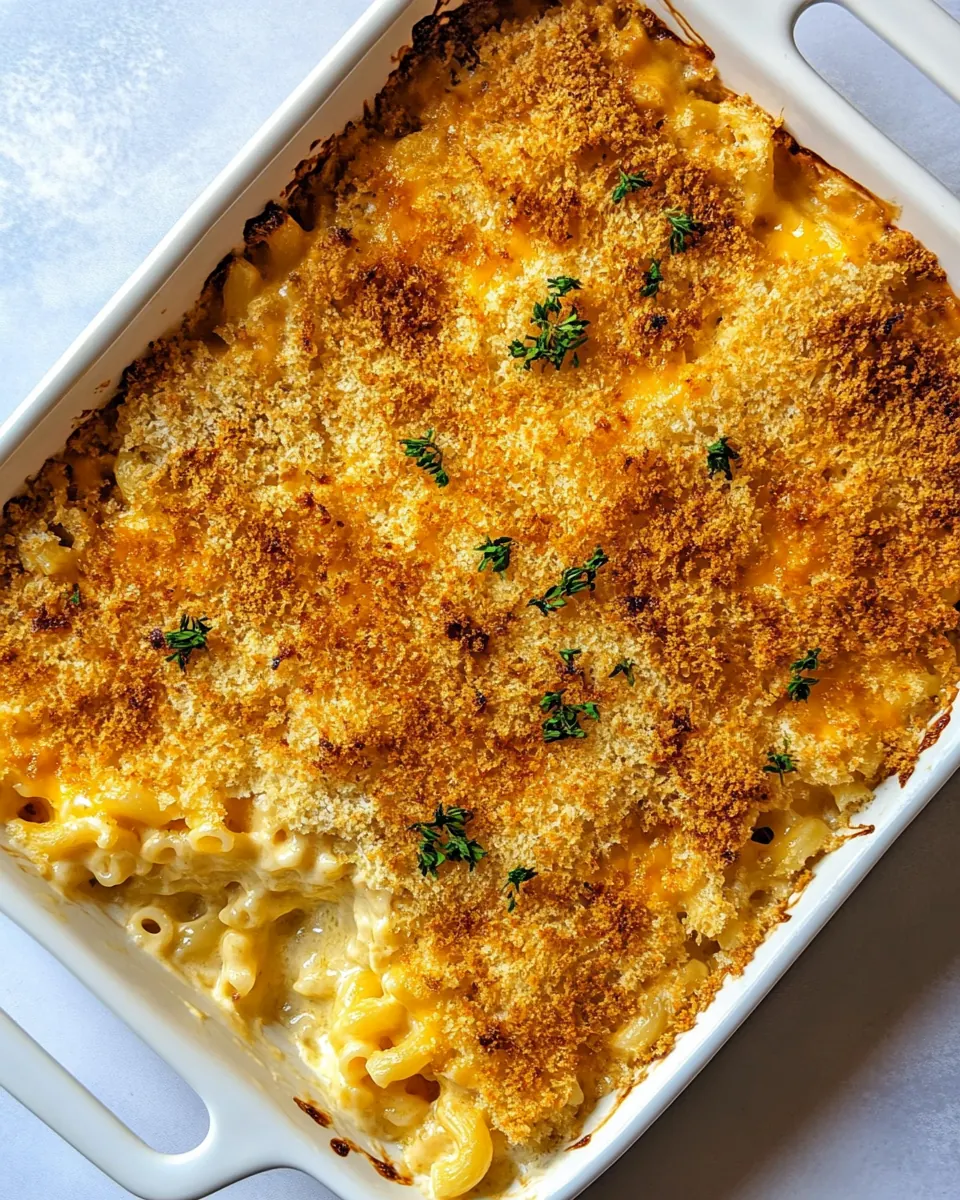
Baked Mac and Cheese
Baked Mac and Cheese was the dish I turned to when I first wanted to comfort a crowd without spending all night in the kitchen. The recipe has a way of bringing people together around the table, with that first spoonful offering a warm mouthful of creamy texture and nostalgia. I remember the first time I layered this in a 9×13 dish, feeling a small thrill as the bubbling cheese peeked over the edge, promising golden crunchy topping and a gooey middle.
Over the years I’ve tinkered with the balance of cheeses and the breadcrumb topping, learning to trust subtle techniques that change the finished texture. What started as a simple weeknight indulgence became my go to for colder evenings when I want something that feels both special and effortless. I like that it travels well to potlucks and that you can make most of it ahead, then finish it in the oven for that fresh out of kitchen appeal.
Recipe Snapshot
60 mins
20 mins
40 mins
Medium
450 kcal
American
Gluten-Free, Low FODMAP
Dinner
Large pot, Dutch oven or heavy pot, 9×13 baking dish, Whisk, Box grater
What’s Great About This Baked Mac and Cheese
Comforting, familiar flavor
I adore how Baked Mac and Cheese taps into memory with every bite. The combination of creamy sauce and melted cheese feels like a warm hug, and when I serve it I can tell people are instantly relaxed. The texture contrast between a silky interior and a crunchy top makes it emotionally satisfying, not just filling.
Layered technique for better texture
I’ve learned that layering really matters. When I separate some of the cheese to nestle inside the dish and sprinkle the rest on top, it creates pockets of molten cheese beneath a glossy sauce, while the top browns separately. That small change elevates the whole experience and avoids the flat, homogenous result you sometimes get.
Flexible for busy cooks
You can prep many components ahead, which I often do. Grating cheese in advance, warming the dairy slightly, and melting butter for the topping means the final assembly goes quickly. I love having that flexibility on nights when I want to host but not be stuck at the stove the entire evening.
Great for feeding a crowd
Because this recipe yields a generous amount, it is one of my favorites for gatherings. It scales predictably, and the combination of hearty elbow macaroni and rich cheese keeps bellies full. I appreciate a dish that remains satisfying whether you’re serving ten or a smaller group.
Reliable, reproducible results
There is a comforting predictability here. When I follow the sequence of making a roux, tempering the dairy, and adding cheese off the heat, the sauce comes out silky almost every time. That reliability makes me confident to recommend this recipe to friends who are learning to cook.
Ingredient List for Baked Mac and Cheese
These ingredients are chosen for harmony and function. The pasta provides structure, the butter and flour form a roux that thickens the half and half, and the cheeses bring both melty texture and sharp flavor. Each component plays a role, from the seasoning that layers subtle savory notes to the panko that gives a satisfying crunch on top.
- 1 pound (16 oz.) uncooked elbow macaroni: Cooked to al dente and used as the hearty pasta base that absorbs the creamy sauce, providing structure and bulk to the casserole.
- 1/4 cup butter + 1/4 cup butter (one stick cut in half): Melted and divided to create a rich roux with flour and to dot the top for a golden, flavorful crust when baked, contributing buttery richness throughout.
- 1/3 cup flour: Whisked into melted butter to form a roux that thickens the half-and-half into a smooth, velvety cheese sauce that clings to the pasta.
- 4 cups half-and-half: Heated and slowly incorporated into the roux to create a creamy, custard-like sauce; provides sweetness and depth while carrying the melted cheeses.
- 4 cups grated sharp cheddar: Shredded and melted into the béchamel to deliver sharp, tangy cheese flavor and a smooth, cohesive melt that defines classic mac and cheese.
- 2 cups grated Gruyère cheese: Grated and blended with the cheddar to add nutty, slightly sweet complexity and a silky, gooey texture when melted into the sauce.
- 1/2 teaspoons salt: Measured and stirred into the sauce to enhance and balance the flavors, ensuring the dish is well-seasoned without overpowering the cheeses.
- 1/2 teaspoon garlic powder: Sprinkled into the sauce to impart subtle savory and aromatic garlic notes that complement the cheeses and enrich overall flavor.
- 1/2 teaspoon mustard powder: Added to the sauce to introduce a warm, pungent undertone that heightens the savory profile and complements the dairy richness.
- 1/4 teaspoon paprika: Lightly mixed into the sauce or sprinkled on top to provide a faint smoky warmth and color contrast that brightens the overall flavor.
- Pepper to taste: Ground freshly over the finished dish to provide adjustable heat and aromatic complexity, allowing diners to tailor spiciness to taste.
- 1 cup panko breadcrumbs or crushed Ritz crackers: Tossed with melted butter and used as a crunchy topping or alternative crumb layer to add golden texture and a contrasting crisp finish.
Cooking Method for Baked Mac and Cheese
This method walks you through warming dairy, making a roux, building a smooth cheese sauce, and layering for baking. It is conversational and practical, with small checks to ensure you get the texture and flavor I aim for in my own kitchen.
- To prep: – Take the half-and-half out of the fridge to let it warm up a bit. – Grate your cheeses and add them to a large bowl and toss together. Measure out 4 cups (this is for the sauce) and keep that separate from the remaining 2 cups of cheese (for the middle layer of the mac and cheese). – For the panko topping, melt 1/4 cup of the butter in a medium bowl and set aside (don't add the panko in until step 10). – Add the seasonings (salt, garlic powder, mustard powder, paprika, and pepper) to a small bowl.: The kitchen will smell faintly of dairy and metal as you grate cheese, and you may hear the soft scrape of a box grater. I like to stage everything before I begin so the assembly flows without pause. Keep the grated cheeses separate into the amounts called for so you can layer properly, and set the butter meant for the topping aside once melted. A common misstep at this stage is rushing the grating, which can produce uneven pieces that melt inconsistently; take a breath, work steadily, and wear a finger guard if you have one.
- Preheat the oven to 375 F and move the rack to the top third of the oven.: When the oven temperature climbs, you will notice the air warming and the element glow begin to stabilize. Using the top third helps the breadcrumb topping brown before the sauce overdries. I always give the oven time to reach full heat to ensure even baking. If you slide the pan in too early, the topping may not crisp properly, so wait until the preheat cycle completes.
- Boil a large, salted pot of water for the macaroni and cook it for 1 minute less than package directions indicate. Once it's done, drain it, add a bit of olive oil or butter to it (less than 1 tbsp) and toss, then set aside (it's fine to sit in the colander you drained it in).: You'll hear a lively boil and see rolling bubbles as the water reaches temperature, and the salted water seasons the pasta as it absorbs liquid. Cooking slightly under package time yields pasta that remains toothsome after baking. After draining, toss the pasta with less than 1 tablespoon of oil or butter to keep pieces separated. Overcooking at this stage is the fastest route to a mealy final texture, so watch the pot closely and test early.
- To a pot/Dutch oven, add the remaining 1/4 cup of the butter and melt over medium heat. Once it's melted, add in the flour and stir (I just use a whisk) until combined. Let it cook for 3-5 minutes, stirring fairly often, until it starts to smell a little nutty and goes a bit golden (it should still be pale).: As the butter melts, it will hiss and foam gently, releasing a nutty aroma when it begins to brown lightly. Stir in the flour immediately and whisk until combined, creating a slightly grainy paste that will smooth out. Cook this mixture for 3 to 5 minutes until it smells gently toasty and just begins to take on color, but remains fairly pale. This prevents a raw flour taste in your sauce. If you let it color too much the sauce will have a toasty note that can overshadow the cheeses, so keep your eye on it and stir regularly.
- Gradually whisk in the half-and-half. Keep whisking or else it could scorch to the bottom of the pot. Whisk until the sauce gets thick enough to coat the back of a spoon. Timing can vary, and this can take up to 10 minutes or so – be patient and don't stop whisking. Don't let the sauce get too thick – it will get a lot thicker as you add the cheese.: As you pour in the warmed half-and-half , the mixture will hiss and the sauce will gradually smooth, transforming from paste into a glossy cream. Whisk continuously to avoid scorching the bottom of the pot and to break up any lumps. The sauce will thicken enough to coat the back of a spoon within several minutes, which is your visual cue to proceed. If the sauce thickens too quickly, lower the heat and add the dairy more slowly to maintain a silky texture; scorching will impart a burnt note that is hard to fix.
- Take the pot off the heat and gradually whisk in the 4 cups of cheese as well as the seasonings (salt, garlic powder, mustard powder, paprika, and pepper).: Off the heat the sauce becomes forgiving, and as you whisk in the grated cheddar and Gruyère cheese you will see it shift from glossy to luxuriously thick and stringy. Add the salt , garlic powder , mustard powder , paprika , and pepper now so the flavors meld without being dulled by high heat. If you add cheese while the pot is still piping hot, it can break and become grainy, so this off heat stage is crucial. Taste and adjust seasoning carefully because cheeses can vary widely in salt intensity.
- Add the cooked macaroni to the pot and stir until coated.: As you fold the elbow macaroni into the sauce, you will hear a gentle slosh and see the pasta become glossy, each curve catching the sauce. This is where the dish starts to feel substantial; the sauce clings to the pasta rather than pooling. Be gentle to keep the pasta from breaking apart. Overstirring can make the mixture gluey, so stop once the pieces are well coated.
- Add half the mac/cheese mix from the pot to a 9×13 baking dish and spread it in an even layer. I find it easiest to do this with a ladle.: Sliding the first portion into the dish you will notice a smooth, even bed forming, and using a ladle helps you control distribution. This base layer sets up the structure for the layered method, preventing a top heavy bake. Pressing too hard here can compact the pasta, so distribute lightly and evenly for the best final texture.
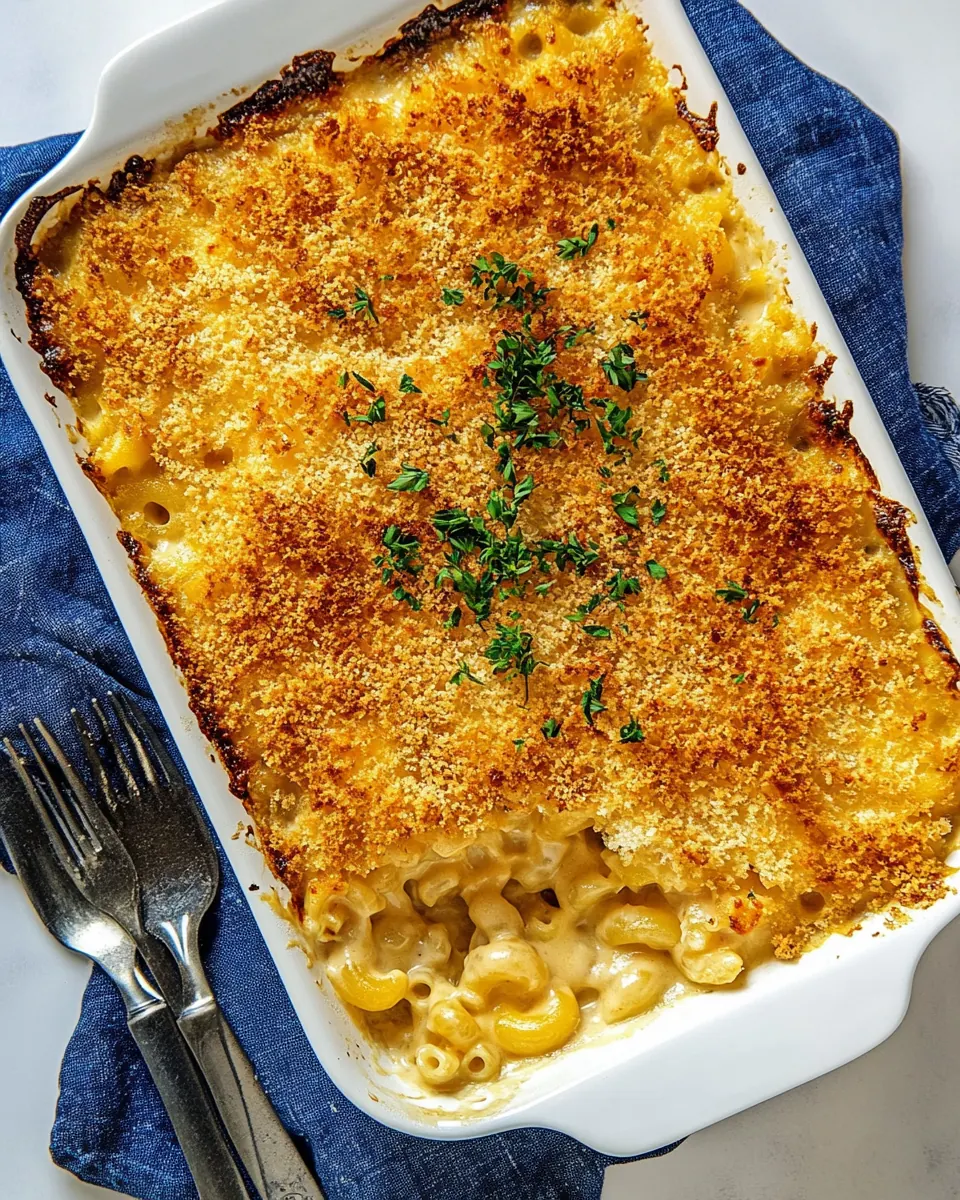
- Sprinkle the remaining 2 cups of cheese into the baking dish, then add the remaining mac/cheese mix on top of it.: Adding the reserved grated cheese creates pockets of melty, concentrated flavor in the center of the casserole, and as you top it with the second layer the surface evens out into a pleasing strata. This step introduces textural contrast internally and ensures each serving has molten cheese pockets. Make sure the middle cheese is distributed evenly, otherwise you may get uneven melts or bites with too much or too little cheese.
- Add the panko to the bowl with the melted butter and stir until combined, then sprinkle it over the mac and cheese.: The panko will clump slightly as it soaks up the butter, and when you sprinkle it over the surface you will see the dish gain a rough textured top that will brown in the oven. This buttery crunch is vital for contrast against the creamy interior. If you skip adding butter to the crumbs they may brown too quickly without becoming crisp, so ensure they are evenly coated.
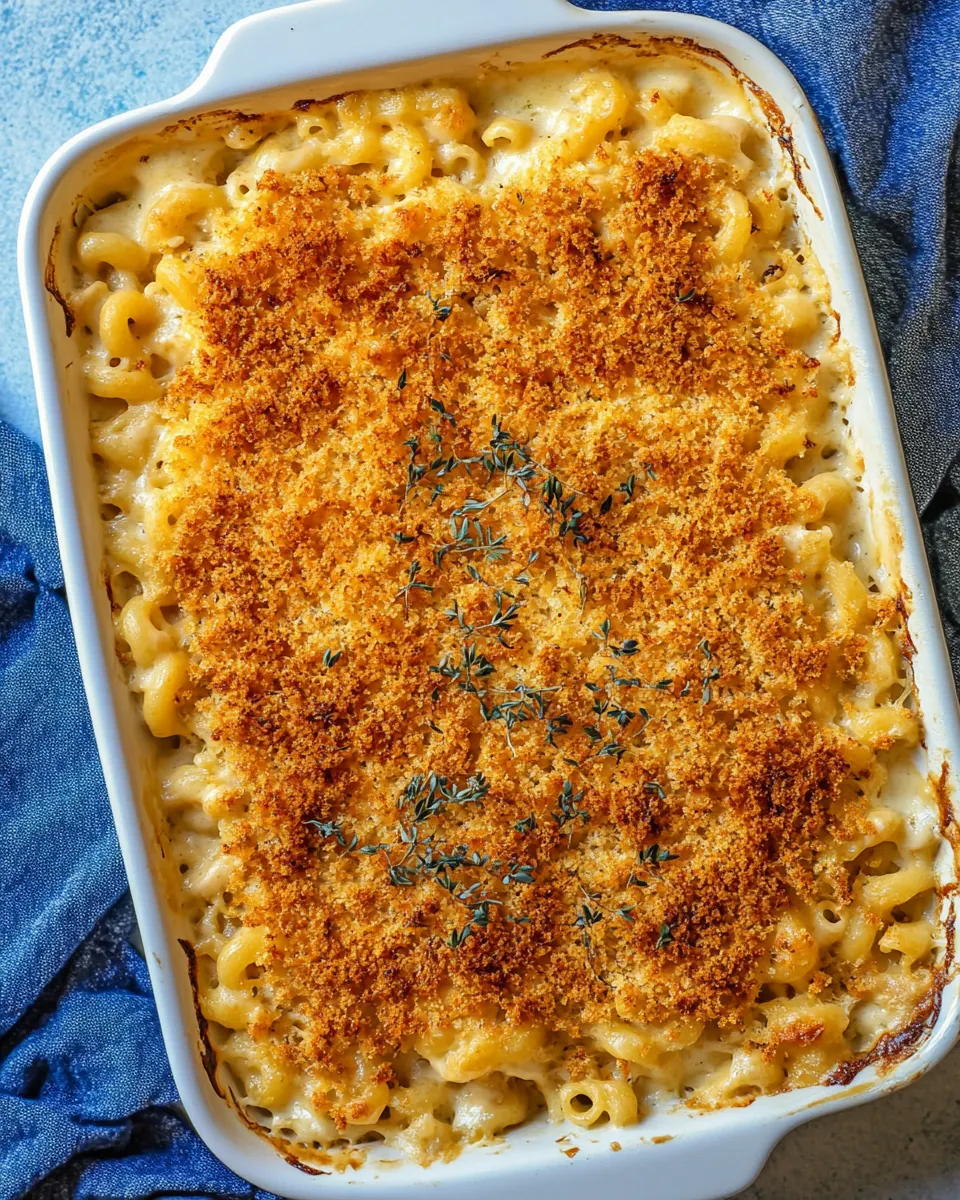
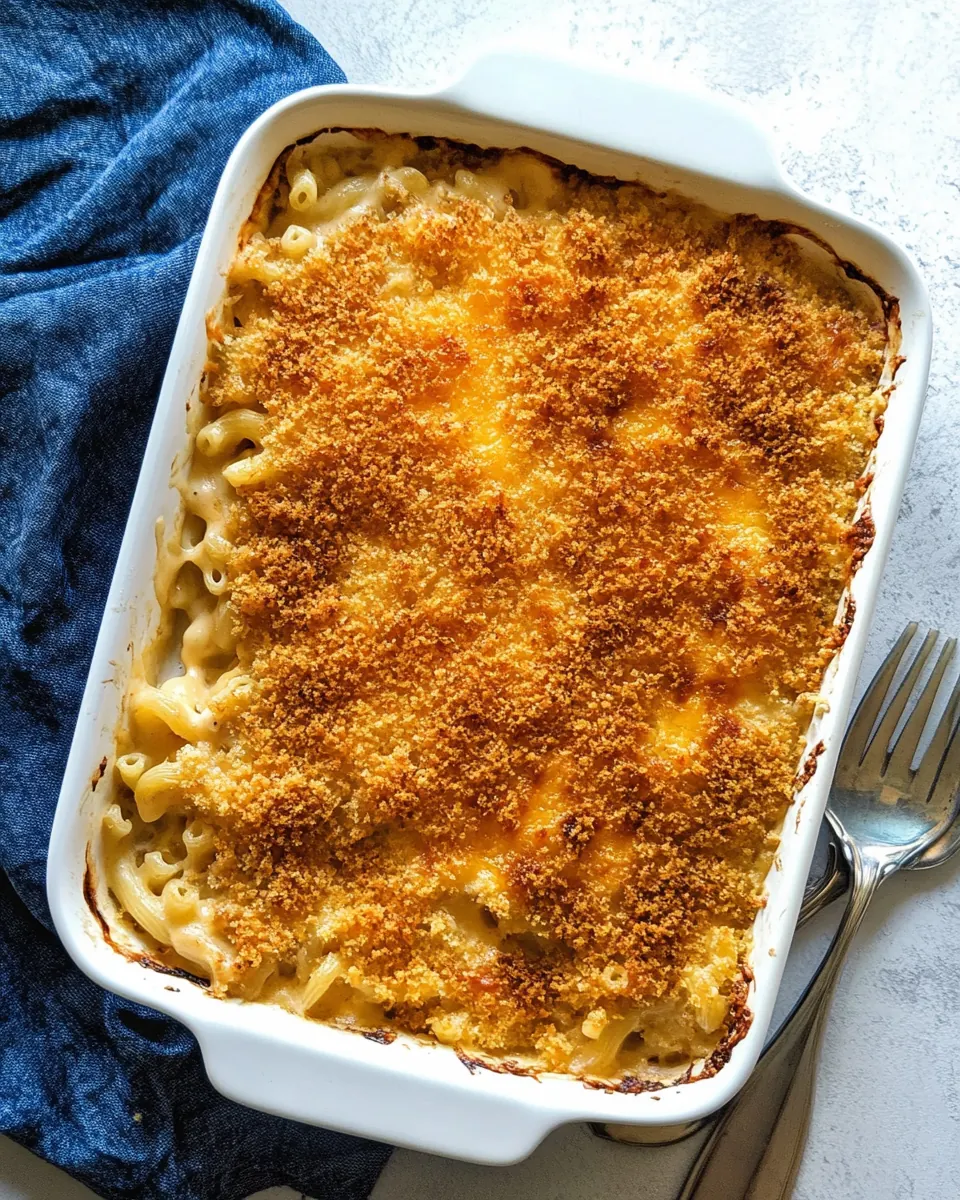
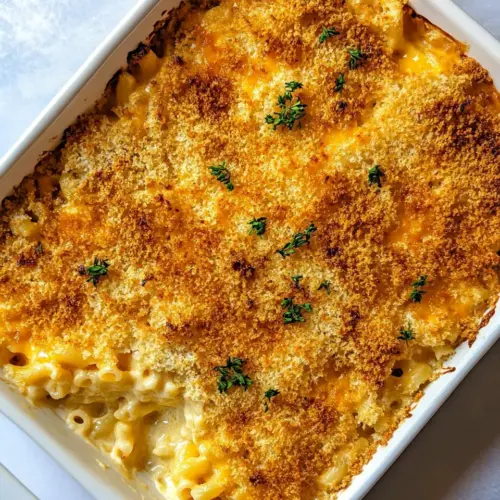
- Bake, uncovered, for 15-20 minutes (let the topping turn golden but don't overcook as the sauce will dry out). Enjoy hot!: As the pan bakes the kitchen will fill with a warm, cheesy aroma and the topping will turn a golden shade, sometimes crackling gently at the edges. Watch for that visual cue; once the crumbs are golden and the sauce is bubbling at the edges, remove the dish so the sauce does not dry out. A typical error is leaving it in too long in pursuit of deeper color, which concentrates the sauce and yields a dry finish, so check the bake at 15 minutes and be ready to pull it when it looks bronzed and inviting.
Variations to Try
I enjoy offering a few variations when I want to switch up texture or flavor. These ideas help you tailor the dish to different occasions without changing the core technique. Each tip below is practical and rooted in what I’ve tested in my own kitchen.
- Swap proportions of cheese, adjust the ratio of cheddar to Gruyère cheese to favor sharper or nuttier notes, which changes the overall flavor profile while keeping the same melting behavior.
- Use crushed crackers for the topping, swap panko for crushed Ritz crackers and mix with melted butter to create a slightly savory, richer crust that browns quickly and offers a different crunch.
- Double the sauce for extra creaminess, increase the amount of half-and-half slightly if you prefer a looser, creamier casserole that holds moisture and reheats nicely.
- Prepare ahead and refrigerate, assemble up to the point of baking, cover, and chill overnight; bring the dish toward room temperature before baking so the interior heats evenly.
- Toast panko first, lightly toast the crumbs in a pan with the reserved butter for a nuttier flavor before scattering them on top, watching carefully to avoid burning.
Serving Suggestions
This dish serves as a centerpiece or an indulgent side. Below I outline ways I like to plate and pair it for different gatherings, along with storage and serving notes to keep the texture and flavor at their best.
- Serve hot from the oven, spoon into warm bowls so the sauce stays molten, which makes for the most satisfying presentation and mouthfeel.
- Pair with bright salad, a crisp green salad dressed with a tangy vinaigrette balances the dish’s richness and refreshes the palate between bites.
- Family style for casual dinners, place the 9×13 dish in the center of the table with warmed plates so everyone can help themselves, perfect for relaxed weeknight meals with loved ones.
- Potluck friendly, transport the casserole in an insulated carrier and reheat briefly in the oven to revive the topping; this keeps the dish crowd pleasing and practical for gatherings.
- Storage and reheating, refrigerate leftovers in an airtight container for up to three days, reheat in a moderate oven until warmed through to preserve texture rather than microwaving which can make it gummy.
- Seasonal pairing, serve in winter when you want comfort food, it pairs well with simple roasted vegetables or a citrus salad to cut the richness.
FAQ
Conclusion
What makes this dish special is the contrast between a velvety cheese sauce and a golden crunchy topping that everyone reaches for first. Give it a try the next time you want something that feels indulgent yet simple to pull together, and you may find it becomes a staple in your meal rotation. Make it when you want a fuss free, satisfying crowd pleaser that travels well to gatherings and warms up beautifully for leftovers.
Baked Mac and Cheese
Equipment
- Large Pot
- Dutch oven or heavy pot
- 9×13 baking dish
- Whisk
- Box grater
Ingredients
- 1 pound (16 oz.) uncooked elbow macaroni Cooked to al dente and used as the hearty pasta base that absorbs the creamy sauce, providing structure and bulk to the casserole.
- 1/4 cup butter + 1/4 cup butter (one stick cut in half) Melted and divided to create a rich roux with flour and to dot the top for a golden, flavorful crust when baked, contributing buttery richness throughout.
- 1/3 cup flour Whisked into melted butter to form a roux that thickens the half-and-half into a smooth, velvety cheese sauce that clings to the pasta.
- 4 cups half-and-half Heated and slowly incorporated into the roux to create a creamy, custard-like sauce; provides sweetness and depth while carrying the melted cheeses.
- 4 cups grated sharp cheddar Shredded and melted into the béchamel to deliver sharp, tangy cheese flavor and a smooth, cohesive melt that defines classic mac and cheese.
- 2 cups grated Gruyère cheese Grated and blended with the cheddar to add nutty, slightly sweet complexity and a silky, gooey texture when melted into the sauce.
- 1/2 teaspoons salt Measured and stirred into the sauce to enhance and balance the flavors, ensuring the dish is well-seasoned without overpowering the cheeses.
- 1/2 teaspoon garlic powder Sprinkled into the sauce to impart subtle savory and aromatic garlic notes that complement the cheeses and enrich overall flavor.
- 1/2 teaspoon mustard powder Added to the sauce to introduce a warm, pungent undertone that heightens the savory profile and complements the dairy richness.
- 1/4 teaspoon paprika Lightly mixed into the sauce or sprinkled on top to provide a faint smoky warmth and color contrast that brightens the overall flavor.
- Pepper to taste Ground freshly over the finished dish to provide adjustable heat and aromatic complexity, allowing diners to tailor spiciness to taste.
- 1 cup panko breadcrumbs or crushed Ritz crackers Tossed with melted butter and used as a crunchy topping or alternative crumb layer to add golden texture and a contrasting crisp finish.
Instructions
- To prep: – Take the half-and-half out of the fridge to let it warm up a bit. – Grate your cheeses and add them to a large bowl and toss together. Measure out 4 cups (this is for the sauce) and keep that separate from the remaining 2 cups of cheese (for the middle layer of the mac and cheese). – For the panko topping, melt 1/4 cup of the butter in a medium bowl and set aside (don't add the panko in until step 10). – Add the seasonings (salt, garlic powder, mustard powder, paprika, and pepper) to a small bowl.: The kitchen will smell faintly of dairy and metal as you grate cheese, and you may hear the soft scrape of a box grater. I like to stage everything before I begin so the assembly flows without pause. Keep the grated cheeses separate into the amounts called for so you can layer properly, and set the butter meant for the topping aside once melted. A common misstep at this stage is rushing the grating, which can produce uneven pieces that melt inconsistently; take a breath, work steadily, and wear a finger guard if you have one.
- Preheat the oven to 375 F and move the rack to the top third of the oven.: When the oven temperature climbs, you will notice the air warming and the element glow begin to stabilize. Using the top third helps the breadcrumb topping brown before the sauce overdries. I always give the oven time to reach full heat to ensure even baking. If you slide the pan in too early, the topping may not crisp properly, so wait until the preheat cycle completes.
- Boil a large, salted pot of water for the macaroni and cook it for 1 minute less than package directions indicate. Once it's done, drain it, add a bit of olive oil or butter to it (less than 1 tbsp) and toss, then set aside (it's fine to sit in the colander you drained it in).: You'll hear a lively boil and see rolling bubbles as the water reaches temperature, and the salted water seasons the pasta as it absorbs liquid. Cooking slightly under package time yields pasta that remains toothsome after baking. After draining, toss the pasta with less than 1 tablespoon of oil or butter to keep pieces separated. Overcooking at this stage is the fastest route to a mealy final texture, so watch the pot closely and test early.
- To a pot/Dutch oven, add the remaining 1/4 cup of the butter and melt over medium heat. Once it's melted, add in the flour and stir (I just use a whisk) until combined. Let it cook for 3-5 minutes, stirring fairly often, until it starts to smell a little nutty and goes a bit golden (it should still be pale).: As the butter melts, it will hiss and foam gently, releasing a nutty aroma when it begins to brown lightly. Stir in the flour immediately and whisk until combined, creating a slightly grainy paste that will smooth out. Cook this mixture for 3 to 5 minutes until it smells gently toasty and just begins to take on color, but remains fairly pale. This prevents a raw flour taste in your sauce. If you let it color too much the sauce will have a toasty note that can overshadow the cheeses, so keep your eye on it and stir regularly.
- Gradually whisk in the half-and-half. Keep whisking or else it could scorch to the bottom of the pot. Whisk until the sauce gets thick enough to coat the back of a spoon. Timing can vary, and this can take up to 10 minutes or so – be patient and don't stop whisking. Don't let the sauce get too thick – it will get a lot thicker as you add the cheese.: As you pour in the warmed half-and-half , the mixture will hiss and the sauce will gradually smooth, transforming from paste into a glossy cream. Whisk continuously to avoid scorching the bottom of the pot and to break up any lumps. The sauce will thicken enough to coat the back of a spoon within several minutes, which is your visual cue to proceed. If the sauce thickens too quickly, lower the heat and add the dairy more slowly to maintain a silky texture; scorching will impart a burnt note that is hard to fix.
- Take the pot off the heat and gradually whisk in the 4 cups of cheese as well as the seasonings (salt, garlic powder, mustard powder, paprika, and pepper).: Off the heat the sauce becomes forgiving, and as you whisk in the grated cheddar and Gruyère cheese you will see it shift from glossy to luxuriously thick and stringy. Add the salt , garlic powder , mustard powder , paprika , and pepper now so the flavors meld without being dulled by high heat. If you add cheese while the pot is still piping hot, it can break and become grainy, so this off heat stage is crucial. Taste and adjust seasoning carefully because cheeses can vary widely in salt intensity.
- Add the cooked macaroni to the pot and stir until coated.: As you fold the elbow macaroni into the sauce, you will hear a gentle slosh and see the pasta become glossy, each curve catching the sauce. This is where the dish starts to feel substantial; the sauce clings to the pasta rather than pooling. Be gentle to keep the pasta from breaking apart. Overstirring can make the mixture gluey, so stop once the pieces are well coated.
- Add half the mac/cheese mix from the pot to a 9×13 baking dish and spread it in an even layer. I find it easiest to do this with a ladle.: Sliding the first portion into the dish you will notice a smooth, even bed forming, and using a ladle helps you control distribution. This base layer sets up the structure for the layered method, preventing a top heavy bake. Pressing too hard here can compact the pasta, so distribute lightly and evenly for the best final texture.
- Sprinkle the remaining 2 cups of cheese into the baking dish, then add the remaining mac/cheese mix on top of it.: Adding the reserved grated cheese creates pockets of melty, concentrated flavor in the center of the casserole, and as you top it with the second layer the surface evens out into a pleasing strata. This step introduces textural contrast internally and ensures each serving has molten cheese pockets. Make sure the middle cheese is distributed evenly, otherwise you may get uneven melts or bites with too much or too little cheese.
- Add the panko to the bowl with the melted butter and stir until combined, then sprinkle it over the mac and cheese.: The panko will clump slightly as it soaks up the butter, and when you sprinkle it over the surface you will see the dish gain a rough textured top that will brown in the oven. This buttery crunch is vital for contrast against the creamy interior. If you skip adding butter to the crumbs they may brown too quickly without becoming crisp, so ensure they are evenly coated.
- Bake, uncovered, for 15-20 minutes (let the topping turn golden but don't overcook as the sauce will dry out). Enjoy hot!: As the pan bakes the kitchen will fill with a warm, cheesy aroma and the topping will turn a golden shade, sometimes crackling gently at the edges. Watch for that visual cue; once the crumbs are golden and the sauce is bubbling at the edges, remove the dish so the sauce does not dry out. A typical error is leaving it in too long in pursuit of deeper color, which concentrates the sauce and yields a dry finish, so check the bake at 15 minutes and be ready to pull it when it looks bronzed and inviting.
Notes
- Swap proportions of cheese, adjust the ratio of cheddar to Gruyère cheese to favor sharper or nuttier notes, which changes the overall flavor profile while keeping the same melting behavior.
- Use crushed crackers for the topping, swap panko for crushed Ritz crackers and mix with melted butter to create a slightly savory, richer crust that browns quickly and offers a different crunch.
- Double the sauce for extra creaminess, increase the amount of half-and-half slightly if you prefer a looser, creamier casserole that holds moisture and reheats nicely.
- Prepare ahead and refrigerate, assemble up to the point of baking, cover, and chill overnight; bring the dish toward room temperature before baking so the interior heats evenly.
- Toast panko first, lightly toast the crumbs in a pan with the reserved butter for a nuttier flavor before scattering them on top, watching carefully to avoid burning.