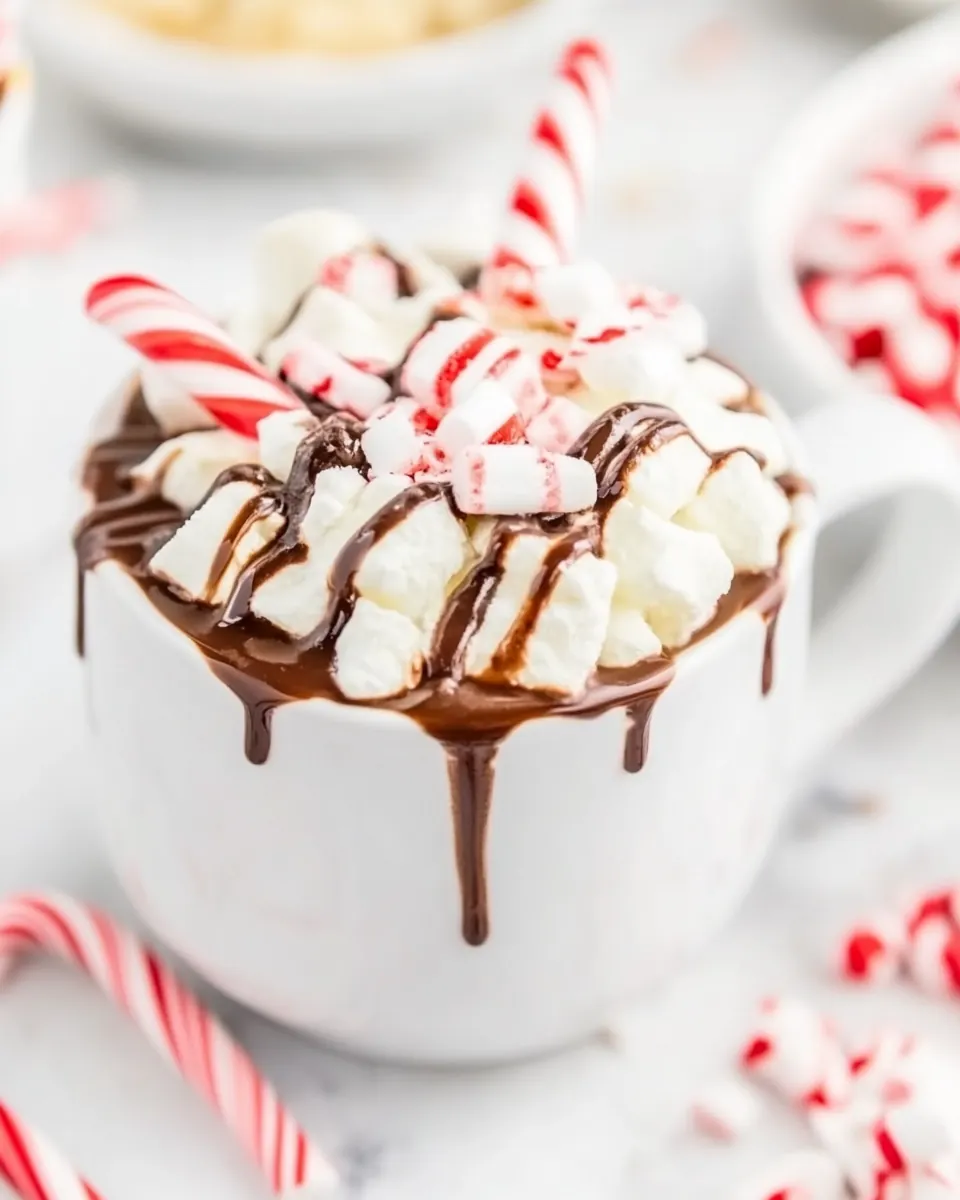
Candy Cane Hot Chocolate
Candy Cane Hot Chocolate is the kind of cozy treat I reach for when the air turns sharp and my kitchen smells like toasted sugar and cocoa, a memory maker that always brings a little holiday smile. The first time I made this, I was scrambling to warm up post-sledding, and the crackle of crushed peppermint in the saucepan felt like a tiny celebration. I remember stirring slowly, watching glossy chocolate melt into creamy milk, and thinking this would be my go to for cold evenings.
That evening I ladled steaming mugs and watched faces soften with each sip, conversation slowing as everyone savored the mint and chocolate pairing. Since then, I keep a secret stash of extra candy canes for garnish, and I love how the crushed bits add a pretty, crunchy top. When friends drop by unexpectedly, I can whip this up in a flash, and it never fails to feel special.
Recipe Snapshot
30 mins
5 mins
25 mins
Easy
320 kcal
American
Keto, Gluten-Free
Desserts
Medium saucepan, Whisk, Rolling pin, Zip top bag
The Appeal of This Candy Cane Hot Chocolate
Comforting Creaminess
I adore how Candy Cane Hot Chocolate leans into rich, velvety texture with simple dairy. The combination of whole milk and heavy cream gives a silky mouthfeel that coats the palate, making each sip feel indulgent without being cloying. I find that this creaminess is the backbone that lets the mint and chocolate shine.
Bright Peppermint Spark
The crushed candy canes and a touch of peppermint extract bring a lively, cooling contrast. I love that the mint wakes up the chocolate, creating a festive balance. For me, that peppermint note is what transforms a plain hot chocolate into something celebratory.
Deep Chocolate Flavor
Using semi sweet chocolate chips and unsweetened cocoa powder layers the chocolate flavor so it tastes complex, not one dimensionally sweet. I appreciate the way the chips melt into a glossy ribbon, giving both aroma and weight to each cup. It delivers chocolate intensity while still letting the mint linger on the finish.
Quick and Crowd Friendly
I often make Candy Cane Hot Chocolate when guests arrive, because it is straightforward yet impressive. From crushed candy to finished mug, the hands on time is minimal, so I can focus on company instead of fuss. It scales easily, and that makes it a go to for small gatherings during the holiday season.
Fun Garnish and Texture
The optional toppings make this playful. I love spooning a dollop of whipped cream and sprinkling extra peppermint pieces on top, the contrast of temperatures and textures turns each sip into a mini event. The visual finish matters to me as much as the flavor.
What’s In This Candy Cane Hot Chocolate
These ingredients work together like a small, festive orchestra, where each player enhances the others. The dairy provides a lush foundation, the semi sweet chocolate chips and cocoa powder supply layered chocolate depth, and the candy canes and peppermint extract add crisp, cooling brightness. I keep optional toppings on hand to personalize each mug.
- 1/3 cup candy canes crushed, or other crushed peppermints: Crushed into fine pieces to provide bright peppermint flavor and a festive crunchy texture; use as primary peppermint sweetener and stir-in for visible candy flecks throughout the hot chocolate. Sprinkle on top as a garnish for color contrast and added crunch, and dissolve some while warming to infuse the drink with minty notes.
- 2 1/2 cups whole milk see notes: Heated gently to form the liquid base and carry dissolved chocolate and cocoa, providing the majority of the beverage’s body, creaminess, and milky sweetness. Warm at low heat to avoid scalding, and combine with cream and chocolate for a smooth, cohesive hot chocolate.
- 1 1/2 cups heavy cream: Added to increase richness, velvety mouthfeel, and luscious creaminess; balances the milk to create an indulgent texture and fuller flavor. Whisk into warmed milk and chocolate for a silky finish and to help stabilize foam and toppings.
- 10 ounces semi-sweet chocolate chips: Melted into the warm milk and cream to create the chocolate flavor backbone, contribute cocoa solids and sweetness, and thicken the drink slightly when combined with heat. Use good-quality semi–sweet chips for balanced sweetness and a smooth melt-in texture without graininess.
- 2 tablespoons cocoa powder unsweetened: Whisked in to intensify chocolate flavor, deepen color, and boost the overall cocoa profile without adding sweetness, helping the drink taste more complex and chocolate-forward. Sift and blend thoroughly to prevent lumps and ensure even incorporation into the hot liquid.
- 2 teaspoons peppermint extract: Added sparingly to provide concentrated peppermint aroma and flavor, enhancing the crushed candy canes without excessive sweetness; use measured amounts to avoid overpowering the chocolate. Stir in near the end of heating to preserve the fresh peppermint fragrance.
- Whipped cream, chocolate sauce, marshmallows, extra peppermint candy cane pieces toppings (optional): Optional toppings offering texture, sweetness, and visual appeal such as whipped cream for creaminess, chocolate sauce for extra richness, marshmallows for melt-in sweetness, and extra peppermint pieces for garnish and crunch.
Making This Candy Cane Hot Chocolate

I always approach the actual making with a relaxed, attentive rhythm, because the transformation happens as much in slow stirring as it does in ingredients. Gather your tools and ingredients, and be ready to watch colors and textures shift. The following steps are faithful to the original directions, but I expand them so you’ll know what to listen for and how to troubleshoot.
- Unwrap the candy canes and place them in a strong zip-top bag. With a rolling pin or a heavy metal canned good gently crush the candy canes until broken into pieces.: The first sensory cue is the bright peppermint scent released when you unwrap and crush the candy. I like tapping the bag with a rolling pin so shards form, which creates a mix of fine dust and larger crunchy bits that melt differently, giving layers of texture. A common mistake is pressing too gently, leaving whole pieces that are hard to melt, or crushing too aggressively, making only dust. If you hear sharp, brittle snaps, you are doing it right. Make sure the bag is sealed tightly to avoid sticky hands, and keep extra whole canes aside for garnishing.
- Place a medium saucepan over medium heat. Add milk, heavy cream, chocolate chips, crushed candy canes, cocoa powder and peppermint extract to the pot. Blend well with a whisk.: As you crush, the aroma of peppermint becomes stronger and slightly sweet, signaling readiness. Aim for uneven pieces so some dissolve quickly in the saucepan while others retain a pleasing crunch for topping. Avoid over crushing into powder if you prefer textural contrast, because powder can settle and clump. If crushing makes a mess, transfer to a small bowl to contain shards; the sound should be crisp, not thudding, which indicates the candy is shattering cleanly.
- Continue to stir frequently until chocolate and candy is melted and the pot is at a slow simmer; about 10-15 minutes. The chocolate will look darker as you stir. Lower heat to lowest setting and continue to heat for 15 minutes. Do not let the mixture boil, a slow simmer is okay.: When the pan warms, you will smell a faint toasty note from the metal, and a skim of steam will rise as you add liquids. This initial heat sets the stage for smooth melting and prevents sudden scorching. A frequent error is starting on high heat, which risks burning the dairy or seizing the chocolate. Use a medium setting so the temperature climbs steadily, letting flavors marry gently without stress.
- Serve immediately and enjoy! Top with optional whipped cream or marshmallows and extra candy cane pieces sprinkled on top.: Once the pan is warm, the mixture begins to steam and the chocolate will start softening at the edges. Whisk immediately to help the cocoa powder and chocolate incorporate into the liquid, creating ribbons of glossy mass. The smell will deepen to a warm cocoa aroma with mint highlights. If lumps form, slow the heat and whisk vigorously to smooth them out; adding chocolate too quickly to scalding milk can cause clumping.
- Blend well with a whisk: As you whisk, the mixture becomes glossier and thicker, and you can see streaks merge into a uniform color. The whisking motion aerates slightly, which softens texture and prevents hot spots. A common misstep is stopping too early, leaving streaks of unmelted chocolate or pockets of cocoa. Keep whisking until the chocolate and cocoa are fully integrated and the liquid has a satiny sheen.
- Continue to stir frequently until chocolate and candy is melted and the pot is at a slow simmer; about 10 to 15 minutes: During this phase, you will notice the chocolate darken and the aroma intensify. Small bubbles will form at the edges, a reliable visual cue that you have reached a slow simmer. Stirring prevents the bottom from sticking and the chocolate from scorching. If you see rapid rolling bubbles, the heat is too high; reduce it immediately to avoid a burnt flavor. The texture should be smooth and slightly thickened.
- Lower heat to lowest setting and continue to heat for 15 minutes: On a very low flame, flavors deepen and the peppermint disperses evenly without evaporating. The mixture will become silkier and the aroma will mellow into a harmonious chocolate mint scent. Avoid allowing the mixture to boil, because boiling can separate fats and change texture. If you notice any graininess beginning, remove from heat and whisk briskly to re-emulsify the drink for a polished finish.
- Do not let the mixture boil, a slow simmer is okay: Maintaining a gentle simmer keeps the structure intact while allowing flavors to blend slowly. If boiling occurs, you risk curdling or a burned taste, and the mixture may lose its glossy sheen. Use the tip of a wooden spoon to check for tiny bubbles and reduce heat immediately if the bubbles are large and vigorous. Staying patient here rewards you with a balanced, smooth cup.
- Serve immediately and enjoy: The final sensory play is the steam that lifts the peppermint and chocolate bouquet as you pour, and the weight of the hot liquid fills the mug with comforting warmth. Garnish with whipped cream , extra crushed peppermint, or a drizzle of chocolate sauce for contrast. A common error is letting it sit too long, which can thicken and cool; serve right away for the best mouthfeel and aroma.
- Top with optional whipped cream or marshmallows and extra candy cane pieces sprinkled on top: The contrast of cold whipped cream melting into hot chocolate, or the pillowy marshmallows softening on the surface, creates delightful temperature and texture interplay. Sprinkle extra peppermint pieces for sparkle and crunch. Be mindful not to overload the cup, or the toppings may overwhelm the balanced flavors you worked to achieve. Present with a small spoon for stirring and savoring.
How to Switch It Up

I like to offer approachable variations so you can make Candy Cane Hot Chocolate feel personal. Below are practical ideas that keep the spirit of the drink while letting you experiment with texture, temperature, and presentation.
- Try different milk bases Use oat or coconut milk for a dairy free alternative, keeping in mind the drink will be less creamy than with whole milk and heavy cream.
- Adjust mint intensity Reduce the amount of crushed candy canes or peppermint extract if you prefer a subtler hint of mint, adding more only after tasting.
- Top creatively Experiment with whipped cream swirls, a dusting of cocoa powder, or a few extra peppermint shards for an elegant finish.
- Make it ahead for a crowd Keep the base warm in a thermos or slow cooker on low, stirring occasionally to maintain smoothness without boiling.
- Play with chocolate ratios Use a blend of semi sweet chips and a bit more cocoa powder for a deeper, less sweet profile that appeals to chocolate purists.
Serving Suggestions
This section covers ways I like to present Candy Cane Hot Chocolate for different settings, from quiet nights to holiday gatherings. Think about pairing, occasion, and practical storage so every serving feels intentional.
- Mug presentation Serve in pre warmed mugs to keep the drink hot longer, and top with a generous swirl of whipped cream and crushed peppermint for a festive look.
- Holiday gatherings Offer a toppings bar with extra candy cane pieces and chocolate sauce so guests can customize their cup at family celebrations like Christmas.
- Cozy movie night Pair with light cookies or biscotti; the mint and chocolate sing alongside buttery or nutty snacks for a comforting evening.
- Storage tips Keep any leftover hot chocolate base refrigerated up to two days, reheat gently over low heat while stirring to restore the smooth texture.
- Seasonal pairings This is perfect for winter evenings, holiday brunches, or a post outdoor activity warm up; the cool peppermint and warm cocoa make it especially festive.
- Portioning This recipe yields four eight ounce servings, so scale up for larger groups and keep a ladle handy for easy service.
FAQ
Conclusion
Candy Cane Hot Chocolate stands out for its creamy texture and festive peppermint twist. The marriage of semi sweet chocolate chips, cocoa powder, and crushed candy canes makes each mug feel celebratory yet comforting. Give it a try on a cold evening or at your next holiday gathering, and notice how the mint lifts the chocolate into something bright and cheerful. I hope this becomes a warm staple for your winter traditions, bringing small moments of joy with every steaming sip.

Candy Cane Hot Chocolate
Equipment
- Medium Saucepan
- Whisk
- Rolling Pin
- Zip-top Bag
Ingredients
- 1/3 cup candy canes crushed, or other crushed peppermints Crushed into fine pieces to provide bright peppermint flavor and a festive crunchy texture; use as primary peppermint sweetener and stir-in for visible candy flecks throughout the hot chocolate. Sprinkle on top as a garnish for color contrast and added crunch, and dissolve some while warming to infuse the drink with minty notes.
- 2 1/2 cups whole milk see notes Heated gently to form the liquid base and carry dissolved chocolate and cocoa, providing the majority of the beverage’s body, creaminess, and milky sweetness. Warm at low heat to avoid scalding, and combine with cream and chocolate for a smooth, cohesive hot chocolate.
- 1 1/2 cups heavy cream Added to increase richness, velvety mouthfeel, and luscious creaminess; balances the milk to create an indulgent texture and fuller flavor. Whisk into warmed milk and chocolate for a silky finish and to help stabilize foam and toppings.
- 10 ounces semi-sweet chocolate chips Melted into the warm milk and cream to create the chocolate flavor backbone, contribute cocoa solids and sweetness, and thicken the drink slightly when combined with heat. Use good-quality semi-sweet chips for balanced sweetness and a smooth melt-in texture without graininess.
- 2 tablespoons cocoa powder unsweetened Whisked in to intensify chocolate flavor, deepen color, and boost the overall cocoa profile without adding sweetness, helping the drink taste more complex and chocolate-forward. Sift and blend thoroughly to prevent lumps and ensure even incorporation into the hot liquid.
- 2 teaspoons peppermint extract Added sparingly to provide concentrated peppermint aroma and flavor, enhancing the crushed candy canes without excessive sweetness; use measured amounts to avoid overpowering the chocolate. Stir in near the end of heating to preserve the fresh peppermint fragrance.
- Whipped cream, chocolate sauce, marshmallows, extra peppermint candy cane pieces optional toppings Optional toppings offering texture, sweetness, and visual appeal such as whipped cream for creaminess, chocolate sauce for extra richness, marshmallows for melt-in sweetness, and extra peppermint pieces for garnish and crunch.
Instructions
- Unwrap the candy canes and place them in a strong zip-top bag. With a rolling pin or a heavy metal canned good gently crush the candy canes until broken into pieces.: The first sensory cue is the bright peppermint scent released when you unwrap and crush the candy. I like tapping the bag with a rolling pin so shards form, which creates a mix of fine dust and larger crunchy bits that melt differently, giving layers of texture. A common mistake is pressing too gently, leaving whole pieces that are hard to melt, or crushing too aggressively, making only dust. If you hear sharp, brittle snaps, you are doing it right. Make sure the bag is sealed tightly to avoid sticky hands, and keep extra whole canes aside for garnishing.
- Place a medium saucepan over medium heat. Add milk, heavy cream, chocolate chips, crushed candy canes, cocoa powder and peppermint extract to the pot. Blend well with a whisk.: As you crush, the aroma of peppermint becomes stronger and slightly sweet, signaling readiness. Aim for uneven pieces so some dissolve quickly in the saucepan while others retain a pleasing crunch for topping. Avoid over crushing into powder if you prefer textural contrast, because powder can settle and clump. If crushing makes a mess, transfer to a small bowl to contain shards; the sound should be crisp, not thudding, which indicates the candy is shattering cleanly.
- Continue to stir frequently until chocolate and candy is melted and the pot is at a slow simmer; about 10-15 minutes. The chocolate will look darker as you stir. Lower heat to lowest setting and continue to heat for 15 minutes. Do not let the mixture boil, a slow simmer is okay.: When the pan warms, you will smell a faint toasty note from the metal, and a skim of steam will rise as you add liquids. This initial heat sets the stage for smooth melting and prevents sudden scorching. A frequent error is starting on high heat, which risks burning the dairy or seizing the chocolate. Use a medium setting so the temperature climbs steadily, letting flavors marry gently without stress.
- Serve immediately and enjoy! Top with optional whipped cream or marshmallows and extra candy cane pieces sprinkled on top.: Once the pan is warm, the mixture begins to steam and the chocolate will start softening at the edges. Whisk immediately to help the cocoa powder and chocolate incorporate into the liquid, creating ribbons of glossy mass. The smell will deepen to a warm cocoa aroma with mint highlights. If lumps form, slow the heat and whisk vigorously to smooth them out; adding chocolate too quickly to scalding milk can cause clumping.
- Blend well with a whisk: As you whisk, the mixture becomes glossier and thicker, and you can see streaks merge into a uniform color. The whisking motion aerates slightly, which softens texture and prevents hot spots. A common misstep is stopping too early, leaving streaks of unmelted chocolate or pockets of cocoa. Keep whisking until the chocolate and cocoa are fully integrated and the liquid has a satiny sheen.
- Continue to stir frequently until chocolate and candy is melted and the pot is at a slow simmer; about 10 to 15 minutes: During this phase, you will notice the chocolate darken and the aroma intensify. Small bubbles will form at the edges, a reliable visual cue that you have reached a slow simmer. Stirring prevents the bottom from sticking and the chocolate from scorching. If you see rapid rolling bubbles, the heat is too high; reduce it immediately to avoid a burnt flavor. The texture should be smooth and slightly thickened.
- Lower heat to lowest setting and continue to heat for 15 minutes: On a very low flame, flavors deepen and the peppermint disperses evenly without evaporating. The mixture will become silkier and the aroma will mellow into a harmonious chocolate mint scent. Avoid allowing the mixture to boil, because boiling can separate fats and change texture. If you notice any graininess beginning, remove from heat and whisk briskly to re-emulsify the drink for a polished finish.
- Do not let the mixture boil, a slow simmer is okay: Maintaining a gentle simmer keeps the structure intact while allowing flavors to blend slowly. If boiling occurs, you risk curdling or a burned taste, and the mixture may lose its glossy sheen. Use the tip of a wooden spoon to check for tiny bubbles and reduce heat immediately if the bubbles are large and vigorous. Staying patient here rewards you with a balanced, smooth cup.
- Serve immediately and enjoy: The final sensory play is the steam that lifts the peppermint and chocolate bouquet as you pour, and the weight of the hot liquid fills the mug with comforting warmth. Garnish with whipped cream , extra crushed peppermint, or a drizzle of chocolate sauce for contrast. A common error is letting it sit too long, which can thicken and cool; serve right away for the best mouthfeel and aroma.
- Top with optional whipped cream or marshmallows and extra candy cane pieces sprinkled on top: The contrast of cold whipped cream melting into hot chocolate, or the pillowy marshmallows softening on the surface, creates delightful temperature and texture interplay. Sprinkle extra peppermint pieces for sparkle and crunch. Be mindful not to overload the cup, or the toppings may overwhelm the balanced flavors you worked to achieve. Present with a small spoon for stirring and savoring.
Notes
- Try different milk bases Use oat or coconut milk for a dairy free alternative, keeping in mind the drink will be less creamy than with whole milk and heavy cream.
- Adjust mint intensity Reduce the amount of crushed candy canes or peppermint extract if you prefer a subtler hint of mint, adding more only after tasting.
- Top creatively Experiment with whipped cream swirls, a dusting of cocoa powder, or a few extra peppermint shards for an elegant finish.
- Make it ahead for a crowd Keep the base warm in a thermos or slow cooker on low, stirring occasionally to maintain smoothness without boiling.
- Play with chocolate ratios Use a blend of semi sweet chips and a bit more cocoa powder for a deeper, less sweet profile that appeals to chocolate purists.