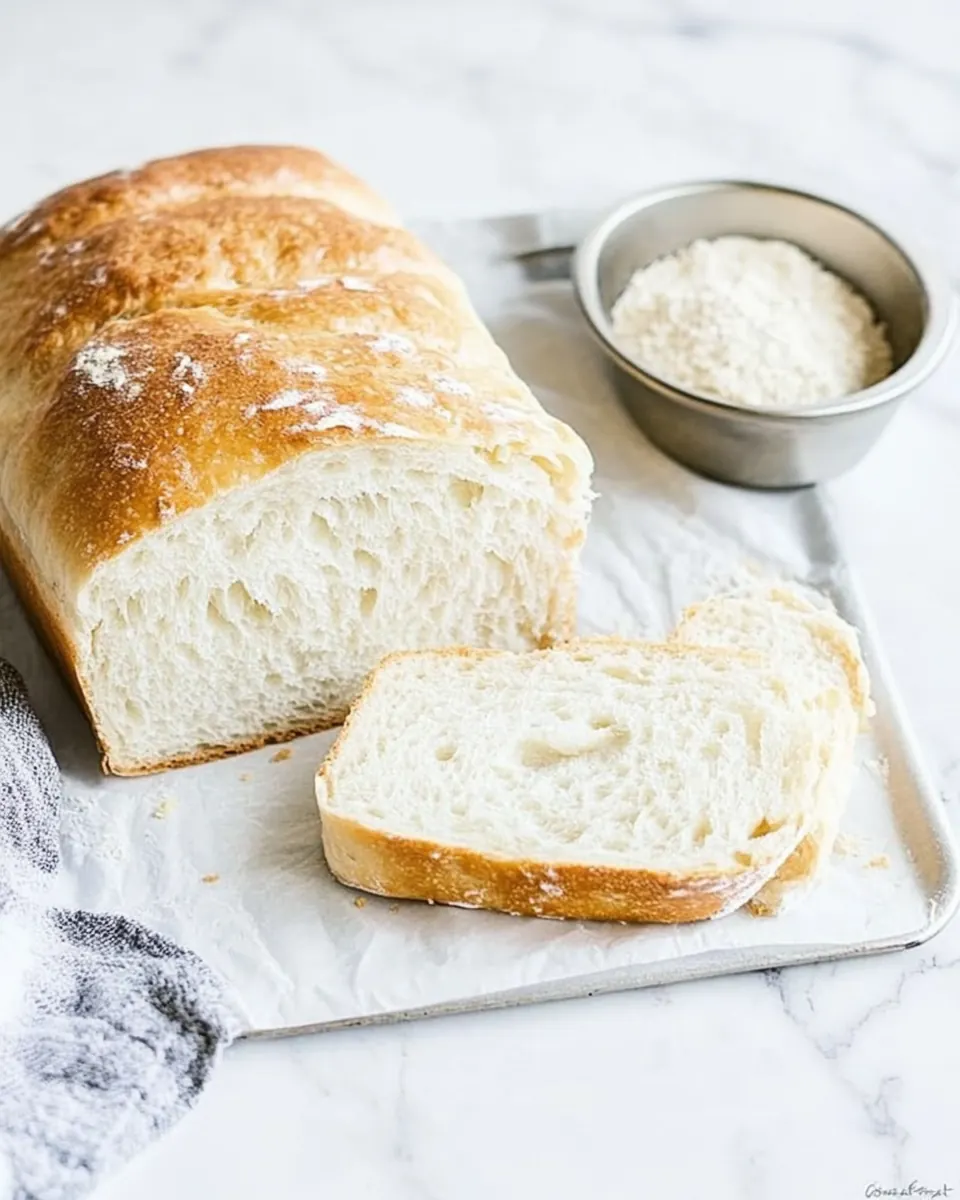
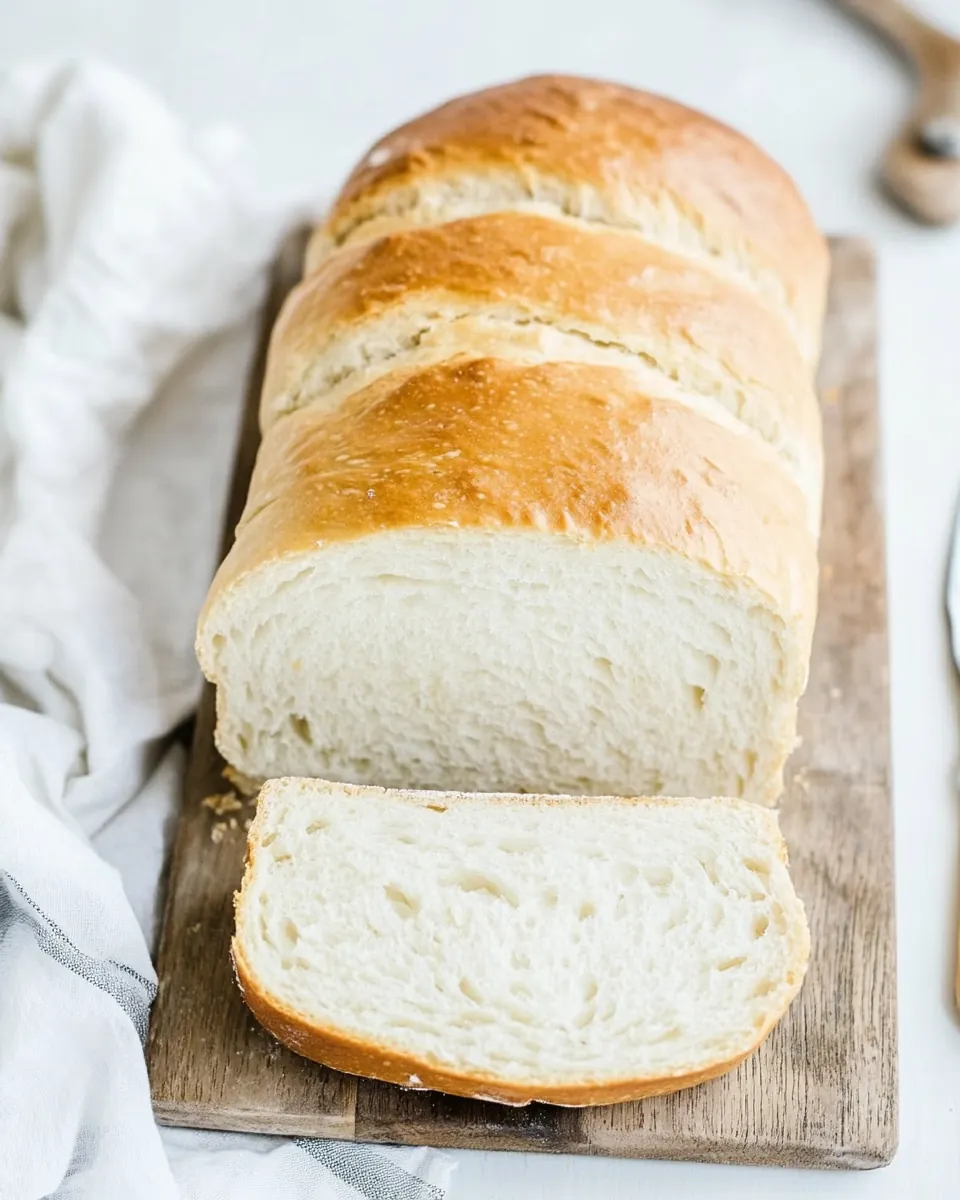
Homemade White Bread
Homemade White Bread started showing up on my kitchen counter the moment I learned that the smell of fresh flour and warm milk could mend a long day. I remember the first loaf I made for a Sunday morning, the crust crackling as I sliced it, and how that single warm slice could quiet a room. I have a habit of testing breads at odd hours, and this recipe became my calm ritual, the kind of thing I reach for when I need simple comfort.
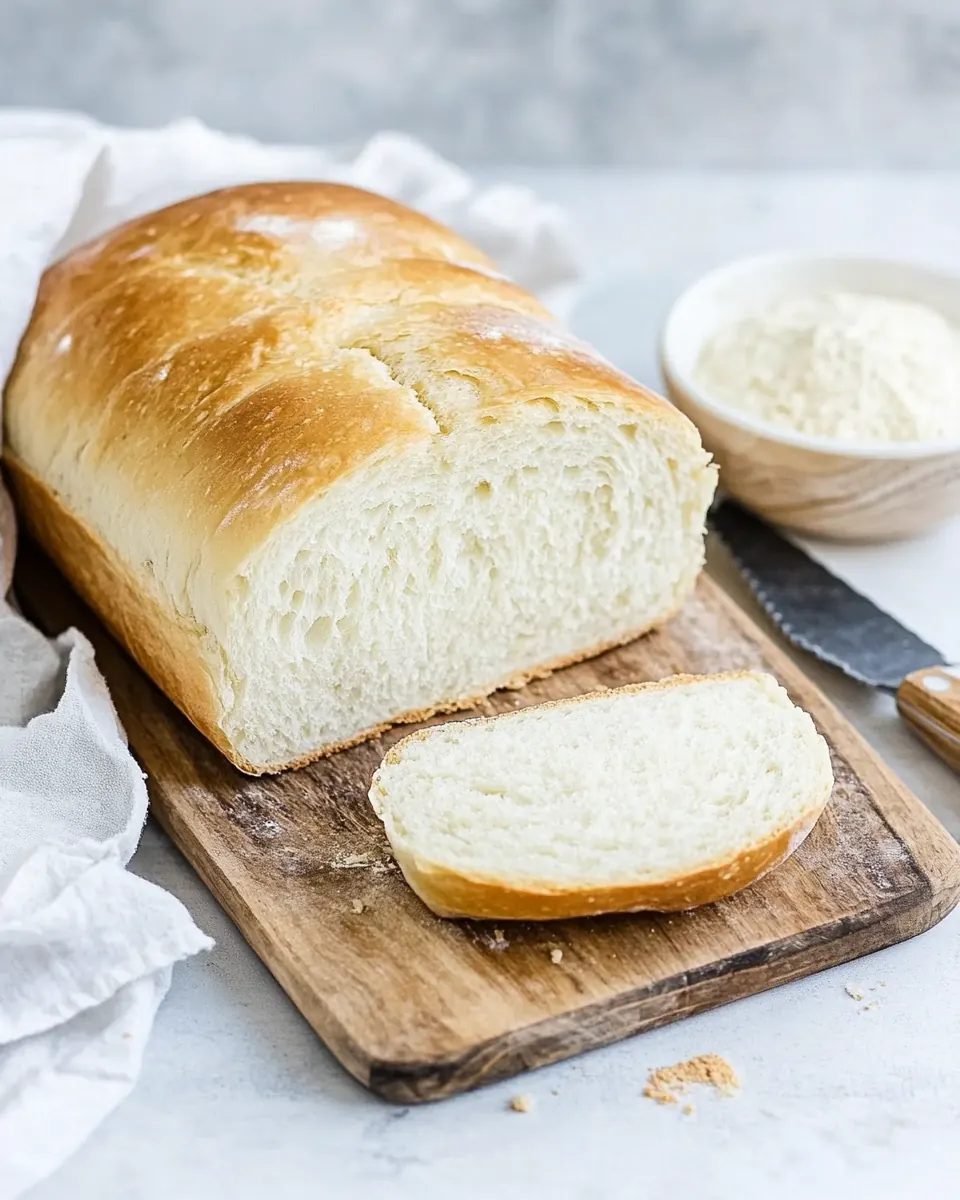
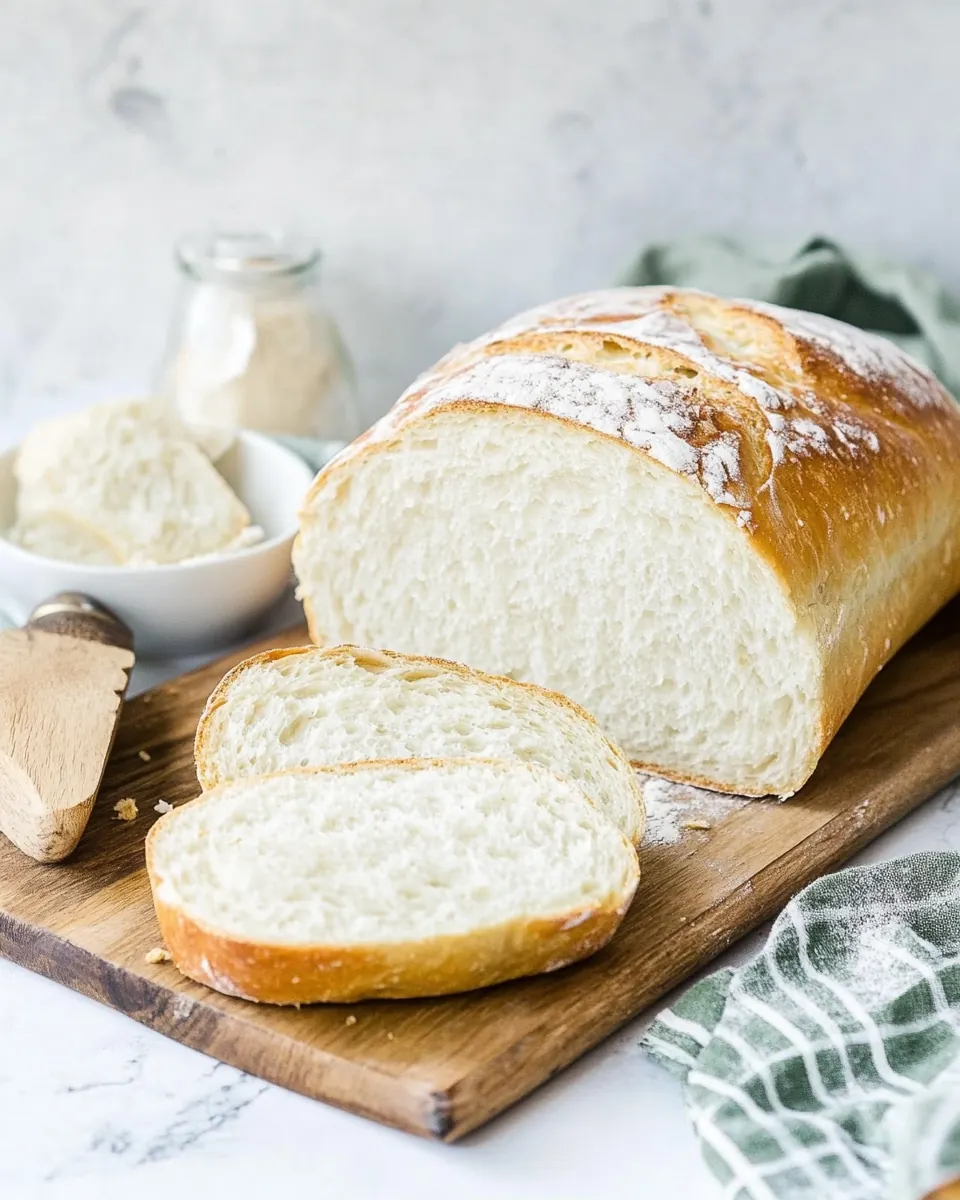
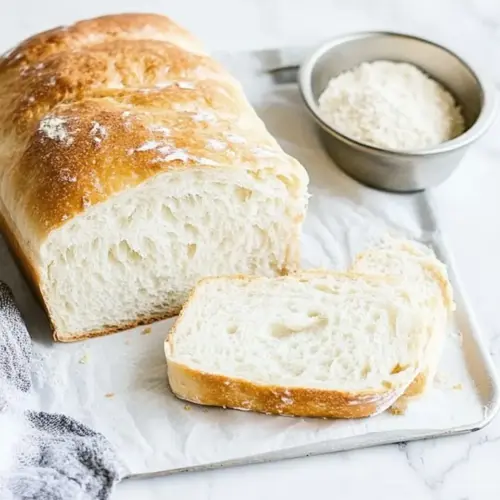
Over the years, I tweaked proportions, watched dough in different lights, and learned little tricks from friends and bakers I admire. With this Homemade White Bread recipe, you get a tender crumb and a golden top without fuss. The texture is soft, the crumb slightly springy, and the crust has a gentle chew that makes it perfect for sandwiches or just a swipe of butter. I often bring a warm pan to the table when guests arrive, and it always becomes the unexpected highlight.
Recipe Snapshot
50 mins
20 mins
30 mins
Medium
150 kcal
American
Gluten-Free, Low FODMAP
Dinner
Stand mixer with hook attachment, 8 x 4 loaf pan, Mixing bowl, Cooling rack
What We Adore About This Homemade White Bread
Reliable Everyday Bread
I love how predictable this Homemade White Bread is, it never throws me a curveball if I treat it right. The method is forgiving, which means you can make it on a busy weekday evening and still end up with a loaf that tastes like you had all afternoon. I appreciate recipes that reward attention but do not demand perfection, and this one fits that sweet spot.
Comforting Texture
What keeps me coming back is the soft, even crumb. The combination of all purpose flour, milk, and a little butter yields a tender interior that toasts beautifully. When you press a finger into a fresh slice, there is a subtle spring that tells you the dough was kneaded and proofed properly. That tactile feedback is satisfying, and it makes the end result feel homemade in the best way.
Simple Ingredients, Big Flavor
We are working with pantry staples, yet the flavor is clean and mildly sweet thanks to a touch of sugar and the richness of milk. You do not need many components to craft something memorable. I like that this bread allows the basic ingredients to sing without masking them with too many extras.
Flexible Uses
This loaf shines in many roles, from a buttered breakfast slice to the base of an open faced sandwich. It holds up to spreads and fillings but remains tender enough for delicate toppings. I often use it for grilled cheese nights because the interior melts into a creamy layer, while the crust provides just enough resistance to hold everything together.
Beginner Friendly Techniques
The techniques in this recipe are approachable, yet they teach essential bread baking skills like proofing and shaping. I find that when you master this basic loaf, you gain confidence to experiment with other breads. It is a great stepping stone for anyone curious about home baking.
Homemade White Bread Ingredients
These ingredients form a harmonious, classic white loaf. The balance between liquid, fat, and flour builds the structure, while the yeast and sugar create lift and subtle sweetness. Each item plays a clear role, and together they create a bread that is tender, slightly rich, and reliably soft.
- 1/2 cup warm water, 112° to 115°: Provide warmth to activate yeast by bringing dough temperature up; measure water at 112° to 115° for optimal fermentation. Aid in dissolving sugar and yeast, creating the starter that gives bread rise, and incorporate easily into dry ingredients for even hydration.
- 2 tablespoons sugar, divided in half: Contribute sweetness and feed the yeast when divided; add half to the yeast mixture to kickstart fermentation and the remainder to the dough for balanced flavor. Enhance crust browning and tenderize crumb by influencing Maillard reactions and moisture retention during baking.
- 1 tablespoon active yeast: Leaven the dough by producing carbon dioxide gas during fermentation, creating airy crumb structure and volume. Promote dough flavor development through fermentation and determine rise time, so ensure yeast is fresh and properly proofed in warm water.
- 2 cups whole milk: Provide rich flavor and creamy mouthfeel while increasing dough hydration and tenderness; whole milk adds proteins and fats that enrich crumb structure. Encourage browning of crust because of natural sugars and lactose, and help extend shelf life by retaining moisture.
- 1 1/2 teaspoons coarse salt: Season the dough by controlling flavor balance and strengthening gluten structure when used in proper proportions. Regulate yeast activity slightly and enhance overall taste, so distribute evenly to avoid pockets of salt that can inhibit fermentation locally.
- 3 tablespoons softened unsalted butter: Add fat to the dough to tenderize crumb and contribute to softer slices and richer flavor; use softened unsalted butter for easier incorporation. Improve dough extensibility and mouthfeel, and help produce a finer, more tender texture in the finished loaf.
- 5 1/2 to 6 cups all-purpose flour: Create the bulk of the dough by supplying starch and gluten-forming proteins that develop structure and chewiness; adjust between 5 1/2 and 6 cups to reach desired dough consistency. Absorb liquids, determine final loaf density, and require proper kneading to build gluten for a good rise.
Making Homemade White Bread
This recipe follows a straightforward, hands on approach that rewards attention during proofing and shaping. Expect to move between the mixer and a floured surface, noticing how the dough transforms from shaggy to smooth. Keep an eye on texture and aroma as you go, they are your best guide.
- Add the warm water (112° to 115°) to a bowl of a stand mixer along with 1/2 the amount of sugar and yeast. Let the mixture sit for 5 to 7 minutes until a raft has formed.: You will notice a bubbly, foamy surface and a pleasantly yeasty aroma when the activation is right, a scent that is mildly sweet and tangy. This foam means the yeast is alive and ready to leaven the dough, and it prevents flat loaves. The texture of the liquid should be silky and slightly warm to the touch, not hot. A common mistake is using water that's too hot, which can kill the yeast , or water too cool, which will delay the foam. If the foam does not develop within the time window, discard and start with fresh yeast and water at the correct temperature.
- Add in the remaining sugar, milk, salt, butter, and 1/2 the amount of flour. Add the hook attachment and turn the stand mixer to low speed.: When you combine these elements, the bowl will look shaggy as the wet ingredients coat the first measure of flour . The sound in the mixer will be soft, a low hum, and you may see streaks of dough clinging to the hook. Mixing on low prevents over developing the exterior gluten too soon, which helps achieve a tender crumb. A pitfall here is adding all the flour at once, which can result in an inconsistent mix and lumps. Ensure the butter is softened so it blends smoothly without leaving greased pockets.
- Slowly pour in the remaining flour 1/2 to 1 cup at a time until completely combined. Knead on low speed for 5 to 7 minutes.: As you add more flour , the dough will tighten and form a cohesive ball that slides around the bowl. The sound transitions to a steadier, slightly louder whir as the hook works. Kneading develops the gluten network, resulting in structure and chew. Feel for a smooth, elastic surface and a slight resistance when pulled. Over kneading can make the crumb too tight and dry, while under kneading yields a slack dough that will not hold shape. If the dough sticks excessively, add small pinches of extra flour , but avoid going past the upper amount listed.
- Transfer the dough to a clean surface dusted with flour and knead by hand for 1 to 2 minutes until soft.: The tactile change is immediate, the dough becomes silkier and you can feel air pockets working through the mass. When you press it, it should gently spring back. This brief hand knead completes gluten alignment and gives you direct feedback on hydration. A common oversight is using too much flour during this step; use only enough to prevent sticking so the final loaf does not dry out.
- Transfer the dough to a large bowl and cover with plastic or a lid.: Placing the dough in a greased bowl will allow it to glide as it expands, and covering traps humidity so the surface does not form a dry skin. The dough should feel warm to the touch through the bowl as fermentation proceeds. If you leave the dough uncovered, a crust forms and prevents proper rise. Choose a bowl with room to double in size to avoid sticky overflow.
- Proof in the oven with only the oven light on for 40 minutes or until it has doubled in size. Return the dough to a clean surface and divide the dough in half.: The oven light creates a gently warm environment that encourages consistent rise, and you will see slow, steady expansion and a soft, pillowy surface. The aroma will develop into a mild, yeasty fragrance. If it does not double, allow extra time rather than increasing temperature, which can affect texture. Cutting the rise short yields dense bread, while over proofing can cause collapse in the oven. Use a gentle touch when handling to keep the trapped gases intact.
- Press the dough down onto a clean flour surface until it is as wide as an 8” loaf pan and about 15”- 16” long.: The process flattens the air pockets slightly and sets the shape for rolling. You should feel a soft resistance as the dough evens out, and the surface will look matte rather than wet. This step creates an even distribution of dough for a uniform loaf. If you press too hard you will expel too much gas and lose volume, so be gentle and steady.
- Roll up the dough from starting on the 8” side until it is rolled up and tight. Fold in the ends and pinch the edges together from the ends and underneath where the bread was rolled up to seal them.: Rolling should produce a tight, even cylinder; you can hear a faint stretching as the dough shapes. Sealing the seams prevents the loaf from unraveling as it rises and bakes. If you leave gaps, the loaf can open and form irregular crusts. A common misstep is rolling too loosely, which leads to uneven crumb structure.
- Place the dough seam side down into a greased 8” x 4” loaf pan and cover with a towel until the dough has just risen past the top of the pan.: Sitting in the pan, the dough will gently swell and you will see it reach and just crest the rim, a visual cue that it is ready for the oven. This final rise ensures oven spring and proper shape. Over proofing here can make the loaf collapse in the oven, so aim for a rise that reaches just above the lip. Keep the towel slightly loose to avoid compressing the dough.
- Bake in the oven at 425° for 20 to 25 minutes or until it reaches an internal temperature of around 200°.: The oven will transform the dough rapidly; the crust will shift from pale to golden brown, and you may hear faint crackles as steam escapes. The heat sets the structure and creates that irresistible aroma. Using a thermometer ensures doneness without over baking. A frequent error is baking at a lower temperature for longer, which can dry the loaf and reduce tenderness. Aim for that golden hue and the target internal temperature.
- Set it on a cooling rack and let it cool to room temperature. Brush with melted butter and serve.: As it cools, steam escapes and the crumb firms up to an ideal texture, releasing a warm, buttery scent when you brush the top. Cooling is essential; cutting too soon yields a gummy interior. Let the loaf rest so the crumb stabilizes, then brush with melted butter for shine and flavor. If you slice while scalding hot, the crumb will smear and compress, so I always wait until it is cool enough to handle.
Pro Tips and Tweaks
This section collects practical adjustments and storage advice I use when making Homemade White Bread. These tips help you handle variations in flour, timing, and storage while keeping the loaf consistent and delicious.
- Temperature matters: Aim for the specified water temperature to activate the yeast without killing it, and use an oven light proofing trick rather than turning the oven on.
- Flour adjustments: Add the remaining flour gradually, watching dough texture, because ambient humidity affects absorption and you want a slightly tacky, elastic dough.
- Kneading control: Knead on low speed for the recommended time to develop gluten properly, and finish with a short hand knead to feel the dough’s softness and elasticity.
- Proofing cues: Look for a doubled size and a pillowy surface rather than relying strictly on time, since yeast activity varies by environment.
- Internal temperature: Use a thermometer to check for around 200° internal temperature to ensure the loaf is fully baked without over drying.
- Storage and make ahead: Cool completely before storing at room temperature for up to three days, refrigerate for up to five days, or freeze for up to three months, thawing at room temperature.
Pairing Suggestions for Homemade White Bread
This loaf is versatile and pairs well with many meals and occasions. Below are serving ideas, storage suggestions, and recommended pairings to elevate how you present and enjoy your Homemade White Bread.
- Breakfast toast: Slice and toast the loaf, then top with butter or a mild spread for a simple morning option that highlights the bread’s soft crumb.
- Sandwiches: Use as the base for classic sandwiches, because the loaf’s tender interior and sturdy crumb hold fillings without collapsing.
- Comfort meals: Serve alongside soups or stews to soak up broths and sauces, making it ideal for cozy weekday dinners.
- Entertaining: Bring a warm loaf to the table for brunch or casual gatherings, slicing it on a board with butter for communal sharing.
- Storage tips: Keep at room temperature covered for up to three days, refrigerate covered for up to five days, or freeze for up to three months; reheat wrapped in foil at 250° for five to seven minutes.
- Seasonal pairings: This bread fits every season, from spring brunches to winter dinners, due to its evergreen, neutral profile that complements many menus.
FAQ
Conclusion
This Homemade White Bread stands out for its comforting texture, straightforward method, and reliable results. It’s a versatile loaf that performs well for toast, sandwiches, and dinner sides, making it a worthy addition to your baking rotation. Try it soon, and enjoy the simple pleasure of warm, freshly baked bread coming from your own oven.
Homemade White Bread
Equipment
- Stand mixer with hook attachment
- 8 x 4 loaf pan
- Mixing Bowl
- Cooling rack
Ingredients
- 1/2 cup warm water, 112° to 115° Provide warmth to activate yeast by bringing dough temperature up; measure water at 112° to 115° for optimal fermentation. Aid in dissolving sugar and yeast, creating the starter that gives bread rise, and incorporate easily into dry ingredients for even hydration.
- 2 tablespoons sugar, divided in half Contribute sweetness and feed the yeast when divided; add half to the yeast mixture to kickstart fermentation and the remainder to the dough for balanced flavor. Enhance crust browning and tenderize crumb by influencing Maillard reactions and moisture retention during baking.
- 1 tablespoon active yeast Leaven the dough by producing carbon dioxide gas during fermentation, creating airy crumb structure and volume. Promote dough flavor development through fermentation and determine rise time, so ensure yeast is fresh and properly proofed in warm water.
- 2 cups whole milk Provide rich flavor and creamy mouthfeel while increasing dough hydration and tenderness; whole milk adds proteins and fats that enrich crumb structure. Encourage browning of crust because of natural sugars and lactose, and help extend shelf life by retaining moisture.
- 1 1/2 teaspoons coarse salt Season the dough by controlling flavor balance and strengthening gluten structure when used in proper proportions. Regulate yeast activity slightly and enhance overall taste, so distribute evenly to avoid pockets of salt that can inhibit fermentation locally.
- 3 tablespoons softened unsalted butter Add fat to the dough to tenderize crumb and contribute to softer slices and richer flavor; use softened unsalted butter for easier incorporation. Improve dough extensibility and mouthfeel, and help produce a finer, more tender texture in the finished loaf.
- 5 1/2 to 6 cups all-purpose flour Create the bulk of the dough by supplying starch and gluten-forming proteins that develop structure and chewiness; adjust between 5 1/2 and 6 cups to reach desired dough consistency. Absorb liquids, determine final loaf density, and require proper kneading to build gluten for a good rise.
Instructions
- Add the warm water (112° to 115°) to a bowl of a stand mixer along with 1/2 the amount of sugar and yeast. Let the mixture sit for 5 to 7 minutes until a raft has formed.: You will notice a bubbly, foamy surface and a pleasantly yeasty aroma when the activation is right, a scent that is mildly sweet and tangy. This foam means the yeast is alive and ready to leaven the dough, and it prevents flat loaves. The texture of the liquid should be silky and slightly warm to the touch, not hot. A common mistake is using water that's too hot, which can kill the yeast , or water too cool, which will delay the foam. If the foam does not develop within the time window, discard and start with fresh yeast and water at the correct temperature.
- Add in the remaining sugar, milk, salt, butter, and 1/2 the amount of flour. Add the hook attachment and turn the stand mixer to low speed.: When you combine these elements, the bowl will look shaggy as the wet ingredients coat the first measure of flour . The sound in the mixer will be soft, a low hum, and you may see streaks of dough clinging to the hook. Mixing on low prevents over developing the exterior gluten too soon, which helps achieve a tender crumb. A pitfall here is adding all the flour at once, which can result in an inconsistent mix and lumps. Ensure the butter is softened so it blends smoothly without leaving greased pockets.
- Slowly pour in the remaining flour 1/2 to 1 cup at a time until completely combined. Knead on low speed for 5 to 7 minutes.: As you add more flour , the dough will tighten and form a cohesive ball that slides around the bowl. The sound transitions to a steadier, slightly louder whir as the hook works. Kneading develops the gluten network, resulting in structure and chew. Feel for a smooth, elastic surface and a slight resistance when pulled. Over kneading can make the crumb too tight and dry, while under kneading yields a slack dough that will not hold shape. If the dough sticks excessively, add small pinches of extra flour , but avoid going past the upper amount listed.
- Transfer the dough to a clean surface dusted with flour and knead by hand for 1 to 2 minutes until soft.: The tactile change is immediate, the dough becomes silkier and you can feel air pockets working through the mass. When you press it, it should gently spring back. This brief hand knead completes gluten alignment and gives you direct feedback on hydration. A common oversight is using too much flour during this step; use only enough to prevent sticking so the final loaf does not dry out.
- Transfer the dough to a large bowl and cover with plastic or a lid.: Placing the dough in a greased bowl will allow it to glide as it expands, and covering traps humidity so the surface does not form a dry skin. The dough should feel warm to the touch through the bowl as fermentation proceeds. If you leave the dough uncovered, a crust forms and prevents proper rise. Choose a bowl with room to double in size to avoid sticky overflow.
- Proof in the oven with only the oven light on for 40 minutes or until it has doubled in size. Return the dough to a clean surface and divide the dough in half.: The oven light creates a gently warm environment that encourages consistent rise, and you will see slow, steady expansion and a soft, pillowy surface. The aroma will develop into a mild, yeasty fragrance. If it does not double, allow extra time rather than increasing temperature, which can affect texture. Cutting the rise short yields dense bread, while over proofing can cause collapse in the oven. Use a gentle touch when handling to keep the trapped gases intact.
- Press the dough down onto a clean flour surface until it is as wide as an 8” loaf pan and about 15”- 16” long.: The process flattens the air pockets slightly and sets the shape for rolling. You should feel a soft resistance as the dough evens out, and the surface will look matte rather than wet. This step creates an even distribution of dough for a uniform loaf. If you press too hard you will expel too much gas and lose volume, so be gentle and steady.
- Roll up the dough from starting on the 8” side until it is rolled up and tight. Fold in the ends and pinch the edges together from the ends and underneath where the bread was rolled up to seal them.: Rolling should produce a tight, even cylinder; you can hear a faint stretching as the dough shapes. Sealing the seams prevents the loaf from unraveling as it rises and bakes. If you leave gaps, the loaf can open and form irregular crusts. A common misstep is rolling too loosely, which leads to uneven crumb structure.
- Place the dough seam side down into a greased 8” x 4” loaf pan and cover with a towel until the dough has just risen past the top of the pan.: Sitting in the pan, the dough will gently swell and you will see it reach and just crest the rim, a visual cue that it is ready for the oven. This final rise ensures oven spring and proper shape. Over proofing here can make the loaf collapse in the oven, so aim for a rise that reaches just above the lip. Keep the towel slightly loose to avoid compressing the dough.
- Bake in the oven at 425° for 20 to 25 minutes or until it reaches an internal temperature of around 200°.: The oven will transform the dough rapidly; the crust will shift from pale to golden brown, and you may hear faint crackles as steam escapes. The heat sets the structure and creates that irresistible aroma. Using a thermometer ensures doneness without over baking. A frequent error is baking at a lower temperature for longer, which can dry the loaf and reduce tenderness. Aim for that golden hue and the target internal temperature.
- Set it on a cooling rack and let it cool to room temperature. Brush with melted butter and serve.: As it cools, steam escapes and the crumb firms up to an ideal texture, releasing a warm, buttery scent when you brush the top. Cooling is essential; cutting too soon yields a gummy interior. Let the loaf rest so the crumb stabilizes, then brush with melted butter for shine and flavor. If you slice while scalding hot, the crumb will smear and compress, so I always wait until it is cool enough to handle.
Notes
- Temperature matters: Aim for the specified water temperature to activate the yeast without killing it, and use an oven light proofing trick rather than turning the oven on.
- Flour adjustments: Add the remaining flour gradually, watching dough texture, because ambient humidity affects absorption and you want a slightly tacky, elastic dough.
- Kneading control: Knead on low speed for the recommended time to develop gluten properly, and finish with a short hand knead to feel the dough’s softness and elasticity.
- Proofing cues: Look for a doubled size and a pillowy surface rather than relying strictly on time, since yeast activity varies by environment.
- Internal temperature: Use a thermometer to check for around 200° internal temperature to ensure the loaf is fully baked without over drying.
- Storage and make ahead: Cool completely before storing at room temperature for up to three days, refrigerate for up to five days, or freeze for up to three months, thawing at room temperature.