Bunny Butt Cookies
Bunny Butt Cookies started as a silly idea the first time I tried to make a holiday treat that made grown people laugh out loud. I remember standing at my kitchen counter with a tube of store bought sugar cookie dough and a pile of marshmallows, thinking I could turn something ordinary into something playful. The first batch was a little lopsided, but my kids declared them the most charming cookies they had ever seen, and from that moment they became our family ritual for spring gatherings.
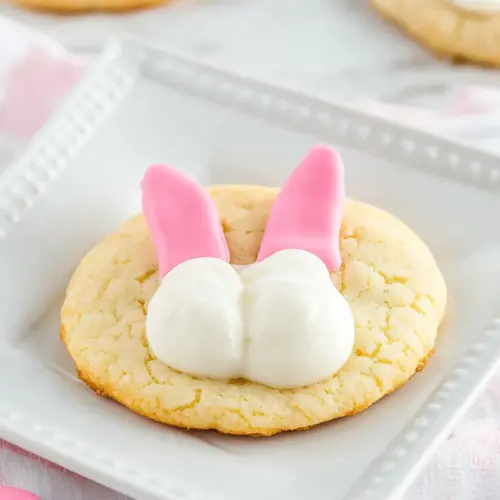
Over time I refined the little details, learning how the right amount of white vanilla frosting makes the feet sit perfectly and how piping a tiny pink vanilla frosting heel pad brings the whole face to life. I love how these treats are approachable, because you do not need to be a pastry chef to make them look delightful. When friends arrive with flowers and a crowd of little helpers, these cookies are the instant mood lifter that everyone reaches for first.
What I appreciate most about Bunny Butt Cookies is their combination of ease and whimsy. We’ve made them for neighborhood potlucks, classroom parties, and a quiet Sunday tea, and each time they bring the same smile. The best part is how forgiving the recipe is, which means you can personalize colors and decorations without risking the structure of the cookie. Bring a piping bag, a steady hand, and a sense of play, and you’ll have a batch that’s equal parts nostalgic and new.
Recipe Snapshot
20 mins
5 mins
15 mins
Medium
150 kcal
American
Vegan, Gluten-Free
Desserts
Oven, Baking sheet, Parchment paper, Cooling rack, Knife, Piping bag
Why This Bunny Butt Cookies Works
Cute with Zero Stress
I love how Bunny Butt Cookies look like you spent hours, while in reality you’re using store bought sugar cookie dough and simple marshmallows. That contrast between effort and result makes them my go to when I want impact without drama.
Kid Friendly Assembly
We get the kids involved in the frosting and placement, and it becomes a shared activity. Little hands can press the marshmallow feet and drop the tiny mini marshmallows tails, and everyone feels proud of the final tray.
Fast to Pull Together
Between slicing the roll and piping a few details, these cookies come together quickly. The short bake and cool time means you’ll have a finished platter in under an hour, which is why I reach for this recipe when plans change mid afternoon.
Visually Versatile
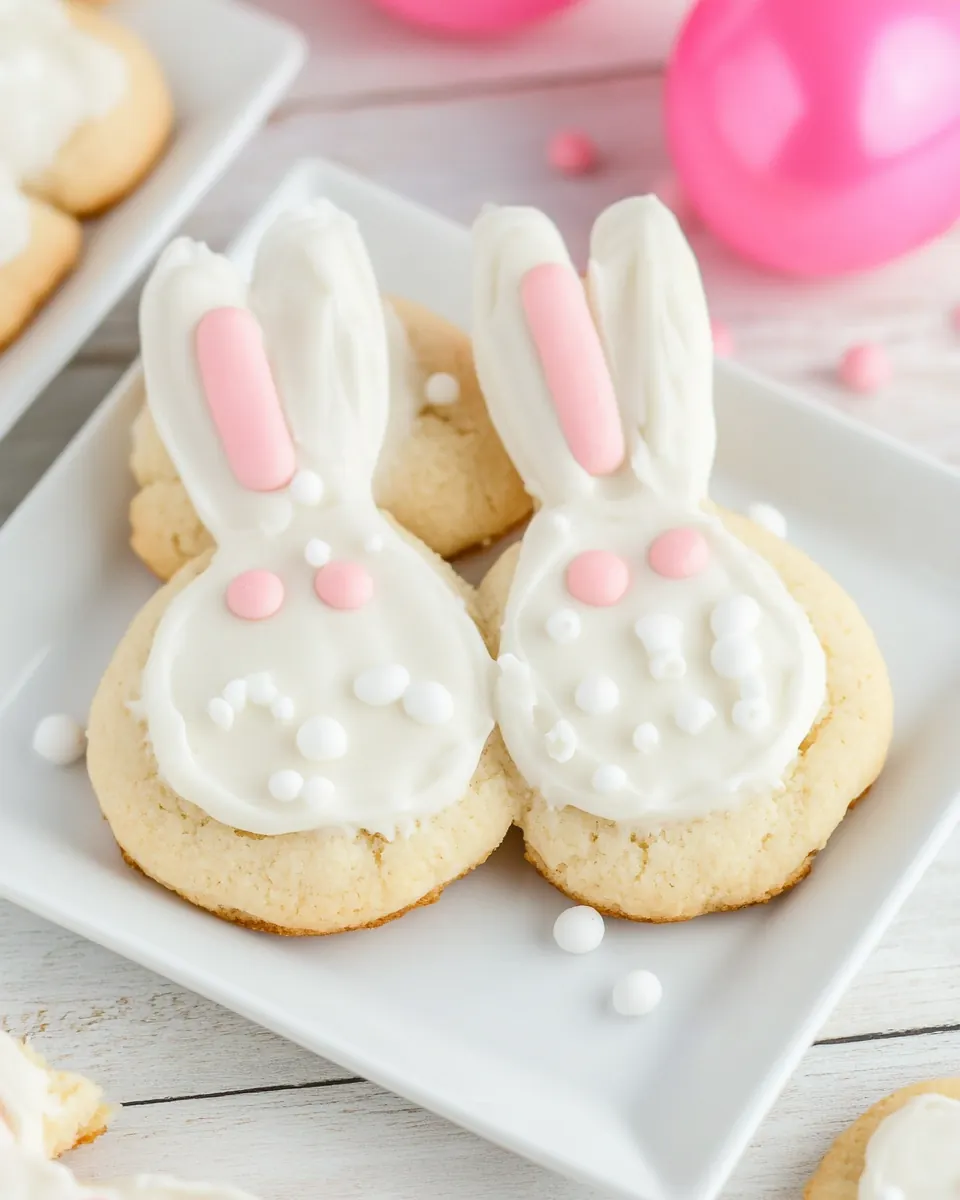
The use of both white and bright pink vanilla frosting lets you switch color themes easily. I’ve adapted them for baby showers and spring brunches just by altering the frosting hue and sparkling sugar.
Make Ahead Friendly
You can bake and frost these in stages, then store them carefully. That flexibility is a lifesaver when preparing for a busy holiday spread, and it keeps the presentation fresh and tidy.
What’s In This Bunny Butt Cookies

These ingredients are chosen for playfulness and predictability. The star is pre made sugar cookie dough, which guarantees consistent texture and saves time. Frostings provide structure and color, while marshmallows create the signature three dimensional feet and tail. The sparkling sugar finishes the look and adds a little crunch so each bite contrasts a soft cookie with crystalline sweet texture.
- 16 ounces store-bought sugar cookie dough: Softens and provides the cookie base for shaping; pressable dough makes quick, uniform cookie bodies without preparing from scratch. Use room-temperature dough to form consistent rounds that will support decorations and baking times similar to store directions.
- 16 ounces store-bought white vanilla frosting: Sweetens and glazes the cookie surface with a smooth vanilla finish; white frosting acts as an adhesive for marshmallow and sugar decorations. Spread a thin, even layer to avoid sliding and to create a bright canvas for contrast with pink frosting.
- 2 tablespoons white sparkling sugar: Adds sparkle and crunch as a decorative accent; white sparkling sugar gives a subtle shimmer suitable for bunny tails or decorative trim. Sprinkle sparingly for visual effect without overpowering texture or sweetness.
- 15 large marshmallows: Provides a soft, pillowy shape useful for forming the bunny tail or body accents; large marshmallows offer size and presence when attached to cookies. Cut or press slightly to create rounded shapes and secure with frosting as edible adhesive.
- 15 mini marshmallows: Offers small, puffy texture for detail work such as tiny tails or nose accents; mini marshmallows are ideal for clustering or creating miniature embellishments. Press into frosting gently to adhere and use them for proportionate contrast with large marshmallows.
- 16 ounces store-bought bright pink vanilla frosting: Colors and flavors with vibrant hue and vanilla sweetness; bright pink frosting creates eye-catching contrast and defines facial features or decorative areas. Pipe or spread carefully to achieve crisp lines and consistent color across cookies.
Recipe Directions for Bunny Butt Cookies
These directions are straightforward, and I like to walk you through sensory cues so you know when things are right. You will go from slicing dough to a decorated platter, and I find the pacing makes the process relaxing and slightly addictive. Keep a clean counter and a few towels handy for quick cleanup as you decorate.
- Preheat your oven to 325 degrees Fahrenheit and prepare a large nonstick baking sheet with parchment paper.: The kitchen will fill with a faint warm, neutral smell as the oven comes up to temperature, and the parchment creates an even surface so cookies bake without sticking. This low heat helps cookies bake through without over browning. If your oven runs hot, they can burn on the edges, so check a minute or two early.
- Use a knife to cut the cookie roll into 15 1/2-inch slices. Place the cookie dough on the prepared baking sheet 2 – 3 inches apart.: As you slice, the dough should give a soft, slightly tacky feel, and you should see even round discs. Spacing is important so cookies have room to spread and keep their round shape. A common slip is cutting uneven slices, which leads to uneven baking and odd shapes.
- Bake for 10 – 12 minutes or until just becoming brown. Remove from the oven and allow to cool on a cooling rack.: While baking you will notice the aroma of baked sugar and butter growing stronger and the tops changing from pale to a hint of golden brown. Pull them when edges set but centers are still soft, because they firm as they cool. Overbaking dries them out, so watch the color closely.
- Cut each of the 15 large marshmallows in half to form the bunny feet. Set aside.: Cutting marshmallows releases a sweet, faint scent, and the exposed interior looks pillowy. Use a sharp knife and press straight down to keep halves even. A slippery surface makes cutting tricky, so hold the marshmallow steady to avoid ragged halves.
- Once the baked cookies are completely cool, spread white vanilla frosting over the cooled cookies.: The frosting should be thick and creamy, gliding onto the cookie with a soft, spreadable sound. Cool cookies are essential so the frosting does not melt and slide off, leaving a glossy mess. If you spread too vigorously you can tear the cookie surface, so go gently.
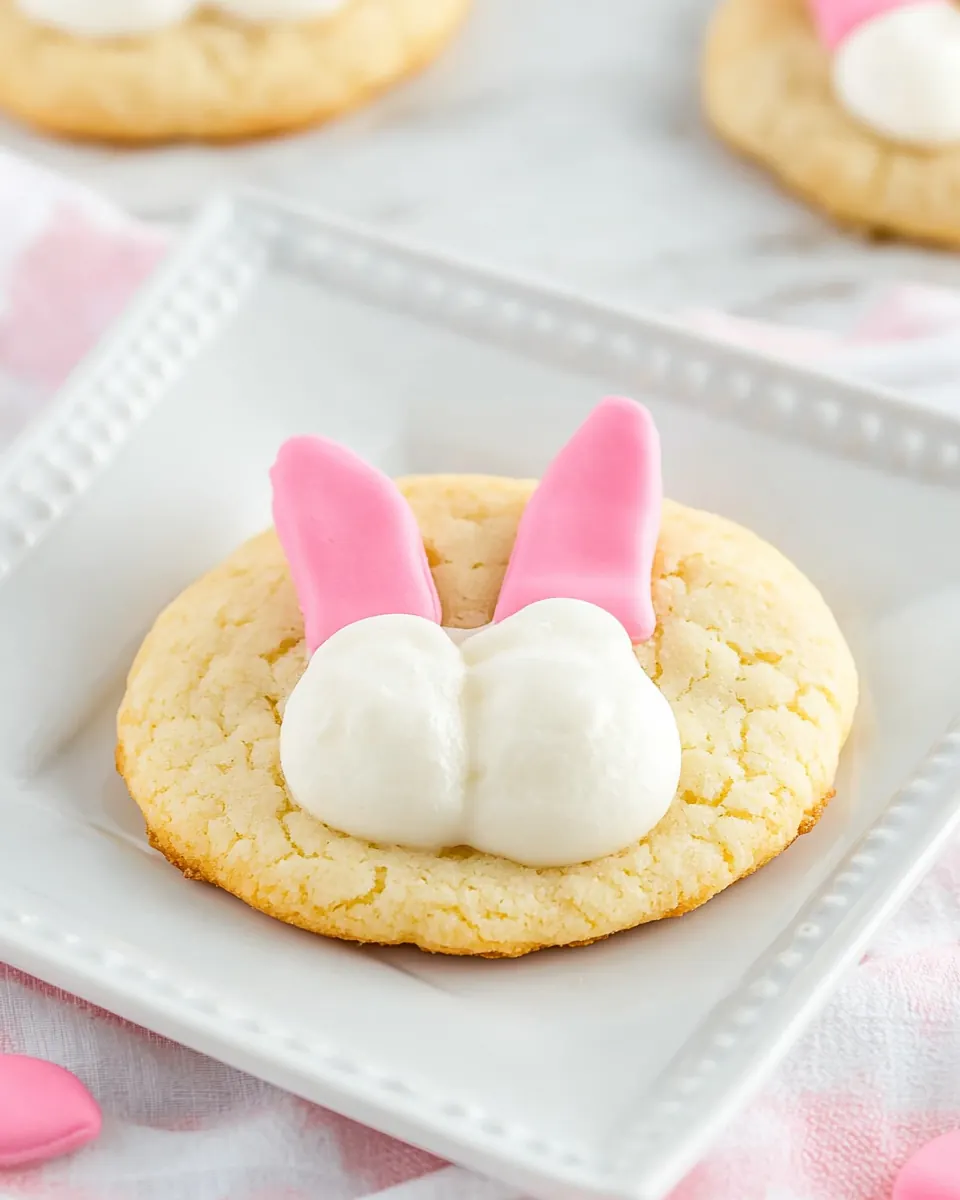
- Sprinkle the white icing with white sparkling sugar. Then place 2 large marshmallow halves on the frosted cookies as the bunny feet.: The sparkling sugar adds a faint crunch under your teeth and catches light, making each cookie sparkle. When setting the marshmallow halves, press lightly so they adhere to the frosting without sinking. Do not press too hard or you will flatten the marshmallow texture.
- Then place a mini marshmallow in the center of the cookie, just above the feet, to form the bunny tail.: The mini will sit like a little white pom pom, adding a soft touch of dimension. It should rest against the frosting and remain centered above the feet. If placed while frosting is still wet, it may slide off center, so ensure the base has some set.
- Place the pink icing in a piping bag and pipe a small heel pad and toe pads on the marshmallow halves that form the feet.: Piping produces a gentle, precise sound as the frosting emerges, and the bright pink contrast defines the bunny foot pads beautifully. Use light, steady pressure and a small round tip for neat pads. Pressing too hard will create blobby pads that lose the cute detail.
Helpful Hints
These hints cover assembly, storage, and small tricks I use to make decorating faster and more reliable. They aim to keep your cookies looking sharp and tasting fresh, whether you are making a single batch or a dozen for a party.
- Keep tools ready, have a sharp knife, piping bag, and spatula nearby so you can move smoothly from baking to decorating without hunting for equipment.
- Cool completely before frosting, if the cookies are even slightly warm the frosting will melt and lose shape, so patience pays off.
- Use parchment between layers, when storing to prevent frosting smudging, especially if you need to stack cookies in a container.
- Work in batches, frost a few cookies at a time so the marshmallows and mini marshmallows can be positioned before the base frosting sets too hard.
- Pipe with control, squeeze gently and consistently for tidy heel and toe pads, and practice on parchment if you need to steady your hand.
- Store at room temperature, these cookies keep their texture best out of the fridge for up to three days if the frosting has fully set.
Pairing Suggestions for Bunny Butt Cookies
These cookies pair well with simple beverages and light accompaniments, and their playful look makes them great for themed tables. Think seasonal touches and bright presentations to complement the cute aesthetic.
- Serve with milk, a classic match that balances the sweetness and invites dunking, ideal for children and nostalgic adults alike.
- Offer a selection of small fruit, like berries or sliced strawberries, to add a fresh, tangy contrast to the sweet cookie platter during brunch or afternoon tea.
- Create a themed dessert table, place Bunny Butt Cookies alongside other pastel treats for Easter or spring gatherings to amplify the visual impact and celebration mood.
- Pack for classroom parties, these travel well if stored flat in a container with parchment paper between layers, and they become an instant hit with kids.
- Use as a centerpiece, arrange cookies on a tiered tray for a party display that doubles as decor, making the dessert area both pretty and edible.
- Store and refresh, keep at room temperature for up to three days, and if frosting dulls a bit, a light dusting of sparkling sugar revives the shine before serving.
FAQ
Conclusion
Bunny Butt Cookies stand out because they transform simple store bought components into a whimsical, shareable treat that brings smiles. They are approachable, quick, and perfect for springtime gatherings when you want something playful without fuss. Give them a try the next time you need a lighthearted dessert, and invite a few helpers to make the decorating part of the fun. You will find that small details like sparkling sugar and neat piping elevate the presentation, and once you see how delighted your guests are, these cookies will become a repeat favorite.
Bunny Butt Cookies
Equipment
- Oven
- Baking Sheet
- Parchment Paper
- Cooling rack
- Knife
- Piping Bag
Ingredients
- 16 ounces store-bought sugar cookie dough Softens and provides the cookie base for shaping; pressable dough makes quick, uniform cookie bodies without preparing from scratch. Use room-temperature dough to form consistent rounds that will support decorations and baking times similar to store directions.
- 16 ounces store-bought white vanilla frosting Sweetens and glazes the cookie surface with a smooth vanilla finish; white frosting acts as an adhesive for marshmallow and sugar decorations. Spread a thin, even layer to avoid sliding and to create a bright canvas for contrast with pink frosting.
- 2 tablespoons white sparkling sugar Adds sparkle and crunch as a decorative accent; white sparkling sugar gives a subtle shimmer suitable for bunny tails or decorative trim. Sprinkle sparingly for visual effect without overpowering texture or sweetness.
- 15 large marshmallows Provides a soft, pillowy shape useful for forming the bunny tail or body accents; large marshmallows offer size and presence when attached to cookies. Cut or press slightly to create rounded shapes and secure with frosting as edible adhesive.
- 15 mini marshmallows Offers small, puffy texture for detail work such as tiny tails or nose accents; mini marshmallows are ideal for clustering or creating miniature embellishments. Press into frosting gently to adhere and use them for proportionate contrast with large marshmallows.
- 16 ounces store-bought bright pink vanilla frosting Colors and flavors with vibrant hue and vanilla sweetness; bright pink frosting creates eye-catching contrast and defines facial features or decorative areas. Pipe or spread carefully to achieve crisp lines and consistent color across cookies.
Instructions
- Preheat your oven to 325 degrees Fahrenheit and prepare a large nonstick baking sheet with parchment paper.: The kitchen will fill with a faint warm, neutral smell as the oven comes up to temperature, and the parchment creates an even surface so cookies bake without sticking. This low heat helps cookies bake through without over browning. If your oven runs hot, they can burn on the edges, so check a minute or two early.
- Use a knife to cut the cookie roll into 15 1/2-inch slices. Place the cookie dough on the prepared baking sheet 2 – 3 inches apart.: As you slice, the dough should give a soft, slightly tacky feel, and you should see even round discs. Spacing is important so cookies have room to spread and keep their round shape. A common slip is cutting uneven slices, which leads to uneven baking and odd shapes.
- Bake for 10 – 12 minutes or until just becoming brown. Remove from the oven and allow to cool on a cooling rack.: While baking you will notice the aroma of baked sugar and butter growing stronger and the tops changing from pale to a hint of golden brown. Pull them when edges set but centers are still soft, because they firm as they cool. Overbaking dries them out, so watch the color closely.
- Cut each of the 15 large marshmallows in half to form the bunny feet. Set aside.: Cutting marshmallows releases a sweet, faint scent, and the exposed interior looks pillowy. Use a sharp knife and press straight down to keep halves even. A slippery surface makes cutting tricky, so hold the marshmallow steady to avoid ragged halves.
- Once the baked cookies are completely cool, spread white vanilla frosting over the cooled cookies.: The frosting should be thick and creamy, gliding onto the cookie with a soft, spreadable sound. Cool cookies are essential so the frosting does not melt and slide off, leaving a glossy mess. If you spread too vigorously you can tear the cookie surface, so go gently.
- Sprinkle the white icing with white sparkling sugar. Then place 2 large marshmallow halves on the frosted cookies as the bunny feet.: The sparkling sugar adds a faint crunch under your teeth and catches light, making each cookie sparkle. When setting the marshmallow halves, press lightly so they adhere to the frosting without sinking. Do not press too hard or you will flatten the marshmallow texture.
- Then place a mini marshmallow in the center of the cookie, just above the feet, to form the bunny tail.: The mini will sit like a little white pom pom, adding a soft touch of dimension. It should rest against the frosting and remain centered above the feet. If placed while frosting is still wet, it may slide off center, so ensure the base has some set.
- Place the pink icing in a piping bag and pipe a small heel pad and toe pads on the marshmallow halves that form the feet.: Piping produces a gentle, precise sound as the frosting emerges, and the bright pink contrast defines the bunny foot pads beautifully. Use light, steady pressure and a small round tip for neat pads. Pressing too hard will create blobby pads that lose the cute detail.
Notes
- Keep tools ready, have a sharp knife, piping bag, and spatula nearby so you can move smoothly from baking to decorating without hunting for equipment.
- Cool completely before frosting, if the cookies are even slightly warm the frosting will melt and lose shape, so patience pays off.
- Use parchment between layers, when storing to prevent frosting smudging, especially if you need to stack cookies in a container.
- Work in batches, frost a few cookies at a time so the marshmallows and mini marshmallows can be positioned before the base frosting sets too hard.
- Pipe with control, squeeze gently and consistently for tidy heel and toe pads, and practice on parchment if you need to steady your hand.
- Store at room temperature, these cookies keep their texture best out of the fridge for up to three days if the frosting has fully set.