Peppermint Oreo Truffles
Peppermint Oreo Truffles came into my life on a snowy afternoon when I needed a small, festive project to lift my spirits. I remember unwrapping a sleeve of Oreos and thinking about how a few simple ingredients could become something oddly luxurious, bright with peppermint and rich with chocolate. That first batch disappeared faster than I expected, leaving me convinced these little bites belong in every holiday exchange and cozy get together.
I started playing with textures, and what struck me was how forgiving this recipe is. The cookie crumbs and cream cheese form a silky, moldable center, while the melted dark melting wafers give a glossy shell that snaps with each bite. I love that you can make these ahead, pop them in the fridge, and pull them out when guests arrive, serving something that feels homemade but impressive.
Over the years I have adapted my process to make dipping neater and faster, and I always keep extra crushed candy cane on hand for a festive finish. Friends ask for the recipe every season, and I pass it on with the same grin I had when I first tasted these truffles. If you enjoy sweet treats with a bright peppermint note, you will probably find yourself making these repeatedly.
Recipe Snapshot
30 mins
30 mins
Easy
120 kcal
American
Keto, Gluten-Free
Desserts
Food processor, Blender, Wax paper lined pan, Toothpick or fork, Baking sheet
The Appeal of This Peppermint Oreo Truffles
They are ridiculously simple
I love how Peppermint Oreo Truffles feel special while staying effortless. You do not need tempering skills or advanced baking techniques, and yet the end result looks like something from a bakery counter.
Flavor balance is spot on
The combo of crushed Oreos, tangy cream cheese, and cool peppermint creates a contrast that keeps each bite interesting. The dark coating adds a slightly bitter counterpoint that stops the sweetness from becoming cloying.
Perfect for gifting and parties
I always make a double batch around the holidays because they travel well and present beautifully in boxes. Sprinkling crushed candy cane on top instantly signals holiday cheer.
Make ahead friendly
You can prepare the centers, chill them, and dip them later, which makes these ideal for busy hosting days. I often freeze the balls briefly to speed up the dipping process and reduce mess.
Fun to customize
While this recipe shines as written, you can tweak the coating or the candy garnish to suit your vibe. I enjoy how small changes lead to very different finishes while preserving the core texture and flavor.
What to Buy for Peppermint Oreo Truffles
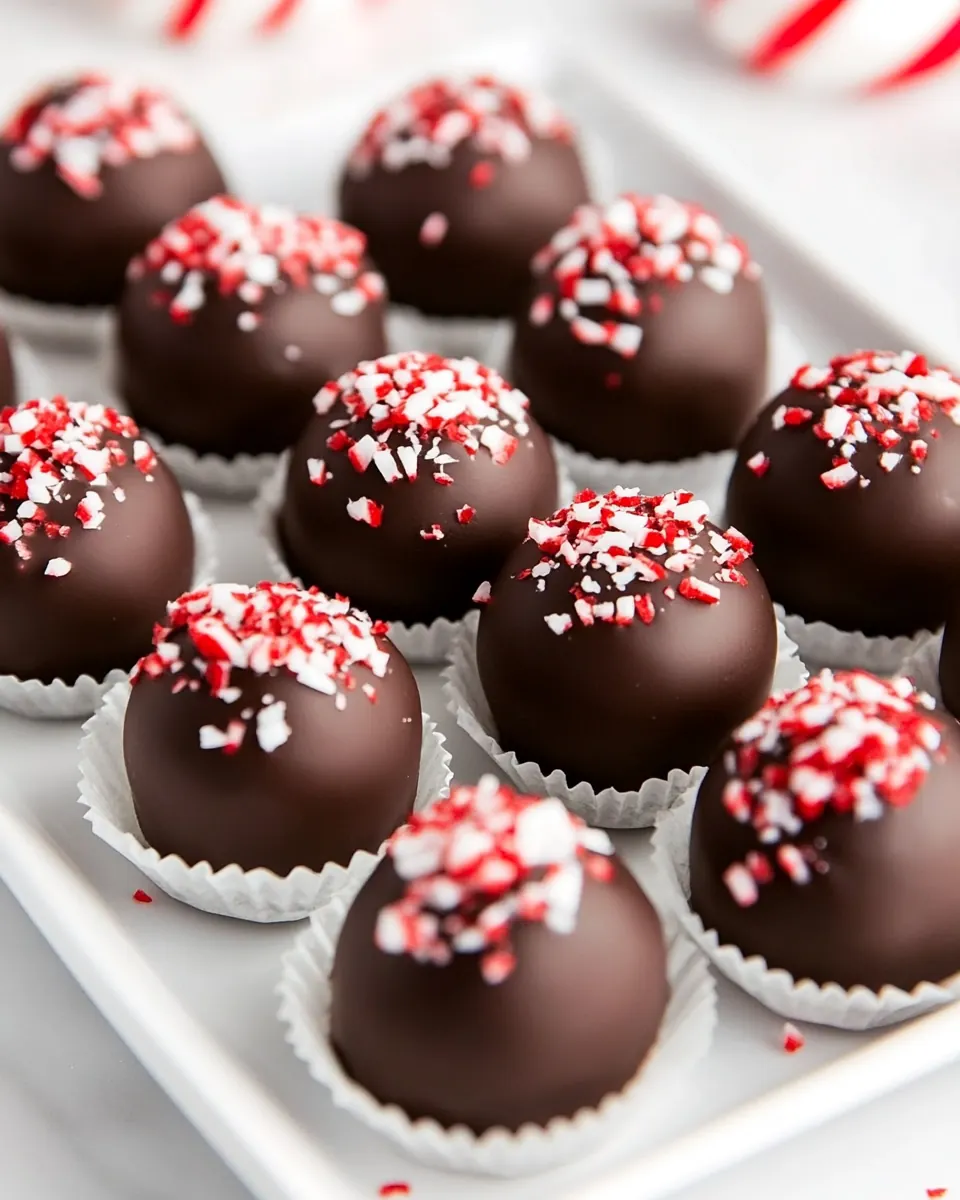
These ingredients are honest and straightforward, playing clearly defined roles. The crushed Oreos provide structure and chocolate flavor, while the cream cheese adds creaminess and binds the mixture. Peppermint extract lifts the profile, the dark melting wafers or almond bark give a glossy protective shell, and the crushed candy cane finishes with a crunchy peppermint burst.
- 36 regular Oreos: Crush into fine crumbs to form the truffle base and provide texture; binds easily with cream cheese when processed. Use the full package amount to yield consistent flavor and structure for rolling into balls.
- 8 ounces cream cheese, at room temperature: Soften to room temperature and beat until smooth to create a creamy binder that holds Oreo crumbs together; contributes richness and moisture. Ensure full amount is incorporated for proper consistency and to prevent greasy or crumbly truffles.
- 1 teaspoon peppermint extract: Infuse with flavor by adding to the filling to give a bright, minty aroma and a distinct holiday note; a little goes a long way. Measure carefully to balance peppermint intensity without overpowering the chocolate.
- 16 ounces dark melting wafers or almond bark: Melt gently and temper if needed to coat the truffles, creating a smooth, firm chocolate shell that sets nicely; provides a glossy finish and snap. Choose dark melting wafers or almond bark for ease of melting and a stable coating.
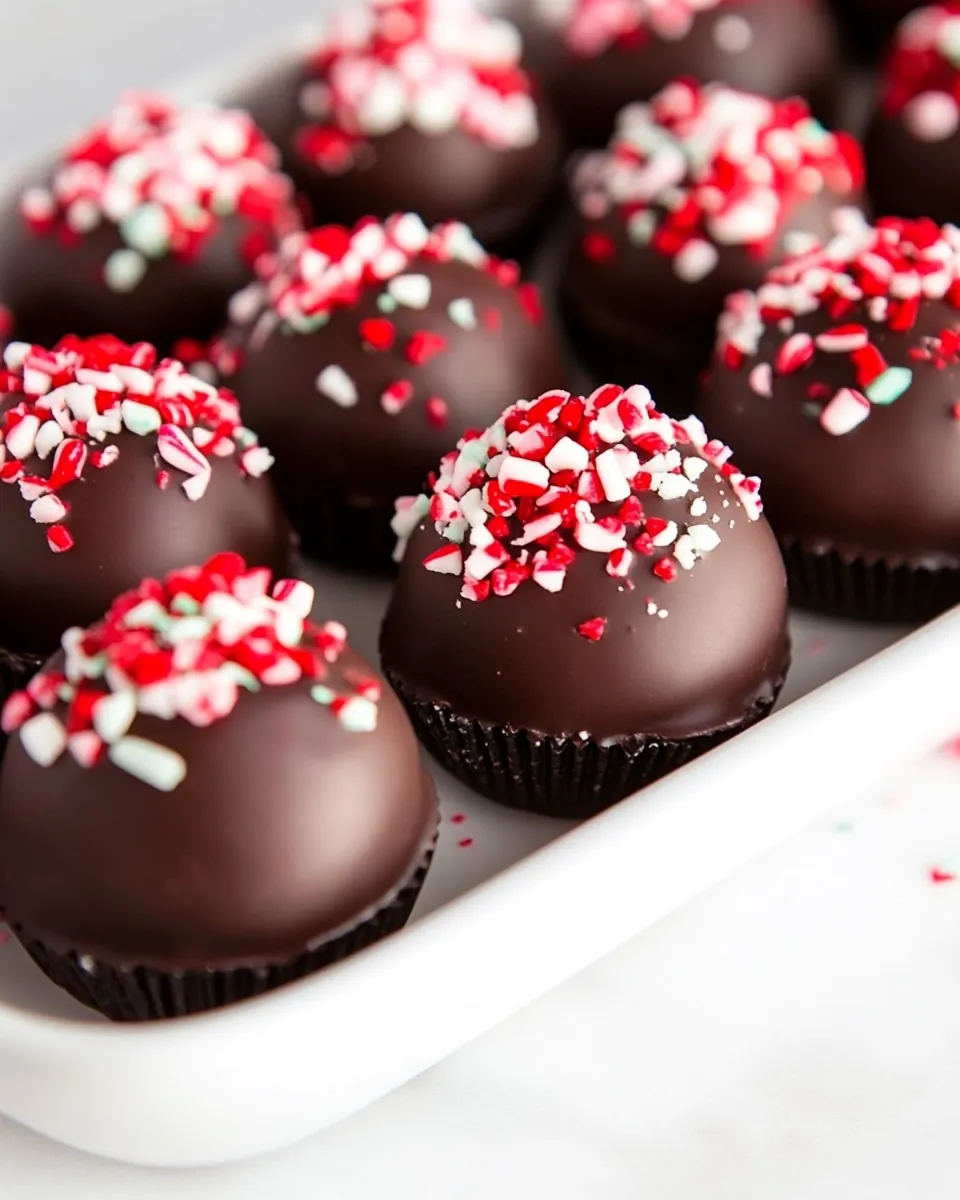
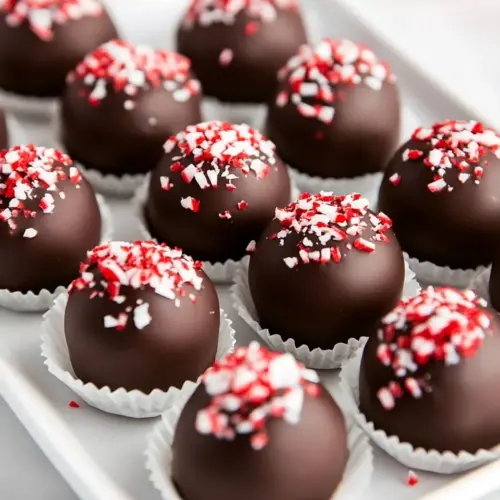
- 2 tablespoon crushed candy cane: Sprinkle or press into the outer coating to add crunchy, refreshing mint pieces and festive color; enhances texture and visual appeal. Crush finely for even distribution and an attractive topping on each truffle.
Recipe Directions for Peppermint Oreo Truffles

These directions are approachable and methodical, designed to help you achieve glossy, well coated truffles every time. Read through the steps before you begin, set up a tidy workspace with wax paper, and chill the centers so the dipping goes smoothly. Keep extra dark melting wafers or almond bark ready for remelting as you work.
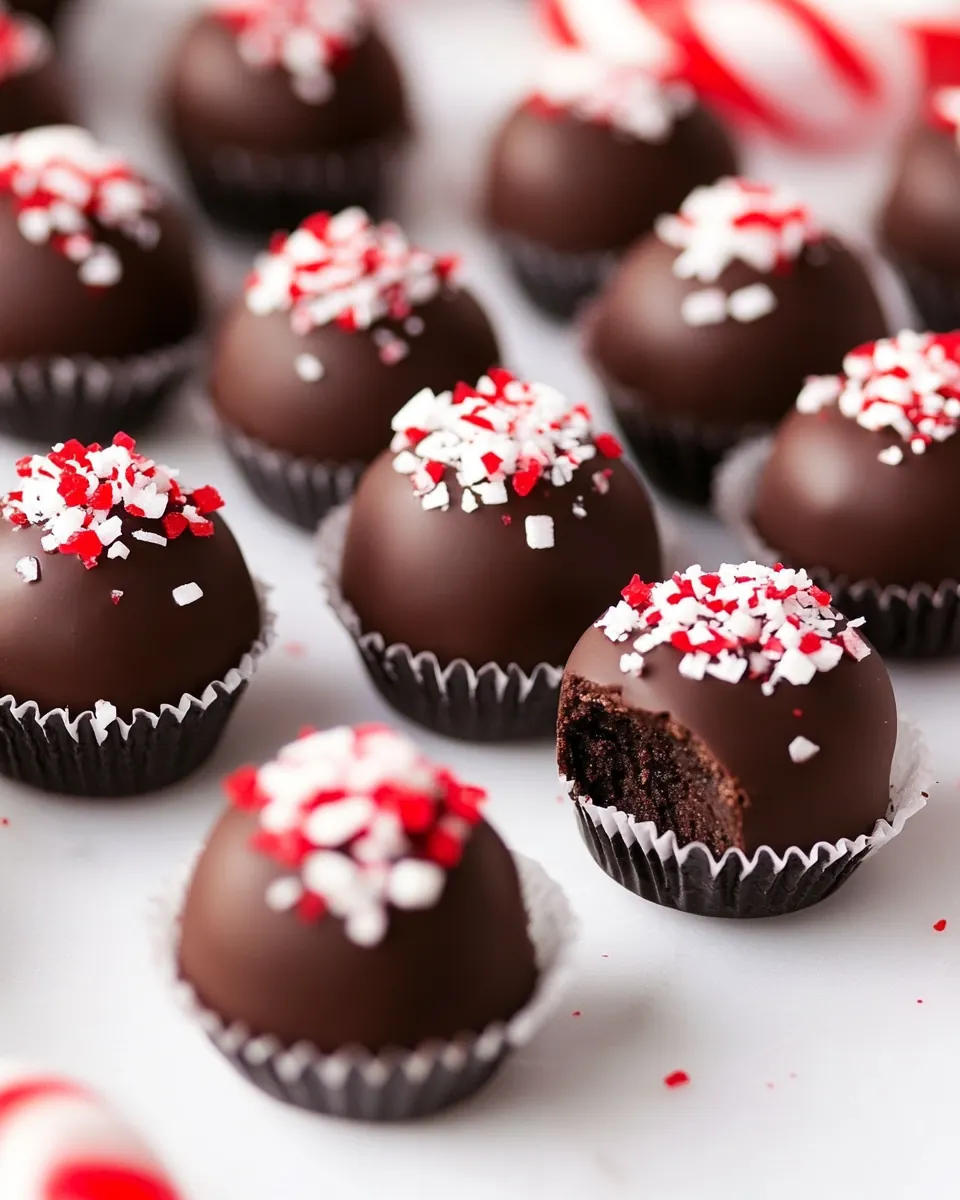
- Place whole Oreos in a food processor or blender and puree until finely crushed. Add the cream cheese and extract. Puree until well combined.: Close your eyes and listen for the steady hum as the Oreos break down into a fine, sandy crumb, the aroma shifting from packaged sweetness to chocolatey warmth. This texture is important because it determines how smoothly the crumbs will bind with the cream cheese . If the pieces are too large, you will feel crumbly bits in the center rather than a creamy homogenous bite. A common mistake here is pulsing too briefly, leaving noticeable cookie chunks; process until you see a uniform, powdery consistency and scrape down the bowl once to capture any hidden pieces.
- Scoop the mixture out into 1 inch balls (about 2 teaspoons), roll into a ball and place on a wax paper lined pan. Place the balls in the fridge for 2 hours or freezer for 30 minutes.: As you add softened cream cheese and the peppermint extract , the processor will transition from a dry crumb to a dense, glossy mass. The scent of peppermint will bloom, cutting through the chocolate notes. This step matters because thorough incorporation ensures each truffle has an even flavor and holds together when rolled. If the mixture seems too wet, chill it briefly; if too dry, make sure the cream cheese was truly at room temperature. An error people make is adding more cream cheese to compensate for dryness right away, which can throw off the texture.
- Melt the chocolate according to directions. Take half the balls out of the fridge at a time (so the others stay firm and easy to dip). Dip each ball into the chocolate using a toothpick or fork. Let the excess chocolate drip back in the bowl. Place on a wax paper lined baking sheet and immediately sprinkle crushed peppermint candy on top. Repeat with remaining Oreo balls. Remelt the chocolate as needed.: You should see the mixture gather into a single, pliable ball, with no streaks of cream cheese . The visual cue is a smooth, slightly glossy dough with a uniform color. This uniformity affects the final mouthfeel, preventing pockets of overt creaminess or dry crumbs. Avoid overprocessing, because excessive blending warms the mixture and can make the centers too soft to shape easily; pulse and check frequently to stop at the right moment.
- Store in the fridge.: When you portion the centers, aim for consistent sizes to ensure even chilling and coating. Using a small scoop or measuring spoons helps create uniform 1 inch balls that look tidy and finish at the same pace. The tactile feedback of rolling into a smooth ball tells you the moisture level is correct; if the surface cracks, it is too dry, and if it is sticky, it needs a short chill. A typical pitfall here is making uneven sizes, which leads to some truffles cracking under the weight of the coating while others remain undercoated.
- Roll into a ball and place on a wax paper lined pan: The wax paper prevents sticking and collects stray crumbs, while the tray keeps the shapes from flattening. Press gently to smooth the surface, which helps the chocolate coating slide on more evenly later. The shape and smoothness influence how the chocolate sets and how the candies adhere. People sometimes skip the wax paper and end up prying truffles off a sticky surface, which can damage their appearance.
- Place the balls in the fridge for 2 hours or freezer for 30 minutes: Chilling firms the centers, making them less likely to fall apart when dipped. You will notice the cooling tightens the outer surface, and the aroma will mellow slightly. This step is why the truffles hold a neat profile after coating. A misstep is insufficient chilling, which causes the centers to crumble during dipping, so resist impatience and allow the time needed for solidity.
- Melt the chocolate according to directions: Melt the dark melting wafers or almond bark gently, stirring until glossy and completely smooth, with no lumps. The silky sheen indicates the fat in the coating has fully liquefied, which helps the chocolate set with a crisp finish. Avoid overheating because burnt chocolate becomes grainy and dull; use brief intervals if microwaving or a low simmer if using a double boiler. Many people rush this and end up with seizing, which ruins the smooth coating effect.
- Take half the balls out of the fridge at a time: Working in small batches keeps the remaining centers cold and firm, which makes dipping cleaner and faster. The contrast between cold center and warm chocolate ensures the chocolate sets quickly around the ball rather than soaking in. If you remove all the balls at once, the centers will warm, increasing the risk of slipping and misshapen coatings. Chilling in stages avoids a messy, prolonged dipping session.
- Dip each ball into the chocolate using a toothpick or fork: As you dip, watch the chocolate cling and form a glossy shell; a slight shaking motion helps excess drip back into the bowl. The sound is quiet, but you will feel the weight shift as the liquid coating settles, and visually the chocolate should look uniformly smooth. This technique matters for a clean finish and to avoid thick, uneven layers. A common error is dipping too slowly, which can cause the center to overheat and the chocolate to pool at the base.
- Let the excess chocolate drip back in the bowl: Hold the truffle above the bowl and tap gently to release surplus coating so the set layer is thin and elegant. The dripping helps you control how much chocolate remains, and a thin shell provides the right snap without overpowering the creamy interior. People often leave too much chocolate on, creating heavy, overly sweet shells that mask the peppermint center.
- Place on a wax paper lined baking sheet and immediately sprinkle crushed peppermint candy on top: The warm chocolate acts like glue for the crushed candy cane , so apply it right away to achieve good adhesion. Visually, the candy adds contrast and texture, and the cool peppermint pieces enhance the sensory peppermint note with a crisp crunch. A mistake is waiting too long to sprinkle, which prevents the candy from sticking and forces you to press pieces on, potentially damaging the shiny finish.
- Repeat with remaining Oreo balls: Continue working in batches, remelting the chocolate as needed to maintain a smooth coating temperature and consistency. Observing the chocolate as you work helps you judge when to remelt, because cooling chocolate thickens and loses gloss. A frequent issue is letting the coating thicken too much, producing clumpy coverage that hides the clean lines of the truffle.
- Remelt the chocolate as needed: Keep the chocolate at a pourable sheen by gently reheating, stirring to restore a smooth texture. Properly fluid chocolate ensures thin, even layers and a professional look. Over reheating on high heat is the usual mistake, which can scorch the chocolate and make it grainy.
- Store in the fridge: Once fully set, keep the truffles chilled to maintain firm centers and a crisp coating. Stored in an airtight container, they will stay fresh and retain texture. Leaving them at room temperature for prolonged periods will soften the centers and may cause blooming on the chocolate surface, which affects appearance though not safety.
Recipe Variations about Peppermint Oreo Truffles
I like to experiment with small changes that alter texture and presentation while keeping the core method intact. Below are ideas to try, each expanded for clarity and easy execution.
- Swap the coating Change the dark melting wafers or almond bark to a milk or white coating for a sweeter finish, and keep an eye on melting temperatures since different coatings behave differently when reheated.
- Adjust peppermint intensity If you prefer a milder candy note, reduce the peppermint extract slightly, or increase it for a bolder flavor, measuring carefully because it is potent.
- Use different garnish sizes Crush the candy cane more finely for a subtle crunch, or leave larger shards for a dramatic look and extra texture contrast.
- Freeze for firm centers Freeze a tray of rolled balls for 30 minutes to make dipping faster and neater; just avoid leaving them in long enough to freeze solid which can cause cracking when the warm chocolate hits.
- Package as gifts Arrange cooled truffles in a small box with parchment and separate layers with wax paper; the sturdy coating helps them travel well when wrapped properly.
Serving Ideas for Peppermint Oreo Truffles
These truffles are versatile when it comes to serving. Whether you are preparing a dessert platter for a holiday party or packing small boxes as edible gifts, these ideas will help you present them beautifully. I often pair them with complementary sweets and suggest storage and serving temperatures to keep them at peak quality.
- Party platter Arrange the truffles on a large platter, alternating with plain chocolate pieces to balance sweetness, and label them so guests know the peppermint flavor.
- Gift boxes Place truffles in small gift boxes lined with parchment and a dusting of cocoa on the bottom for a professional presentation that travels well.
- After dinner treat Serve a small plate of two truffles alongside coffee or tea to provide a sweet, minty finish to a meal.
- Holiday dessert table Include the truffles among cookies and candies so guests can mix and match, and refill the platter from the fridge as needed to keep the coating crisp.
- Storage tips Keep truffles in an airtight container in the fridge, and bring them to a cool room temperature for about 10 to 15 minutes before serving for the best texture and aroma.
- Occasions These work well for holiday gatherings, cookie exchanges, or anytime you want a small, festive confection to share during the winter months.
FAQ
Conclusion
These Peppermint Oreo Truffles combine simple pantry ingredients into a festive treat that tastes far fancier than the effort suggests. They are forgiving to make, adaptable for gifting, and deliver a pleasant crunch from the crushed candy cane balanced by a creamy center. Try making a batch this week and share a few with friends or neighbors, you might find they become your new go to holiday confection. Enjoy the process as much as the result, and have fun with small variations to suit your personal preference.
Peppermint Oreo Truffles
Equipment
- Food Processor
- Blender
- Wax paper lined pan
- Toothpick or fork
- Baking Sheet
Ingredients
- 36 regular Oreos Crush into fine crumbs to form the truffle base and provide texture; binds easily with cream cheese when processed. Use the full package amount to yield consistent flavor and structure for rolling into balls.
- 8 ounces cream cheese, at room temperature Soften to room temperature and beat until smooth to create a creamy binder that holds Oreo crumbs together; contributes richness and moisture. Ensure full amount is incorporated for proper consistency and to prevent greasy or crumbly truffles.
- 1 teaspoon peppermint extract Infuse with flavor by adding to the filling to give a bright, minty aroma and a distinct holiday note; a little goes a long way. Measure carefully to balance peppermint intensity without overpowering the chocolate.
- 16 ounces dark melting wafers or almond bark Melt gently and temper if needed to coat the truffles, creating a smooth, firm chocolate shell that sets nicely; provides a glossy finish and snap. Choose dark melting wafers or almond bark for ease of melting and a stable coating.
- 2 tablespoon crushed candy cane Sprinkle or press into the outer coating to add crunchy, refreshing mint pieces and festive color; enhances texture and visual appeal. Crush finely for even distribution and an attractive topping on each truffle.
Instructions
- Place whole Oreos in a food processor or blender and puree until finely crushed. Add the cream cheese and extract. Puree until well combined.: Close your eyes and listen for the steady hum as the Oreos break down into a fine, sandy crumb, the aroma shifting from packaged sweetness to chocolatey warmth. This texture is important because it determines how smoothly the crumbs will bind with the cream cheese . If the pieces are too large, you will feel crumbly bits in the center rather than a creamy homogenous bite. A common mistake here is pulsing too briefly, leaving noticeable cookie chunks; process until you see a uniform, powdery consistency and scrape down the bowl once to capture any hidden pieces.
- Scoop the mixture out into 1 inch balls (about 2 teaspoons), roll into a ball and place on a wax paper lined pan. Place the balls in the fridge for 2 hours or freezer for 30 minutes.: As you add softened cream cheese and the peppermint extract , the processor will transition from a dry crumb to a dense, glossy mass. The scent of peppermint will bloom, cutting through the chocolate notes. This step matters because thorough incorporation ensures each truffle has an even flavor and holds together when rolled. If the mixture seems too wet, chill it briefly; if too dry, make sure the cream cheese was truly at room temperature. An error people make is adding more cream cheese to compensate for dryness right away, which can throw off the texture.
- Melt the chocolate according to directions. Take half the balls out of the fridge at a time (so the others stay firm and easy to dip). Dip each ball into the chocolate using a toothpick or fork. Let the excess chocolate drip back in the bowl. Place on a wax paper lined baking sheet and immediately sprinkle crushed peppermint candy on top. Repeat with remaining Oreo balls. Remelt the chocolate as needed.: You should see the mixture gather into a single, pliable ball, with no streaks of cream cheese . The visual cue is a smooth, slightly glossy dough with a uniform color. This uniformity affects the final mouthfeel, preventing pockets of overt creaminess or dry crumbs. Avoid overprocessing, because excessive blending warms the mixture and can make the centers too soft to shape easily; pulse and check frequently to stop at the right moment.
- Store in the fridge.: When you portion the centers, aim for consistent sizes to ensure even chilling and coating. Using a small scoop or measuring spoons helps create uniform 1 inch balls that look tidy and finish at the same pace. The tactile feedback of rolling into a smooth ball tells you the moisture level is correct; if the surface cracks, it is too dry, and if it is sticky, it needs a short chill. A typical pitfall here is making uneven sizes, which leads to some truffles cracking under the weight of the coating while others remain undercoated.
- Roll into a ball and place on a wax paper lined pan: The wax paper prevents sticking and collects stray crumbs, while the tray keeps the shapes from flattening. Press gently to smooth the surface, which helps the chocolate coating slide on more evenly later. The shape and smoothness influence how the chocolate sets and how the candies adhere. People sometimes skip the wax paper and end up prying truffles off a sticky surface, which can damage their appearance.
- Place the balls in the fridge for 2 hours or freezer for 30 minutes: Chilling firms the centers, making them less likely to fall apart when dipped. You will notice the cooling tightens the outer surface, and the aroma will mellow slightly. This step is why the truffles hold a neat profile after coating. A misstep is insufficient chilling, which causes the centers to crumble during dipping, so resist impatience and allow the time needed for solidity.
- Melt the chocolate according to directions: Melt the dark melting wafers or almond bark gently, stirring until glossy and completely smooth, with no lumps. The silky sheen indicates the fat in the coating has fully liquefied, which helps the chocolate set with a crisp finish. Avoid overheating because burnt chocolate becomes grainy and dull; use brief intervals if microwaving or a low simmer if using a double boiler. Many people rush this and end up with seizing, which ruins the smooth coating effect.
- Take half the balls out of the fridge at a time: Working in small batches keeps the remaining centers cold and firm, which makes dipping cleaner and faster. The contrast between cold center and warm chocolate ensures the chocolate sets quickly around the ball rather than soaking in. If you remove all the balls at once, the centers will warm, increasing the risk of slipping and misshapen coatings. Chilling in stages avoids a messy, prolonged dipping session.
- Dip each ball into the chocolate using a toothpick or fork: As you dip, watch the chocolate cling and form a glossy shell; a slight shaking motion helps excess drip back into the bowl. The sound is quiet, but you will feel the weight shift as the liquid coating settles, and visually the chocolate should look uniformly smooth. This technique matters for a clean finish and to avoid thick, uneven layers. A common error is dipping too slowly, which can cause the center to overheat and the chocolate to pool at the base.
- Let the excess chocolate drip back in the bowl: Hold the truffle above the bowl and tap gently to release surplus coating so the set layer is thin and elegant. The dripping helps you control how much chocolate remains, and a thin shell provides the right snap without overpowering the creamy interior. People often leave too much chocolate on, creating heavy, overly sweet shells that mask the peppermint center.
- Place on a wax paper lined baking sheet and immediately sprinkle crushed peppermint candy on top: The warm chocolate acts like glue for the crushed candy cane , so apply it right away to achieve good adhesion. Visually, the candy adds contrast and texture, and the cool peppermint pieces enhance the sensory peppermint note with a crisp crunch. A mistake is waiting too long to sprinkle, which prevents the candy from sticking and forces you to press pieces on, potentially damaging the shiny finish.
- Repeat with remaining Oreo balls: Continue working in batches, remelting the chocolate as needed to maintain a smooth coating temperature and consistency. Observing the chocolate as you work helps you judge when to remelt, because cooling chocolate thickens and loses gloss. A frequent issue is letting the coating thicken too much, producing clumpy coverage that hides the clean lines of the truffle.
- Remelt the chocolate as needed: Keep the chocolate at a pourable sheen by gently reheating, stirring to restore a smooth texture. Properly fluid chocolate ensures thin, even layers and a professional look. Over reheating on high heat is the usual mistake, which can scorch the chocolate and make it grainy.
- Store in the fridge: Once fully set, keep the truffles chilled to maintain firm centers and a crisp coating. Stored in an airtight container, they will stay fresh and retain texture. Leaving them at room temperature for prolonged periods will soften the centers and may cause blooming on the chocolate surface, which affects appearance though not safety.
Notes
- Swap the coating Change the dark melting wafers or almond bark to a milk or white coating for a sweeter finish, and keep an eye on melting temperatures since different coatings behave differently when reheated.
- Adjust peppermint intensity If you prefer a milder candy note, reduce the peppermint extract slightly, or increase it for a bolder flavor, measuring carefully because it is potent.
- Use different garnish sizes Crush the candy cane more finely for a subtle crunch, or leave larger shards for a dramatic look and extra texture contrast.
- Freeze for firm centers Freeze a tray of rolled balls for 30 minutes to make dipping faster and neater; just avoid leaving them in long enough to freeze solid which can cause cracking when the warm chocolate hits.
- Package as gifts Arrange cooled truffles in a small box with parchment and separate layers with wax paper; the sturdy coating helps them travel well when wrapped properly.