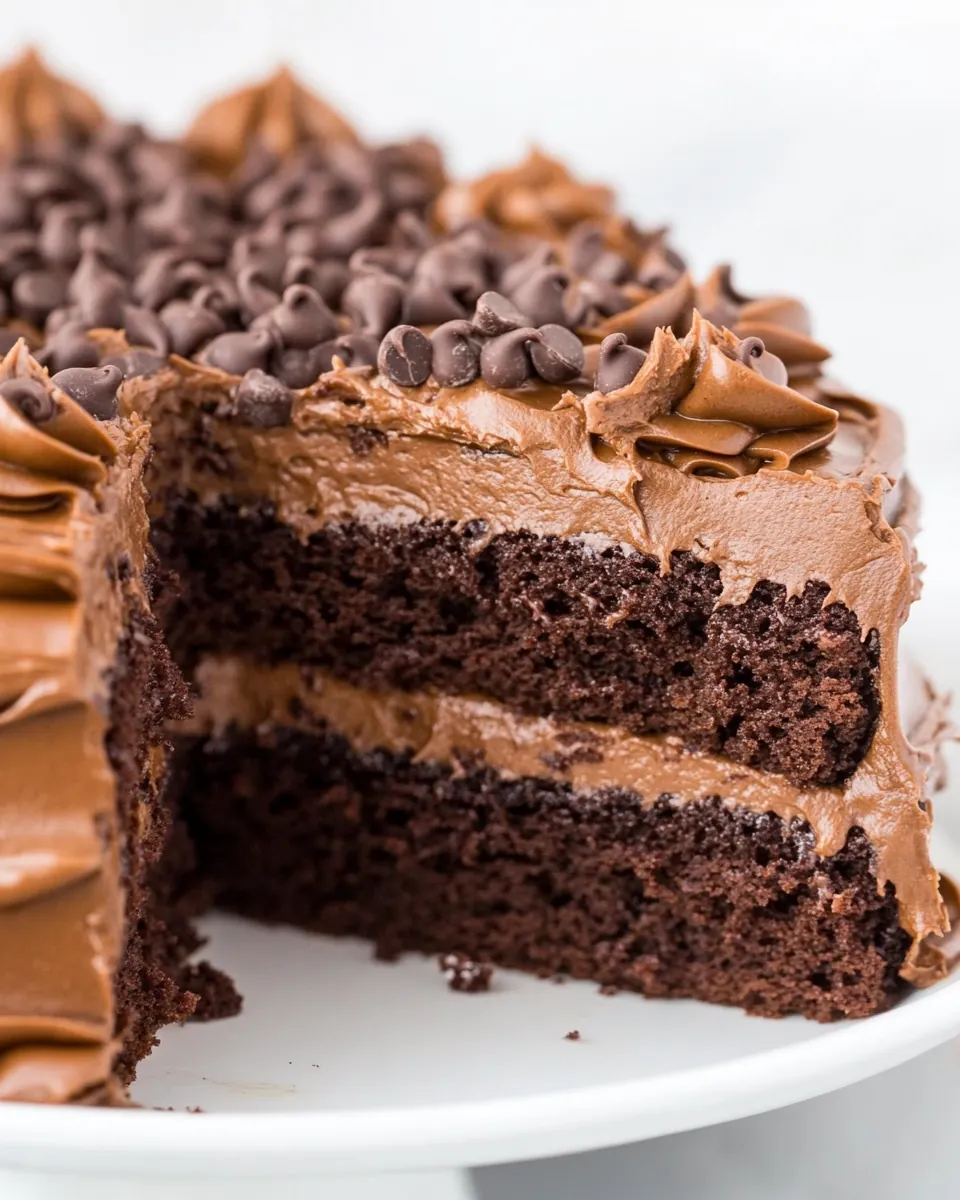
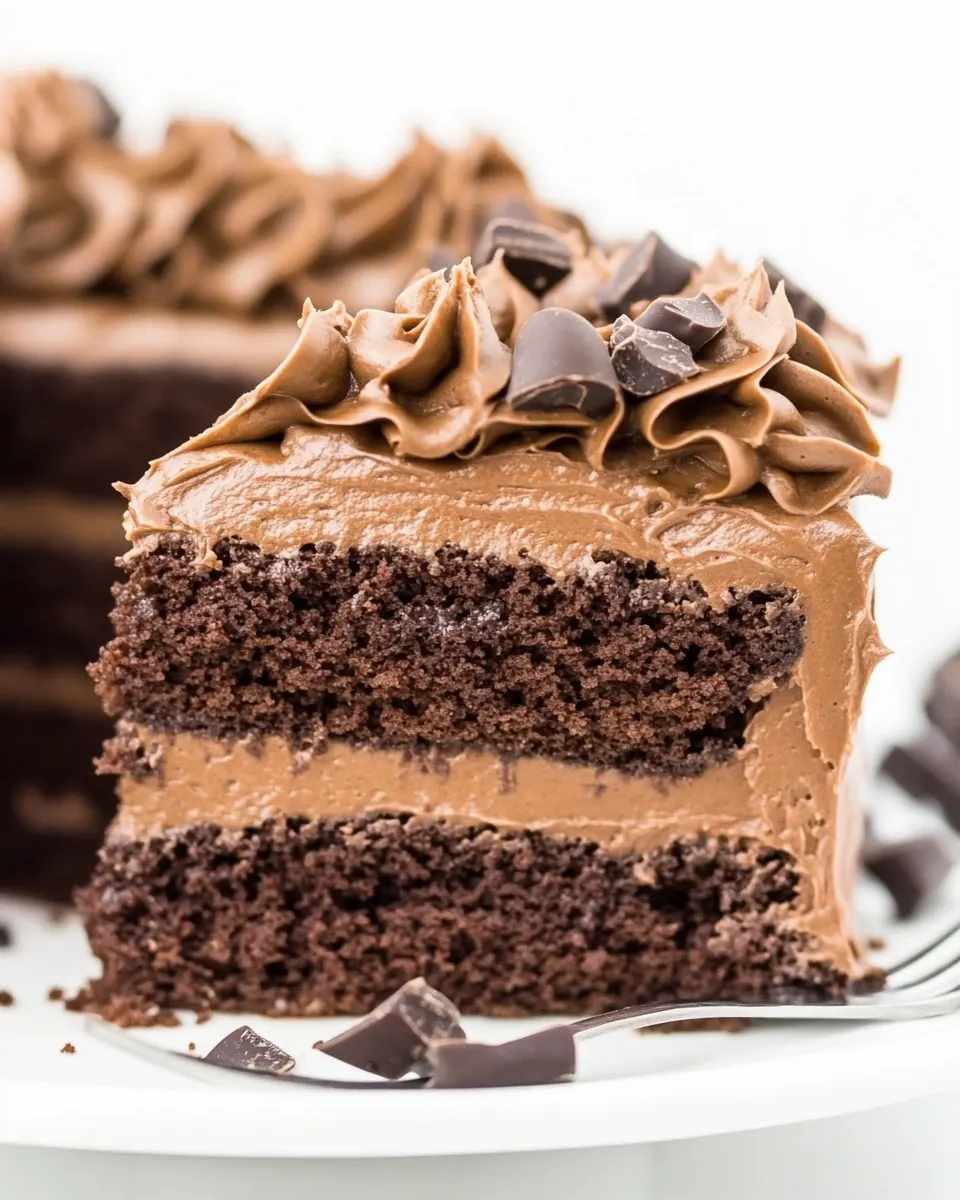
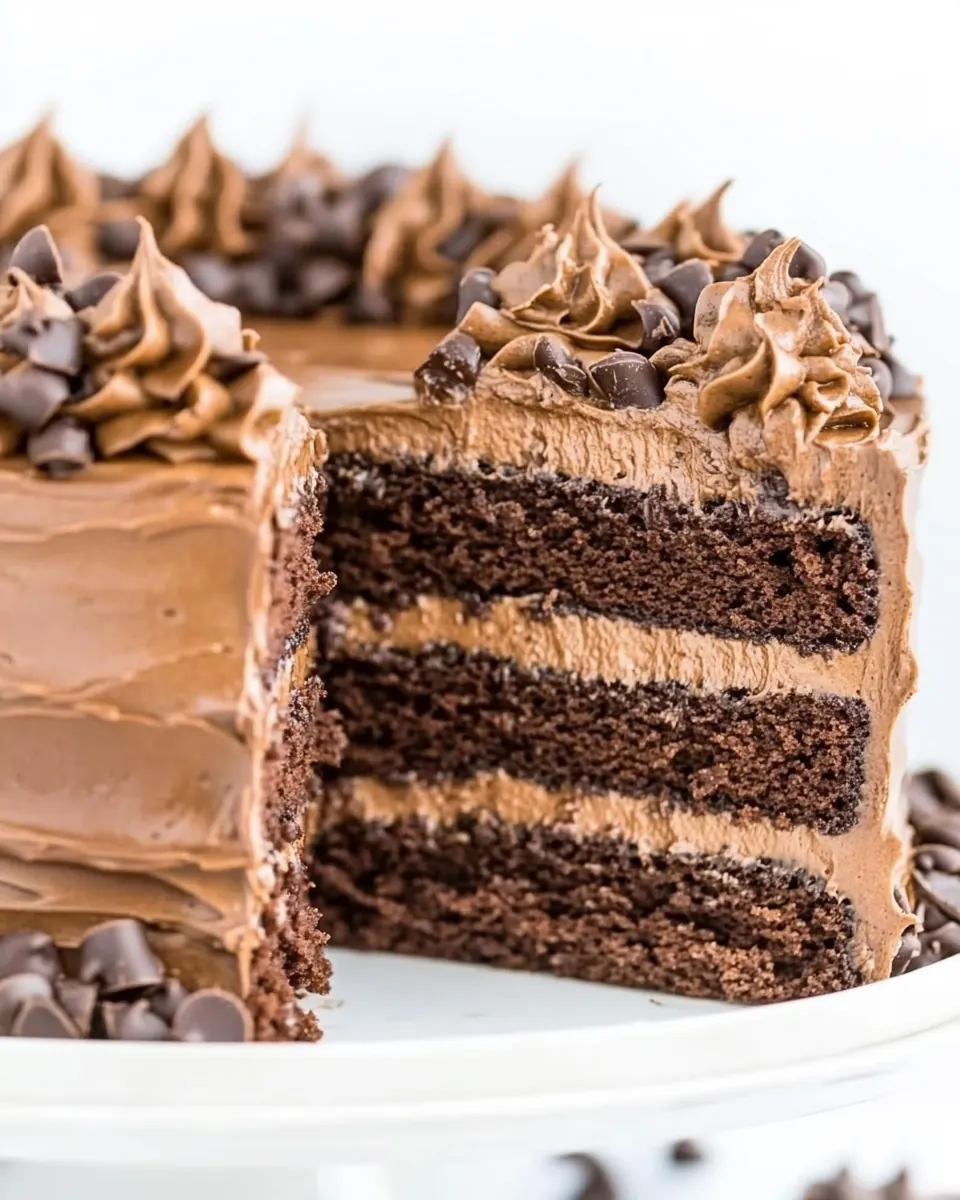
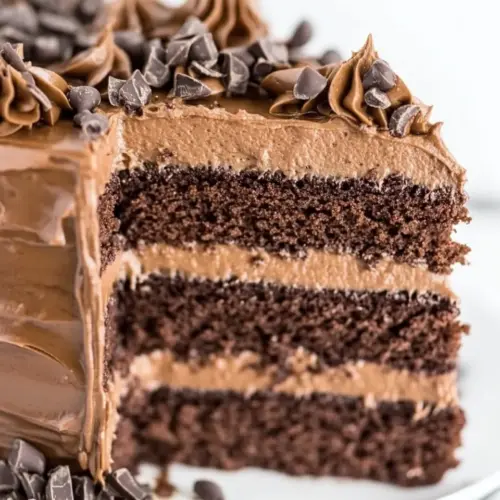
Triple Chocolate Layer Cake
Triple Chocolate Layer Cake is the kind of dessert that makes me stop whatever I am doing and pay attention, because chocolate like this demands it. I remember the first time I baked it for a friend who had just moved into a new apartment, and the soft cocoa scent followed me up the stairs, announcing happiness at every landing. That memory still makes me smile when I pull this cake from the oven, brush away the steam, and admire the glossy frosting catching the light.
There is something comforting about taking time to build layers, smoothing a thick frosting with a well worn spatula, and sprinkling the final shower of mini chips. I have learned a few tricks from trial and error, and I love how this cake brings people together, whether it is a small celebration or a quiet weekend treat. The textures here are what hook me, the tender crumb contrasted with the dense, silky frosting, plus that little optional drizzle that makes the top glint. Over the years I have adapted the steps to be reliably foolproof, so you can expect consistent results even if you are juggling a busy evening.
Recipe Snapshot
50 mins
15 mins
35 mins
Hard
500 kcal
American
Gluten-Free, Low FODMAP
Desserts
2 (9-inch x 2-inch) cake pans, 1 Medium Bowl, 1 Large Bowl, 1 Stand Mixer, 1 Cooling Rack
Why This Triple Chocolate Layer Cake Shines
Rich but balanced chocolate profile
I love how this Triple Chocolate Layer Cake layers deep cocoa, sweet frosting, and melted chocolate accents so every bite reads like an escalating chocolate story. The combination of unsweetened natural cocoa powder in the batter and more cocoa powder in the frosting builds a real chocolate backbone without becoming cloying, which keeps the cake enjoyable slice after slice.
Texture contrast that sings
What really gets me is the contrast between the soft cake crumb and the dense, creamy frosting. The cake batter is thin and bakes into a moist crumb, while the frosting is thick and luxurious. I like to refrigerate the finished cake briefly to let the frosting set, that small pause helps create clean slices and an indulgent mouthfeel.
Reliable techniques anyone can use
I appreciate that the methods here are straightforward but precise. From creaming butter and cream cheese until light, to checking the cake with a tester at the right time, each technique gives consistent results. I usually encourage a careful eye on oven timing since temperatures vary, and keeping a gentle rhythm when mixing ensures a smooth batter.
Flexible finishing touches
Whether you sprinkle with mini chips or drizzle with melted chips for drama, this cake lets you choose your level of fuss. The optional melted topping gives a glossy finish and a hint of snap when it sets, while the chips add a playful texture. I find these small choices let you personalize the cake for different occasions without changing the core recipe.
Great for gatherings and keeps well
I often make this cake a day ahead for gatherings because the flavors deepen after chilling, and it stores beautifully refrigerated for several days. That reliability means less last minute stress when hosting, and more time to enjoy company and compliments.
Triple Chocolate Layer Cake Shopping List
I think of the ingredients as a small ensemble where each player has an important role. The dry components build the structure, while buttermilk and warm coffee add moisture and amplify the chocolate notes. The frosting team of butter, cream cheese, and confectioners’ sugar creates the silky, spreadable finish that clings to the crumb. Taken together, these elements deliver the ideal balance of structure, moisture, and chocolate intensity.
- 1 3/4 cups all-purpose flour: Provide structure and bulk to the cake batter, creating a tender crumb when measured and sifted properly; combine with leaveners to support rise and absorb liquids for proper texture.
- 2 cups granulated sugar: Add sweetness and contribute to moisture while aiding in browning and tenderness; creaming with fats or dissolving in liquids helps distribute flavor evenly throughout the batter.
- 3/4 cups unsweetened natural cocoa powder: Impart deep chocolate flavor and color while contributing a dry, intense cocoa backbone; combine with liquids to bloom and release chocolate aromatics for richer taste.
- 2 teaspoons baking soda: Leaven the cake by producing carbon dioxide when reacting with acidic ingredients, helping create a light, open crumb; measure precisely to avoid off flavors or excessive rise and collapse.
- 1 teaspoon baking powder: Provide additional lift and help balance acidity for controlled rising; small amounts improve texture and contribute to even oven spring.
- 1 teaspoon kosher salt: Enhance overall flavor by balancing sweetness and rounding other flavors, and assist in strengthening the gluten network slightly for better structure; adjust if using a different salt type.
- 1 cup buttermilk, shaken: Add tangy flavor and acidity that reacts with baking soda to leaven, while contributing moisture and tender crumb; shake before measuring to ensure uniform consistency.
- 1/2 cup canola or vegetable oil: Introduce fat for moistness and richness without heavy dairy notes; oils keep the cake tender and extend shelf life while helping distribute fat-soluble flavors.
- 2 large eggs, at room temperature: Contribute structure, richness, and emulsification to the batter; room temperature eggs blend more evenly and help trap air for lift when beaten.
- 2 teaspoons vanilla extract: Add warm, rounded vanilla flavor and aromatic complexity; stir into wet ingredients to evenly infuse the batter with sweetly floral notes.
- 1 cup freshly brewed coffee, warm but not too hot so you don’t scramble the egg: Provide moisture and deepen chocolate flavors when combined with cocoa; warm coffee enhances cocoa solubility and aroma without cooking eggs if cooled slightly.
- 1 cup unsalted butter, softened: Create a rich, creamy base for frostings and fillings, adding flavor, body, and spreadability when softened and beaten with sugars.
- 6 ounces brick-style cream cheese, softened (I used lite): Contribute tanginess and creaminess to frostings, making them lighter and slightly tangy; soften to avoid lumps and ensure smooth incorporation with butter.
- 1 cup unsweetened natural cocoa powder, sifted: Deliver intense chocolate flavor and dry body to frostings when sifted to remove lumps; helps achieve a smooth, dark chocolate icing.
- 2 teaspoons vanilla extract: Enhance flavor and aroma of frostings with concentrated sweet, floral vanilla notes; add to creamy mixtures to deepen perceived sweetness and complexity.
- pinch salt: Brighten and balance sweet frostings with a touch of salt, enhancing chocolate and dairy flavors; use sparingly to avoid obvious saltiness.
- 5 cups confectioners’ sugar: Sweeten and stabilize frostings while providing structure for spreading and piping; sift if needed to prevent graininess and incorporate gradually for texture control.
- about 4 to 5 tablespoons cream, half-and-half may be substituted, or as needed for consistency: Adjust frosting consistency and add creaminess while helping to smooth and loosen icing to the desired spreading or piping viscosity.
- about 1 cup mini semi-sweet chocolate chips, for sprinkling: Provide a crunchy, chocolatey garnish that adds visual appeal and textural contrast when sprinkled over frosting; mini chips distribute evenly across layers.
- about 1/2 cup melted semi-sweet chocolate chips, for drizzling (optional): Offer an optional glossy chocolate drizzle for added richness and decoration; warm melted chips create a shiny finish that sets slightly on cooling.
Putting Together Triple Chocolate Layer Cake
Bringing this cake to life is more about rhythm than speed, and I find the process relaxing when I follow a steady workflow. Have your bowls and pans ready, and keep a thermometer or timer handy so you can read the visual cues rather than rushing. The following steps expand the directions into sensory details and troubleshooting notes so you can be confident at every turn.
- Preheat the oven to 350 F and spray two 9-inch x 2-inch cake pans very well with floured cooking spray, or grease and flour the pans; set aside.: When you preheat to 350 F , you will feel the kitchen warm and smell the faint metallic note of the heating elements if your oven is new. Spraying and flouring the pans ensures the cakes release cleanly, so the edges will pull away slightly from the pan and the top will not stick. If you skip proper pan prep, the cake can tear when you turn it out, so take the extra minute to coat the interior evenly, tapping out excess flour. A common mistake is using too much flour which can create a thin dry crust, so shake out any large excess. Visually, the pans should look evenly coated without clumps of flour.
- Sift the flour, sugar, cocoa, baking soda, baking powder, and salt into a medium bowl or the bowl; set aside.: The sound of the sifter moving and the powder falling into the bowl feels almost meditative, and sifting helps aerate the dry mix so the crumb is light rather than dense. This step prevents lumps of cocoa powder or baking powder from creating uneven pockets in the cake. If you rush this, you might find small clumps in the batter that do not incorporate, causing tiny gritty spots in the finished cake. Make sure the bowl is dry, because any moisture will create immediate clumps in your dry ingredients.
- To a large bowl or the bowl of a stand mixer, add the buttermilk, oil, eggs, vanilla, and beat with a handheld electric mixer on high power or with the paddle attachment of a stand mixer on high power, about 90 seconds.: As you beat these wet ingredients, you will hear a steady whirl and notice the mixture lighten slightly in color and become cohesive. The buttermilk adds tang and the oil provides silkiness; whisking at high speed encourages emulsion, which helps the batter hold air. Overbeating once dry ingredients are in can develop the gluten too much, so this timing is important. If the mixture looks separated, stop and scrape the sides, then continue for a few more seconds until smooth. A common error is adding cold eggs which can make the batter seize visually, so bring them to room temperature.
- With the mixer on low speed, slowly add the dry ingredients and mix until combined, about 1 to 2 minutes.: The quiet hum at low speed allows the dry mix to incorporate gently without flour clouds erupting. You will see the batter thicken and darken as the cocoa powder disperses. Mixing too long at this stage can yield a tight, chewy crumb because of gluten development, so stop as soon as you no longer see streaks of dry ingredients. If you notice clumps clinging to the paddle, scrape the bowl and fold them in by hand to avoid overmixing. The batter should look smooth but not glossy.
- Add the coffee and mix to just to combine; the batter will be very thin.: When the warm coffee hits the batter, you will see it loosen dramatically and steam may rise slightly if the coffee is very warm. The coffee deepens and sharpens the chocolate notes, creating a pronounced cocoa flavor. Stir only until the liquid is incorporated, because overmixing will change the texture, and adding very hot liquid can cook the eggs, so make sure the coffee is warm rather than boiling. The batter should pour easily from a spoon and feel silky on the back of your hand.
- Pour batter into prepared pans and bake for about 35 to 40 minutes or until a cake tester comes out clean or with a few moist crumbs but no batter. Start checking cakes at 25 minutes because all ovens vary.: As the cake bakes, you will notice the aroma deepen into a rich chocolate scent and the surface become matte and slightly springy. The edges might pull away a touch from the pan, another sign of readiness. Use a tester inserted into the center; a few moist crumbs are fine, raw batter is not. Opening the oven too often can cause uneven rise, so check starting at 25 minutes and then in short intervals. If a tester shows wet batter, return the cake and continue monitoring closely to avoid overbaking which causes dryness.
- Cool cakes in the pans for about 30 minutes before turning them out onto a cooling rack to cool completely.: Letting the cakes rest in the pan allows the structure to set and reduces the risk of collapse. You will notice steam slow down and the cake shrink slightly from the pan sides. After about 30 minutes, run a thin knife around the edge if needed and invert gently onto a cooling rack . If you try to unmold too early, the cake can fall apart; too late and the exterior might be sticky and tear. The final cooled cakes should feel springy and be completely cool before frosting to avoid melting the icing.
- To a large bowl or the bowl of a stand mixer, beat the butter and cream cheese with a handheld electric mixer on high power or with the paddle attachment of a stand mixer on high power until light and fluffy, about 2 to 3 minutes.: Whipping butter and cream cheese incorporates air so the frosting becomes light rather than dense. You will see the color shift to a paler tone and the texture become silky. Make sure both are fully softened, because cold lumps will not smooth out and will leave small pockets in the frosting. If the mixture appears curdled, keep beating and scraping the bowl; it should come together. Overbeating for too long can melt the mixture, so stop once it is airy and smooth.
- Reduce the speed to low and slowly add the cocoa powder, vanilla, salt, and beat until combined.: Adding the sifted cocoa powder at low speed keeps the frosting from puffing with dry dust, and you will notice the aroma deepen as it is incorporated. The vanilla and pinch of salt sharpen the overall balance. If you add the cocoa too quickly you may create a cloud of dry powder, which is messy and can lead to uneven mixing. The texture should become uniformly chocolate and paste like before the confectioners' sugar goes in.
- With mixer on low speed, gradually add the confectioners’ sugar, one cup at a time. The frosting will be incredibly thick, almost too thick to mix; this is ok.: As you add the confectioners' sugar , the frosting will thicken and resist the paddle; that density is normal and indicates a stable frosting that will hold shape. Work slowly so the sugar blends and avoid a gritty texture by sifting if needed. If the mixer strains, pause and scrape the bowl, then continue slowly. Rushing to add all the sugar at once can create dust and uneven pockets that are hard to smooth out.
- Add the cream as necessary to create a spreadable consistency (I used about 4 1/2 tablespoons). The frosting should be quite thick and it also will thicken more after the cake has been refrigerated.: Adding cream loosens the frosting to a workable state; you want it spreadable but still substantial enough to hold decorative edges. Start with less than you think you need and add more to reach the desired texture. Keep in mind refrigeration will firm it further, so aim for slightly softer than your final intent. If you add too much liquid, you can correct by adding a touch more confectioners' sugar to thicken again.
- To frost the cake, place 1 layer, flat side up, on a flat plate or cake pedestal. With a knife or offset spatula, spread the top with frosting.: Placing the first layer flat side up gives a stable base for even spreading, and the moment you touch the surface with an offset spatula you will feel the thick frosting glide and leave soft peaks. Apply in the center and push outward to avoid pulling crumbs into the icing. If crumbs appear, do a thin crumb coat and chill briefly before the final layer. A common misstep is applying too much pressure which can tear the crumb, so use gentle, even passes.
- Place the second layer on top, flat side up, and spread the frosting evenly on the top and sides of the cake.: Setting the second layer completes the silhouette and you will notice the cake settle slightly as the weight redistributes. Use sweeping motions to smooth the top and turn small amounts of frosting up the sides in steadier strokes for a clean finish. If the sides look uneven, chill the cake for a short period and then use a bench scraper for a polished edge. Avoid dragging the spatula repeatedly in the same spot which can create ridges.
- Evenly sprinkle the top of the cake with mini chocolate chips.: As you scatter the mini semi–sweet chocolate chips , they add playful texture and visual contrast, landing like tiny roasted pebbles on the silky surface. Press them in lightly so they adhere, but not so firmly that they sink. Space them evenly for a balanced look, and if any melt slightly from residual warmth, wait for it to set in the refrigerator so they maintain their shape.
- Refrigerate the cake for 1 to 2 hours before serving.: Chilling the assembled cake allows the frosting to firm and the flavors to meld, which makes slicing neater and flavor deeper. You will notice the frosting lose some sheen and become denser to the touch after refrigeration. If you cut it too soon, the frosting will smear and slices will be messy, so patience here rewards you with tidy, attractive pieces. Remove from the fridge a short time before serving so it softens slightly for the best mouthfeel.
- Optionally, before serving, drizzle with melted chocolate chips. Cake will keep airtight in the fridge for up to 5 days.: A warm drizzle of melted semi–sweet chocolate chips adds gloss and a slight snap once it sets, creating contrast against the creamy frosting. Pour in a slow, steady stream to create ribbons, or use a fork for a fine web. If the drizzle cools too quickly and clumps, gently rewarm in short bursts. Store airtight in the fridge to preserve freshness, and bring to room temperature briefly before serving for the best texture and flavor.
Substitutions and Tips
A few thoughtful substitutions and technique tips will help you make this Triple Chocolate Layer Cake exactly how you like it. These suggestions are practical and keep the recipe reliable whether you are new to baking or a seasoned baker. Below I expand on notes and common variations, each starting with a highlighted phrase for clarity.
- On coffee substitution The original note mentions that the coffee enhances chocolate depth. If you prefer not to use brewed coffee, you can substitute hot water to maintain batter thinness and moisture; however the chocolate will be less intense. If you do use coffee, keep it warm rather than boiling before adding to the batter to avoid affecting the eggs. The effect is subtle but meaningful, and many bakers find the difference worth trying just once.
- Butter and cream cheese handling Room temperature butter and cream cheese are essential for a lump free frosting. Leave them out for at least 30 minutes at room temperature, and if you are in a cool kitchen, cut them into small pieces to soften faster. When creamed properly, the frosting will be light and homogenous; if not, a short burst of beating while scraping the bowl fixes most issues.
- Measuring flour correctly Spoon and level all-purpose flour into the measuring cup rather than scooping directly. Scooping packs the cup and adds too much flour which can dry the cake. If your kitchen scale is available, 1 3/4 cups is about 220 grams, which gives more consistent results across ovens and climates.
- Frosting thickness control Add cream gradually to reach a spreadable consistency. The frosting is meant to be thick; start with 4 tablespoons and increase if needed. Remember refrigeration will firm it further, so aim for slightly softer than you desire for serving.
- Testing for doneness Use a cake tester or thin skewer and look for a few moist crumbs, not wet batter. Begin checking at 25 minutes to avoid overbaking. Overbaked cake dries quickly, so trust these cues rather than relying solely on time.
- Decorating options Use the mini semi-sweet chocolate chips for texture and the melted chips for shine. For a cleaner drizzle, place the melted chocolate in a small piping bag or a resealable bag with the corner snipped, and practice on parchment first to control flow.
Serving This Triple Chocolate Layer Cake
This cake shines in many contexts, and I find small serving rituals elevate the experience. Whether you serve it for a birthday, a cozy dinner, or a special holiday gathering, a thoughtful presentation and pairing make each slice feel considered. Below are practical serving ideas, storage tips, and occasion notes to help you choose what fits your event.
- Slice thickness Cut slices about one to one and a half inches wide for a balance of cake to frosting. Use a warm, clean knife wiped between cuts for neat edges, and serve slightly chilled so the layers hold together.
- Occasions This cake is perfect for birthdays, dinner parties, or any celebration where a showstopper dessert is welcome. Its rich profile also makes it a great choice for holiday gatherings when guests appreciate a comforting, familiar dessert.
- Pairing suggestions Serve with a small scoop of plain vanilla ice cream or a spoonful of lightly sweetened whipped cream to add contrast. For those avoiding extra dairy at the table, a simple fresh fruit plate works well alongside to cut through sweetness.
- Serving temperature Remove the cake from the fridge about 20 minutes before serving to temper the frosting so it is creamy but still holds shape. This gives the best mouthfeel and flavor release.
- Storage Store airtight in the fridge for up to five days. For longer storage, freeze slices wrapped tightly in plastic and foil; thaw in the fridge overnight and bring to a slightly warmer temperature before serving for best texture.
- Plate presentation Place slices on a warmed plate for contrast and add a few extra mini semi-sweet chocolate chips or a light dusting of sifted cocoa powder for a professional finish. Small edible décor adds visual appeal without changing the flavor.
- Transport tips If bringing the cake to a party, chill it fully before travel to firm the frosting, and carry it on a flat surface in a cake carrier to prevent shifting. A short drive is ideal to avoid long jostles that could mar the finish.
FAQ
Conclusion
This Triple Chocolate Layer Cake stands out for its balanced chocolate depth, tender crumb, and silky cream cheese butter frosting that together create a memorable dessert experience. Give it a try when you want a cake that looks impressive but follows dependable techniques, and you will likely find it becomes a go to for special occasions. I hope you enjoy the ritual of making it as much as the joyful reactions when you serve it.
Triple Chocolate Layer Cake
Equipment
- 2 (9-inch x 2-inch) cake pans
- 1 medium bowl
- 1 Large Bowl
- 1 Stand Mixer
- 1 Cooling Rack
Ingredients
- 1 3/4 cups all-purpose flour Provide structure and bulk to the cake batter, creating a tender crumb when measured and sifted properly; combine with leaveners to support rise and absorb liquids for proper texture.
- 2 cups granulated sugar Add sweetness and contribute to moisture while aiding in browning and tenderness; creaming with fats or dissolving in liquids helps distribute flavor evenly throughout the batter.
- 3/4 cups unsweetened natural cocoa powder Impart deep chocolate flavor and color while contributing a dry, intense cocoa backbone; combine with liquids to bloom and release chocolate aromatics for richer taste.
- 2 teaspoons baking soda Leaven the cake by producing carbon dioxide when reacting with acidic ingredients, helping create a light, open crumb; measure precisely to avoid off flavors or excessive rise and collapse.
- 1 teaspoon baking powder Provide additional lift and help balance acidity for controlled rising; small amounts improve texture and contribute to even oven spring.
- 1 teaspoon kosher salt Enhance overall flavor by balancing sweetness and rounding other flavors, and assist in strengthening the gluten network slightly for better structure; adjust if using a different salt type.
- 1 cup buttermilk, shaken Add tangy flavor and acidity that reacts with baking soda to leaven, while contributing moisture and tender crumb; shake before measuring to ensure uniform consistency.
- 1/2 cup canola or vegetable oil Introduce fat for moistness and richness without heavy dairy notes; oils keep the cake tender and extend shelf life while helping distribute fat-soluble flavors.
- 2 large eggs, at room temperature Contribute structure, richness, and emulsification to the batter; room temperature eggs blend more evenly and help trap air for lift when beaten.
- 2 teaspoons vanilla extract Add warm, rounded vanilla flavor and aromatic complexity; stir into wet ingredients to evenly infuse the batter with sweetly floral notes.
- 1 cup freshly brewed coffee, warm but not too hot so you don’t scramble the egg Provide moisture and deepen chocolate flavors when combined with cocoa; warm coffee enhances cocoa solubility and aroma without cooking eggs if cooled slightly.
- 1 cup unsalted butter, softened Create a rich, creamy base for frostings and fillings, adding flavor, body, and spreadability when softened and beaten with sugars.
- 6 ounces brick-style cream cheese, softened (I used lite) Contribute tanginess and creaminess to frostings, making them lighter and slightly tangy; soften to avoid lumps and ensure smooth incorporation with butter.
- 1 cup unsweetened natural cocoa powder, sifted Deliver intense chocolate flavor and dry body to frostings when sifted to remove lumps; helps achieve a smooth, dark chocolate icing.
- 2 teaspoons vanilla extract Enhance flavor and aroma of frostings with concentrated sweet, floral vanilla notes; add to creamy mixtures to deepen perceived sweetness and complexity.
- pinch salt Brighten and balance sweet frostings with a touch of salt, enhancing chocolate and dairy flavors; use sparingly to avoid obvious saltiness.
- 5 cups confectioners’ sugar Sweeten and stabilize frostings while providing structure for spreading and piping; sift if needed to prevent graininess and incorporate gradually for texture control.
- about 4 to 5 tablespoons cream, half-and-half may be substituted, or as needed for consistency Adjust frosting consistency and add creaminess while helping to smooth and loosen icing to the desired spreading or piping viscosity.
- about 1 cup mini semi-sweet chocolate chips, for sprinkling Provide a crunchy, chocolatey garnish that adds visual appeal and textural contrast when sprinkled over frosting; mini chips distribute evenly across layers.
- about 1/2 cup melted semi-sweet chocolate chips, optional for drizzling Offer an optional glossy chocolate drizzle for added richness and decoration; warm melted chips create a shiny finish that sets slightly on cooling.
Instructions
- Preheat the oven to 350 F and spray two 9-inch x 2-inch cake pans very well with floured cooking spray, or grease and flour the pans; set aside.: When you preheat to 350 F , you will feel the kitchen warm and smell the faint metallic note of the heating elements if your oven is new. Spraying and flouring the pans ensures the cakes release cleanly, so the edges will pull away slightly from the pan and the top will not stick. If you skip proper pan prep, the cake can tear when you turn it out, so take the extra minute to coat the interior evenly, tapping out excess flour. A common mistake is using too much flour which can create a thin dry crust, so shake out any large excess. Visually, the pans should look evenly coated without clumps of flour.
- Sift the flour, sugar, cocoa, baking soda, baking powder, and salt into a medium bowl or the bowl; set aside.: The sound of the sifter moving and the powder falling into the bowl feels almost meditative, and sifting helps aerate the dry mix so the crumb is light rather than dense. This step prevents lumps of cocoa powder or baking powder from creating uneven pockets in the cake. If you rush this, you might find small clumps in the batter that do not incorporate, causing tiny gritty spots in the finished cake. Make sure the bowl is dry, because any moisture will create immediate clumps in your dry ingredients.
- To a large bowl or the bowl of a stand mixer, add the buttermilk, oil, eggs, vanilla, and beat with a handheld electric mixer on high power or with the paddle attachment of a stand mixer on high power, about 90 seconds.: As you beat these wet ingredients, you will hear a steady whirl and notice the mixture lighten slightly in color and become cohesive. The buttermilk adds tang and the oil provides silkiness; whisking at high speed encourages emulsion, which helps the batter hold air. Overbeating once dry ingredients are in can develop the gluten too much, so this timing is important. If the mixture looks separated, stop and scrape the sides, then continue for a few more seconds until smooth. A common error is adding cold eggs which can make the batter seize visually, so bring them to room temperature.
- With the mixer on low speed, slowly add the dry ingredients and mix until combined, about 1 to 2 minutes.: The quiet hum at low speed allows the dry mix to incorporate gently without flour clouds erupting. You will see the batter thicken and darken as the cocoa powder disperses. Mixing too long at this stage can yield a tight, chewy crumb because of gluten development, so stop as soon as you no longer see streaks of dry ingredients. If you notice clumps clinging to the paddle, scrape the bowl and fold them in by hand to avoid overmixing. The batter should look smooth but not glossy.
- Add the coffee and mix to just to combine; the batter will be very thin.: When the warm coffee hits the batter, you will see it loosen dramatically and steam may rise slightly if the coffee is very warm. The coffee deepens and sharpens the chocolate notes, creating a pronounced cocoa flavor. Stir only until the liquid is incorporated, because overmixing will change the texture, and adding very hot liquid can cook the eggs, so make sure the coffee is warm rather than boiling. The batter should pour easily from a spoon and feel silky on the back of your hand.
- Pour batter into prepared pans and bake for about 35 to 40 minutes or until a cake tester comes out clean or with a few moist crumbs but no batter. Start checking cakes at 25 minutes because all ovens vary.: As the cake bakes, you will notice the aroma deepen into a rich chocolate scent and the surface become matte and slightly springy. The edges might pull away a touch from the pan, another sign of readiness. Use a tester inserted into the center; a few moist crumbs are fine, raw batter is not. Opening the oven too often can cause uneven rise, so check starting at 25 minutes and then in short intervals. If a tester shows wet batter, return the cake and continue monitoring closely to avoid overbaking which causes dryness.
- Cool cakes in the pans for about 30 minutes before turning them out onto a cooling rack to cool completely.: Letting the cakes rest in the pan allows the structure to set and reduces the risk of collapse. You will notice steam slow down and the cake shrink slightly from the pan sides. After about 30 minutes, run a thin knife around the edge if needed and invert gently onto a cooling rack . If you try to unmold too early, the cake can fall apart; too late and the exterior might be sticky and tear. The final cooled cakes should feel springy and be completely cool before frosting to avoid melting the icing.
- To a large bowl or the bowl of a stand mixer, beat the butter and cream cheese with a handheld electric mixer on high power or with the paddle attachment of a stand mixer on high power until light and fluffy, about 2 to 3 minutes.: Whipping butter and cream cheese incorporates air so the frosting becomes light rather than dense. You will see the color shift to a paler tone and the texture become silky. Make sure both are fully softened, because cold lumps will not smooth out and will leave small pockets in the frosting. If the mixture appears curdled, keep beating and scraping the bowl; it should come together. Overbeating for too long can melt the mixture, so stop once it is airy and smooth.
- Reduce the speed to low and slowly add the cocoa powder, vanilla, salt, and beat until combined.: Adding the sifted cocoa powder at low speed keeps the frosting from puffing with dry dust, and you will notice the aroma deepen as it is incorporated. The vanilla and pinch of salt sharpen the overall balance. If you add the cocoa too quickly you may create a cloud of dry powder, which is messy and can lead to uneven mixing. The texture should become uniformly chocolate and paste like before the confectioners' sugar goes in.
- With mixer on low speed, gradually add the confectioners’ sugar, one cup at a time. The frosting will be incredibly thick, almost too thick to mix; this is ok.: As you add the confectioners' sugar , the frosting will thicken and resist the paddle; that density is normal and indicates a stable frosting that will hold shape. Work slowly so the sugar blends and avoid a gritty texture by sifting if needed. If the mixer strains, pause and scrape the bowl, then continue slowly. Rushing to add all the sugar at once can create dust and uneven pockets that are hard to smooth out.
- Add the cream as necessary to create a spreadable consistency (I used about 4 1/2 tablespoons). The frosting should be quite thick and it also will thicken more after the cake has been refrigerated.: Adding cream loosens the frosting to a workable state; you want it spreadable but still substantial enough to hold decorative edges. Start with less than you think you need and add more to reach the desired texture. Keep in mind refrigeration will firm it further, so aim for slightly softer than your final intent. If you add too much liquid, you can correct by adding a touch more confectioners' sugar to thicken again.
- To frost the cake, place 1 layer, flat side up, on a flat plate or cake pedestal. With a knife or offset spatula, spread the top with frosting.: Placing the first layer flat side up gives a stable base for even spreading, and the moment you touch the surface with an offset spatula you will feel the thick frosting glide and leave soft peaks. Apply in the center and push outward to avoid pulling crumbs into the icing. If crumbs appear, do a thin crumb coat and chill briefly before the final layer. A common misstep is applying too much pressure which can tear the crumb, so use gentle, even passes.
- Place the second layer on top, flat side up, and spread the frosting evenly on the top and sides of the cake.: Setting the second layer completes the silhouette and you will notice the cake settle slightly as the weight redistributes. Use sweeping motions to smooth the top and turn small amounts of frosting up the sides in steadier strokes for a clean finish. If the sides look uneven, chill the cake for a short period and then use a bench scraper for a polished edge. Avoid dragging the spatula repeatedly in the same spot which can create ridges.
- Evenly sprinkle the top of the cake with mini chocolate chips.: As you scatter the mini semi-sweet chocolate chips , they add playful texture and visual contrast, landing like tiny roasted pebbles on the silky surface. Press them in lightly so they adhere, but not so firmly that they sink. Space them evenly for a balanced look, and if any melt slightly from residual warmth, wait for it to set in the refrigerator so they maintain their shape.
- Refrigerate the cake for 1 to 2 hours before serving.: Chilling the assembled cake allows the frosting to firm and the flavors to meld, which makes slicing neater and flavor deeper. You will notice the frosting lose some sheen and become denser to the touch after refrigeration. If you cut it too soon, the frosting will smear and slices will be messy, so patience here rewards you with tidy, attractive pieces. Remove from the fridge a short time before serving so it softens slightly for the best mouthfeel.
- Optionally, before serving, drizzle with melted chocolate chips. Cake will keep airtight in the fridge for up to 5 days.: A warm drizzle of melted semi-sweet chocolate chips adds gloss and a slight snap once it sets, creating contrast against the creamy frosting. Pour in a slow, steady stream to create ribbons, or use a fork for a fine web. If the drizzle cools too quickly and clumps, gently rewarm in short bursts. Store airtight in the fridge to preserve freshness, and bring to room temperature briefly before serving for the best texture and flavor.
Notes
- On coffee substitution The original note mentions that the coffee enhances chocolate depth. If you prefer not to use brewed coffee, you can substitute hot water to maintain batter thinness and moisture; however the chocolate will be less intense. If you do use coffee, keep it warm rather than boiling before adding to the batter to avoid affecting the eggs. The effect is subtle but meaningful, and many bakers find the difference worth trying just once.
- Butter and cream cheese handling Room temperature butter and cream cheese are essential for a lump free frosting. Leave them out for at least 30 minutes at room temperature, and if you are in a cool kitchen, cut them into small pieces to soften faster. When creamed properly, the frosting will be light and homogenous; if not, a short burst of beating while scraping the bowl fixes most issues.
- Measuring flour correctly Spoon and level all-purpose flour into the measuring cup rather than scooping directly. Scooping packs the cup and adds too much flour which can dry the cake. If your kitchen scale is available, 1 3/4 cups is about 220 grams, which gives more consistent results across ovens and climates.
- Frosting thickness control Add cream gradually to reach a spreadable consistency. The frosting is meant to be thick; start with 4 tablespoons and increase if needed. Remember refrigeration will firm it further, so aim for slightly softer than you desire for serving.
- Testing for doneness Use a cake tester or thin skewer and look for a few moist crumbs, not wet batter. Begin checking at 25 minutes to avoid overbaking. Overbaked cake dries quickly, so trust these cues rather than relying solely on time.
- Decorating options Use the mini semi-sweet chocolate chips for texture and the melted chips for shine. For a cleaner drizzle, place the melted chocolate in a small piping bag or a resealable bag with the corner snipped, and practice on parchment first to control flow.