Taco Salad
Taco Salad is one of those meals I come back to when I want bold flavors without a fuss. The first time I made it for friends, I remember the crunch of the tortilla bowl and the warm, spiced ground beef mingling with cool, crisp lettuce. It felt like a celebration in a bowl, and I loved how every bite delivered a contrast of textures.
Over the years I’ve tweaked the layering and the way I crisp the tortillas, and this version is the one I reach for when I want reliable results. I still shape the flour tortillas while they are hot, because that small move changes the whole experience. My guests always ask for the recipe, and I tell them it’s mostly simple technique and a few quality ingredients.
What I enjoy most about Taco Salad is how forgiving it is. You can assemble it quickly for a weeknight dinner, or lay it out as a build your own bar when friends drop by. The bright pop of cherry tomatoes and the creamy avocado cut through the savory ground beef, and the crunchy corn strips make it feel indulgent without being heavy. I like to talk while I cook, and this dish gives me a chance to chat and tweak seasoning as we go.
Recipe Snapshot
45 mins
20 mins
25 mins
Medium
600 kcal
Mexican
Gluten-Free, Low FODMAP
Dinner
Non-stick skillet, Oven, Sheet tray, Mixing bowls
The Beauty of This Taco Salad
1 Great Contrast of Textures
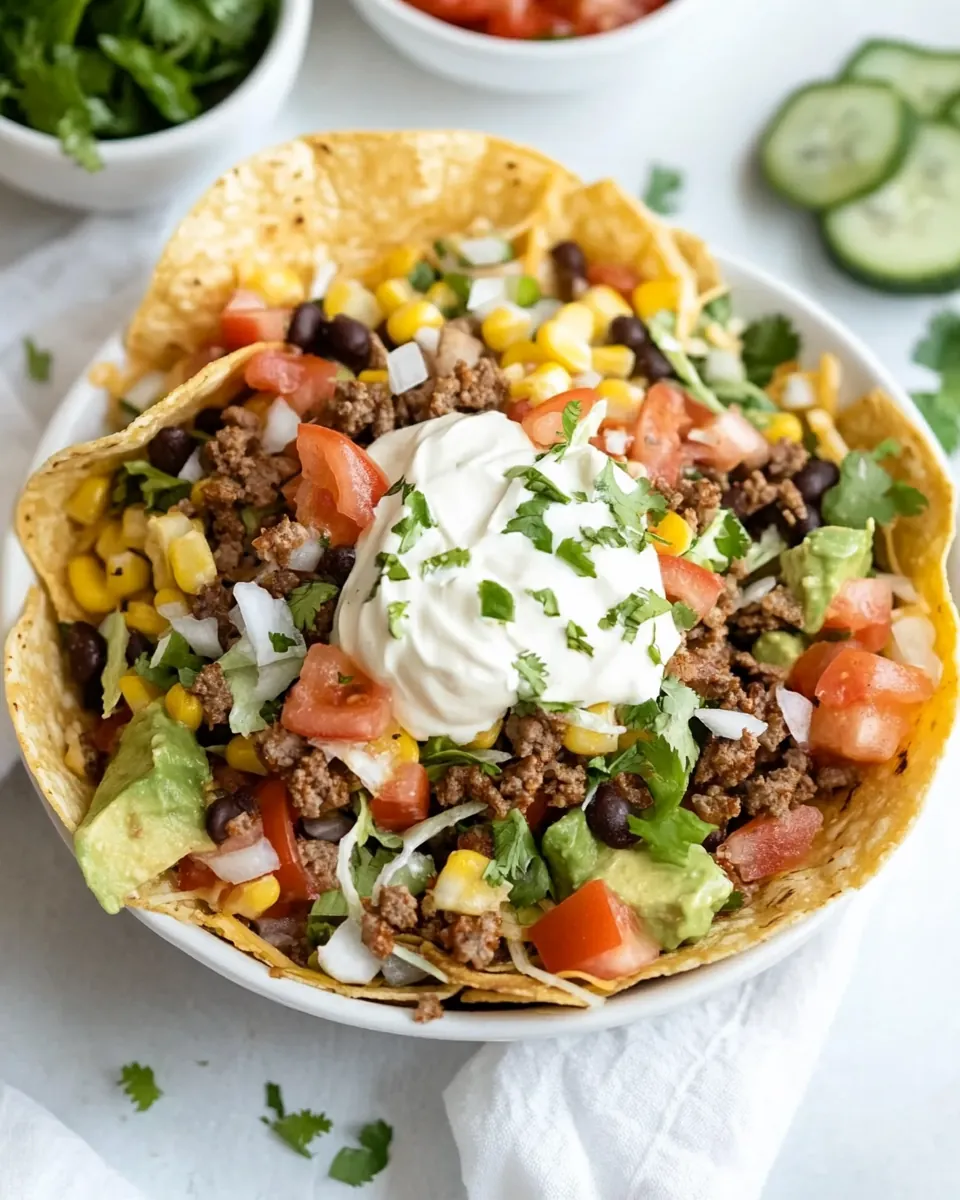
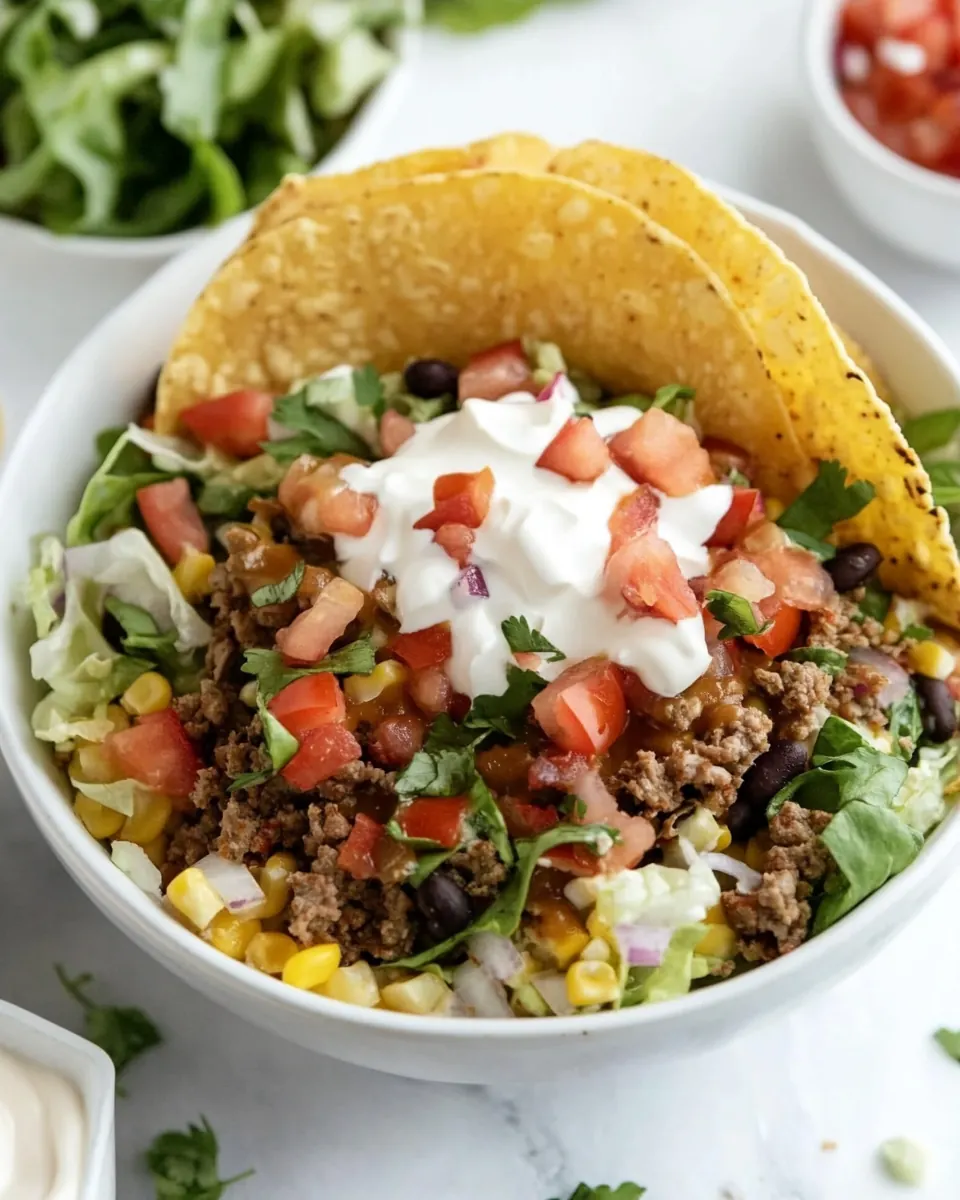
I love how Taco Salad balances crisp, warm, and creamy elements. The crunchy tortilla bowl and fried corn strips give a satisfying crackle, while the shredded cheese melts into warm ground beef, and the chopped lettuce and halved cherry tomatoes add a fresh lift. That interplay keeps every forkful interesting, and I find guests always comment on the variety of mouthfeels.
2 Bold, Familiar Flavors
This salad hits classic taco notes, thanks to seasoned ground beef and simple additions like black beans and corn. I like that it tastes like something everyone knows, but when served in an edible bowl it feels a little special. The taco seasoning ties everything together, and a spoonful of sour cream softens the heat, so you get savory depth without overwhelming the palate.
3 Fast Assembly, Crowd Friendly
Once the components are prepped, assembling Taco Salad is delightfully quick. I often prep the toppings ahead and let people build their own bowls, which makes hosting low stress. Because many elements can be made in advance, this recipe scales up nicely for gatherings, and I appreciate that it stays visually appealing even after a short wait.
4 Flexible and Customizable
Though this version centers on ground beef, the structure welcomes swaps. I stick to the core ingredients listed, but I also like that the concept lets you add or omit items without breaking the recipe. If someone prefers fewer carbs, they can skip the fried corn strips, but I usually encourage them to at least try the crunchy bowls for the theatrical effect.
5 Hands On and Fun to Present
Shaping the flour tortillas into bowls while they are hot is a small, tactile task I enjoy. It creates an impressive presentation that makes the meal feel elevated. I think this matters, because people eat with their eyes, and a crunchy, edible vessel turns a simple salad into an experience.
Taco Salad Ingredients
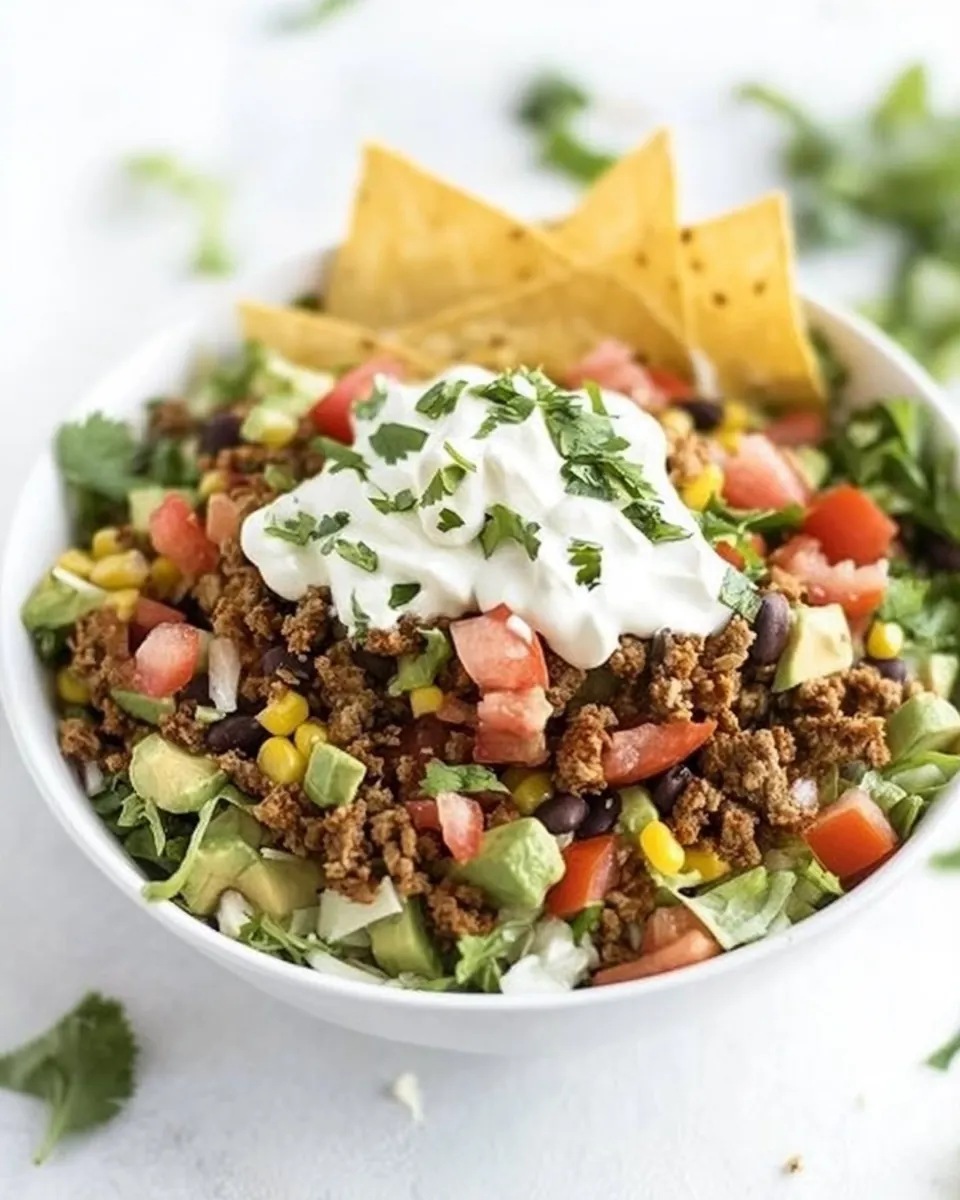
These ingredients form a well balanced taco bowl experience, where warm, seasoned ground beef meets fresh, crisp lettuce and bright vegetables. The key players are the crunchy tortilla elements, which deliver texture, and the creamy touches like avocado and sour cream, which round out the flavor. Everything works together to create satisfying contrasts.
- 1/2 cup + 4 tablespoons avocado oil: Measure and combine as the primary cooking oil; provides a neutral, high-heat fat for frying and crisping tortillas. Helps bind spices when tossed with chips or shells and gives a glossy finish to fried elements. Use the specified amounts to control richness without greasiness.
- 4 extra large flour tortillas: Warm and transform into crisp bowls or strips by frying or baking; provides a sturdy, edible container for the salad components. Can be shaped into bowls while hot to hold greens and toppings, adding crunchy texture and a homemade touch. Extra–large size ensures ample capacity for the assembled salad.
- 8 corn tortillas: Fry or bake until golden to create additional crunchy tortilla chips or small bowls for scooping salad components. Offers a traditional corn flavor that contrasts with flour tortillas and complements the Mexican-inspired toppings. Use as garnish or for serving to add varied textures.
- 1 pound ground beef: Brown and crumble as the savory protein base; supplies hearty, meaty flavor and texture to anchor the salad. Combine with taco seasoning and a little cooking oil to create well-seasoned crumbles that mingle with greens and toppings. Drain excess fat if desired to keep the salad from becoming oily.
- 2 tablespoons taco seasoning: Season the cooked meat to impart classic taco flavors such as cumin, chili, and garlic. Mix into the beef while cooking to distribute flavor evenly and to create a cohesive, spiced filling. Adjust quantity slightly if preferring milder or stronger spice levels.
- 1 head romaine lettuce, cut into bite-size pieces: Chop and serve as the fresh, crisp green foundation of the salad; adds crunchy texture and a mild, slightly bitter taste. Toss with dressing and other ingredients to provide volume and a refreshing counterpoint to rich toppings. Use bite–size pieces for easy scooping.
- 2 thinly sliced green onions: Slice thinly and sprinkle over the salad for a mild oniony bite and subtle green color. Use as a garnish to impart fresh, sharp notes that balance richer elements like cheese and sour cream. Thin slicing ensures a delicate texture and even distribution.
- 1 peeled, small diced small red onion: Dice finely and add for a sharper, pungent crunch that enhances savory components. Provides a bold onion flavor that contrasts with creamy avocado and mellow beans, contributing complexity. Small dice helps distribute the flavor without overwhelming each bite.
- 1 peeled, cored, medium diced avocado: Cube and add for creamy, buttery richness and a cool contrast to spicy and savory toppings. Mash slightly if desired to create pockets of avocado creaminess that bind with dressing and sour cream. Choose ripe but firm fruit to maintain shape in the salad.
- 1 cup cherry tomatoes, sliced in half: Halve and add for sweet, juicy bursts and bright color that lighten the overall flavor profile. Use bite-sized pieces to ensure even distribution and to complement the savory and creamy elements. Fresh tomatoes also add moisture and a pleasant acidity.
- 15 ounce can drained black beans: Rinse, drain, and add for earthy, protein-rich beans that bulk up the salad and provide fiber. Serve whole or slightly mashed to integrate with other toppings and to add a hearty texture. Canned beans save time while still contributing nutritional value.
- 15 ounce can drained corn: Drain and add for a sweet, crisp element that balances the savory and creamy flavors in the salad. Combine with beans and other toppings for a colorful, nutrient-dense mix that appeals to varied palates. Canned corn is convenient and provides pleasant pop in each bite.
- 1 cup shredded Mexican-blend cheese: Shred and sprinkle for melty, savory complexity that ties ingredients together with creamy, cheesy notes. Use as a topping that melts lightly from warm meat or as a cold contrast over the greens. Mexican–blend cheese adds multiple complementary cheese flavors.
- 1/2 cup sour cream: Spoon dollops of cool, tangy creaminess to offset spicy and salty components in the salad. Use sparingly to add richness and a creamy mouthfeel that pairs well with chipotle ranch and seasoned beef. Keeps the assembled dish creamy without becoming heavy.
- Chipotle ranch dressing: Drizzle liberally as a smoky, zesty dressing that unifies the salad with a creamy, spicy finish. Provides both tang and heat, enhancing the taco-seasoned meat and fresh vegetables while adding moisture for easier mixing. Adjust amount to preference for spice and creaminess.
How to Make Taco Salad
This assembly invites a relaxed, step by step rhythm, where you build contrasts of temperature and texture. I like to work in stations so the warm components meet the cool ones at the end, producing a dynamic bowl. These steps expand on the directions to help you sense what to look for and how to troubleshoot.
- Add 1 to 2 tablespoons of avocado oil to a large non-stick skillet over medium heat.: The pan should feel warm under your hand before the first tortilla goes in, and you will notice a faint shimmer on the oil surface. The light sizzle when the tortilla hits the pan is a good auditory cue, and the aroma is slightly nutty but subtle. This oil amount is just enough to toast the flour tortillas without making them greasy. A common mistake is overheating the oil, which causes rapid browning and creates brittle, burnt spots instead of toasty flecks. Keep the heat steady, adjusting it down if the tortillas brown too quickly.
- Next, add in a flour tortilla and cook for 30 to 45 seconds per side or until dark brown spots form.: Listen for a gentle popping sound and watch for scattered browned spots to appear, signaling that the flour has toasted and flavors are developing. The tortilla will puff slightly and release a warm, toasty scent, and the edges will firm up. If you press lightly with a spatula you should feel a tender yet robust surface. Rushing this step by cranking the heat leads to uneven browning and can make the tortilla tough when shaped, so keep an eye on it and flip when the spots appear.
- Immediately transfer it to a small to medium-sized oven-safe bowl and press down in the center using a drinking glass to mold it into a bowl-like shape. Repeat the process with 3 more flour tortillas. Ensure the flour tortillas are in the bowls and on a sheet tray, and bake in the oven on a middle rack at 350° for 14 to 15 minutes or until lightly browned and crisp. Set aside to cool.: The tortilla will still be pliable and warm, which is the perfect moment to form it. Press firmly but gently, and hold for a few seconds so the shape sets. You will feel the tortilla cool and start to hold form, and you may notice steam escaping from the underside. Do not wait too long, because once fully cooled the tortilla will crack when forced into shape. A common misstep is using a bowl that is too small, which makes the molded shell too deep and unstable, so choose a bowl that creates a balanced, holdable vessel.
- Cut the corn tortillas into thick strips.: Work steadily to toast and shape each tortilla while warm. As you repeat, you will develop a rhythm and see consistent color and shape. Stack them on a sheet tray as you go to bake them together, which also helps them finish drying evenly. If one shell cools and becomes brittle, reheat it briefly in the pan for a few seconds to regain pliability, rather than forcing and cracking it.
- Add about 1/2 cup of avocado oil to a medium or large-sized non-stick skillet over low to medium heat.: In the oven the shells will lose remaining moisture and crisp fully, producing a golden hue and a faint toasted smell. The middle rack gives even heat circulation so they crisp uniformly. Check at 12 minutes to monitor color, because ovens vary, and remove when they are just crisp to avoid overbrowning which leads to a brittle, hard shell that breaks when filled. Avoid opening the oven too often, which can extend bake time and dry them out excessively.
- Fry the corn tortilla strips in batches for 30 to 45 seconds or just until crisp.: Cooling allows the shells to firm up into a sturdy bowl that can hold fillings. As they cool you will notice the crackle of crisping and the bowl will lose steam. Do not stack the shells while hot, this traps steam and can soften them. If they feel slightly pliable after cooling, give them a couple more minutes on the tray to finish crisping.
- Let them drain on paper towels to get rid of any excess oil.: Use a sharp knife to make clean cuts, which reduces tearing and produces neat, hearty strips. The cut edges will brown faster when fried, giving a toasty flavor and slightly curled shape. Cutting them uniformly ensures even frying; inconsistent sizes can lead to some pieces burning while others remain soft, so aim for consistent thickness.
- Add the ground beef to a large non-stick skillet over medium-high heat and immediately flatten it out. After 30 seconds of frying, sprinkle 2 to 3 tablespoons of the taco seasoning and mix it in.: The oil should warm gradually to a gentle shimmer without smoking. This moderate heat level helps the corn strips crisp through without burning. You will see small, slow bubbles form around a test strip when the temperature is right. Too high a heat will brown the edges quickly and leave the center limp, so keep the flame steady and adjust as needed.
- Break up the ground beef into bite-size pieces and cook until they are browned and cooked throughout. Set it to the side.: As each strip hits the oil you will hear a bright sizzle and see them take on a golden hue. They will stiffen and float when done, and the aroma becomes pleasantly toasted. Frying in batches prevents crowding, which can lower the oil temperature and result in greasy, limp strips. Transfer them to paper towels to drain immediately to preserve crispness.
- Prepare the lettuce and vegetables.: The towels will wick away residual oil and keep the strips light and crunchy. You might gently blot the top of the strips to remove surface oil, which helps toppings adhere without sliding. Leaving them to sit in one layer prevents steaming, which would soften them. A mistake is stacking hot strips, which traps moisture and ruins the crunch.
- Fill the cooled flour tortilla bowl with lettuce, ground beef, and desired vegetable toppings and cheese.: You will hear a pronounced sizzle as the meat hits the pan, and a fragrant, roasted meat aroma will develop quickly. Flattening creates maximum contact and encourages even browning, producing those flavorful caramelized bits. Avoid stirring constantly, because that prevents proper crust formation. If the pan becomes overcrowded the meat will steam instead of brown, so cook in a single layer for best results.
- Add on your desired dressing and serve.: Adding seasoning early lets the spices warm and bloom in the fat, releasing more aroma and depth. Stir gently to distribute the seasoning so each piece of ground beef picks up flavor. A common error is adding too much liquid at this stage, which dilutes the seasoning; add any water sparingly and only if needed to keep the meat moist.
- Break up the ground beef into bite-size pieces and cook until they are browned and cooked throughout: Look for deep golden browning on many pieces, and a rich, savory smell that indicates developed flavor. The texture should be tender with slightly crisped edges, and there should be no visible pink. Overcooking will dry the meat out, so aim for a balance between caramelization and juiciness. Remove it from heat and set it aside to keep warm while you prep the salad so it does not continue to dry out.
- Prepare the lettuce and vegetables: Rinse and dry the romaine lettuce thoroughly so the dressing clings rather than dilutes. Chop the green onions and dice the red onion and avocado uniformly for even distribution. Halve the cherry tomatoes to release sweet, tangy juices. A common slip is to skip drying the lettuce, which results in a watery salad, so use a salad spinner or pat very dry.
- Fill the cooled flour tortilla bowl with lettuce, ground beef, and desired vegetable toppings and cheese: Layering creates appealing contrasts, so I start with a base of crisp lettuce , then nestle warm ground beef and top with beans, corn, and vegetables. Sprinkle the shredded cheese so it warms slightly from the meat, becoming soft and binding the components. Avoid overfilling, which makes the bowl unstable and messy to eat.
- Add on your desired dressing and serve: Drizzle the chipotle ranch and add dollops of sour cream to taste, finishing with the fried corn strips for crunch and sliced avocado for creaminess. The dressing should enhance rather than drown the ingredients, so start light and let guests add more if they like. Serve immediately so the shells stay crisp and the textures shine.
Variations to Try

If you like experimenting, these variations let you adjust Taco Salad to your mood or guest list. Each idea highlights a single change so the core dish remains recognizable while gaining a new twist.
- Swap the protein Try grilled chicken in place of ground beef to lighten the dish and offer a different smoky note while keeping all other ingredients the same.
- Make it vegetarian Double up on the beans and corn, and pan roast some seasoned mushrooms to add a meaty texture without animal protein.
- Spice level control Adjust the taco seasoning amount, or mix the chipotle ranch with plain sour cream to mellow heat for kids.
- Extra crunch Add toasted pepitas or crushed, toasted corn chips for another layer of texture that plays nicely with the fried strips.
- Serve family style Lay out components in bowls and let everyone build their own, which keeps the tortilla shells crisp and caters to personal tastes.
Best Served With
This section covers occasions, pairing ideas, and storage advice to make serving Taco Salad effortless and appealing. Use the list below to match the meal to the moment and keep leftovers tasty.
- Casual weeknight dinner Arrange prepped components on the counter so family members can assemble bowls quickly, making it a relaxed dinner option that is both filling and fast.
- Game day or small gatherings Set up a build your own station with bowls of chopped vegetables, warmed ground beef, beans, corn, and dressings so guests can customize, keeping the tortilla bowls crisp until filled.
- Summer lunches Serve chilled or room temperature toppings with warm meat for a light summer meal, and pair with iced tea or a citrusy non alcoholic beverage for balance.
- Meal prep and storage Keep the dressing and crunchy elements separate, store components in airtight containers, and refrigerate for up to two days for the prepared elements, while assembled bowls should be eaten immediately.
- Seasonal pairing In summer, highlight ripe cherry tomatoes and fresh avocado, while in cooler months use heartier greens and slightly warmed corn for comforting notes.
- Serving tips Use sturdy plates and place the tortilla bowl on a napkin to catch crumbs, and present the chipotle ranch in a small pitcher so guests can control how much dressing they add.
FAQ
Conclusion
Taco Salad shines because it balances warm seasoned ground beef and crispy, edible tortilla bowls with fresh, cooling vegetables for a lively, textural meal. Give it a try when you want a fun presentation and a satisfying mix of flavors that everyone can customize. I hope you enjoy building this salad as much as I do, and that it becomes a go to for quick dinners and casual gatherings.
Taco Salad
Equipment
- Non-Stick Skillet
- Oven
- Sheet tray
- Mixing Bowls
Ingredients
- 1/2 cup + 4 tablespoons avocado oil Measure and combine as the primary cooking oil; provides a neutral, high-heat fat for frying and crisping tortillas. Helps bind spices when tossed with chips or shells and gives a glossy finish to fried elements. Use the specified amounts to control richness without greasiness.
- 4 extra large flour tortillas Warm and transform into crisp bowls or strips by frying or baking; provides a sturdy, edible container for the salad components. Can be shaped into bowls while hot to hold greens and toppings, adding crunchy texture and a homemade touch. Extra-large size ensures ample capacity for the assembled salad.
- 8 corn tortillas Fry or bake until golden to create additional crunchy tortilla chips or small bowls for scooping salad components. Offers a traditional corn flavor that contrasts with flour tortillas and complements the Mexican-inspired toppings. Use as garnish or for serving to add varied textures.
- 1 pound ground beef Brown and crumble as the savory protein base; supplies hearty, meaty flavor and texture to anchor the salad. Combine with taco seasoning and a little cooking oil to create well-seasoned crumbles that mingle with greens and toppings. Drain excess fat if desired to keep the salad from becoming oily.
- 2 tablespoons taco seasoning Season the cooked meat to impart classic taco flavors such as cumin, chili, and garlic. Mix into the beef while cooking to distribute flavor evenly and to create a cohesive, spiced filling. Adjust quantity slightly if preferring milder or stronger spice levels.
- 1 head romaine lettuce, cut into bite-size pieces Chop and serve as the fresh, crisp green foundation of the salad; adds crunchy texture and a mild, slightly bitter taste. Toss with dressing and other ingredients to provide volume and a refreshing counterpoint to rich toppings. Use bite-size pieces for easy scooping.
- 2 thinly sliced green onions Slice thinly and sprinkle over the salad for a mild oniony bite and subtle green color. Use as a garnish to impart fresh, sharp notes that balance richer elements like cheese and sour cream. Thin slicing ensures a delicate texture and even distribution.
- 1 peeled, small diced small red onion Dice finely and add for a sharper, pungent crunch that enhances savory components. Provides a bold onion flavor that contrasts with creamy avocado and mellow beans, contributing complexity. Small dice helps distribute the flavor without overwhelming each bite.
- 1 peeled, cored, medium diced avocado Cube and add for creamy, buttery richness and a cool contrast to spicy and savory toppings. Mash slightly if desired to create pockets of avocado creaminess that bind with dressing and sour cream. Choose ripe but firm fruit to maintain shape in the salad.
- 1 cup cherry tomatoes, sliced in half Halve and add for sweet, juicy bursts and bright color that lighten the overall flavor profile. Use bite-sized pieces to ensure even distribution and to complement the savory and creamy elements. Fresh tomatoes also add moisture and a pleasant acidity.
- 15 -ounce can drained black beans Rinse, drain, and add for earthy, protein-rich beans that bulk up the salad and provide fiber. Serve whole or slightly mashed to integrate with other toppings and to add a hearty texture. Canned beans save time while still contributing nutritional value.
- 15 -ounce can drained corn Drain and add for a sweet, crisp element that balances the savory and creamy flavors in the salad. Combine with beans and other toppings for a colorful, nutrient-dense mix that appeals to varied palates. Canned corn is convenient and provides pleasant pop in each bite.
- 1 cup shredded Mexican-blend cheese Shred and sprinkle for melty, savory complexity that ties ingredients together with creamy, cheesy notes. Use as a topping that melts lightly from warm meat or as a cold contrast over the greens. Mexican-blend cheese adds multiple complementary cheese flavors.
- 1/2 cup sour cream Spoon dollops of cool, tangy creaminess to offset spicy and salty components in the salad. Use sparingly to add richness and a creamy mouthfeel that pairs well with chipotle ranch and seasoned beef. Keeps the assembled dish creamy without becoming heavy.
- Chipotle ranch dressing Drizzle liberally as a smoky, zesty dressing that unifies the salad with a creamy, spicy finish. Provides both tang and heat, enhancing the taco-seasoned meat and fresh vegetables while adding moisture for easier mixing. Adjust amount to preference for spice and creaminess.
Instructions
- Add 1 to 2 tablespoons of avocado oil to a large non-stick skillet over medium heat.: The pan should feel warm under your hand before the first tortilla goes in, and you will notice a faint shimmer on the oil surface. The light sizzle when the tortilla hits the pan is a good auditory cue, and the aroma is slightly nutty but subtle. This oil amount is just enough to toast the flour tortillas without making them greasy. A common mistake is overheating the oil, which causes rapid browning and creates brittle, burnt spots instead of toasty flecks. Keep the heat steady, adjusting it down if the tortillas brown too quickly.
- Next, add in a flour tortilla and cook for 30 to 45 seconds per side or until dark brown spots form.: Listen for a gentle popping sound and watch for scattered browned spots to appear, signaling that the flour has toasted and flavors are developing. The tortilla will puff slightly and release a warm, toasty scent, and the edges will firm up. If you press lightly with a spatula you should feel a tender yet robust surface. Rushing this step by cranking the heat leads to uneven browning and can make the tortilla tough when shaped, so keep an eye on it and flip when the spots appear.
- Immediately transfer it to a small to medium-sized oven-safe bowl and press down in the center using a drinking glass to mold it into a bowl-like shape. Repeat the process with 3 more flour tortillas. Ensure the flour tortillas are in the bowls and on a sheet tray, and bake in the oven on a middle rack at 350° for 14 to 15 minutes or until lightly browned and crisp. Set aside to cool.: The tortilla will still be pliable and warm, which is the perfect moment to form it. Press firmly but gently, and hold for a few seconds so the shape sets. You will feel the tortilla cool and start to hold form, and you may notice steam escaping from the underside. Do not wait too long, because once fully cooled the tortilla will crack when forced into shape. A common misstep is using a bowl that is too small, which makes the molded shell too deep and unstable, so choose a bowl that creates a balanced, holdable vessel.
- Cut the corn tortillas into thick strips.: Work steadily to toast and shape each tortilla while warm. As you repeat, you will develop a rhythm and see consistent color and shape. Stack them on a sheet tray as you go to bake them together, which also helps them finish drying evenly. If one shell cools and becomes brittle, reheat it briefly in the pan for a few seconds to regain pliability, rather than forcing and cracking it.
- Add about 1/2 cup of avocado oil to a medium or large-sized non-stick skillet over low to medium heat.: In the oven the shells will lose remaining moisture and crisp fully, producing a golden hue and a faint toasted smell. The middle rack gives even heat circulation so they crisp uniformly. Check at 12 minutes to monitor color, because ovens vary, and remove when they are just crisp to avoid overbrowning which leads to a brittle, hard shell that breaks when filled. Avoid opening the oven too often, which can extend bake time and dry them out excessively.
- Fry the corn tortilla strips in batches for 30 to 45 seconds or just until crisp.: Cooling allows the shells to firm up into a sturdy bowl that can hold fillings. As they cool you will notice the crackle of crisping and the bowl will lose steam. Do not stack the shells while hot, this traps steam and can soften them. If they feel slightly pliable after cooling, give them a couple more minutes on the tray to finish crisping.
- Let them drain on paper towels to get rid of any excess oil.: Use a sharp knife to make clean cuts, which reduces tearing and produces neat, hearty strips. The cut edges will brown faster when fried, giving a toasty flavor and slightly curled shape. Cutting them uniformly ensures even frying; inconsistent sizes can lead to some pieces burning while others remain soft, so aim for consistent thickness.
- Add the ground beef to a large non-stick skillet over medium-high heat and immediately flatten it out. After 30 seconds of frying, sprinkle 2 to 3 tablespoons of the taco seasoning and mix it in.: The oil should warm gradually to a gentle shimmer without smoking. This moderate heat level helps the corn strips crisp through without burning. You will see small, slow bubbles form around a test strip when the temperature is right. Too high a heat will brown the edges quickly and leave the center limp, so keep the flame steady and adjust as needed.
- Break up the ground beef into bite-size pieces and cook until they are browned and cooked throughout. Set it to the side.: As each strip hits the oil you will hear a bright sizzle and see them take on a golden hue. They will stiffen and float when done, and the aroma becomes pleasantly toasted. Frying in batches prevents crowding, which can lower the oil temperature and result in greasy, limp strips. Transfer them to paper towels to drain immediately to preserve crispness.
- Prepare the lettuce and vegetables.: The towels will wick away residual oil and keep the strips light and crunchy. You might gently blot the top of the strips to remove surface oil, which helps toppings adhere without sliding. Leaving them to sit in one layer prevents steaming, which would soften them. A mistake is stacking hot strips, which traps moisture and ruins the crunch.
- Fill the cooled flour tortilla bowl with lettuce, ground beef, and desired vegetable toppings and cheese.: You will hear a pronounced sizzle as the meat hits the pan, and a fragrant, roasted meat aroma will develop quickly. Flattening creates maximum contact and encourages even browning, producing those flavorful caramelized bits. Avoid stirring constantly, because that prevents proper crust formation. If the pan becomes overcrowded the meat will steam instead of brown, so cook in a single layer for best results.
- Add on your desired dressing and serve.: Adding seasoning early lets the spices warm and bloom in the fat, releasing more aroma and depth. Stir gently to distribute the seasoning so each piece of ground beef picks up flavor. A common error is adding too much liquid at this stage, which dilutes the seasoning; add any water sparingly and only if needed to keep the meat moist.
- Break up the ground beef into bite-size pieces and cook until they are browned and cooked throughout: Look for deep golden browning on many pieces, and a rich, savory smell that indicates developed flavor. The texture should be tender with slightly crisped edges, and there should be no visible pink. Overcooking will dry the meat out, so aim for a balance between caramelization and juiciness. Remove it from heat and set it aside to keep warm while you prep the salad so it does not continue to dry out.
- Prepare the lettuce and vegetables: Rinse and dry the romaine lettuce thoroughly so the dressing clings rather than dilutes. Chop the green onions and dice the red onion and avocado uniformly for even distribution. Halve the cherry tomatoes to release sweet, tangy juices. A common slip is to skip drying the lettuce, which results in a watery salad, so use a salad spinner or pat very dry.
- Fill the cooled flour tortilla bowl with lettuce, ground beef, and desired vegetable toppings and cheese: Layering creates appealing contrasts, so I start with a base of crisp lettuce , then nestle warm ground beef and top with beans, corn, and vegetables. Sprinkle the shredded cheese so it warms slightly from the meat, becoming soft and binding the components. Avoid overfilling, which makes the bowl unstable and messy to eat.
- Add on your desired dressing and serve: Drizzle the chipotle ranch and add dollops of sour cream to taste, finishing with the fried corn strips for crunch and sliced avocado for creaminess. The dressing should enhance rather than drown the ingredients, so start light and let guests add more if they like. Serve immediately so the shells stay crisp and the textures shine.
Notes
- Swap the protein Try grilled chicken in place of ground beef to lighten the dish and offer a different smoky note while keeping all other ingredients the same.
- Make it vegetarian Double up on the beans and corn, and pan roast some seasoned mushrooms to add a meaty texture without animal protein.
- Spice level control Adjust the taco seasoning amount, or mix the chipotle ranch with plain sour cream to mellow heat for kids.
- Extra crunch Add toasted pepitas or crushed, toasted corn chips for another layer of texture that plays nicely with the fried strips.
- Serve family style Lay out components in bowls and let everyone build their own, which keeps the tortilla shells crisp and caters to personal tastes.