Strawberry Pretzel Salad
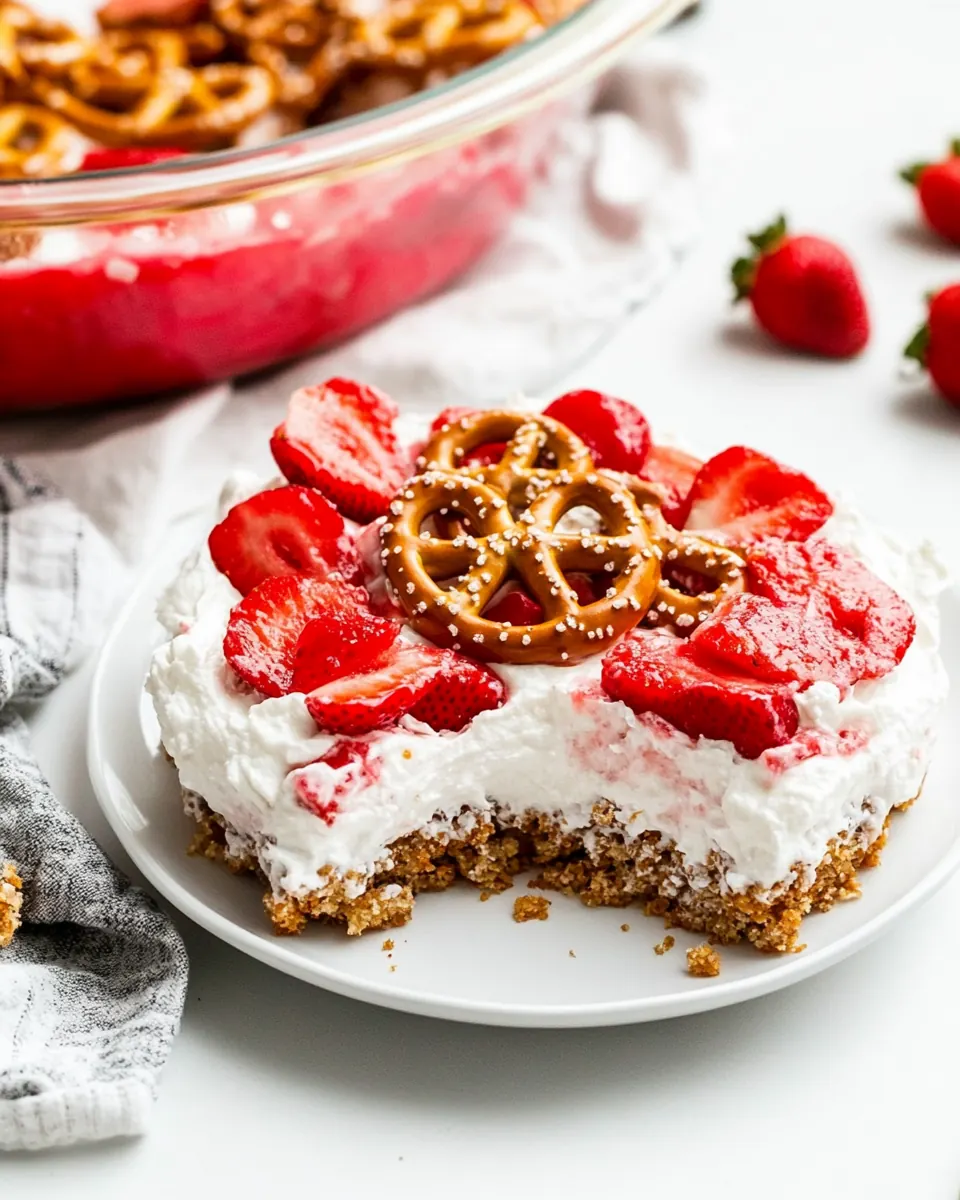
Strawberry Pretzel Salad has been a backyard potluck superstar in my family for years, the one dessert that reliably draws a crowd and sparks a dozen conversations. The first time I brought this to a summer picnic, I remember carrying it on a sunny afternoon, feeling the weight of the layered goodness and wondering if the balance of crunchy and creamy would hold up on the drive. It always does, and that memory still makes me smile when I slice into the crisp pretzel base and reveal the soft, tangy cream cheese layer beneath bright strawberry slices.
Over time I learned a few small adjustments that make the flavors pop even more. I learned to press the crust firmly so it holds together when scooped, and to let the glaze rest so it clings glossy to each strawberry. Friends often ask how this dessert manages to feel both nostalgic and fresh, and for me it comes down to simple contrasts the recipe celebrates: crunchy versus creamy, sweet versus a hint of salt, and the bright acid from lemon that wakes everything up. Those contrasts are what keep folks coming back for seconds.
Recipe Snapshot
40 mins
30 mins
10 mins
Medium
300 kcal
American
Gluten-Free, Low FODMAP
Desserts
Food processor, 9 inch pie pan, Electric mixer, Medium saucepan
Why This Strawberry Pretzel Salad Is a Winner
Crunchy Meets Creamy
I love how the pretzel crust provides a toasted, salty backbone for the whole dish. When you take a bite, you get an audible snap, followed by the lush softness of the cream layer. That contrast is the heart of why I keep making Strawberry Pretzel Salad, it satisfies a craving for texture in a way many desserts do not.
Bright, Fresh Fruit
The strawberry layer is not just pretty, it keeps the whole dish feeling light. I always choose ripe but firm strawberries so they hold up under the glaze and still give a fresh, slightly tart note that balances the sweet components. You get a juicy pop that pairs beautifully with the tang of the cream layer.
Make Ahead Friendly
This is brilliant for parties because you can assemble it hours in advance. I often make mine the day before, which lets the flavors settle and the glaze set properly. That hands off nature makes it a go to for summer gatherings when you want to enjoy the company and not be stuck finishing desserts at the last minute.
Simple Ingredients, Big Impact
There is nothing fussy here, just pantry friendly items that combine to create something special. I appreciate recipes that reward small, sensible techniques rather than long lists, and Strawberry Pretzel Salad is exactly that. A little attention to texture and timing yields a dish that looks impressive but is very forgiving.
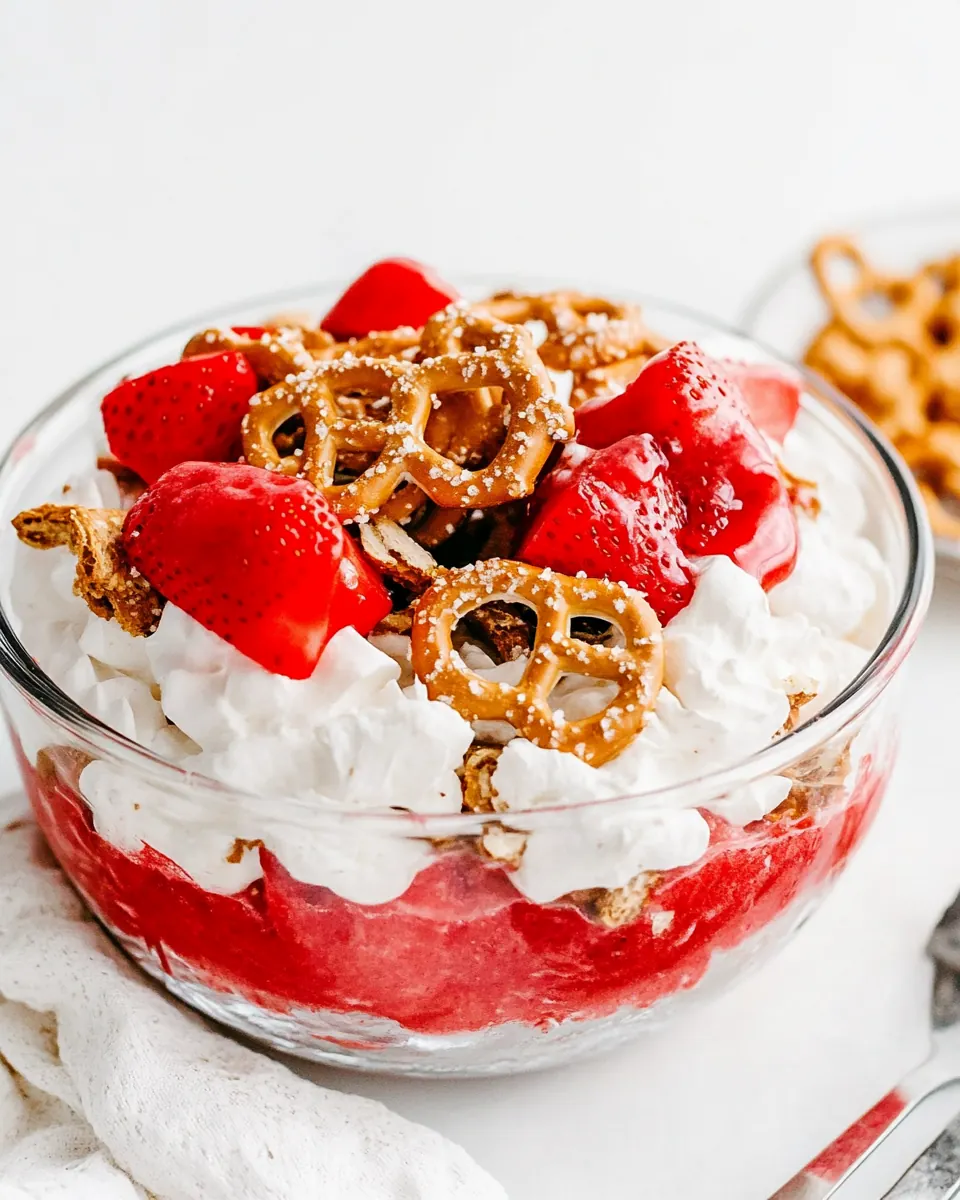
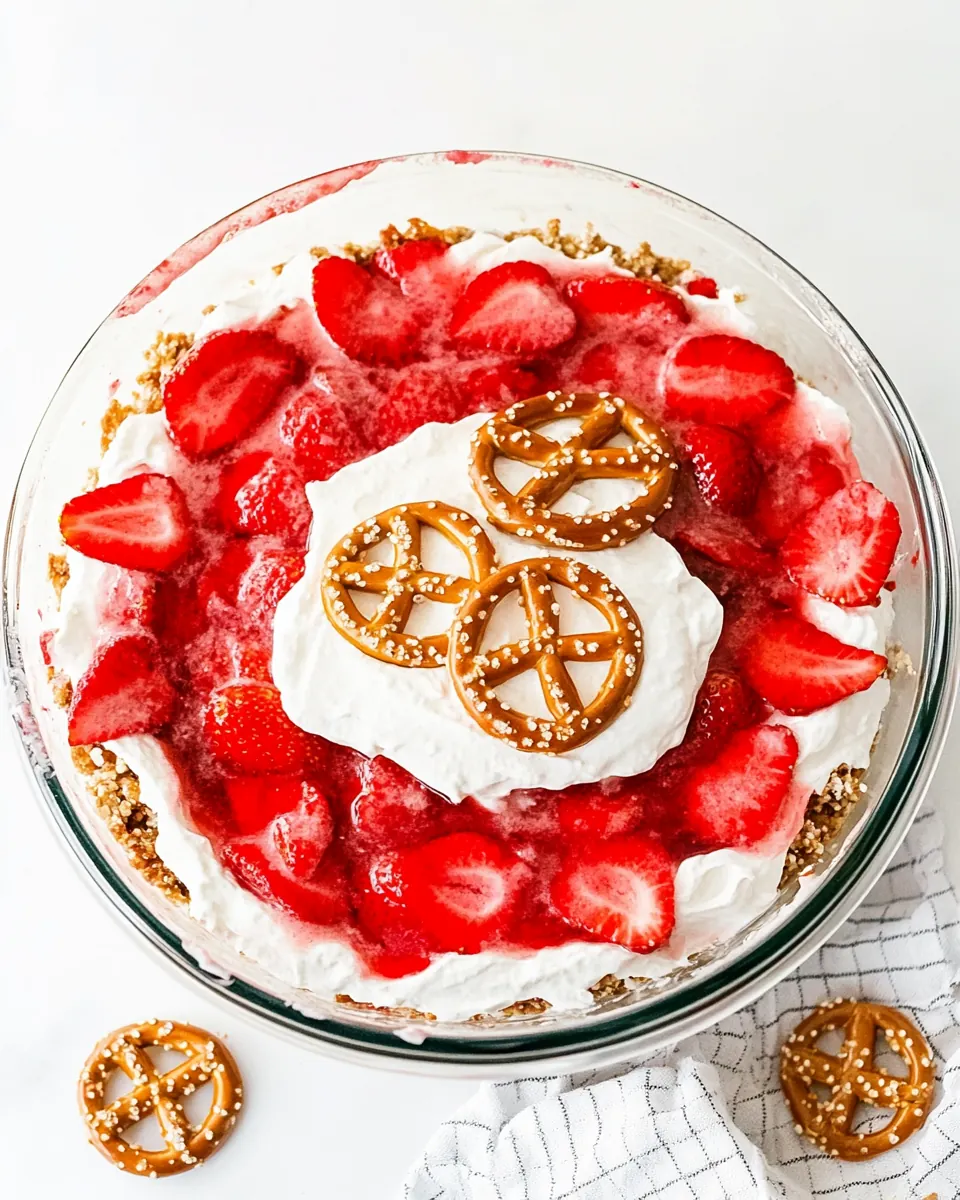
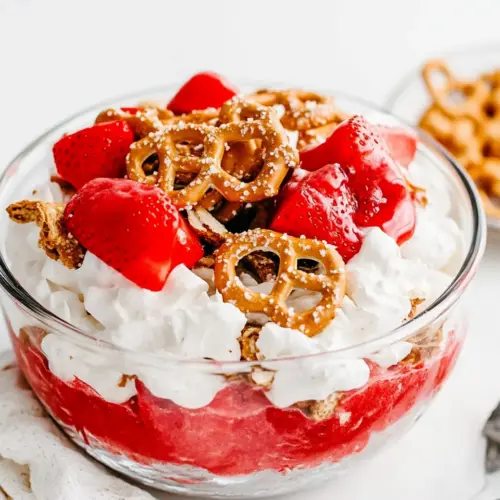
Visual Appeal
Layering makes this dessert a showstopper. The golden crust, pale cream layer, and glossy red strawberry topping create a vibrant presentation that always photographs well. I like bringing it in a clear dish so guests can see the layers through the glass, it builds anticipation even before the first forkful.
What’s In This Strawberry Pretzel Salad
These components work together like a small orchestra, each player supporting the others. The salty pretzels give structure and crunch, the melted butter and brown sugar bind into a flavorful crust, while the whipped, tangy cream cheese filling lends a silky mouthfeel. Finally, the glazed strawberries provide brightness and a glossy finish that ties everything together visually and texturally.
- 4 cups small pretzels: Crush into fine crumbs to form the crunchy base layer that contrasts with creamy and fruity layers; pack firmly to create an even crust that holds together when sliced.
- 5 tbsp brown sugar light or dark: Sweeten and caramelize slightly when mixed with melted butter to bind the pretzel crumbs; add a hint of molasses depth that balances the tartness of the filling and fruit.
- 1/2 cup unsalted butter melted: Melt and combine with pretzel crumbs to bind the crust; add richness and help the base set while contributing a smooth mouthfeel to each bite.
- 8 oz cream cheese softened: Soften and beat until smooth to create the creamy middle layer that provides tangy richness; stabilize with sugar and lemon to achieve a spreadable consistency.
- 1 tbsp lemon juice: Brighten and brighten the cream cheese layer with acidity to cut richness; enhance flavor balance and prevent the filling from tasting overly sweet.
- 1 tsp lemon zest: Zing and elevate the filling with concentrated citrus aroma; add fresh lemon oil that pairs well with the strawberries and cuts through sweetness.
- 1/4 cups sugar: Sweeten the cream cheese mixture to taste and help stabilize whipping; dissolve fully to avoid graininess and ensure a smooth, balanced filling.
- 3/4 cup heavy whipping cream: Whip to medium peaks to create a light, airy texture in the cream cheese layer; fold gently to maintain volume and provide a fluffy counterpoint to the dense crust.
- 4 cups fresh strawberries washed, dried and sliced: Wash, dry, and slice to supply fresh, bright fruit topping; distribute evenly for uniform sweetness and visual appeal while contributing natural juiciness.
- 1/4 cups sugar: Sweeten the strawberry layer to macerate the fruit and draw out juices; dissolve completely to ensure a glossy, evenly sweetened topping.
- 1/2 cup cold water: Dilute and dissolve gelatin and cornstarch smoothly before combining with strawberries; adjust temperature carefully to avoid clumping and ensure proper setting.
- 4 tbsp strawberry gelatin mixture straight from the box, to not follow the recipe on the box: Incorporate directly from the box as the flavored gelling agent to set the strawberry topping; provide color, concentrated strawberry flavor, and firming action when chilled.
- 2 tbsp cornstarch: Thicken and stabilize the strawberry sauce by slurry or cooked mixture to ensure a glossy, cohesive topping; prevent separation and help the topping hold shape when sliced.
Making Strawberry Pretzel Salad

These instructions will walk you through each layer with a focus on sensory cues and timing so you know exactly when things are right. Read each step slowly, and give yourself the space to notice texture and aroma changes as you work. The end result rewards patience.
- Preheat oven to 350 degrees F.: As the oven warms, you should feel a gentle warmth in the kitchen and notice the faint scent of warming air. This preheating stage ensures the crust bakes evenly, giving the melted butter a chance to bond with the crushed pretzels and brown slightly. If you skip preheating, the crust may bake unevenly and remain fragile. A common mistake is placing the pan in too cool an oven, which can result in a greasy, undercooked base rather than a toasted, cohesive one.
- Place all pie crust ingredients into a food processor and process until the ingredients resemble the texture of wet sand. Press crust mixture into the bottom and of the sides of a well-greased 9" pie pan. Bake for 10 minutes. Allow to cool completely prior to filling.: You will hear the rhythmic chopping as the pretzels break down into fine crumbs, and the mixture will smell nutty and slightly salty when combined with the melted butter . Press firmly but evenly into the pan to compact the crumbs, feeling with your fingertips to ensure no loose areas remain. Baking for 10 minutes will toast the crust, giving it a deeper flavor and helping it hold together; look for a subtle deepening in color around the edges. If you do not cool fully before filling, the warm crust can cause the filling to loosen and slide, so patience here prevents a soggy interface. Avoid over processing, which can make crumbs too powdery and yield a dense crust.
- To make filling, in a large bowl using an electric mixer, combine cream cheese, lemon juice, lemon zest and sugar until light and fluffy.: As you beat, the aroma shifts to a bright, citrus scented cream that feels smoother and lighter. The texture should become silky with no lumps; scrape the bowl as needed to incorporate every bit. This aeration lightens the filling and prevents a dense, heavy middle; it also helps the filling marry with the whipped heavy whipping cream later. A common pitfall is using cold cream cheese , which leaves clumps and a grainy texture, so make sure it is softened for effortless whipping.
- In a medium bowl, beat heavy cream until stiff peaks form. Fold whipped cream into the cream cheese mixture just until combined, then spread into prepared pie crust. Chill in the refrigerator for 1 hour.: You will hear a soft whipping sound as air is incorporated into the heavy whipping cream , and visually the peaks will hold shape on the whisk. Folding rather than vigorously beating preserves the airy volume, creating a cloudlike filling that contrasts the crunchy base. After spreading, the surface should look smooth and slightly billowy; chilling firms the layer so it supports the fruit topping. A common mistake is over folding, which can deflate the mixture and produce a dense filling, so fold gently until there are no streaks.
- In a medium saucepan, combine sugar, water, dry strawberry gelatin and cornstarch. Bring to boil over medium heat and let bubble for 1 minute. Remove from heat.: As the liquid heats, the sugar dissolves and the mixture begins to steam gently, releasing a sweet, artificial strawberry scent from the gelatin. Once it reaches a rolling bubble, the cornstarch activates and thickens the liquid; one minute of bubbling ensures the starch cooks through so the glaze will set clear rather than cloudy. Remove from heat promptly to avoid overcooking, which can darken the flavor. A mistake to avoid is not whisking constantly, which can let lumps form or allow the mixture to scorch on the pan bottom.
- Place cleaned, sliced strawberries into a bowl, and pour strawberry glaze mixture over strawberries. Toss to coat strawberries in glaze. Let this mixture sit in the refrigerator for 45 minutes to thicken up a bit. Using a slotted spoon, layer strawberries mixture over the cheesecake layer, then drizzle the remaining sauce over the strawberries to the edges of the pie plate.: When you pour the warm glaze over the strawberries , they release a bright aroma and the fruit will shimmer as the liquid clings. Tossing ensures each slice is coated and begins to absorb the glaze, concentrating the flavor. Refrigerating lets the glaze cool and thicken slightly so it stays glossy and does not seep into the cream layer. Use a slotted spoon to transfer the fruit so excess glaze stays in the bowl for an elegant drizzle across the top. A common issue is adding the fruit while the glaze is too hot, which can soften the berries excessively, so allow it to cool briefly before pouring.
- Refrigerate for at least 4 hours prior to serving.: During this resting time, the layers set and flavors meld, and the glaze becomes pleasantly tacky. You will notice a reassuring firmness when you lightly press the top, indicating it is ready to slice. Chilling also helps the crust maintain its structure so each serving comes out neat. A frequent error is serving too soon, which results in runny slices and a less defined layering; patience yields the best presentation and texture.
Tips and Tricks about Strawberry Pretzel Salad
This recipe rewards small habits that preserve texture and flavor. Below are targeted tips I use every time, expanded into practical advice so you can replicate consistent results at home.
- Use a glass dish for presentation, it lets you admire the layers and makes serving easier because you can see where to slice. Visual cues help you portion neat wedges and a clear dish shows off the contrast between the browned crust, pale filling, and vibrant strawberry topping.
- Dry the strawberries thoroughly, moisture on the fruit can water down the glaze and cause the filling to become soggy. I pat each strawberry with a paper towel before slicing to keep the topping glossy and the layers distinct.
- Toast crushed pretzels briefly in the oven if you want extra depth, watch for a nutty aroma which signals they are ready. Extra toasting tightens the structure of the crust and adds a pleasant toasted note against the sweet filling.
- Measure cornstarch carefully, too much can produce a pasty glaze while too little leaves it runny. I spoon it into the measuring tool rather than packing, for accuracy that yields the right glossy set.
- Chill overnight for best slicing, longer refrigeration firms the layers and makes clean wedges easier. If you need to make it ahead, this is a forgiving dessert that often tastes even better after a night in the fridge.
How to Serve Strawberry Pretzel Salad
This dessert is versatile for gatherings and casual meals. You can serve it on its own as a statement dessert, or pair it with complementary sides for a full spread. Below are detailed serving ideas and storage guidance to make hosting straightforward.
- For summer picnics, bring the dish chilled in a cooler and slice at the picnic spot, the refreshing strawberry topping pairs well with iced tea and picnic salads.
- At potlucks and family gatherings, present it in a clear pan so guests can admire the layered look before you serve neat squares or wedges.
- For holiday tables, it offers a bright, fruity counterpoint to heavier dishes, and its make ahead nature means you can prepare it while focusing on main courses.
- Storage tip, keep wrapped tightly in the refrigerator for up to five days; the crust will remain pleasantly crunchy for several days if chilled well.
- Freezing note, you can freeze for up to six months, but expect a slight softening of the fruit texture after thawing, so I recommend freezing only if necessary.
FAQ
Conclusion
This recipe stands out for its playful contrast between a crunchy, salty crust and a smooth, tangy cream layer topped with glossy strawberries. Give it a try for your next gathering, and you may find it becomes the dish guests request every summer. It is approachable, forgiving, and stylish on the table, so have fun with the assembly and enjoy the compliments that follow.
Strawberry Pretzel Salad
Equipment
- Food Processor
- 9-inch pie pan
- Electric Mixer
- Medium Saucepan
Ingredients
- 4 cups small pretzels Crush into fine crumbs to form the crunchy base layer that contrasts with creamy and fruity layers; pack firmly to create an even crust that holds together when sliced.
- 5 tbsp brown sugar light or dark Sweeten and caramelize slightly when mixed with melted butter to bind the pretzel crumbs; add a hint of molasses depth that balances the tartness of the filling and fruit.
- 1/2 cup unsalted butter melted Melt and combine with pretzel crumbs to bind the crust; add richness and help the base set while contributing a smooth mouthfeel to each bite.
- 8 oz cream cheese softened Soften and beat until smooth to create the creamy middle layer that provides tangy richness; stabilize with sugar and lemon to achieve a spreadable consistency.
- 1 tbsp lemon juice Brighten and brighten the cream cheese layer with acidity to cut richness; enhance flavor balance and prevent the filling from tasting overly sweet.
- 1 tsp lemon zest Zing and elevate the filling with concentrated citrus aroma; add fresh lemon oil that pairs well with the strawberries and cuts through sweetness.
- 1/4 cups sugar Sweeten the cream cheese mixture to taste and help stabilize whipping; dissolve fully to avoid graininess and ensure a smooth, balanced filling.
- 3/4 cup heavy whipping cream Whip to medium peaks to create a light, airy texture in the cream cheese layer; fold gently to maintain volume and provide a fluffy counterpoint to the dense crust.
- 4 cups fresh strawberries washed, dried and sliced Wash, dry, and slice to supply fresh, bright fruit topping; distribute evenly for uniform sweetness and visual appeal while contributing natural juiciness.
- 1/4 cups sugar Sweeten the strawberry layer to macerate the fruit and draw out juices; dissolve completely to ensure a glossy, evenly sweetened topping.
- 1/2 cup cold water Dilute and dissolve gelatin and cornstarch smoothly before combining with strawberries; adjust temperature carefully to avoid clumping and ensure proper setting.
- 4 tbsp strawberry gelatin mixture straight from the box, to not follow the recipe on the box Incorporate directly from the box as the flavored gelling agent to set the strawberry topping; provide color, concentrated strawberry flavor, and firming action when chilled.
- 2 tbsp cornstarch Thicken and stabilize the strawberry sauce by slurry or cooked mixture to ensure a glossy, cohesive topping; prevent separation and help the topping hold shape when sliced.
Instructions
- Preheat oven to 350 degrees F.: As the oven warms, you should feel a gentle warmth in the kitchen and notice the faint scent of warming air. This preheating stage ensures the crust bakes evenly, giving the melted butter a chance to bond with the crushed pretzels and brown slightly. If you skip preheating, the crust may bake unevenly and remain fragile. A common mistake is placing the pan in too cool an oven, which can result in a greasy, undercooked base rather than a toasted, cohesive one.
- Place all pie crust ingredients into a food processor and process until the ingredients resemble the texture of wet sand. Press crust mixture into the bottom and of the sides of a well-greased 9" pie pan. Bake for 10 minutes. Allow to cool completely prior to filling.: You will hear the rhythmic chopping as the pretzels break down into fine crumbs, and the mixture will smell nutty and slightly salty when combined with the melted butter . Press firmly but evenly into the pan to compact the crumbs, feeling with your fingertips to ensure no loose areas remain. Baking for 10 minutes will toast the crust, giving it a deeper flavor and helping it hold together; look for a subtle deepening in color around the edges. If you do not cool fully before filling, the warm crust can cause the filling to loosen and slide, so patience here prevents a soggy interface. Avoid over processing, which can make crumbs too powdery and yield a dense crust.
- To make filling, in a large bowl using an electric mixer, combine cream cheese, lemon juice, lemon zest and sugar until light and fluffy.: As you beat, the aroma shifts to a bright, citrus scented cream that feels smoother and lighter. The texture should become silky with no lumps; scrape the bowl as needed to incorporate every bit. This aeration lightens the filling and prevents a dense, heavy middle; it also helps the filling marry with the whipped heavy whipping cream later. A common pitfall is using cold cream cheese , which leaves clumps and a grainy texture, so make sure it is softened for effortless whipping.
- In a medium bowl, beat heavy cream until stiff peaks form. Fold whipped cream into the cream cheese mixture just until combined, then spread into prepared pie crust. Chill in the refrigerator for 1 hour.: You will hear a soft whipping sound as air is incorporated into the heavy whipping cream , and visually the peaks will hold shape on the whisk. Folding rather than vigorously beating preserves the airy volume, creating a cloudlike filling that contrasts the crunchy base. After spreading, the surface should look smooth and slightly billowy; chilling firms the layer so it supports the fruit topping. A common mistake is over folding, which can deflate the mixture and produce a dense filling, so fold gently until there are no streaks.
- In a medium saucepan, combine sugar, water, dry strawberry gelatin and cornstarch. Bring to boil over medium heat and let bubble for 1 minute. Remove from heat.: As the liquid heats, the sugar dissolves and the mixture begins to steam gently, releasing a sweet, artificial strawberry scent from the gelatin. Once it reaches a rolling bubble, the cornstarch activates and thickens the liquid; one minute of bubbling ensures the starch cooks through so the glaze will set clear rather than cloudy. Remove from heat promptly to avoid overcooking, which can darken the flavor. A mistake to avoid is not whisking constantly, which can let lumps form or allow the mixture to scorch on the pan bottom.
- Place cleaned, sliced strawberries into a bowl, and pour strawberry glaze mixture over strawberries. Toss to coat strawberries in glaze. Let this mixture sit in the refrigerator for 45 minutes to thicken up a bit. Using a slotted spoon, layer strawberries mixture over the cheesecake layer, then drizzle the remaining sauce over the strawberries to the edges of the pie plate.: When you pour the warm glaze over the strawberries , they release a bright aroma and the fruit will shimmer as the liquid clings. Tossing ensures each slice is coated and begins to absorb the glaze, concentrating the flavor. Refrigerating lets the glaze cool and thicken slightly so it stays glossy and does not seep into the cream layer. Use a slotted spoon to transfer the fruit so excess glaze stays in the bowl for an elegant drizzle across the top. A common issue is adding the fruit while the glaze is too hot, which can soften the berries excessively, so allow it to cool briefly before pouring.
- Refrigerate for at least 4 hours prior to serving.: During this resting time, the layers set and flavors meld, and the glaze becomes pleasantly tacky. You will notice a reassuring firmness when you lightly press the top, indicating it is ready to slice. Chilling also helps the crust maintain its structure so each serving comes out neat. A frequent error is serving too soon, which results in runny slices and a less defined layering; patience yields the best presentation and texture.
Notes
- Use a glass dish for presentation, it lets you admire the layers and makes serving easier because you can see where to slice. Visual cues help you portion neat wedges and a clear dish shows off the contrast between the browned crust, pale filling, and vibrant strawberry topping.
- Dry the strawberries thoroughly, moisture on the fruit can water down the glaze and cause the filling to become soggy. I pat each strawberry with a paper towel before slicing to keep the topping glossy and the layers distinct.
- Toast crushed pretzels briefly in the oven if you want extra depth, watch for a nutty aroma which signals they are ready. Extra toasting tightens the structure of the crust and adds a pleasant toasted note against the sweet filling.
- Measure cornstarch carefully, too much can produce a pasty glaze while too little leaves it runny. I spoon it into the measuring tool rather than packing, for accuracy that yields the right glossy set.
- Chill overnight for best slicing, longer refrigeration firms the layers and makes clean wedges easier. If you need to make it ahead, this is a forgiving dessert that often tastes even better after a night in the fridge.