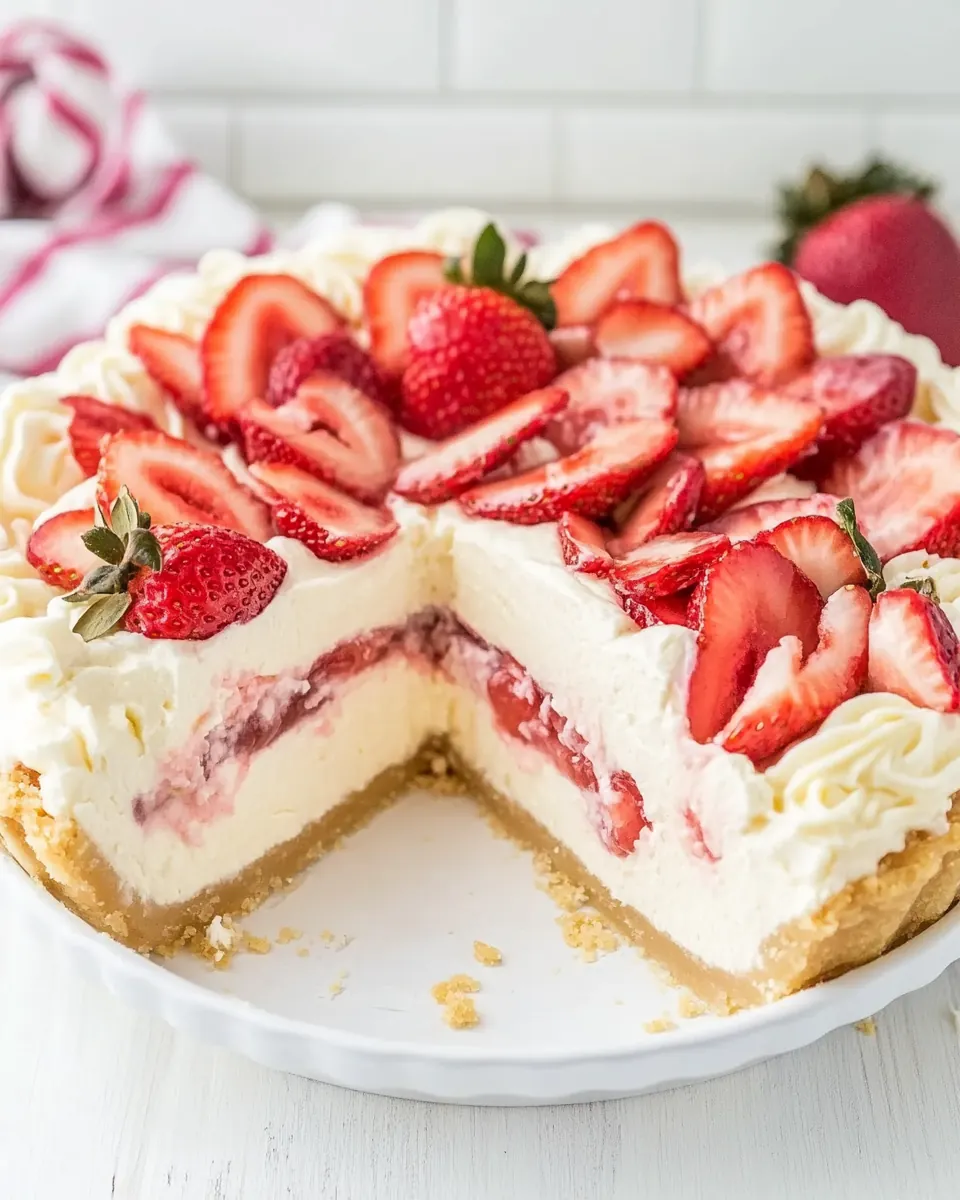
Strawberry Cream Cheese Pie
Strawberry Cream Cheese Pie has been one of those desserts I turn to whenever I want something that feels nostalgic yet effortless. The first time I made this pie it was for a small spring gathering, and the way the bright strawberries met the pillowy cream cheese filling felt like a memory from childhood updated for grown up palates. I still remember the soft crackle of the crust as I sliced into the chilled pie, and how the filling held its shape while still melting on the tongue.
I love how approachable this recipe is, and how quickly a few quality ingredients can transform into something celebratory. Over the years I have tweaked little things, like how cold the water for the gelatin should be, or how long to whip the cream, and those small adjustments made a big difference in texture. Friends always ask what makes this pie so special, and honestly it is the contrast between the tangy cream cheese base and the glossy, jam-coated strawberries.
When I bring this pie to potlucks, people assume it took hours. I enjoy watching their faces when I tell them it mostly comes together with a few careful steps. The recipe also travels well, which is useful for picnics or afternoons when you want a dessert that looks elegant without a lot of fuss. Each bite is creamy, fruity, and just sweet enough to keep you reaching for another slice.
Recipe Snapshot
35 mins
20 mins
15 mins
Hard
350 kcal
American
Gluten-Free, Low FODMAP
Desserts
9-inch pie pan, Parchment paper, Pie weights, Hand mixer, Stand mixer or mixing bowl, Microwave safe bowl, Offset spatula
Why This Strawberry Cream Cheese Pie Stands Out
Fresh Seasonal Flavor That Pops
I adore how the Strawberry Cream Cheese Pie lets ripe strawberries shine. In spring, berries are at their best, and the jam glaze amplifies their aroma and glossy color, making every slice look and taste like spring on a plate. I find that using ripe but firm berries gives the best texture, so the topping keeps a pleasant bite.
Silky, Stable Filling
The addition of unflavored gelatin means the cream cheese filling sets up beautifully without becoming rubbery. I prefer this technique because it creates a filling that is creamy when you bite into it, yet stable enough to slice neatly for guests. I like that it eliminates the need for baking the filling, so the taste stays fresh and cool.
Quick Prep, Big Impact
This pie feels fancy but is surprisingly quick. From my experience, about the time it takes to pre-bake the crust and chill the filling, you can prepare the fruit topping and whipped garnish. That fast turnaround is perfect when I need a last minute dessert that still wows a crowd.
Flexible and Friendly
I often adapt the recipe slightly depending on what I have on hand, but the core approach is forgiving. The pie crust can be store bought for ease, or homemade when I have extra time. Either way, the rest of the recipe snaps together with familiar tools and simple techniques, which makes it ideal for cooks of all skill levels.
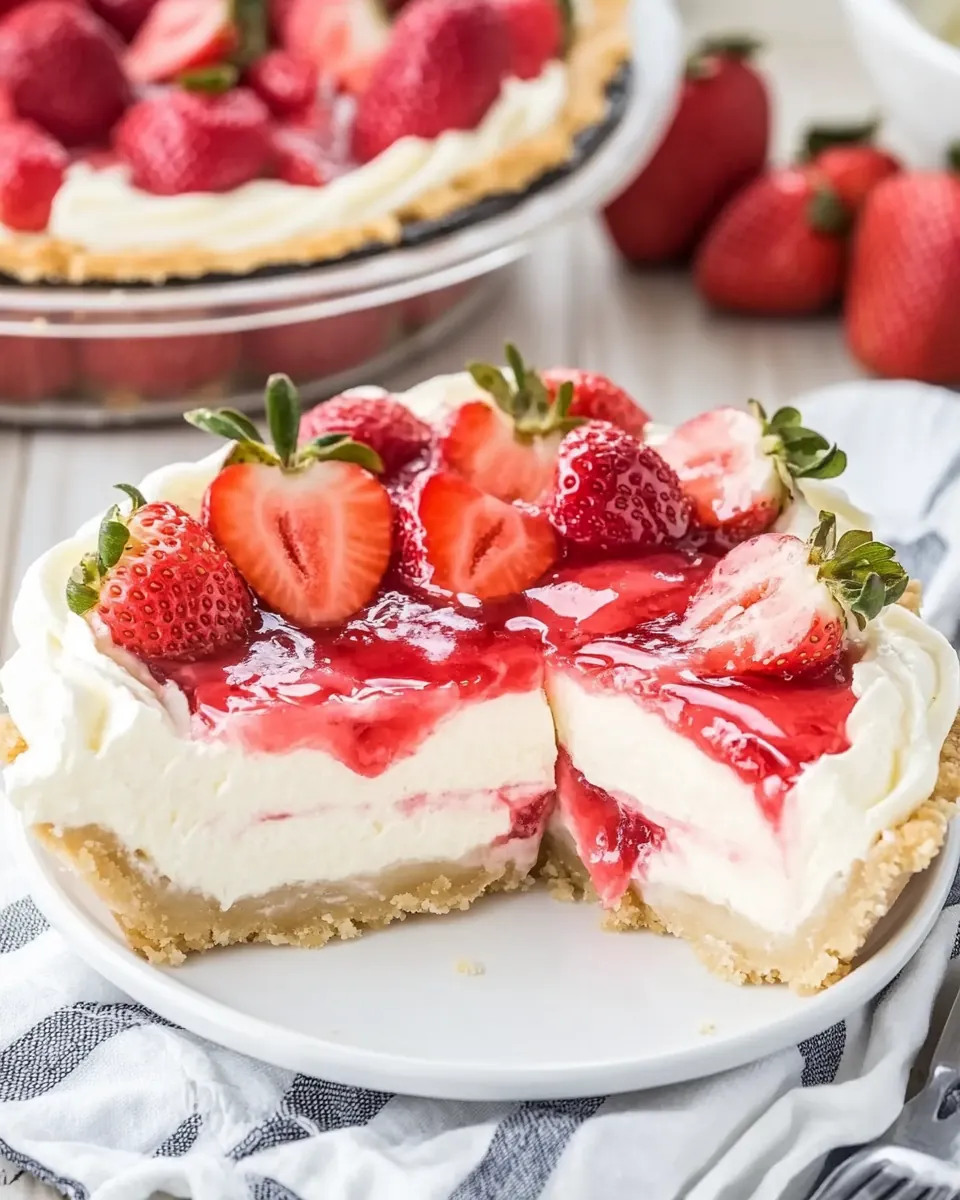
Looks Great, Travels Well
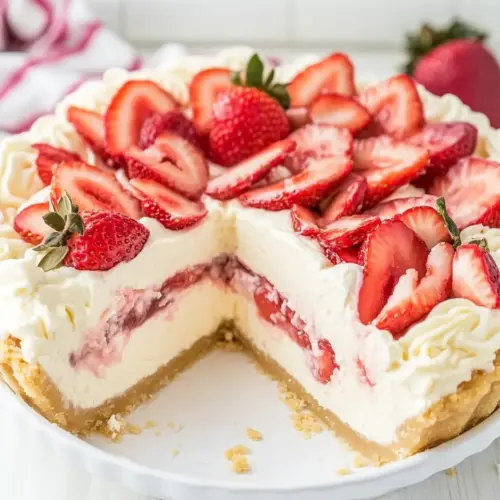
The final presentation is a big reason I love this pie. The jam glaze keeps the strawberries shiny and the piped whipped cream gives a professional finish. I’ve carried it to backyard gatherings and it arrives intact and inviting, which makes it a reliable choice whenever I want a dessert that delivers both flavor and visual appeal.
What Goes Into Strawberry Cream Cheese Pie
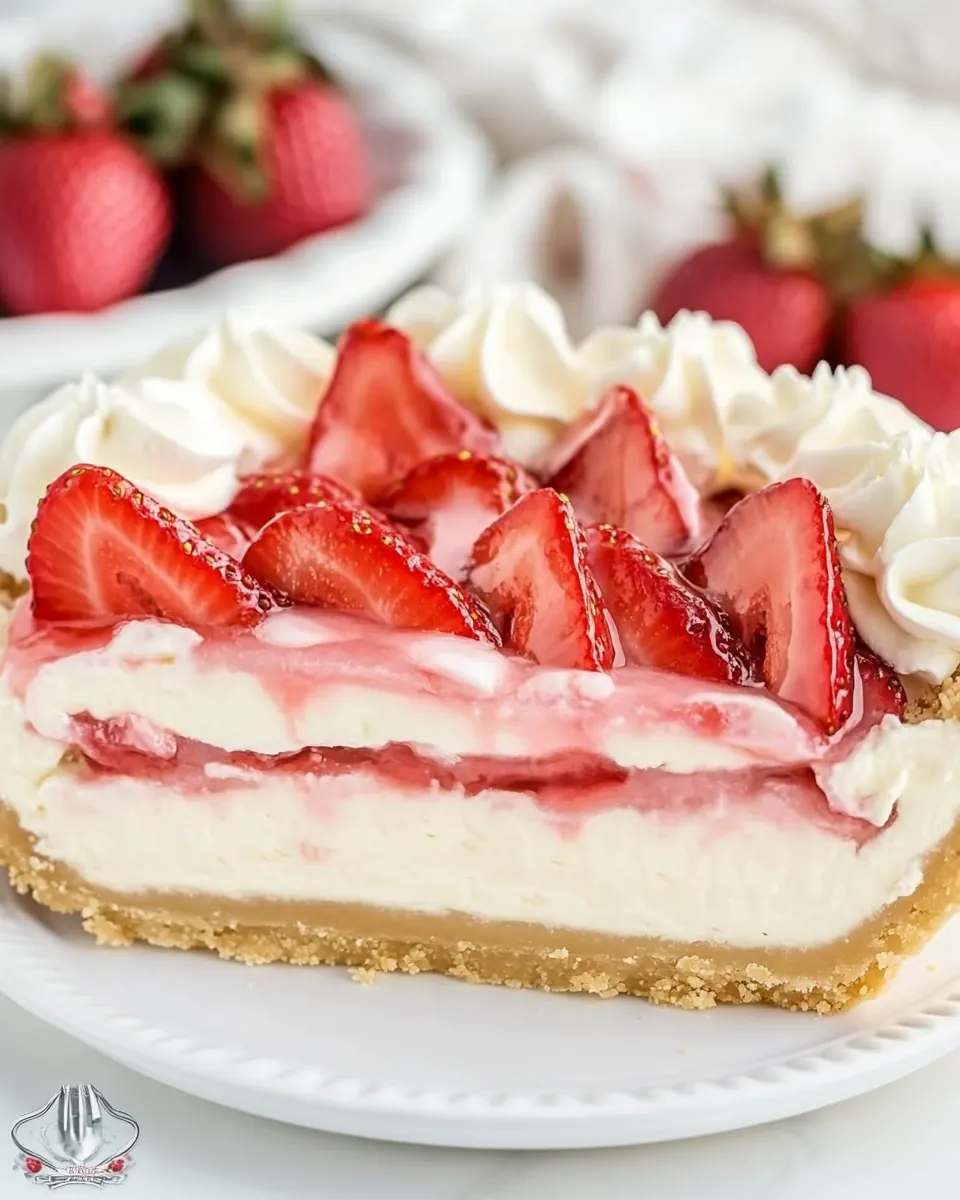
These ingredients work in harmony to create a pie that is both lush and structured. The key players are the creamy cream cheese filling, the crisp pie crust, and the bright strawberries enveloped in a glossy jam glaze. Gelatin acts quietly but critically to give the filling and topping the right set so slices hold their shape. The whipped cream adds a light, sweet finish that balances the denser filling.
- 1 store-bought pie crust (or the flaky and homemade pie crust recipe from our site): Provide a crisp, pre-baked base that supports the filling and adds a flaky, buttery texture to the pie. Use a store–bought crust for convenience or substitute with a flaky homemade recipe for a richer, more artisanal result. Blind-bake according to package or recipe directions to ensure a firm foundation for the cream cheese and strawberry layers.
- 1/2 cup cold water: Keep cold to help bloom gelatin and prevent premature setting when combining with gelatin powder. Use measured cold water to dissolve gelatin evenly and ensure a smooth, stable gelatin mixture. Chill briefly if needed before incorporating into whipped components to maintain desired texture.
- 2 1/4 teaspoons unflavored gelatin (like Knox brand (0.25-ounce packet)): Bloom gently to activate its gelling properties so the filling sets properly and holds shape when sliced. Sprinkle over cold water and let sit for a few minutes, then dissolve with low heat or a warm bath to ensure clarity and smoothness. Use the specified amount to achieve a firm yet creamy consistency in the filling and glaze.
- 1 cup heavy whipping cream: Whip until soft peaks form to add volume, lightness, and richness to the cream cheese filling. Keep chilled until ready to fold into the sweetened cream cheese mixture to maintain stability and fluffy texture. Use a full cup to balance richness without overpowering the tang of the cream cheese.
- 12 ounces cream cheese (softened to room temperature): Soften to room temperature to achieve a silky, lump-free filling with a smooth mouthfeel. Beat until creamy before adding powdered sugar and other flavorings to ensure even incorporation and a stable structure. Use full-fat cream cheese for optimal richness and cohesive texture in the pie.
- 2 cups powdered sugar: Sweeten and stabilize the cream cheese filling while adding a fine texture that dissolves completely when beaten. Sift or add slowly while mixing to avoid graininess and to achieve a smooth, uniformly sweet filling. Adjust slightly if needed to balance sweetness against the tart strawberries.
- 2 teaspoons vanilla extract: Flavor subtly to enhance the cream cheese filling with warm, familiar vanilla notes without overpowering other flavors. Add during beating to disperse aroma evenly throughout the filling and complement the strawberries. Use pure extract for the best, clean vanilla profile.
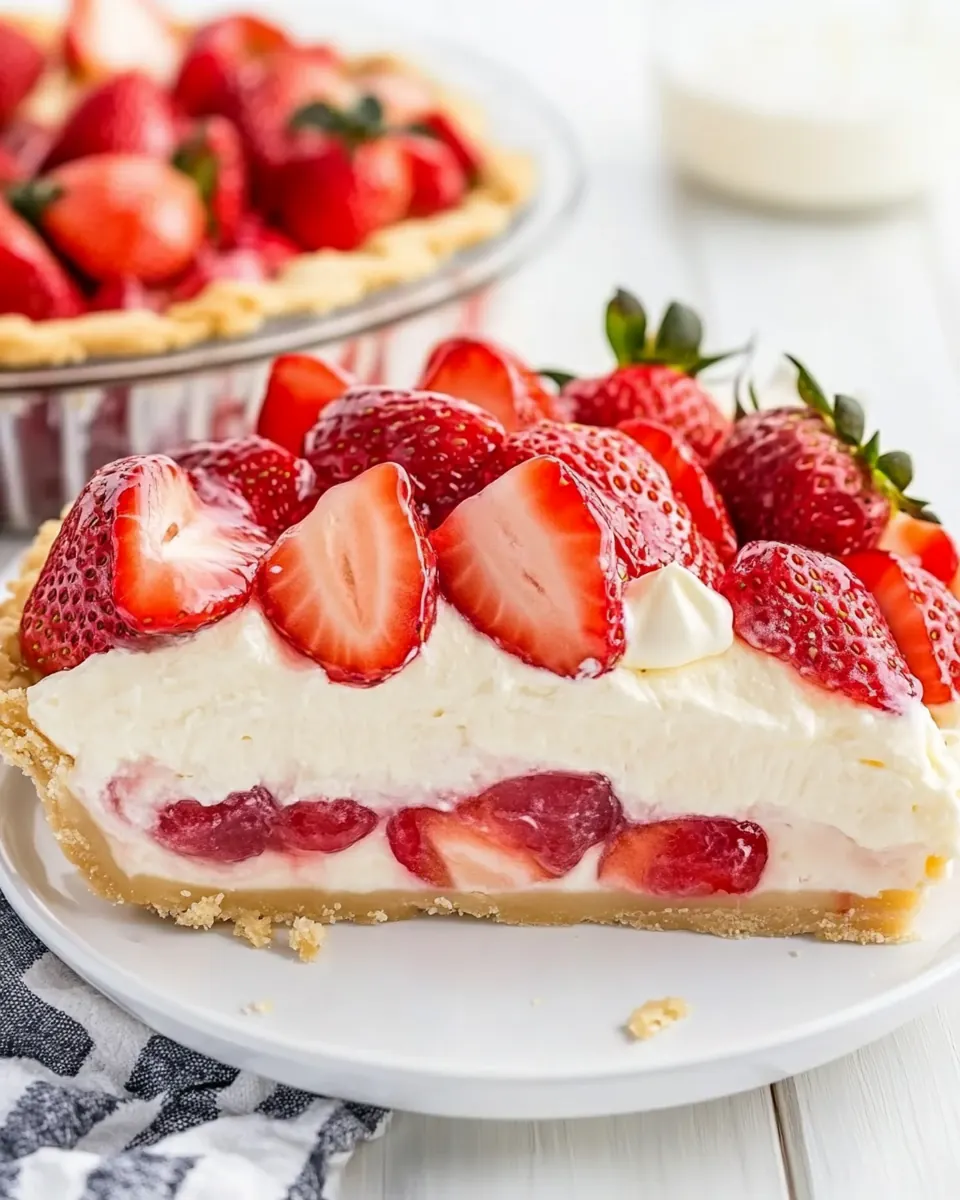
- 1 pound fresh strawberries (sliced): Slice uniformly to provide fresh, juicy fruit pieces that add brightness, texture, and visual appeal to the pie. Layer or arrange on top of the cream cheese filling to showcase color and ensure even distribution in each slice. Choose ripe strawberries for optimal sweetness and aroma.
- 1/2 cup seedless strawberry jam: Warm and thin to create a glossy, fruit-forward glaze that seals and sweetens the strawberry topping. Melt gently and brush over sliced strawberries to add shine and help preserve freshness while adding a concentrated strawberry flavor. Use seedless jam for a smooth, clear finish without seeds.
- 2 tablespoons cold water: Chill to help bloom the second gelatin addition or to adjust glaze consistency before combining with jam and heated mixtures. Use cold water to disperse gelatin granules and ensure full hydration prior to melting. Measure accurately to maintain the intended set of the strawberry glaze.
- 2 1/4 teaspoons unflavored gelatin (like Knox brand (0.25-ounce packet)): Bloom again to activate gelatin for the strawberry glaze so it firms to a spreadable, glossy finish. Sprinkle over cold water and allow to absorb liquid fully before dissolving in warm jam for clarity and smooth texture. Use identical amounts to ensure glaze sets consistently with the filling.
- 1 cup heavy whipping cream: Whip until soft peaks form to lighten the strawberry glaze mixture or add body to secondary cream components. Keep chilled and incorporate gently into jam or gelatin mixtures to maintain a silky consistency and aeration. Use the specified quantity to balance texture and richness in the final topping.
- 1/2 cup powdered sugar: Sweeten lightly when used in the glaze or decorative cream to add a touch of powdered sweetness and stabilize whipped cream. Sift or add gradually while whipping to prevent lumps and ensure a smooth, even sweetness throughout. Use measured amount to avoid over-sweetening the delicate strawberry flavors.
Recipe Directions for Strawberry Cream Cheese Pie
These directions guide you through building the pie in stages, from pre-baking the crust to glazing the fruit and finishing with a piped whipped cream border. Take your time with each stage and keep chilled items cold. You will find the steps methodical, and the result will reward patience.
- Preheat the oven to 450°F. Lightly spray a 9-inch pie pan with nonstick spray. Place the crust in the pie pan and gently prick the crust on the bottom with a fork. Lay a piece of parchment paper on top of the pie crust and gently fill with pie weights. Bake for 15 minutes, or until the crust is golden. Once baked, remove the parchment and pie weights and set the pre-baked crust on the counter to cool while preparing the cream cheese filling mixture.: The scent of warming butter and flour will start to emerge as the oven heats, and that initial high temperature helps the crust set quickly so it does not become soggy when the filling is added. You want the crust golden at the edges and firm to the touch, which tells you the structure is ready to hold the filling. A common mistake is starting with an oven that is not fully heated, which can lead to uneven browning, so wait until the oven reaches the stated temperature before sliding the crust in.
- In a medium-sized bowl, using a hand mixer on medium-high speed, whip the heavy cream until stiff peaks form. Set aside.: The faint scent of oil will be barely noticeable, but this step ensures the baked pie releases cleanly from the pan. Smooth edges and an intact bottom are signs the pan was prepared properly. Avoid over spraying, which can cause a greasy finish on the crust, so a light, even mist is ideal.
- In a small bowl, combine the water and gelatin. Gently swirl the gelatin around, making sure that it is completely absorbed by the water. Set aside.: You will feel the slight resistance as the fork makes small holes, and this docking prevents air pockets from forming while baking. If you skip docking, the crust can bubble up unevenly, so take a moment to do it thoroughly but gently to avoid tearing.
- In the bowl of a stand mixer, or using another medium-sized mixing bowl and a handheld mixer on medium-high speed, blend the cream cheese for 30 seconds to 1 minute, or until smooth.: The parchment should lie snug against the shell, and the weights press the crust down for an even bake. You will notice the crust edges remain crisp while the bottom stays flat. A tip is to press the weights gently so the crust keeps its shape without stretching.
- Add the powdered sugar and vanilla extract and continue mixing for 1 1/2 to 2 minutes or until no lumps remain. Start your mixer on low, then work up to medium-high speed.: Listen for a faint crackle as moisture evaporates, and watch the color shift to a deep, warm tan along the edges. This visual cue means the crust is done and will support the filling without collapsing. One mistake is leaving it too long, which can lead to an overly browned, bitter edge, so check a minute or two before the suggested time.
- Heat the bowl with the gelatin and water mixture in the microwave for 20 to 30 seconds. Give it a good stir making sure that there are no lumps remaining. While your mixer is on low speed, pour the warm gelatin into the bowl of the cream cheese mixture. Mix on low for 1 to 2 minutes or until completely combined.: The cooled crust should feel firm and slightly brittle at the edge, a sign it is ready. Cooling prevents the filling from softening the crust prematurely. If you try to fill a hot crust, steam can make the bottom soggy, so let it rest until only slightly warm or fully cool.
- Gently fold the whipped heavy cream into the cream cheese mixture just until everything is evenly incorporated.: The cream will go from glossy to billowy, and you will hear the beaters change rhythm as peaks hold their shape. Stiff peaks are when the cream stands upright without folding over, producing a light texture that lifts the filling. Over whipping will turn the cream grainy and begin to turn it to butter, so stop as soon as firm peaks appear.
- Spread the cream cheese mixture evenly on top of the crust. Refrigerate the cream cheese pie base while you prepare the strawberry topping.: You will see the gelatin granules absorb liquid and swell slightly, becoming gelatinous to the touch. This step, called blooming, ensures a lump free gelatin when warmed. If you skip blooming, you risk pockets of undissolved gelatin in the pie, so always let it rest a few minutes.
- Prepare your fresh strawberries by rinsing them in cool water and then patting them completely dry. Remove the green tops, cut the berries into 1/4-inch slices, and place them into a large bowl. Set aside.: Watch as the cream cheese becomes glossy and free of clumps, and you will feel it become much easier to work with. Smoothness here prevents a grainy filling and ensures the sugar blends seamlessly. If your cream cheese is too cold, it will tear instead of smooth, so always bring it to room temperature first.
- In a small bowl, add the water and unflavored gelatin. Gently swirl to make sure that all the gelatin is mixed with the water. Let it sit for about 2 to 3 minutes to thicken.: The mixture will lighten slightly and smell more fragrant, with the sugar dissolving into the cream cheese . Start mixing gently and then increase speed to avoid a cloud of sugar dust. A pitfall is adding sugar too quickly which can cause splatter or uneven incorporation, so add gradually.
- In a microwave-safe bowl (a glass 2 cup measure works great for this), place the seedless strawberry jam and microwave on high for 30 to 45 seconds. Once warm, give it a whisk to loosen it up and make it smooth and pourable.: The gelatin should turn a clear liquid without boiling, and you will see any remaining granules disappear as you stir. Warming just melts the gelatin, preserving its gelling power. Overheating can degrade the gelatin, so avoid boiling and use short bursts of heat.
- Once the jam is hot and smooth, add the gelatin mixture to the jam and whisk again until it is completely incorporated and no lumps remain.: The smooth, clear gelatin should coat your spoon with a slight sheen, indicating it is ready to be added. This ensures even distribution when combined into the cooler mixture. If you notice any grainy pieces, return to the microwave briefly, stirring often until fully dissolved.
- Pour the jam mixture over the sliced berries and gently combine, making sure that all the berries are coated.: The warm liquid will quickly incorporate and you will notice the mixture become silkier and slightly looser, which is expected. Mixing on low prevents splashing and ensures even distribution. Pour too quickly and you could create hot spots that cause the filling to separate, so add steadily.
- Remove the pie from the refrigerator; using a slotted spoon, spoon the berry mixture gently over the cheesecake filling, being careful not to get too much extra liquid on the pie.: The bowl should feel smooth when you scrape it, and you will no longer see streaks of gelatin or sugar. This uniform texture is critical for consistent setting. If you under mix, pockets of gelatin can form, so be thorough but gentle.
- Place the pie back in the refrigerator to chill and set for at least 5 hours (or up to overnight). While the pie is chilling, you can make the whipped topping for the garnish.: Using a rubber spatula, fold with wide motions to preserve the airy whipped cream, which gives the filling a light mouthfeel. Look for a uniform pale mixture with no streaks of white or dense pockets. Over folding will deflate the cream, making the filling heavy, so stop as soon as the components blend.
- Using a medium-sized mixing bowl and a handheld mixer on medium-high speed, beat the heavy cream and powdered sugar until stiff peaks form.: Smooth the top with an offset spatula until it is level, and the surface should look glossy and dense. Even spreading ensures uniform slices and a neat appearance. Rushing this step can trap air or cause dips, so take a moment to smooth carefully.
- Fill a decorator’s piping bag, or a gallon-sized Ziploc bag with a small corner of the bag snipped off, with the whipped cream. Pipe small swirls at the edge of your pie just before serving. Note: Do not add the whipped topping until just before you are ready to serve.: Chilling firms the filling and gives the gelatin time to set, which is important before adding the fruit layer. You should feel the filling cool to the touch and lose some give when pressed gently. If you try to add the topping too soon, the fruit can sink into a loose filling, so be patient.
- Prepare your fresh strawberries by rinsing them in cool water and then patting them completely dry: The berries will smell bright and look plump after rinsing, and removing excess moisture helps the glaze adhere. Dry berries also prevent the topping from becoming watery. If you leave them damp, the glaze can dilute and run off, so pat thoroughly.
- Remove the green tops, cut the berries into 1/4-inch slices, and place them into a large bowl: Uniform slices create a consistent bite and help the jam glaze coat evenly. The sound of a clean knife through firm berries is a reassuring cue that they are ripe but not mushy. Avoid slices that are too thick, which can make the topping heavy and difficult to slice neatly.
- In a small bowl, add the water and unflavored gelatin: As before, allow the gelatin to bloom so it will melt smoothly into the warm jam mixture later. You will see it swell slightly as it absorbs the water, signaling readiness for heating. Neglecting to bloom will risk lumps in the glaze.
- Let it sit for about 2 to 3 minutes to thicken: The gelatin will thicken into a gel like consistency which becomes easy to dissolve when warmed. This pause ensures even melting and prevents clumping when mixed with the heated jam. Rushing this pause can lead to uneven gelatin incorporation.
- In a microwave-safe bowl, place the seedless strawberry jam and microwave on high for 30 to 45 seconds: The jam will loosen, steam gently, and become glossy, making it easy to whisk. Warm jam blends effortlessly with the dissolved gelatin and coats the berries beautifully. Be cautious because jam can bubble and splatter when too hot, so use short intervals.
- Once warm, give it a whisk to loosen it up and make it smooth and pourable: A quick whisk will take the jam from sticky to silky, and you will see no clumps or stringy bits. Smoothness means the glaze will spread evenly and look professional on the fruit. If it seems too thick, a few seconds more in the microwave will help, but avoid overheating.
- Once the jam is hot and smooth, add the gelatin mixture to the jam and whisk again until it is completely incorporated and no lumps remain: The combined mixture should be glossy and slightly thinner than the warmed jam alone, which is perfect for coating. This ensures the glaze will set clear and hold the berries together. If lumps appear, whisk vigorously or briefly reheat to dissolve them.
- Pour the jam mixture over the sliced berries and gently combine: The rasp of the spoon against the bowl and the sheen of the jam will signal that the berries are uniformly coated. Coating helps preserve the fruit and gives a beautiful presentation. Be gentle to avoid breaking the slices, which can make the topping too juicy.
- Remove the pie from the refrigerator; using a slotted spoon, spoon the berry mixture gently over the cheesecake filling: The slotted spoon helps control excess liquid so the pie does not get soggy, and you will see glossy slices arranged atop the filling. Place the berries evenly for a consistent look and texture in each slice. A common error is pouring the mixture directly, which can deposit too much glaze and soften the filling.
- Place the pie back in the refrigerator to chill and set for at least 5 hours (or up to overnight): During this time the glaze and filling will firm, and you will notice a satisfying reduction in wobble when you nudge the pie. Chilling overnight deepens the flavors and makes slicing neater. If you serve it too soon, the slices may collapse, so allow adequate chill time.
- While the pie is chilling, you can make the whipped topping for the garnish: Whipping the heavy cream with powdered sugar will produce peaks that are satiny and hold their shape for piping. Keep the bowl and beaters cold for best results. Overwhipping this cream can make it stodgy, so stop when stiff peaks form.
- Using a medium-sized mixing bowl and a handheld mixer on medium-high speed, beat the heavy cream and powdered sugar until stiff peaks form: The cream will thicken noticeably and become glossy, and when you lift the beaters the peaks should stand tall. This texture ensures decorative swirls that remain intact. If the cream looks curdled, you have over whipped, so briefly fold in a spoonful of fresh cream to rescue it.
- Fill a decorator’s piping bag, or a gallon-sized Ziploc bag with a small corner of the bag snipped off, with the whipped cream: The whipped cream will glide smoothly through the tip or snip, and you will feel control as you pipe. Use steady pressure to create even rosettes around the pie edge. If your piping is uneven, practice on parchment first to steady your hand.
- Pipe small swirls at the edge of your pie just before serving: The final touch should look airy and inviting, with each swirl holding its shape. Add the whipped topping right before serving so it stays pristine and does not weep. If you pipe too early, the cream can soften and lose definition, so reserve this step for the last moment.
Making Adjustments
This section helps you adapt the pie without losing its signature texture and appearance. Below are practical tips that expand on the recipe notes and common adjustments I use depending on ingredient availability or timing.
- Use instant clearjel as an alternative: If you prefer a plant based thickener or cannot find unflavored gelatin, follow the package instructions for instant Clearjel to thicken the jam glaze, remembering that Clearjel sets differently and may require cooling rather than refrigeration.
- Store bought crust shortcut: A pre baked store bought crust saves time and still produces reliable flakiness, just watch closely during baking so it does not over brown at the edges.
- To rescue over whipped cream: If your whipped topping starts to look grainy, add a tablespoon of fresh cold heavy cream and fold gently to smooth it back to a glossy texture.
- Substituting fresh fruit: If strawberries are not at peak, you can use fresh raspberries or blackberries, but adjust the jam type to complement the berry for a cohesive flavor and color.
- Transport tips: Keep the pie chilled in a cooler when traveling, and add the whipped garnish upon arrival to keep it looking fresh and intact for serving.
Serve This Strawberry Cream Cheese Pie With
This pie is versatile for casual and special occasions, and the serving suggestions below offer ideas for pairings, storage, and presentation to match the mood of your occasion.
- Family gatherings and potlucks: Slice the pie into even wedges and serve on a platter for easy passing. It is excellent for springtime brunches where the bright berries fit the season.
- Picnic or outdoor events: Travel with the pie chilled in an insulated carrier and add the whipped cream at the last minute. It makes a lovely, shareable dessert that travels well when kept cool.
- Holiday or celebration dessert: For seasonal events like spring holidays, present the pie with extra whole berries on top and small piped swirls of whipped cream for a festive look.
- Storage tips: Refrigerate leftovers covered for up to three days. To preserve the whipped garnish, remove leftover slices to an airtight container and add fresh whipped cream before serving again.
- Serving style: Use a warm, thin blade knife, wiping between cuts for clean slices. A chilled plate helps keep the pie cool while serving, maintaining the filling texture.
FAQ
Conclusion
This Strawberry Cream Cheese Pie stands out for its silky filling, bright fruit topping, and elegant presentation, all achieved with straightforward techniques. It is a wonderful choice when you want a dessert that looks special without requiring advanced baking skills. I encourage you to give it a try for your next spring gathering or casual dinner, and enjoy the fresh berry flavor combined with a creamy, stable filling. Share it with friends or keep it as a personal treat, and notice how a handful of simple steps yields such a satisfying result.
Strawberry Cream Cheese Pie
Equipment
- 9-inch pie pan
- Parchment Paper
- Pie weights
- Hand Mixer
- Stand mixer or mixing bowl
- Microwave-safe Bowl
- Offset Spatula
Ingredients
- 1 store-bought pie crust (or the flaky and homemade pie crust recipe from our site) Provide a crisp, pre-baked base that supports the filling and adds a flaky, buttery texture to the pie. Use a store-bought crust for convenience or substitute with a flaky homemade recipe for a richer, more artisanal result. Blind-bake according to package or recipe directions to ensure a firm foundation for the cream cheese and strawberry layers.
- 1/2 cup cold water Keep cold to help bloom gelatin and prevent premature setting when combining with gelatin powder. Use measured cold water to dissolve gelatin evenly and ensure a smooth, stable gelatin mixture. Chill briefly if needed before incorporating into whipped components to maintain desired texture.
- 2 1/4 teaspoons unflavored gelatin (like Knox brand (0.25-ounce packet)) Bloom gently to activate its gelling properties so the filling sets properly and holds shape when sliced. Sprinkle over cold water and let sit for a few minutes, then dissolve with low heat or a warm bath to ensure clarity and smoothness. Use the specified amount to achieve a firm yet creamy consistency in the filling and glaze.
- 1 cup heavy whipping cream Whip until soft peaks form to add volume, lightness, and richness to the cream cheese filling. Keep chilled until ready to fold into the sweetened cream cheese mixture to maintain stability and fluffy texture. Use a full cup to balance richness without overpowering the tang of the cream cheese.
- 12 ounces cream cheese (softened to room temperature) Soften to room temperature to achieve a silky, lump-free filling with a smooth mouthfeel. Beat until creamy before adding powdered sugar and other flavorings to ensure even incorporation and a stable structure. Use full-fat cream cheese for optimal richness and cohesive texture in the pie.
- 2 cups powdered sugar Sweeten and stabilize the cream cheese filling while adding a fine texture that dissolves completely when beaten. Sift or add slowly while mixing to avoid graininess and to achieve a smooth, uniformly sweet filling. Adjust slightly if needed to balance sweetness against the tart strawberries.
- 2 teaspoons vanilla extract Flavor subtly to enhance the cream cheese filling with warm, familiar vanilla notes without overpowering other flavors. Add during beating to disperse aroma evenly throughout the filling and complement the strawberries. Use pure extract for the best, clean vanilla profile.
- 1 pound fresh strawberries (sliced) Slice uniformly to provide fresh, juicy fruit pieces that add brightness, texture, and visual appeal to the pie. Layer or arrange on top of the cream cheese filling to showcase color and ensure even distribution in each slice. Choose ripe strawberries for optimal sweetness and aroma.
- 1/2 cup seedless strawberry jam Warm and thin to create a glossy, fruit-forward glaze that seals and sweetens the strawberry topping. Melt gently and brush over sliced strawberries to add shine and help preserve freshness while adding a concentrated strawberry flavor. Use seedless jam for a smooth, clear finish without seeds.
- 2 tablespoons cold water Chill to help bloom the second gelatin addition or to adjust glaze consistency before combining with jam and heated mixtures. Use cold water to disperse gelatin granules and ensure full hydration prior to melting. Measure accurately to maintain the intended set of the strawberry glaze.
- 2 1/4 teaspoons unflavored gelatin (like Knox brand (0.25-ounce packet)) Bloom again to activate gelatin for the strawberry glaze so it firms to a spreadable, glossy finish. Sprinkle over cold water and allow to absorb liquid fully before dissolving in warm jam for clarity and smooth texture. Use identical amounts to ensure glaze sets consistently with the filling.
- 1 cup heavy whipping cream Whip until soft peaks form to lighten the strawberry glaze mixture or add body to secondary cream components. Keep chilled and incorporate gently into jam or gelatin mixtures to maintain a silky consistency and aeration. Use the specified quantity to balance texture and richness in the final topping.
- 1/2 cup powdered sugar Sweeten lightly when used in the glaze or decorative cream to add a touch of powdered sweetness and stabilize whipped cream. Sift or add gradually while whipping to prevent lumps and ensure a smooth, even sweetness throughout. Use measured amount to avoid over-sweetening the delicate strawberry flavors.
Instructions
- Preheat the oven to 450°F. Lightly spray a 9-inch pie pan with nonstick spray. Place the crust in the pie pan and gently prick the crust on the bottom with a fork. Lay a piece of parchment paper on top of the pie crust and gently fill with pie weights. Bake for 15 minutes, or until the crust is golden. Once baked, remove the parchment and pie weights and set the pre-baked crust on the counter to cool while preparing the cream cheese filling mixture.: The scent of warming butter and flour will start to emerge as the oven heats, and that initial high temperature helps the crust set quickly so it does not become soggy when the filling is added. You want the crust golden at the edges and firm to the touch, which tells you the structure is ready to hold the filling. A common mistake is starting with an oven that is not fully heated, which can lead to uneven browning, so wait until the oven reaches the stated temperature before sliding the crust in.
- In a medium-sized bowl, using a hand mixer on medium-high speed, whip the heavy cream until stiff peaks form. Set aside.: The faint scent of oil will be barely noticeable, but this step ensures the baked pie releases cleanly from the pan. Smooth edges and an intact bottom are signs the pan was prepared properly. Avoid over spraying, which can cause a greasy finish on the crust, so a light, even mist is ideal.
- In a small bowl, combine the water and gelatin. Gently swirl the gelatin around, making sure that it is completely absorbed by the water. Set aside.: You will feel the slight resistance as the fork makes small holes, and this docking prevents air pockets from forming while baking. If you skip docking, the crust can bubble up unevenly, so take a moment to do it thoroughly but gently to avoid tearing.
- In the bowl of a stand mixer, or using another medium-sized mixing bowl and a handheld mixer on medium-high speed, blend the cream cheese for 30 seconds to 1 minute, or until smooth.: The parchment should lie snug against the shell, and the weights press the crust down for an even bake. You will notice the crust edges remain crisp while the bottom stays flat. A tip is to press the weights gently so the crust keeps its shape without stretching.
- Add the powdered sugar and vanilla extract and continue mixing for 1 1/2 to 2 minutes or until no lumps remain. Start your mixer on low, then work up to medium-high speed.: Listen for a faint crackle as moisture evaporates, and watch the color shift to a deep, warm tan along the edges. This visual cue means the crust is done and will support the filling without collapsing. One mistake is leaving it too long, which can lead to an overly browned, bitter edge, so check a minute or two before the suggested time.
- Heat the bowl with the gelatin and water mixture in the microwave for 20 to 30 seconds. Give it a good stir making sure that there are no lumps remaining. While your mixer is on low speed, pour the warm gelatin into the bowl of the cream cheese mixture. Mix on low for 1 to 2 minutes or until completely combined.: The cooled crust should feel firm and slightly brittle at the edge, a sign it is ready. Cooling prevents the filling from softening the crust prematurely. If you try to fill a hot crust, steam can make the bottom soggy, so let it rest until only slightly warm or fully cool.
- Gently fold the whipped heavy cream into the cream cheese mixture just until everything is evenly incorporated.: The cream will go from glossy to billowy, and you will hear the beaters change rhythm as peaks hold their shape. Stiff peaks are when the cream stands upright without folding over, producing a light texture that lifts the filling. Over whipping will turn the cream grainy and begin to turn it to butter, so stop as soon as firm peaks appear.
- Spread the cream cheese mixture evenly on top of the crust. Refrigerate the cream cheese pie base while you prepare the strawberry topping.: You will see the gelatin granules absorb liquid and swell slightly, becoming gelatinous to the touch. This step, called blooming, ensures a lump free gelatin when warmed. If you skip blooming, you risk pockets of undissolved gelatin in the pie, so always let it rest a few minutes.
- Prepare your fresh strawberries by rinsing them in cool water and then patting them completely dry. Remove the green tops, cut the berries into 1/4-inch slices, and place them into a large bowl. Set aside.: Watch as the cream cheese becomes glossy and free of clumps, and you will feel it become much easier to work with. Smoothness here prevents a grainy filling and ensures the sugar blends seamlessly. If your cream cheese is too cold, it will tear instead of smooth, so always bring it to room temperature first.
- In a small bowl, add the water and unflavored gelatin. Gently swirl to make sure that all the gelatin is mixed with the water. Let it sit for about 2 to 3 minutes to thicken.: The mixture will lighten slightly and smell more fragrant, with the sugar dissolving into the cream cheese . Start mixing gently and then increase speed to avoid a cloud of sugar dust. A pitfall is adding sugar too quickly which can cause splatter or uneven incorporation, so add gradually.
- In a microwave-safe bowl (a glass 2 cup measure works great for this), place the seedless strawberry jam and microwave on high for 30 to 45 seconds. Once warm, give it a whisk to loosen it up and make it smooth and pourable.: The gelatin should turn a clear liquid without boiling, and you will see any remaining granules disappear as you stir. Warming just melts the gelatin, preserving its gelling power. Overheating can degrade the gelatin, so avoid boiling and use short bursts of heat.
- Once the jam is hot and smooth, add the gelatin mixture to the jam and whisk again until it is completely incorporated and no lumps remain.: The smooth, clear gelatin should coat your spoon with a slight sheen, indicating it is ready to be added. This ensures even distribution when combined into the cooler mixture. If you notice any grainy pieces, return to the microwave briefly, stirring often until fully dissolved.
- Pour the jam mixture over the sliced berries and gently combine, making sure that all the berries are coated.: The warm liquid will quickly incorporate and you will notice the mixture become silkier and slightly looser, which is expected. Mixing on low prevents splashing and ensures even distribution. Pour too quickly and you could create hot spots that cause the filling to separate, so add steadily.
- Remove the pie from the refrigerator; using a slotted spoon, spoon the berry mixture gently over the cheesecake filling, being careful not to get too much extra liquid on the pie.: The bowl should feel smooth when you scrape it, and you will no longer see streaks of gelatin or sugar. This uniform texture is critical for consistent setting. If you under mix, pockets of gelatin can form, so be thorough but gentle.
- Place the pie back in the refrigerator to chill and set for at least 5 hours (or up to overnight). While the pie is chilling, you can make the whipped topping for the garnish.: Using a rubber spatula, fold with wide motions to preserve the airy whipped cream, which gives the filling a light mouthfeel. Look for a uniform pale mixture with no streaks of white or dense pockets. Over folding will deflate the cream, making the filling heavy, so stop as soon as the components blend.
- Using a medium-sized mixing bowl and a handheld mixer on medium-high speed, beat the heavy cream and powdered sugar until stiff peaks form.: Smooth the top with an offset spatula until it is level, and the surface should look glossy and dense. Even spreading ensures uniform slices and a neat appearance. Rushing this step can trap air or cause dips, so take a moment to smooth carefully.
- Fill a decorator’s piping bag, or a gallon-sized Ziploc bag with a small corner of the bag snipped off, with the whipped cream. Pipe small swirls at the edge of your pie just before serving. Note: Do not add the whipped topping until just before you are ready to serve.: Chilling firms the filling and gives the gelatin time to set, which is important before adding the fruit layer. You should feel the filling cool to the touch and lose some give when pressed gently. If you try to add the topping too soon, the fruit can sink into a loose filling, so be patient.
- Prepare your fresh strawberries by rinsing them in cool water and then patting them completely dry: The berries will smell bright and look plump after rinsing, and removing excess moisture helps the glaze adhere. Dry berries also prevent the topping from becoming watery. If you leave them damp, the glaze can dilute and run off, so pat thoroughly.
- Remove the green tops, cut the berries into 1/4-inch slices, and place them into a large bowl: Uniform slices create a consistent bite and help the jam glaze coat evenly. The sound of a clean knife through firm berries is a reassuring cue that they are ripe but not mushy. Avoid slices that are too thick, which can make the topping heavy and difficult to slice neatly.
- In a small bowl, add the water and unflavored gelatin: As before, allow the gelatin to bloom so it will melt smoothly into the warm jam mixture later. You will see it swell slightly as it absorbs the water, signaling readiness for heating. Neglecting to bloom will risk lumps in the glaze.
- Let it sit for about 2 to 3 minutes to thicken: The gelatin will thicken into a gel like consistency which becomes easy to dissolve when warmed. This pause ensures even melting and prevents clumping when mixed with the heated jam. Rushing this pause can lead to uneven gelatin incorporation.
- In a microwave-safe bowl, place the seedless strawberry jam and microwave on high for 30 to 45 seconds: The jam will loosen, steam gently, and become glossy, making it easy to whisk. Warm jam blends effortlessly with the dissolved gelatin and coats the berries beautifully. Be cautious because jam can bubble and splatter when too hot, so use short intervals.
- Once warm, give it a whisk to loosen it up and make it smooth and pourable: A quick whisk will take the jam from sticky to silky, and you will see no clumps or stringy bits. Smoothness means the glaze will spread evenly and look professional on the fruit. If it seems too thick, a few seconds more in the microwave will help, but avoid overheating.
- Once the jam is hot and smooth, add the gelatin mixture to the jam and whisk again until it is completely incorporated and no lumps remain: The combined mixture should be glossy and slightly thinner than the warmed jam alone, which is perfect for coating. This ensures the glaze will set clear and hold the berries together. If lumps appear, whisk vigorously or briefly reheat to dissolve them.
- Pour the jam mixture over the sliced berries and gently combine: The rasp of the spoon against the bowl and the sheen of the jam will signal that the berries are uniformly coated. Coating helps preserve the fruit and gives a beautiful presentation. Be gentle to avoid breaking the slices, which can make the topping too juicy.
- Remove the pie from the refrigerator; using a slotted spoon, spoon the berry mixture gently over the cheesecake filling: The slotted spoon helps control excess liquid so the pie does not get soggy, and you will see glossy slices arranged atop the filling. Place the berries evenly for a consistent look and texture in each slice. A common error is pouring the mixture directly, which can deposit too much glaze and soften the filling.
- Place the pie back in the refrigerator to chill and set for at least 5 hours (or up to overnight): During this time the glaze and filling will firm, and you will notice a satisfying reduction in wobble when you nudge the pie. Chilling overnight deepens the flavors and makes slicing neater. If you serve it too soon, the slices may collapse, so allow adequate chill time.
- While the pie is chilling, you can make the whipped topping for the garnish: Whipping the heavy cream with powdered sugar will produce peaks that are satiny and hold their shape for piping. Keep the bowl and beaters cold for best results. Overwhipping this cream can make it stodgy, so stop when stiff peaks form.
- Using a medium-sized mixing bowl and a handheld mixer on medium-high speed, beat the heavy cream and powdered sugar until stiff peaks form: The cream will thicken noticeably and become glossy, and when you lift the beaters the peaks should stand tall. This texture ensures decorative swirls that remain intact. If the cream looks curdled, you have over whipped, so briefly fold in a spoonful of fresh cream to rescue it.
- Fill a decorator’s piping bag, or a gallon-sized Ziploc bag with a small corner of the bag snipped off, with the whipped cream: The whipped cream will glide smoothly through the tip or snip, and you will feel control as you pipe. Use steady pressure to create even rosettes around the pie edge. If your piping is uneven, practice on parchment first to steady your hand.
- Pipe small swirls at the edge of your pie just before serving: The final touch should look airy and inviting, with each swirl holding its shape. Add the whipped topping right before serving so it stays pristine and does not weep. If you pipe too early, the cream can soften and lose definition, so reserve this step for the last moment.
Notes
- Use instant clearjel as an alternative: If you prefer a plant based thickener or cannot find unflavored gelatin, follow the package instructions for instant Clearjel to thicken the jam glaze, remembering that Clearjel sets differently and may require cooling rather than refrigeration.
- Store bought crust shortcut: A pre baked store bought crust saves time and still produces reliable flakiness, just watch closely during baking so it does not over brown at the edges.
- To rescue over whipped cream: If your whipped topping starts to look grainy, add a tablespoon of fresh cold heavy cream and fold gently to smooth it back to a glossy texture.
- Substituting fresh fruit: If strawberries are not at peak, you can use fresh raspberries or blackberries, but adjust the jam type to complement the berry for a cohesive flavor and color.
- Transport tips: Keep the pie chilled in a cooler when traveling, and add the whipped garnish upon arrival to keep it looking fresh and intact for serving.