
Sriracha Tuna Melt
Sriracha Tuna Melt has been my quick fix on nights when I want something warm, tangy, and utterly satisfying without fuss. The first time I tossed together this mashup I was late from work and craving comfort that felt more grown up than a plain sandwich. I grabbed pantry staples, slapped them together, and a few minutes later I had a crunchy, spicy, cheesy bite that made me grin. That exact moment turned this into one of my go to improvised dinners, and I still lean on it when the week gets away from me.
Over the years I have nudged the recipe to balance heat and creaminess, learning small tricks that make every bite sing. A quick broil gives the bread a toasty snap, while a slow warm under low broil coaxed the cheese into a silky blanket. I like a bold sriracha drizzle at the end to add bright chile tang, and the little pop of pickle relish keeps the whole sandwich from feeling heavy. This combination pays off whether I eat at the counter, share with a friend, or pack a half for later.
Recipe Snapshot
20 mins
10 mins
10 mins
Easy
350 kcal
American
Gluten-Free, Low FODMAP
Dinner
Solid White Tuna in Water, Sriracha, Mayonnaise, Pickle Relish
What Makes This Sriracha Tuna Melt Special
Bold Flavor with Minimal Effort
I love that Sriracha Tuna Melt turns a humble can of tuna into something that tastes restaurant worthy. The blend of mayonnaise and sriracha brings creamy heat that transforms the texture and aroma, so you feel like you achieved more than you actually did.
Speedy Weeknight Winner
We often need dinners that are fast and forgiving, and this recipe fits that bill. From assembly to first bite, it takes very little hands on time. I can usually have the toaster and broiler doing their work while I prep a quick beverage or tidy the kitchen, so dinner feels effortless but intentional.
Textural Contrast
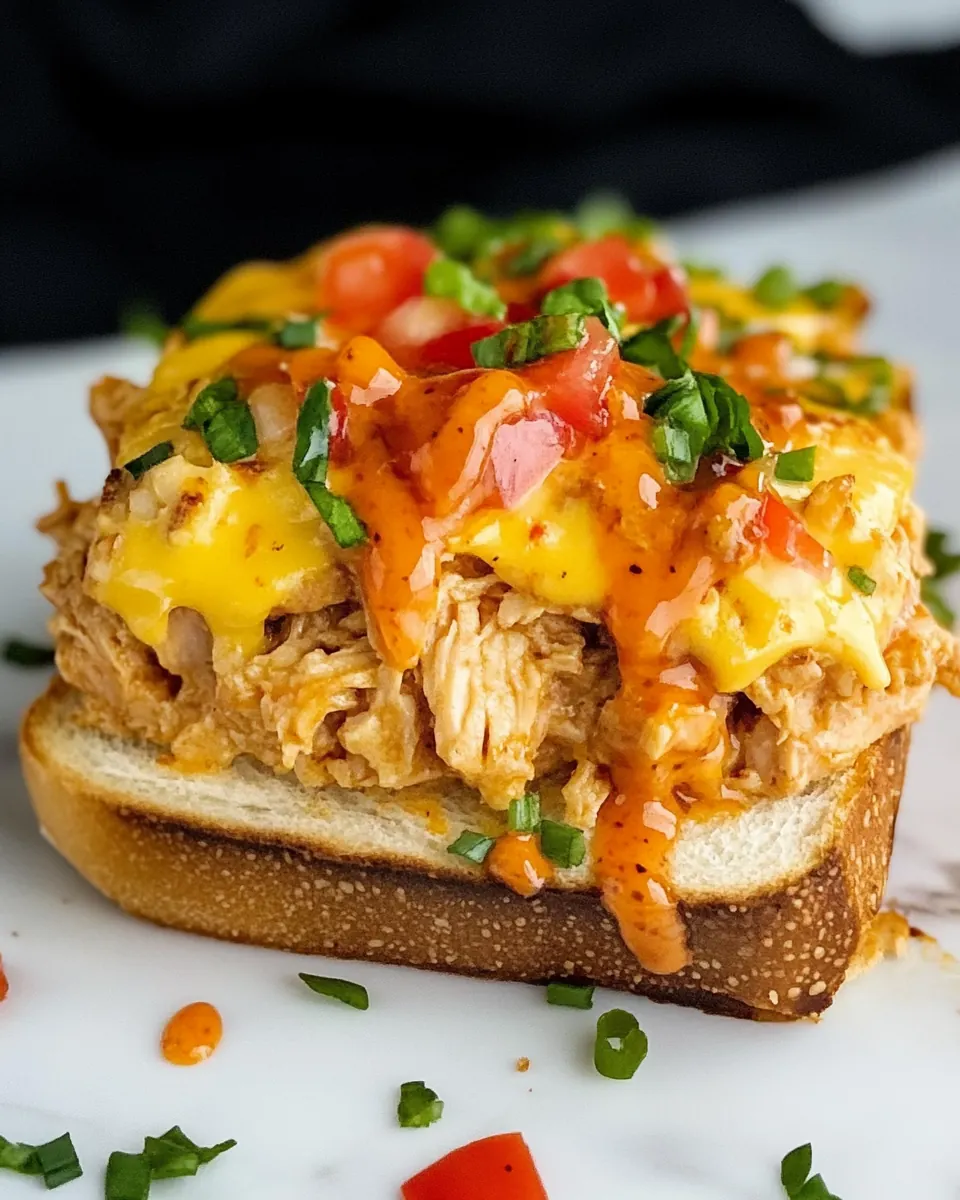
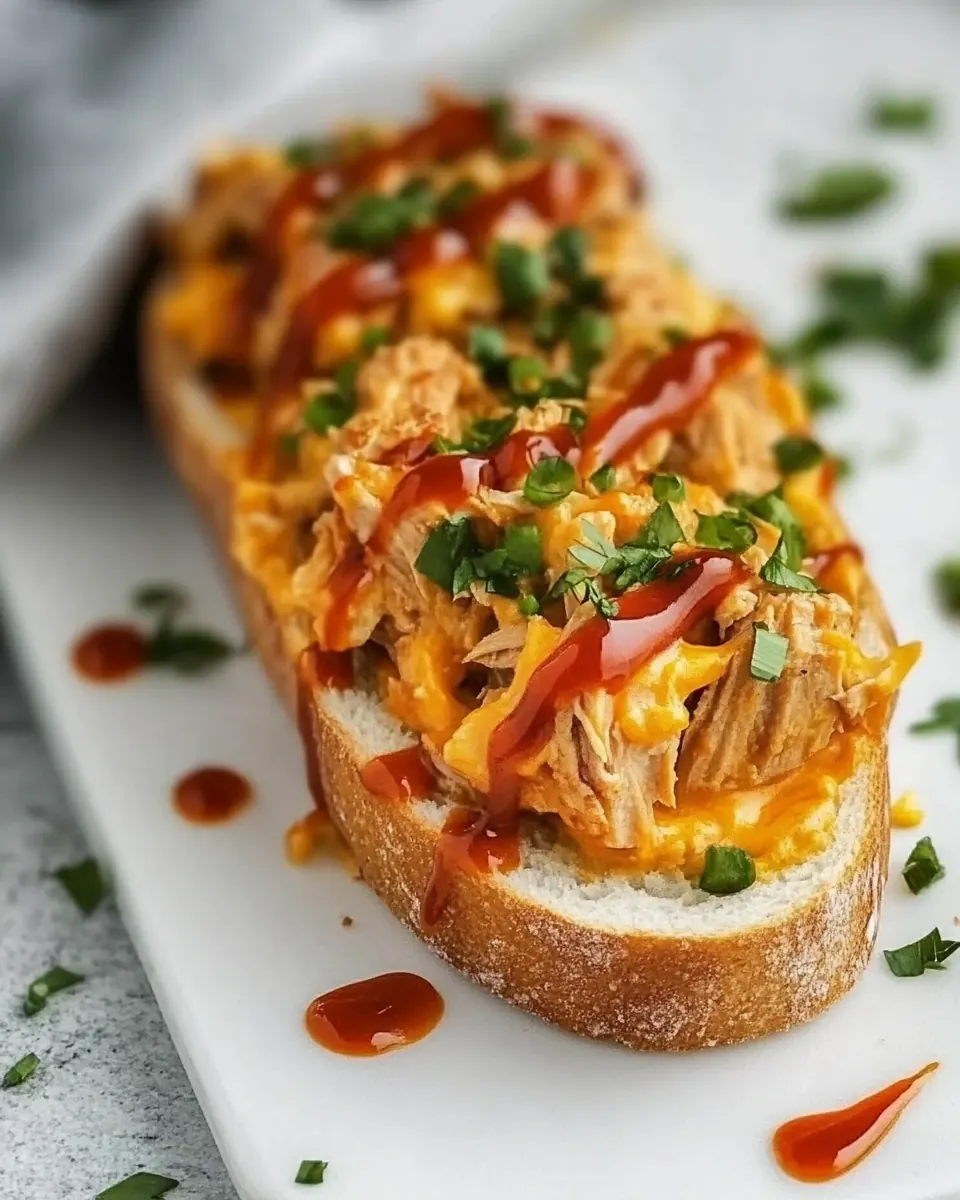
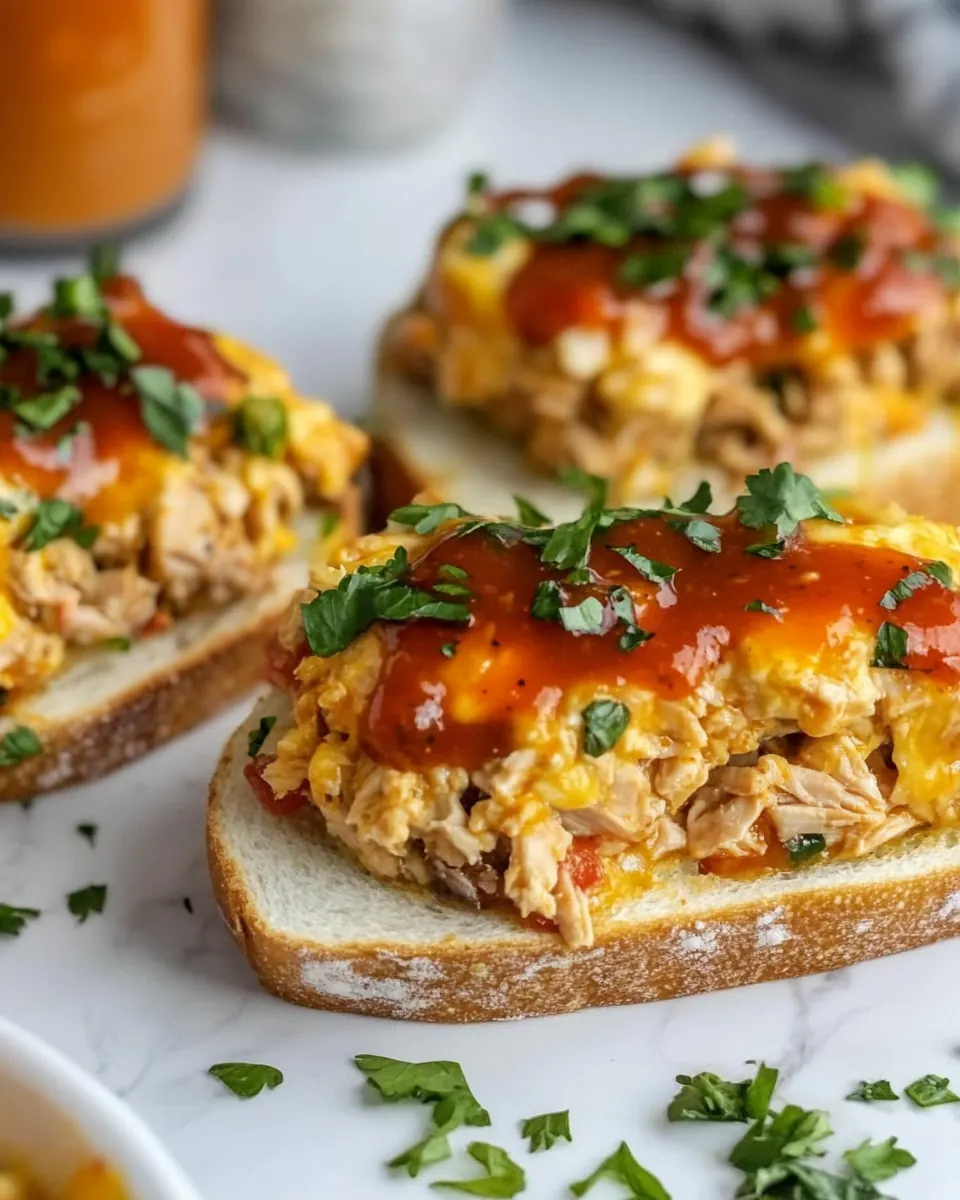
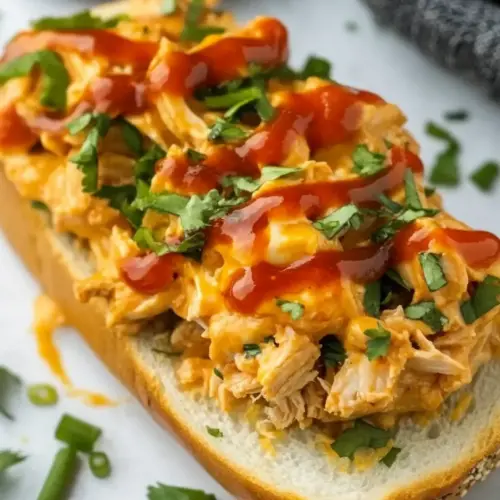
I adore the crunch of toasted bread against the creamy tuna mixture and melty cheddar. That contrast is what turns a simple sandwich into a craveable experience. The broiler creates little browned bits on the cheese that add a smoky note and an appealing visual cue.
Customizable Heat and Tang
You can nudge the spice level up or down easily. I like to drizzle extra sriracha at the end for a fresh hit, while the pickle relish offers brightness and texture. That balance keeps each bite lively, and you can tweak it depending on who you are feeding.
Pantry Friendly
This is the kind of recipe I keep in my back pocket for empty pantry nights. Canned tuna, jarred pickle relish, a wedge of cheddar, and some bread are all it takes. I find that having a few dependable combinations like this makes weekday cooking less intimidating and more enjoyable.
Ingredients to Make Sriracha Tuna Melt
These ingredients are practical and focused on contrast. The core players are creamy, spicy, and crunchy elements that combine to create a quick handheld meal. The canned tuna provides protein and body, mayonnaise brings silkiness, sriracha supplies heat, and cheddar delivers that melty, savory finish. The pickle relish cuts through richness with acidity and texture, while the bread acts as a toasty canvas.
- 4 slices bread: Toast or sandwich foundation that provides structure and a crisp contrast when buttered and toasted; choose sturdy slices to hold the tuna filling without becoming soggy. Can be varied for texture and flavor by using whole grain, sourdough, or white bread depending on preference and toasting time.
- 2 tablespoons softened butter: Softening medium that spreads easily and promotes even browning and crispness on the exterior of the toasts; helps prevent sticking and adds a rich, buttery flavor. Spread evenly on bread before toasting to achieve a golden finish and enhance overall mouthfeel.
- 15 ounce can Chicken of the Sea® Solid White Tuna, drained well: Flaked protein base that supplies hearty texture and savory flavor to the filling when drained and broken up; offers convenience and consistent results for a tuna melt. Combine gently with other ingredients to maintain moistness without making the mixture watery.
- 3 tablespoons mayonnaise: Binding and creamy agent that brings richness and helps hold the tuna mixture together, contributing to a smooth mouthfeel and balanced flavor. Adjust quantity to taste for desired creaminess and to control the final moisture level of the filling.
- 1 tablespoon sriracha plus more for drizzling over the finished toasts: Spicy flavor enhancer that adds heat and a touch of sweetness, giving the tuna mixture a bright, bold kick; use the stated amount and reserve extra for drizzling over finished toasts. Mix thoroughly into the tuna to distribute heat evenly and taste before adding more.
- 2 teaspoons pickle relish drained well: Sweet-tangy condiment that contributes small bursts of acidity and texture, cutting through richness and adding a classic pickle flavor to the mixture; ensure excess liquid is drained. Stir into the tuna gently so relish pieces remain distinct for contrast in each bite.
- 1/2 teaspoon black pepper: Warm seasoning that provides a peppery bite to balance the creaminess and heat from other components; adjust to personal spice tolerance. Whisk or mix in evenly so the pepper complements rather than overwhelms the other flavors.
- 1/4 teaspoon kosher salt if needed: Optional seasoning to fine-tune saltiness only if needed after tasting; helps avoid over-salting when using canned tuna and cheese. Sprinkle sparingly and taste the mixture before adding more, since canned ingredients may already contain sodium.
- 1 cup shredded sharp or medium cheddar: Melting cheese that creates a gooey, savory topping which binds the toast components when heated and adds sharp dairy flavor; choose sharp or medium cheddar per preference. Evenly distribute over the tuna mixture and broil or grill until bubbly and golden for best results.
- chopped fresh cilantro garnish (optional): Fresh herb garnish that delivers a bright, citrusy note and visual freshness when sprinkled over finished toasts; use chopped leaves sparingly to accent flavors. Add just before serving to preserve color and aromatic impact.
Cooking Instructions for Sriracha Tuna Melt
These steps are straightforward but each one has little tricks that make a big difference. I like to work with the oven hot and keep an eye on the broiler, because rapid heat can go from perfect to burnt fast. Follow sensory cues like the smell of buttery toast, the sight of bubbling cheese, and the gentle sizzle of the tuna mixture to know you are on track.
- Butter both sides of the bread slices and place bread on a sheet pan. The tuna mixture makes enough for four regular size open-faced tuna melts. Either butter four slices of bread and use all the tuna mixture OR butter two sliced of bread and save half the tuna mixture for later.: The aroma of butter warming in the oven is the first sign dinner is on. You should smell a toasty, slightly nutty scent as the butter heats, and the surface of the bread will begin to brown at the edges. This creates a barrier that prevents the bread from soaking up moisture from the topping, preserving crispness. A common mistake is spreading the butter unevenly, which leads to patchy browning, so take a moment to coat each slice fully. If the bread curls slightly, press it down gently with a spatula so it broils evenly. Avoid using too much butter or the edges will darken before the center achieves color.
- For the tuna salad mixture, in a small bowl stir together tuna, mayo, sriracha, pickle relish, and black pepper. Add salt if needed.: When you mix these, notice the sheen of the mayonnaise as it binds the flakes of tuna , and the tiny flecks of pickle relish add visual contrast. The mix should be moist but not runny, with the heat of the sriracha evenly distributed. This step matters because a well emulsified mixture spreads cleanly and heats uniformly under the broiler. One trap is overmixing so the tuna gets too mashed and loses its flaky texture, so stir gently to combine. If the mixture seems dry, add a little extra mayonnaise gradually until it reaches a spreadable consistency.
- With broiler on high, toast first side of the bread under the broiler, and then flip the bread over and very lightly toast the second side.: Keep a close ear for a light crackle and watch for a golden edge to develop, that tells you the crust is crisping. The first side needs a bit more time to build that structural crunch, while the second side should be barely toasted so it does not overbake once topped. If your broiler is particularly aggressive, move the rack a bit lower to avoid rapid burning. A frequent error is leaving the bread under the broiler unattended, which can turn golden to char in seconds, so stay present and use tongs or a spatula to flip quickly.
- Remove sheet pan from oven. Top the lightly toasted side of the bread with the tuna mixture and shredded cheese. Leave the edges of the bread just slightly exposed, for additional toasting.: When you lift the sheet pan out you should feel the residual heat and smell a rich toasted aroma. This pause matters because the hot pan is ready for topping and will help the cheese melt faster. Placing the mixture on slightly cooled bread can prevent the cheese from melting properly. Be mindful of the hot metal surface, use an oven mitt, and set the pan on a heatproof surface to avoid accidents. A simple mistake here is rushing and scorching your hands, so always use protection.
- With the broiler on low, place sheet pan back into oven. Let the tuna salad mixture and cheese get thoroughly heated, nice and slow. Once cheese is melty, turn the broiler to high to blister the cheese just a bit, if desired. Take care to not let the bread burn.: Spread the mixture so the edges of the bread remain exposed, which allows them to continue toasting and become crispier. You will see the glossy mayonnaise and flecks of relish, and the shredded cheddar should form an even layer for uniform melting. This technique matters because exposed edges create contrast in texture, making each bite more interesting. Avoid piling too much filling in the center or the bread will sag and become difficult to eat. If the cheese is uneven, use your fingers to distribute it gently so it browns consistently under heat.
- Remove sheet pan from oven and drizzle sriracha over the top of the finished melts. Garnish with fresh cilantro, if desired. Then enjoy while it’s hot!: Gentle heat allows the filling to warm through and the cheddar to melt gradually, producing a silky texture rather than an oily separation. Listen for a soft sizzle and watch the cheese become glossy and begin to droop toward the edges. Taking time on low heat develops a more integrated flavor and prevents the bread from burning before the filling is hot. A common pitfall is switching to high broil immediately, which can bubble the cheese unevenly and blacken the bread. If it is taking longer than expected, check that the oven rack is in the correct position so the heat reaches the food efficiently.
- Once cheese is melty, turn the broiler to high to blister the cheese just a bit: A brief flash of intense heat will create tiny browned spots on the cheddar , adding a toasty, caramelized note and an appealing texture. Watch carefully as this step happens fast, and you want small blisters rather than large charred areas. That final high heat elevates the flavor by introducing slight bitterness that balances the richness. One mistake is leaving it too long, which will burn the edges of the bread, so count seconds and be ready to pull the pan.
- Remove sheet pan from oven and drizzle sriracha over the top of the finished melts: The piping hot sandwiches will hiss slightly as you add the cooler sriracha , releasing a bright, fragrant chile aroma. The final drizzle gives a fresh kick and a glossy finish that looks inviting on the plate. Garnish with chopped cilantro if using, which provides a herby contrast. Avoid drizzling too much sriracha if you are serving heat sensitive guests; a little can go a long way. A frequent misstep is adding the drizzle too early, which loses the fresh heat, so wait until after baking for the most vibrant flavor.
- Garnish with fresh cilantro, if desired: The herb offers a burst of color and a lively, citrusy lift against the savory base. Chop just before serving to keep it bright, and scatter sparingly so it complements rather than overwhelms. This finishing touch makes the plate look intentional and adds aromatic nuance as you bite into the sandwich. One small mistake is adding the garnish too early, which causes it to wilt under the oven heat, so reserve this until the end.
- Then enjoy while it’s hot: Serve immediately so you experience the contrast of crunchy bread and melty cheddar with warm, creamy tuna . The best sensory cue is the first pull of stringy, melted cheese and the burst of sriracha on the tongue. If you plan to pack leftovers, allow the filling to cool before closing to avoid steam softening the bread. A common error is letting the sandwich sit too long, which sacrifices the peak texture and warmth.
How to Switch It Up
There are simple ways to vary this sandwich while keeping the same core approach. Small swaps change the texture, spice level, and visual appeal without altering the quick assembly and broiling steps that make this recipe so reliable.
- Mix up the heat by varying the amount of sriracha in the tuna mixture and as a finishing drizzle, tasting as you go to avoid overwhelming the other flavors.
- Change the cheese by trying a milder or sharper meltable option, but keep a similar amount so the texture and melt behavior remain consistent.
- Swap the relish for finely chopped cornichons or capers if you prefer a brighter briny note, doing so sparingly to maintain balance.
- Try open faced or closed styles depending on how portable you need the sandwich to be, but remember that a closed sandwich will steam slightly when wrapped.
- Use whole grain or sourdough to introduce nutty or tangy backbone flavors that pair nicely with the spicy tuna filling.
What to Serve With Sriracha Tuna Melt
These serving ideas complement the spicy, creamy profile of the sandwich. I like to pair contrasting textures and cooling elements so the meal feels balanced and complete. Choose sides that add freshness, crunch, or a light, acidic counterpoint.
- Simple green salad with a light vinaigrette to cut richness and add refreshing crispness to the plate.
- Pickle spear or extra relish served on the side to amplify the bright, tangy notes in each bite.
- Crispy kettle chips for an extra textural contrast that echoes the toasted bread crunch.
- Fresh fruit like sliced apples or grapes to provide a juicy, sweet counterpoint to the savory sandwich.
- Warm soup such as a light vegetable or broth based bowl if you want a cozier meal pairing for cooler nights.
- Occasions include quick lunches, casual dinners, or a simple Ramadan iftar option where a satisfying, quick warm bite is appreciated.
- Storage tips suggest assembling the tuna mixture separately and toasting the bread just before serving to keep textures optimal for leftovers.
- Seasonal pairing favors lighter sides in summer and warm soups in colder months, making this sandwich adaptable year round.
FAQ
Conclusion
This recipe’s charm is how it elevates simple pantry staples into a satisfying, flavor forward meal. Try the Sriracha Tuna Melt when you want something quick, comforting, and a little spicy, and I think you will be surprised by how much personality a can of tuna can have. Share it with a friend or keep it all to yourself, and enjoy the mix of crunchy toast, creamy tuna, and melty cheddar that makes this a dependable weekday favorite.
Sriracha Tuna Melt
Equipment
- Solid White Tuna in Water
- Sriracha
- Mayonnaise
- Pickle Relish
Ingredients
- 4 slices bread Toast or sandwich foundation that provides structure and a crisp contrast when buttered and toasted; choose sturdy slices to hold the tuna filling without becoming soggy. Can be varied for texture and flavor by using whole grain, sourdough, or white bread depending on preference and toasting time.
- 2 tablespoons softened butter Softening medium that spreads easily and promotes even browning and crispness on the exterior of the toasts; helps prevent sticking and adds a rich, buttery flavor. Spread evenly on bread before toasting to achieve a golden finish and enhance overall mouthfeel.
- 15 -ounce can Chicken of the Sea® Solid White Tuna, drained well Flaked protein base that supplies hearty texture and savory flavor to the filling when drained and broken up; offers convenience and consistent results for a tuna melt. Combine gently with other ingredients to maintain moistness without making the mixture watery.
- 3 tablespoons mayonnaise Binding and creamy agent that brings richness and helps hold the tuna mixture together, contributing to a smooth mouthfeel and balanced flavor. Adjust quantity to taste for desired creaminess and to control the final moisture level of the filling.
- 1 tablespoon sriracha plus more for drizzling over the finished toasts Spicy flavor enhancer that adds heat and a touch of sweetness, giving the tuna mixture a bright, bold kick; use the stated amount and reserve extra for drizzling over finished toasts. Mix thoroughly into the tuna to distribute heat evenly and taste before adding more.
- 2 teaspoons pickle relish drained well Sweet-tangy condiment that contributes small bursts of acidity and texture, cutting through richness and adding a classic pickle flavor to the mixture; ensure excess liquid is drained. Stir into the tuna gently so relish pieces remain distinct for contrast in each bite.
- 1/2 teaspoon black pepper Warm seasoning that provides a peppery bite to balance the creaminess and heat from other components; adjust to personal spice tolerance. Whisk or mix in evenly so the pepper complements rather than overwhelms the other flavors.
- 1/4 teaspoon kosher salt if needed Optional seasoning to fine-tune saltiness only if needed after tasting; helps avoid over-salting when using canned tuna and cheese. Sprinkle sparingly and taste the mixture before adding more, since canned ingredients may already contain sodium.
- 1 cup shredded sharp or medium cheddar Melting cheese that creates a gooey, savory topping which binds the toast components when heated and adds sharp dairy flavor; choose sharp or medium cheddar per preference. Evenly distribute over the tuna mixture and broil or grill until bubbly and golden for best results.
- chopped fresh cilantro optional garnish Fresh herb garnish that delivers a bright, citrusy note and visual freshness when sprinkled over finished toasts; use chopped leaves sparingly to accent flavors. Add just before serving to preserve color and aromatic impact.
Instructions
- Butter both sides of the bread slices and place bread on a sheet pan. The tuna mixture makes enough for four regular size open-faced tuna melts. Either butter four slices of bread and use all the tuna mixture OR butter two sliced of bread and save half the tuna mixture for later.: The aroma of butter warming in the oven is the first sign dinner is on. You should smell a toasty, slightly nutty scent as the butter heats, and the surface of the bread will begin to brown at the edges. This creates a barrier that prevents the bread from soaking up moisture from the topping, preserving crispness. A common mistake is spreading the butter unevenly, which leads to patchy browning, so take a moment to coat each slice fully. If the bread curls slightly, press it down gently with a spatula so it broils evenly. Avoid using too much butter or the edges will darken before the center achieves color.
- For the tuna salad mixture, in a small bowl stir together tuna, mayo, sriracha, pickle relish, and black pepper. Add salt if needed.: When you mix these, notice the sheen of the mayonnaise as it binds the flakes of tuna , and the tiny flecks of pickle relish add visual contrast. The mix should be moist but not runny, with the heat of the sriracha evenly distributed. This step matters because a well emulsified mixture spreads cleanly and heats uniformly under the broiler. One trap is overmixing so the tuna gets too mashed and loses its flaky texture, so stir gently to combine. If the mixture seems dry, add a little extra mayonnaise gradually until it reaches a spreadable consistency.
- With broiler on high, toast first side of the bread under the broiler, and then flip the bread over and very lightly toast the second side.: Keep a close ear for a light crackle and watch for a golden edge to develop, that tells you the crust is crisping. The first side needs a bit more time to build that structural crunch, while the second side should be barely toasted so it does not overbake once topped. If your broiler is particularly aggressive, move the rack a bit lower to avoid rapid burning. A frequent error is leaving the bread under the broiler unattended, which can turn golden to char in seconds, so stay present and use tongs or a spatula to flip quickly.
- Remove sheet pan from oven. Top the lightly toasted side of the bread with the tuna mixture and shredded cheese. Leave the edges of the bread just slightly exposed, for additional toasting.: When you lift the sheet pan out you should feel the residual heat and smell a rich toasted aroma. This pause matters because the hot pan is ready for topping and will help the cheese melt faster. Placing the mixture on slightly cooled bread can prevent the cheese from melting properly. Be mindful of the hot metal surface, use an oven mitt, and set the pan on a heatproof surface to avoid accidents. A simple mistake here is rushing and scorching your hands, so always use protection.
- With the broiler on low, place sheet pan back into oven. Let the tuna salad mixture and cheese get thoroughly heated, nice and slow. Once cheese is melty, turn the broiler to high to blister the cheese just a bit, if desired. Take care to not let the bread burn.: Spread the mixture so the edges of the bread remain exposed, which allows them to continue toasting and become crispier. You will see the glossy mayonnaise and flecks of relish, and the shredded cheddar should form an even layer for uniform melting. This technique matters because exposed edges create contrast in texture, making each bite more interesting. Avoid piling too much filling in the center or the bread will sag and become difficult to eat. If the cheese is uneven, use your fingers to distribute it gently so it browns consistently under heat.
- Remove sheet pan from oven and drizzle sriracha over the top of the finished melts. Garnish with fresh cilantro, if desired. Then enjoy while it’s hot!: Gentle heat allows the filling to warm through and the cheddar to melt gradually, producing a silky texture rather than an oily separation. Listen for a soft sizzle and watch the cheese become glossy and begin to droop toward the edges. Taking time on low heat develops a more integrated flavor and prevents the bread from burning before the filling is hot. A common pitfall is switching to high broil immediately, which can bubble the cheese unevenly and blacken the bread. If it is taking longer than expected, check that the oven rack is in the correct position so the heat reaches the food efficiently.
- Once cheese is melty, turn the broiler to high to blister the cheese just a bit: A brief flash of intense heat will create tiny browned spots on the cheddar , adding a toasty, caramelized note and an appealing texture. Watch carefully as this step happens fast, and you want small blisters rather than large charred areas. That final high heat elevates the flavor by introducing slight bitterness that balances the richness. One mistake is leaving it too long, which will burn the edges of the bread, so count seconds and be ready to pull the pan.
- Remove sheet pan from oven and drizzle sriracha over the top of the finished melts: The piping hot sandwiches will hiss slightly as you add the cooler sriracha , releasing a bright, fragrant chile aroma. The final drizzle gives a fresh kick and a glossy finish that looks inviting on the plate. Garnish with chopped cilantro if using, which provides a herby contrast. Avoid drizzling too much sriracha if you are serving heat sensitive guests; a little can go a long way. A frequent misstep is adding the drizzle too early, which loses the fresh heat, so wait until after baking for the most vibrant flavor.
- Garnish with fresh cilantro, if desired: The herb offers a burst of color and a lively, citrusy lift against the savory base. Chop just before serving to keep it bright, and scatter sparingly so it complements rather than overwhelms. This finishing touch makes the plate look intentional and adds aromatic nuance as you bite into the sandwich. One small mistake is adding the garnish too early, which causes it to wilt under the oven heat, so reserve this until the end.
- Then enjoy while it’s hot: Serve immediately so you experience the contrast of crunchy bread and melty cheddar with warm, creamy tuna . The best sensory cue is the first pull of stringy, melted cheese and the burst of sriracha on the tongue. If you plan to pack leftovers, allow the filling to cool before closing to avoid steam softening the bread. A common error is letting the sandwich sit too long, which sacrifices the peak texture and warmth.
Notes
- Mix up the heat by varying the amount of sriracha in the tuna mixture and as a finishing drizzle, tasting as you go to avoid overwhelming the other flavors.
- Change the cheese by trying a milder or sharper meltable option, but keep a similar amount so the texture and melt behavior remain consistent.
- Swap the relish for finely chopped cornichons or capers if you prefer a brighter briny note, doing so sparingly to maintain balance.
- Try open faced or closed styles depending on how portable you need the sandwich to be, but remember that a closed sandwich will steam slightly when wrapped.
- Use whole grain or sourdough to introduce nutty or tangy backbone flavors that pair nicely with the spicy tuna filling.