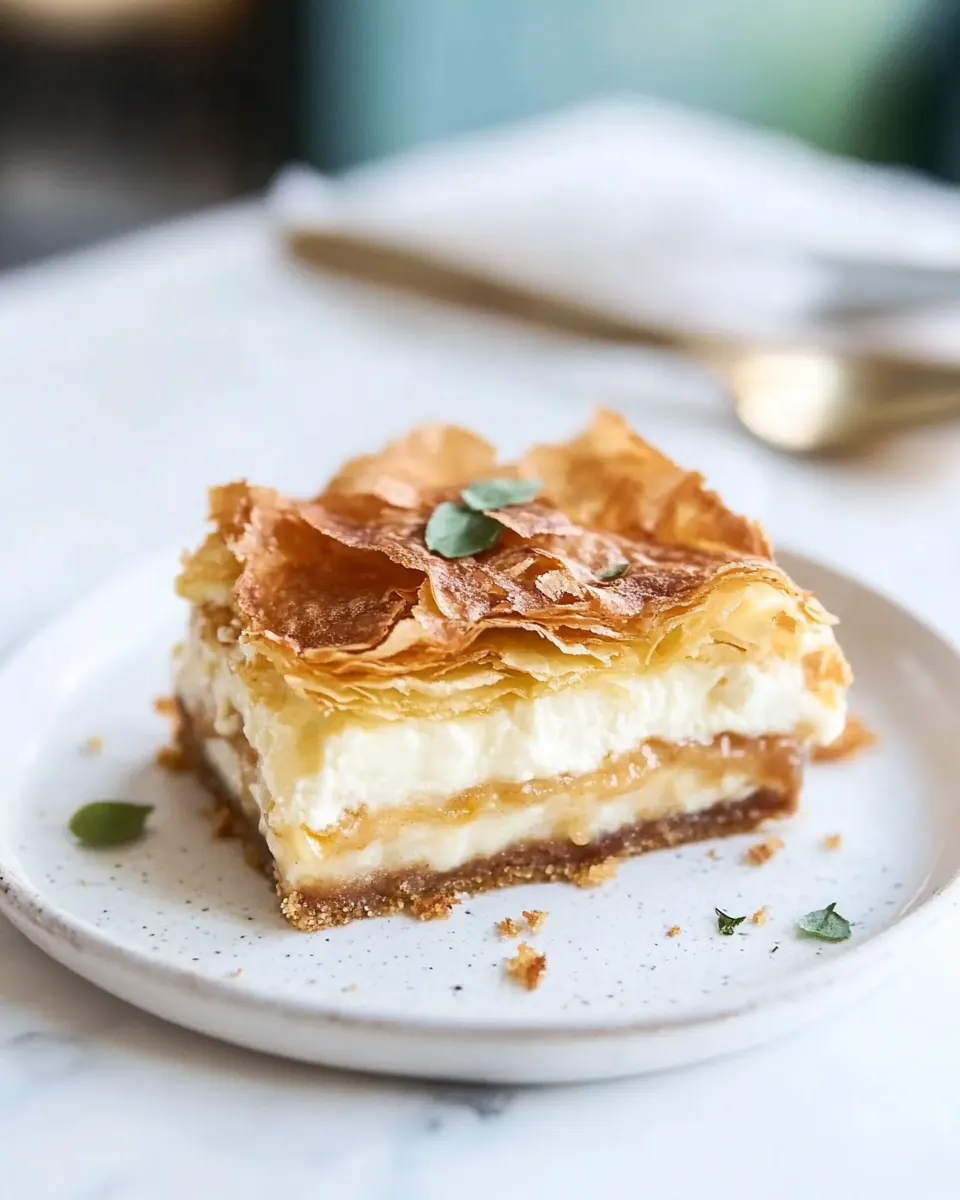
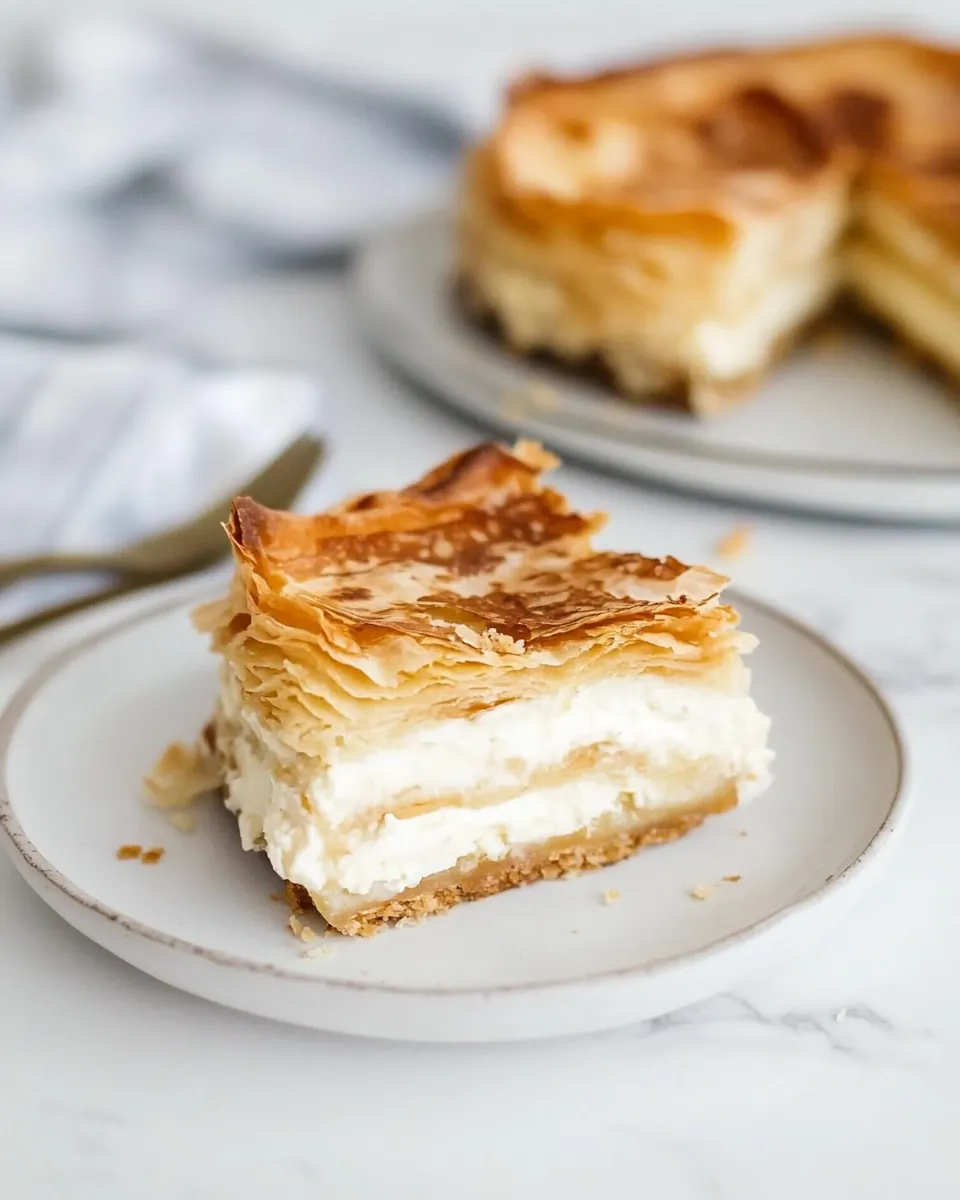
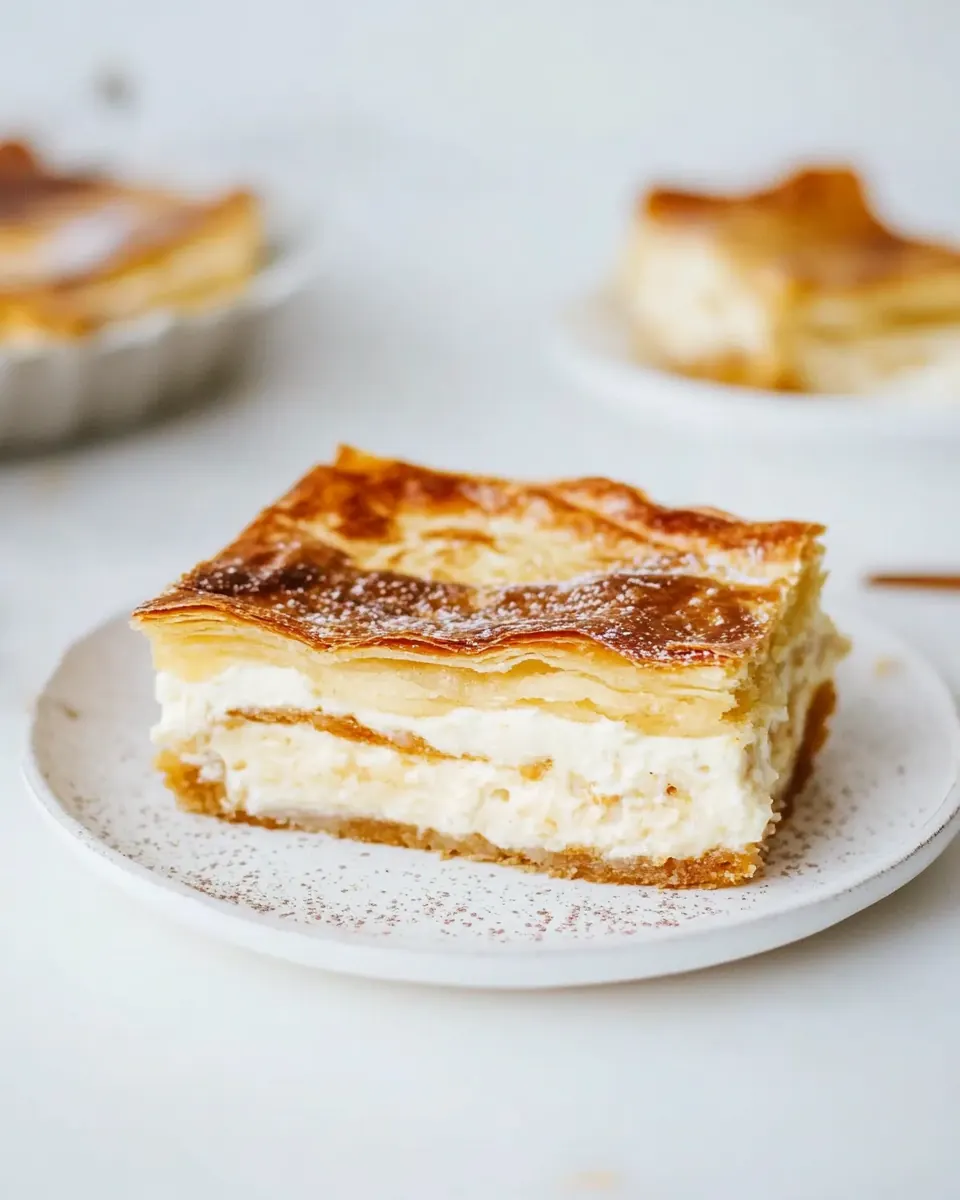
Sopapilla Cheesecake
Sopapilla Cheesecake has been my go to when I want a dessert that feels nostalgic and effortless at the same time.
I first made Sopapilla Cheesecake for a neighborhood potluck after a long week of mismatched schedules. I remember the comfort of the warm kitchen, the butter scent lifting through the house, and the hush that fell over the table when people took their first bite. That moment convinced me that some desserts are worth repeating, especially when they come together from a few pantry staples and a little patience. Over the years I have tweaked the method until the top browns just so and the filling stays silky rather than runny.
When I bring out a pan of Sopapilla Cheesecake, I like how it invites conversation. It slices into pieces that are perfect for sharing, and the combination of flaky dough and creamy filling always sparks questions about how simple ingredients can feel so indulgent. I’ve learned to watch the edges as it bakes, they tell you everything about doneness. One bite brings that delicate cinnamon sugar crunch followed by a soft, lush center, and I always make a mental note to double the batch if friends are coming.
Recipe Snapshot
40 mins
10 mins
30 mins
Easy
250 kcal
American
Gluten-Free, Low FODMAP
Desserts
9×13 inch baking dish, Electric hand mixer, Spatula
Why This Sopapilla Cheesecake Hits Different
Comfort in simplicity
I love Sopapilla Cheesecake because it relies on a few straightforward pantry items and still tastes like a special treat. The beauty is that you do not need fancy tools or rare ingredients, so I can whip it up on a weeknight and feel accomplished without fuss.
Textural contrast
The contrast between the flaky crescent rolls sheets and the creamy cream cheese filling is everything. I find that this interplay is what keeps people coming back for more slices, the crisp top and tender middle create a balanced bite.
Kid friendly and crowd pleasing
I often serve Sopapilla Cheesecake at gatherings because nearly everyone, from kids to grandparents, reaches for seconds. It’s approachable, not overly sweet, and feels familiar even to those discovering it for the first time.
Fast but impressive
It takes minimal hands on time to assemble, yet it emerges from the oven looking like you spent hours crafting it. That is the kind of recipe I adore: quick to prepare, dramatic to present.
Versatile finishing touch
Finally, Sopapilla Cheesecake is a flexible canvas. The cinnamon sugar topping gives it warmth, and there is room to adapt the sweetness or presentation depending on the occasion. These qualities make it both reliable and exciting for me when planning desserts.
Ingredients for Sopapilla Cheesecake
These ingredients form a simple harmony. The star players are the flaky crescent rolls that create a delicate pastry shell, and the silky cream cheese filling that provides richness and tang. Sugar sweetens and caramelizes with the melted butter, while cinnamon adds warmth and aroma. Each component is essential, contributing texture, flavor, or structure.
- 2 cans crescent rolls: Unroll and layer as a flaky base and top for the dessert, providing structure and a golden, buttery crust when baked. Helps create pockets that hold the creamy filling and cinnamon–sugar topping, contributing to the signature sopapilla texture. Can be pressed slightly to seal edges and prevent filling leakage during baking.
- 2 sticks low-fat cream cheese (8 ounces each), room temperature: Soften and whip to a smooth, creamy cheesecake filling that contributes rich, tangy dairy flavor and silky mouthfeel. Can be beaten with sugar and vanilla to create stability and richness, balancing the sweet cinnamon–sugar topping. Room temperature improves blending and yields a lump-free custard.
- 1 cup white sugar divided: Sweeten and balance the tang of the cream cheese; divide usage to sweeten the filling and to sprinkle on top for caramelized crunch. Dissolve into the cream cheese for smooth consistency and combine with cinnamon for the sopapilla topping. Amount controls overall sweetness and browning of the finished pastry.
- 1 teaspoon vanilla extract: Flavor and aromatic enhancer that brightens the cream cheese filling and complements the cinnamon–sugar topping. Stir into the filling to integrate subtle floral-vanilla notes that round out the dessert. Use sparingly to prevent overpowering delicate dairy flavors.
- 1/4 cup butter melted: Melt and brush to promote browning and help the top crescent layer crisp and adhere to the filling. Adds a subtle buttery richness that intensifies oven browning and mouthfeel. Can be applied before baking to ensure an even, golden finish and help cinnamon–sugar stick.
- 1 teaspoon cinnamon: Season and dust to provide warm, spicy aroma and characteristic sopapilla flavor when mixed with sugar for the topping. Combine with the reserved sugar to sprinkle over the top, creating a fragrant, caramelized crust. Use measured amounts to balance sweetness and spice.
Step by Step Guide for Sopapilla Cheesecake

I like to walk through these steps slowly the first time, then you can speed up as you get comfortable. The directions are straightforward, but paying attention to texture and visual cues will reward you with a perfect bake. Keep your oven preheated and ingredients at the right temperatures for consistent results.
- Grease a 9×13-inch baking dish, and heat your oven to 350°F.: You will notice the initial scent of warm metal and butter if you use a buttered dish, and that subtle aroma sets the stage. Preheating to 350°F ensures even rising and predictable browning, so the top crisps without the filling overcooking. I prefer to brush the pan with a thin coating of butter rather than spray so the crust can brown naturally. A common mistake is skipping preheat, which can cause uneven bake and a soggy center, so start the oven before assembly.
- Lay one of the crescent roll sheets out in the baking dish. (If you are using a smaller dish, then just cut the sheet to the right size.): As you unroll the first crescent rolls sheet, you will feel its delicate, pliable texture. Gently press it into the dish, smoothing corners with your fingertips to avoid tearing. If the sheet is slightly larger, trim with kitchen scissors so it lies flat, which helps the filling spread evenly and prevents leaking. Avoid stretching the dough, because that can cause uneven thickness and lead to uneven browning.
- Blend the cream cheese, 3/4 cup of sugar, and vanilla with an electric hand mixer until smooth. Spoon the mixture onto the sheet and spread it out to cover the whole dish evenly.: The blending releases a faint sweet dairy aroma and creates a silky texture that you should aim for. As the cream cheese loosens, the mixture will shine slightly and hold soft peaks, a sign it is well combined. Spoon onto the dough and use a spatula to achieve an even layer that reaches close to the edges without overflowing. Over mixing can introduce air pockets that cause small cracks, so stop when smooth. A common pitfall is using cold cream cheese , which leaves lumps, so ensure it is room temperature.
- Roll out the other roll of crescent dough and gently place it on top of the cream cheese mixture. Pour the melted butter over the dough. Mix the remaining sugar and cinnamon together and sprinkle this on top.: When you lay the second crescent rolls sheet over the filling, you will feel a slight resistance as it settles; press lightly to adhere without squeezing filling out. Pouring the melted butter creates a glossy sheen and a rich smell that the oven will transform into crispness. Mixing the remaining sugar with cinnamon before sprinkling ensures even coverage, which caramelizes into a fragrant, slightly crunchy topping. One mistake is pouring too much butter , which can make the top overly greasy; stick to the measured amount.
- Pop it into the heated oven and bake for 25-30 minutes, until it is bubbly and the top is beautifully browned. Then, allow it to cool.: As it bakes you will hear faint bubble sounds and smell the warming cinnamon and butter. The top should develop an even golden brown color, and you might see the filling bubbling gently at the edges, a reliable cue that it is done. Remove it and let it cool in the pan so the filling sets up, making slicing neater and cleaner. Cutting while too warm can lead to a squishy center, so patience is the key. A common error is overbaking, which will dry the filling out, so check for that gentle bubbling and golden top rather than relying on a timer alone.
Recipe Tips about Sopapilla Cheesecake
I like to share tips that help you get consistent results every time you make Sopapilla Cheesecake. These notes cover timing, texture, and small adjustments that make the dessert shine.
- Bring ingredients to room temperature to ensure a lump free filling and smoother blending of the cream cheese with the sugar and vanilla.
- Trim dough to fit if needed so the crescent rolls lay flat and bake evenly across the pan without bunching at the corners.
- Measure butter carefully because too much will make the top soggy while too little may prevent proper browning and crispness.
- Sprinkle cinnamon sugar evenly for consistent caramelization and aroma in every bite; uneven topping can yield pockets of sweetness or bland spots.
- Cool completely before slicing to allow the filling to set, producing cleaner slices and a better texture when plated.
What Goes Well With This Sopapilla Cheesecake
Sopapilla Cheesecake pairs wonderfully with simple accompaniments that echo its warm, sweet notes. I often serve it with light beverages and seasonal fruit to balance richness. It works for casual family desserts and celebratory gatherings alike, and is particularly welcome during holidays and cool evenings. Below are serving ideas, occasions, and storage suggestions to help you plan.
- Serve with fresh berries to add bright acidity and a fresh contrast to the creamy filling.
- Offer a dusting of powdered sugar for a pretty finish that adds subtle sweetness without changing texture.
- Present on a dessert platter cut into squares for potlucks, making it easy for guests to help themselves.
- Pair with coffee or tea during after dinner or brunch to complement the cinnamon notes.
- Store chilled in an airtight container for up to three days to maintain texture, or freeze individual slices wrapped tightly for longer storage.
- Serve at seasonal gatherings like family dinners or celebrations where a crowd pleasing, easy dessert is ideal.
FAQ
Conclusion
Sopapilla Cheesecake stands out for its effortless assembly and the delightful contrast between a flaky pastry top and a creamy cheese filling. It’s the sort of dessert that makes guests pause, then smile with a second helping. Give it a try when you want an impressive yet simple sweet to bring to gatherings or to enjoy with family. You will likely find yourself returning to this recipe whenever you want a dependable, crowd pleasing dessert that feels both homey and special.

Sopapilla Cheesecake
Equipment
- 9x13-inch Baking Dish
- electric hand mixer
- Spatula
Ingredients
- 2 cans crescent rolls Unroll and layer as a flaky base and top for the dessert, providing structure and a golden, buttery crust when baked. Helps create pockets that hold the creamy filling and cinnamon-sugar topping, contributing to the signature sopapilla texture. Can be pressed slightly to seal edges and prevent filling leakage during baking.
- 2 sticks low-fat cream cheese (8 ounces each), room temperature Soften and whip to a smooth, creamy cheesecake filling that contributes rich, tangy dairy flavor and silky mouthfeel. Can be beaten with sugar and vanilla to create stability and richness, balancing the sweet cinnamon-sugar topping. Room temperature improves blending and yields a lump-free custard.
- 1 cup white sugar divided Sweeten and balance the tang of the cream cheese; divide usage to sweeten the filling and to sprinkle on top for caramelized crunch. Dissolve into the cream cheese for smooth consistency and combine with cinnamon for the sopapilla topping. Amount controls overall sweetness and browning of the finished pastry.
- 1 teaspoon vanilla extract Flavor and aromatic enhancer that brightens the cream cheese filling and complements the cinnamon-sugar topping. Stir into the filling to integrate subtle floral-vanilla notes that round out the dessert. Use sparingly to prevent overpowering delicate dairy flavors.
- 1/4 cup butter melted Melt and brush to promote browning and help the top crescent layer crisp and adhere to the filling. Adds a subtle buttery richness that intensifies oven browning and mouthfeel. Can be applied before baking to ensure an even, golden finish and help cinnamon-sugar stick.
- 1 teaspoon cinnamon Season and dust to provide warm, spicy aroma and characteristic sopapilla flavor when mixed with sugar for the topping. Combine with the reserved sugar to sprinkle over the top, creating a fragrant, caramelized crust. Use measured amounts to balance sweetness and spice.
Instructions
- Grease a 9×13-inch baking dish, and heat your oven to 350°F.: You will notice the initial scent of warm metal and butter if you use a buttered dish, and that subtle aroma sets the stage. Preheating to 350°F ensures even rising and predictable browning, so the top crisps without the filling overcooking. I prefer to brush the pan with a thin coating of butter rather than spray so the crust can brown naturally. A common mistake is skipping preheat, which can cause uneven bake and a soggy center, so start the oven before assembly.
- Lay one of the crescent roll sheets out in the baking dish. (If you are using a smaller dish, then just cut the sheet to the right size.): As you unroll the first crescent rolls sheet, you will feel its delicate, pliable texture. Gently press it into the dish, smoothing corners with your fingertips to avoid tearing. If the sheet is slightly larger, trim with kitchen scissors so it lies flat, which helps the filling spread evenly and prevents leaking. Avoid stretching the dough, because that can cause uneven thickness and lead to uneven browning.
- Blend the cream cheese, 3/4 cup of sugar, and vanilla with an electric hand mixer until smooth. Spoon the mixture onto the sheet and spread it out to cover the whole dish evenly.: The blending releases a faint sweet dairy aroma and creates a silky texture that you should aim for. As the cream cheese loosens, the mixture will shine slightly and hold soft peaks, a sign it is well combined. Spoon onto the dough and use a spatula to achieve an even layer that reaches close to the edges without overflowing. Over mixing can introduce air pockets that cause small cracks, so stop when smooth. A common pitfall is using cold cream cheese , which leaves lumps, so ensure it is room temperature.
- Roll out the other roll of crescent dough and gently place it on top of the cream cheese mixture. Pour the melted butter over the dough. Mix the remaining sugar and cinnamon together and sprinkle this on top.: When you lay the second crescent rolls sheet over the filling, you will feel a slight resistance as it settles; press lightly to adhere without squeezing filling out. Pouring the melted butter creates a glossy sheen and a rich smell that the oven will transform into crispness. Mixing the remaining sugar with cinnamon before sprinkling ensures even coverage, which caramelizes into a fragrant, slightly crunchy topping. One mistake is pouring too much butter , which can make the top overly greasy; stick to the measured amount.
- Pop it into the heated oven and bake for 25-30 minutes, until it is bubbly and the top is beautifully browned. Then, allow it to cool.: As it bakes you will hear faint bubble sounds and smell the warming cinnamon and butter. The top should develop an even golden brown color, and you might see the filling bubbling gently at the edges, a reliable cue that it is done. Remove it and let it cool in the pan so the filling sets up, making slicing neater and cleaner. Cutting while too warm can lead to a squishy center, so patience is the key. A common error is overbaking, which will dry the filling out, so check for that gentle bubbling and golden top rather than relying on a timer alone.
Notes
- Bring ingredients to room temperature to ensure a lump free filling and smoother blending of the cream cheese with the sugar and vanilla.
- Trim dough to fit if needed so the crescent rolls lay flat and bake evenly across the pan without bunching at the corners.
- Measure butter carefully because too much will make the top soggy while too little may prevent proper browning and crispness.
- Sprinkle cinnamon sugar evenly for consistent caramelization and aroma in every bite; uneven topping can yield pockets of sweetness or bland spots.
- Cool completely before slicing to allow the filling to set, producing cleaner slices and a better texture when plated.