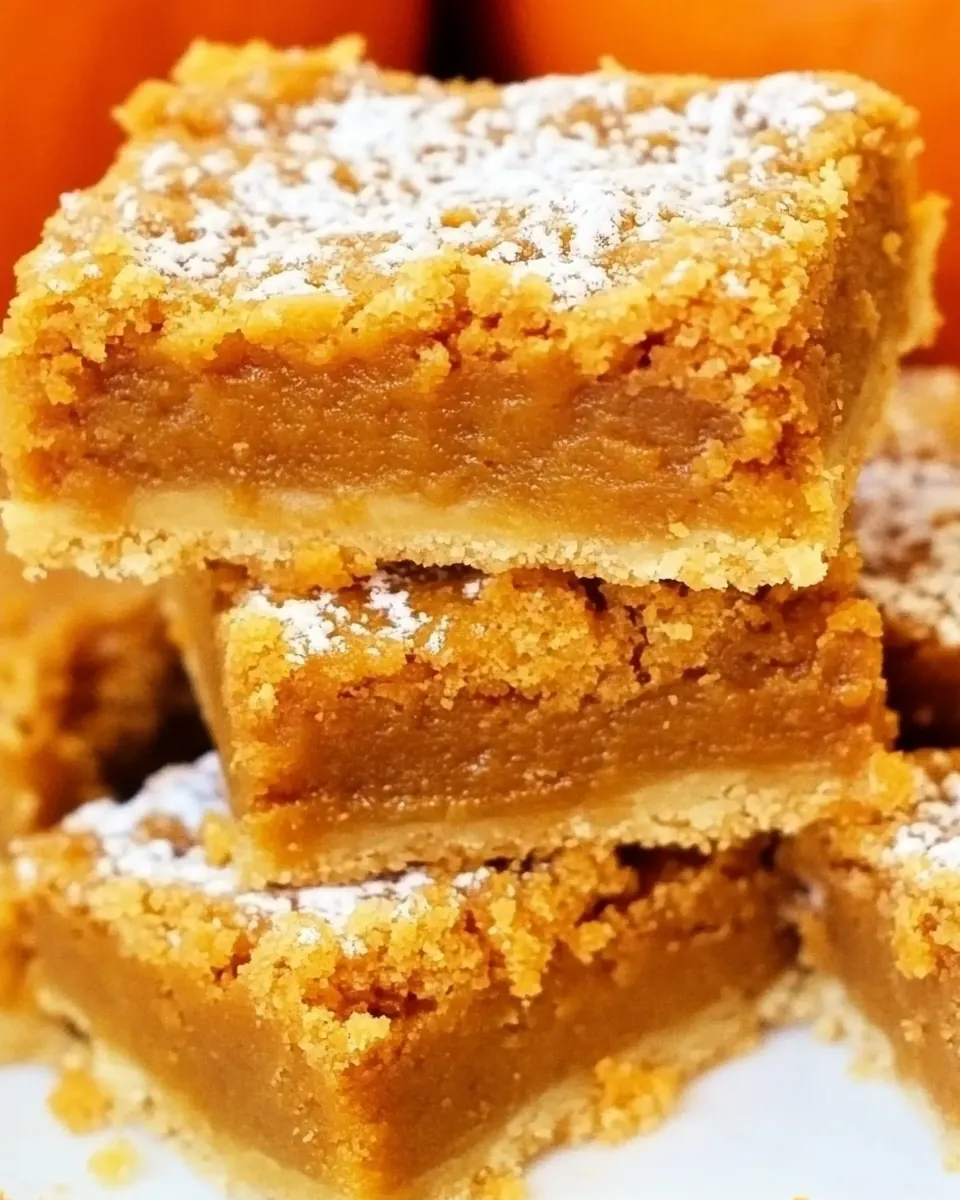
Pumpkin Pie Bars
Pumpkin Pie Bars have been my go to fall bake for years, a treat I reach for when the afternoons get cooler and my kitchen smells of warm spices. The first time I brought these to a neighborhood potluck someone told me they tasted like a cross between a classic pie and a cookie bar, and I have loved that description ever since. I remember standing by the oven, wiping my hands on a kitchen towel, and feeling silly proud as friends reached for seconds.
Every batch of Pumpkin Pie Bars seems to carry a small memory for me, whether it is a rainy Sunday afternoon or the chaotic calm before Thanksgiving dinner. I like how the crust holds a crumbly, buttery bite while the filling stays delectably silky, and the spice blend always brings people together at the table. Over time I tuned the topping to be just the right texture, and now I tweak little things depending on whether I want a softer bar or a more rustic, sandy crust.
Recipe Snapshot
40 mins
10 mins
30 mins
Medium
180 kcal
American
Gluten-Free, Low FODMAP
Desserts
8 inch square pan, parchment paper, stand mixer, mixing bowls, oven
Why This Pumpkin Pie Bars Is a Winner
A feel good seasonal favorite
I love Pumpkin Pie Bars because they deliver everything I want from autumn baking. The combination of tender pumpkin filling and a crisp, buttery base is comforting and nostalgic. When I serve them, people immediately relax, and that reaction never gets old.
Simple, crowd pleasing format
Bars are so much easier to portion and transport than a pie, that is why I reach for Pumpkin Pie Bars for gatherings. You can slice them into tidy squares or generous wedges, and guests can grab a piece without a fork if the moment calls for it. That practicality keeps them top of my list for potlucks.
Textural contrast
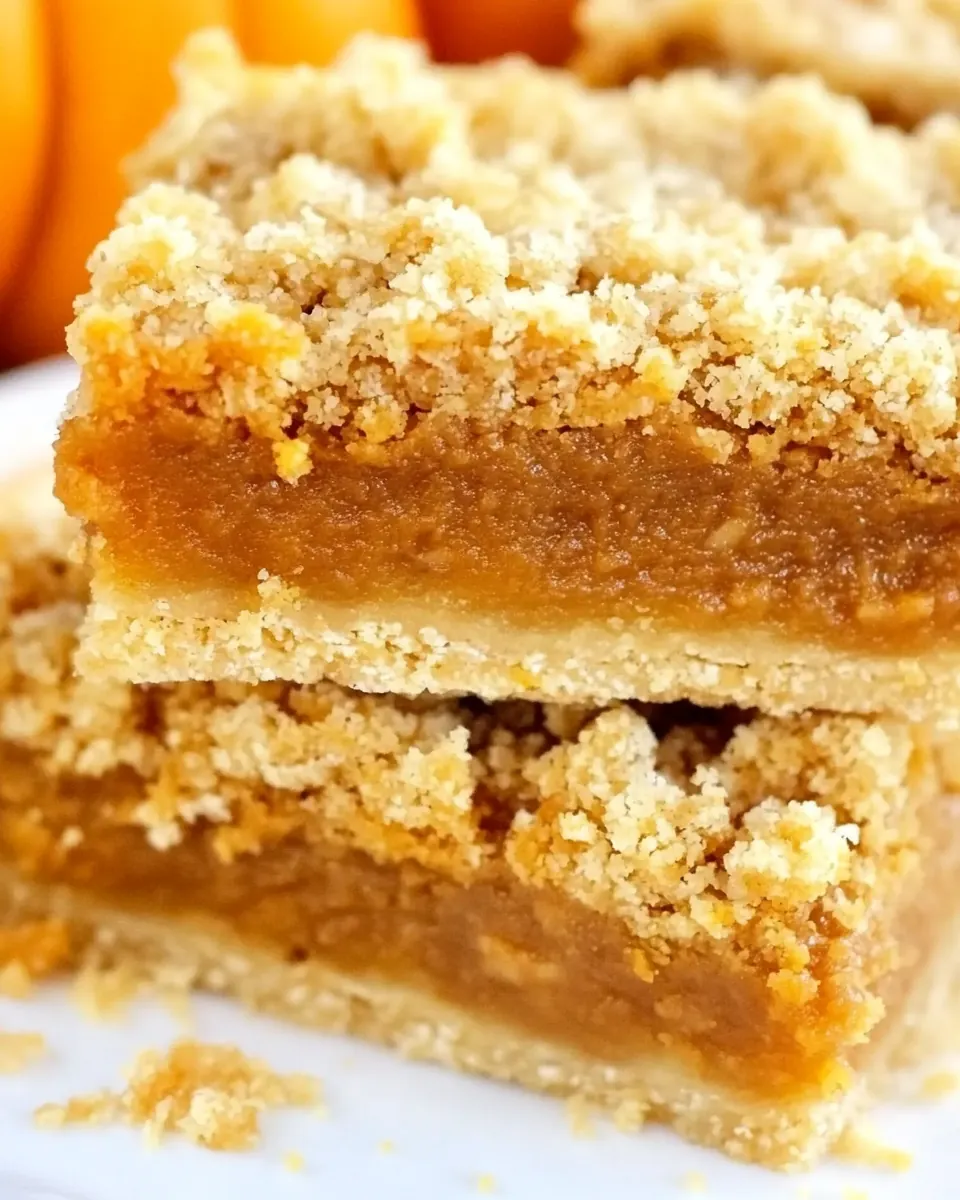
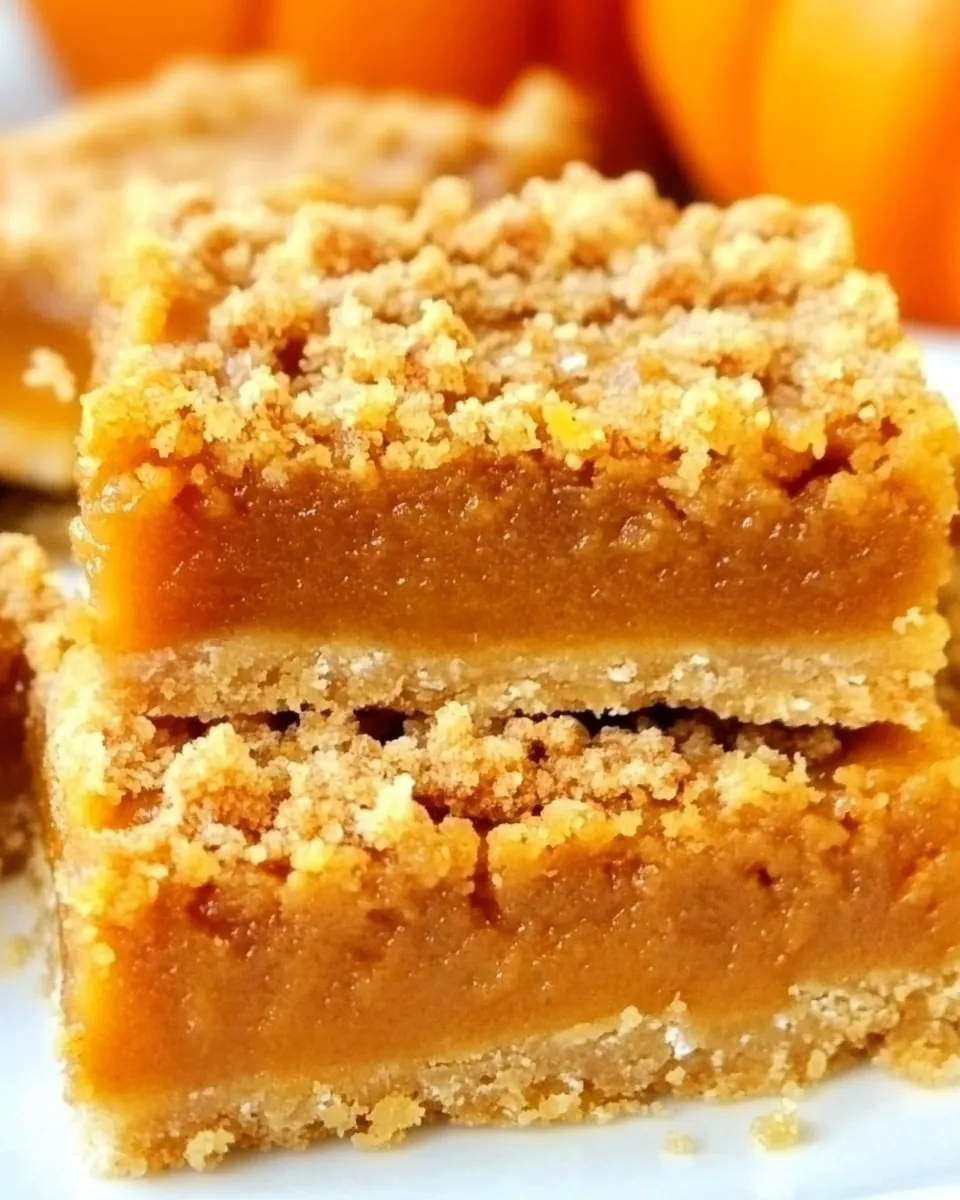
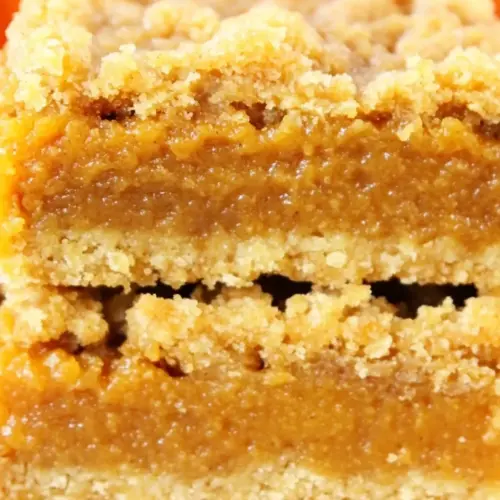
The magic in Pumpkin Pie Bars comes from texture. The crust is crumbly and slightly sandy, while the pumpkin layer is smooth and custard like. I savor how the topping crisps and turns golden in the oven, giving each bite that little satisfying crunch before the soft filling melts on your tongue.
Flexible and forgiving
I appreciate how forgiving this recipe is. The method lets you adjust the amount of topping or press the crust a little thinner for a bolder filling to crust ratio. If you are a little off on measurements, the bars still hold together and taste wonderful, so it is a great recipe to build confidence in the kitchen.
Approachable spice profile
The cinnamon and cloves in Pumpkin Pie Bars are comforting without being overpowering. I find that the gentle warmth of these spices invites seconds, and they pair beautifully with a cup of coffee or tea. They hit that sweet spot between seasonal flair and everyday treat.
Pumpkin Pie Bars Shopping List
These ingredients are chosen to create a balanced bar where each element has a role. The crust ingredients provide structure and a buttery base, while the spice and filling elements bring that classic pumpkin pie flavor. Together they create a harmony of crumbly texture and custardy filling, with the topping offering a golden finish that seals the experience.
- 1/2 c unsalted butter melted cooled to room temperature: Melted and cooled to room temperature to provide a rich, tender fat that binds the crust components and adds moistness without making the dough greasy. Enhances flavor and helps the crust brown evenly during baking.
- 1/2 c light brown sugar: Lightly sweetened to contribute caramel-like depth to the crust while balancing the spice and pumpkin filling. Helps create a chewy, slightly crunchy texture when combined with the melted butter and flour.
- 1 1/2 c all-purpose flour: All-purpose flour gives structure to the crust by forming the gluten network when mixed with the butter and sugar. Provides a neutral base that supports the filling and yields a tender, flaky bar.
- 1/2 teaspoon baking soda: Leavening agent used sparingly to provide a subtle lift and prevent the crust from becoming overly dense. Works with the baking powder to ensure a light, slightly aerated texture.
- 1/2 teaspoon baking powder: Used with baking soda to create balanced leavening and contribute to a light, tender crumb in the crust. Helps ensure even rise and texture without altering flavor significantly.
- 1/4 teaspoon salt: Adds a hint of saltiness to enhance and balance the sweetness while strengthening gluten structure slightly for proper dough cohesion. Keeps the overall flavor profile rounded and prevents blandness.
- 1 teaspoon ground cinnamon: Provides warm, aromatic spice that complements pumpkin and adds classic pie-bar flavor notes when mixed into the crust or filling. Enhances the overall aroma and seasonal character of the dessert.
- 1/4 teaspoon ground cloves: Adds a pungent, warm undertone to accentuate the pumpkin spice profile and deepen the filling’s complexity. Used sparingly to avoid overpowering other spices and maintain balance.
- 1 1/2 cups pumpkin pie mix from a can, not puree: Pumpkin pie mix from a can supplies the seasoned pumpkin filling base already blended with spices and sweeteners, delivering the characteristic texture and flavor of pumpkin pie. Ensures consistent moisture and seasoning for the bars without needing extra puree adjustments.
- 1 large egg: Serves as a binding agent in the filling, helping to set the pumpkin mixture as it bakes and contributing richness and structure. Adds a touch of silkiness to the filling while aiding cohesion between ingredients.
- 1/2 teaspoon pure vanilla extract: Adds floral, sweet aromatics to the filling and helps round out flavors by enhancing other sweet and spice notes. Provides a subtle depth that complements the pumpkin and spices without overpowering them.
Preparation Steps for Pumpkin Pie Bars
These steps will walk you from prepping the pan to cutting tidy squares. I like to move deliberately and pause to check visual cues, because small adjustments during baking make a big difference in texture and presentation.
- Prepare the 8" square pan by greasing the sides and the bottom. Line with parchment paper. Set aside.: The air smells faintly of oil as you grease the pan, and the smooth parchment gives you a sure, nonstick surface to lift the bars out later, preventing edges from tearing. I press the paper into the corners so the crust will have clean lines, that practice makes serving much neater. One common mistake is not leaving an overhang on the parchment, which makes it hard to lift the bars out of the pan, so leave a couple of inches of overhang for easy removal. This step matters because a properly lined pan protects the crust edges and helps the bars cool evenly, preserving the crust to filling ratio.
- Preheat oven to 375 degrees F.: You will feel the kitchen begin to warm as the oven reaches temperature, and the consistent heat is crucial for achieving the right crust texture and filling set. Preheating ensures the topping starts to brown within the correct time window, creating that golden crust without overbaking the filling. A typical mistake is sliding the pan into a cold oven, which leads to a denser crust and uneven bake. Use an oven thermometer if you suspect your oven runs hot or cool, because accurate temperature prevents overbaked edges or undercooked centers.
- Melt butter in microwave or on the stove and let cool to room temperature.: The butter releases a toasted dairy aroma as it melts, and cooling it prevents it from cooking the egg or making the dough too loose when combined. I set it aside in a heatproof bowl and stir occasionally until it loses visible warmth. If you add warm butter to the egg, you risk curdling the egg or creating a greasy dough, which harms the final crumb. Cooling is simple, but essential, because it ensures the butter incorporates smoothly into the flour, giving that tender, sandy texture we want.
- In a medium mixing bowl, whisk together flour, brown sugar, soda, baking powder, cinnamon, cloves and salt.: When you whisk, the dry mix emits a sweet, spiced scent that tells you the flavors are well combined. Thorough mixing distributes the leavening evenly so the crust and topping rise predictably. I take a moment to break up any lumps of brown sugar by pressing them against the bowl with my whisk. A common oversight is under mixing, causing pockets of uneven flavor or uneven lift. This blending step matters because it creates a base that will produce uniform texture and consistent flavor in every bite.
- Add melted butter and mix until crumbly dough forms.: As the butter meets the dry mix, the mixture changes texture and small clumps appear, releasing a buttery, toasty aroma. Use a fork or spatula to combine until the crumbs hold together when pressed, but avoid over mixing which can toughen the crust. One thing to watch for is adding too much liquid, which will yield a sticky, unworkable dough. The crumbly dough is what creates that sandy, tender crust and the crisp topping once baked.
- Reserve about 3/4 c of the mixture for the topping.: The reserved crumbs will become the crunchy top that contrasts the smooth filling, and putting them aside feels like preparing the final flourish. I scoop out the portion and pat it down slightly so it will crumble more uniformly over the pumpkin layer. A mistake to avoid is reserving too little, which results in a thin topping that may not brown nicely. This reserved mixture is important because it delivers the pleasurable crunch that balances the custard like filling.
- Press the remaining dough into prepared pan. Set aside.: Pressing the dough creates a compact base that should look even and slightly dense, forming a foundation that will support the filling. I press firmly with the back of a spoon or my fingertips to create a level surface, paying attention to the corners so the bars slice cleanly later. If you press unevenly, the crust can be thinner in some spots and overbaked in others, so take a moment to smooth it out. A solid base helps the bars hold together and gives a satisfying bite beneath the pumpkin.
- Place all filling ingredients in a large mixing bowl of a stand mixer and mix until all combined.: As you blend the pumpkin pie mix, egg, and vanilla, the bowl fills with a warm spice aroma and the mixture becomes silkier and glossier, indicating it is evenly emulsified. I scrape the sides of the bowl to ensure there are no streaks of egg or pockets of unmixed spice, because uniformity leads to even texture after baking. A common issue is overmixing, which can incorporate too much air and cause the filling to crack while cooling, so mix until just combined for a smooth custard like texture.
- Pour over crust.: The filling flows with a thick, velvety consistency, settling into any little gaps in the crust and spreading into a smooth layer. Pouring slowly helps the filling find a natural level, and I use a spatula to nudge it gently if needed. Pouring too hastily can disturb the crust or create an uneven surface, so take a steady approach. This step matters because a level filling ensures uniform baking and that every square has the same custard to crust balance.
- Sprinkle with the topping mixture.: The crumbs scatter and nestle into the pumpkin, creating a mosaic of golden bits across the surface that will crisp and brown in the oven. I try to distribute the topping evenly to avoid dense clumps and to ensure the final texture is consistent. One mistake is piling the topping in the center which can leave thin edges; aim for balanced coverage to get crunchy edges everywhere. The topping is the textural punctuation that elevates the bars from simple to memorable.
- Bake for 28 to 32 minutes or until the topping is golden brown.: The kitchen will fill with a rich, spiced aroma as the bars bake, and you should watch for a gentle jiggle in the center but a set edge, which indicates doneness. The topping should turn a warm golden brown and the filling should hold together when gently nudged. A common error is overbaking, which dries the filling and dulls the texture, so start checking at the earlier time and trust visual cues. This bake time is pivotal because it develops the caramelized notes and sets the custard to a sliceable consistency.
- Cool completely in pan. Cut into squares.: Cooling lets the filling finish setting and the crust firm up, and as they cool the bars become easier to remove and slice cleanly. I wait until they reach room temperature, then use the parchment overhang to lift them out and a sharp knife to slice. Cutting while warm often yields ragged edges and a filling that oozes, so resist the urge to slice too soon. Proper cooling preserves the structure and texture so each square holds its shape beautifully.
Making Adjustments
These tips will help you tweak the recipe for texture, transport, and flavor stability. Small adjustments can change the final bars significantly, so I explain why each change matters and how to execute it safely.
- Chill time matters: If you plan to transport the bars, refrigerate them for at least an hour after they reach room temperature to firm the filling, which reduces slumping during travel.
- Topping texture: For a coarser crumble, pulse the crumb mixture briefly in a food processor. Avoid over processing, which creates a paste and removes the desired sandy texture.
- Even spreading: After pouring the filling, gently tap the pan on the counter to remove air bubbles and help the filling settle into an even layer without disrupting the crust.
- Browning control: If the topping browns too fast, tent the pan loosely with foil partway through baking to prevent burning while allowing the center to finish cooking.
- Storage for best texture: Store the bars in a single layer or separated with parchment to avoid scuffing the topping; refrigerate in a covered container for up to three days as noted in the recipe notes.
Serving This Pumpkin Pie Bars
These bars are versatile for many occasions and present beautifully with a few simple touches. I often serve them warm or at room temperature, and they pair nicely with light beverages or a scoop of chilled accompaniment when appropriate.
- Cut into neat squares: Use a sharp knife and wipe it between cuts for clean edges that look appealing on a serving platter.
- Party platter idea: Arrange squares on a large platter and garnish sparingly with a dusting of ground cinnamon for a pretty finish without overpowering the flavor.
- Occasions: These bars are perfect for fall gatherings, potlucks, and Thanksgiving dessert tables because they are easy to portion and travel well.
- Storage tips: Refrigerate leftovers in a covered container for up to three days to preserve texture and freshness.
- Seasonal pairings: Serve alongside spiced coffee or tea for a comforting combo that highlights the warm spice notes in the bars.
- Presentation note: For a casual event, stack squares slightly overlapping on a wooden board for rustic charm; for formal gatherings, place individually on dessert plates with a small garnish.
FAQ
Conclusion
What makes these bars special is their perfect balance of a tender, buttery crust and a smooth spiced pumpkin filling topped with a crunchy crumb. They are approachable to make, transport easily, and hit all the seasonal notes without fuss. Try them when you need a dessert that feels both familiar and festive, and you will likely find they become a repeat request for fall gatherings. Give them a go and enjoy the warm spice and buttery texture that make them such a satisfying treat.
Pumpkin Pie Bars
Equipment
- 8 inch square pan
- Parchment Paper
- Stand mixer
- Mixing Bowls
- Oven
Ingredients
- 1/2 c unsalted butter melted cooled to room temperature Melted and cooled to room temperature to provide a rich, tender fat that binds the crust components and adds moistness without making the dough greasy. Enhances flavor and helps the crust brown evenly during baking.
- 1/2 c light brown sugar Lightly sweetened to contribute caramel-like depth to the crust while balancing the spice and pumpkin filling. Helps create a chewy, slightly crunchy texture when combined with the melted butter and flour.
- 1 1/2 c all-purpose flour All-purpose flour gives structure to the crust by forming the gluten network when mixed with the butter and sugar. Provides a neutral base that supports the filling and yields a tender, flaky bar.
- 1/2 teaspoon baking soda Leavening agent used sparingly to provide a subtle lift and prevent the crust from becoming overly dense. Works with the baking powder to ensure a light, slightly aerated texture.
- 1/2 teaspoon baking powder Used with baking soda to create balanced leavening and contribute to a light, tender crumb in the crust. Helps ensure even rise and texture without altering flavor significantly.
- 1/4 teaspoon salt Adds a hint of saltiness to enhance and balance the sweetness while strengthening gluten structure slightly for proper dough cohesion. Keeps the overall flavor profile rounded and prevents blandness.
- 1 teaspoon ground cinnamon Provides warm, aromatic spice that complements pumpkin and adds classic pie-bar flavor notes when mixed into the crust or filling. Enhances the overall aroma and seasonal character of the dessert.
- 1/4 teaspoon ground cloves Adds a pungent, warm undertone to accentuate the pumpkin spice profile and deepen the filling’s complexity. Used sparingly to avoid overpowering other spices and maintain balance.
- 1 1/2 cups pumpkin pie mix from a can, not puree Pumpkin pie mix from a can supplies the seasoned pumpkin filling base already blended with spices and sweeteners, delivering the characteristic texture and flavor of pumpkin pie. Ensures consistent moisture and seasoning for the bars without needing extra puree adjustments.
- 1 large egg Serves as a binding agent in the filling, helping to set the pumpkin mixture as it bakes and contributing richness and structure. Adds a touch of silkiness to the filling while aiding cohesion between ingredients.
- 1/2 teaspoon pure vanilla extract Adds floral, sweet aromatics to the filling and helps round out flavors by enhancing other sweet and spice notes. Provides a subtle depth that complements the pumpkin and spices without overpowering them.
Instructions
- Prepare the 8" square pan by greasing the sides and the bottom. Line with parchment paper. Set aside.: The air smells faintly of oil as you grease the pan, and the smooth parchment gives you a sure, nonstick surface to lift the bars out later, preventing edges from tearing. I press the paper into the corners so the crust will have clean lines, that practice makes serving much neater. One common mistake is not leaving an overhang on the parchment, which makes it hard to lift the bars out of the pan, so leave a couple of inches of overhang for easy removal. This step matters because a properly lined pan protects the crust edges and helps the bars cool evenly, preserving the crust to filling ratio.
- Preheat oven to 375 degrees F.: You will feel the kitchen begin to warm as the oven reaches temperature, and the consistent heat is crucial for achieving the right crust texture and filling set. Preheating ensures the topping starts to brown within the correct time window, creating that golden crust without overbaking the filling. A typical mistake is sliding the pan into a cold oven, which leads to a denser crust and uneven bake. Use an oven thermometer if you suspect your oven runs hot or cool, because accurate temperature prevents overbaked edges or undercooked centers.
- Melt butter in microwave or on the stove and let cool to room temperature.: The butter releases a toasted dairy aroma as it melts, and cooling it prevents it from cooking the egg or making the dough too loose when combined. I set it aside in a heatproof bowl and stir occasionally until it loses visible warmth. If you add warm butter to the egg, you risk curdling the egg or creating a greasy dough, which harms the final crumb. Cooling is simple, but essential, because it ensures the butter incorporates smoothly into the flour, giving that tender, sandy texture we want.
- In a medium mixing bowl, whisk together flour, brown sugar, soda, baking powder, cinnamon, cloves and salt.: When you whisk, the dry mix emits a sweet, spiced scent that tells you the flavors are well combined. Thorough mixing distributes the leavening evenly so the crust and topping rise predictably. I take a moment to break up any lumps of brown sugar by pressing them against the bowl with my whisk. A common oversight is under mixing, causing pockets of uneven flavor or uneven lift. This blending step matters because it creates a base that will produce uniform texture and consistent flavor in every bite.
- Add melted butter and mix until crumbly dough forms.: As the butter meets the dry mix, the mixture changes texture and small clumps appear, releasing a buttery, toasty aroma. Use a fork or spatula to combine until the crumbs hold together when pressed, but avoid over mixing which can toughen the crust. One thing to watch for is adding too much liquid, which will yield a sticky, unworkable dough. The crumbly dough is what creates that sandy, tender crust and the crisp topping once baked.
- Reserve about 3/4 c of the mixture for the topping.: The reserved crumbs will become the crunchy top that contrasts the smooth filling, and putting them aside feels like preparing the final flourish. I scoop out the portion and pat it down slightly so it will crumble more uniformly over the pumpkin layer. A mistake to avoid is reserving too little, which results in a thin topping that may not brown nicely. This reserved mixture is important because it delivers the pleasurable crunch that balances the custard like filling.
- Press the remaining dough into prepared pan. Set aside.: Pressing the dough creates a compact base that should look even and slightly dense, forming a foundation that will support the filling. I press firmly with the back of a spoon or my fingertips to create a level surface, paying attention to the corners so the bars slice cleanly later. If you press unevenly, the crust can be thinner in some spots and overbaked in others, so take a moment to smooth it out. A solid base helps the bars hold together and gives a satisfying bite beneath the pumpkin.
- Place all filling ingredients in a large mixing bowl of a stand mixer and mix until all combined.: As you blend the pumpkin pie mix, egg, and vanilla, the bowl fills with a warm spice aroma and the mixture becomes silkier and glossier, indicating it is evenly emulsified. I scrape the sides of the bowl to ensure there are no streaks of egg or pockets of unmixed spice, because uniformity leads to even texture after baking. A common issue is overmixing, which can incorporate too much air and cause the filling to crack while cooling, so mix until just combined for a smooth custard like texture.
- Pour over crust.: The filling flows with a thick, velvety consistency, settling into any little gaps in the crust and spreading into a smooth layer. Pouring slowly helps the filling find a natural level, and I use a spatula to nudge it gently if needed. Pouring too hastily can disturb the crust or create an uneven surface, so take a steady approach. This step matters because a level filling ensures uniform baking and that every square has the same custard to crust balance.
- Sprinkle with the topping mixture.: The crumbs scatter and nestle into the pumpkin, creating a mosaic of golden bits across the surface that will crisp and brown in the oven. I try to distribute the topping evenly to avoid dense clumps and to ensure the final texture is consistent. One mistake is piling the topping in the center which can leave thin edges; aim for balanced coverage to get crunchy edges everywhere. The topping is the textural punctuation that elevates the bars from simple to memorable.
- Bake for 28 to 32 minutes or until the topping is golden brown.: The kitchen will fill with a rich, spiced aroma as the bars bake, and you should watch for a gentle jiggle in the center but a set edge, which indicates doneness. The topping should turn a warm golden brown and the filling should hold together when gently nudged. A common error is overbaking, which dries the filling and dulls the texture, so start checking at the earlier time and trust visual cues. This bake time is pivotal because it develops the caramelized notes and sets the custard to a sliceable consistency.
- Cool completely in pan. Cut into squares.: Cooling lets the filling finish setting and the crust firm up, and as they cool the bars become easier to remove and slice cleanly. I wait until they reach room temperature, then use the parchment overhang to lift them out and a sharp knife to slice. Cutting while warm often yields ragged edges and a filling that oozes, so resist the urge to slice too soon. Proper cooling preserves the structure and texture so each square holds its shape beautifully.
Notes
- Chill time matters: If you plan to transport the bars, refrigerate them for at least an hour after they reach room temperature to firm the filling, which reduces slumping during travel.
- Topping texture: For a coarser crumble, pulse the crumb mixture briefly in a food processor. Avoid over processing, which creates a paste and removes the desired sandy texture.
- Even spreading: After pouring the filling, gently tap the pan on the counter to remove air bubbles and help the filling settle into an even layer without disrupting the crust.
- Browning control: If the topping browns too fast, tent the pan loosely with foil partway through baking to prevent burning while allowing the center to finish cooking.
- Storage for best texture: Store the bars in a single layer or separated with parchment to avoid scuffing the topping; refrigerate in a covered container for up to three days as noted in the recipe notes.