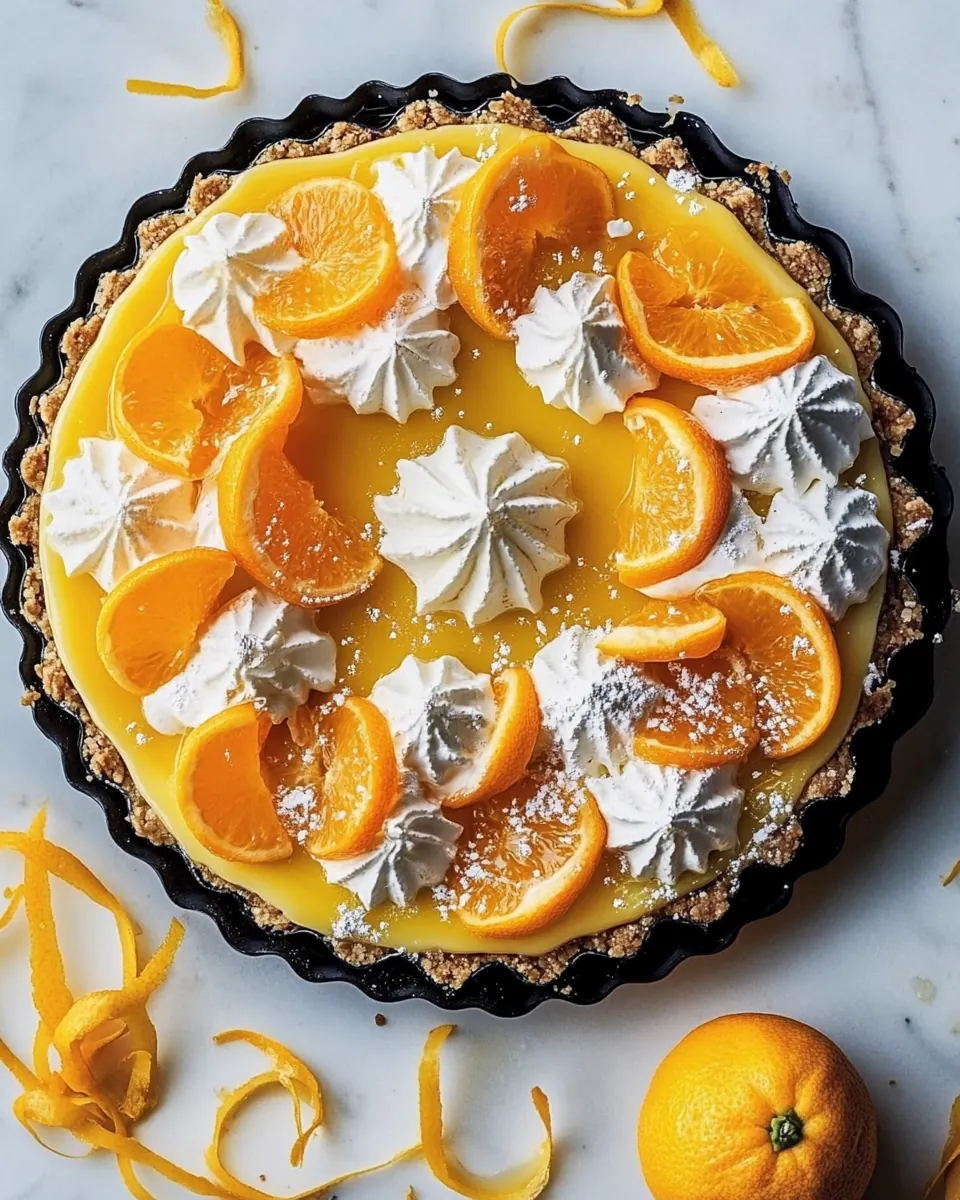
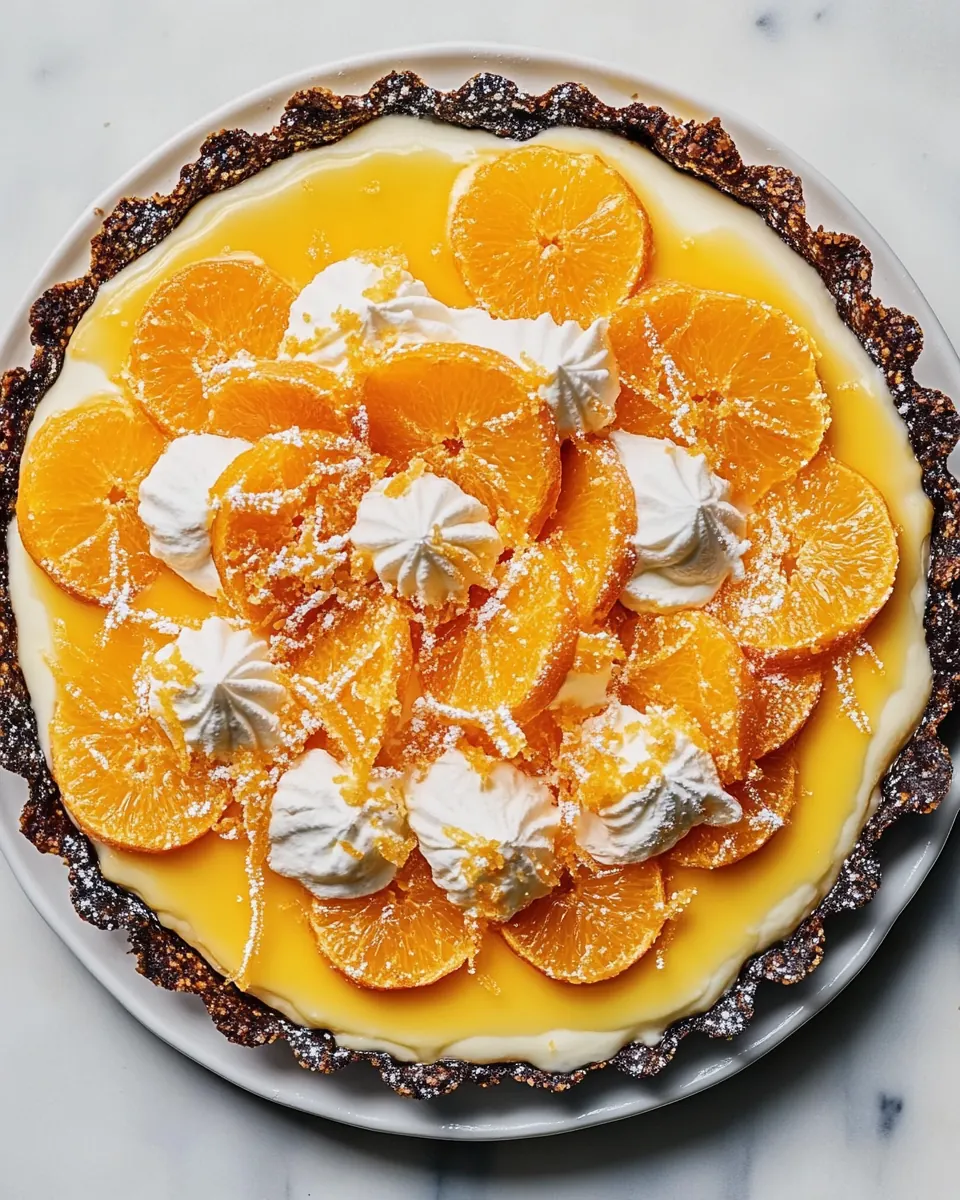
Satsuma Cream Tart
Satsuma Cream Tart is one of those desserts I bring out when I want a bright finish to a cozy meal. The first time I served this tart I remember the hush at the table as people tasted the creamy filling against the deep chocolate crumb crust, then the animated questions about the marmalade. I still chuckle thinking about how the citrus aroma filled the kitchen while the tart cooled, and how the whipped cream dotted the top like little clouds.
Over the years I have tweaked the balance between sweet and tart, and I love that this recipe relies on a simple set of ingredients to deliver a layered experience. The texture contrast between the crisp chocolate base and the silky, slightly tangy filling makes every forkful interesting, and the candied peels add a playful, slightly chewy note. Every time I make Satsuma Cream Tart I feel like I am sharing a piece of winter sunshine with friends and family, even on an overcast day.
Recipe Snapshot
55 mins
30 mins
25 mins
Medium
320 kcal
American
Gluten-Free, Low FODMAP
Desserts
Medium bowl, Small bowl, Fluted removable bottom tart pan, Offset spatula, Wire rack
What Makes This Satsuma Cream Tart Special
Bright citrus flavor that does not overwhelm
I adore how the zesty notes from the satsuma zest and satsuma juice lift the whole dessert. The citrus is present and clear, but it never overpowers the creamy base, so the tart stays balanced and interesting.
Chocolate crust for contrast
The chocolate sandwich cookie crumbs provide a rich, slightly bitter backbone that plays beautifully against the sweet filling. I find that this contrast keeps the dessert from feeling cloying, and offers a satisfying crunch under each forkful.
Simple, pantry friendly technique
I appreciate that the preparation uses approachable steps and ingredients like sweetened condensed milk and egg yolks. That means you can get a showstopping tart on the table without hunting for obscure items.
Make ahead friendly
This tart improves with resting time. Chilling it overnight lets the filling set and the flavors meld, so it’s an ideal dessert to prepare in advance when you want to reduce last minute work.
Textural layers and garnish options
The whipped cream and candied peels finish the tart in different ways, adding airiness and a spark of chew. I love that you can vary the garnish to suit the occasion, keeping the core dessert the same while still changing the presentation.
Essential Ingredients for Satsuma Cream Tart
The ingredients in this tart are chosen to create complementary textures and layered flavors. The cookie crumbs form a crunchy base that anchors the silky filling. The citrus elements bring brightness and clarity, while the sweetened condensed milk and egg yolks build a luxuriously smooth body. Each player has a job, and together they deliver a dessert that feels indulgent without being fussy.
- Crust: Provide a clear section header indicating the start of the crust components and organizing the recipe for readers to follow; set expectations for assembly steps that follow.
- 2 cups (224 grams) chocolate sandwich cookie crumbs (see Note): Form a crunchy, chocolatey base when finely crushed and combined with butter, providing structure, texture, and rich cocoa flavor to contrast the tart filling.
- 3 tablespoons (36 grams) granulated sugar: Add subtle sweetness and help bind the cookie crumbs together while balancing the tartness of the satsuma filling for a well-rounded crust flavor.
- 1/4 teaspoon kosher salt: Enhance and intensify the flavors by balancing sweetness, rounding out the chocolate notes, and strengthening the overall seasoning of the crust.
- 1/4 cup (57 grams) unsalted butter, melted and cooled: Moisten the crumb mixture so it holds its shape once pressed into the tart pan; contribute a rich mouthfeel and deepen the crust’s flavor profile.
- 1 large egg yolk (19 grams): Enrich the crust with fat and act as a light binder to help set the crumb mixture during baking, yielding a tender yet cohesive base.
- Filling: Introduce a new section heading to separate the filling components from the crust and guide readers through recipe stages and timing.
- 3/4 cup (225 grams) Satsuma Marmalade (recipe follows): Provide concentrated satsuma flavor and sweetness that forms the primary citrus element of the filling, contributing both fruitiness and texture.
- 3/4 cup (232 grams) sweetened condensed milk: Contribute creaminess, thick sweetness, and body to the filling, helping it set while adding a caramel-like depth that complements the satsumas.
- 2 tablespoons (6 grams) satsuma zest: Infuse intense citrus aroma and bright, bitter orange oil that elevates the filling’s fragrance and adds complex flavor notes.
- 3 tablespoons (45 grams) fresh satsuma juice: Deliver fresh acidity and juice to brighten the filling, balance sweetness, and help create the correct consistency once combined and cooked.
- 3 large egg yolks (56 grams), room temperature: Thicken and enrich the filling while adding silkiness and richness; egg yolks also help stabilize and set the custard-like texture.
- 2 teaspoons (6 grams) vanilla extract: Enhance and deepen the flavor profile with warm vanilla notes, complementing the citrus and sweetened condensed milk for a rounded filling.
- 1/4 teaspoon kosher salt: Provide saline balance to the sweet and acidic elements of the filling, enhancing overall flavor clarity and preventing cloying sweetness.
- Sweetened whipped cream, to serve: Offer a light, airy counterpoint when dolloped on the finished tart; sweetened whipped cream adds creaminess and visual contrast.
- Garnish: Candied Satsuma Peels (recipe follows): Supply a bright, glossy garnish with concentrated candied peel pieces that add chew, bitterness, and a decorative finish to the tart.
Putting Together Satsuma Cream Tart
Bringing this tart to life is about layering textures and timing your steps so each component sets perfectly. Follow the sequence and pay attention to visual and tactile cues, because those signals tell you when to move on. Keep tools at the ready and plan for chilling time so the tart slices cleanly.
- Preheat oven to 350°F (180°C). Spray a 13 1/2 x 4 1/4-inch fluted removable-bottom tart pan with baking spray with flour.: As the oven warms you will notice a faint, dry heat that readies the air for baking, and this initial heat helps the crust crisp rather than steam. Preheating ensures even browning during the short bake, which is vital for the chocolate crumb shell to develop aroma and structure. A common mistake is skipping pan prep, which can make removing the tart difficult, so take a moment to spray and dust the pan thoroughly. If your oven runs hot or cool, use an oven thermometer to confirm the temperature to avoid under or over baking.
- For crust: In a medium bowl, stir together cookie crumbs, sugar, and salt.: In a medium bowl, stir together cookie crumbs, sugar, and salt. : When you combine the cookie crumbs , granulated sugar , and kosher salt , you should hear a soft, dry rustle as the crumbs move, and the mixture will look uniformly dark and sandy. This step is about even distribution so every bite has balance. A dusty mix can indicate that the crumbs are too fine, which is fine, but you must press them firmly later to form a solid base. Avoid skipping the salt, because it wakes up the chocolate notes and prevents the filling from tasting flat.
- In a small bowl, whisk together melted butter and egg yolk. Stir butter mixture into cookie crumb mixture until well combined. Press mixture into bottom and up sides of prepared pan.: The glossy melted unsalted butter blended with the egg yolk will create a slightly wet, crumbly paste. As you press it into the pan you will feel the crumbs compact and hold together; this tactile feedback tells you the crust is properly packed. Press firmly along the sides to create an even wall for the filling. If you press too lightly the crust may crumble when sliced, so take your time to form a compact, even layer.
- Bake until fragrant, 15 to 20 minutes. Let cool for 30 minutes. Leave oven on.: During baking the kitchen fills with a toasty chocolate aroma and the crust will slightly firm, giving off a gentle crackle at the edges when done. Cooling for 30 minutes stabilizes the structure so the marmalade and custard do not seep into warm crumbs. A typical misstep is not allowing sufficient cooldown, which can lead to a soggy boundary between crust and filling, so resist the urge to fill while warm.
- For filling: Using a small offset spatula, spread Satsuma Marmalade in bottom of cooled prepared crust; freeze until cold, 10 to 15 minutes.: Using a small offset spatula, spread Satsuma Marmalade in bottom of cooled prepared crust; freeze until cold, 10 to 15 minutes. : Spreading the Satsuma Marmalade produces a glossy, sticky layer that gleams under the light. Freezing briefly firms the marmalade, creating a protective barrier that prevents the custard from seeping into the crust. If you skip the chilling, the custard may blur into the crumbs, losing the clean layers that make slicing neat and attractive. Watch for a slightly tacky surface before proceeding, this indicates readiness.
- In a large bowl, whisk together condensed milk, satsuma zest and juice, egg yolks, vanilla, and salt until well combined. Spread onto marmalade in prepared crust. Using a wooden pick, pop any air bubbles on surface.: As you whisk the sweetened condensed milk , satsuma zest , satsuma juice , and egg yolks , the mixture will thicken and develop a glossy sheen, releasing a fragrant citrus perfume. Pouring it over the chilled marmalade creates a layered effect; the filling should sit cleanly atop the marmalade. Running a wooden pick across the top to pop bubbles prevents tiny holes in the finished custard. One error to avoid is under mixing, which can leave streaks, or over mixing vigorously, which can trap excess air leading to unwanted fissures during baking.
- Bake until fragrant and edges of crust look dry, edges of filling are set, and center jiggles slightly, 20 to 25 minutes. Let cool completely in pan on a wire rack. Loosely cover and refrigerate until cold, at least 4 hours, or up to overnight.: As the tart bakes the filling will puff slightly and the oven will fill with a warm citrus and vanilla aroma. The visual cues are crucial, watch for dry crust edges and a custard that is gently set with a central wobble. Cooling on a wire rack prevents condensation from forming beneath the pan, and refrigerating gives the custard time to firm for clean slicing. A common misstep is removing the tart too early, which leads to a runny center; be patient and allow the full chill time.
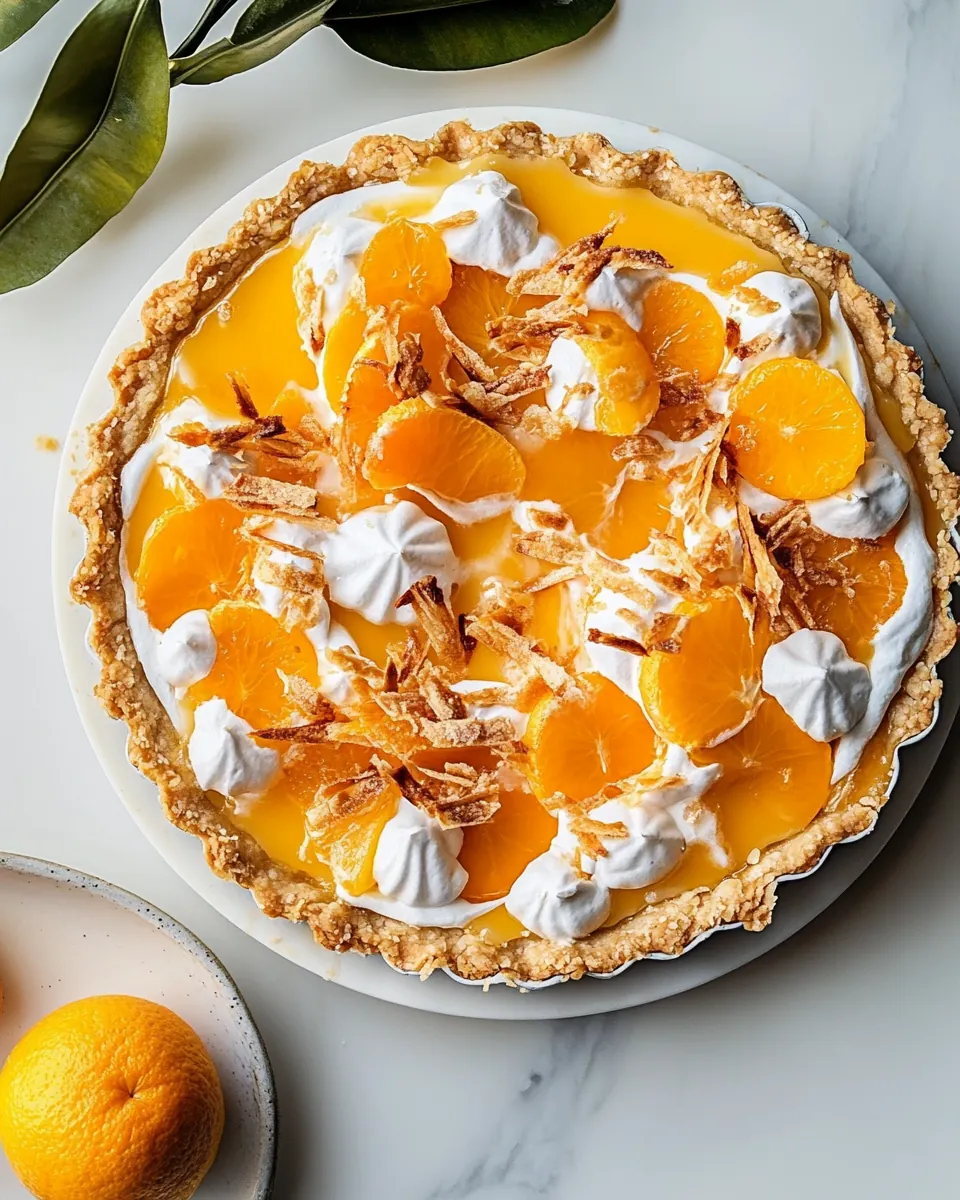
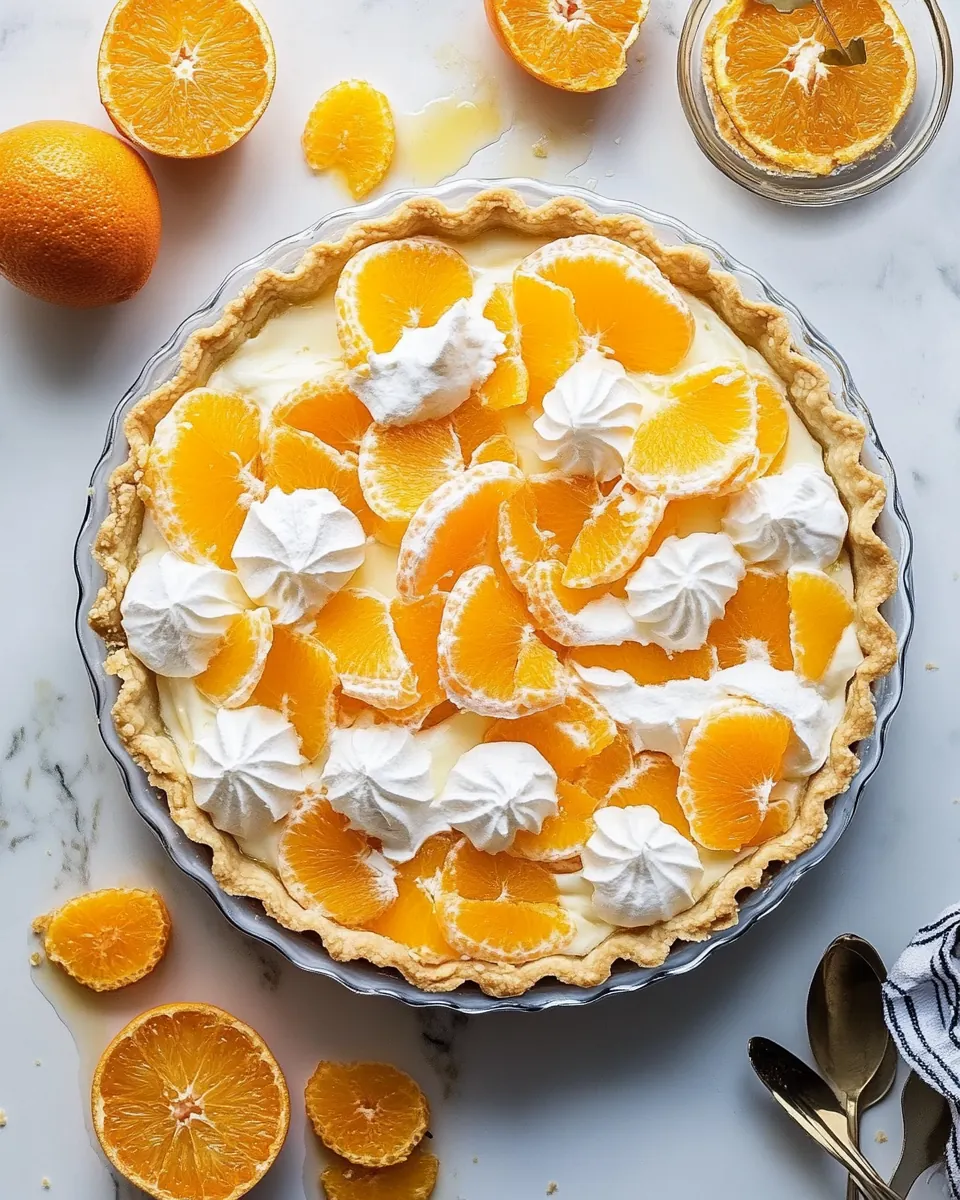
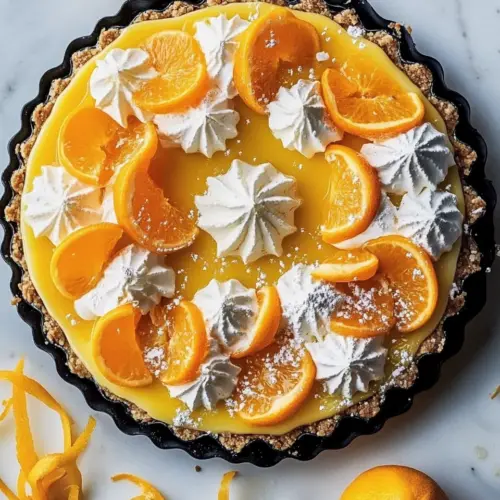
- Just before serving, remove from pan, and top with whipped cream. Garnish with Candied Satsuma Peels, if desired.: When you release the tart from the removable bottom the crust should hold its shape and the cross section will show defined layers, which is always rewarding. Adding sweetened whipped cream softens the citrus brightness and adds lightness, while the Candied Satsuma Peels create a shiny, textural accent. A final tip is to slice with a warm, wiped knife for tidy pieces. Avoid storing the tart at room temperature for long periods once topped, as the cream will soften quickly.
How to Switch It Up
If you want to vary presentation or texture, there are straightforward ways to tweak the tart. Small adjustments can highlight different flavor notes or make the dessert easier to slice and serve. Below I share practical ideas that maintain the core character while giving you options for creativity.
- Swap the cookie base: Try a different dark chocolate cookie to change the intensity of the crust, but keep the crumb texture similar to maintain structure.
- Adjust citrus intensity: Add more or less satsuma zest to emphasize aroma without shifting the balance of the custard.
- Whipped cream variations: Fold in a small splash of satsuma juice into the whipped cream for a faint citrus note that ties the garnish to the filling.
- Make-ahead planning: Bake the crust and prepare the marmalade a day ahead so building the tart on the day of serving is quick and calm.
- Garnish choices: Use finely grated satsuma zest alongside candied peels for a delicate, fragrant finish if you prefer less chew.
How to Serve Satsuma Cream Tart
This tart works beautifully as a celebratory dessert or an elegant finish to a seasonal dinner. Think about temperature, accompaniments, and timing to make the serving moment feel effortless and special. The following ideas cover settings, pairings, and storage, so you can present the tart with confidence.
- Serve chilled: Present the tart cold directly from the refrigerator for the cleanest slices and the best texture contrast between crust and filling.
- Portioning: Use a warm, dry knife wiped between cuts to create smooth edges and uniform slices for a refined look.
- Accompaniments: Pair with a small dollop of sweetened whipped cream and a candied peel to echo the flavors and textures of the tart.
- Occasions: Ideal for winter gatherings, holiday dinners, or anytime you want a bright dessert that feels seasonal and festive.
- Storage: Keep the tart loosely covered in the refrigerator for up to two days, but add whipped cream only before serving to preserve texture.
- Presentation tips: Garnish each slice with a thin strip of candied peel laid gently across the cream for an elegant finish.
- Make-ahead strategy: Complete the tart the day before, refrigerate overnight, and add final garnishes just before guests arrive to save time.
FAQ
Conclusion
This tart stands out for its bright citrus character balanced against a rich chocolate crumb crust, making it a memorable dessert without being fussy. Try making it for a winter dinner or a holiday gathering, and you will likely find it becomes a requested repeat. The straightforward steps and make ahead friendly nature mean you can focus on company rather than last minute prep, and the final slices feel both festive and comforting.
Satsuma Cream Tart
Equipment
- Medium Bowl
- Small Bowl
- Fluted removable bottom tart pan
- Offset Spatula
- Wire Rack
Ingredients
- Crust: Provide a clear section header indicating the start of the crust components and organizing the recipe for readers to follow; set expectations for assembly steps that follow.
- 2 cups (224 grams) chocolate sandwich cookie crumbs (see Note) Form a crunchy, chocolatey base when finely crushed and combined with butter, providing structure, texture, and rich cocoa flavor to contrast the tart filling.
- 3 tablespoons (36 grams) granulated sugar Add subtle sweetness and help bind the cookie crumbs together while balancing the tartness of the satsuma filling for a well-rounded crust flavor.
- 1/4 teaspoon kosher salt Enhance and intensify the flavors by balancing sweetness, rounding out the chocolate notes, and strengthening the overall seasoning of the crust.
- 1/4 cup (57 grams) unsalted butter, melted and cooled Moisten the crumb mixture so it holds its shape once pressed into the tart pan; contribute a rich mouthfeel and deepen the crust’s flavor profile.
- 1 large egg yolk (19 grams) Enrich the crust with fat and act as a light binder to help set the crumb mixture during baking, yielding a tender yet cohesive base.
- Filling: Introduce a new section heading to separate the filling components from the crust and guide readers through recipe stages and timing.
- 3/4 cup (225 grams) Satsuma Marmalade (recipe follows) Provide concentrated satsuma flavor and sweetness that forms the primary citrus element of the filling, contributing both fruitiness and texture.
- 3/4 cup (232 grams) sweetened condensed milk Contribute creaminess, thick sweetness, and body to the filling, helping it set while adding a caramel-like depth that complements the satsumas.
- 2 tablespoons (6 grams) satsuma zest Infuse intense citrus aroma and bright, bitter orange oil that elevates the filling’s fragrance and adds complex flavor notes.
- 3 tablespoons (45 grams) fresh satsuma juice Deliver fresh acidity and juice to brighten the filling, balance sweetness, and help create the correct consistency once combined and cooked.
- 3 large egg yolks (56 grams), room temperature Thicken and enrich the filling while adding silkiness and richness; egg yolks also help stabilize and set the custard-like texture.
- 2 teaspoons (6 grams) vanilla extract Enhance and deepen the flavor profile with warm vanilla notes, complementing the citrus and sweetened condensed milk for a rounded filling.
- 1/4 teaspoon kosher salt Provide saline balance to the sweet and acidic elements of the filling, enhancing overall flavor clarity and preventing cloying sweetness.
- Sweetened whipped cream, to serve Offer a light, airy counterpoint when dolloped on the finished tart; sweetened whipped cream adds creaminess and visual contrast.
- Garnish: Candied Satsuma Peels (recipe follows) Supply a bright, glossy garnish with concentrated candied peel pieces that add chew, bitterness, and a decorative finish to the tart.
Instructions
- Preheat oven to 350°F (180°C). Spray a 13 1/2 x 4 1/4-inch fluted removable-bottom tart pan with baking spray with flour.: As the oven warms you will notice a faint, dry heat that readies the air for baking, and this initial heat helps the crust crisp rather than steam. Preheating ensures even browning during the short bake, which is vital for the chocolate crumb shell to develop aroma and structure. A common mistake is skipping pan prep, which can make removing the tart difficult, so take a moment to spray and dust the pan thoroughly. If your oven runs hot or cool, use an oven thermometer to confirm the temperature to avoid under or over baking.
- For crust: In a medium bowl, stir together cookie crumbs, sugar, and salt.: In a medium bowl, stir together cookie crumbs, sugar, and salt. : When you combine the cookie crumbs , granulated sugar , and kosher salt , you should hear a soft, dry rustle as the crumbs move, and the mixture will look uniformly dark and sandy. This step is about even distribution so every bite has balance. A dusty mix can indicate that the crumbs are too fine, which is fine, but you must press them firmly later to form a solid base. Avoid skipping the salt, because it wakes up the chocolate notes and prevents the filling from tasting flat.
- In a small bowl, whisk together melted butter and egg yolk. Stir butter mixture into cookie crumb mixture until well combined. Press mixture into bottom and up sides of prepared pan.: The glossy melted unsalted butter blended with the egg yolk will create a slightly wet, crumbly paste. As you press it into the pan you will feel the crumbs compact and hold together; this tactile feedback tells you the crust is properly packed. Press firmly along the sides to create an even wall for the filling. If you press too lightly the crust may crumble when sliced, so take your time to form a compact, even layer.
- Bake until fragrant, 15 to 20 minutes. Let cool for 30 minutes. Leave oven on.: During baking the kitchen fills with a toasty chocolate aroma and the crust will slightly firm, giving off a gentle crackle at the edges when done. Cooling for 30 minutes stabilizes the structure so the marmalade and custard do not seep into warm crumbs. A typical misstep is not allowing sufficient cooldown, which can lead to a soggy boundary between crust and filling, so resist the urge to fill while warm.
- For filling: Using a small offset spatula, spread Satsuma Marmalade in bottom of cooled prepared crust; freeze until cold, 10 to 15 minutes.: Using a small offset spatula, spread Satsuma Marmalade in bottom of cooled prepared crust; freeze until cold, 10 to 15 minutes. : Spreading the Satsuma Marmalade produces a glossy, sticky layer that gleams under the light. Freezing briefly firms the marmalade, creating a protective barrier that prevents the custard from seeping into the crust. If you skip the chilling, the custard may blur into the crumbs, losing the clean layers that make slicing neat and attractive. Watch for a slightly tacky surface before proceeding, this indicates readiness.
- In a large bowl, whisk together condensed milk, satsuma zest and juice, egg yolks, vanilla, and salt until well combined. Spread onto marmalade in prepared crust. Using a wooden pick, pop any air bubbles on surface.: As you whisk the sweetened condensed milk , satsuma zest , satsuma juice , and egg yolks , the mixture will thicken and develop a glossy sheen, releasing a fragrant citrus perfume. Pouring it over the chilled marmalade creates a layered effect; the filling should sit cleanly atop the marmalade. Running a wooden pick across the top to pop bubbles prevents tiny holes in the finished custard. One error to avoid is under mixing, which can leave streaks, or over mixing vigorously, which can trap excess air leading to unwanted fissures during baking.
- Bake until fragrant and edges of crust look dry, edges of filling are set, and center jiggles slightly, 20 to 25 minutes. Let cool completely in pan on a wire rack. Loosely cover and refrigerate until cold, at least 4 hours, or up to overnight.: As the tart bakes the filling will puff slightly and the oven will fill with a warm citrus and vanilla aroma. The visual cues are crucial, watch for dry crust edges and a custard that is gently set with a central wobble. Cooling on a wire rack prevents condensation from forming beneath the pan, and refrigerating gives the custard time to firm for clean slicing. A common misstep is removing the tart too early, which leads to a runny center; be patient and allow the full chill time.
- Just before serving, remove from pan, and top with whipped cream. Garnish with Candied Satsuma Peels, if desired.: When you release the tart from the removable bottom the crust should hold its shape and the cross section will show defined layers, which is always rewarding. Adding sweetened whipped cream softens the citrus brightness and adds lightness, while the Candied Satsuma Peels create a shiny, textural accent. A final tip is to slice with a warm, wiped knife for tidy pieces. Avoid storing the tart at room temperature for long periods once topped, as the cream will soften quickly.
Notes
- Swap the cookie base: Try a different dark chocolate cookie to change the intensity of the crust, but keep the crumb texture similar to maintain structure.
- Adjust citrus intensity: Add more or less satsuma zest to emphasize aroma without shifting the balance of the custard.
- Whipped cream variations: Fold in a small splash of satsuma juice into the whipped cream for a faint citrus note that ties the garnish to the filling.
- Make-ahead planning: Bake the crust and prepare the marmalade a day ahead so building the tart on the day of serving is quick and calm.
- Garnish choices: Use finely grated satsuma zest alongside candied peels for a delicate, fragrant finish if you prefer less chew.