Pecan Praline Mini Cheesecakes
Pecan Praline Mini Cheesecakes arrived at my kitchen counter one chilly afternoon when I was craving a tiny, indulgent dessert that still felt special enough for guests. I remember unwrapping a box of vanilla wafers and a bag of pecans with the kind of impatience that makes small tasks feel like a ceremony, and by the time the praline paste was glossy and warm, the whole house smelled like toasted sugar and toasted nuts. I love how small treats can carry big memories, and these little cheesecakes do exactly that for me.
When I developed this version of Pecan Praline Mini Cheesecakes, I wanted handheld desserts that balance a crisp, buttery crust with a smooth, creamy filling and a crunchy, caramelized top. There is a comfort to stirring softened cream cheese until it is silk smooth, and a thrill to the moment you pour molten caramel over pecan halves and hear the sugar sizzle and snap as it cools. Over the years I have served these at holiday get togethers, and each time someone asks for the recipe I find myself telling the story of the very first batch I made for Thanksgiving.
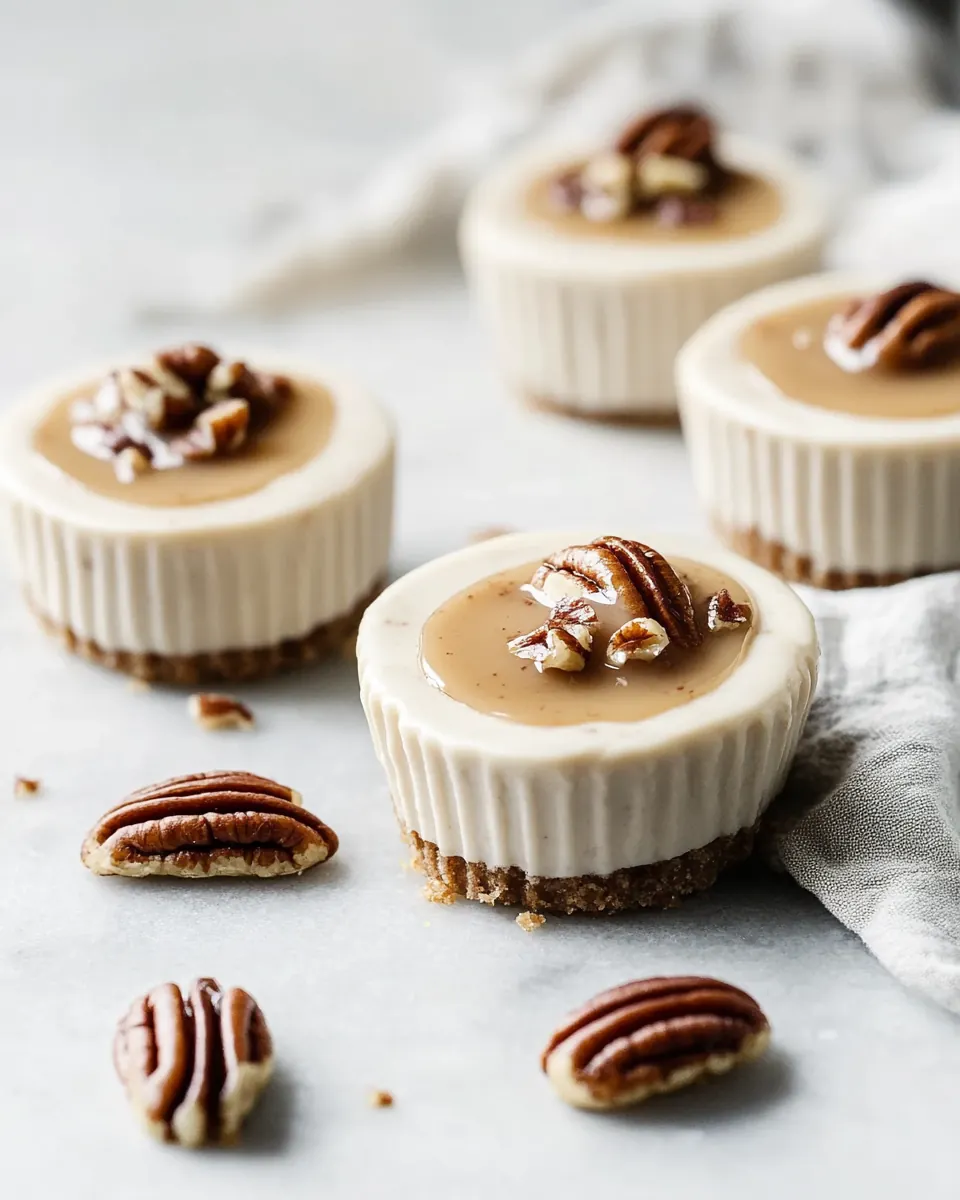
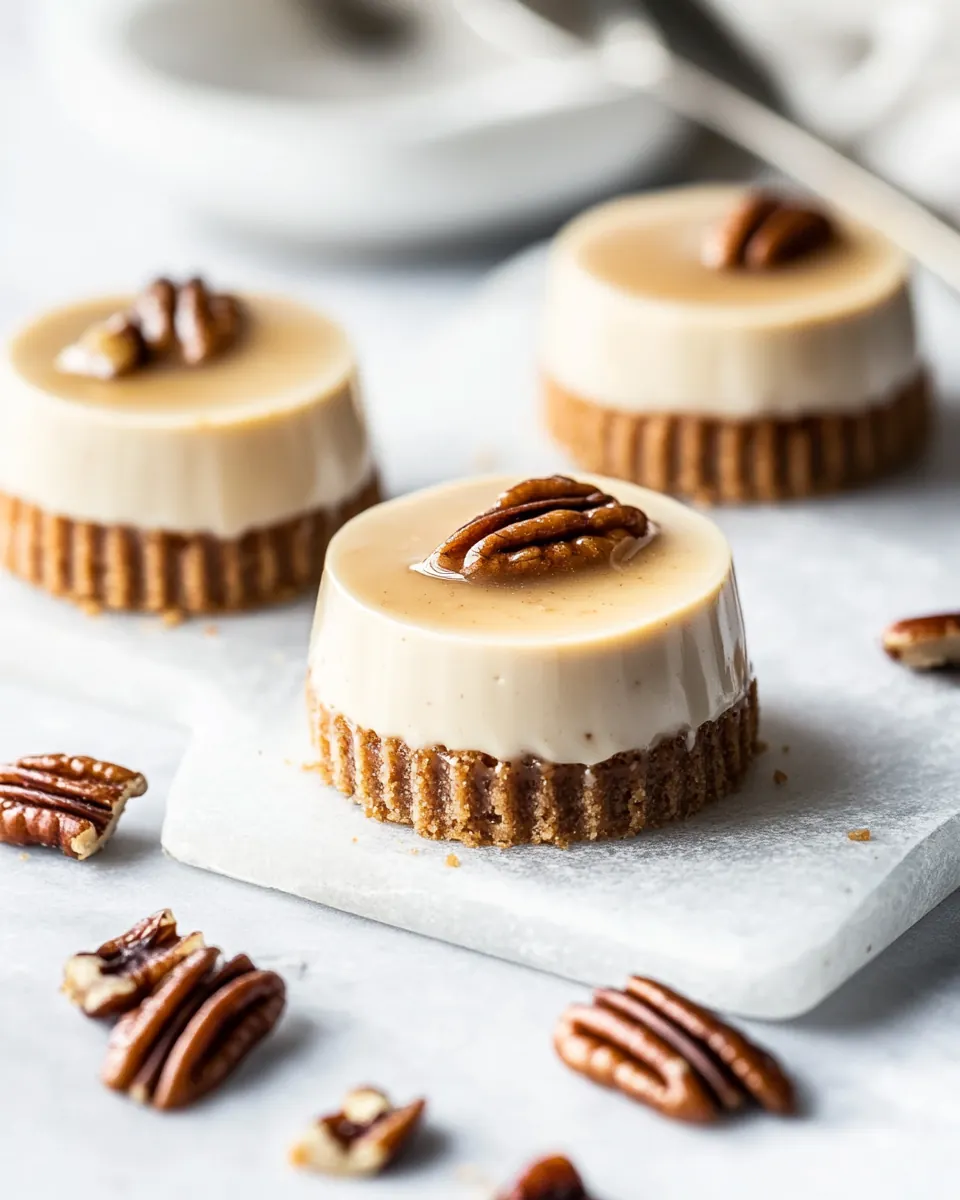
What makes me return to this recipe is the interplay of textures and the way simple techniques elevate humble ingredients. The crust is a tiny, buttery foundation that keeps each bite tidy. The filling is rich and slightly tangy, and the praline swirl gives a warm, toasty note that cuts through the richness. When you top each mini cheesecake with a glossy white chocolate and praline glaze, it feels almost ceremonial, even if you are just enjoying one with a late afternoon coffee. I hope my notes and steps help you feel confident making these, whether it is for a holiday table, a dinner party, or a quiet weekend treat.
Recipe Snapshot
50 mins
20 mins
30 mins
Hard
250 kcal
American
Gluten-Free, Low FODMAP
Desserts
Baking sheet, Silicone baking mat, Heavyweight saucepan, Pastry brush, Zip top bag, Rolling pin, High powered blender or food processor, Muffin tins, Paper cupcake liners, Flat bottomed juice glass or tart tamper, Food processor or stand mixer, Mixing bowls, Toothpick, Wire rack
The Beauty of This Pecan Praline Mini Cheesecakes
Small but Memorable
I adore how Pecan Praline Mini Cheesecakes deliver maximum impact in a tiny format. They are perfect for when you want to offer a dessert that feels special without committing to a whole cake. I find the portion size encourages sharing, and guests often comment on how elegant they look on the plate.
Texture Play
The contrast between the crunchy, nut forward crust and the silky cream cheese filling is what hooked me. I like the way each mouthful moves from crisp to creamy to sticky praline, creating a satisfying progression. This balance makes the dessert interesting from the first bite to the last.
Make Ahead Friendly
One reason I reach for this recipe for gatherings is its make ahead nature. You can prepare the cheesecakes and refrigerate them up to two days in advance, which saves stress on the day you host. I usually finish them with glaze an hour before serving so the tops have a perfect sheen.
Deep, Toasted Flavor
The homemade praline paste provides a deep, toasted pecan flavor that you just cannot replicate with store bought toppings. I love that you get real caramel notes, and the process of caramelizing sugar and nuts fills the kitchen with a warm aroma that sets a cozy tone for any meal.
Customizable Sweetness
These mini cheesecakes are forgiving when it comes to sweetness levels. I often adjust the amount of praline in the swirl or the white chocolate in the glaze depending on how sweet I want the final bite. That flexibility makes the recipe useful for different palates and occasions.
What Goes Into Pecan Praline Mini Cheesecakes
These ingredients are chosen to work in harmony. The crumbs form a sturdy, buttery base, while the cream cheese filling gives a rich, tangy center. The praline paste, made from caramelized pecan halves, ties the whole dessert together with toasted, caramel notes. Every component has a role, and together they create a layered bite where texture and flavor complement each other.
- 1 cup granulated sugar: Sweeten and caramelize when heated, providing the base for a praline sauce and adding deep, crystalline sweetness to the topping and filling preparation.
- 2 tablespoons filtered water: Dilute and help dissolve sugar evenly, ensuring a smooth caramel texture while preventing premature crystallization during syrup formation.
- 1 teaspoon corn syrup: Aid in preventing crystallization and add a subtle gloss to the caramel, contributing to a silky, stable praline coating for the pecans.
- 2 cups (8 ounces) pecan halves or pieces: Provide toasted, nutty flavor and crunchy texture to the praline and garnish; can be chopped or left whole depending on desired bite and presentation.
- 4 ounces vanilla wafer cookies: Form a buttery, slightly sweet crumb base when crushed and combined with butter, supplying structure and a classic shortbread-like contrast to the creamy filling.
- 1/4 cup (1 ounce) pecan halves or pieces: Add additional nutty flavor and crunchy texture for finishing or incorporation into the praline mixture; used in smaller quantity for accent or garnish.
- 2 tablespoons unsalted butter: Bind crushed cookies into a cohesive crust and add richness; melted butter helps the crust set firmly and brown slightly when baked or chilled.
- 8 ounces full fat cream cheese, at room temperature: Create the rich, tangy, creamy body of the cheesecake; at room temperature it blends smoothly with sugar and eggs to produce a silky filling.
- 1/4 cup packed light brown sugar: Impart molasses-like sweetness and subtle caramel notes that complement the pecans and deepen the overall flavor of the filling or praline layer.
- 2 tablespoons heavy cream: Loosen the filling slightly for a smoother texture and add a touch of richness; heavy cream also helps create a velvety mouthfeel in the cheesecake.
- 2 teaspoons all-purpose flour: Stabilize and slightly thicken the filling, improving structure and preventing cracking while helping the mixture hold together during baking.
- 1 teaspoon vanilla extract: Enhance overall flavor with warm, sweet vanilla aromatics, rounding out the dairy richness and complementing the praline and pecan elements.
- 1/8 teaspoon kosher salt: Balance sweetness with a hint of savory and enhance other flavors; salt brightens the dessert and brings depth to the praline and filling.
- 1 large egg, at room temperature: Emulsify and set the filling, providing structure and lift; a room–temperature egg blends smoothly and helps the cheesecake firm up when baked.
- 3 tablespoons (2 1/4 ounces) praline paste: Introduce concentrated caramelized pecan flavor and smooth texture, intensifying the praline profile when swirled into the filling or used between layers.
- 3 ounces good quality white chocolate, finely chopped: Contribute creamy sweetness and a velvety melt with subtle cocoa butter notes that elevate the praline and add richness to the final topping.
- 3 tablespoons (2 1/4 ounces) praline paste: Reinforce praline flavor and texture with additional paste for layering or drizzling, enhancing nutty sweetness and creating depth in the dessert.
- 10 candied pecan halves, for garnish: Garnish and decorate with a glossy, candied finish that signals the praline theme while adding a crisp, sweet pecan accent to each mini cheesecake.
The Method for Pecan Praline Mini Cheesecakes
I approach this recipe with a relaxed focus, because timing and sensory cues matter more than rigid schedules. Work in stages: make the praline paste first, then the crusts, then the filling, and finally the glaze and assembly. Take moments to notice the aroma of caramel and the gloss of melted white chocolate so you know you are on the right track.
- To make praline paste, first spread pecans in a single layer on a baking sheet lined with a silicone baking mat. Set aside.: You will smell the faint toasty note of raw pecan as they warm slightly on the sheet, and arranging them in a single layer ensures even contact when the hot caramel arrives. This step prevents steaming and keeps the nuts crisp once coated, which is important because soft nuts will yield a muddied paste. One common mistake here is crowding the pan, which can lead to uneven caramel coverage, so leave space between pieces when you can.
- Pour water and corn syrup into a small, heavyweight saucepan set over medium heat. Add sugar and gently stir with a spoon until sugar is completely dissolved (try not to splash any sugar crystals up on the sides of the pan if you can). Brush down the sides of the pan with a pastry brush and water to remove any stray sugar crystals.: As the mixture warms, you will see it go from cloudy to clear, then begin to bubble steadily. The surface will steam gently, and keeping stray crystals off the sides prevents sudden recrystallization, which can ruin the caramel. If your sugar starts to crystallize on the sides, careful brushing will save the batch; avoid vigorous stirring once boiling starts, or the sugar can seize.
- Once sugar is dissolved and begins to boil, stop stirring. Continue to let the sugar boil until it becomes rich amber in color. You can gently swirl the pan if necessary to ensure the sugar caramelizes evenly, just don’t stir it after it starts bubbling.: Watch the color closely, because caramel can move from golden to burnt very quickly. You will notice a deep, toasty aroma as it reaches amber, and that smell is the signal it is almost ready. A frequent error is waiting too long, which will give a bitter taste, so remove from heat as soon as you hit that warm amber tone.
- Immediately (and carefully!) pour hot caramelized sugar over top of pecans on baking sheet. Let cool completely, at least 1 hour.: When the molten caramel hits the nuts you will hear a light crackle and see glossy sugar wrapping the pecan surfaces. Cooling solidifies the coating, so be patient and avoid touching until cooled. Don’t try to speed cooling too quickly, because the caramel can become sticky and unset if disturbed.
- Break up caramelized nuts into large pieces. Place in a zip top bag. Wrap with a kitchen towel and bang it a few times with a rolling pin or meat pounder until broken up into chunks.: The sound will be satisfying as the brittle shatters into uneven chunks, which is what you want for easier processing. Large pieces minimize dust in your processor and make it straightforward to transform into paste. Avoid over smashing into powder at this stage, which can make the processing take longer and generate heat.
- Transfer broken up pieces to a high-powered blender or food processor. Start on reasonably low speed and work your way up, until the caramelized nuts transform into a smooth butter. This might take a while, just be patient with it. Scrape down the sides of the container as needed to ensure everything is mixed smoothly. Transfer to a bowl and set aside. Praline paste will keep in an airtight container at room temperature for up to 1 week.: As the blades work, you will first get crumbs, then a gritty paste, and finally a glossy, spreadable paste as natural oils release. The smell will be intensely nutty and caramelized. A common pitfall is running the machine at too high a speed immediately, which can overheat the paste and make it grainy, so pulse and increase speed gradually while scraping often.
- Preheat oven to 350 degrees F.: You will feel warmth from the oven as it comes to temperature, and preheating ensures the crusts set quickly without becoming soggy. Reliable oven temperature is important, because underheated ovens lead to uneven baking. A frequent oversight is skipping preheat, which can lengthen bake times and affect texture.
- To make the crusts, grind up cookies and pecans in a food processor until finely ground. Drizzle in butter and pulse until evenly moistened. Press into muffin tins lined with paper cupcake liners. You’ll want about 1 tablespoon of crumbs for each standard-sized muffin cup. Use a flat-bottomed juice glass or tart tamper to press the crumbs firmly in an even layer.: You should smell buttery cookie and warm pecan as you pulse. The crumbs should hold when pressed and form a tidy, compact base. Pressing firmly helps the crust hold together after baking and while you fill the cups. A common mistake is using too little butter, which yields dry, crumbly crusts that fall apart when you try to remove the liners.
- Bake crusts for 4 to 6 minutes or until set and edges are barely starting to brown. Remove from oven and let cool completely while you prepare the filling.: The brief bake firms the crust and toasts the nuts slightly, releasing a deeper aroma. Watch for the edges to take a hint of color without burning. If you leave them in too long, the crumbs can become overly crisp and hard, so time this short bake carefully.
- For cheesecake filling, combine softened cream cheese, brown sugar, cream, flour, vanilla and salt in a food processor or stand mixer. Mix until completely smooth, scraping down the sides of the bowl as necessary.: As the mixture turns silky, it will emit a creamy, sweet scent. Smoothness matters because lumps can create an uneven set and detract from the mouthfeel. Over mixing at high speed can incorporate too much air and cause cracking, so stop once perfectly smooth and scrape the bowl clean.
- Transfer to a mixing bowl. Add egg and whisk by hand until completely incorporated.: Whisking by hand keeps the mixture denser and creamier, reducing air bubbles that could cause the minis to puff and sink. The batter should become homogeneous and slightly glossy. A common error is overwhipping, which can create tunnels and a less tender texture.
- Spoon out 1/4 cup of batter into a small bowl. Add 3 tablespoons praline paste and stir until smooth. You’ll use this to make the swirl filling.: The swirl mixture will be richly aromatic and darker than the plain batter, signaling concentrated praline flavor. Mixing thoroughly ensures even color and distribution. Forgetting to reserve batter or mixing unevenly can result in blobs rather than pretty swirls when baked.
- Fill each muffin cup with about 3 tablespoons of batter, filling no more than 2/3 full. You should have enough for about 10 cups. Reserve a little bit of the plain batter for the swirl.: Fill slowly so the cups remain tidy. The cups should feel substantial but not overfilled, leaving room for a slight rise. Overfilling leads to spillover or misshapen tops, so measure carefully for uniform results.
- Drop a few dollops of praline batter onto top of each cheesecake, then another dollop or so of plain batter. Use a toothpick in a figure-8 pattern to gently swirl the two colors together.: As you swirl, watch the marbling form; the goal is an elegant, subtle pattern rather than full mixing. The motion should be delicate to maintain texture contrast. Be cautious not to over swirl, which can blend the flavors completely and lose the visual appeal.
- Bake cheesecakes for 15 to 17 minutes or until edges are set and center still jiggles ever so slightly. Turn off the oven and crack the oven door; let cheesecakes cool in the oven for 30 minutes, then remove and place pan on a wire rack to cool completely. (At this point cheesecakes can be glazed or also refrigerated overnight if desired).: You will notice a gently puffed edge and a center that trembles faintly, the classic cue of a perfectly set cheesecake. Cooling slowly prevents cracks and helps texture develop. A typical mistake is removing them too quickly, which can cause centers to collapse or tops to crack.
- For topping, gently melt white chocolate and 3 tablespoons praline paste. You can do this in the microwave, heating in 15 second intervals at 50% power (stirring between each interval), or on the stovetop over low heat (keep the pan on the burner for a minute or two, then remove it for a minute or two. You just need barely enough heat to melt the white chocolate and nothing more), or in a chocolate melting pot on the ‘warm’ setting.: The melted glaze should be glossy and pourable, with a fragrant, sweet aroma. Heat slowly to avoid seizing the white chocolate , which is sensitive to high temperatures. Overheating is the most common issue here, so use low heat and brief intervals.
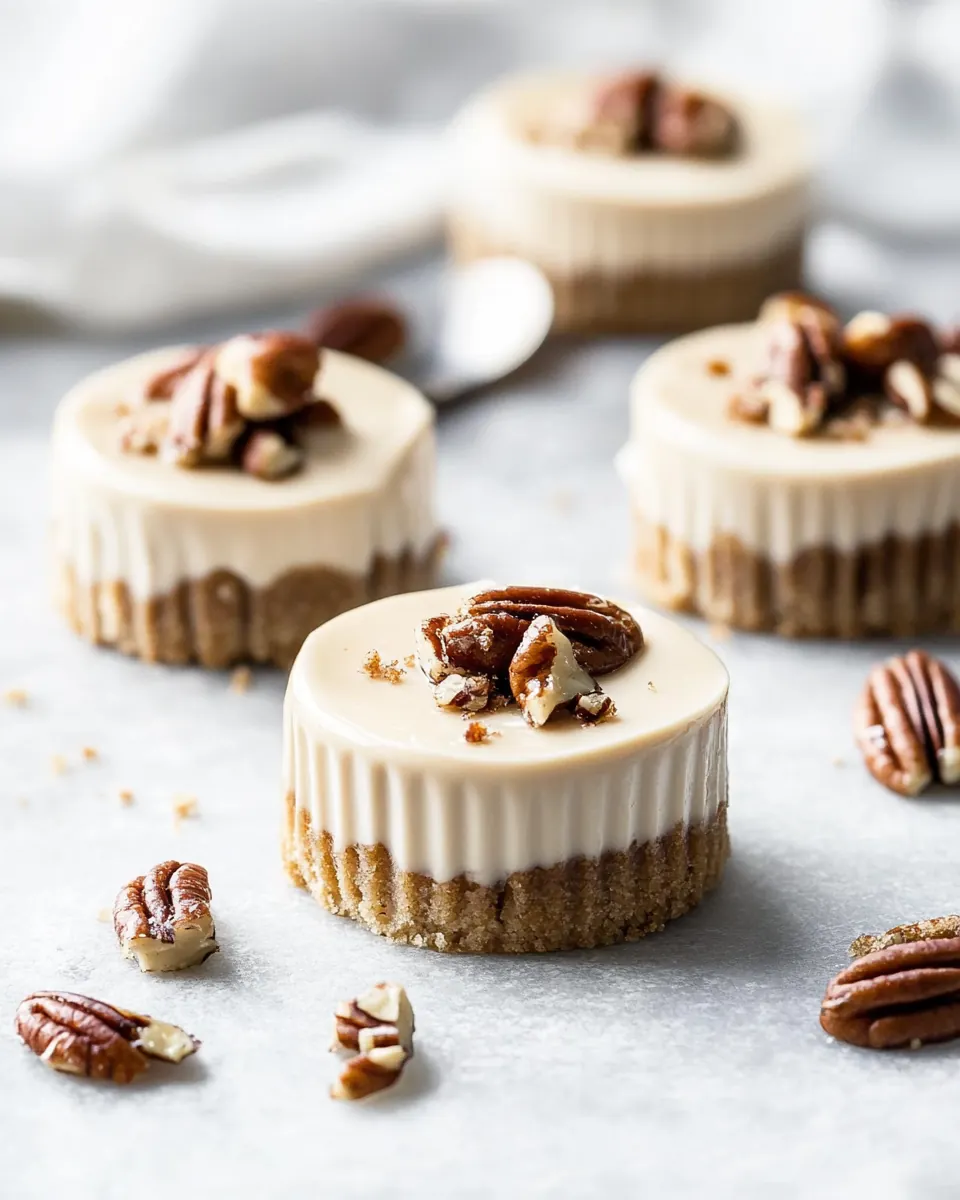
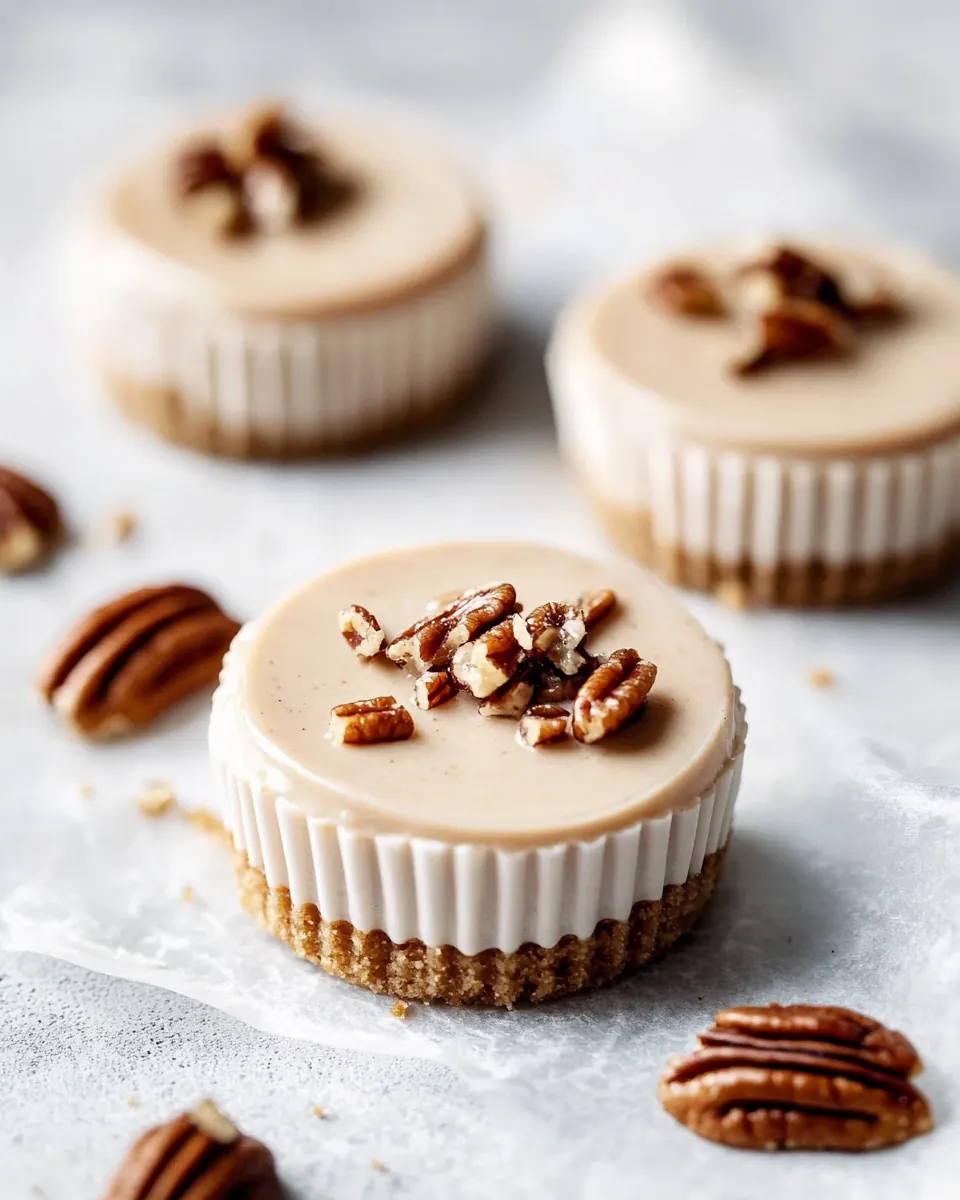
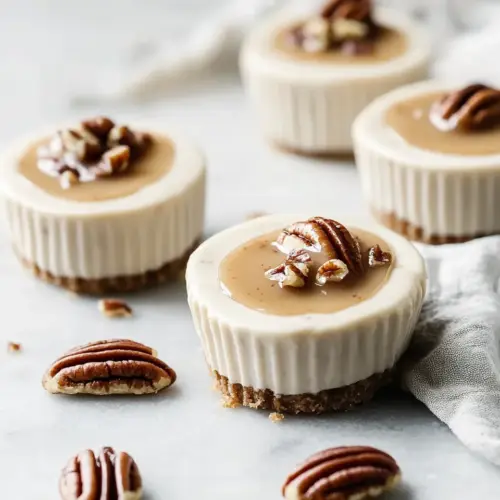
- Once topping is melted and smooth, spoon about 1 tablespoon onto the top of each cooled cheesecake, jiggling the spoon on the surface of the glaze to spread it out to the edges. Top each cheesecake with a candied pecan.: As you spoon, the glaze will spread into a shiny cap that frames the candied pecan . The contrast of soft filling and crisp garnish is delightful. If your glaze is too thick, thin it with a touch more warm cream; too thin glaze may run off, so adjust cautiously.
- Refrigerate for at least 1 hour or until glaze is firmly set. Cheesecakes can be made up to 2 days ahead of time and refrigerated until ready to eat; let come to room temperature for 20 minutes before serving.: Chilling firms the glaze and allows flavors to meld, and you will notice the texture tighten slightly when they are ready. Letting them rest at room temperature loosens the filling to its ideal creamy state. A common slip is serving them too cold, which can mute flavors, so plan for that brief rest before plating.
Ways to Adapt This Recipe
There are simple ways to adapt Pecan Praline Mini Cheesecakes without changing what makes them special. Small swaps and timing adjustments let you tailor texture and sweetness to your taste. Below are practical ideas I use and recommend.
- Swap cookie base sparingly: If you prefer a different crumb, choose a mild cookie similar in sweetness to the vanilla wafers to preserve balance, and press the crumbs firmly so the crust still holds.
- Adjust praline intensity: Stir a touch less praline paste into the swirl if you want a subtler nutty note, or increase it for a more pronounced toasted pecan flavor, tasting a small spoonful before adding to the batter.
- Make the paste ahead: Praline paste stores well for up to a week at room temperature, so you can prepare it in advance and save time on baking day while keeping fresh flavor.
- Glaze technique: If your glaze seems too thick, warm it gently and stir in a teaspoon of heavy cream at a time until pourable, then spoon onto cooled cheesecakes for a glossy finish.
- Serving temperature: Chill the cheesecakes thoroughly for firm slices, but pull them out for about 20 minutes before serving so the flavors and textures open up to their full potential.
- Uniform portions: Use a small cookie scoop for batter to ensure each cup receives equal amounts, which promotes even baking and consistent presentation.
Best Served With
Serving these little sweets is part of the pleasure. I like to pair Pecan Praline Mini Cheesecakes with simple elements that complement the toasted sugar and nut flavors. Think bright, fresh accompaniments or warm beverages to match the cozy profile.
- Light coffee or espresso: A small cup of coffee cuts through the sweetness and complements the caramelized notes, making for a classic pairing during a holiday brunch or after dinner.
- Whipped cream on the side: A dollop of unsweetened or lightly sweetened whipped cream offers a cool, airy contrast to the dense filling and sticky praline topping.
- Fresh berries: A few tart berries on the plate add acidity and a pop of color, which balances the richness and makes the dessert feel brighter for spring or summer gatherings.
- Holiday dessert platter: These minis work beautifully on a Thanksgiving or holiday dessert board, arranged with nuts and small cookies for a shareable display that looks festive and refined.
- Make ahead storage: Store the cheesecakes in an airtight container in the refrigerator for up to two days, layering separated with parchment to protect the glaze, and allow 20 minutes at room temperature before serving for best texture.
- Seasonal presentation: In the fall, garnish with a cinnamon dusting or place on a platter with autumn leaves for a cozy presentation that highlights the warm flavor profile.
FAQ
Conclusion
These Pecan Praline Mini Cheesecakes stand out because they marry a crunchy, buttery crust with a silky cream cheese filling and a deeply flavored praline swirl, all in a perfect small package. I hope you give them a try; they are forgiving, impressive, and great for sharing at holidays or intimate gatherings. Let the praline paste deepen your appreciation for caramelized pecan flavor, and enjoy the satisfaction of serving something that looks as special as it tastes.
Pecan Praline Mini Cheesecakes
Equipment
- Baking Sheet
- Silicone Baking Mat
- Heavyweight saucepan
- Pastry Brush
- Zip-top Bag
- Rolling Pin
- High powered blender or food processor
- Muffin tins
- Paper cupcake liners
- Flat bottomed juice glass or tart tamper
- Food processor or stand mixer
- Mixing Bowls
- Toothpick
- Wire Rack
Ingredients
- 1 cup granulated sugar Sweeten and caramelize when heated, providing the base for a praline sauce and adding deep, crystalline sweetness to the topping and filling preparation.
- 2 tablespoons filtered water Dilute and help dissolve sugar evenly, ensuring a smooth caramel texture while preventing premature crystallization during syrup formation.
- 1 teaspoon corn syrup Aid in preventing crystallization and add a subtle gloss to the caramel, contributing to a silky, stable praline coating for the pecans.
- 2 cups (8 ounces) pecan halves or pieces Provide toasted, nutty flavor and crunchy texture to the praline and garnish; can be chopped or left whole depending on desired bite and presentation.
- 4 ounces vanilla wafer cookies Form a buttery, slightly sweet crumb base when crushed and combined with butter, supplying structure and a classic shortbread-like contrast to the creamy filling.
- 1/4 cup (1 ounce) pecan halves or pieces Add additional nutty flavor and crunchy texture for finishing or incorporation into the praline mixture; used in smaller quantity for accent or garnish.
- 2 tablespoons unsalted butter Bind crushed cookies into a cohesive crust and add richness; melted butter helps the crust set firmly and brown slightly when baked or chilled.
- 8 ounces full fat cream cheese, at room temperature Create the rich, tangy, creamy body of the cheesecake; at room temperature it blends smoothly with sugar and eggs to produce a silky filling.
- 1/4 cup packed light brown sugar Impart molasses-like sweetness and subtle caramel notes that complement the pecans and deepen the overall flavor of the filling or praline layer.
- 2 tablespoons heavy cream Loosen the filling slightly for a smoother texture and add a touch of richness; heavy cream also helps create a velvety mouthfeel in the cheesecake.
- 2 teaspoons all-purpose flour Stabilize and slightly thicken the filling, improving structure and preventing cracking while helping the mixture hold together during baking.
- 1 teaspoon vanilla extract Enhance overall flavor with warm, sweet vanilla aromatics, rounding out the dairy richness and complementing the praline and pecan elements.
- 1/8 teaspoon kosher salt Balance sweetness with a hint of savory and enhance other flavors; salt brightens the dessert and brings depth to the praline and filling.
- 1 large egg, at room temperature Emulsify and set the filling, providing structure and lift; a room-temperature egg blends smoothly and helps the cheesecake firm up when baked.
- 3 tablespoons (2 1/4 ounces) praline paste Introduce concentrated caramelized pecan flavor and smooth texture, intensifying the praline profile when swirled into the filling or used between layers.
- 3 ounces good quality white chocolate, finely chopped Contribute creamy sweetness and a velvety melt with subtle cocoa butter notes that elevate the praline and add richness to the final topping.
- 3 tablespoons (2 1/4 ounces) praline paste Reinforce praline flavor and texture with additional paste for layering or drizzling, enhancing nutty sweetness and creating depth in the dessert.
- 10 candied pecan halves, for garnish Garnish and decorate with a glossy, candied finish that signals the praline theme while adding a crisp, sweet pecan accent to each mini cheesecake.
Instructions
- To make praline paste, first spread pecans in a single layer on a baking sheet lined with a silicone baking mat. Set aside.: You will smell the faint toasty note of raw pecan as they warm slightly on the sheet, and arranging them in a single layer ensures even contact when the hot caramel arrives. This step prevents steaming and keeps the nuts crisp once coated, which is important because soft nuts will yield a muddied paste. One common mistake here is crowding the pan, which can lead to uneven caramel coverage, so leave space between pieces when you can.
- Pour water and corn syrup into a small, heavyweight saucepan set over medium heat. Add sugar and gently stir with a spoon until sugar is completely dissolved (try not to splash any sugar crystals up on the sides of the pan if you can). Brush down the sides of the pan with a pastry brush and water to remove any stray sugar crystals.: As the mixture warms, you will see it go from cloudy to clear, then begin to bubble steadily. The surface will steam gently, and keeping stray crystals off the sides prevents sudden recrystallization, which can ruin the caramel. If your sugar starts to crystallize on the sides, careful brushing will save the batch; avoid vigorous stirring once boiling starts, or the sugar can seize.
- Once sugar is dissolved and begins to boil, stop stirring. Continue to let the sugar boil until it becomes rich amber in color. You can gently swirl the pan if necessary to ensure the sugar caramelizes evenly, just don’t stir it after it starts bubbling.: Watch the color closely, because caramel can move from golden to burnt very quickly. You will notice a deep, toasty aroma as it reaches amber, and that smell is the signal it is almost ready. A frequent error is waiting too long, which will give a bitter taste, so remove from heat as soon as you hit that warm amber tone.
- Immediately (and carefully!) pour hot caramelized sugar over top of pecans on baking sheet. Let cool completely, at least 1 hour.: When the molten caramel hits the nuts you will hear a light crackle and see glossy sugar wrapping the pecan surfaces. Cooling solidifies the coating, so be patient and avoid touching until cooled. Don’t try to speed cooling too quickly, because the caramel can become sticky and unset if disturbed.
- Break up caramelized nuts into large pieces. Place in a zip top bag. Wrap with a kitchen towel and bang it a few times with a rolling pin or meat pounder until broken up into chunks.: The sound will be satisfying as the brittle shatters into uneven chunks, which is what you want for easier processing. Large pieces minimize dust in your processor and make it straightforward to transform into paste. Avoid over smashing into powder at this stage, which can make the processing take longer and generate heat.
- Transfer broken up pieces to a high-powered blender or food processor. Start on reasonably low speed and work your way up, until the caramelized nuts transform into a smooth butter. This might take a while, just be patient with it. Scrape down the sides of the container as needed to ensure everything is mixed smoothly. Transfer to a bowl and set aside. Praline paste will keep in an airtight container at room temperature for up to 1 week.: As the blades work, you will first get crumbs, then a gritty paste, and finally a glossy, spreadable paste as natural oils release. The smell will be intensely nutty and caramelized. A common pitfall is running the machine at too high a speed immediately, which can overheat the paste and make it grainy, so pulse and increase speed gradually while scraping often.
- Preheat oven to 350 degrees F.: You will feel warmth from the oven as it comes to temperature, and preheating ensures the crusts set quickly without becoming soggy. Reliable oven temperature is important, because underheated ovens lead to uneven baking. A frequent oversight is skipping preheat, which can lengthen bake times and affect texture.
- To make the crusts, grind up cookies and pecans in a food processor until finely ground. Drizzle in butter and pulse until evenly moistened. Press into muffin tins lined with paper cupcake liners. You’ll want about 1 tablespoon of crumbs for each standard-sized muffin cup. Use a flat-bottomed juice glass or tart tamper to press the crumbs firmly in an even layer.: You should smell buttery cookie and warm pecan as you pulse. The crumbs should hold when pressed and form a tidy, compact base. Pressing firmly helps the crust hold together after baking and while you fill the cups. A common mistake is using too little butter, which yields dry, crumbly crusts that fall apart when you try to remove the liners.
- Bake crusts for 4 to 6 minutes or until set and edges are barely starting to brown. Remove from oven and let cool completely while you prepare the filling.: The brief bake firms the crust and toasts the nuts slightly, releasing a deeper aroma. Watch for the edges to take a hint of color without burning. If you leave them in too long, the crumbs can become overly crisp and hard, so time this short bake carefully.
- For cheesecake filling, combine softened cream cheese, brown sugar, cream, flour, vanilla and salt in a food processor or stand mixer. Mix until completely smooth, scraping down the sides of the bowl as necessary.: As the mixture turns silky, it will emit a creamy, sweet scent. Smoothness matters because lumps can create an uneven set and detract from the mouthfeel. Over mixing at high speed can incorporate too much air and cause cracking, so stop once perfectly smooth and scrape the bowl clean.
- Transfer to a mixing bowl. Add egg and whisk by hand until completely incorporated.: Whisking by hand keeps the mixture denser and creamier, reducing air bubbles that could cause the minis to puff and sink. The batter should become homogeneous and slightly glossy. A common error is overwhipping, which can create tunnels and a less tender texture.
- Spoon out 1/4 cup of batter into a small bowl. Add 3 tablespoons praline paste and stir until smooth. You’ll use this to make the swirl filling.: The swirl mixture will be richly aromatic and darker than the plain batter, signaling concentrated praline flavor. Mixing thoroughly ensures even color and distribution. Forgetting to reserve batter or mixing unevenly can result in blobs rather than pretty swirls when baked.
- Fill each muffin cup with about 3 tablespoons of batter, filling no more than 2/3 full. You should have enough for about 10 cups. Reserve a little bit of the plain batter for the swirl.: Fill slowly so the cups remain tidy. The cups should feel substantial but not overfilled, leaving room for a slight rise. Overfilling leads to spillover or misshapen tops, so measure carefully for uniform results.
- Drop a few dollops of praline batter onto top of each cheesecake, then another dollop or so of plain batter. Use a toothpick in a figure-8 pattern to gently swirl the two colors together.: As you swirl, watch the marbling form; the goal is an elegant, subtle pattern rather than full mixing. The motion should be delicate to maintain texture contrast. Be cautious not to over swirl, which can blend the flavors completely and lose the visual appeal.
- Bake cheesecakes for 15 to 17 minutes or until edges are set and center still jiggles ever so slightly. Turn off the oven and crack the oven door; let cheesecakes cool in the oven for 30 minutes, then remove and place pan on a wire rack to cool completely. (At this point cheesecakes can be glazed or also refrigerated overnight if desired).: You will notice a gently puffed edge and a center that trembles faintly, the classic cue of a perfectly set cheesecake. Cooling slowly prevents cracks and helps texture develop. A typical mistake is removing them too quickly, which can cause centers to collapse or tops to crack.
- For topping, gently melt white chocolate and 3 tablespoons praline paste. You can do this in the microwave, heating in 15 second intervals at 50% power (stirring between each interval), or on the stovetop over low heat (keep the pan on the burner for a minute or two, then remove it for a minute or two. You just need barely enough heat to melt the white chocolate and nothing more), or in a chocolate melting pot on the ‘warm’ setting.: The melted glaze should be glossy and pourable, with a fragrant, sweet aroma. Heat slowly to avoid seizing the white chocolate , which is sensitive to high temperatures. Overheating is the most common issue here, so use low heat and brief intervals.
- Once topping is melted and smooth, spoon about 1 tablespoon onto the top of each cooled cheesecake, jiggling the spoon on the surface of the glaze to spread it out to the edges. Top each cheesecake with a candied pecan.: As you spoon, the glaze will spread into a shiny cap that frames the candied pecan . The contrast of soft filling and crisp garnish is delightful. If your glaze is too thick, thin it with a touch more warm cream; too thin glaze may run off, so adjust cautiously.
- Refrigerate for at least 1 hour or until glaze is firmly set. Cheesecakes can be made up to 2 days ahead of time and refrigerated until ready to eat; let come to room temperature for 20 minutes before serving.: Chilling firms the glaze and allows flavors to meld, and you will notice the texture tighten slightly when they are ready. Letting them rest at room temperature loosens the filling to its ideal creamy state. A common slip is serving them too cold, which can mute flavors, so plan for that brief rest before plating.
Notes
- Swap cookie base sparingly: If you prefer a different crumb, choose a mild cookie similar in sweetness to the vanilla wafers to preserve balance, and press the crumbs firmly so the crust still holds.
- Adjust praline intensity: Stir a touch less praline paste into the swirl if you want a subtler nutty note, or increase it for a more pronounced toasted pecan flavor, tasting a small spoonful before adding to the batter.
- Make the paste ahead: Praline paste stores well for up to a week at room temperature, so you can prepare it in advance and save time on baking day while keeping fresh flavor.
- Glaze technique: If your glaze seems too thick, warm it gently and stir in a teaspoon of heavy cream at a time until pourable, then spoon onto cooled cheesecakes for a glossy finish.
- Serving temperature: Chill the cheesecakes thoroughly for firm slices, but pull them out for about 20 minutes before serving so the flavors and textures open up to their full potential.
- Uniform portions: Use a small cookie scoop for batter to ensure each cup receives equal amounts, which promotes even baking and consistent presentation.