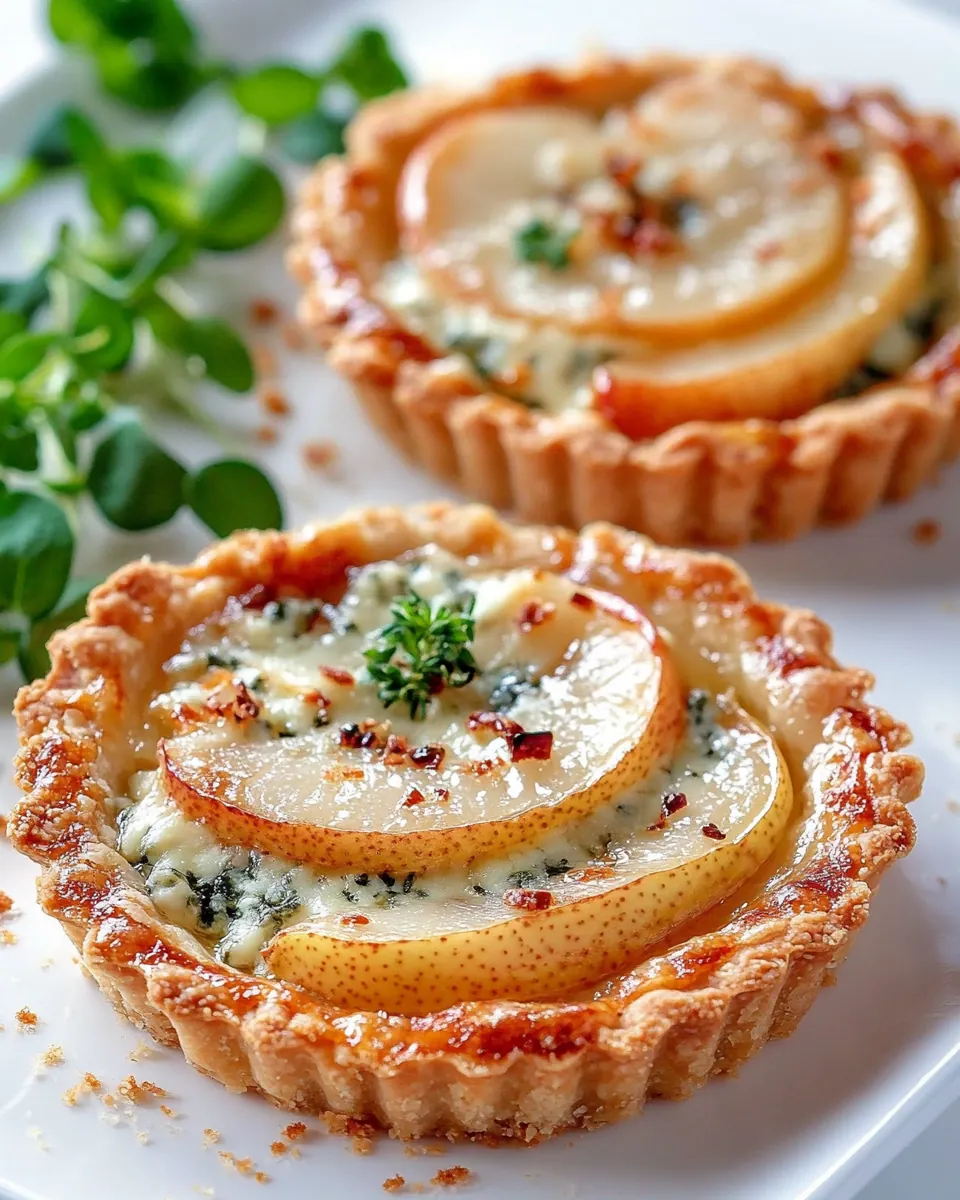
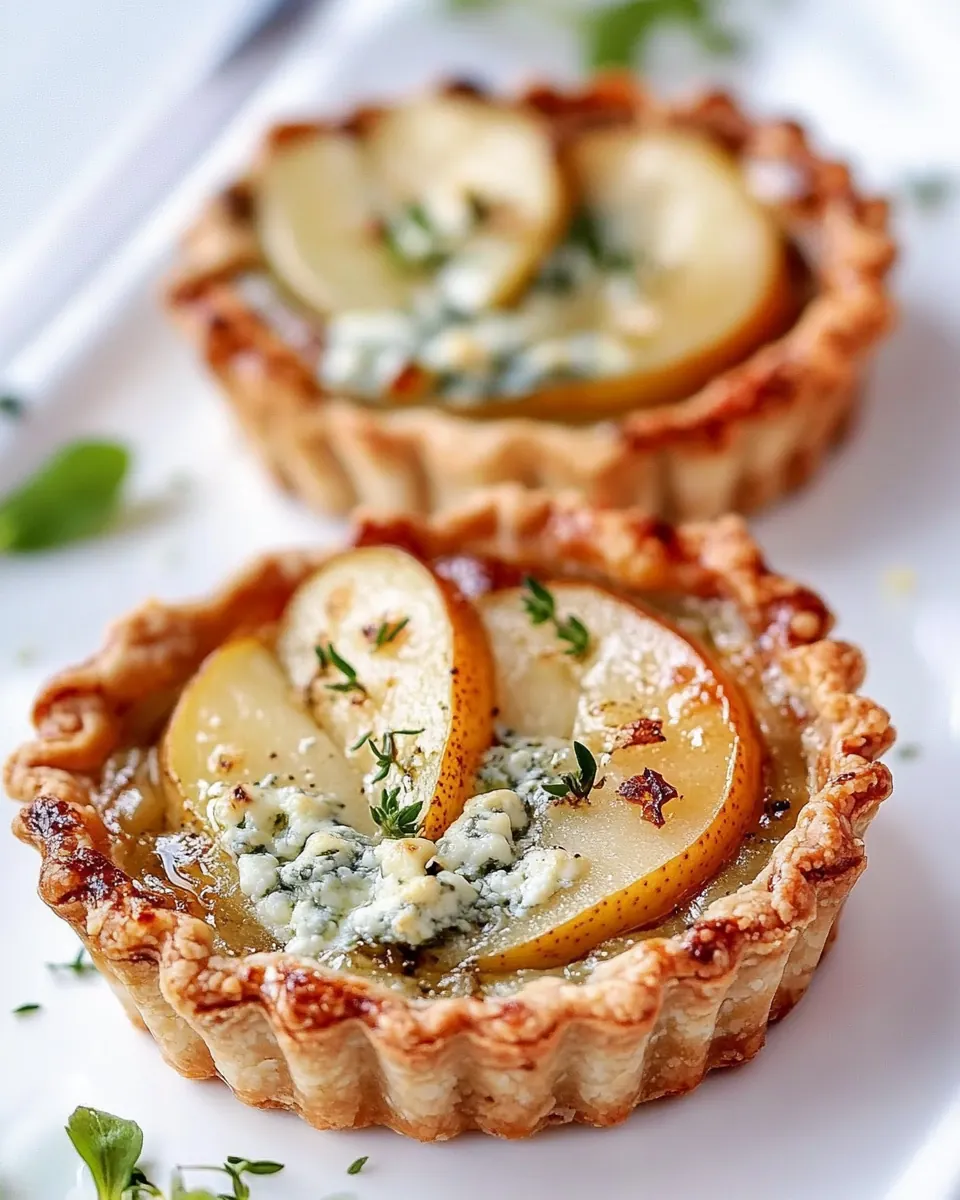
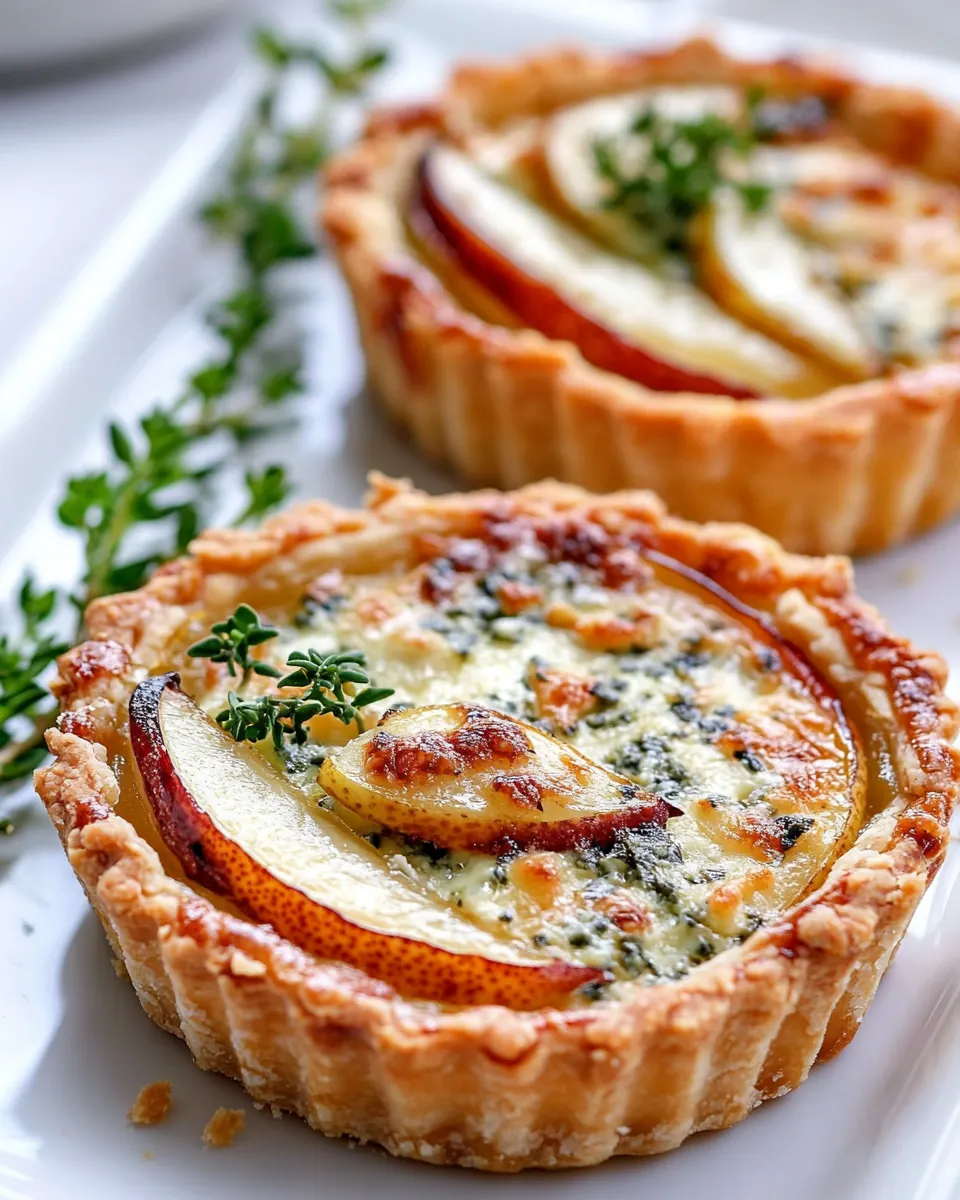
Pear Gorgonzola Tartlets
Pear Gorgonzola Tartlets came into my kitchen on a crisp afternoon when I wanted something elegant yet unfussy to bring to a small get together. I remember carrying a tray of these warm tartlets down the stairs, feeling the heat fog the windowpanes, and watching friends’ faces light up at the first bite. They felt special without being precious, like a perfect balance of sweet fruit and tangy cheese that somehow whispered comfort and celebration at once.
I’ve made Pear Gorgonzola Tartlets for quiet nights when I want something solo and for lively gatherings where everyone reaches for seconds. The first sentence of every version of this recipe is the same in spirit, though the details shift with the season. In fall I choose pears that give a faintly grainy texture and a honeyed sweetness, which pairs beautifully with the creamy, slightly spicy character of gorgonzola. It is one of those simple matches that feels like fate on a pastry shell.
When I roll these out I think about memories of learning to press dough into tiny pans with my fingers, the way the edges take shape and become a golden, buttery cradle for the filling. I also recall the tiny flourish of rosemary on top, which smells evergreen and festive, and the small, surprising pop of chili flakes that wakes the palate. Every time I serve Pear Gorgonzola Tartlets someone asks for the recipe, and I always laugh because the steps are straightforward, but the result feels refined.
Recipe Snapshot
35 mins
15 mins
20 mins
Medium
200 kcal
Italian
Gluten-Free, Low FODMAP
Appetizers
oven, food processor, mini tart pans or a tart pan
Why This Pear Gorgonzola Tartlets Works
Contrast of Flavors
I love how pear and gorgonzola play off each other. The pear brings a gentle, floral sweetness while the gorgonzola provides creamy saltiness and a touch of tang. That interplay keeps every mouthful interesting, and I often find guests pausing to savor the combination.
Buttery, Crisp Pastry
The crust is central to why I keep making these. Using a blend of flours and cold, diced butter yields a texture that is both sturdy and flaky. You’ll get a satisfying crunch followed by a tender interior, which frames the softer elements nicely.
Speed and Simplicity
These tartlets are surprisingly quick to pull together, especially if you use a food processor. I value recipes that let me spend minutes preparing and still look like I spent hours, and these deliver that every time. They rehearse only a few reliable techniques, so you can feel confident even if you are pressed for time.
Flexible Serving Options
I like that Pear Gorgonzola Tartlets can be served hot from the oven, warm, or at room temperature. That flexibility makes them perfect for buffets, picnic baskets, or a plated starter. I often switch up the presentation, sometimes finishing with a sprig of rosemary or a light sprinkle of chili flakes for visual drama and a little heat.
Seasonal Appeal
Because pear shines in fall, these tartlets feel seasonal without being fussy. They bring a sense of occasion to a weeknight meal and an autumnal elegance to holiday spreads. I keep returning to them because they hit an emotional note as much as a culinary one.
Ingredients You’ll Need for Pear Gorgonzola Tartlets
I think about these ingredients as a tight cast of characters. The crust ingredients provide structure and a buttery backbone, while the filling components introduce contrasting sweet, savory, and aromatic notes. Together they create a harmonious bite where texture and flavor are equally important.
- 150 g all-purpose flour: Provide structure and body to the tart dough by combining with fats and liquids; sifts easily for even texture and achieves a tender crumb when chilled and handled minimally.
- 100 g corn flour: Contribute a slightly different starch profile to the pastry, lightening the dough and adding a delicate crumb; blends with all-purpose flour to reduce gluten development for a flakier crust.
- 1/2 tsp salt: Season the dough and fillings to enhance overall flavor balance; a small amount rounds out sweetness from pears and cuts through richness of cheeses.
- 1/2 tsp baking powder: Help the pastry rise subtly and provide a lighter, airier texture in the crust; works with the egg to give a gentle lift without overpowering flakiness.
- 1 egg: Bind the dough components together while adding richness and helping create a pliable, cohesive pastry; also contributes to browning and a tender mouthfeel when baked.
- 100 g cream cheese: Add creamy richness and tang to the filling while keeping the texture smooth; spreads easily into the tart base and complements the sharper blue cheese.
- 125 g butter: Provide major fat for the pastry, creating flakiness and a rich flavor; when cold and worked into the flour, butter yields tender layers and a golden finish.
- 2 large pears: Bring natural sweetness and juiciness to the tart while adding a delicate floral aroma; thinly sliced or poached, pears pair well with blue cheese for a balanced sweet-savory profile.
- 150 g sweet or spicy gorgonzola to taste: Introduce bold, tangy, and slightly salty flavors that contrast with the sweet pears; crumbled over the tart, gorgonzola adds depth and a creamy, pungent bite to each serving.
- chili flakes: Add a touch of heat and a visual pop when sprinkled sparingly; balances the creamy and sweet elements by providing a subtle warming contrast.
- red pepper: Contribute both color and mild sweet pepper notes when diced or roasted; enhances visual appeal and offers a gentle vegetal counterpoint to cheeses and fruit.
- small sprigs of rosemary (for decor): Serve as an aromatic garnish that adds a fresh, resinous note and elevates presentation; small sprigs can be tucked on top for decorative contrast and subtle fragrance.
Step by Step Instructions for Pear Gorgonzola Tartlets
These instructions walk you through the dough, assembly, and baking in a conversational way so you feel supported at each stage. I like to pause and smell the mixture as the butter hits the flour and to listen for the oven cues as the tart shells turn amber. Follow along, and trust your senses as much as the clock.
- Use a food processor to knead the dough; it's the easiest way to make unleavened dough in my opinion! Put the dry ingredients (all-purpose flour, corn flour, salt and baking powder) in the bowl of the food processor and process for a few seconds to mix well!: As the blade whirls you will hear a soft chopping sound and sense the dry mixture first becoming sandy, then slightly clumped, which is the key cue that the flour and corn flour are ready to receive fat. The food processor speeds the job while keeping the butter cold, which preserves pockets of fat for flakiness. Why it matters, the rapid pulsing limits heat transfer from your hands so the butter does not melt prematurely, resulting in a tender, layered crust. If the dough warms too much you'll lose that flakiness, so pause if you notice a tacky, greasy texture and chill the bowl briefly.
- Then add the diced cold butter, beaten egg, and cream cheese, then process all the ingredients at maximum speed until a compact ball of dough forms!: Right after pulsing, you should smell the faint toasted scent of the combined flour and note the uniform pale color, which tells you the salt and baking powder are evenly distributed. This step ensures even rising and consistent seasoning throughout the crust. A common mistake is skimping on this blend, which leads to pockets of unbalanced flavor; take the extra few pulses to avoid that.
- Wrap the dough in plastic wrap and refrigerate for half an hour, or, if you're in a hurry, a quarter hour in the freezer!: You will see the mixture suddenly come together into a cohesive mass that clings to the blade, signaling the right moment to stop. The butter should still show tiny flecks if you inspect closely, which will create steam channels in the oven and give a layered bite. The dough will feel cool to the touch and slightly tacky, not wet. If it seems too dry, add a teaspoon of cold water at a time; if it gets too wet, chill it to firm it up.
- Place the cold dough on a floured board and roll it out into a 0.5-0.7 cm (~1/4 inch) thick sheet and cut out circles slightly larger than the pans you are using to bake the mini-tarts.: Cooling the dough firms the butter and relaxes the gluten, which helps the pastry remain tender when rolled. I love the quiet patience of this pause, which lets flavors settle and textures stabilize. Avoid skipping this, because warm dough will shrink and lose its shape while baking, making the tart shells distorted instead of neat.
- Lightly butter the tart pans and line them with the circles of dough, pressing the dough against the side of the pans with your fingers, then prick the dough in places with a fork.: As you roll, you will see the dough smooth and even out, with the surface taking on a matte sheen that indicates proper hydration. The thickness ensures the shell bakes crisp but still fragile enough to bite through. If you press too hard while rolling you will compact the layers, causing a tough crust; let the roller glide with light pressure and reset the dough in the fridge if it becomes too warm.
- Put the mini tarts in the fridge for 10 minutes, while the oven heats up to 190°C/375° F.: When you press the dough into the pan you should feel it snugly conform, with tiny air pockets trapped under the surface that will expand slightly in the oven. Docking the bases with a fork prevents blistering and keeps the bottoms flat for a neat filling. One misstep is overworking the dough while pressing, which can make the crust dense; press gently and avoid stretching the pastry.
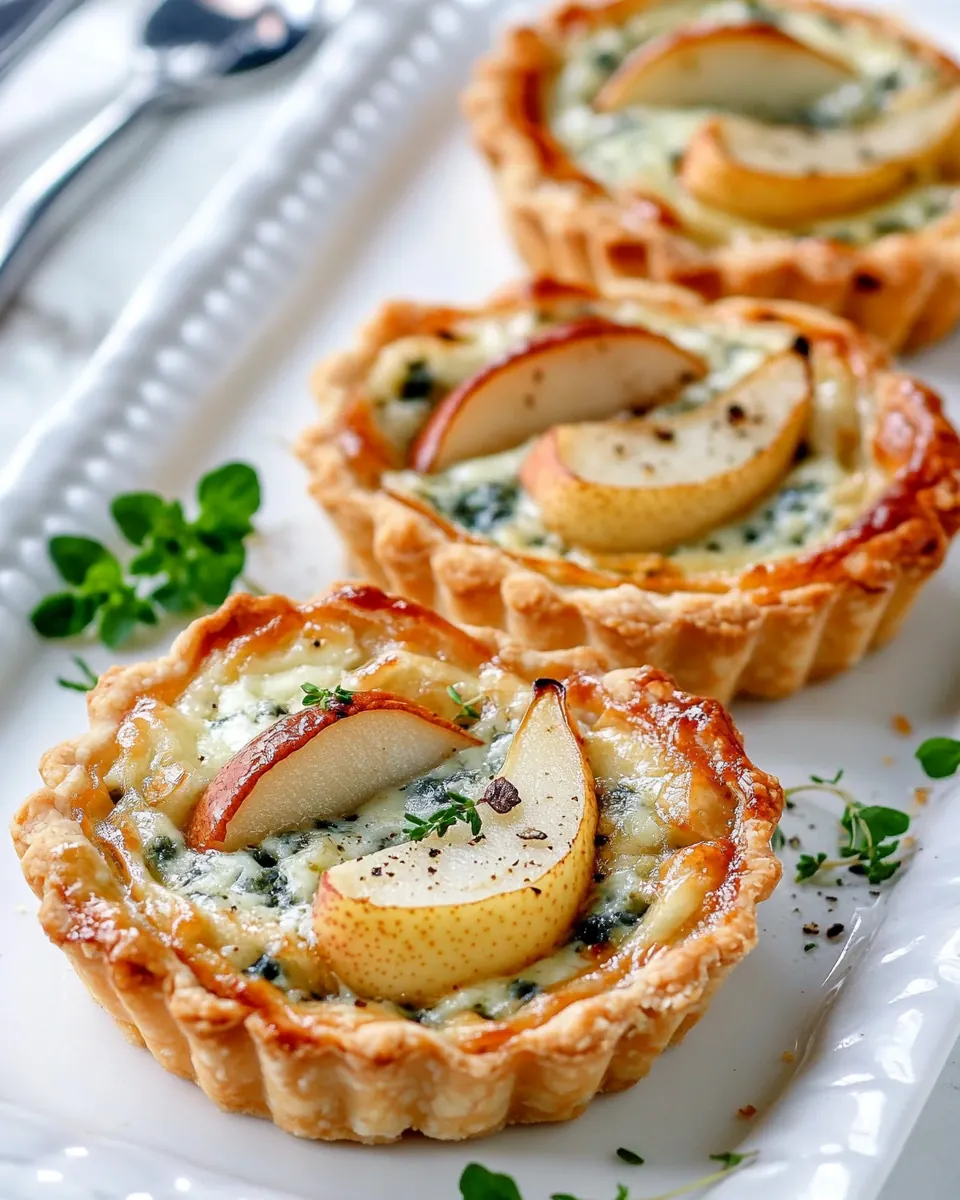
- Bake the dough for 10 minutes, then remove it from the oven. Fill the tartlets with slices of Gorgonzola cheese, and top with slices of pear.: Chilling again before baking helps the crust hold its shape and encourages an even rise. You will feel the pan cool to the touch and see the pastry firm up, which makes it easier to transfer to the oven without distortion. If you bake from warm pastry the edges may slump, so resist the urge to rush this short rest.
- Brush the pear slices with some melted butter. Finally, sprinkle over a few chili flakes and some red pepper, then return the tartlets to the oven for another 10 minutes or until the shells are golden brown and the gorgonzola cheese is bubbling.: In the oven you will witness the color shift from pale to light golden, and the kitchen will take on a toasty, buttery aroma. Pull them at the ten minute mark when the edges are just taking color but the base is set, then layer on the creamy gorgonzola and the sliced pear . The layering matters because the cheese will melt and mingle with the fruit, creating pockets of creamy, sweet tang. A common miscue is overbaking the shells first, which can make the final tart dry once the filling finishes cooking.
- Serve hot or cold decorated with small sprigs of rosemary!: Brushing pear with melted butter gives them a glossy finish and helps them caramelize slightly in the oven, contributing to aroma and texture. As they bake you will hear a quiet bubbling as the gorgonzola softens and sputters at the edges, while the tart shell deepens to a warm brown. The chili flakes ignite gentle heat that lingers after the first sweet bite. Avoid leaving them in too long, because the cheese can separate and become greasy rather than luxuriously creamy.
- Serve hot or cold decorated with small sprigs of rosemary: The final presentation is a visual and aromatic flourish. When served hot, the cheese is melted and creamy and the crust sings with warmth; when served at room temperature the flavors have time to settle, producing a balanced profile. Tuck a small rosemary sprig into each tartlet for fragrance and a rustic look. A common oversight is forgetting to cool slightly before transporting, which can cause the filling to slump in transit, so allow a short rest if you need to move them far.
Recipe Notes about Pear Gorgonzola Tartlets
Here are focused, practical notes I return to each time I make these tartlets. I expand on the small touches that make them reliably successful, and each tip begins with a short, bold phrase for quick scanning.
- Chill in stages: Rest the dough in the fridge after mixing, and again when lined in the pans to ensure a snappy, shaped crust that does not warp while baking.
- Keep butter cold: Dice the butter small and cold, and pulse briefly so the dough forms with visible pea sized bits that melt into flaky layers in the oven.
- Even pear slices: Cut the pears into consistent thickness so they soften uniformly and create a cohesive texture with the melted gorgonzola.
- Use a thermometer for the oven: Confirm your oven is at the correct temperature, because an oven that runs hot will brown the shell before the cheese has a chance to bubble.
- Finish with herbs: Add small rosemary sprigs after baking for fragrance, and avoid placing them too close to the cheese to prevent wilting from direct heat.
What to Serve With Pear Gorgonzola Tartlets
These tartlets are versatile, and the right accompaniments can make them shine depending on the occasion. Whether it is a casual lunch or a fall dinner, choose sides that echo the sweet savory theme and offer textural contrast.
- Arugula salad with lemon vinaigrette: A peppery arugula salad dressed simply with lemon and olive oil cuts through the richness and refreshes the palate between bites.
- Simple green salad for light lunches: Mixed greens with a light sherry or balsamic style dressing give a crunchy, acidic counterpoint when serving these for an informal midday meal.
- Charcuterie elements for a spread: If arranging a board, include crackers, dried fruits, and nuts to add crunch and variety in texture alongside the soft tartlets.
- Warm soup for seasonal dinners: Pair with a silky squash or carrot soup in fall to lean into seasonal produce while the tartlets provide an elegant, savory-acid balance.
- Occasion serving ideas: For Ramadan iftar or holiday gatherings, present these as a starter on a platter with small plates; they travel well when cooled slightly and can be enjoyed at room temperature.
- Storage tips: Store cooled tartlets in an airtight container in the fridge for up to two days, and reheat briefly in a 160 C 325 F oven to revive crispness before serving.
- Seasonal pairings: In fall, highlight pear varieties and add a small garnish of fresh herbs; in milder months, serve at room temperature for a relaxed, picnic friendly offering.
FAQ
Conclusion
Pear Gorgonzola Tartlets shine because they balance sweet, creamy, and savory elements on a crisp, buttery crust. They are elegant enough for guests and simple enough for a cozy night in, delivering memorable flavor without fuss. Give them a try this season, and watch how a few thoughtful ingredients turn into a dish that keeps people coming back for more. I hope you enjoy making and sharing these tartlets as much as I do; they are one of those recipes that reward attention to small details and generous servings of conviviality.

Pear Gorgonzola Tartlets
Equipment
- Oven
- Food Processor
- mini tart pans or a tart pan
Ingredients
- 150 g all-purpose flour Provide structure and body to the tart dough by combining with fats and liquids; sifts easily for even texture and achieves a tender crumb when chilled and handled minimally.
- 100 g corn flour Contribute a slightly different starch profile to the pastry, lightening the dough and adding a delicate crumb; blends with all-purpose flour to reduce gluten development for a flakier crust.
- 1/2 tsp salt Season the dough and fillings to enhance overall flavor balance; a small amount rounds out sweetness from pears and cuts through richness of cheeses.
- 1/2 tsp baking powder Help the pastry rise subtly and provide a lighter, airier texture in the crust; works with the egg to give a gentle lift without overpowering flakiness.
- 1 egg Bind the dough components together while adding richness and helping create a pliable, cohesive pastry; also contributes to browning and a tender mouthfeel when baked.
- 100 g cream cheese Add creamy richness and tang to the filling while keeping the texture smooth; spreads easily into the tart base and complements the sharper blue cheese.
- 125 g butter Provide major fat for the pastry, creating flakiness and a rich flavor; when cold and worked into the flour, butter yields tender layers and a golden finish.
- 2 large pears Bring natural sweetness and juiciness to the tart while adding a delicate floral aroma; thinly sliced or poached, pears pair well with blue cheese for a balanced sweet-savory profile.
- 150 g sweet or spicy gorgonzola to taste Introduce bold, tangy, and slightly salty flavors that contrast with the sweet pears; crumbled over the tart, gorgonzola adds depth and a creamy, pungent bite to each serving.
- chili flakes Add a touch of heat and a visual pop when sprinkled sparingly; balances the creamy and sweet elements by providing a subtle warming contrast.
- red pepper Contribute both color and mild sweet pepper notes when diced or roasted; enhances visual appeal and offers a gentle vegetal counterpoint to cheeses and fruit.
- small sprigs of rosemary (for decor) Serve as an aromatic garnish that adds a fresh, resinous note and elevates presentation; small sprigs can be tucked on top for decorative contrast and subtle fragrance.
Instructions
- Use a food processor to knead the dough; it's the easiest way to make unleavened dough in my opinion! Put the dry ingredients (all-purpose flour, corn flour, salt and baking powder) in the bowl of the food processor and process for a few seconds to mix well!: As the blade whirls you will hear a soft chopping sound and sense the dry mixture first becoming sandy, then slightly clumped, which is the key cue that the flour and corn flour are ready to receive fat. The food processor speeds the job while keeping the butter cold, which preserves pockets of fat for flakiness. Why it matters, the rapid pulsing limits heat transfer from your hands so the butter does not melt prematurely, resulting in a tender, layered crust. If the dough warms too much you'll lose that flakiness, so pause if you notice a tacky, greasy texture and chill the bowl briefly.
- Then add the diced cold butter, beaten egg, and cream cheese, then process all the ingredients at maximum speed until a compact ball of dough forms!: Right after pulsing, you should smell the faint toasted scent of the combined flour and note the uniform pale color, which tells you the salt and baking powder are evenly distributed. This step ensures even rising and consistent seasoning throughout the crust. A common mistake is skimping on this blend, which leads to pockets of unbalanced flavor; take the extra few pulses to avoid that.
- Wrap the dough in plastic wrap and refrigerate for half an hour, or, if you're in a hurry, a quarter hour in the freezer!: You will see the mixture suddenly come together into a cohesive mass that clings to the blade, signaling the right moment to stop. The butter should still show tiny flecks if you inspect closely, which will create steam channels in the oven and give a layered bite. The dough will feel cool to the touch and slightly tacky, not wet. If it seems too dry, add a teaspoon of cold water at a time; if it gets too wet, chill it to firm it up.
- Place the cold dough on a floured board and roll it out into a 0.5-0.7 cm (~1/4 inch) thick sheet and cut out circles slightly larger than the pans you are using to bake the mini-tarts.: Cooling the dough firms the butter and relaxes the gluten, which helps the pastry remain tender when rolled. I love the quiet patience of this pause, which lets flavors settle and textures stabilize. Avoid skipping this, because warm dough will shrink and lose its shape while baking, making the tart shells distorted instead of neat.
- Lightly butter the tart pans and line them with the circles of dough, pressing the dough against the side of the pans with your fingers, then prick the dough in places with a fork.: As you roll, you will see the dough smooth and even out, with the surface taking on a matte sheen that indicates proper hydration. The thickness ensures the shell bakes crisp but still fragile enough to bite through. If you press too hard while rolling you will compact the layers, causing a tough crust; let the roller glide with light pressure and reset the dough in the fridge if it becomes too warm.
- Put the mini tarts in the fridge for 10 minutes, while the oven heats up to 190°C/375° F.: When you press the dough into the pan you should feel it snugly conform, with tiny air pockets trapped under the surface that will expand slightly in the oven. Docking the bases with a fork prevents blistering and keeps the bottoms flat for a neat filling. One misstep is overworking the dough while pressing, which can make the crust dense; press gently and avoid stretching the pastry.
- Bake the dough for 10 minutes, then remove it from the oven. Fill the tartlets with slices of Gorgonzola cheese, and top with slices of pear.: Chilling again before baking helps the crust hold its shape and encourages an even rise. You will feel the pan cool to the touch and see the pastry firm up, which makes it easier to transfer to the oven without distortion. If you bake from warm pastry the edges may slump, so resist the urge to rush this short rest.
- Brush the pear slices with some melted butter. Finally, sprinkle over a few chili flakes and some red pepper, then return the tartlets to the oven for another 10 minutes or until the shells are golden brown and the gorgonzola cheese is bubbling.: In the oven you will witness the color shift from pale to light golden, and the kitchen will take on a toasty, buttery aroma. Pull them at the ten minute mark when the edges are just taking color but the base is set, then layer on the creamy gorgonzola and the sliced pear . The layering matters because the cheese will melt and mingle with the fruit, creating pockets of creamy, sweet tang. A common miscue is overbaking the shells first, which can make the final tart dry once the filling finishes cooking.
- Serve hot or cold decorated with small sprigs of rosemary!: Brushing pear with melted butter gives them a glossy finish and helps them caramelize slightly in the oven, contributing to aroma and texture. As they bake you will hear a quiet bubbling as the gorgonzola softens and sputters at the edges, while the tart shell deepens to a warm brown. The chili flakes ignite gentle heat that lingers after the first sweet bite. Avoid leaving them in too long, because the cheese can separate and become greasy rather than luxuriously creamy.
- Serve hot or cold decorated with small sprigs of rosemary: The final presentation is a visual and aromatic flourish. When served hot, the cheese is melted and creamy and the crust sings with warmth; when served at room temperature the flavors have time to settle, producing a balanced profile. Tuck a small rosemary sprig into each tartlet for fragrance and a rustic look. A common oversight is forgetting to cool slightly before transporting, which can cause the filling to slump in transit, so allow a short rest if you need to move them far.
Notes
- Chill in stages: Rest the dough in the fridge after mixing, and again when lined in the pans to ensure a snappy, shaped crust that does not warp while baking.
- Keep butter cold: Dice the butter small and cold, and pulse briefly so the dough forms with visible pea sized bits that melt into flaky layers in the oven.
- Even pear slices: Cut the pears into consistent thickness so they soften uniformly and create a cohesive texture with the melted gorgonzola.
- Use a thermometer for the oven: Confirm your oven is at the correct temperature, because an oven that runs hot will brown the shell before the cheese has a chance to bubble.
- Finish with herbs: Add small rosemary sprigs after baking for fragrance, and avoid placing them too close to the cheese to prevent wilting from direct heat.