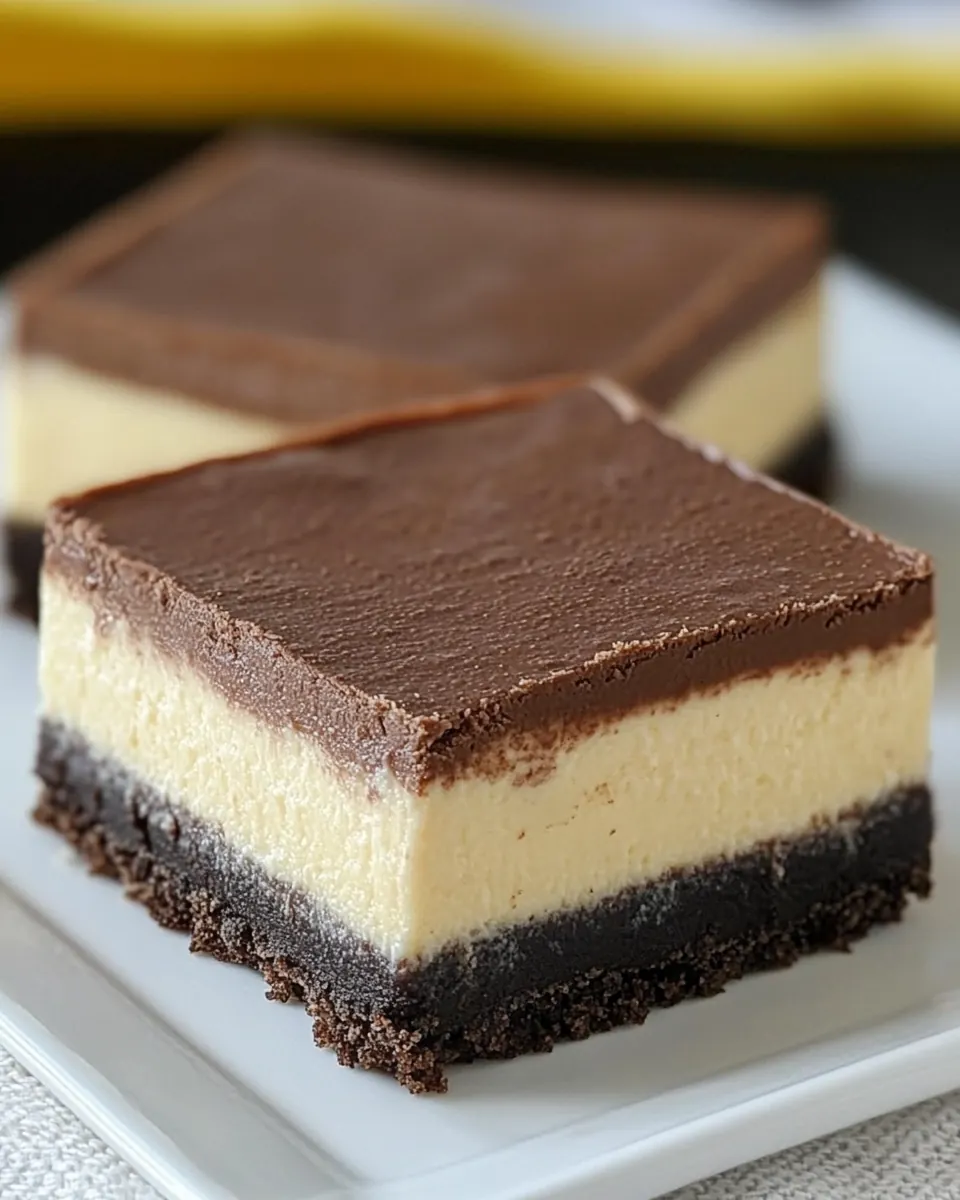
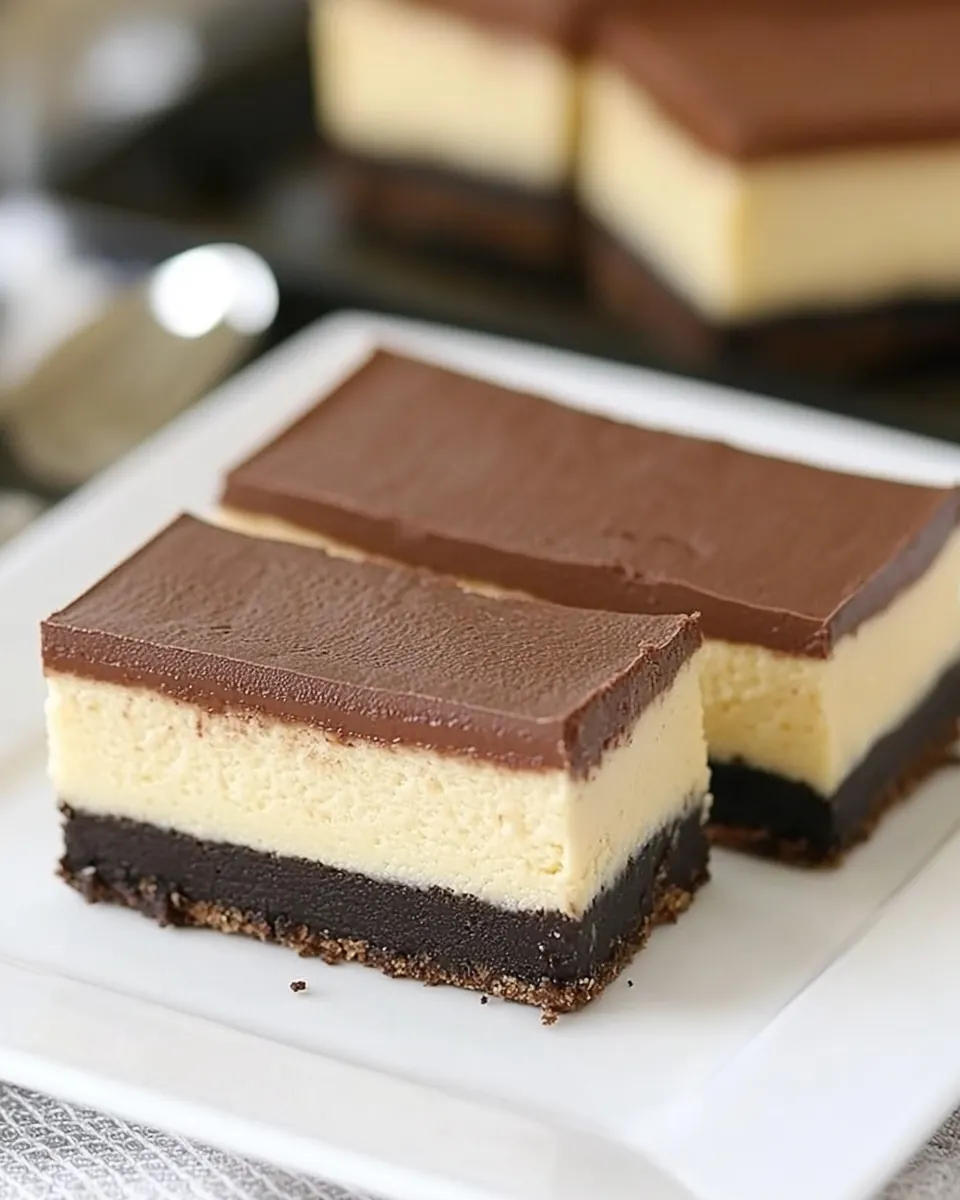
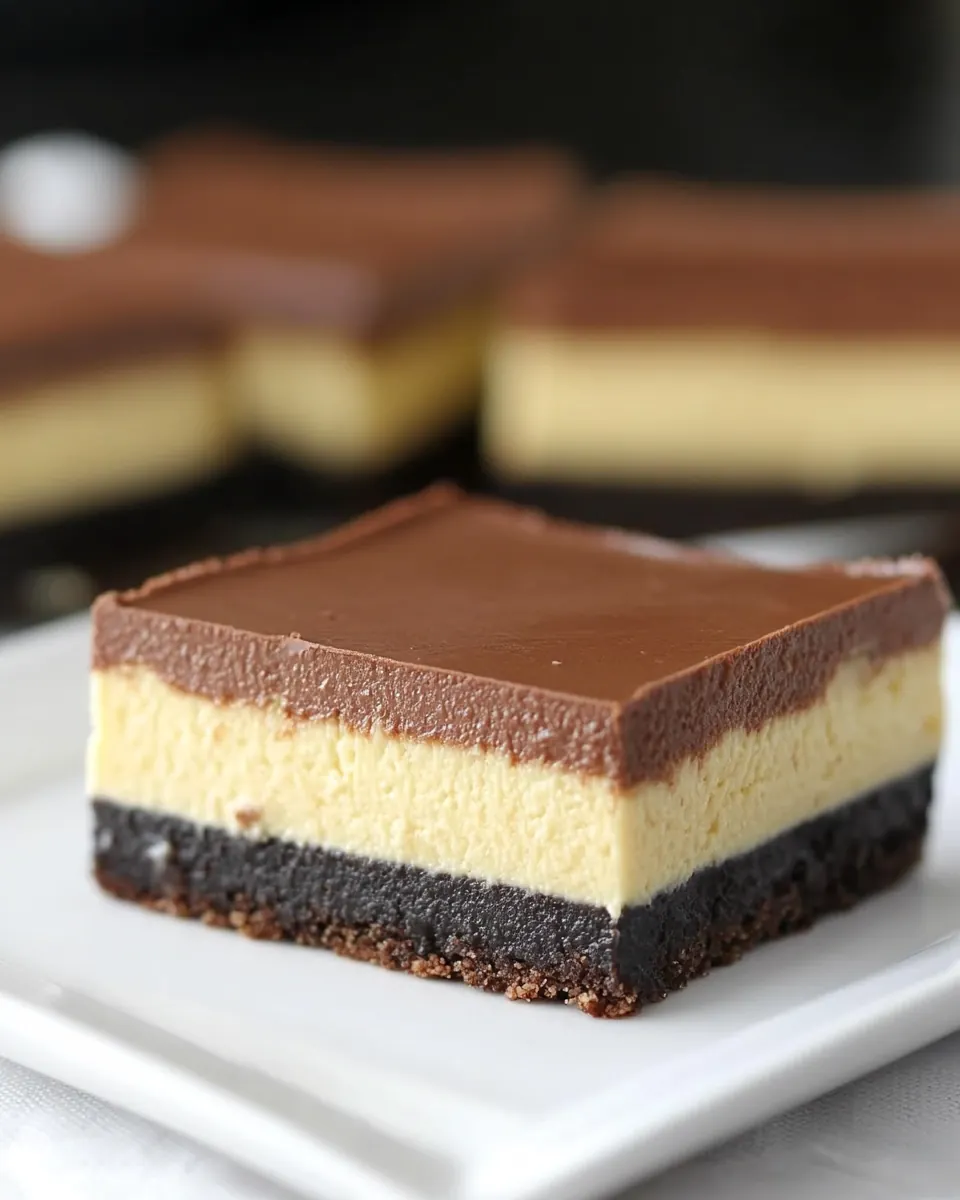
Nutella Cheesecake Bars
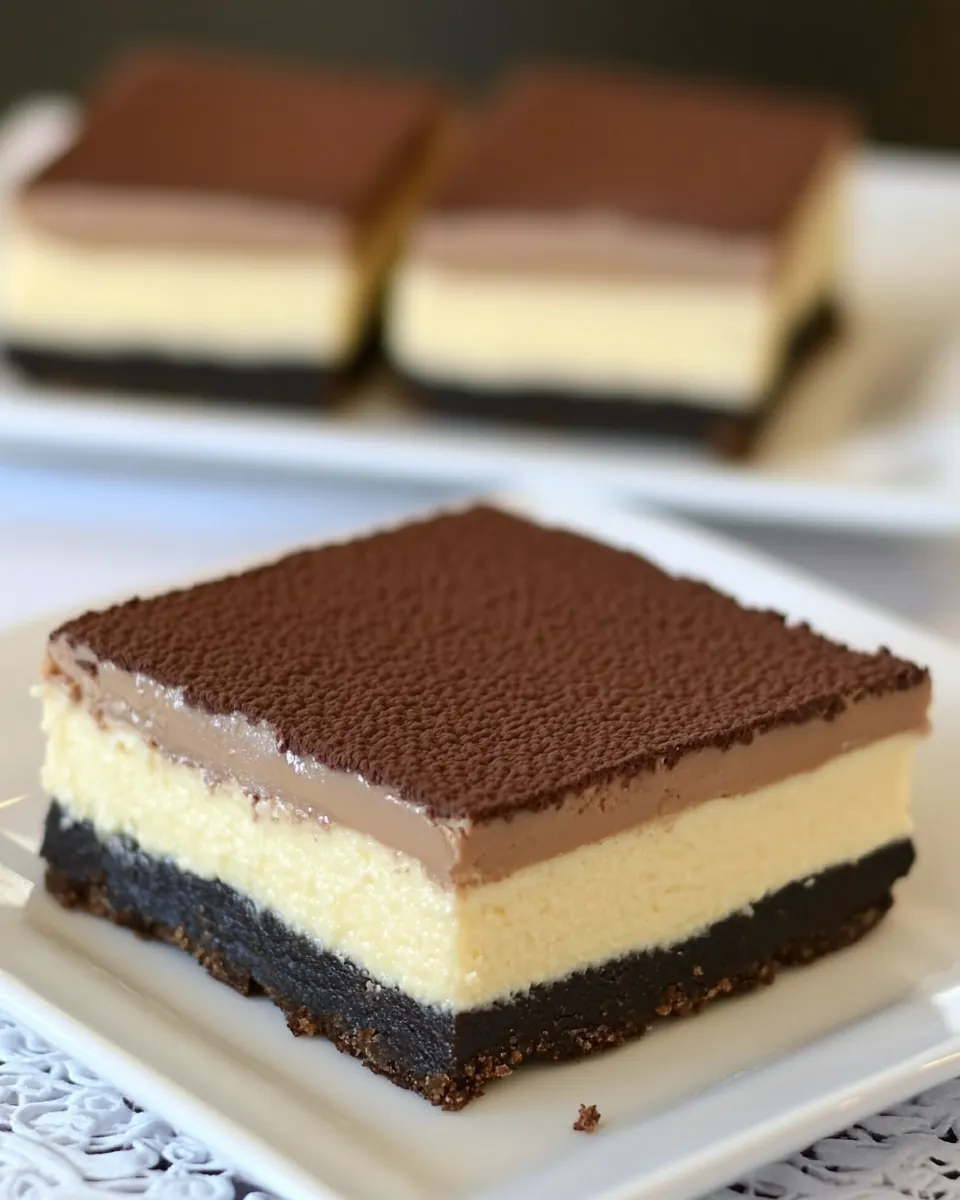
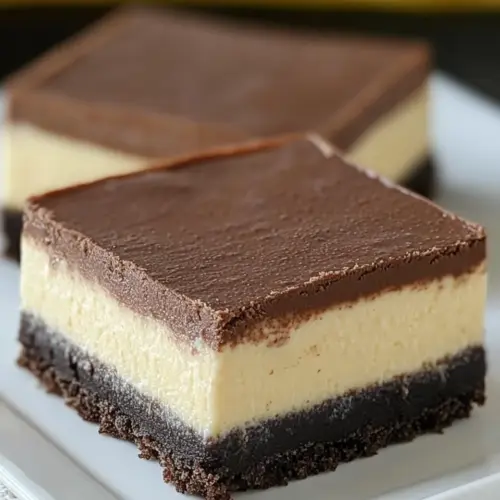
Nutella Cheesecake Bars have been my secret dessert for every celebration where people ask for something a little extra comforting and a little indulgent. The first time I made these, I remember the buttery Oreo crust crisping at the edges while the kitchen filled with that unmistakable warm cocoa and cream cheese aroma. I was nervous about layering two textures, yet the result was a harmonious contrast between a crunchy base and a silky, slightly wobbly cheesecake top, streaked with glossy, hazelnut rich Nutella.
I keep coming back to this recipe because it fits so many occasions. On a random weeknight when I want something special, I’ll slice one or two squares and savor them slowly with strong coffee. At potlucks, they vanish fast since the crowd loves the familiar chocolate hazelnut flavor combined with classic cheesecake tang. Over time I learned small tricks like letting the pan cool completely before refrigerating, and using room temperature cream cheese and eggs so the batter becomes impossibly smooth. Those tiny adjustments turn good bars into memorable ones.
Recipe Snapshot
1 hr 20 mins
30 mins
50 mins
Medium
250 kcal
American
Gluten-Free, Low FODMAP
Desserts
Food processor, 8 x 8 inch baking dish, Parchment paper, Cooling rack, Measuring cup
Why This Nutella Cheesecake Bars Hits Different
Flavor that Balances Comfort and Luxury
I adore how Nutella Cheesecake Bars balance a nostalgic chocolate and hazelnut flavor with the clean tang of cream cheese. The interplay between the crunchy Oreo base and the silky filling makes every bite layered and interesting. I find people are surprised by how sophisticated yet approachable this dessert tastes.
Simple Steps, Impressive Results
One of the things I love is how straightforward the process is. With just a few standard techniques, the bars look like they came from a bakery. I often tell friends that a food processor and a little patience are the real keys here, and most home cooks will nail it on their first try.
Texture Play
The recipe delivers on texture, which is crucial for me. The Oreo crust crisps and gives a solid base, while the cheesecake layers remain creamy, slightly jiggle when done, and set to a perfect sliceable firmness after chilling. That contrast makes the bars endlessly satisfying.
Make Ahead Friendly
I love that you can make these ahead. After a few hours in the refrigerator the flavors meld and the bars slice beautifully. For gatherings, I’ll bake them the day before and free up oven time on the event day, knowing they actually taste better after resting.
Versatility and Crowd Appeal
These bars please a wide range of palates, from kids to adults. You can dress them up for special occasions or keep them simple for everyday treats. I often bring them to celebrations because they look impressive yet require minimal last minute work.
Ingredients Required for Nutella Cheesecake Bars
I believe in letting quality ingredients do the heavy lifting. For these Nutella Cheesecake Bars, the crust, the cheesecake base, and the Nutella layer each play a specific role. The crust provides structure and crunch, the cream cheese gives tang and silkiness, and the Nutella brings a rich hazelnut chocolate note that makes the bars feel celebratory.
- 2 cups Oreo crumbs: Provide a sturdy, chocolatey base by combining finely crushed Oreo crumbs with melted butter to form a pressable crust; press firmly into the pan to ensure even baking and support for the cheesecake layer. Add depth and texture to contrast the creamy filling while contributing a familiar cookie flavor loved in no-bake or baked bars.
- 1/4 cup unsalted butter, melted: Bind the Oreo crumbs and add richness with melted unsalted butter so the crust holds together and slices cleanly; use just enough to moisten the crumbs without making them greasy. Melted butter also helps brown the edges slightly when baked, improving mouthfeel and structure.
- 16 oz (455 g) cream cheese, at room temperature: Soften and enrich the filling by using room–temperature cream cheese, which whips smoothly for a silky texture; beat until creamy to avoid lumps and achieve a professional cheesecake consistency. Provide the primary tang and body that balances the sweetness of Nutella and sugar, crucial for the dessert’s signature creamy mouthfeel.
- 2 eggs, at room temperature: Incorporate structure and moisture by adding room–temperature eggs, which help the cheesecake set during baking; mix in one at a time to maintain a smooth emulsion. Contribute to a tender crumb and stable texture while aiding in the custardy quality of the bars.
- 1/2 cup granulated sugar: Sweeten and stabilize the filling with granulated sugar to balance the tang of cream cheese and bitterness of chocolate; dissolve well into the mixture for even sweetness. Assist in setting the cheesecake by interacting with proteins in the eggs during baking for a consistent finish.
- 1/4 cup heavy cream, + 1 tablespoon: Increase creaminess and loosen the batter with heavy cream plus an additional tablespoon to adjust consistency; add gradually while beating for a velvety, rich filling. Enhance mouthfeel and create a smooth, sliceable texture that complements the dense, chocolate crust.
- 1 vanilla bean, halved and seeds scraped (or 1 tsp vanilla extract): Infuse aromatic vanilla by scraping seeds from a halved vanilla bean or adding vanilla extract to build complexity and lift flavors; incorporate into the batter for an even floral and sweet background note. Elevate the overall profile so chocolate and hazelnut notes from Nutella shine without overwhelming the palate.
- 1/3 cup Nutella: Swirl in Nutella to provide concentrated hazelnut-chocolate flavor and luxurious richness, creating pockets of chocolate throughout the bars; fold gently to preserve marbling if desired. Serve as the signature flavor component that balances creaminess and sweetness, delivering the dessert’s defining taste.
Step by Step Guide for Nutella Cheesecake Bars
These directions turn simple pantry ingredients into showstopping bars. I like to work in stages, prepping the crust first, then the filling, and finally assembling and baking. Give yourself a calm rhythm, and the results will reward you.
- Preheat the oven to 325°F (170°C). Butter an 8" × 8" (20 x 20 cm) baking dish and line it with parchment paper, ensuring the parchment is well pressed into the corners. Set aside.: The moment you open the oven and feel the warm, dry air sweep out you know baking has begun, and that steady 325°F warmth is perfect for gentle, even baking. Buttering the pan and pressing parchment into the corners creates a slick release surface, which makes lifting the whole block out later simple and clean. I use my fingers to smooth the parchment into each corner so the crust can be pressed tightly without gaps. A common pitfall is skipping the parchment, which can cause sticking, and make the bars tear when removed.
- In a food processor, pulse the Oreos until they turn into crumbs. Add the melted butter and pulse until the mixture is moistened. Press the Oreo mixture evenly into the bottom of the baking dish. Bake the crust until set, about 12 minutes. Set aside to cool.: When you pulse the Oreo cookies, they transform from whole cookies into a fine, coffee brown dust that smells faintly of chocolate. Adding the warm, melted butter brings out a toasty aroma and binds the crumbs into a moldable mass. Pressing the mixture firmly into the pan produces a compact crust that crackles slightly at the edges when baked. After 12 minutes the crust should feel set to the touch and give off a deeper chocolate scent, which signals readiness. Avoid under-pressing the crumbs, which leads to a loose base that will crumble when cut.
- Clean the food processor, then add the cream cheese, eggs, sugar, 1/4 cup of heavy cream, and vanilla. Pulse until smooth. Transfer 2/3 of the cream cheese mixture to a bowl and set aside.: As you blend the softened cream cheese with the eggs and sugar , a glossy pale batter forms, carrying a sweet, tangy aroma. The folding in of the heavy cream lightens the mouthfeel and helps the cheesecake achieve a velvety finish. Removing two thirds of this mixture ensures you have separate plain and Nutella layers, which makes for a neat, layered appearance. If the batter still shows lumps, pause and scrape the bowl, then pulse again gently. Overmixing here can add too much air and lead to cracking during baking.
- Add Nutella and 1 tablespoon of heavy cream to the remaining 1/3 of the cream cheese mixture in the processor. Pulse until smooth.: The Nutella folded into the reserved batter melts into a shiny, mahogany swirl with a heady hazelnut perfume, especially after a few pulses. The tablespoon of heavy cream loosens the mixture to a spreadable consistency, so it lays atop the plain layer without tugging. The sound is almost silent, but visually you can see the Nutella become fully incorporated and glossy. A frequent error is trying to stir cold Nutella directly, which can clump; warming it briefly and then pulsing ensures even blending.
- To assemble, spread the plain cheesecake mixture over the cooled Oreo crust, taking care not to disturb the crust. Then, pour the Nutella cheesecake layer on top of the plain cheesecake layer and spread it evenly.: Spreading the plain batter creates a creamy canvas, and you should feel a subtle resistance as the filling levels out into an even sheet. Pouring the darker Nutella layer over it creates an inviting contrast, like a marbled cheesecake in the making. Use a spatula to coax each layer smooth, moving with gentle, confident strokes so the crust does not break apart. If you get impatient and push too hard while smoothing, you might disturb the crust and create gaps, which affects presentation.
- Bake on the center rack of the oven for about 35 minutes, or until the center jiggles slightly. Remove from the oven and cool completely on a cooling rack. Refrigerate for at least 3 hours.: During baking the edges will puff slightly and develop a faint golden hue, while the center will still exhibit a slight wobble when nudged, which is the hallmark of a perfectly baked cheesecake texture. The scent will deepen into a rich, baked dairy aroma dotted by chocolate haze. Cooling on a rack prevents residual heat from overcooking the interior, and the extended chill in the refrigerator helps the structure firm up for clean slicing. A common oversight is slicing too soon; cutting before the bars have chilled results in messy squares and a softer mouthfeel.
- When ready to serve, lift the bars out of the pan using the parchment paper (it should release easily). Cut into 16 squares and serve.: Lifting the parchment reveals the layered block, and the first cut should show a crisp contrast between the dark crumb and the pale and chocolate layers above. Use a sharp knife warmed under hot water then dried for a cleaner slice, and you will hear a satisfying, gentle crumble as each square separates. The texture is silky on the tongue, with the crunch of the Oreo base balancing the creamy layers. Avoid using a dull knife, which drags and creates ragged edges instead of neat servings.
Tips and Variations
Small adjustments can elevate these Nutella Cheesecake Bars from great to unforgettable. Below I share practical tips I rely on, plus a simple variation for a neater layered look. These suggestions are rooted in experiences I had while tinkering until the texture and flavor felt just right.
- Room Temperature Ingredients: Make sure your cream cheese and eggs are at room temperature to achieve a smooth batter and avoid lumps.
- Even Crust Pressing: Use the flat bottom of a measuring cup to press the Oreo crumbs firmly and evenly, which helps the crust hold together when slicing.
- Gentle Mixing: Pulse gently in the food processor to avoid adding excess air, which can cause cracks in the cheesecake during baking.
- Warm Nutella Slightly: If your Nutella is thick, warm it very briefly in the microwave or over a warm water bath so it blends smoothly with the cheesecake batter.
- Use Piping for Neat Layers: For a tidier top layer, place the Nutella mixture in a piping bag and pipe it over the plain layer before smoothing, which creates a more even finish.
- Sharp Knife for Serving: Warm a sharp knife under hot water and dry it between cuts to get clean, restaurant style squares.
Perfect Pairings for Nutella Cheesecake Bars
These bars shine when paired thoughtfully. Whether you are serving them for a holiday table, a casual afternoon tea, or a dessert at a dinner party, the right accompaniments amplify the experience. Below are serving ideas, storage notes, and occasion suggestions to help you plan.
- Serve with coffee or espresso: A cup of strong coffee complements the sweetness and balances the creamy richness of the bars, making them ideal for afternoon gatherings.
- Plate for dessert course: Arrange small squares on a dessert plate for dinner parties, adding a dusting of cocoa or a light sprinkle of crushed Oreo crumbs for texture and visual contrast.
- Make ahead for events: Bake the bars a day in advance and refrigerate, which improves slicing and allows you to focus on other dishes on the day of your event.
- Storage tips: Keep the bars covered in the refrigerator for up to four days, or freeze tightly wrapped for up to one month. Thaw in the refrigerator overnight for the best texture.
- Occasion friendly: These bars work well for birthdays, potlucks, and holiday dessert tables when you want a crowd pleasing sweet that is easy to transport.
- Portion control: Cut into 16 squares for manageable portions that allow guests to enjoy a sweet finish without overindulging.
FAQ
Conclusion
These Nutella Cheesecake Bars shine because they combine a crunchy Oreo base with a silky, dual layered cheesecake that carries indulgent Nutella richness. I encourage you to make them for a gathering or a cozy night in; they store well and reward a little patience with clean slices and deep flavor. Once you try them, you may find they become your go to dessert when you want something that looks impressive but stays comfortingly familiar.
Nutella Cheesecake Bars
Equipment
- Food Processor
- 8 x 8 inch baking dish
- Parchment Paper
- Cooling rack
- Measuring Cup
Ingredients
- 2 cups Oreo crumbs Provide a sturdy, chocolatey base by combining finely crushed Oreo crumbs with melted butter to form a pressable crust; press firmly into the pan to ensure even baking and support for the cheesecake layer. Add depth and texture to contrast the creamy filling while contributing a familiar cookie flavor loved in no-bake or baked bars.
- 1/4 cup unsalted butter, melted Bind the Oreo crumbs and add richness with melted unsalted butter so the crust holds together and slices cleanly; use just enough to moisten the crumbs without making them greasy. Melted butter also helps brown the edges slightly when baked, improving mouthfeel and structure.
- 16 oz (455 g) cream cheese, at room temperature Soften and enrich the filling by using room-temperature cream cheese, which whips smoothly for a silky texture; beat until creamy to avoid lumps and achieve a professional cheesecake consistency. Provide the primary tang and body that balances the sweetness of Nutella and sugar, crucial for the dessert’s signature creamy mouthfeel.
- 2 eggs, at room temperature Incorporate structure and moisture by adding room-temperature eggs, which help the cheesecake set during baking; mix in one at a time to maintain a smooth emulsion. Contribute to a tender crumb and stable texture while aiding in the custardy quality of the bars.
- 1/2 cup granulated sugar Sweeten and stabilize the filling with granulated sugar to balance the tang of cream cheese and bitterness of chocolate; dissolve well into the mixture for even sweetness. Assist in setting the cheesecake by interacting with proteins in the eggs during baking for a consistent finish.
- 1/4 cup heavy cream, + 1 tablespoon Increase creaminess and loosen the batter with heavy cream plus an additional tablespoon to adjust consistency; add gradually while beating for a velvety, rich filling. Enhance mouthfeel and create a smooth, sliceable texture that complements the dense, chocolate crust.
- 1 vanilla bean, halved and seeds scraped (or 1 tsp vanilla extract) Infuse aromatic vanilla by scraping seeds from a halved vanilla bean or adding vanilla extract to build complexity and lift flavors; incorporate into the batter for an even floral and sweet background note. Elevate the overall profile so chocolate and hazelnut notes from Nutella shine without overwhelming the palate.
- 1/3 cup Nutella Swirl in Nutella to provide concentrated hazelnut-chocolate flavor and luxurious richness, creating pockets of chocolate throughout the bars; fold gently to preserve marbling if desired. Serve as the signature flavor component that balances creaminess and sweetness, delivering the dessert’s defining taste.
Instructions
- Preheat the oven to 325°F (170°C). Butter an 8" × 8" (20 x 20 cm) baking dish and line it with parchment paper, ensuring the parchment is well pressed into the corners. Set aside.: The moment you open the oven and feel the warm, dry air sweep out you know baking has begun, and that steady 325°F warmth is perfect for gentle, even baking. Buttering the pan and pressing parchment into the corners creates a slick release surface, which makes lifting the whole block out later simple and clean. I use my fingers to smooth the parchment into each corner so the crust can be pressed tightly without gaps. A common pitfall is skipping the parchment, which can cause sticking, and make the bars tear when removed.
- In a food processor, pulse the Oreos until they turn into crumbs. Add the melted butter and pulse until the mixture is moistened. Press the Oreo mixture evenly into the bottom of the baking dish. Bake the crust until set, about 12 minutes. Set aside to cool.: When you pulse the Oreo cookies, they transform from whole cookies into a fine, coffee brown dust that smells faintly of chocolate. Adding the warm, melted butter brings out a toasty aroma and binds the crumbs into a moldable mass. Pressing the mixture firmly into the pan produces a compact crust that crackles slightly at the edges when baked. After 12 minutes the crust should feel set to the touch and give off a deeper chocolate scent, which signals readiness. Avoid under-pressing the crumbs, which leads to a loose base that will crumble when cut.
- Clean the food processor, then add the cream cheese, eggs, sugar, 1/4 cup of heavy cream, and vanilla. Pulse until smooth. Transfer 2/3 of the cream cheese mixture to a bowl and set aside.: As you blend the softened cream cheese with the eggs and sugar , a glossy pale batter forms, carrying a sweet, tangy aroma. The folding in of the heavy cream lightens the mouthfeel and helps the cheesecake achieve a velvety finish. Removing two thirds of this mixture ensures you have separate plain and Nutella layers, which makes for a neat, layered appearance. If the batter still shows lumps, pause and scrape the bowl, then pulse again gently. Overmixing here can add too much air and lead to cracking during baking.
- Add Nutella and 1 tablespoon of heavy cream to the remaining 1/3 of the cream cheese mixture in the processor. Pulse until smooth.: The Nutella folded into the reserved batter melts into a shiny, mahogany swirl with a heady hazelnut perfume, especially after a few pulses. The tablespoon of heavy cream loosens the mixture to a spreadable consistency, so it lays atop the plain layer without tugging. The sound is almost silent, but visually you can see the Nutella become fully incorporated and glossy. A frequent error is trying to stir cold Nutella directly, which can clump; warming it briefly and then pulsing ensures even blending.
- To assemble, spread the plain cheesecake mixture over the cooled Oreo crust, taking care not to disturb the crust. Then, pour the Nutella cheesecake layer on top of the plain cheesecake layer and spread it evenly.: Spreading the plain batter creates a creamy canvas, and you should feel a subtle resistance as the filling levels out into an even sheet. Pouring the darker Nutella layer over it creates an inviting contrast, like a marbled cheesecake in the making. Use a spatula to coax each layer smooth, moving with gentle, confident strokes so the crust does not break apart. If you get impatient and push too hard while smoothing, you might disturb the crust and create gaps, which affects presentation.
- Bake on the center rack of the oven for about 35 minutes, or until the center jiggles slightly. Remove from the oven and cool completely on a cooling rack. Refrigerate for at least 3 hours.: During baking the edges will puff slightly and develop a faint golden hue, while the center will still exhibit a slight wobble when nudged, which is the hallmark of a perfectly baked cheesecake texture. The scent will deepen into a rich, baked dairy aroma dotted by chocolate haze. Cooling on a rack prevents residual heat from overcooking the interior, and the extended chill in the refrigerator helps the structure firm up for clean slicing. A common oversight is slicing too soon; cutting before the bars have chilled results in messy squares and a softer mouthfeel.
- When ready to serve, lift the bars out of the pan using the parchment paper (it should release easily). Cut into 16 squares and serve.: Lifting the parchment reveals the layered block, and the first cut should show a crisp contrast between the dark crumb and the pale and chocolate layers above. Use a sharp knife warmed under hot water then dried for a cleaner slice, and you will hear a satisfying, gentle crumble as each square separates. The texture is silky on the tongue, with the crunch of the Oreo base balancing the creamy layers. Avoid using a dull knife, which drags and creates ragged edges instead of neat servings.
Notes
- Room Temperature Ingredients: Make sure your cream cheese and eggs are at room temperature to achieve a smooth batter and avoid lumps.
- Even Crust Pressing: Use the flat bottom of a measuring cup to press the Oreo crumbs firmly and evenly, which helps the crust hold together when slicing.
- Gentle Mixing: Pulse gently in the food processor to avoid adding excess air, which can cause cracks in the cheesecake during baking.
- Warm Nutella Slightly: If your Nutella is thick, warm it very briefly in the microwave or over a warm water bath so it blends smoothly with the cheesecake batter.
- Use Piping for Neat Layers: For a tidier top layer, place the Nutella mixture in a piping bag and pipe it over the plain layer before smoothing, which creates a more even finish.
- Sharp Knife for Serving: Warm a sharp knife under hot water and dry it between cuts to get clean, restaurant style squares.