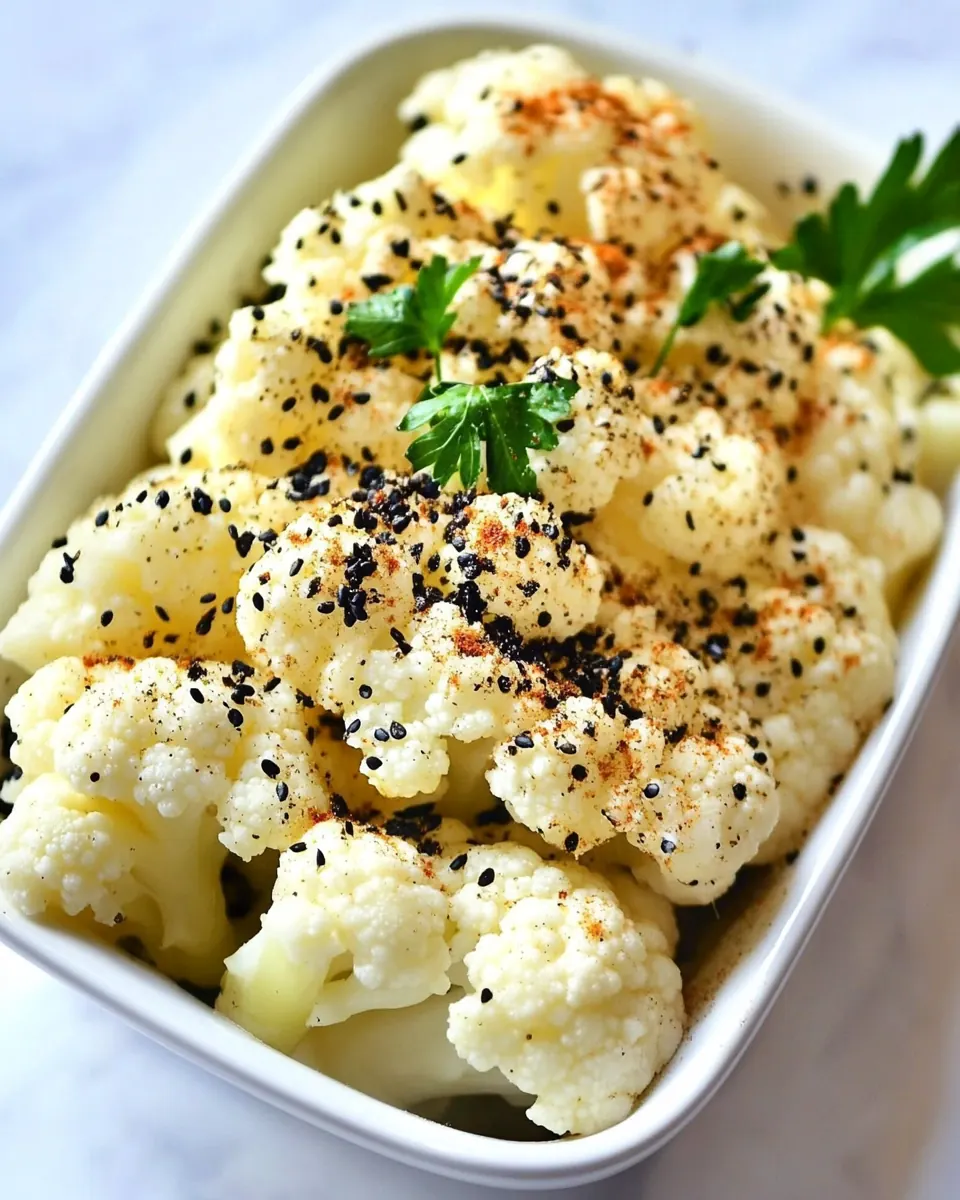
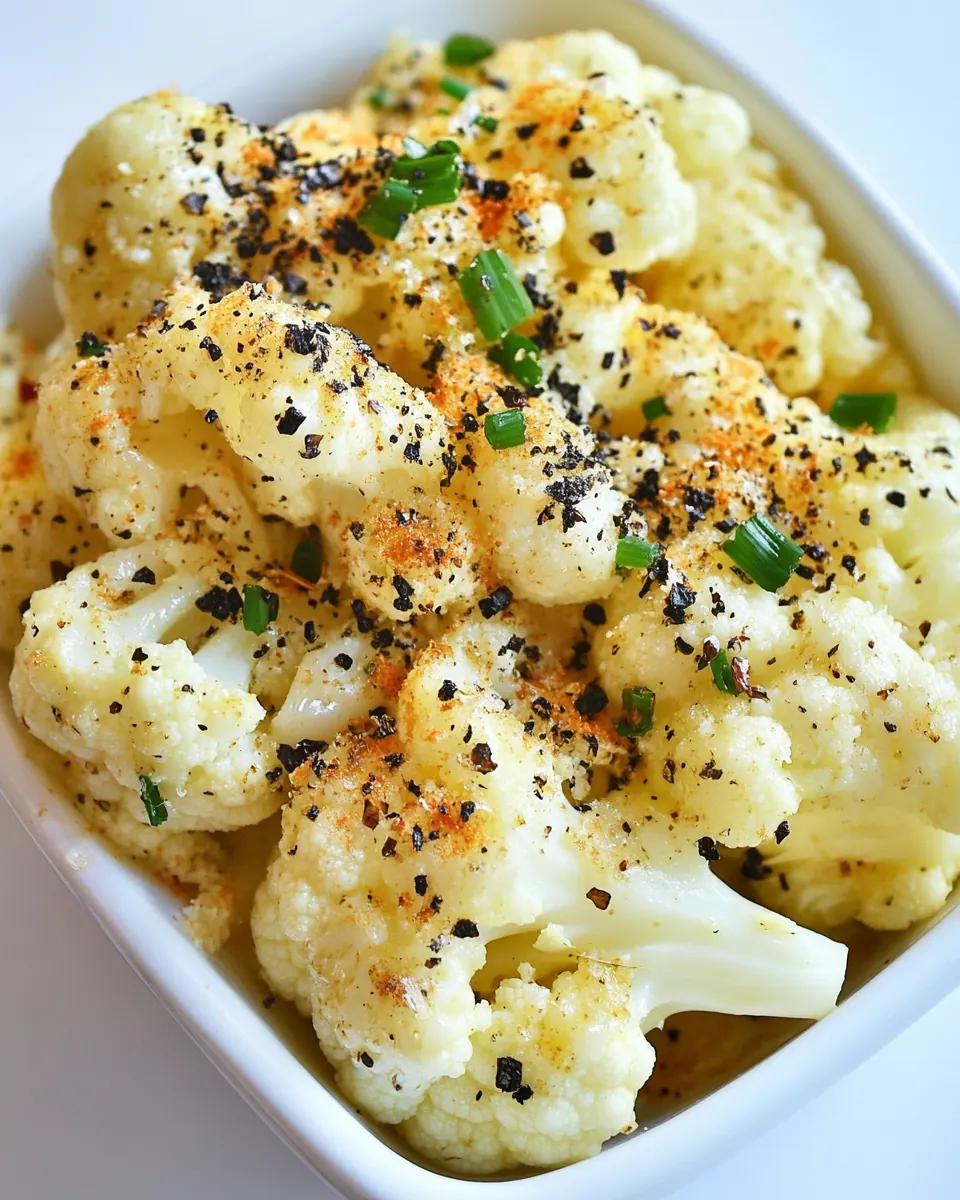
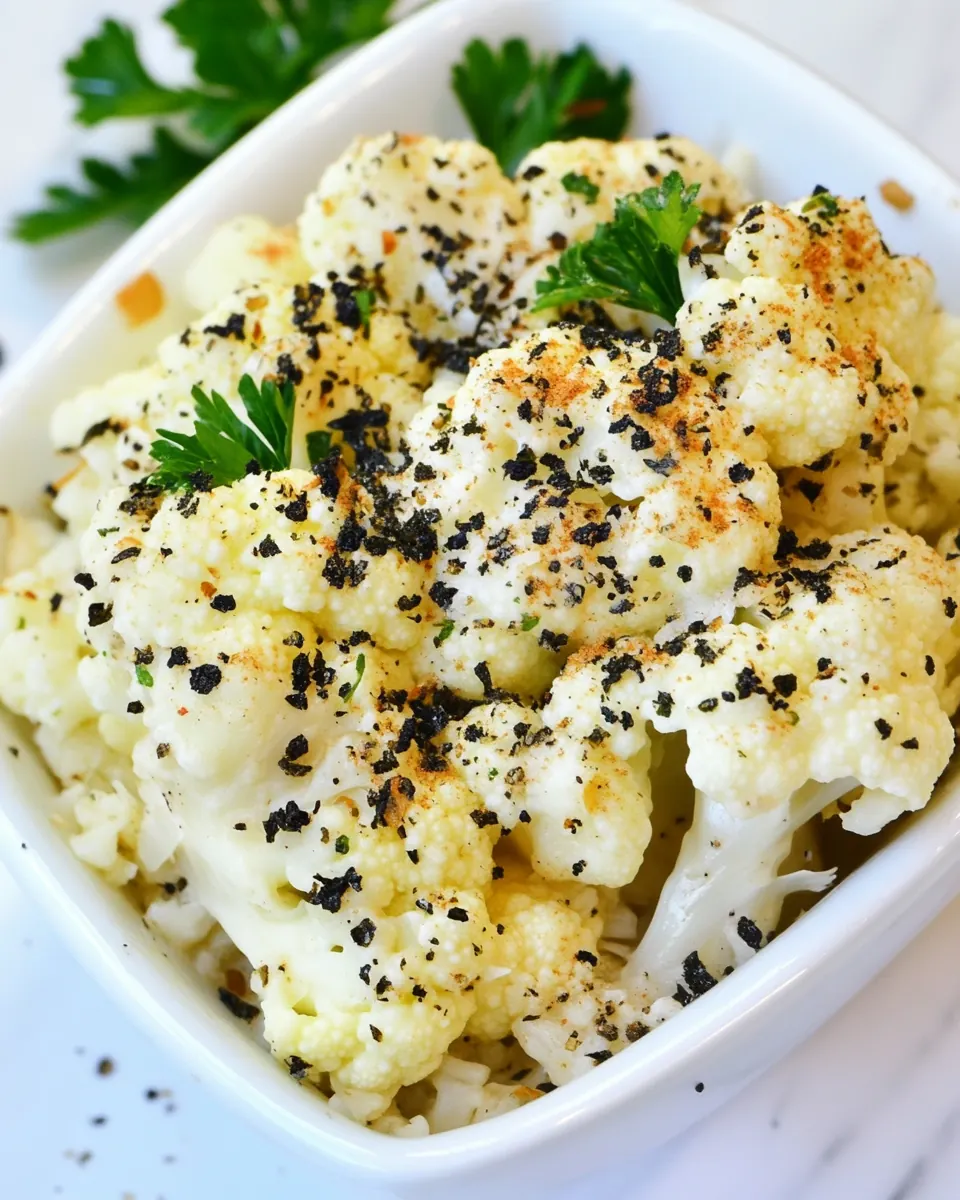
Ninja Foodi Cauliflower
Ninja Foodi Cauliflower has become one of those recipes I reach for when I want something simple but impressive, and it always surprises guests and family alike. The first time I tried it I was short on time but wanted a centerpiece that felt special. Using the Ninja Foodi’s pressure then air crisp functions made the texture spot on, tender inside with a golden top that has a lovely toasted note. I remember wiping my hands on a towel, carrying the steaming head to the table, and watching everyone lean in for that first slice.
Over the months I tweaked little things, like the seasoning I use and whether I baste the cauliflower before or after the crisping stage. I learned how gentle pressure cooking cooks through the core while the air crisp step finishes the exterior, giving a contrast that makes the whole vegetable feel indulgent. Friends now ask for this at potlucks because it holds shape well and looks elegant on a platter. When I serve it, I like to tell the story of how a humble vegetable becomes a star with just a couple of smart techniques and simple pantry items.
Recipe Snapshot
4 mins
1 mins
3 mins
Medium
80 kcal
American
Keto, Paleo
Side Dishes
Ninja Foodi, Air Crisp Basket, Tongs
Why This Ninja Foodi Cauliflower Hits Different
One appliance, big payoff
I love that Ninja Foodi Cauliflower uses the multipurpose nature of the Ninja Foodi so you get both tender steam and crisped exterior without fuss. The combo of pressure and air crisping means you do less babysitting and still get restaurant worthy results, which makes weeknight cooking feel luxurious.
Textural drama
The contrast between a fork tender interior and a lightly golden top is the real showstopper for me. That texture makes the cauliflower feel substantial enough to serve as a main or an impressive side. I find folks who claim not to love cauliflower are often converted after one bite.
Straightforward seasoning
Because the technique is solid, you only need simple additions like Olive Oil and your favorite Seasoning to elevate it. I usually keep things minimal so the natural nutty sweetness of roasted cauliflower can shine through, but the method supports bold flavors if I want to go that route.
Flexible for occasions
I bring this to casual dinners and to more festive tables because it photographs well and slices into neat wedges, making sharing easy. It scales nicely, and the timing is forgiving enough that I can prepare it alongside other dishes without stress. That practicality means I use it all year long.
Minimal cleanup
Using the inner pot and air crisp basket keeps things tidy, and because the process is quick, you avoid long oven times. I appreciate recipes that give a big sensory payoff with little fuss, and this one does exactly that.
Ninja Foodi Cauliflower Shopping List
These ingredients are intentionally few, because this method highlights the vegetable itself. Think of the list as collaborators rather than players vying for attention. The Medium Cauliflower Head is the star, while Olive Oil and the Seasoning provide texture and flavor. Together they let the natural sweetness and nuttiness of the cauliflower develop as it pressures then crisps.
- Medium Cauliflower Head: Provide a firm, sturdy core to the recipe while offering a mild, slightly nutty flavor; roast or air-fry until tender and caramelized to create a satisfying centerpiece. Slice or leave whole depending on presentation and ensure even cooking by trimming leaves and core as needed. Absorb seasonings and oil well, resulting in a meaty, vegetable-forward texture that stands in for larger dishes.
- Olive Oil – either spritz or to baste: Coat the cauliflower lightly to promote browning and crispness while preventing dryness; use a spritz for even coverage or baste with a brush for more control and flavor. Help distribute seasonings evenly and enhance the surface texture during high-heat cooking methods like air-frying or roasting. Add healthy fats and contribute subtle fruity, peppery notes depending on quality and quantity used.
- Seasoning – like garlic salt or Everything Bagel Seasoning: Add bold, concentrated taste to complement the mild cauliflower by introducing savory, garlicky, or umami-packed elements; choose garlic salt for direct seasoning or Everything Bagel for a complex mix of seeds and spices. Create a flavorful crust when applied before cooking and elevate otherwise subtle vegetable flavors with salt and aromatic components. Allow the seasoning to adhere to the oiled surface to maximize flavor penetration and final texture.
Cooking Method for Ninja Foodi Cauliflower
This cooking method relies on the Ninja Foodi’s pressure function to ensure the center cooks quickly, then finishes with air crisping for color and a toasted edge. Below I expand each step into sensory rich guidance so you know what to expect and how to troubleshoot along the way.
- Add one cup of water in the inner Ceramic bowl of the pressure cooker.: The moment the water hits the inner ceramic, you'll hear a gentle clink and the scent is neutral, but this small amount is essential because it generates the steam that softens the core without turning the cauliflower soggy. The water creates the moisture environment, so resist the temptation to add a lot more, or the florets may become waterlogged during pressure cooking. A common mistake is overfilling which reduces the air crisping effectiveness later.
- Add Air Crisp Basket inside Ceramic Pot.: As you place the basket, you may notice a light metallic click, and the basket provides separation so the cauliflower steams rather than sitting in water. This separation is important to keep the bottom from becoming mushy, which would spoil the final texture. Ensure the basket sits level, because if it tilts you risk uneven cooking and one side may finish softer than the other.
- Place whole Cauliflower into Air Crisp Basket.: When you lower the head into the basket the visual feels satisfying, a compact crown nestled into the metal grid. Position it stem side down for stability. If the cauliflower is too large to sit comfortably, trim only a little from the base rather than cutting into the florets. A common error is forcing an oversized head which leads to uneven pressure exposure and inconsistent doneness.
- Add Pressure Cooker lid to Ninja Foodi.: Securing the lid creates a sealed environment and you may notice a faint change in tightness as it locks. This sealed atmosphere allows pressure to build uniformly, which is how the core and outer sections reach similar tenderness. Make sure the lid is aligned and latched, because an improperly seated lid will not pressurize and the cooking time will be off.
- Seal VENT closed.: Closing the vent is the last mechanical step before pressure builds, and it is critical because any leak reduces effective steam and increases cooking time. You may hear a subtle click when sealed properly. Always double check the vent position, since a vent left open is a common oversight that prevents the unit from reaching proper pressure.
- Pressure Cook Cauliflower on LOW for 3 minutes. The pressure cooker will cook the cauliflower as it builds pressure, which is why the timing is so low.: During pressure building you will hear gentle hissing and then a low hum as the unit reaches pressure, and the short active time is designed because steaming occurs while pressure builds. This timing keeps the texture tender without turning mushy, since overcooking under pressure quickly leads to a mealy interior. Avoid extending the high pressure time unless you prefer a very soft result, which many people do not.
- Once completed, QUICK RELEASE the vent (carefully).: As you open the vent, a rush of steam will hiss out and you should feel the heat on your hands from a safe distance. Quick releasing stops the cooking immediately, preserving a firm but tender texture. Be careful not to place your face or hands directly over the vent, because that hot steam can burn. The frequent mistake here is releasing too slowly, which allows residual heat to keep softening the cauliflower.
- When pressure is gone, open lid.: Lifting the lid will release a warm, concentrated vegetable aroma, and you might see tiny droplets of condensation on the underside. Opening only after the pressure indicator drops prevents sudden steam bursts, so patience here protects you. A common slip is opening too soon, which can be startling and potentially hazardous.
- Remove air crisp basket (use gloves) and dump out excess water (carefully!) from inner pot.: The basket will be hot and steamy, so using protective gloves is essential, and pouring out the water keeps the next crisping step effective. You will feel the residual warmth and may notice a faint roasted scent as trapped steam escapes. If you fail to remove that water, the air crisp stage will be less effective and the exterior will not brown properly.
- Spritz or baste olive oil on head of cauliflower.: Applying Olive Oil right now rewards you with a glossy sheen on the surface which promotes browning and flavor concentration during air crisping. Use a spray for even coverage or a brush for targeted basting, but ensure a thin layer so it crisps rather than pools. Over oiling is the typical mistake, because excess oil can create spots that become too dark or greasy.
- Add any seasoning you like – I prefer garlic salt, Everything Bagel, or Lawry's seasoning salt.: When you sprinkle Seasoning over the oiled surface, the aromas begin to bloom immediately, and this is when flavors adhere best. Light, even seasoning lets the cauliflower's natural notes come through while adding desired savory accents. Avoid dumping on heavy salt or spice, because it can mask the vegetable's character and create an unbalanced bite.
- Finish roasting cauliflower by Air Frying (Air Crisp with Ninja Foodi) on 400 degrees for 10 minutes, until top is slightly golden brown and flavored.: As the air crisp stage begins you will hear a lively circulation sound and the top will slowly take on a golden hue, sometimes with tiny toasted flecks. That 400 degree heat encourages Maillard browning on the surface, which deepens flavor and adds a pleasant crust. Watch for the top to become slightly golden because overshooting this step can lead to excessive charring rather than an appetizing toast.
- Remove Cauliflower head with tongs and carefully slice or enjoy as is. Should be fork tender!: The final reveal is tactile and olfactory, with a soft give when pierced by a fork and a warm roasted scent. Slicing shows a tender interior with a golden exterior, and the contrast is what makes each bite interesting. Handle gently to keep the shape intact, because aggressive cutting can crumble the florets and spoil the presentation.
Make It Your Own
I like to treat this recipe as a template that supports small creative choices. Below are expanded tips to help you make the dish match your mood, pantry, and the occasion, while preserving the technique that makes it work.
- Adjust seasoning boldly: If you crave more punch, try a robust seasoned salt or spice blend applied lightly so the cauliflower still shines. Swap blends from meal to meal to keep the profile fresh.
- Control browning: For deeper color, extend the air crisp time by a couple of minutes but monitor closely to avoid charring. Timing varies by appliance and size of head, so check visually at the 8 minute mark.
- Use a spray for even oiling: A mist sprayer distributes oil finely and prevents pooling, helping the top crisp uniformly. Basting with a brush is fine if you prefer a more generous finish.
- Scale carefully: If your head is larger than average, expect slightly longer pressure time and a few extra minutes of air crisping. Check doneness by inserting a fork into the core for tenderness.
- Rest briefly before slicing: Let the cauliflower cool for two to three minutes after removing from the Foodi, because this helps the juices settle and makes cleaner slices.
- Pair compatible seasonings: Stick to a single dominant flavor theme like garlicky, herbed, or smoky, to keep the taste cohesive and avoid muddled flavors.
- Protect your hands: Use sturdy heat resistant gloves when removing the basket, because steam and hot metal can cause burns unexpectedly.
What to Serve Alongside Ninja Foodi Cauliflower
This dish works well almost anywhere from casual weeknight dinners to more formal gatherings, and the servings can be adjusted for sharing. Below are pairing ideas, occasions, and storage notes that help you present it beautifully and keep leftovers in great shape.
- Serve as a centerpiece: Present the whole head on a platter for family style meals, letting guests slice at the table for an interactive experience that feels special.
- Use as a hearty side: Pair with simple roasted vegetables or a grain salad for a balanced plate during lunch or dinner occasions, creating contrast in textures and colors.
- Occasions: This is suitable for weeknight dinners when you want minimal fuss but also works for more formal gatherings where a vegetable centerpiece is welcome, including holiday spreads or Ramadan if you need versatile sides.
- Storage tips: Wrap leftovers tightly and refrigerate within two hours, consuming within three days for best texture. Reheat gently in the air crisp setting for a few minutes to revive the exterior crispness.
- Seasonal pairing: Serve year round, with lighter accompaniments in spring and heartier, warming sides in cooler months, because the preparation is evergreen and adapts to seasonal menus.
FAQ
Conclusion
What makes this recipe special is how it transforms a simple head of cauliflower into a centerpiece with tender insides and a toasted exterior using two complementary Ninja Foodi functions. I encourage you to try it because the technique is forgiving, fast, and produces a memorable plate with minimal ingredients. Give it a go on a weeknight or for guests, and enjoy the little ritual of slicing into a warm, golden head that tastes far more elaborate than the effort it takes.

Ninja Foodi Cauliflower
Equipment
- Ninja Foodi
- Air Crisp Basket
- Tongs
Ingredients
- Medium Cauliflower Head Provide a firm, sturdy core to the recipe while offering a mild, slightly nutty flavor; roast or air-fry until tender and caramelized to create a satisfying centerpiece. Slice or leave whole depending on presentation and ensure even cooking by trimming leaves and core as needed. Absorb seasonings and oil well, resulting in a meaty, vegetable-forward texture that stands in for larger dishes.
- Olive Oil – either spritz or to baste Coat the cauliflower lightly to promote browning and crispness while preventing dryness; use a spritz for even coverage or baste with a brush for more control and flavor. Help distribute seasonings evenly and enhance the surface texture during high-heat cooking methods like air-frying or roasting. Add healthy fats and contribute subtle fruity, peppery notes depending on quality and quantity used.
- Seasoning – like garlic salt or Everything Bagel Seasoning Add bold, concentrated taste to complement the mild cauliflower by introducing savory, garlicky, or umami-packed elements; choose garlic salt for direct seasoning or Everything Bagel for a complex mix of seeds and spices. Create a flavorful crust when applied before cooking and elevate otherwise subtle vegetable flavors with salt and aromatic components. Allow the seasoning to adhere to the oiled surface to maximize flavor penetration and final texture.
Instructions
- Add one cup of water in the inner Ceramic bowl of the pressure cooker.: The moment the water hits the inner ceramic, you'll hear a gentle clink and the scent is neutral, but this small amount is essential because it generates the steam that softens the core without turning the cauliflower soggy. The water creates the moisture environment, so resist the temptation to add a lot more, or the florets may become waterlogged during pressure cooking. A common mistake is overfilling which reduces the air crisping effectiveness later.
- Add Air Crisp Basket inside Ceramic Pot.: As you place the basket, you may notice a light metallic click, and the basket provides separation so the cauliflower steams rather than sitting in water. This separation is important to keep the bottom from becoming mushy, which would spoil the final texture. Ensure the basket sits level, because if it tilts you risk uneven cooking and one side may finish softer than the other.
- Place whole Cauliflower into Air Crisp Basket.: When you lower the head into the basket the visual feels satisfying, a compact crown nestled into the metal grid. Position it stem side down for stability. If the cauliflower is too large to sit comfortably, trim only a little from the base rather than cutting into the florets. A common error is forcing an oversized head which leads to uneven pressure exposure and inconsistent doneness.
- Add Pressure Cooker lid to Ninja Foodi.: Securing the lid creates a sealed environment and you may notice a faint change in tightness as it locks. This sealed atmosphere allows pressure to build uniformly, which is how the core and outer sections reach similar tenderness. Make sure the lid is aligned and latched, because an improperly seated lid will not pressurize and the cooking time will be off.
- Seal VENT closed.: Closing the vent is the last mechanical step before pressure builds, and it is critical because any leak reduces effective steam and increases cooking time. You may hear a subtle click when sealed properly. Always double check the vent position, since a vent left open is a common oversight that prevents the unit from reaching proper pressure.
- Pressure Cook Cauliflower on LOW for 3 minutes. The pressure cooker will cook the cauliflower as it builds pressure, which is why the timing is so low.: During pressure building you will hear gentle hissing and then a low hum as the unit reaches pressure, and the short active time is designed because steaming occurs while pressure builds. This timing keeps the texture tender without turning mushy, since overcooking under pressure quickly leads to a mealy interior. Avoid extending the high pressure time unless you prefer a very soft result, which many people do not.
- Once completed, QUICK RELEASE the vent (carefully).: As you open the vent, a rush of steam will hiss out and you should feel the heat on your hands from a safe distance. Quick releasing stops the cooking immediately, preserving a firm but tender texture. Be careful not to place your face or hands directly over the vent, because that hot steam can burn. The frequent mistake here is releasing too slowly, which allows residual heat to keep softening the cauliflower.
- When pressure is gone, open lid.: Lifting the lid will release a warm, concentrated vegetable aroma, and you might see tiny droplets of condensation on the underside. Opening only after the pressure indicator drops prevents sudden steam bursts, so patience here protects you. A common slip is opening too soon, which can be startling and potentially hazardous.
- Remove air crisp basket (use gloves) and dump out excess water (carefully!) from inner pot.: The basket will be hot and steamy, so using protective gloves is essential, and pouring out the water keeps the next crisping step effective. You will feel the residual warmth and may notice a faint roasted scent as trapped steam escapes. If you fail to remove that water, the air crisp stage will be less effective and the exterior will not brown properly.
- Spritz or baste olive oil on head of cauliflower.: Applying Olive Oil right now rewards you with a glossy sheen on the surface which promotes browning and flavor concentration during air crisping. Use a spray for even coverage or a brush for targeted basting, but ensure a thin layer so it crisps rather than pools. Over oiling is the typical mistake, because excess oil can create spots that become too dark or greasy.
- Add any seasoning you like – I prefer garlic salt, Everything Bagel, or Lawry's seasoning salt.: When you sprinkle Seasoning over the oiled surface, the aromas begin to bloom immediately, and this is when flavors adhere best. Light, even seasoning lets the cauliflower's natural notes come through while adding desired savory accents. Avoid dumping on heavy salt or spice, because it can mask the vegetable's character and create an unbalanced bite.
- Finish roasting cauliflower by Air Frying (Air Crisp with Ninja Foodi) on 400 degrees for 10 minutes, until top is slightly golden brown and flavored.: As the air crisp stage begins you will hear a lively circulation sound and the top will slowly take on a golden hue, sometimes with tiny toasted flecks. That 400 degree heat encourages Maillard browning on the surface, which deepens flavor and adds a pleasant crust. Watch for the top to become slightly golden because overshooting this step can lead to excessive charring rather than an appetizing toast.
- Remove Cauliflower head with tongs and carefully slice or enjoy as is. Should be fork tender!: The final reveal is tactile and olfactory, with a soft give when pierced by a fork and a warm roasted scent. Slicing shows a tender interior with a golden exterior, and the contrast is what makes each bite interesting. Handle gently to keep the shape intact, because aggressive cutting can crumble the florets and spoil the presentation.
Notes
- Adjust seasoning boldly: If you crave more punch, try a robust seasoned salt or spice blend applied lightly so the cauliflower still shines. Swap blends from meal to meal to keep the profile fresh.
- Control browning: For deeper color, extend the air crisp time by a couple of minutes but monitor closely to avoid charring. Timing varies by appliance and size of head, so check visually at the 8 minute mark.
- Use a spray for even oiling: A mist sprayer distributes oil finely and prevents pooling, helping the top crisp uniformly. Basting with a brush is fine if you prefer a more generous finish.
- Scale carefully: If your head is larger than average, expect slightly longer pressure time and a few extra minutes of air crisping. Check doneness by inserting a fork into the core for tenderness.
- Rest briefly before slicing: Let the cauliflower cool for two to three minutes after removing from the Foodi, because this helps the juices settle and makes cleaner slices.
- Pair compatible seasonings: Stick to a single dominant flavor theme like garlicky, herbed, or smoky, to keep the taste cohesive and avoid muddled flavors.
- Protect your hands: Use sturdy heat resistant gloves when removing the basket, because steam and hot metal can cause burns unexpectedly.