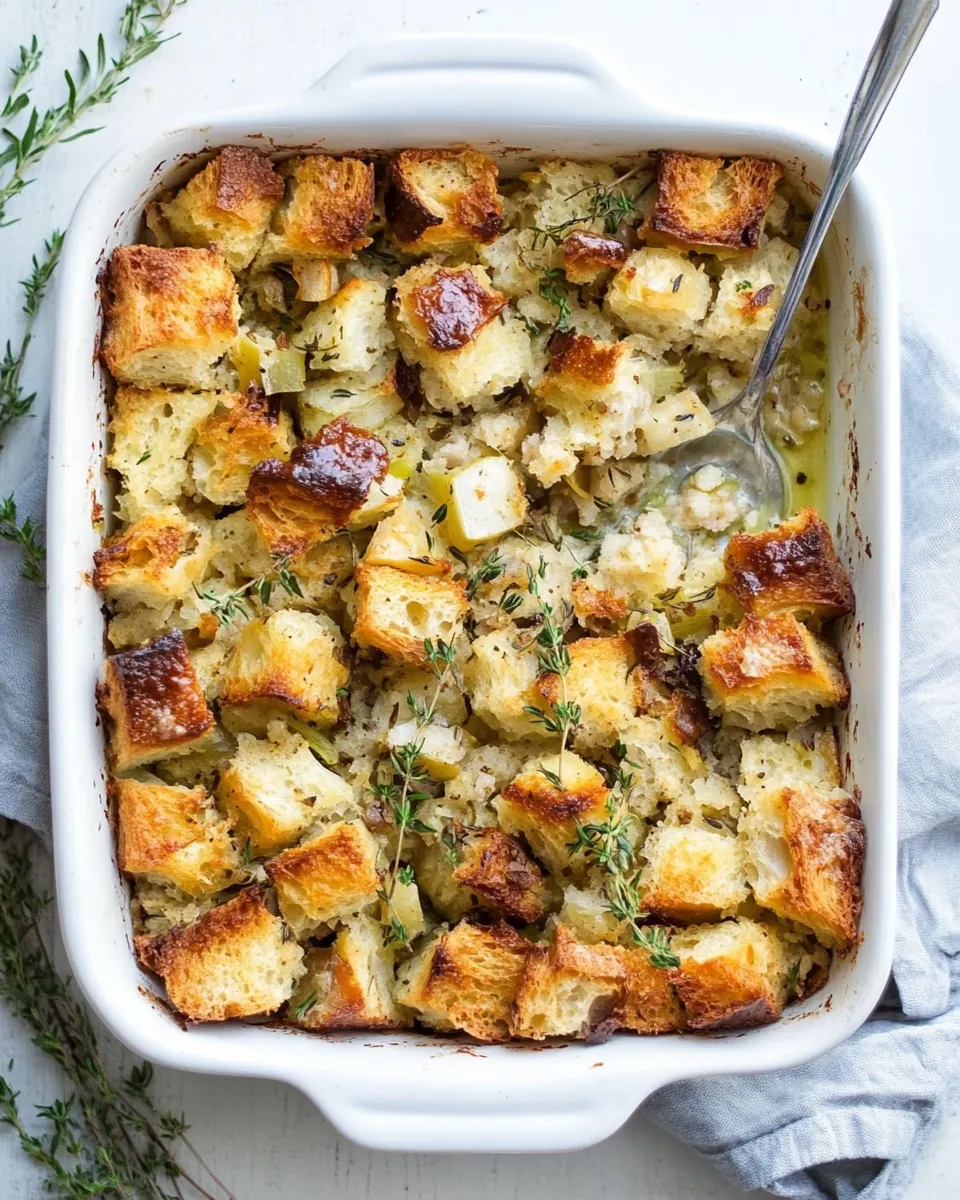
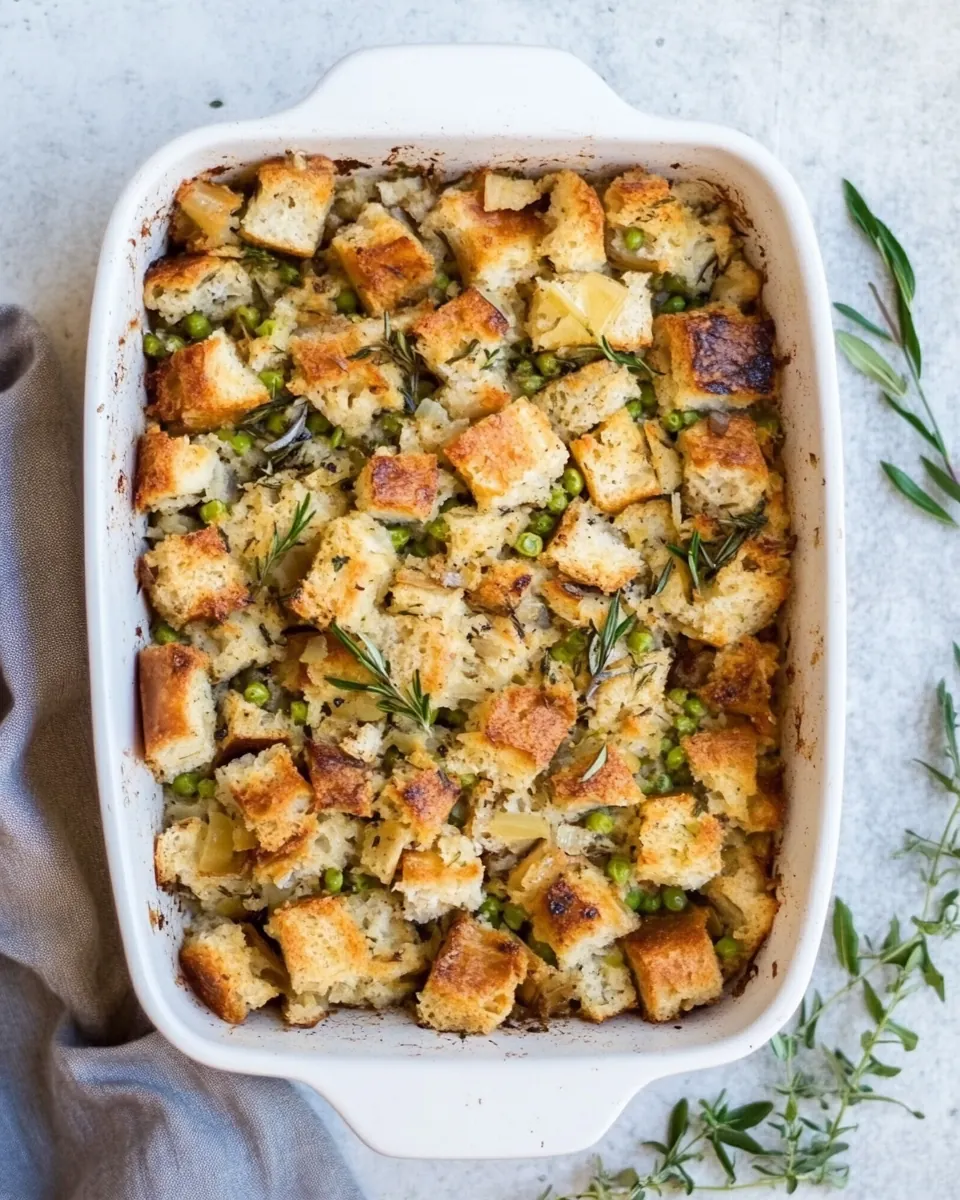
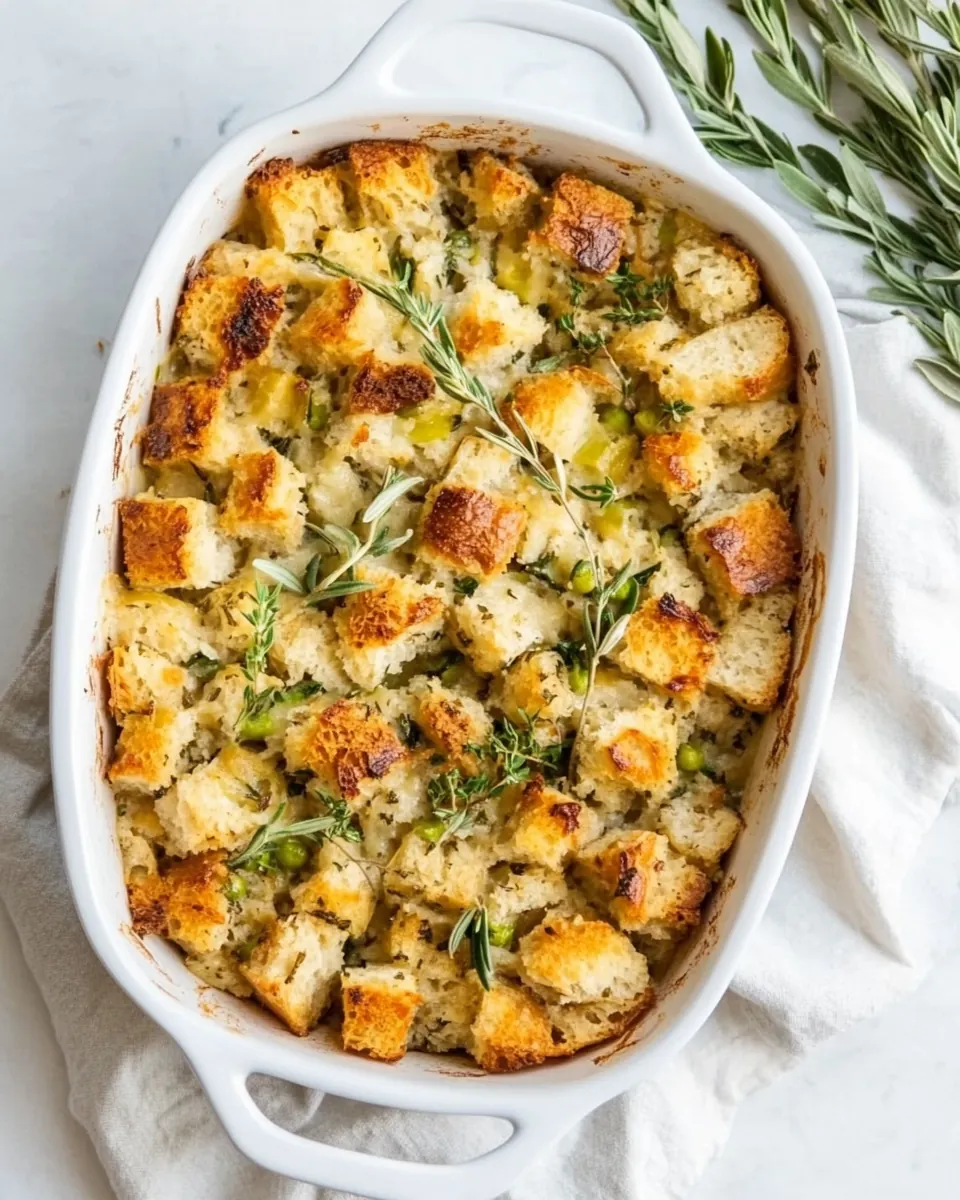
Gluten Free Stuffing
Gluten Free Stuffing has been one of those recipes I reach for when I want comfort that feels both familiar and thoughtful, and the first time I made it for a holiday table everyone asked for the recipe before the plates were cleared.
That afternoon I stood at the counter with a bowl of torn gluten free bread, a pan of sizzling butter, and the aromatics of onion and celery filling the kitchen. I remember how the mixture smelled warm and herbal as I stirred in the chopped parsley and the tiny, fragrant hits of sage, thyme, and marjoram. It felt like making a patchwork of flavors into something whole, the kind of food that gathers people.
Over the years I have tweaked the balance of bread to broth and eggs until the texture was just right, moist but not soggy, with crisp edges from the oven. I like that this version celebrates simple technique more than fancy ingredients, and that you can make the day before, yet it still tastes bright and freshly baked when you serve it. Friends who need gluten free options have told me this is the stuffing they judge every other stuffing by, and that praise sticks with me.
Recipe Snapshot
1 hr 10 mins
20 mins
50 mins
Medium
250 kcal
American
Gluten-Free, Low FODMAP
Side Dishes
Large skillet, 9-inch by 13-inch baking dish, Mixing bowl, Whisk
What You’ll Enjoy About This Gluten Free Stuffing
Comfort with Confidence
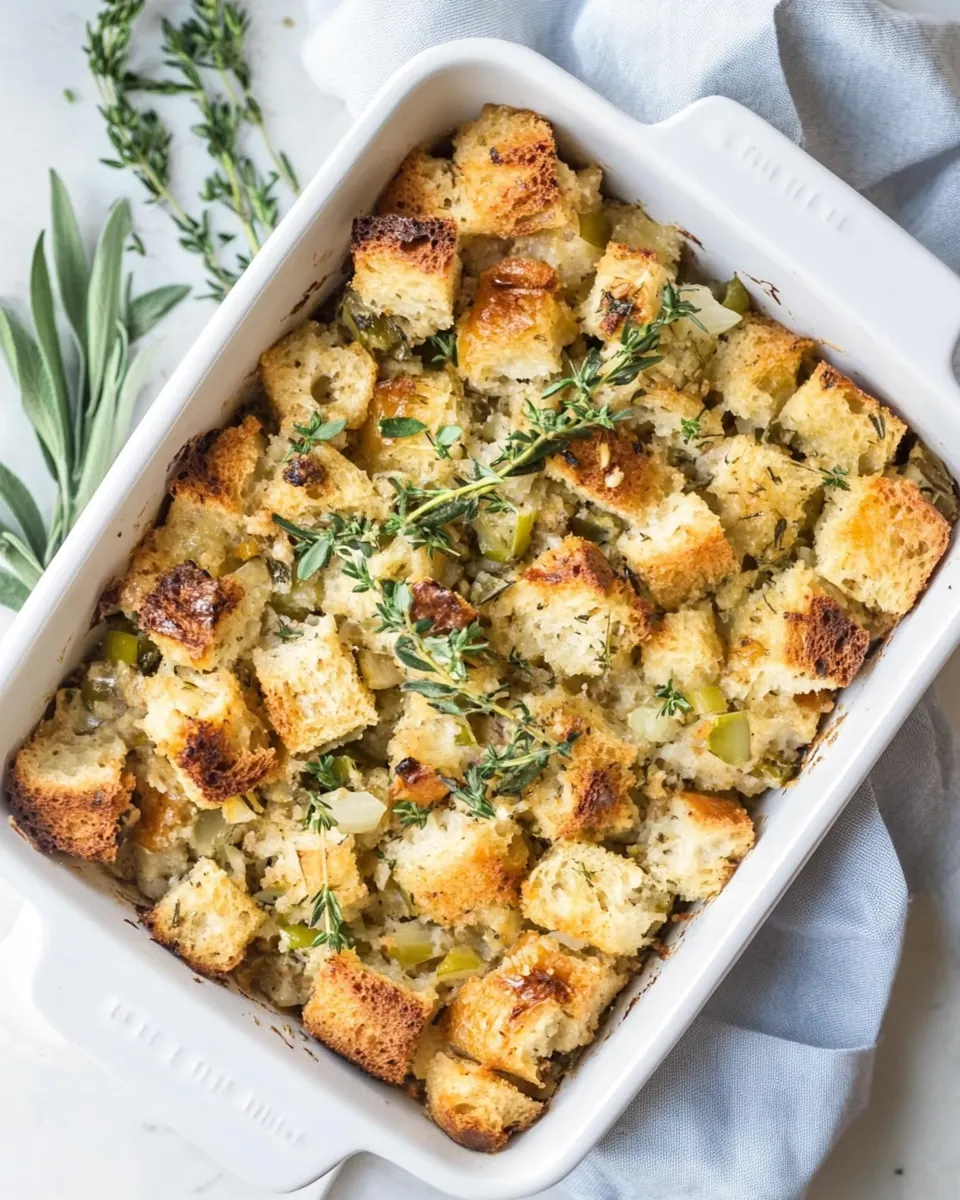
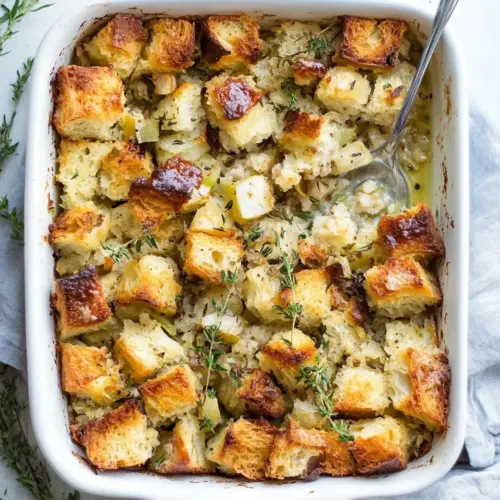
I love how Gluten Free Stuffing delivers that homey, nostalgic comfort without compromise. When I serve it, guests often close their eyes for a second and smile, and I think that comes from the buttery base and the toasted bread cubes soaking up the chicken broth. The result is rich yet clean, a texture that is both tender and pleasantly chewy at the center.
Simple, Trusted Ingredients
What stands out is the ingredient list itself: basic pantry staples that layer flavor naturally. Using quality butter gives the dish a rounded mouthfeel, while the trio of herbs adds subtle complexity. I like that this is approachable, you do not need specialty items to make something impressive.
Versatile and Make Ahead Friendly
One of the reasons I keep this recipe in heavy rotation is how well it adapts to timing. You can dry the gluten free bread a day or two ahead, assemble in advance, and then finish in the oven just before serving. That flexibility means less stress on the big day, and it still gets those crisp edges that make everyone happy.
Great for Groups and Holidays
This version scales nicely, and because the flavors are classic, it pairs seamlessly with roasted mains and simple vegetables. I often double the batch for gatherings, knowing the texture holds up when reheated. It is reliably a crowd pleaser that fits into traditional holiday spreads.
Trusted Technique Yields Consistent Results
The method behind this dish is forgiving but precise enough to matter. Sweating the onion and celery slowly builds sweetness, and whisking the eggs with chicken broth binds the cubes into the right consistency. I find these small steps make a huge difference in the final bite.
Everything You Need for Gluten Free Stuffing
This ingredient list reads like a short story about how simple parts come together to create something memorable. The key players are the toasted gluten free bread that provides structure, the butter that carries flavor, the aromatic duo of onion and celery that builds sweetness, and the chicken broth and eggs that bind the mixture so it bakes moist with crisp edges. Each ingredient plays a clear role, balancing texture and aroma so the finished dish is comforting and well rounded.
- 1/2 cup butter (1 stick) plus more for buttering dish: Melted and rich, provides moisture and a silky mouthfeel while helping sauté vegetables and bind the stuffing; use softened butter to brown onions and celery and dot the top before baking for flavor and color.
- 1 large onion peeled, chopped: Peeled and chopped to release sweet, savory aromatics when cooked; onions form the flavor base, soften with butter, and contribute texture and depth to the stuffing.
- 4 celery ribs halved lengthwise and chopped: Crisp and aromatic when halved and chopped, celery adds a fresh vegetal crunch and aromatic bitterness that balances richness; cook until tender to integrate its texture into the mixture.
- 3 eggs: Beaten and incorporated to act as a binding agent and add richness and structure; eggs help hold the cubed bread together and contribute to a tender, custardy interior.
- 2 cups chicken broth (see note 1): Savory and hydrating liquid that moistens dried bread and dissolves seasonings; chicken broth infuses umami and helps achieve the right stuffing consistency before baking.
- salt and freshly ground black pepper: Seasoning agents used to enhance and balance flavors; salt and freshly ground black pepper bring out natural tastes and provide essential seasoning control throughout preparation.
- 1/2 cup minced fresh parsley (see note 2): Fresh and bright herb that adds a clean, grassy note and visual color; minced parsley is stirred in near the end to lift flavors and enhance freshness.
- 1 teaspoon minced fresh sage or 1/2 teaspoon dried: Earthy and slightly peppery herb used to impart warm, savory depth; minced sage lends classic stuffing aroma and pairs well with butter and poultry flavors.
- 1 teaspoon minced fresh thyme or 1/2 teaspoon dried: Delicate and lemony, thyme contributes subtle floral and savory notes that harmonize with other herbs and deepen the overall herbaceous profile.
- 1 teaspoon minced fresh marjoram or 1/2 teaspoon dried: Mildly floral and sweet, marjoram brings soft aromatic complexity and rounds out the herb blend; mince finely to distribute its gentle flavor throughout the stuffing.
- 1 loaf gluten-free bread cut into 1/2-inch cubes and dried overnight on counter (about 1 pound, see note 3): Dried, cubed base that soaks up broth and binds with eggs and butter; gluten–free bread provides structure and texture while keeping the dish suitable for gluten-sensitive diners.
The Method for Gluten Free Stuffing
I approach the method with patience because small texture decisions make a big difference in the final dish. The aim is to coax sweetness from the vegetables, hydrate the bread properly, and bake so the center is tender while the edges crisp. Below are the steps rewritten in a conversational, sensory way that helps you judge doneness and avoid common pitfalls.
- Adjust oven rack to middle position and preheat to 400 degrees. Coat a 9-inch by 13-inch baking dish with butter.: As the oven warms, you will notice a faint heat rising and the kitchen taking on a warm anticipation, which primes the dish to brown evenly, especially the top edges where crispness forms. Using the middle rack ensures balanced air circulation, preventing the bottom from burning while the top stays pale. A frequent misstep is placing the dish too close to the heating element, which can crisp the top too quickly while leaving the interior undercooked. I like to set a timer early so the oven is fully stabilized at temperature before the dish goes in.
- In large skillet over medium-high heat, melt butter until foaming. Add onion and celery and sauté until translucent, about 7 to 8 minutes. Meanwhile, whisk eggs in large bowl. Stir in broth, 1 teaspoon salt, and 1/2 teaspoon pepper.: Rubbing the pan with softened butter creates a nonstick barrier and an initial layer of flavor that toasts against the dish surface, producing those irresistible browned edges. The butter will begin to melt and scent the pan, and when the stuffing hits that warm surface it starts developing a slightly toasted base that contrasts with the soft center. Avoid skipping this step, because without it the stuffing can cling and tear when serving; too much butter pooled in the bottom can make the underside greasy, so aim for an even coating.
- To skillet, add parsley, sage, thyme, and marjoram until fragrant, about 30 seconds. Transfer to bowl with eggs and mix well. Add bread cubes and toss to combine. Transfer to prepared baking dish.: As the butter melts and begins to foam, it releases a rich, nutty aroma that signals it is ready for the aromatics. The gentle sizzle is an auditory cue that the pan is at the correct heat for sautéing. If you overheat and let the butter brown, it will impart a roasted flavor that can overshadow the delicate herbs, so keep it to a gentle foam.
- Cover tightly with foil and bake until mostly heated through, about 25 minutes. Remove foil and bake until crispy edges form, about 15 to 20 minutes longer.: During the sauté you will see the onion go from opaque to translucent and the celery soften, releasing sweet vegetal juices that mix with the butter. The sound will be a steady gentle sizzle and the smell will deepen into a mellow, caramelized aroma. Cooking too quickly on too high heat will brown the vegetables rather than sweeten them, changing the flavor profile; patience here yields a sweeter, more nuanced base.
- Meanwhile, whisk eggs in large bowl: While the vegetables cook, whisking the eggs introduces air and creates a uniform binder so the chicken broth mixes smoothly. The eggs should look pale and slightly frothy, signaling they are well combined. Under whisking can leave streaks of yolk that do not distribute evenly, causing uneven setting when baked; over whisking will add foam which can change texture, so aim for smooth and consistent.
- Stir in broth, 1 teaspoon salt, and 1/2 teaspoon pepper: Pouring warm chicken broth into the whisked eggs releases steam and slightly warms the mixture, which helps the bread absorb evenly. The seasoning at this stage allows you to taste and adjust the savory backbone before it meets the bread cubes. A common error is adding all the broth cold, which can create condensation and uneven absorption; using warm broth yields a silkier finish.
- To skillet, add parsley, sage, thyme, and marjoram until fragrant, about 30 seconds: Tossing the parsley and other herbs into the hot skillet for a quick 30 seconds blooms their oils and heightens aroma without overcooking them. You will catch a bright herbal bouquet lift from the pan, a key sensory moment that tells you the aromatics are ready. Watch closely, because herbs can go from fragrant to bitter if left too long on high heat; a brief toss is all you need.
- Transfer to bowl with eggs and mix well: When the hot herb and vegetable mixture meets the egg and broth, steam and savory notes mingle and the mixture loosens slightly, creating a cohesive liquid for the bread cubes to soak in. The bowl should feel warm and you will see the liquids blend into a single glossy mixture. If the pan contents are too hot and go directly into cold eggs, you risk scrambling; temper the eggs gently by stirring as you add the warm mixture.
- Add bread cubes and toss to combine: Tossing the dried gluten free bread with the liquid allows the cubes to hydrate uniformly, absorbing just enough to be tender without falling apart. Run your hands or a spoon through the bowl to ensure every cube is coated, and look for a texture that gives slightly when pressed. Clumping indicates too much liquid in one area, while dry pockets suggest insufficient mixing; adjust by letting it sit briefly if needed so the moisture evens out.
- Transfer to prepared baking dish: Spreading the moistened bread evenly into the buttered pan sets up uniform baking. Use a spatula to level the surface so the center and edges cook at the same rate, which helps the crisping process be consistent. An uneven bed can cause some areas to dry more quickly while others remain too moist, so take a moment to smooth it out.
- Cover tightly with foil and bake until mostly heated through, about 25 minutes: Covering traps steam and ensures the interior warms and sets gently, creating a tender crumb. As it bakes you may notice a faint steam escaping when you lift the foil, and the center should feel springy when gently pressed. Removing the foil too soon will dry the center, while leaving it too long can prevent the top from developing texture, so aim for that mostly set stage.
- Remove foil and bake until crispy edges form, about 15 to 20 minutes longer: When you uncover the dish the oven begins concentrating heat on the surface, coaxing golden brown, slightly blistered edges and a toasty aroma that tells you the stuffing is ready. You will hear a soft crackle as the top crisps and smell a rich, browned butter and herb fragrance. A common mistake is pulling it out before those edges form, which robs the dish of contrast; watch for a deep golden color at the rim for the ideal finish.
Customization Ideas
I often get asked how to make this dish feel more personal, so these ideas focus on texture, timing, and flavor lifts you can control without changing the core recipe. Each tip starts with a concise suggestion followed by practical notes on how to execute it.
- Use different gluten free breads Try a softer white loaf or a denser multigrain to vary texture, remembering that denser loaves may need slightly more liquid to hydrate fully.
- Make it ahead Assemble the stuffing up to one day in advance and keep it covered in the refrigerator, then bake covered first and finish uncovered to get the crisp edges.
- Adjust herb intensity If you prefer a milder profile, reduce sage and marjoram by half and boost parsley to keep brightness without overpowering the dish.
- Control browning If your oven runs hot, tent the dish with foil for the final minutes to prevent darkening while still allowing the center to set.
- Toast the bread in the oven If you cannot dry the bread overnight, bake the cubes at 300 degrees for 30 to 40 minutes to remove moisture and concentrate flavor before assembling.
What Complements This Gluten Free Stuffing
This stuffing slots into many meal contexts, from weekday dinners to celebratory feasts, and the right accompaniments enhance its comforting, savory character. Below are serving ideas and practical notes presented as a list so you can mix and match based on occasion and timing.
- Roast poultry A roasted chicken or turkey pairs beautifully, with the stuffing absorbing pan juices and carrying those savory notes through every bite.
- Simple roasted vegetables Vegetables like roasted root vegetables or sautéed green beans add color and a caramelized counterpoint to the buttery stuffing.
- Holiday spreads For Thanksgiving or similar gatherings, place the stuffing alongside slices of roasted bird and a gravy on the side so guests can add saucy richness as they wish.
- Leftover storage Store cooled leftovers covered in the refrigerator for up to four days, and reheat in a 350 degree oven until warmed through to help the edges regain some crispness.
- Seasonal pairings In the fall I serve this with spiced sides like roasted squash, while in other seasons lighter salads can balance the richness.
- Serving style Spoon into a warm serving dish and garnish with a sprinkle of fresh parsley to add a fresh visual and flavor lift right before serving.
FAQ
Conclusion
This Gluten Free Stuffing stands out for its simple ingredients and reliable technique that produce a tender interior with crisp, flavorful edges. Give it a try when you want a comforting side that accommodates gluten free needs without sacrificing traditional flavor and texture. Make it your own by choosing your favorite gluten free bread and fresh herbs, and enjoy the way it brings people to the table with familiar, satisfying taste.
Gluten Free Stuffing
Equipment
- Large Skillet
- 9-inch by 13-inch baking dish
- Mixing Bowl
- Whisk
Ingredients
- 1/2 cup butter (1 stick) plus more for buttering dish Melted and rich, provides moisture and a silky mouthfeel while helping sauté vegetables and bind the stuffing; use softened butter to brown onions and celery and dot the top before baking for flavor and color.
- 1 large onion peeled, chopped Peeled and chopped to release sweet, savory aromatics when cooked; onions form the flavor base, soften with butter, and contribute texture and depth to the stuffing.
- 4 celery ribs halved lengthwise and chopped Crisp and aromatic when halved and chopped, celery adds a fresh vegetal crunch and aromatic bitterness that balances richness; cook until tender to integrate its texture into the mixture.
- 3 eggs Beaten and incorporated to act as a binding agent and add richness and structure; eggs help hold the cubed bread together and contribute to a tender, custardy interior.
- 2 cups chicken broth (see note 1) Savory and hydrating liquid that moistens dried bread and dissolves seasonings; chicken broth infuses umami and helps achieve the right stuffing consistency before baking.
- salt and freshly ground black pepper Seasoning agents used to enhance and balance flavors; salt and freshly ground black pepper bring out natural tastes and provide essential seasoning control throughout preparation.
- 1/2 cup minced fresh parsley (see note 2) Fresh and bright herb that adds a clean, grassy note and visual color; minced parsley is stirred in near the end to lift flavors and enhance freshness.
- 1 teaspoon minced fresh sage or 1/2 teaspoon dried Earthy and slightly peppery herb used to impart warm, savory depth; minced sage lends classic stuffing aroma and pairs well with butter and poultry flavors.
- 1 teaspoon minced fresh thyme or 1/2 teaspoon dried Delicate and lemony, thyme contributes subtle floral and savory notes that harmonize with other herbs and deepen the overall herbaceous profile.
- 1 teaspoon minced fresh marjoram or 1/2 teaspoon dried Mildly floral and sweet, marjoram brings soft aromatic complexity and rounds out the herb blend; mince finely to distribute its gentle flavor throughout the stuffing.
- 1 loaf gluten-free bread cut into 1/2-inch cubes and dried overnight on counter (about 1 pound, see note 3) Dried, cubed base that soaks up broth and binds with eggs and butter; gluten-free bread provides structure and texture while keeping the dish suitable for gluten-sensitive diners.
Instructions
- Adjust oven rack to middle position and preheat to 400 degrees. Coat a 9-inch by 13-inch baking dish with butter.: As the oven warms, you will notice a faint heat rising and the kitchen taking on a warm anticipation, which primes the dish to brown evenly, especially the top edges where crispness forms. Using the middle rack ensures balanced air circulation, preventing the bottom from burning while the top stays pale. A frequent misstep is placing the dish too close to the heating element, which can crisp the top too quickly while leaving the interior undercooked. I like to set a timer early so the oven is fully stabilized at temperature before the dish goes in.
- In large skillet over medium-high heat, melt butter until foaming. Add onion and celery and sauté until translucent, about 7 to 8 minutes. Meanwhile, whisk eggs in large bowl. Stir in broth, 1 teaspoon salt, and 1/2 teaspoon pepper.: Rubbing the pan with softened butter creates a nonstick barrier and an initial layer of flavor that toasts against the dish surface, producing those irresistible browned edges. The butter will begin to melt and scent the pan, and when the stuffing hits that warm surface it starts developing a slightly toasted base that contrasts with the soft center. Avoid skipping this step, because without it the stuffing can cling and tear when serving; too much butter pooled in the bottom can make the underside greasy, so aim for an even coating.
- To skillet, add parsley, sage, thyme, and marjoram until fragrant, about 30 seconds. Transfer to bowl with eggs and mix well. Add bread cubes and toss to combine. Transfer to prepared baking dish.: As the butter melts and begins to foam, it releases a rich, nutty aroma that signals it is ready for the aromatics. The gentle sizzle is an auditory cue that the pan is at the correct heat for sautéing. If you overheat and let the butter brown, it will impart a roasted flavor that can overshadow the delicate herbs, so keep it to a gentle foam.
- Cover tightly with foil and bake until mostly heated through, about 25 minutes. Remove foil and bake until crispy edges form, about 15 to 20 minutes longer.: During the sauté you will see the onion go from opaque to translucent and the celery soften, releasing sweet vegetal juices that mix with the butter. The sound will be a steady gentle sizzle and the smell will deepen into a mellow, caramelized aroma. Cooking too quickly on too high heat will brown the vegetables rather than sweeten them, changing the flavor profile; patience here yields a sweeter, more nuanced base.
- Meanwhile, whisk eggs in large bowl: While the vegetables cook, whisking the eggs introduces air and creates a uniform binder so the chicken broth mixes smoothly. The eggs should look pale and slightly frothy, signaling they are well combined. Under whisking can leave streaks of yolk that do not distribute evenly, causing uneven setting when baked; over whisking will add foam which can change texture, so aim for smooth and consistent.
- Stir in broth, 1 teaspoon salt, and 1/2 teaspoon pepper: Pouring warm chicken broth into the whisked eggs releases steam and slightly warms the mixture, which helps the bread absorb evenly. The seasoning at this stage allows you to taste and adjust the savory backbone before it meets the bread cubes. A common error is adding all the broth cold, which can create condensation and uneven absorption; using warm broth yields a silkier finish.
- To skillet, add parsley, sage, thyme, and marjoram until fragrant, about 30 seconds: Tossing the parsley and other herbs into the hot skillet for a quick 30 seconds blooms their oils and heightens aroma without overcooking them. You will catch a bright herbal bouquet lift from the pan, a key sensory moment that tells you the aromatics are ready. Watch closely, because herbs can go from fragrant to bitter if left too long on high heat; a brief toss is all you need.
- Transfer to bowl with eggs and mix well: When the hot herb and vegetable mixture meets the egg and broth, steam and savory notes mingle and the mixture loosens slightly, creating a cohesive liquid for the bread cubes to soak in. The bowl should feel warm and you will see the liquids blend into a single glossy mixture. If the pan contents are too hot and go directly into cold eggs, you risk scrambling; temper the eggs gently by stirring as you add the warm mixture.
- Add bread cubes and toss to combine: Tossing the dried gluten free bread with the liquid allows the cubes to hydrate uniformly, absorbing just enough to be tender without falling apart. Run your hands or a spoon through the bowl to ensure every cube is coated, and look for a texture that gives slightly when pressed. Clumping indicates too much liquid in one area, while dry pockets suggest insufficient mixing; adjust by letting it sit briefly if needed so the moisture evens out.
- Transfer to prepared baking dish: Spreading the moistened bread evenly into the buttered pan sets up uniform baking. Use a spatula to level the surface so the center and edges cook at the same rate, which helps the crisping process be consistent. An uneven bed can cause some areas to dry more quickly while others remain too moist, so take a moment to smooth it out.
- Cover tightly with foil and bake until mostly heated through, about 25 minutes: Covering traps steam and ensures the interior warms and sets gently, creating a tender crumb. As it bakes you may notice a faint steam escaping when you lift the foil, and the center should feel springy when gently pressed. Removing the foil too soon will dry the center, while leaving it too long can prevent the top from developing texture, so aim for that mostly set stage.
- Remove foil and bake until crispy edges form, about 15 to 20 minutes longer: When you uncover the dish the oven begins concentrating heat on the surface, coaxing golden brown, slightly blistered edges and a toasty aroma that tells you the stuffing is ready. You will hear a soft crackle as the top crisps and smell a rich, browned butter and herb fragrance. A common mistake is pulling it out before those edges form, which robs the dish of contrast; watch for a deep golden color at the rim for the ideal finish.
Notes
- Use different gluten free breads Try a softer white loaf or a denser multigrain to vary texture, remembering that denser loaves may need slightly more liquid to hydrate fully.
- Make it ahead Assemble the stuffing up to one day in advance and keep it covered in the refrigerator, then bake covered first and finish uncovered to get the crisp edges.
- Adjust herb intensity If you prefer a milder profile, reduce sage and marjoram by half and boost parsley to keep brightness without overpowering the dish.
- Control browning If your oven runs hot, tent the dish with foil for the final minutes to prevent darkening while still allowing the center to set.
- Toast the bread in the oven If you cannot dry the bread overnight, bake the cubes at 300 degrees for 30 to 40 minutes to remove moisture and concentrate flavor before assembling.