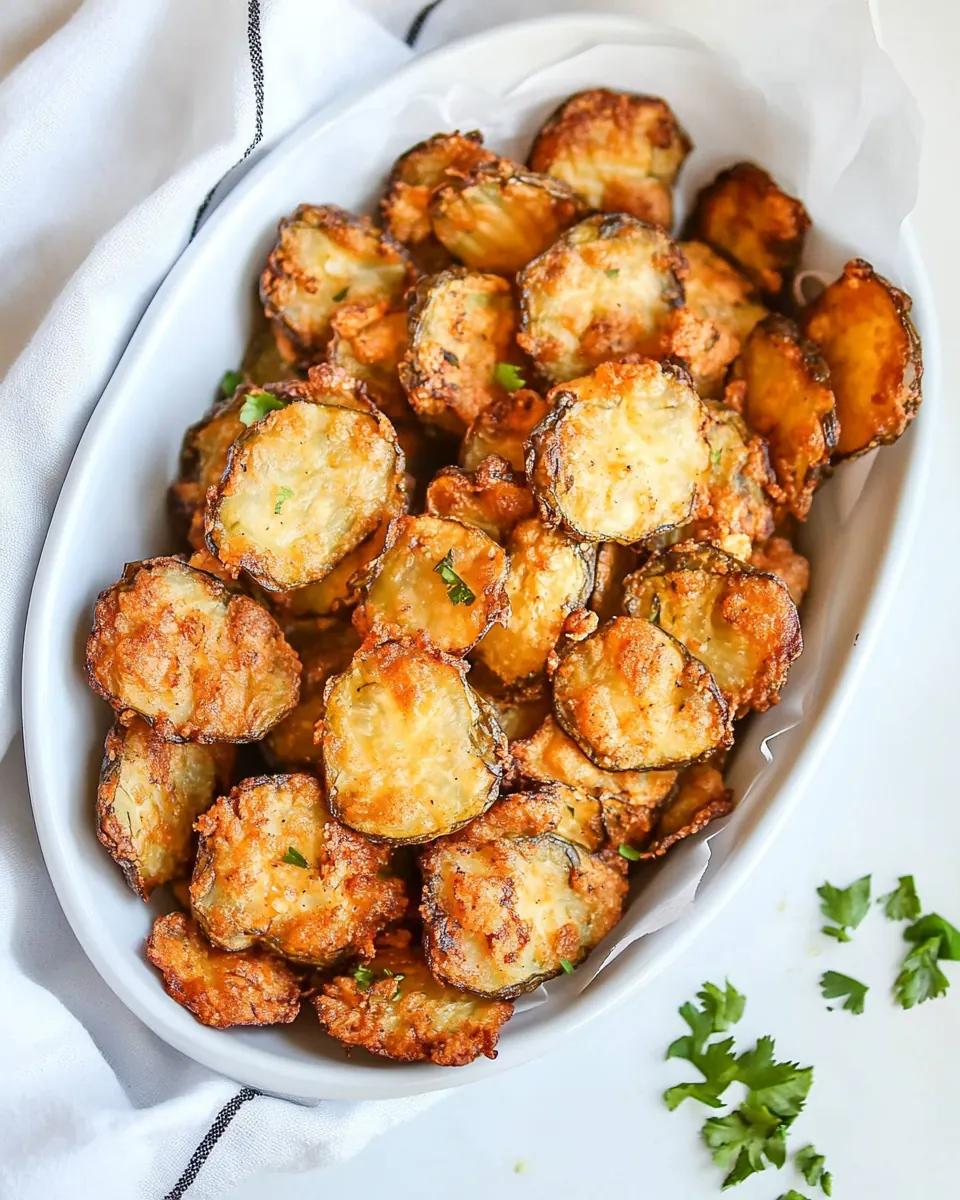
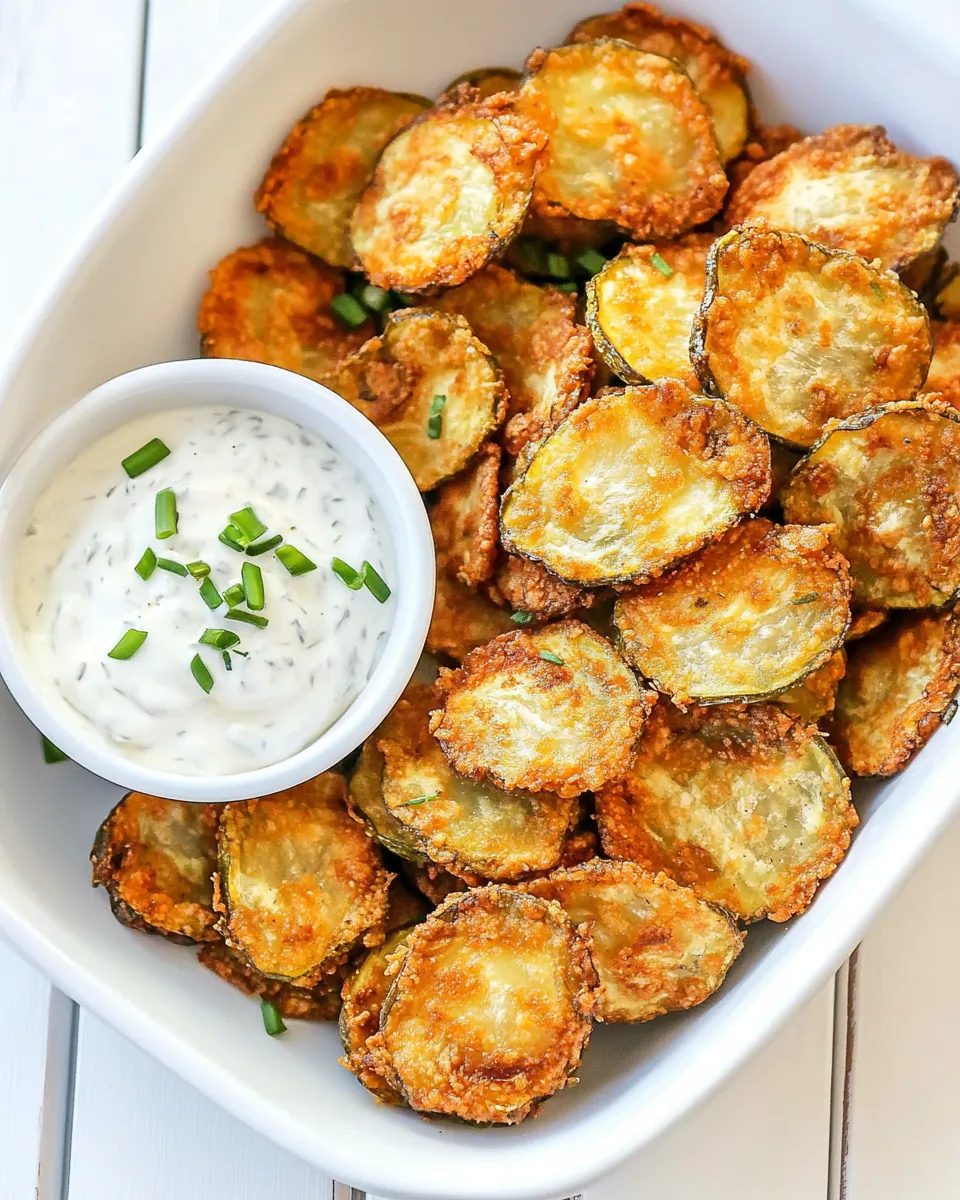
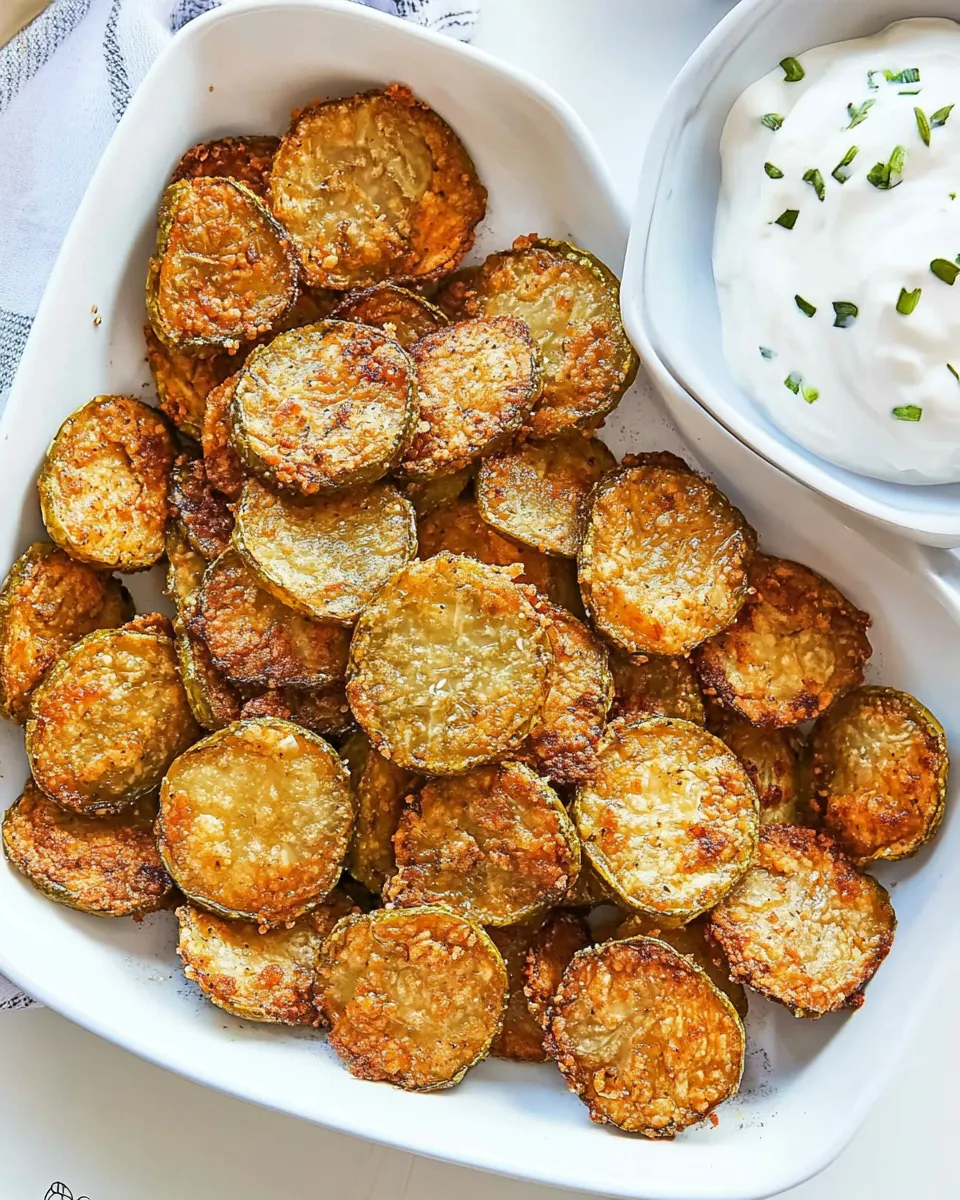
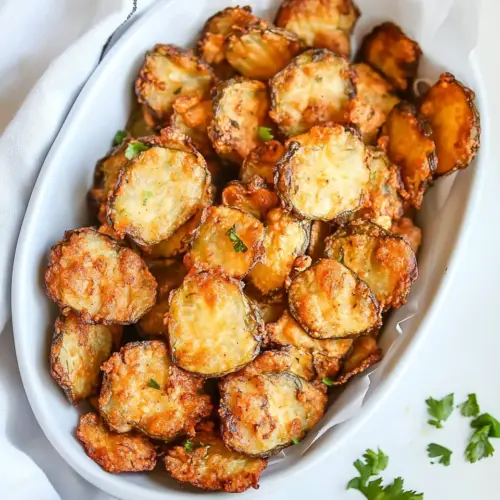
Fried Pickles
Fried Pickles always take me back to sun soaked afternoons at a roadside fair near my childhood home, where the smell of sizzling oil and bold vinegar cut through the humid air and demanded I take a bite. I remember the first time I learned to make them at home, a messy but thrilling kitchen lesson that involved flour dusted across the counter, a stubborn jar lid, and my dog circling the frying station like a tiny sous chef. That first batch taught me two things, one practical, one sentimental, the practical being that getting the coating right matters, and the sentimental being that simple snacks can make ordinary days feel celebratory.
Over the years I have tweaked the coating and the dipping routine for the crispiest results, and I still smile when I pull a tray of golden rounds from the oil. Friends show up for game night and ask for that familiar crunch, and I like how this recipe invites conversation without fuss. You do not need a fancy pantry to make these, just a few pantry staples and the best jar of pickles you can find. I prefer pickles that hold their crunch after brining, because the contrast between the bright, vinegary pickle chips and the warm, crunchy coating is everything.
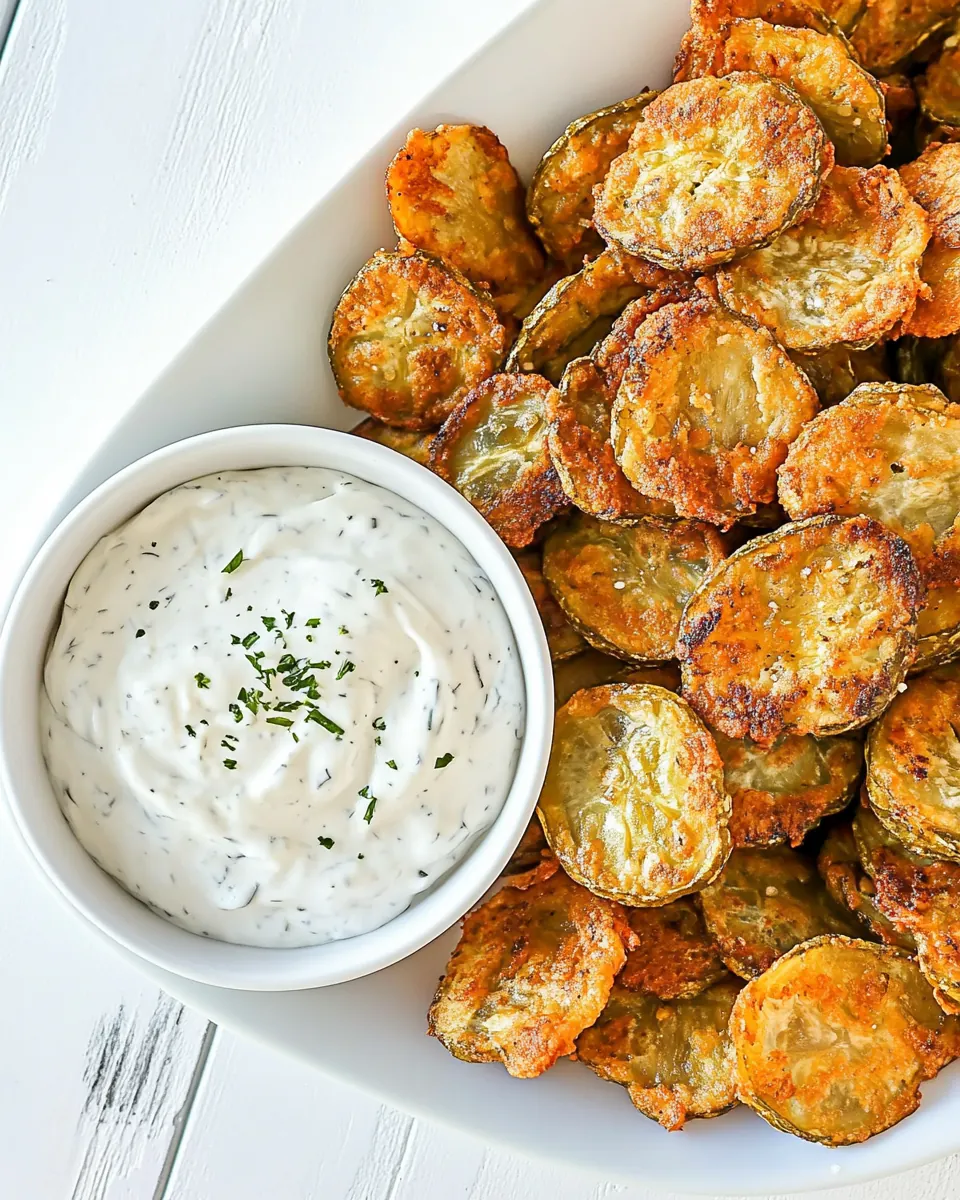
When I serve Fried Pickles I set out a bowl of tangy ranch and let people dunk to their hearts content, and somehow the simple ritual of sharing them makes the gathering feel cozier. I hope you find the same kind of joy plating them up for neighbors or tucking them into a casual weekend spread. They are playful, bold, and surprisingly adaptable, showing that the best snacks are the ones that bring people together with minimal drama and maximum crunch.
Recipe Snapshot
36 mins
15 mins
21 mins
Medium
300 kcal
American
Gluten-Free, Low FODMAP
Appetizers
Deep fryer or sturdy skillet with an inch of vegetable oil
What Makes This Fried Pickles Special
Crunch that surprises
I love how Fried Pickles deliver an immediate textural contrast. The moment you bite in there is a sharp snap as the coating fractures, followed by the juicy burst of brined pickle chips. That interplay is the heart of this snack, and it keeps people coming back for more.
Bright vinegar flavor
The brine in the pickle chips adds an acidic lift that cuts through the richness of the fried coating. I appreciate snacks that do not feel heavy, and the vinegar keeps the palate refreshed so you can enjoy several at a time without feeling weighed down.
Easy to scale
I often double or triple this recipe when friends stop by, and it holds up well. Working in batches is straightforward, and you can keep cooked pieces warm without losing too much crispness if you place them on a wire rack over a sheet tray.
Family friendly
Whenever I make these for a crowd, kids and adults alike gravitate toward them. The combination of crunchy coating and tangy pickle chips makes them a reliable crowd pleaser at casual gatherings, tailgates, and weeknight treats.
Customizable dipping
I enjoy experimenting with dips, but a classic cool ranch pairs beautifully. You can keep the flavor profile traditional, or add a spicy twist if you like a little heat. The base recipe is flexible enough to accommodate many dipping sauces without losing its identity.
Ingredients You’ll Need for Fried Pickles
These ingredients are all about balance, bringing together crunchy, tangy, and seasoned elements. The key players are the pickle chips, which provide the bright vinegar flavor, and the trio of flour, spices, and buttermilk that form a crispy, well seasoned coating. The oil is there to achieve that golden texture, while the mustard in the batter adds a subtle depth that keeps the coating from tasting flat.
- Vegetable oil for frying: Used for deep-frying to achieve a crispy exterior; maintain oil at the proper temperature to prevent soggy batter. Replenish as needed between batches and strain or discard when darkened to preserve flavor.
- 16 oz jar dill pickle chips: Packed in brine to provide tangy crunch and classic dill flavor; drain well and pat dry to avoid excess moisture in the batter. Slice thickness influences frying time, so choose chips for quick, even cooking.
- 1 cup buttermilk: Adds moisture and a mild tang to the batter, helping the flour adhere and creating a tender interior. Keep chilled to help the coating set quickly when pickles hit the hot oil.
- 2 tablespoons stone-ground mustard: Adds savory, slightly pungent flavor with whole-grain texture that complements dill and buttermilk; whisk into wet mix for an even distribution. Use measured amount to balance heat and acidity without overpowering the pickles.
- 1 1/2 cup all-purpose flour: Forms the bulk of the dry coating, providing structure and crispness when fried; sift or whisk to remove lumps for a smooth dredge. Combine with seasonings to create a consistent, golden crust on each pickle chip.
- 1 teaspoon salt: Enhances overall flavor of the coating by bringing out savory notes and balancing acidity; dissolve evenly into the flour for a consistent taste. Adjust slightly to taste, but follow the recipe for best results.
- 1 teaspoon black pepper freshly ground: Provides a warm, earthy bite that complements the tangy pickles and cuts through richness; freshly grinding maximizes aroma and flavor. Distribute evenly in the dry mix to ensure each bite is seasoned.
- 1 teaspoon cayenne pepper: Contributes bright heat and a subtle smoky warmth to the batter, elevating the fried pickles with a lively kick. Use sparingly to avoid overwhelming the dill and buttermilk flavors.
- Homemade Ranch for serving: Serves as a creamy, cool dipping sauce to balance the hot, salty fried pickles; prepare ahead and chill to let flavors meld. Offer alongside freshly fried batches for contrast in temperature and texture.
Step by Step Guide for Fried Pickles
These directions transform pantry staples into an irresistible snack. Follow each step and take your time with the sensory cues, because sound, color, and aroma will tell you when the process is working. I encourage you to work in small batches to preserve oil temperature, and keep a plate lined with paper towels ready for draining.
- Heat the oil in your skillet or fryer to 350°F.: The moment the oil reaches the proper temperature you will notice a faint shimmer and the occasional wisps of steam rising, which is a good sign you are near 350°F. This temperature ensures the coating turns golden and crisp quickly, sealing the interior and preventing oil absorption. If the oil is underheated the coating will take longer to brown and will soak up more oil, producing a heavy texture. If it is overheated you risk burning the crust before the inside crisps. Use a thermometer and adjust heat in small increments to maintain a steady 350°F.
- Place the pickles on paper towels. Use dry paper towels to pat them completely dry.: When you press a pickle chip between towels, you should feel and see moisture being released, and the surface should stop glistening when it is dry enough. Removing surface brine helps the batter stick and prevents sputtering in the hot oil. A common oversight is skipping this drying step, which leads to splattering and a coating that slides off during frying. Pat each chip gently but thoroughly so the batter clings uniformly.
- In one bowl or pan, mix together the buttermilk and mustard until fully combined.: Mixing the buttermilk with the stone ground mustard creates a slightly thick, tangy bath that flavors the batter and aids adhesion. You should see a homogeneous mixture without visible mustard pockets. This combo imparts moisture to the coating and helps the flour layer bind. If you under mix you may get uneven pockets of mustard flavor; over mixing is harmless, but be sure the texture remains slightly viscous to cling to the pickle chips .
- In a second bowl, whisk together the flour with the salt, pepper, and cayenne pepper.: As you whisk the all-purpose flour and spices, notice how the flour becomes uniformly speckled with pepper and cayenne, signaling even seasoning. Well mixed flour ensures every bite has balanced flavor and color. Failing to whisk thoroughly creates streaks of spice or bland bits of flour in the coating. Use a fork or whisk to aerate the mixture so the dredge stays light.
- Working in batches, dip the pickles into the buttermilk mixture to completely coat. Next, dredge them in the flour mixture, using your fingers to help ensure the pickle is fully coated.: When you lower a pickle chip into the wet batter it should be fully enveloped and cling with a thin film, not dripping excessively. The tactile feel will be slightly cool and tacky. This wet layer primes the surface for the dry dredge. If your pieces are still shedding too much liquid, blot them again first, because excess moisture can create a gummy coating rather than a crisp crust.
- Add the coated pickles into the hot oil, and cook, flipping once or twice, until golden brown and very crispy, about 4 minutes. Use a spider or metal slotted spoon to transfer the fried pickles to a platter lined with paper towels. Continue with the remaining pickles.: As you press the wet chip into the seasoned flour , you will hear a faint scraping and see the edges take on a dusty, textured look, signaling good coverage. The flour should adhere in a thin, even layer; pressing too hard can create clumpy spots that fry unevenly. One pitfall is overloading the flour, which yields heavy, doughy shells, so tap off any excess before frying.
- Serve at once with your favorite dipping sauce (such as our Homemade Ranch).: When the pieces hit the oil you will hear a steady sizzle, and the color will progress from pale to warm golden brown. Flip once or twice so all sides brown evenly. The right visual cue is a consistent golden exterior that is firm to the touch with a high pitched sizzle, signaling moisture escaping and a crisp crust forming. A common mistake is crowding the pan, which drops the oil temperature and causes uneven browning. Work in small batches and watch the clock and color closely.
- Use a spider or metal slotted spoon to transfer the fried pickles to a platter lined with paper towels.: As you lift the pieces out the oil will drain through the slotted tool and the surface will glisten briefly before settling into a dry, crackly sheen. The paper towels will catch residual oil, keeping the exterior crisp. Avoid stacking the pieces directly on top of each other, which traps steam and softens the crust. If you want to retain crispness for a brief hold, place them on a wire rack rather than paper towels.
- Continue with the remaining pickles.: Keep the oil at the steady temperature, and repeat the same rhythm so each batch receives consistent heat and timing. You will notice the oil temperature will dip slightly when you add pieces, then recover, and that recovery is essential to maintaining uniform results. A frequent error is letting the oil cool down too much between batches, which extends frying time and produces oily coating. Adjust heat as needed to keep that 350°F target.
- Serve at once with your favorite dipping sauce such as our Homemade Ranch.: The ideal serving moment is when the coating is still warm and crisp and the dip is cool and creamy, creating a contrast in temperature and texture. As the minutes pass the coating will slowly lose its initial crunch, so plan to serve promptly. A typical misstep is preparing everything too far in advance, which results in diminished crispness and a less satisfying bite.
Ways to Adapt This Recipe
If you want to change the vibe of these Fried Pickles there are several easy routes to explore. Below I share adaptations I use depending on occasion, equipment, or how adventurous the crowd is. Each tip starts with a bolded phrase so you can scan for the idea quickly.
- Air fryer version Swap the deep frying for an air fryer by spraying the coated pickle chips lightly with oil and cooking in a single layer. This reduces oil usage but expect a slightly different crisp; it will still be tasty and more pantry friendly.
- Baked approach Arrange the coated pieces on a parchment lined sheet, spray with oil, and bake until golden, turning once. Baking is gentler and yields a less greasy result, though it may not achieve the same deep crunch as frying.
- Spice adjustment Increase or decrease the cayenne pepper to control heat, or swap for smoked paprika for a smoky note. Adjust carefully so the spice complements rather than overwhelms the pickle chips.
- Pickle choice Try bread and butter chips for a sweeter twist, or sandwich dill chips for classic tang. The type of pickle chips will change the final flavor profile significantly, so pick according to your desired balance of sweet and sour.
- Make ahead tips Prep the batter and dredge in advance, then refrigerate coated pieces for a short time before frying. This can help with timing during a party, but avoid long storage as the coating may absorb moisture.
What to Pair With Fried Pickles
These crunchy rounds are wonderfully versatile when it comes to pairing. Below I outline serving ideas for casual gatherings, game day spreads, and relaxed dinners. Each suggestion focuses on complementary textures and flavors that let the tangy pickle chips shine.
- Classic dip station, set out a bowl of cool Homemade Ranch alongside spicy aioli for contrast, allowing guests to choose their favorite dipping style.
- Casual game day spread, include wings, sliders, and crunchy fries so the Fried Pickles join a variety of finger foods that keep everyone satisfied during long matches or movie nights.
- Light lunch pairing, serve with a crisp green salad dressed lightly, so the pickles provide a playful crunchy accent without making the meal heavy.
- Picnic or potluck, pack them in a container with a separate dip compartment to preserve the coating, and serve within a short window for best texture.
- Storage notes, these are best eaten immediately, but you can refrigerate leftovers in an airtight container and re crisp them in a hot oven or air fryer for a few minutes before serving.
- Seasonal occasions, they work well for summer barbecues and casual outdoor gatherings where finger foods are welcome, and the bright acidity of the pickle chips refreshes the palate amidst richer dishes.
FAQ
Conclusion
Fried Pickles stand out because they combine crisp, golden coating with bright, vinegary pickle flavor for an addictive snack experience. Give them a try the next time you want an easy, shareable appetizer that brings a playful crunch to the table. I hope this recipe becomes one of your go to snacks for casual gatherings and impromptu game nights, delivering that satisfying contrast of textures and bold flavors every time.
Fried Pickles
Equipment
- Deep fryer or sturdy skillet with an inch of vegetable oil
Ingredients
- Vegetable oil for frying Used for deep-frying to achieve a crispy exterior; maintain oil at the proper temperature to prevent soggy batter. Replenish as needed between batches and strain or discard when darkened to preserve flavor.
- 16 oz jar dill pickle chips Packed in brine to provide tangy crunch and classic dill flavor; drain well and pat dry to avoid excess moisture in the batter. Slice thickness influences frying time, so choose chips for quick, even cooking.
- 1 cup buttermilk Adds moisture and a mild tang to the batter, helping the flour adhere and creating a tender interior. Keep chilled to help the coating set quickly when pickles hit the hot oil.
- 2 tablespoons stone-ground mustard Adds savory, slightly pungent flavor with whole-grain texture that complements dill and buttermilk; whisk into wet mix for an even distribution. Use measured amount to balance heat and acidity without overpowering the pickles.
- 1 1/2 cup all-purpose flour Forms the bulk of the dry coating, providing structure and crispness when fried; sift or whisk to remove lumps for a smooth dredge. Combine with seasonings to create a consistent, golden crust on each pickle chip.
- 1 teaspoon salt Enhances overall flavor of the coating by bringing out savory notes and balancing acidity; dissolve evenly into the flour for a consistent taste. Adjust slightly to taste, but follow the recipe for best results.
- 1 teaspoon black pepper freshly ground Provides a warm, earthy bite that complements the tangy pickles and cuts through richness; freshly grinding maximizes aroma and flavor. Distribute evenly in the dry mix to ensure each bite is seasoned.
- 1 teaspoon cayenne pepper Contributes bright heat and a subtle smoky warmth to the batter, elevating the fried pickles with a lively kick. Use sparingly to avoid overwhelming the dill and buttermilk flavors.
- Homemade Ranch for serving Serves as a creamy, cool dipping sauce to balance the hot, salty fried pickles; prepare ahead and chill to let flavors meld. Offer alongside freshly fried batches for contrast in temperature and texture.
Instructions
- Heat the oil in your skillet or fryer to 350°F.: The moment the oil reaches the proper temperature you will notice a faint shimmer and the occasional wisps of steam rising, which is a good sign you are near 350°F. This temperature ensures the coating turns golden and crisp quickly, sealing the interior and preventing oil absorption. If the oil is underheated the coating will take longer to brown and will soak up more oil, producing a heavy texture. If it is overheated you risk burning the crust before the inside crisps. Use a thermometer and adjust heat in small increments to maintain a steady 350°F.
- Place the pickles on paper towels. Use dry paper towels to pat them completely dry.: When you press a pickle chip between towels, you should feel and see moisture being released, and the surface should stop glistening when it is dry enough. Removing surface brine helps the batter stick and prevents sputtering in the hot oil. A common oversight is skipping this drying step, which leads to splattering and a coating that slides off during frying. Pat each chip gently but thoroughly so the batter clings uniformly.
- In one bowl or pan, mix together the buttermilk and mustard until fully combined.: Mixing the buttermilk with the stone ground mustard creates a slightly thick, tangy bath that flavors the batter and aids adhesion. You should see a homogeneous mixture without visible mustard pockets. This combo imparts moisture to the coating and helps the flour layer bind. If you under mix you may get uneven pockets of mustard flavor; over mixing is harmless, but be sure the texture remains slightly viscous to cling to the pickle chips .
- In a second bowl, whisk together the flour with the salt, pepper, and cayenne pepper.: As you whisk the all-purpose flour and spices, notice how the flour becomes uniformly speckled with pepper and cayenne, signaling even seasoning. Well mixed flour ensures every bite has balanced flavor and color. Failing to whisk thoroughly creates streaks of spice or bland bits of flour in the coating. Use a fork or whisk to aerate the mixture so the dredge stays light.
- Working in batches, dip the pickles into the buttermilk mixture to completely coat. Next, dredge them in the flour mixture, using your fingers to help ensure the pickle is fully coated.: When you lower a pickle chip into the wet batter it should be fully enveloped and cling with a thin film, not dripping excessively. The tactile feel will be slightly cool and tacky. This wet layer primes the surface for the dry dredge. If your pieces are still shedding too much liquid, blot them again first, because excess moisture can create a gummy coating rather than a crisp crust.
- Add the coated pickles into the hot oil, and cook, flipping once or twice, until golden brown and very crispy, about 4 minutes. Use a spider or metal slotted spoon to transfer the fried pickles to a platter lined with paper towels. Continue with the remaining pickles.: As you press the wet chip into the seasoned flour , you will hear a faint scraping and see the edges take on a dusty, textured look, signaling good coverage. The flour should adhere in a thin, even layer; pressing too hard can create clumpy spots that fry unevenly. One pitfall is overloading the flour, which yields heavy, doughy shells, so tap off any excess before frying.
- Serve at once with your favorite dipping sauce (such as our Homemade Ranch).: When the pieces hit the oil you will hear a steady sizzle, and the color will progress from pale to warm golden brown. Flip once or twice so all sides brown evenly. The right visual cue is a consistent golden exterior that is firm to the touch with a high pitched sizzle, signaling moisture escaping and a crisp crust forming. A common mistake is crowding the pan, which drops the oil temperature and causes uneven browning. Work in small batches and watch the clock and color closely.
- Use a spider or metal slotted spoon to transfer the fried pickles to a platter lined with paper towels.: As you lift the pieces out the oil will drain through the slotted tool and the surface will glisten briefly before settling into a dry, crackly sheen. The paper towels will catch residual oil, keeping the exterior crisp. Avoid stacking the pieces directly on top of each other, which traps steam and softens the crust. If you want to retain crispness for a brief hold, place them on a wire rack rather than paper towels.
- Continue with the remaining pickles.: Keep the oil at the steady temperature, and repeat the same rhythm so each batch receives consistent heat and timing. You will notice the oil temperature will dip slightly when you add pieces, then recover, and that recovery is essential to maintaining uniform results. A frequent error is letting the oil cool down too much between batches, which extends frying time and produces oily coating. Adjust heat as needed to keep that 350°F target.
- Serve at once with your favorite dipping sauce such as our Homemade Ranch.: The ideal serving moment is when the coating is still warm and crisp and the dip is cool and creamy, creating a contrast in temperature and texture. As the minutes pass the coating will slowly lose its initial crunch, so plan to serve promptly. A typical misstep is preparing everything too far in advance, which results in diminished crispness and a less satisfying bite.
Notes
- Air fryer version Swap the deep frying for an air fryer by spraying the coated pickle chips lightly with oil and cooking in a single layer. This reduces oil usage but expect a slightly different crisp; it will still be tasty and more pantry friendly.
- Baked approach Arrange the coated pieces on a parchment lined sheet, spray with oil, and bake until golden, turning once. Baking is gentler and yields a less greasy result, though it may not achieve the same deep crunch as frying.
- Spice adjustment Increase or decrease the cayenne pepper to control heat, or swap for smoked paprika for a smoky note. Adjust carefully so the spice complements rather than overwhelms the pickle chips.
- Pickle choice Try bread and butter chips for a sweeter twist, or sandwich dill chips for classic tang. The type of pickle chips will change the final flavor profile significantly, so pick according to your desired balance of sweet and sour.
- Make ahead tips Prep the batter and dredge in advance, then refrigerate coated pieces for a short time before frying. This can help with timing during a party, but avoid long storage as the coating may absorb moisture.