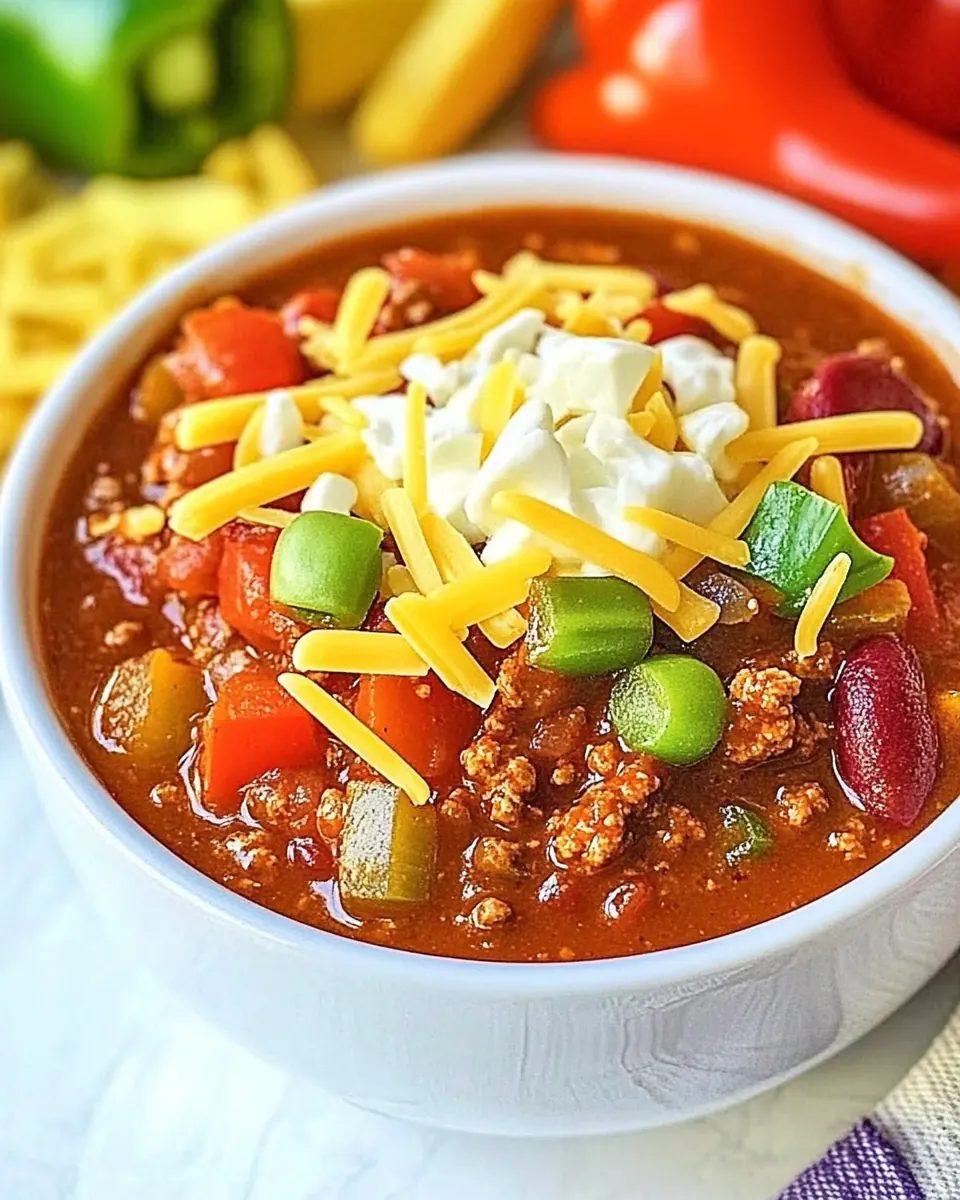
Firehouse Chili
Firehouse Chili is the sort of bowl I reach for when the house smells like a sports night and everyone needs something hearty to rally around.
I first met this chili at a neighborhood fundraiser where volunteers ladled steaming portions into paper bowls without ceremony, and the line never stopped. I remember the first spoonful, how the savory ground beef and the bright, slightly smoky Rotel diced tomatoes and green chilies hit together, making conversation easier and hands warmer. That evening I scribbled down notes and promised myself I would recreate that exact balance of heat and comfort at home. Over the years I tuned the seasoning so the chili powder sings without overpowering the other players, and I learned to lean on simple, pantry friendly cans like tomato sauce and chili beans to make the pot stretch for a crowd.
When I make Firehouse Chili now, it usually means company is coming, or someone needs a bowl that feels like an embrace. I like that it is forgiving, letting you adjust salt and spice as you go, and that it keeps beautifully for leftovers. There are evenings I brown the ground beef and let the pot simmer while I tidy up, its aroma promising dinner without fuss. It’s no-frills food that still feels celebratory, and that is why this recipe lives in my rotation.
Recipe Snapshot
40 mins
10 mins
30 mins
Easy
450 kcal
Mexican
Gluten-Free, Low FODMAP
Dinner
Dutch Oven
What You’ll Enjoy About This Firehouse Chili
Bold, straightforward flavor
I love how Firehouse Chili delivers immediate, tactile flavor. The combination of chili powder, cumin, and dried oregano layers warmth and earthiness while the Rotel diced tomatoes and green chilies add bright acidity and a touch of heat. This is not a shy bowl, it announces itself but keeps balance.
Built for feeding a crowd
We often make this recipe for gatherings because the ingredient list is economical and scalable. The three cans of Rotel diced tomatoes and green chilies and the cans of chili beans bulk up the pot without sacrificing texture. It’s a dish that stretches easily and still tastes robust the next day.
Pantry friendly and fast
From my experience, you can pull this together with mostly pantry staples. With simple items like tomato sauce and beef broth on hand, you can have dinner bubbling away with minimal effort. That makes it my go to when time is short but appetite is big.
Comfort with personality
What keeps me coming back is the personality in every spoonful. The crushed garlic and juicy tomatoes give it warmth, while the salt and spices let you tune the profile to your taste. It’s a comforting, honest chili that feels like it belongs at a volunteer station, a tailgate, or a family table.
Versatile leftovers
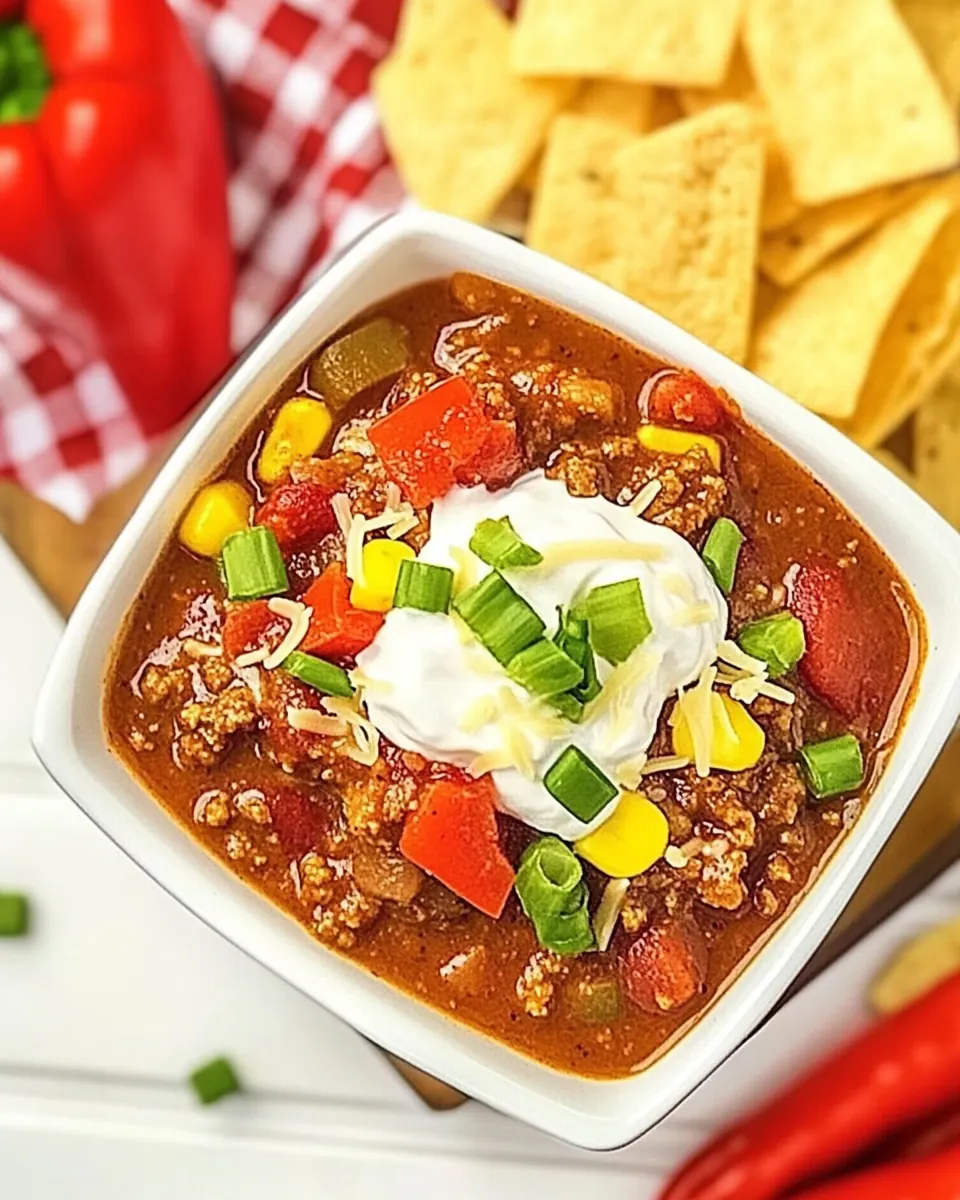
I always plan for leftovers because this chili transforms the next day. It’s perfect on baked potatoes or spooned over nachos, and it freezes well in portions. That versatility makes it a recipe I enjoy making often.
What Goes Into Firehouse Chili
The ingredients in this pot speak the same language: bold, straightforward, and crowd ready. Key players like ground beef, Rotel diced tomatoes and green chilies, and chili beans create layers of texture and flavor, while seasonings such as chili powder, cumin, and dried oregano bring warmth and depth. The liquids, tomato sauce and beef broth, tie everything together so the chili finishes with a cohesive mouthfeel rather than a dry stew.
- 1 1/2 lb ground beef: Brown and crumble to develop rich savory flavor and provide the hearty protein base for the chili, rendering some fat that helps carry spices and build mouthfeel. Use medium-high heat and break into small pieces so it integrates evenly with the sauce and beans.
- 2 tbsp dried onion flakes: Rehydrate and release sweet, mellow onion notes that contribute background aromatics and texture without adding moisture like fresh onions. Sprinkle early so the flakes can soften and infuse the dish as it simmers.
- 4 garlic cloves, crushed: Crush and sauté briefly to unlock sharp, pungent aromatics that brighten the chili and layer complexity against the beef and spices. Add after the onion flakes so garlic doesn’t burn and instead becomes deeply fragrant throughout the pot.
- 1 1/2 tsp salt, or to taste: Season and enhance all other flavors while helping balance acidity and heat; adjust to taste near the end of cooking for proper seasoning. Start with the stated amount and add incrementally to avoid oversalting, tasting after the chili has simmered.
- 1/4 tsp cumin: Warm and add a subtle earthy bitterness that complements chili powder and tomato; use sparingly because its flavor is concentrated. Stir in early so the cumin can marry with the beef and other spices during cooking.
- 1/4 tsp dried oregano: Contribute a slightly herbaceous, minty note that brightens the overall spice profile and evokes traditional chili seasoning. Add with other dried spices to allow time for its flavors to infuse during simmering.
- 3 tbsp chili powder: Build the primary heat, depth, and characteristic chili flavor, providing both spice and a complex paprika-like background. Measure to control heat level and add gradually if adjusting for personal spice preference.
- 3 (10-oz) cans Rotel diced tomatoes and green chilies, undrained: Provide bright tomato acidity and a moderate, smoky heat from the green chilies while adding body and liquid to the chili; keep undrained so juices contribute flavor and consistency. Stir in whole to distribute tomatoes and chilies evenly throughout the pot.
- 1 cup tomato sauce: Thicken and deepen the tomato base while adding a smooth, cohesive texture and concentrated tomato flavor. Pour in to balance the liquid from tomatoes and broth, helping create a saucy consistency that coats the beans and meat.
- 1 cup beef broth: Add savory, beefy liquid to adjust consistency and intensify meaty flavor without diluting richness; use to reach preferred thickness while simmering. Choose low-sodium broth if controlling salt level to better manage seasoning.
- 3 (16-oz) can chili beans, undrained: Contribute soft, saucy beans already seasoned in a savory sauce, supplying fiber, bulk, and traditional chili texture; keep undrained so the bean sauce enriches the chili base. Stir in toward the end of simmering to heat through without breaking down excessively.
The Process for Making Firehouse Chili

These directions are straightforward, but the small decisions along the way shape the final bowl. Take your time while browning the meat and use the simmer to coax flavors together. Below I expand each CSV instruction into detailed, sensory rich guidance so you can replicate reliable results every time.
- In a Dutch oven, cook ground beef until no longer pink. Drain fat.: The moment the meat hits the hot surface you will hear a sharp sizzle, and that sound is your ally; it signals browning, which produces rich, nutty aromas as proteins and sugars caramelize. As you break the ground beef apart with a spatula, look for pieces that turn deep brown along their edges, not pale gray. That browning creates fond on the pot bottom, which adds savory complexity when deglazed or combined with the next ingredients. A common mistake is overcrowding the pot, which causes steaming instead of browning; work in batches if necessary to preserve that sizzle and achieve those caramelized bits.
- Add remaining ingredients. Bring to a boil, reduce heat to simmer and cook 30 to 45 minutes.: After the meat is browned, you will notice glossy pools of rendered fat collecting in the pot. Carefully pour off or spoon out excess fat so the chili doesn’t become greasy, but leave a spoonful to carry flavor. The remaining surface fat will shimmer and help the spices bloom when added, releasing their aromas into the warm oil. If you remove too much fat you might lose flavor and the spices will feel muted, so keep a little bit for that flavor bridge between meat and sauce.
- Add remaining ingredients: When you add the dried onion flakes , crushed garlic , salt , cumin , dried oregano , chili powder , Rotel diced tomatoes and green chilies , tomato sauce , beef broth , and chili beans , the pot will go quiet in the best way as aromas bloom. The liquid will steam and lift the spice scent into the air, and you should notice herbaceous and tomato notes marrying with the beef. Stir gently until everything looks integrated; the color should shift to a deeper, unified red with flecks of green from the chilies. A frequent misstep is tossing everything in and immediately turning off the heat. Allowing the mixture to warm helps flavors meld and releases aromas for a cohesive profile.
- Bring to a boil: As the surface tightens and small bubbles begin to appear across the top, you will see the pot come into a rolling simmer. That initial boil helps to bring temperatures up quickly so the flavors begin fusing. Watch carefully because vigorous boiling can cause splatter and make the chili reduce too quickly. The sound will change from a gentle simmer to a more assertive bubbling; that’s your cue to adjust heat.
- Reduce heat to simmer and cook 30 to 45 minutes: Once reduced to a simmer, you will witness a transformation; the sauce will thicken slowly, becoming glossy and clinging to the meat and beans. Aromas will deepen and meld, with the chili powder mellowing and the Rotel diced tomatoes and green chilies integrating into the sauce. Stir occasionally to prevent sticking, and check texture after about 30 minutes to see if it has reached the thickness you prefer. If the chili is too thin, continue to simmer uncovered until it thickens. A typical error is rushing this stage with higher heat; that can toughen meat and concentrate saltiness, so maintain a patient, low simmer for the best mouthfeel.
Expert Tips about Firehouse Chili

I like to collect small practices that make a big difference when cooking Firehouse Chili. The suggestions below come from repeated pots and feeding friends, and each one is meant to help you land consistent, flavorful results.
- Brown in batches: If your pot is crowded the meat will steam instead of brown, so give it room to sizzle for deeper flavor.
- Reserve a bit of fat: Leaving a tablespoon or two of rendered fat helps spices bloom and carry aroma through the sauce.
- Control the heat: Use mild or regular Rotel diced tomatoes and green chilies if you are sensitive to spice, and taste as you go to adjust the chili powder level.
- Use undrained cans: The liquid in the Rotel diced tomatoes and green chilies and chili beans contributes to the sauce body, reducing the need for extra broth.
- Simmer uncovered: Letting the pot reduce slightly concentrates flavor and improves mouthfeel without needing thickeners.
- Make ahead: This chili often tastes better the next day, so consider preparing it a day ahead to let flavors harmonize.
- Freeze portions: Freeze in individual containers for quick meals; thaw completely before reheating to preserve texture.
Serving Suggestions
This chili is designed to be shared and dressed up depending on the occasion. Whether serving at a casual game night or as a comforting family dinner, the ideas below help you present it with ease and style.
- Serve over baked potatoes: Spoon warm Firehouse Chili over a split baked potato for a hearty meal that stretches portions and adds comforting starch.
- Top nachos: Ladle chili over crispy tortilla chips and finish with optional garnishes for a party friendly platter that invites sharing.
- Family dinners: Serve bowls with simple sides like crusty bread or a light salad for a complete and satisfying evening meal.
- Tailgating and potlucks: Keep the chili in a slow cooker or insulated pot for easy serving at events, it’s a reliable crowd pleaser.
- Storage tips: Refrigerate leftovers for four to five days, or freeze in individual portions for grab and go meals; thaw fully before reheating to preserve texture.
- Seasonal pairings: This warm, robust chili is ideal in cooler months when you crave comfort food, and it pairs well with bright, acidic sides to cut richness.
FAQ
Conclusion
Firehouse Chili stands out for its bold, approachable flavor and its ability to feed a group without fuss. I encourage you to give this recipe a try the next time you need a comforting, make ahead meal that keeps well and pleases a crowd. It’s an honest, satisfying bowl that invites conversation and seconds, and I hope it becomes a regular in your rotation for chilly evenings and lively gatherings.

Firehouse Chili
Equipment
- Dutch Oven
Ingredients
- 1 1/2 lb ground beef Brown and crumble to develop rich savory flavor and provide the hearty protein base for the chili, rendering some fat that helps carry spices and build mouthfeel. Use medium-high heat and break into small pieces so it integrates evenly with the sauce and beans.
- 2 tbsp dried onion flakes Rehydrate and release sweet, mellow onion notes that contribute background aromatics and texture without adding moisture like fresh onions. Sprinkle early so the flakes can soften and infuse the dish as it simmers.
- 4 garlic cloves, crushed Crush and sauté briefly to unlock sharp, pungent aromatics that brighten the chili and layer complexity against the beef and spices. Add after the onion flakes so garlic doesn’t burn and instead becomes deeply fragrant throughout the pot.
- 1 1/2 tsp salt, or to taste Season and enhance all other flavors while helping balance acidity and heat; adjust to taste near the end of cooking for proper seasoning. Start with the stated amount and add incrementally to avoid oversalting, tasting after the chili has simmered.
- 1/4 tsp cumin Warm and add a subtle earthy bitterness that complements chili powder and tomato; use sparingly because its flavor is concentrated. Stir in early so the cumin can marry with the beef and other spices during cooking.
- 1/4 tsp dried oregano Contribute a slightly herbaceous, minty note that brightens the overall spice profile and evokes traditional chili seasoning. Add with other dried spices to allow time for its flavors to infuse during simmering.
- 3 tbsp chili powder Build the primary heat, depth, and characteristic chili flavor, providing both spice and a complex paprika-like background. Measure to control heat level and add gradually if adjusting for personal spice preference.
- 3 (10-oz) cans Rotel diced tomatoes and green chilies, undrained Provide bright tomato acidity and a moderate, smoky heat from the green chilies while adding body and liquid to the chili; keep undrained so juices contribute flavor and consistency. Stir in whole to distribute tomatoes and chilies evenly throughout the pot.
- 1 cup tomato sauce Thicken and deepen the tomato base while adding a smooth, cohesive texture and concentrated tomato flavor. Pour in to balance the liquid from tomatoes and broth, helping create a saucy consistency that coats the beans and meat.
- 1 cup beef broth Add savory, beefy liquid to adjust consistency and intensify meaty flavor without diluting richness; use to reach preferred thickness while simmering. Choose low-sodium broth if controlling salt level to better manage seasoning.
- 3 (16-oz) can chili beans, undrained Contribute soft, saucy beans already seasoned in a savory sauce, supplying fiber, bulk, and traditional chili texture; keep undrained so the bean sauce enriches the chili base. Stir in toward the end of simmering to heat through without breaking down excessively.
Instructions
- In a Dutch oven, cook ground beef until no longer pink. Drain fat.: The moment the meat hits the hot surface you will hear a sharp sizzle, and that sound is your ally; it signals browning, which produces rich, nutty aromas as proteins and sugars caramelize. As you break the ground beef apart with a spatula, look for pieces that turn deep brown along their edges, not pale gray. That browning creates fond on the pot bottom, which adds savory complexity when deglazed or combined with the next ingredients. A common mistake is overcrowding the pot, which causes steaming instead of browning; work in batches if necessary to preserve that sizzle and achieve those caramelized bits.
- Add remaining ingredients. Bring to a boil, reduce heat to simmer and cook 30 to 45 minutes.: After the meat is browned, you will notice glossy pools of rendered fat collecting in the pot. Carefully pour off or spoon out excess fat so the chili doesn’t become greasy, but leave a spoonful to carry flavor. The remaining surface fat will shimmer and help the spices bloom when added, releasing their aromas into the warm oil. If you remove too much fat you might lose flavor and the spices will feel muted, so keep a little bit for that flavor bridge between meat and sauce.
- Add remaining ingredients: When you add the dried onion flakes , crushed garlic , salt , cumin , dried oregano , chili powder , Rotel diced tomatoes and green chilies , tomato sauce , beef broth , and chili beans , the pot will go quiet in the best way as aromas bloom. The liquid will steam and lift the spice scent into the air, and you should notice herbaceous and tomato notes marrying with the beef. Stir gently until everything looks integrated; the color should shift to a deeper, unified red with flecks of green from the chilies. A frequent misstep is tossing everything in and immediately turning off the heat. Allowing the mixture to warm helps flavors meld and releases aromas for a cohesive profile.
- Bring to a boil: As the surface tightens and small bubbles begin to appear across the top, you will see the pot come into a rolling simmer. That initial boil helps to bring temperatures up quickly so the flavors begin fusing. Watch carefully because vigorous boiling can cause splatter and make the chili reduce too quickly. The sound will change from a gentle simmer to a more assertive bubbling; that’s your cue to adjust heat.
- Reduce heat to simmer and cook 30 to 45 minutes: Once reduced to a simmer, you will witness a transformation; the sauce will thicken slowly, becoming glossy and clinging to the meat and beans. Aromas will deepen and meld, with the chili powder mellowing and the Rotel diced tomatoes and green chilies integrating into the sauce. Stir occasionally to prevent sticking, and check texture after about 30 minutes to see if it has reached the thickness you prefer. If the chili is too thin, continue to simmer uncovered until it thickens. A typical error is rushing this stage with higher heat; that can toughen meat and concentrate saltiness, so maintain a patient, low simmer for the best mouthfeel.
Notes
- Brown in batches: If your pot is crowded the meat will steam instead of brown, so give it room to sizzle for deeper flavor.
- Reserve a bit of fat: Leaving a tablespoon or two of rendered fat helps spices bloom and carry aroma through the sauce.
- Control the heat: Use mild or regular Rotel diced tomatoes and green chilies if you are sensitive to spice, and taste as you go to adjust the chili powder level.
- Use undrained cans: The liquid in the Rotel diced tomatoes and green chilies and chili beans contributes to the sauce body, reducing the need for extra broth.
- Simmer uncovered: Letting the pot reduce slightly concentrates flavor and improves mouthfeel without needing thickeners.
- Make ahead: This chili often tastes better the next day, so consider preparing it a day ahead to let flavors harmonize.
- Freeze portions: Freeze in individual containers for quick meals; thaw completely before reheating to preserve texture.