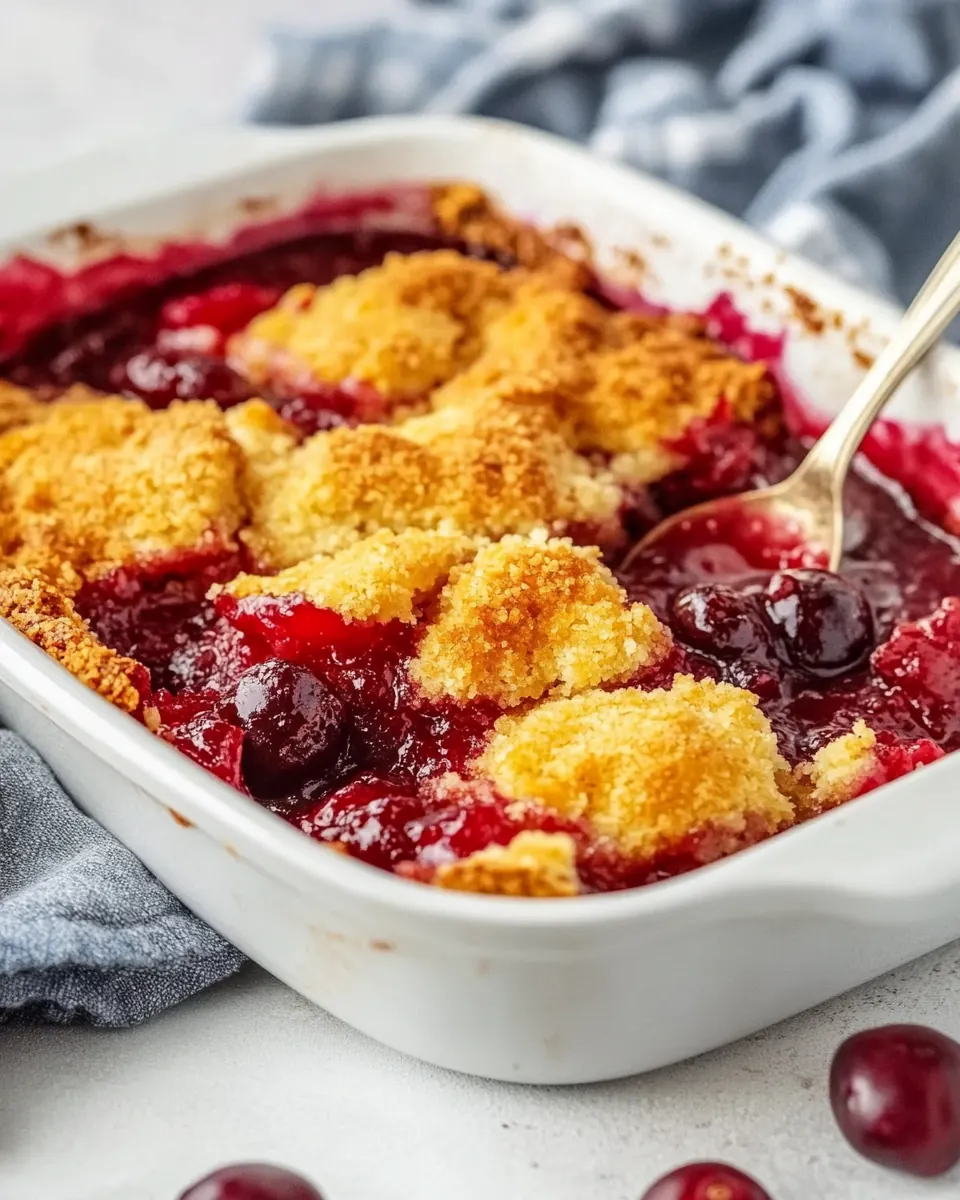
Easy Cherry Cobbler
Easy Cherry Cobbler is the one dessert I reach for when I want something that tastes like summer with almost no fuss. I still remember the first time I made it for a neighborhood potluck, carrying a warm pan that sent everyone toward the kitchen with curious smiles. The combination of bright cherries and a bready, golden topping felt both nostalgic and fresh, and I loved watching people take that first spoonful and close their eyes.
Over the years I tweaked small things until this version became my go to for gatherings and quiet weeknights alike. There’s a comfort in how the tart cherries bubble and scent the kitchen while the topping browns into a slightly crisp, tender blanket. I often tell friends this is a recipe you can make with your eyes closed once you’ve done it a couple of times, and that confidence makes it even more fun to serve.
What I appreciate most is how forgiving the technique is, and how the pantry friendly ingredients let you pull it together at a moment’s notice. Whether I’m bringing it to a summer barbecue or making a sweet finish for a casual dinner, this Easy Cherry Cobbler has a way of feeling both celebratory and completely homey. It has become a small ritual of comfort in my kitchen, and I hope it becomes one in yours as well.
Recipe Snapshot
50 mins
20 mins
30 mins
Medium
250 kcal
American
Vegan, Gluten-Free
Desserts
medium saucepan, 9×9 inch baking pan, fork, whisk
What Makes This Easy Cherry Cobbler Special
Bright, Tangy Fruit Flavor
I love how the tart cherries bring an assertive, tangy brightness that cuts through the sweetness. When you stir the heated filling, the aroma becomes this lively fruit scent that lifts the whole house. That tartness means the topping does not need to be overly sweet, so the overall dessert stays balanced, not cloying.
Speed and Simplicity
This recipe is a brilliant shortcut. With canned cherries and a box of cake mix, you get bakery style results with a fraction of the effort. I often make this when I have unexpected guests because it comes together fast, and I can focus on enjoying company instead of fussing over pastry.
Texture Contrast
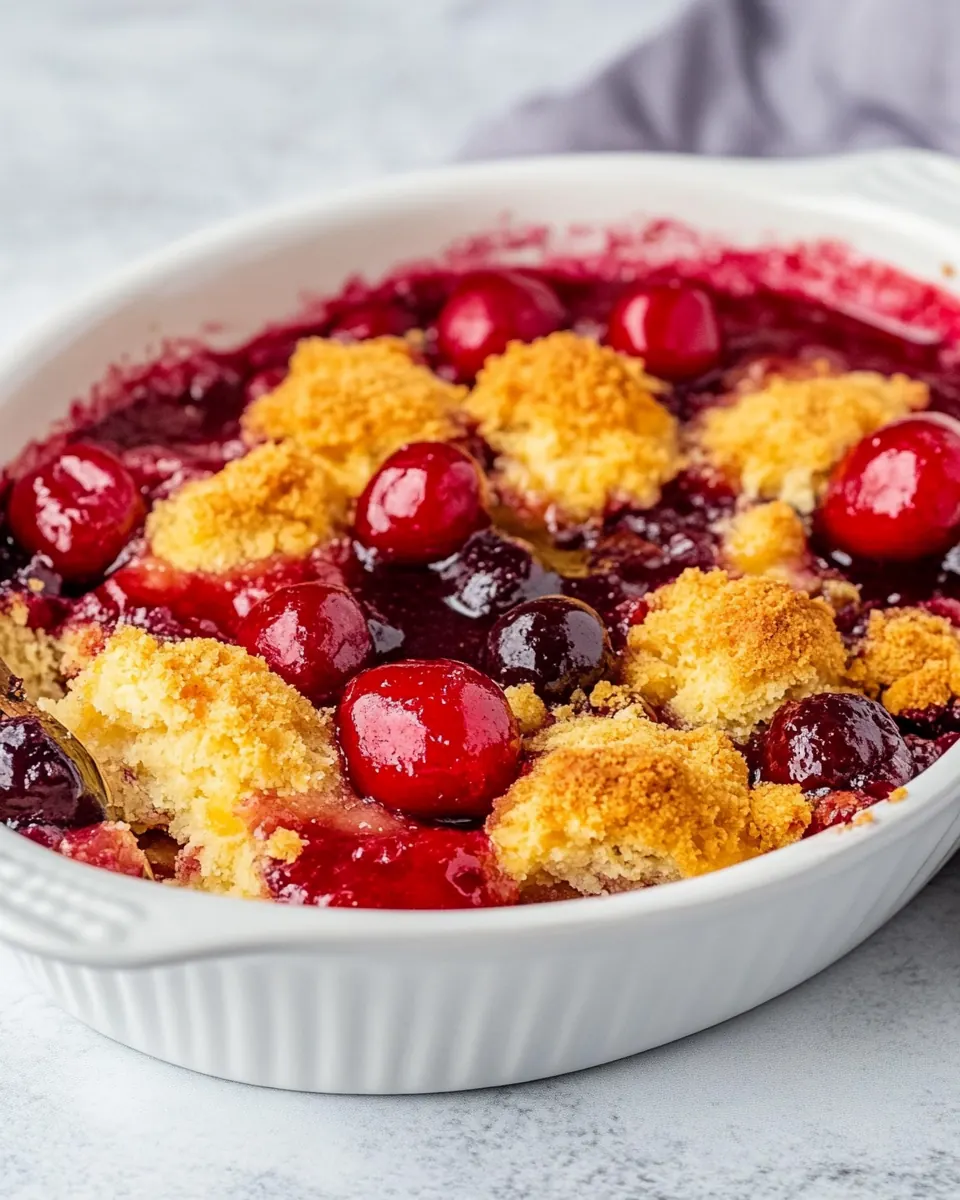
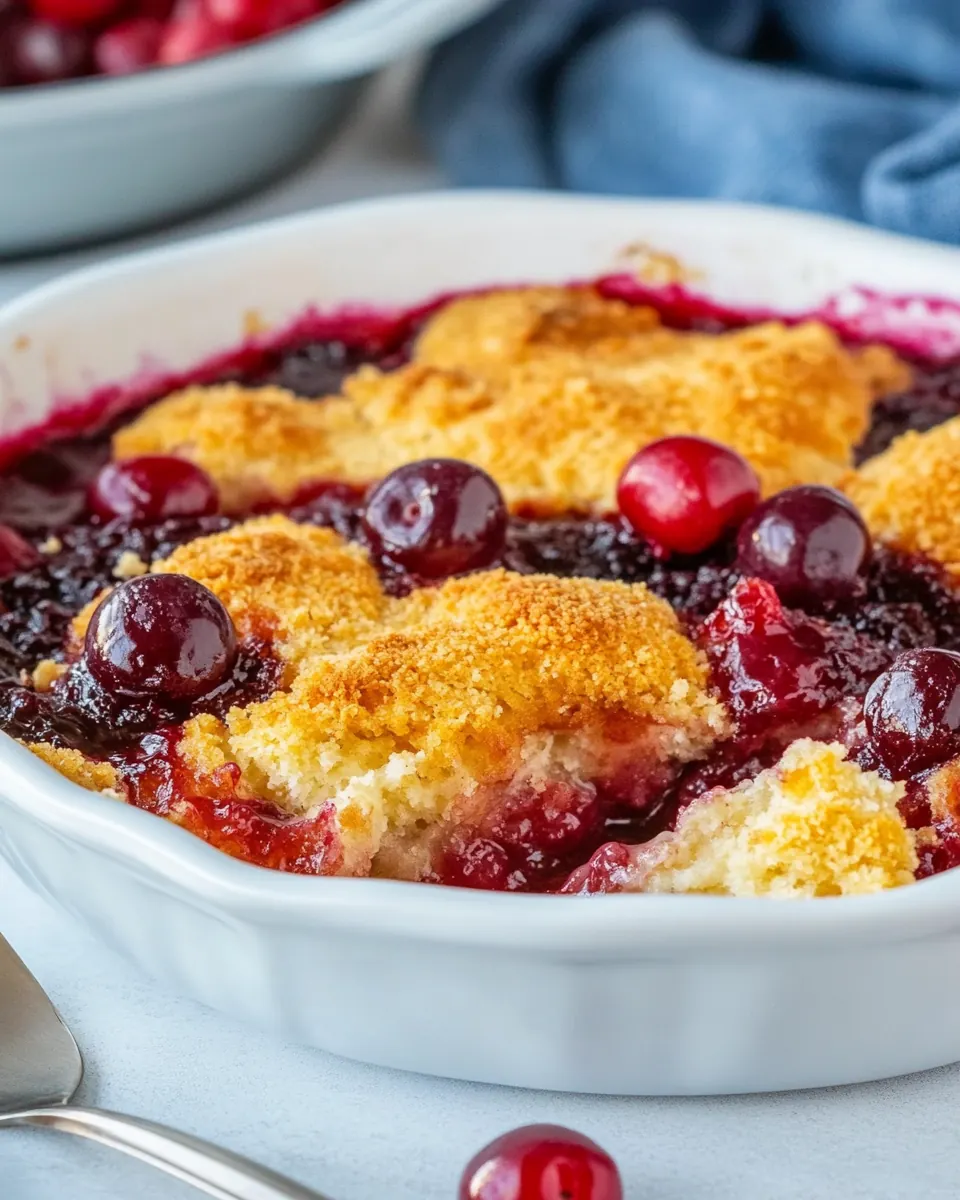
The interplay between the thick, glossy cherry filling and the tender, slightly crisp top is what keeps me coming back. As the lemon lime soda reacts with the dry cake mix, it creates pockets of air that bake into a pleasant crumb, while the fruit underneath remains syrupy and spoonable.
Highly Adaptable
I appreciate recipes that let you adjust without losing the soul of the dish. You can scale this for a larger crowd, swap the cherry juice source, or change the pan size and still end up with a great result. That flexibility has saved me more than once when I misjudged how many people would arrive.
Comforting, Crowd Pleaser
This is the kind of dessert that gets passed around at potlucks and put on repeat at family dinners. It serves a crowd beautifully, and its nostalgic quality tends to spark conversations. I like that it feels both celebratory and simple, a rare combination.
Essential Ingredients for Easy Cherry Cobbler
These ingredients are straightforward and designed to work together to produce a vibrant fruit filling under a golden, tender topping. The cherries are the flavor anchor, the sugar and cornstarch create a glossy, thickened filling, and the cake mix combined with lemon lime soda turns into a quick, aerated topping. Each player has an obvious role, and together they deliver a classic, comforting cobbler with minimal effort.
- 2 (14.25 oz) cans Tart Cherries with juice: Provide bright, tart flavor and tender texture to the filling; drain one can if a denser filling is desired, or include juice for more sauce; heat gently to meld flavors before thickening.
- 1/2 cup (237 ml) tart cherry juice: Add concentrated tart cherry flavor and liquid to enhance the filling's sauciness; measure precisely and combine with cornstarch to prevent lumps while simmering until clear and thickened.
- 1 1/3 cup (267 g) granulated sugar: Impart sweetness and balance the cherries' tartness; dissolve into the cherry mixture and taste as you cook to adjust sweetness, keeping in mind the cake topping adds additional sugar.
- 1/2 cup (32 g) cornstarch: Thicken the cherry juices into a glossy, spoonable filling; whisk with the cherry juice before heating to avoid lumps and simmer until translucent and bubbling to activate starch.
- 1 (14-16 ounce) package yellow cake mix: Provide a quick, buttery crumb topping and structure for the cobbler; sprinkle evenly over the prepared filling and bake until the mix absorbs juices and forms a golden crust.
- 12 ounces lemon lime soda: Introduce effervescence and lightness to the topping while adding subtle sweetness; pour over the cake mix so carbonation and soda dissolve the dry mix into a tender, cake-like crust.
Preparation Steps for Easy Cherry Cobbler
This recipe follows a clear sequence that balances making a glossy filling while preparing a quick, aerated topping. Keep cookware and measuring tools nearby, and allow the filling to cool slightly before topping so the dry cake mix behaves correctly when the soda is added.
- Drain cherries and reserve 1/2 cup juice. Discard any remaining juice.: The moment you open the cans you will notice a sweet, tart syrup scent; draining thoroughly removes excess liquid so the filling base is not too thin, and reserving exactly 1/2 cup of that juice ensures you have the concentrated flavor needed to hydrate the cornstarch . A common mistake is discarding too much liquid, which leaves you with insufficient juice to dissolve the thickener and can make the filling underwhelming. Keep a gentle hand when pouring, so you capture just the right amount without losing whole cherries.
- Add juice, sugar, and cornstarch to a medium saucepan. Place over medium-low heat whisk until smooth. Continue stirring constantly until mixture boils and thickens. Remove from heat.: When these ingredients meet cold in the saucepan, begin whisking right away to disperse the cornstarch into the liquid so you get a smooth slurry. As you heat over medium low , the mixture will initially steam and smell faintly of sweet cherry, then take on a syrupy sheen as it approaches simmer. Stirring constantly prevents lumps and ensures the thickening reaction happens evenly. Avoid cranking the heat, or you risk scorching and a grainy texture.
- Stir cherries into the thickened mixture.: You'll know the filling is ready when the blocks of steam become continuous and the liquid visibly thickens, coating the whisk; the smell will deepen to a more pronounced cherry jam aroma. Boiling activates the cornstarch , producing a glossy, translucent gel. If you stop stirring, the bottom may scorch and create off flavors, so keep a steady motion until you remove it from heat.
- Pour cherry mixture into a 9×9-inch baking pan. Cool while oven preheats.: The steam will ease and the saucepan surface will cool minutely, but the filling will remain hot and smell sweet and fruity; removing it at the right moment prevents over thickening or a pasty finish. As it cools a touch, the viscosity will set to a perfect spoonable consistency. A common error here is letting it stand too long and become firm, which makes it harder to spread into the pan evenly.
- While cherries are cooling, preheat oven to 350°F.: When you fold the cherries in, the filling will shimmer and the fruit will disperse evenly, releasing small bursts of syrup as you mix. This step distributes fruit so each serving has both filling and whole cherries, enhancing texture. Avoid over mixing which can break the cherries and make the filling uniformly smooth rather than pleasantly chunked.
- Once the oven is preheated, sprinkle dry cake mix over cherries, then slowly pour lemon lime soda evenly over the top. Use a fork to lightly mix the soda and dry mix – you don’t want it all mixed but you want the dry mix moistened so it dissolves during baking.: As you transfer the glossy, deep red filling, you should hear a soft sluicing sound and see the mixture settle into the pan. Spreading it out evenly ensures consistent baking and prevents thin spots that could burn later. A frequent oversight is using the wrong pan size, which alters baking time and texture; confirm the pan size before pouring so the filling depth matches the recipe.
- Bake for approximately 25-35 minutes or until light golden brown on top.: Letting the filling cool slightly while the oven reaches temperature reduces the risk of the topping dissolving into the hot fruit and becoming soggy. You will notice the surface lose some steam and the aroma mellow, which is a cue to proceed. Rushing this step can cause the dry cake mix to absorb too much liquid when added, yielding a handful like texture instead of a tender crumb.
- Serve plain or with ice cream.: The oven should reach a consistent 350°F so the topping sets and browns properly as the filling bubbles. Once preheated, the dry cake mix will begin reacting predictably with the lemon lime soda and the heat will produce a golden surface. Make sure your oven rack is centered; placing the pan too close to the top can lead to uneven browning.
- Sprinkle dry cake mix over cherries then slowly pour lemon lime soda: As you sprinkle the dry cake mix , you'll see it sit in a light layer; the soda will fizz as it meets the dry mix and release a citrus scent. Pouring slowly helps moisten the mix rather than washing it into the filling, and using a fork to gently combine creates little pockets of batter that bake into airy pockets. If you mix too vigorously, the topping will homogonize with the filling and lose its distinct texture.
- Use a fork to lightly mix the soda and dry mix: The fork action should be gentle, creating slight swirls and ensuring the dry bits are dampened while leaving some dry spots so the cobbler develops texture contrast. You will see small bubbles form where the soda reacted, which is a good sign. Overworking here causes the topping to collapse and become dense rather than tender and aerated.
- Bake for approximately 25 to 35 minutes: In the oven, the kitchen will fill with a warm, caramelized fruit scent and the topping will progress from pale to a light golden brown; bubbling along the edges indicates the filling is hot and set. The visual cue is important, as the exact time depends on oven variance and pan depth. A mistake to avoid is pulling the cobbler out too early; an underbaked topping can be doughy and the filling may not have set properly.
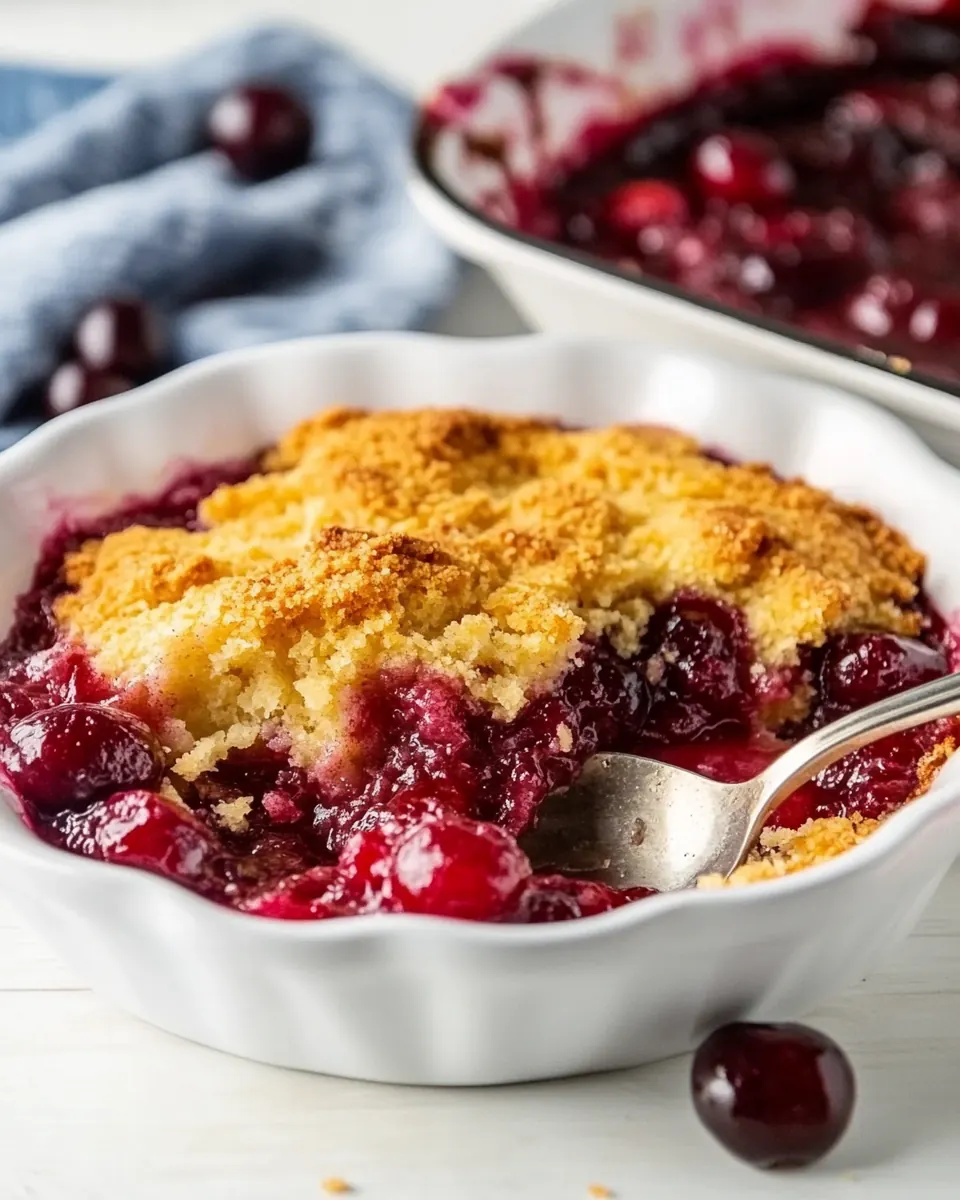
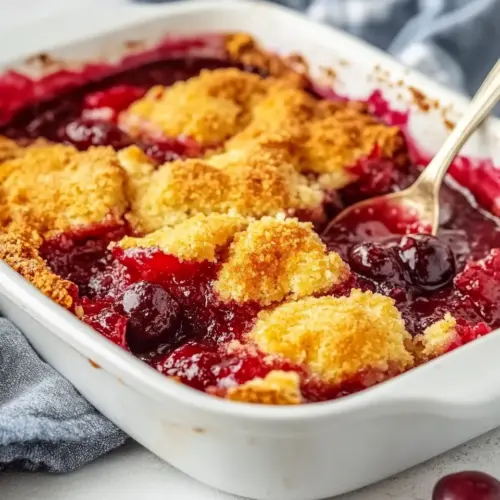
- Serve plain or with ice cream: The finished cobbler should present a glossy, bubbling fruit layer peeking beneath a tender, golden top; serving it warm highlights the contrast between syrupy filling and slightly crisp topping. If you add cold ice cream , the combination of temperatures and textures becomes even more delightful. Be cautious not to leave leftovers at room temperature for too long; store any extras in the refrigerator to preserve texture.
Customization Ideas
This section offers ways to tweak presentation and flavor while staying true to the straightforward spirit of the recipe. Use these ideas to adapt the cobbler for different occasions or textures, and choose a few that suit your pantry and taste.
- Thaw frozen cherries first If you use frozen cherries, thaw completely and drain any excess water so the filling keeps the right consistency and does not dilute the flavor.
- Use tart cherry juice alternative If you cannot find tart cherry juice, you can use plain water sparingly, but taste as you go to keep the filling balanced.
- Choose pan size for texture For a thinner topping and more filling surface, bake in a 9×13-inch pan; reduce bake time and watch for fast browning.
- Add extract after cooking Stir a teaspoon of vanilla or almond extract into the filling off heat for a subtle aromatic lift, adding it after removing the pan from the stove.
- Store properly Cool completely before covering and refrigerating in an airtight container; the filling will continue to thicken as it chills.
Serving Options for Easy Cherry Cobbler
This cobbler is versatile and easy to serve for many occasions, from casual family dinners to summer gatherings. Think about pairing textures and temperatures to highlight the sweet and tart qualities of the dish, and choose serving methods that fit your audience and timing.
- Classic warm bowl Serve a generous scoop of the cobbler warm in a bowl so the bubbling cherry filling and the tender topping are easy to spoon together.
- With cold ice cream Place a scoop of vanilla style ice cream on top to create a temperature contrast and melty sauce that enhances each bite.
- Family style pan Present the 9×9 pan directly at the table for casual gatherings, letting guests help themselves with spoons or pie servers.
- For outdoor gatherings This dish travels well; cover and keep chilled until serving time if the event is outdoors, then warm briefly if you have access to an oven.
- Storage and leftovers Refrigerate any leftovers in an airtight container for up to four days; rewarm in a low oven to restore the topping’s texture before serving.
- Seasonal pairing Because it highlights tart cherries, this cobbler is great for summer menus and celebratory occasions where bright fruit desserts are welcome.
FAQ
Conclusion
This Easy Cherry Cobbler stands out for its vibrant tart fruit filling and effortless, golden topping that comes together with pantry staples. Give it a try when you want a reliable dessert that is both nostalgic and simple to execute. Serve it warm straight from the pan and watch how quickly it becomes a favorite for family meals and casual gatherings.
Easy Cherry Cobbler
Equipment
- Medium Saucepan
- 9x9-inch Baking Pan
- Fork
- Whisk
Ingredients
- 2 (14.25 oz) cans Tart Cherries with juice Provide bright, tart flavor and tender texture to the filling; drain one can if a denser filling is desired, or include juice for more sauce; heat gently to meld flavors before thickening.
- 1/2 cup (237 ml) tart cherry juice Add concentrated tart cherry flavor and liquid to enhance the filling's sauciness; measure precisely and combine with cornstarch to prevent lumps while simmering until clear and thickened.
- 1 1/3 cup (267 g) granulated sugar Impart sweetness and balance the cherries' tartness; dissolve into the cherry mixture and taste as you cook to adjust sweetness, keeping in mind the cake topping adds additional sugar.
- 1/2 cup (32 g) cornstarch Thicken the cherry juices into a glossy, spoonable filling; whisk with the cherry juice before heating to avoid lumps and simmer until translucent and bubbling to activate starch.
- 1 (14-16 ounce) package yellow cake mix Provide a quick, buttery crumb topping and structure for the cobbler; sprinkle evenly over the prepared filling and bake until the mix absorbs juices and forms a golden crust.
- 12 ounces lemon lime soda Introduce effervescence and lightness to the topping while adding subtle sweetness; pour over the cake mix so carbonation and soda dissolve the dry mix into a tender, cake-like crust.
Instructions
- Drain cherries and reserve 1/2 cup juice. Discard any remaining juice.: The moment you open the cans you will notice a sweet, tart syrup scent; draining thoroughly removes excess liquid so the filling base is not too thin, and reserving exactly 1/2 cup of that juice ensures you have the concentrated flavor needed to hydrate the cornstarch . A common mistake is discarding too much liquid, which leaves you with insufficient juice to dissolve the thickener and can make the filling underwhelming. Keep a gentle hand when pouring, so you capture just the right amount without losing whole cherries.
- Add juice, sugar, and cornstarch to a medium saucepan. Place over medium-low heat whisk until smooth. Continue stirring constantly until mixture boils and thickens. Remove from heat.: When these ingredients meet cold in the saucepan, begin whisking right away to disperse the cornstarch into the liquid so you get a smooth slurry. As you heat over medium low , the mixture will initially steam and smell faintly of sweet cherry, then take on a syrupy sheen as it approaches simmer. Stirring constantly prevents lumps and ensures the thickening reaction happens evenly. Avoid cranking the heat, or you risk scorching and a grainy texture.
- Stir cherries into the thickened mixture.: You'll know the filling is ready when the blocks of steam become continuous and the liquid visibly thickens, coating the whisk; the smell will deepen to a more pronounced cherry jam aroma. Boiling activates the cornstarch , producing a glossy, translucent gel. If you stop stirring, the bottom may scorch and create off flavors, so keep a steady motion until you remove it from heat.
- Pour cherry mixture into a 9×9-inch baking pan. Cool while oven preheats.: The steam will ease and the saucepan surface will cool minutely, but the filling will remain hot and smell sweet and fruity; removing it at the right moment prevents over thickening or a pasty finish. As it cools a touch, the viscosity will set to a perfect spoonable consistency. A common error here is letting it stand too long and become firm, which makes it harder to spread into the pan evenly.
- While cherries are cooling, preheat oven to 350°F.: When you fold the cherries in, the filling will shimmer and the fruit will disperse evenly, releasing small bursts of syrup as you mix. This step distributes fruit so each serving has both filling and whole cherries, enhancing texture. Avoid over mixing which can break the cherries and make the filling uniformly smooth rather than pleasantly chunked.
- Once the oven is preheated, sprinkle dry cake mix over cherries, then slowly pour lemon lime soda evenly over the top. Use a fork to lightly mix the soda and dry mix – you don’t want it all mixed but you want the dry mix moistened so it dissolves during baking.: As you transfer the glossy, deep red filling, you should hear a soft sluicing sound and see the mixture settle into the pan. Spreading it out evenly ensures consistent baking and prevents thin spots that could burn later. A frequent oversight is using the wrong pan size, which alters baking time and texture; confirm the pan size before pouring so the filling depth matches the recipe.
- Bake for approximately 25-35 minutes or until light golden brown on top.: Letting the filling cool slightly while the oven reaches temperature reduces the risk of the topping dissolving into the hot fruit and becoming soggy. You will notice the surface lose some steam and the aroma mellow, which is a cue to proceed. Rushing this step can cause the dry cake mix to absorb too much liquid when added, yielding a handful like texture instead of a tender crumb.
- Serve plain or with ice cream.: The oven should reach a consistent 350°F so the topping sets and browns properly as the filling bubbles. Once preheated, the dry cake mix will begin reacting predictably with the lemon lime soda and the heat will produce a golden surface. Make sure your oven rack is centered; placing the pan too close to the top can lead to uneven browning.
- Sprinkle dry cake mix over cherries then slowly pour lemon lime soda: As you sprinkle the dry cake mix , you'll see it sit in a light layer; the soda will fizz as it meets the dry mix and release a citrus scent. Pouring slowly helps moisten the mix rather than washing it into the filling, and using a fork to gently combine creates little pockets of batter that bake into airy pockets. If you mix too vigorously, the topping will homogonize with the filling and lose its distinct texture.
- Use a fork to lightly mix the soda and dry mix: The fork action should be gentle, creating slight swirls and ensuring the dry bits are dampened while leaving some dry spots so the cobbler develops texture contrast. You will see small bubbles form where the soda reacted, which is a good sign. Overworking here causes the topping to collapse and become dense rather than tender and aerated.
- Bake for approximately 25 to 35 minutes: In the oven, the kitchen will fill with a warm, caramelized fruit scent and the topping will progress from pale to a light golden brown; bubbling along the edges indicates the filling is hot and set. The visual cue is important, as the exact time depends on oven variance and pan depth. A mistake to avoid is pulling the cobbler out too early; an underbaked topping can be doughy and the filling may not have set properly.
- Serve plain or with ice cream: The finished cobbler should present a glossy, bubbling fruit layer peeking beneath a tender, golden top; serving it warm highlights the contrast between syrupy filling and slightly crisp topping. If you add cold ice cream , the combination of temperatures and textures becomes even more delightful. Be cautious not to leave leftovers at room temperature for too long; store any extras in the refrigerator to preserve texture.
Notes
- Thaw frozen cherries first If you use frozen cherries, thaw completely and drain any excess water so the filling keeps the right consistency and does not dilute the flavor.
- Use tart cherry juice alternative If you cannot find tart cherry juice, you can use plain water sparingly, but taste as you go to keep the filling balanced.
- Choose pan size for texture For a thinner topping and more filling surface, bake in a 9×13-inch pan; reduce bake time and watch for fast browning.
- Add extract after cooking Stir a teaspoon of vanilla or almond extract into the filling off heat for a subtle aromatic lift, adding it after removing the pan from the stove.
- Store properly Cool completely before covering and refrigerating in an airtight container; the filling will continue to thicken as it chills.