Cinnamon Twist
Cinnamon Twist has been a warm corner of my kitchen routine for years, the kind of recipe I reach for when I want a sticky, comforting treat that smells like home.
I first learned to braid and shape this pastry on a chilly afternoon while visiting a friend who insisted that the secret to a perfect pull apart is gentle hands and patience. I remember the bench dusted with flour, the soft elasticity of the dough under my fingertips, and the little thrill when the spiral revealed cinnamon ribbons. Since then, I have made this Cinnamon Twist for weekend breakfasts, cozy book club mornings, and last minute guests who always ask for the recipe.
What I love is how approachable it feels, even when it looks showy. You do not need special tools, just a willingness to roll, spread, and twist. Over time I refined the rhythm of rolling to exactly the size that yields the most tender crumb, and I learned to watch for visual cues rather than rely on a clock. This made the bake more intuitive, and I started turning out reliably golden, tender loaves that pull apart into gooey layers.
Every time the oven door opens and that first puff of warm, cinnamon scented air escapes, I think about small rituals that make a house feel like a home. The Cinnamon Twist has become one of those rituals for me.
Recipe Snapshot
1 hr 15 mins
20 mins
55 mins
Medium
300 kcal
American
Gluten-Free, Low FODMAP
Desserts
9 inch round cake pan, Mixing bowl, Rolling surface
Why This Cinnamon Twist Works
Comforting aroma that anchors the morning
The moment I slide the pan into the oven, the kitchen fills with the sweet scent of cinnamon and butter, and that alone makes this recipe worth the effort. I find the aroma instantly creates anticipation, and guests always gather around the oven with smiling faces.
Show stopping but simple to make
I love how the finished Cinnamon Twist looks like a bakery centerpiece, while the techniques are straightforward. Rolling, spreading, and twisting are easy to master, and once you get the motions down the process feels almost meditative.
Versatile for occasions
Whether it is a relaxed weekend breakfast or a celebratory brunch, the Cinnamon Twist slots into many moments. It pairs beautifully with coffee or tea, and because it is baked in a single pan it travels well to potlucks and gatherings.
Textural delight
The contrast between the tender inner crumb and the slightly crisp outer edges is what keeps me coming back. The butter in the filling melts into ribbons that caramelize slightly at the surface, giving you a combination of soft, gooey layers and lightly crisp bites.
Easy to adapt
I often tinker with rise times and oven placement to suit my schedule, and the recipe forgives small timing tweaks. It is one of those recipes where learning a couple of visual cues pays off, so you can confidently make it on busy mornings.
Shopping List for Cinnamon Twist
I think of these ingredients as a short list of reliable players that come together to make something greater than the sum. The base dough provides structure and tenderness, the butter adds richness, and the cinnamon and granulated sugar form the sweet, spiced ribbons that define the experience. Keep things simple and high quality for the best result, especially the butter, since it impacts both texture and flavor.
- Cinnamon Roll Dough: Provide the soft, pre-made base that simplifies assembly and supplies a yeasted, tender texture ideal for twists and swirls. Conveniently shaped and ready-to-roll, it ensures consistent layers and an even bake while absorbing cinnamon butter for rich flavor. Often available refrigerated or frozen, it speeds preparation without sacrificing classic cinnamon roll characteristics.
- 1 cup (133 grams) granulated sugar: Add crystalline sweetness and structure to the filling and any finishing sprinkle, contributing bulk and caramelization during baking for a crisp edge. Dissolve easily when mixed with butter and cinnamon to form a cohesive, spreadable filling that browns attractively. Adjusting quantity subtly alters sweetness and mouthfeel of the finished twist.
- 2 1/2 teaspoons (5 grams) ground cinnamon: Provide warm, aromatic spice that defines the classic cinnamon profile and pairs with sugar to create the filling's signature flavor. Distribute evenly through the sugar mixture to infuse each layer with fragrance and depth, enhancing perceived sweetness. Use measured amounts to avoid overpowering delicate dough while ensuring recognizable spice notes.
- 1/2 cup (113 grams) unsalted butter, softened: Contribute creamy richness and help bind the sugar–cinnamon mixture into a spreadable paste that keeps layers moist during baking. Soften beforehand to allow smooth incorporation and even coverage, promoting tender crumb and glossy interior. Butter also aids in browning and adds a luscious mouthfeel to each cinnamon twist.
- 1 large egg (50 grams), lightly beaten: Offer moisture and gentle structure to the dough, aiding in binding the filling components while contributing tenderness when beaten into the mixture. Incorporate lightly to avoid overworking the dough yet provide richness and a slight lift during baking. Egg also supports a golden color and subtle firmness to sliced twists.
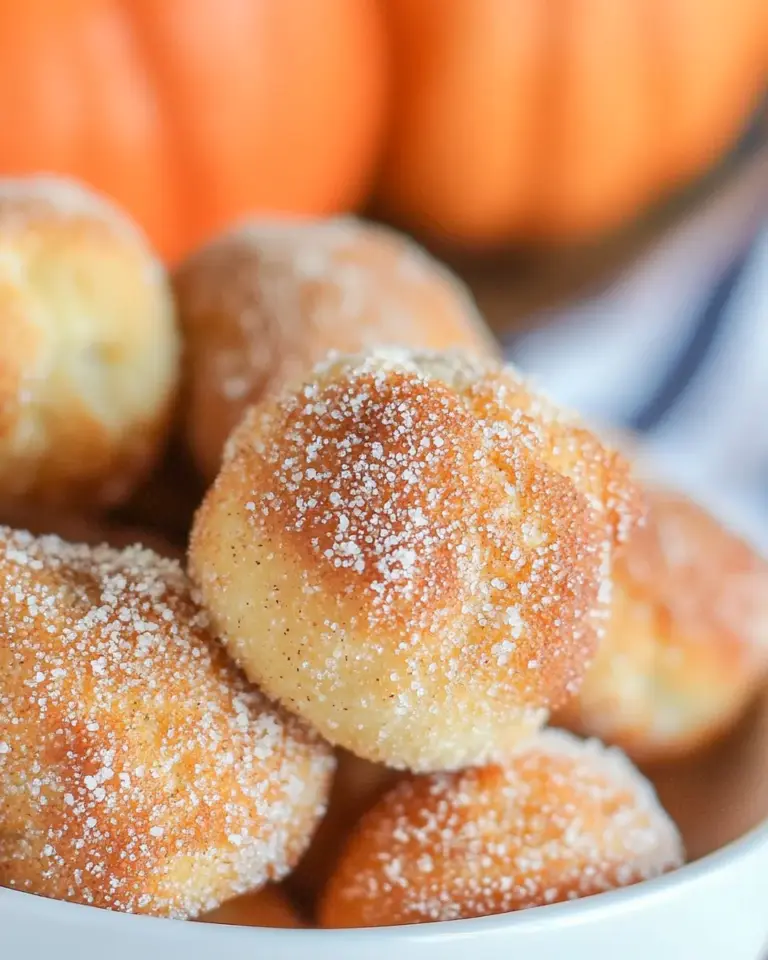
- Garnish: cinnamon sugar: Provide a final crunchy, sweet finish that emphasizes cinnamon aroma and adds visual appeal when sprinkled before or after baking. Use a fine mix of sugar and cinnamon to create contrast with the soft interior and enhance first bites with immediate sweetness. Apply sparingly for balanced flavor and texture on each twist.
Cooking Instructions for Cinnamon Twist
I approach the steps with a calm, steady rhythm, and I encourage you to pay attention to tactile and visual cues rather than racing the clock. Below I expand each direction into detailed guidance so you can feel confident at every turn and avoid common missteps.
- Spray a 9-inch round cake pan with cooking spray.: You will notice a thin, even sheen covering the pan surface which prevents sticking and helps the twist release cleanly after baking. A common problem is using too little coating, which can lead to the loaf clinging to the pan; make sure the base and sides are lightly covered. The sound is silent here, but the visual cue is a uniform matte sheen. If you are worried about sticking, you can also line the bottom with parchment that is trimmed to fit. Avoid using oils that leave a heavy puddle as they can cause uneven baking, and check the pan for dents that might cause the dough to bake unevenly.
- Lightly punch down Cinnamon Roll Dough. Cover and let stand for 5 minutes. Turn out dough onto a lightly floured surface, and roll into a 21 x 12-inch rectangle.: As you work the dough, you should feel it relax beneath your hands; the springs of trapped air will ease when you punch it down. After a short rest the dough will be more compliant and easier to roll. The surface should be just dusted with flour to prevent sticking, but not so much that the dough dries. When rolling, aim for a consistent thickness so baking is even; uneven thickness can produce doughy centers or overly crisp edges. A good visual cue is a smooth surface without large bubbles. If the dough resists stretching, give it another few minutes to relax. Avoid overflouring which can make the layers dry, and if the dough tears, press gently to reseal.
- In a small bowl, combine granulated sugar and cinnamon. Spread butter onto dough, and sprinkle with sugar mixture, leaving a 1/2-inch border on one long side. Brush egg over side of dough without filling.: The aroma of cinnamon and sugar when combined is immediately inviting, and spreading softened butter should feel creamy under your knife or spatula. Be mindful to leave a clean border along one side so you have space to brush the beaten egg for sealing. The sugar mixture should be evenly scattered so no dense patches form, which would create pockets of overly sweet or crunchy bits. If the butter begins to melt and pool, refrigerate the dough briefly to keep layers defined. One common mistake is using melted butter , which soaks into the dough instead of forming ribbons; keep it spreadable but not liquid.
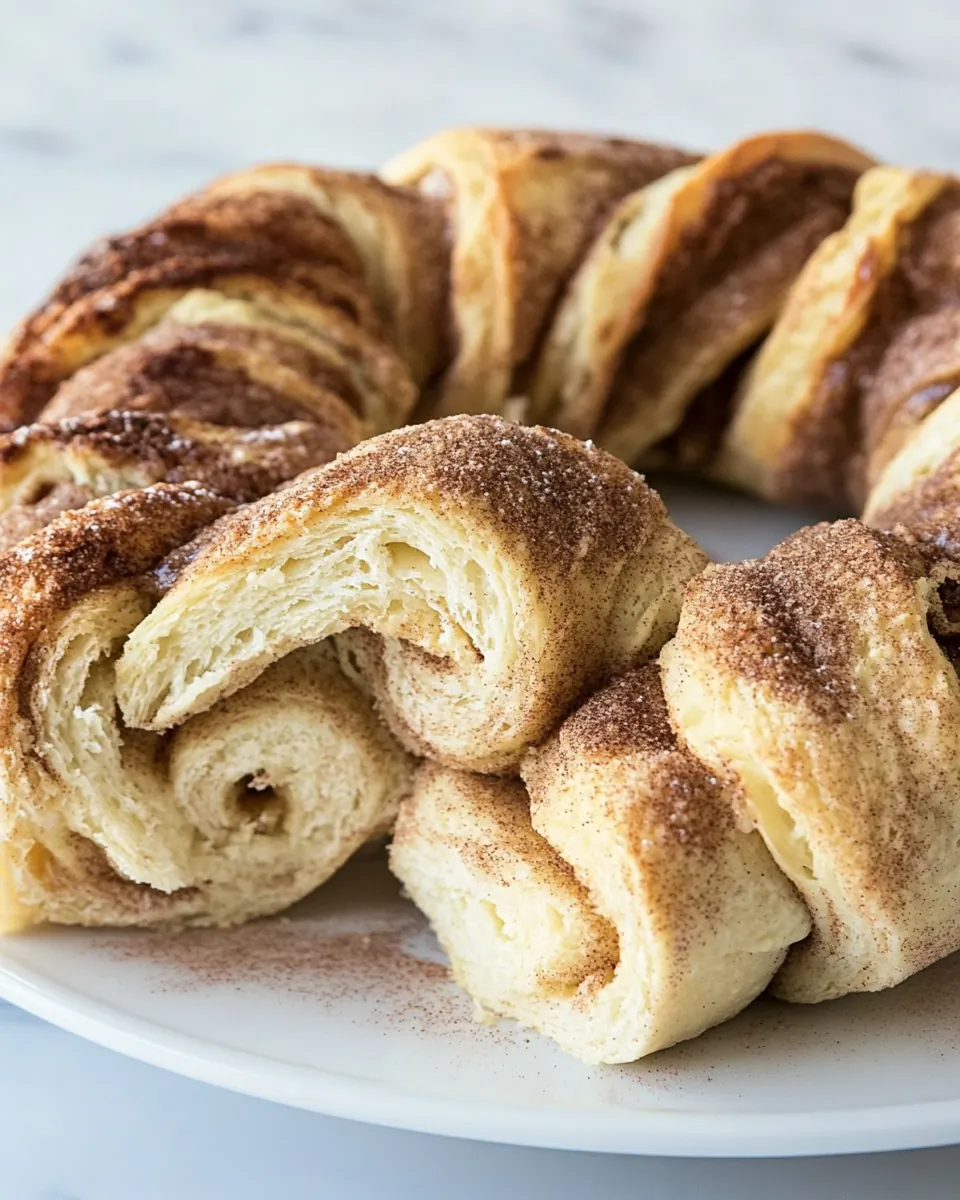
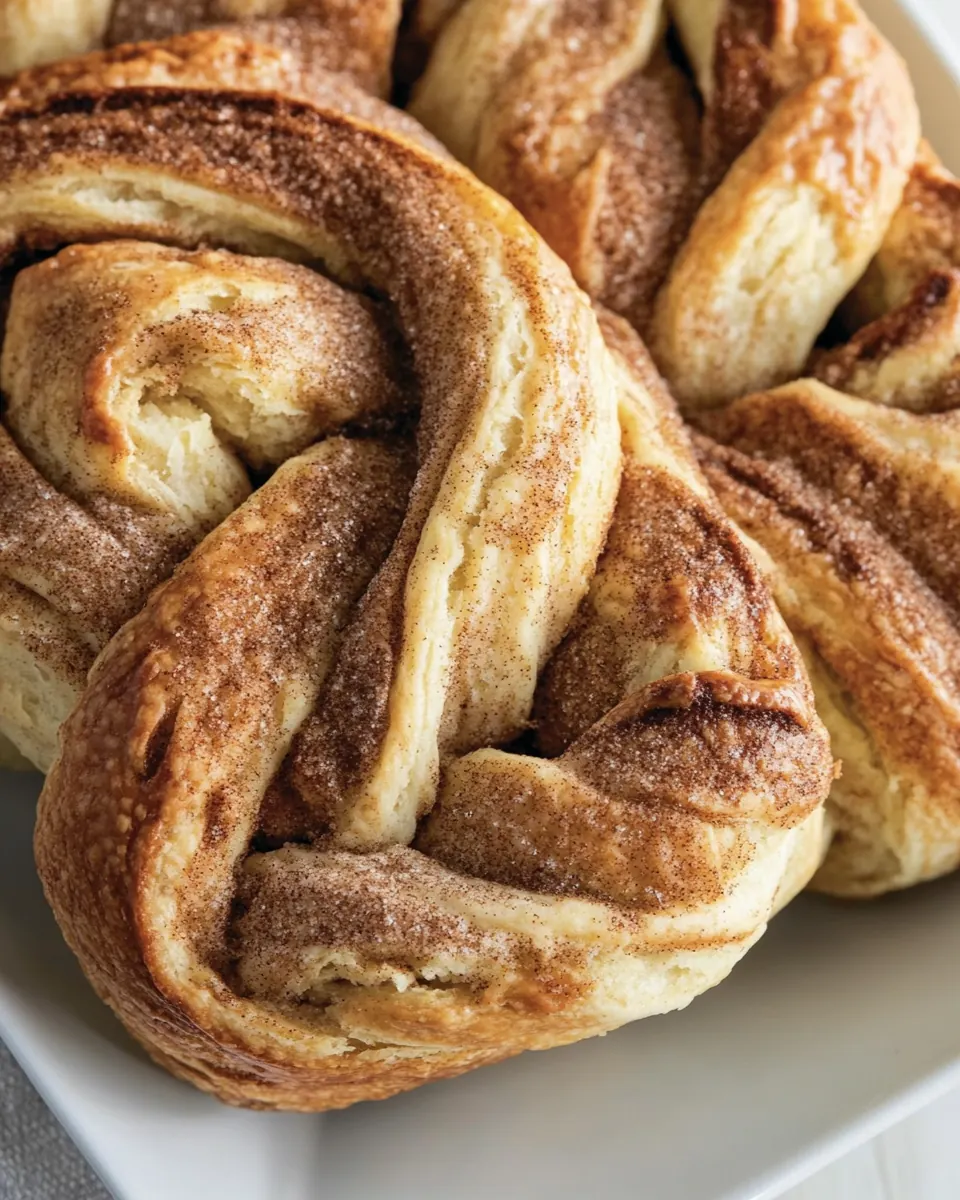
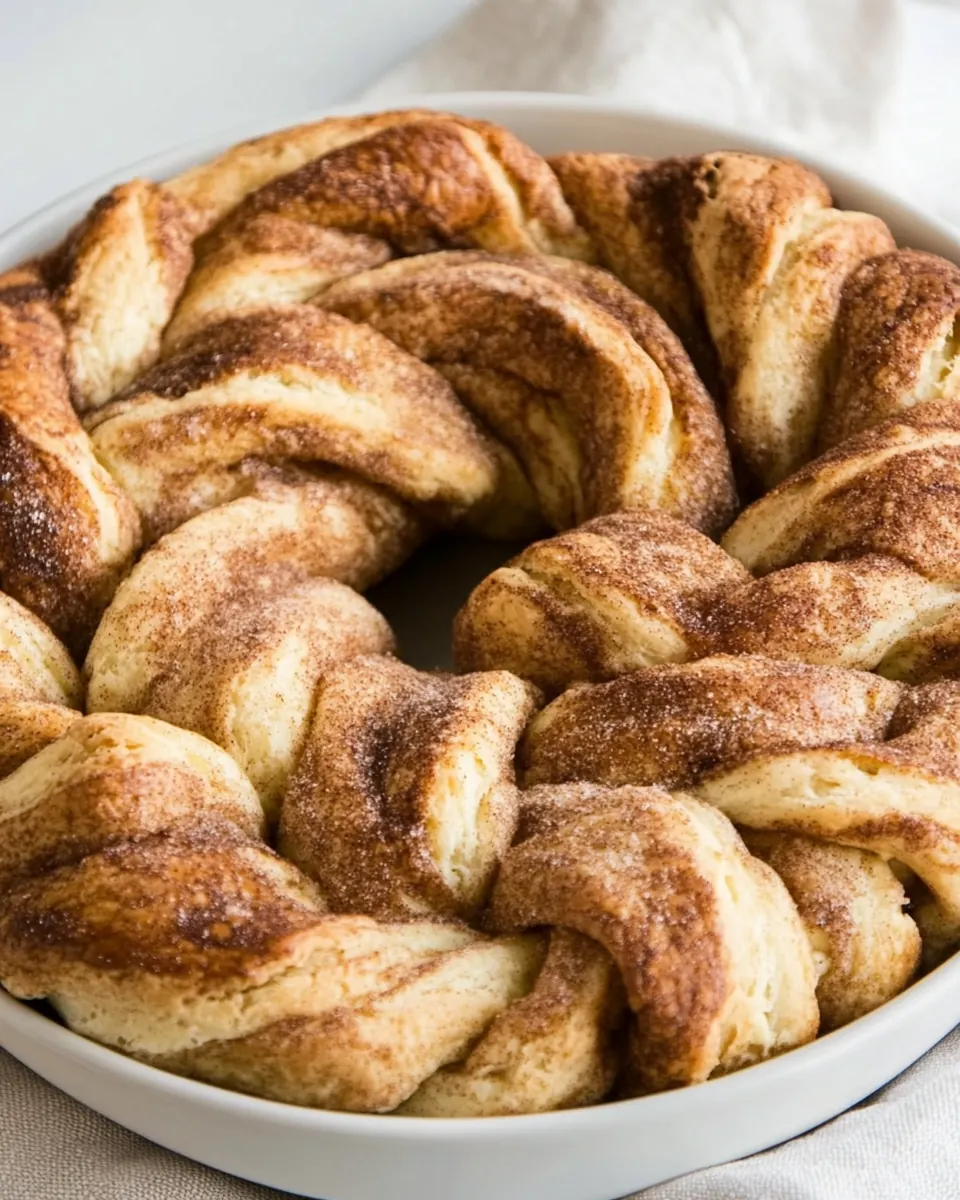
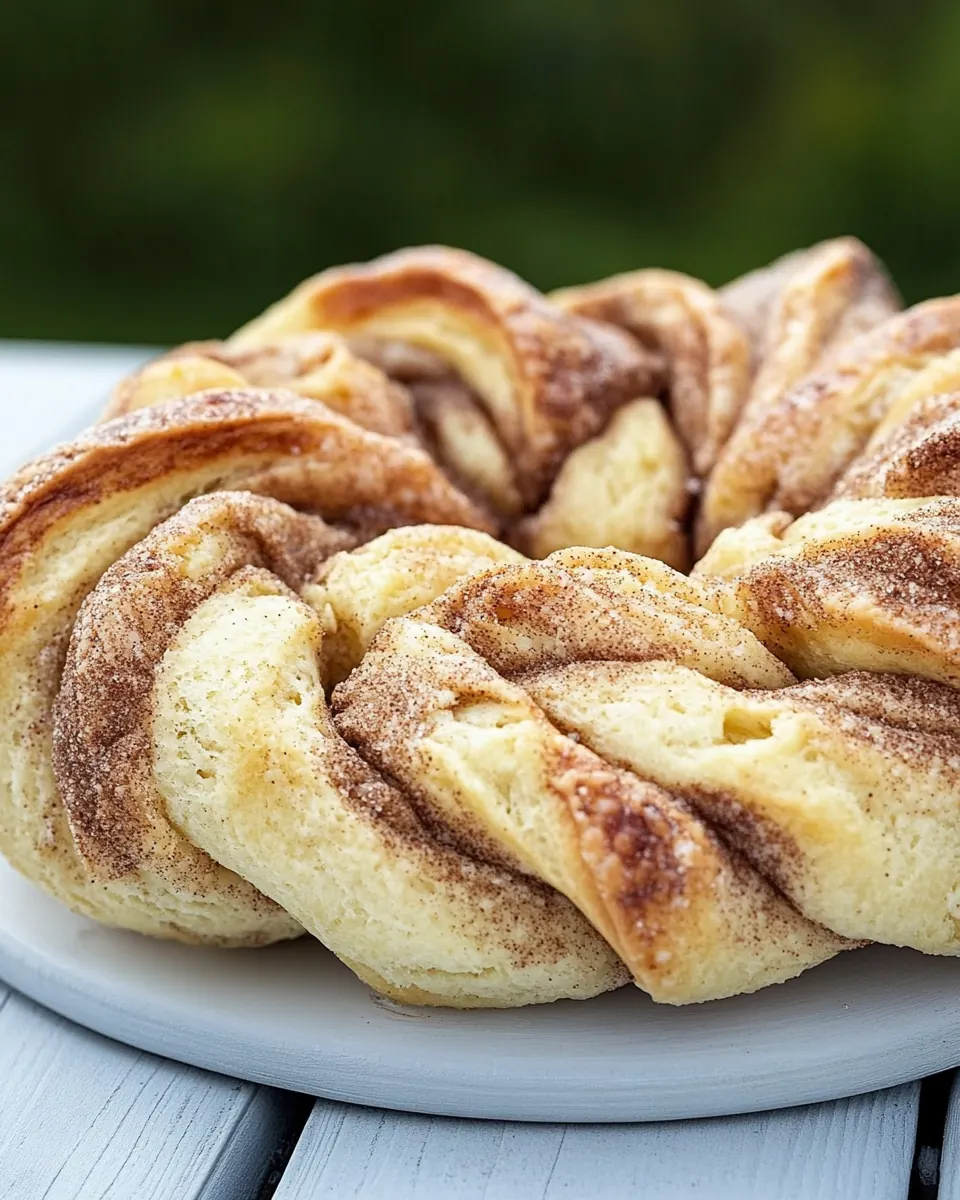
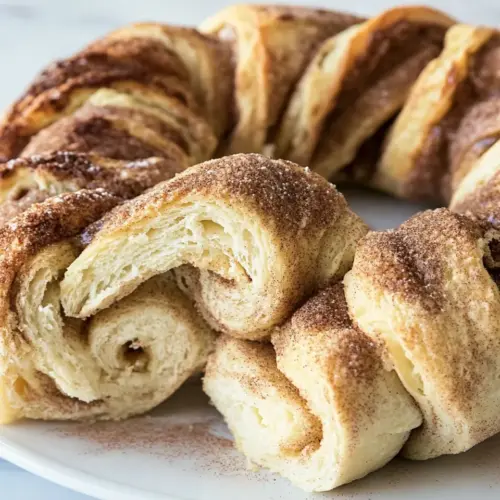
- Starting with one long side, roll dough into a log, pinching seam to seal. Place log seam side down on a cutting board, and cut in half lengthwise leaving 1 1/2 inches at top. Carefully twist dough pieces around each other, and form into a circle. Place in prepared pan, cut sides up. Let rise in a warm, draft-free place (75°) until dough has puffed, about 30 minutes.: When you roll, you should see the cinnamon ribbons coil inward; pressing the seam firmly prevents unraveling during shaping and baking. Cutting and twisting expose the inner layers which will caramelize and create contrast; handle the strands gently to preserve the swirl. Forming into a circle creates even heat distribution in the pan and produces an attractive presentation. During the rise, the dough should visibly puff and feel pillowy to the touch; underproofing yields a dense center, while overproofing risks collapse. Watch for a roughly 30 minute proof at about 75 degrees Fahrenheit, but prioritize visual puffiness rather than exact time. A common error is letting the dough sit in a drafty area which forms a skin, so keep it covered and in a warm spot.
- Preheat oven to 350°F.: You will sense readiness when the oven reaches an even 350 degrees Fahrenheit and the interior is stable. Preheating ensures the dough begins baking immediately and the structure sets correctly, preventing a flat final product. I always wait for the oven indicator and give it a couple extra minutes to stabilize. A quick test is to place your hand near the open door for a second to feel the heat, but avoid prolonged exposure. Turning on the oven too early or too late can affect rise and browning, so aim for a consistent temperature before the pan goes in.
- Bake until a wooden pick inserted in center comes out clean, 50 to 55 minutes, covering with foil halfway through baking to prevent excess browning. Let cool in pan for 20 minutes. Remove from pan. Garnish with cinnamon sugar, if desired.: The smell during this long bake is deep and buttery, with caramel notes from the sugar. Listen for a faint, steady bubbling and watch the top for a deep golden color; if it darkens too quickly, loosely tent with foil halfway through as instructed. The wooden pick test checks that the interior is set, and removing it clean or with a few moist crumbs indicates doneness. Letting the bread cool in the pan for 20 minutes helps the structure stabilize so it does not fall apart when removed. Overbaking dries the interior, while underbaking leaves a gummy center. A common mistake is skipping the foil tent which can lead to an overly browned crust before the center finishes cooking.
- Remove from pan Garnish with cinnamon sugar if desired: The final release is satisfying when the loaf lifts out intact and you see the braided layers. Garnishing with a sprinkle of cinnamon sugar adds a light sparkle and an extra cinnamon punch. Allowing the loaf to cool slightly before sprinkling ensures the sugar does not dissolve into the warm surface. If you slice too hot, the layers can compress and become misshapen, so patience here matters. Present on a platter and enjoy the mix of tender, sweet interior and lightly crisp exterior.
Ways to Adapt This Recipe
This section offers practical and creative ways to adapt the Cinnamon Twist, whether you need to adjust timing, presentation, or make it friendlier for different occasions. Each tip starts with a bolded hook to make it easy to scan and apply.
- Make ahead: Assemble the twist up to the point of the final rise, then refrigerate overnight. In the morning, bring it to room temperature for about 30 to 60 minutes before baking for fresh, morning ready results.
- Switch the sugar ratio: If you prefer a milder cinnamon presence, reduce the granulated sugar slightly and keep the cinnamon measurement, which maintains structure while softening sweetness.
- Control browning: If your oven runs hot, tent with foil earlier than halfway through baking to avoid an overly dark crust while ensuring the interior cooks through.
- Garnish options: Instead of or in addition to cinnamon sugar, sprinkle a light dusting of powdered sugar after cooling for a softer finish that still adds visual appeal.
- Transport tips: Cool fully, then wrap loosely in parchment and place in a shallow box for travel to prevent crushing the top while keeping the twist looking fresh.
Side Dish Ideas for Cinnamon Twist
The Cinnamon Twist is wonderfully versatile at the table. Below are thoughtful serving suggestions, pairings for different occasions, and storage guidance to keep your loaf tasting its best when shared or stored.
- Breakfast service: Serve sliced warm with a pot of coffee or tea for a comforting morning spread. The tender layers and cinnamon aroma pair especially well with milky coffee beverages.
- Brunch centerpiece: Present the twist as the centerpiece among fresh fruit and yogurt. The visual appeal makes it ideal for weekends when you want a crowd pleasing option without too much fuss.
- Casual gatherings: Offer the twist on a wooden board with small plates for guests to pull apart. It works well for book clubs, casual showers, or relaxed holiday mornings.
- Occasion pairing: For autumn or fall themed events, emphasize the cinnamon garnish and serve alongside warm spiced drinks to highlight seasonal flavors.
- Storage tips: Store covered at room temperature for up to two days, or freeze slices wrapped tightly for up to one month. Rewarm gently in a low oven to revive the texture before serving.
- Serving style: For an elegant touch, serve slices with a small ramekin of warmed honey or a light glaze on the side so guests may drizzle to taste.
FAQ
Conclusion
What makes this recipe special is the way a few simple ingredients transform into a tender, aromatic loaf with beautiful layers and a comforting scent. Try the Cinnamon Twist when you want a bakery worthy centerpiece that is still approachable to make at home. Start with good quality butter and a patient roll and rise, and you will be rewarded with warm, cinnamon filled slices that bring people together. Enjoy the process and the cozy moments it creates.
Cinnamon Twist
Equipment
- 9-inch Round Cake Pan
- Mixing Bowl
- Rolling surface
Ingredients
- Cinnamon Roll Dough Provide the soft, pre-made base that simplifies assembly and supplies a yeasted, tender texture ideal for twists and swirls. Conveniently shaped and ready-to-roll, it ensures consistent layers and an even bake while absorbing cinnamon butter for rich flavor. Often available refrigerated or frozen, it speeds preparation without sacrificing classic cinnamon roll characteristics.
- 1 cup (133 grams) granulated sugar Add crystalline sweetness and structure to the filling and any finishing sprinkle, contributing bulk and caramelization during baking for a crisp edge. Dissolve easily when mixed with butter and cinnamon to form a cohesive, spreadable filling that browns attractively. Adjusting quantity subtly alters sweetness and mouthfeel of the finished twist.
- 2 1/2 teaspoons (5 grams) ground cinnamon Provide warm, aromatic spice that defines the classic cinnamon profile and pairs with sugar to create the filling's signature flavor. Distribute evenly through the sugar mixture to infuse each layer with fragrance and depth, enhancing perceived sweetness. Use measured amounts to avoid overpowering delicate dough while ensuring recognizable spice notes.
- 1/2 cup (113 grams) unsalted butter, softened Contribute creamy richness and help bind the sugar-cinnamon mixture into a spreadable paste that keeps layers moist during baking. Soften beforehand to allow smooth incorporation and even coverage, promoting tender crumb and glossy interior. Butter also aids in browning and adds a luscious mouthfeel to each cinnamon twist.
- 1 large egg (50 grams), lightly beaten Offer moisture and gentle structure to the dough, aiding in binding the filling components while contributing tenderness when beaten into the mixture. Incorporate lightly to avoid overworking the dough yet provide richness and a slight lift during baking. Egg also supports a golden color and subtle firmness to sliced twists.
- Garnish: cinnamon sugar Provide a final crunchy, sweet finish that emphasizes cinnamon aroma and adds visual appeal when sprinkled before or after baking. Use a fine mix of sugar and cinnamon to create contrast with the soft interior and enhance first bites with immediate sweetness. Apply sparingly for balanced flavor and texture on each twist.
Instructions
- Spray a 9-inch round cake pan with cooking spray.: You will notice a thin, even sheen covering the pan surface which prevents sticking and helps the twist release cleanly after baking. A common problem is using too little coating, which can lead to the loaf clinging to the pan; make sure the base and sides are lightly covered. The sound is silent here, but the visual cue is a uniform matte sheen. If you are worried about sticking, you can also line the bottom with parchment that is trimmed to fit. Avoid using oils that leave a heavy puddle as they can cause uneven baking, and check the pan for dents that might cause the dough to bake unevenly.
- Lightly punch down Cinnamon Roll Dough. Cover and let stand for 5 minutes. Turn out dough onto a lightly floured surface, and roll into a 21 x 12-inch rectangle.: As you work the dough, you should feel it relax beneath your hands; the springs of trapped air will ease when you punch it down. After a short rest the dough will be more compliant and easier to roll. The surface should be just dusted with flour to prevent sticking, but not so much that the dough dries. When rolling, aim for a consistent thickness so baking is even; uneven thickness can produce doughy centers or overly crisp edges. A good visual cue is a smooth surface without large bubbles. If the dough resists stretching, give it another few minutes to relax. Avoid overflouring which can make the layers dry, and if the dough tears, press gently to reseal.
- In a small bowl, combine granulated sugar and cinnamon. Spread butter onto dough, and sprinkle with sugar mixture, leaving a 1/2-inch border on one long side. Brush egg over side of dough without filling.: The aroma of cinnamon and sugar when combined is immediately inviting, and spreading softened butter should feel creamy under your knife or spatula. Be mindful to leave a clean border along one side so you have space to brush the beaten egg for sealing. The sugar mixture should be evenly scattered so no dense patches form, which would create pockets of overly sweet or crunchy bits. If the butter begins to melt and pool, refrigerate the dough briefly to keep layers defined. One common mistake is using melted butter , which soaks into the dough instead of forming ribbons; keep it spreadable but not liquid.
- Starting with one long side, roll dough into a log, pinching seam to seal. Place log seam side down on a cutting board, and cut in half lengthwise leaving 1 1/2 inches at top. Carefully twist dough pieces around each other, and form into a circle. Place in prepared pan, cut sides up. Let rise in a warm, draft-free place (75°) until dough has puffed, about 30 minutes.: When you roll, you should see the cinnamon ribbons coil inward; pressing the seam firmly prevents unraveling during shaping and baking. Cutting and twisting expose the inner layers which will caramelize and create contrast; handle the strands gently to preserve the swirl. Forming into a circle creates even heat distribution in the pan and produces an attractive presentation. During the rise, the dough should visibly puff and feel pillowy to the touch; underproofing yields a dense center, while overproofing risks collapse. Watch for a roughly 30 minute proof at about 75 degrees Fahrenheit, but prioritize visual puffiness rather than exact time. A common error is letting the dough sit in a drafty area which forms a skin, so keep it covered and in a warm spot.
- Preheat oven to 350°F.: You will sense readiness when the oven reaches an even 350 degrees Fahrenheit and the interior is stable. Preheating ensures the dough begins baking immediately and the structure sets correctly, preventing a flat final product. I always wait for the oven indicator and give it a couple extra minutes to stabilize. A quick test is to place your hand near the open door for a second to feel the heat, but avoid prolonged exposure. Turning on the oven too early or too late can affect rise and browning, so aim for a consistent temperature before the pan goes in.
- Bake until a wooden pick inserted in center comes out clean, 50 to 55 minutes, covering with foil halfway through baking to prevent excess browning. Let cool in pan for 20 minutes. Remove from pan. Garnish with cinnamon sugar, if desired.: The smell during this long bake is deep and buttery, with caramel notes from the sugar. Listen for a faint, steady bubbling and watch the top for a deep golden color; if it darkens too quickly, loosely tent with foil halfway through as instructed. The wooden pick test checks that the interior is set, and removing it clean or with a few moist crumbs indicates doneness. Letting the bread cool in the pan for 20 minutes helps the structure stabilize so it does not fall apart when removed. Overbaking dries the interior, while underbaking leaves a gummy center. A common mistake is skipping the foil tent which can lead to an overly browned crust before the center finishes cooking.
- Remove from pan Garnish with cinnamon sugar if desired: The final release is satisfying when the loaf lifts out intact and you see the braided layers. Garnishing with a sprinkle of cinnamon sugar adds a light sparkle and an extra cinnamon punch. Allowing the loaf to cool slightly before sprinkling ensures the sugar does not dissolve into the warm surface. If you slice too hot, the layers can compress and become misshapen, so patience here matters. Present on a platter and enjoy the mix of tender, sweet interior and lightly crisp exterior.
Notes
- Make ahead: Assemble the twist up to the point of the final rise, then refrigerate overnight. In the morning, bring it to room temperature for about 30 to 60 minutes before baking for fresh, morning ready results.
- Switch the sugar ratio: If you prefer a milder cinnamon presence, reduce the granulated sugar slightly and keep the cinnamon measurement, which maintains structure while softening sweetness.
- Control browning: If your oven runs hot, tent with foil earlier than halfway through baking to avoid an overly dark crust while ensuring the interior cooks through.
- Garnish options: Instead of or in addition to cinnamon sugar, sprinkle a light dusting of powdered sugar after cooling for a softer finish that still adds visual appeal.
- Transport tips: Cool fully, then wrap loosely in parchment and place in a shallow box for travel to prevent crushing the top while keeping the twist looking fresh.