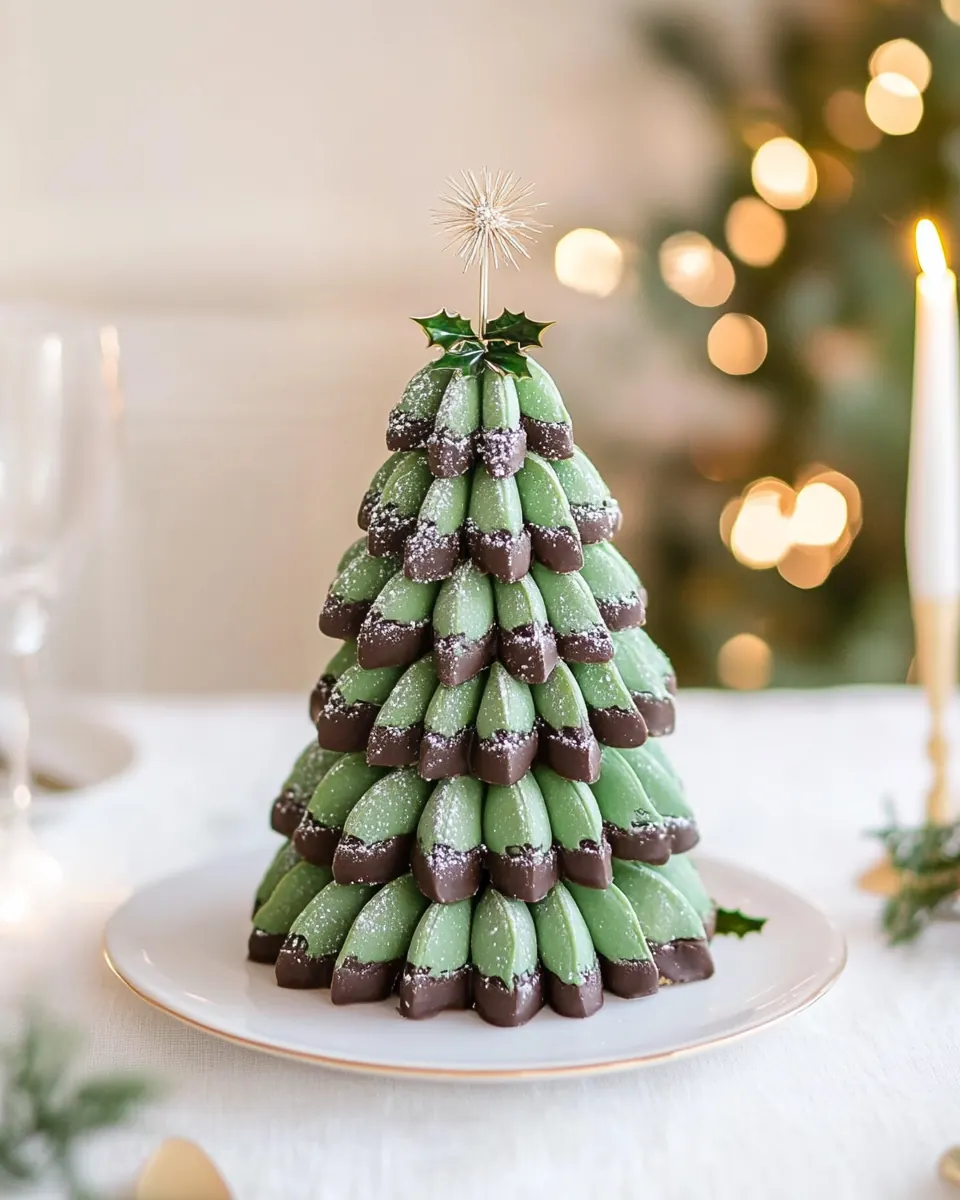
Chocolate coated Vanilla Madeleine Christmas Tree
Chocolate coated Vanilla Madeleine Christmas Tree has been one of my favorite festive projects ever since I first tried arranging tiny cakes into a centerpiece that looked almost too good to nibble on. The first time I made this, I was juggling a tray of warm madeleines and a cup of melting white chocolate, humming holiday songs while my kitchen slowly filled with a sweet, buttery aroma. It felt less like baking and more like crafting edible ornaments, and I loved that playful energy.
I remember giving a mini tree to a neighbor who had lost her spirit that season. Watching her face light up when she saw the delicate madeleines stacked into a cone reminded me why I bake beyond just the taste. The combination of crisp, slightly golden edges and that soft, pillowy center wrapped in a glossy coat of white chocolate feels celebratory and comforting at once. Over the years I adjusted the recipe, playing with honey and a richer salted butter, and each time the results were more fragrant and more nostalgic.
Making the tree is such a satisfying ritual. You whisk a smooth batter, and soon your kitchen smells of vanilla and warm butter. Then comes the calm, careful part where you coat each mini cake in melt-in-your-mouth chocolate and pin them like tiny wreaths onto a cone. Children tend to gather around when I assemble it, eager to help add decorations, which turns the whole process into a shared memory. If you love holiday baking and a bit of hands on decorating, you will find this project impossible not to adore.
Recipe Snapshot
1 hr 10 mins
60 mins
10 mins
Medium
150 kcal
French
Gluten-Free, Low FODMAP
Desserts
Madeleine moulds, Mixing bowls, Whisk, Double boiler or microwave safe bowl, Cooling rack, Small polystyrene cone, Toothpicks
The Charm of This Chocolate coated Vanilla Madeleine Christmas Tree
Playful Presentation
I adore how the Chocolate coated Vanilla Madeleine Christmas Tree turns ordinary madeleines into a showstopper. I love transforming small bites into a three dimensional display, because it makes dessert the centerpiece of the table, not just an afterthought.
Flavor Harmony
The balance of sweet caster sugar, warm honey, and fragrant vanilla complemented by salted butter creates a layered taste. I find that the tiny cakes are tender yet slightly crisp at the edges, and the white chocolate coating adds a creamy contrast that keeps each bite interesting.
Kid Friendly and Festive
I often involve kids in the assembly, and they adore spooning the melted white chocolate and choosing decorations. It is a great way to celebrate creativity, and the hands on element keeps everyone engaged while the oven does most of the work.
Flexible and Customizable
Over time, I experimented with colored coatings and different garnish ideas, so the recipe adapts to themes and color palettes. I personally appreciate that you can alter the look while keeping the core batter and method unchanged, making it ideal for parties and themed gatherings.
Make Ahead Friendly
I like that you can bake the madeleines a day ahead and finish coating them the day you assemble the tree. That convenience matters when you are hosting, because you can spread the work across two sessions and still serve something that tastes fresh and homemade.
What’s In This Chocolate coated Vanilla Madeleine Christmas Tree

These ingredients are deliberately simple, chosen to highlight the light sponge of the madeleines and the luxurious coating of white chocolate. The key players are the flour and eggs which lend structure and lift, the caster sugar and honey for nuanced sweetness, and the melted salted butter for richness. Each item works together to give you that signature hump, tender crumb, and glossy finish for assembly.
- 150 g plain all-purpose flour: Provides the structural base and bulk for the batter, contributing to crumb and texture; sift to remove lumps and ensure even incorporation. Works with eggs and butter to form the tender sponge characteristic of madeleines.
- 1 tsp baking powder: Acts as a leavening agent to create lightness and lift in the batter; evenly distribute and avoid overmixing after adding to preserve air. Balances the dense components to produce a delicate rise during baking.
- 150 g caster sugar: Adds sweetness and helps with browning and moistness; cream briefly with eggs to dissolve and incorporate aeration. Contributes to the caramelized flavor that enhances the buttery, honeyed profile.
- 4 large free-range eggs: Adds structure, moisture and richness while trapping air for a light sponge; beat with sugar until pale and doubled for optimal rise. Provides the main protein network that sets the madeleine shape and texture.
- 160 g Kerrygold salted butter melted: Contributes rich buttery flavor and tender mouthfeel while adding moisture and fat; melt gently and cool slightly before folding in to avoid cooking eggs. Salted butter also supplies seasoning that elevates the overall taste.
- 2 Tblsp honey: Imparts additional sweetness, moisture and a subtle floral note while aiding tenderness; fold in with melted butter for an even distribution. Enhances flavor complexity and helps keep the madeleines soft after baking.
- 2 tsp vanilla extract: Delivers aromatic sweetness and depth, reinforcing the vanilla notes in the batter; add with the wet ingredients to disperse flavor evenly. Complements the honey and butter for a classic vanilla-madeleine profile.
- Small polystyrene cone approximately 27 cm high.: Provides a structural support for assembling the tree-shaped decoration and coating process; wrap or cover to prevent crumbs from sticking during decoration. Serves as a temporary form for arranging cooled, chocolate-coated madeleines into a festive tree.
The Process for Making Chocolate coated Vanilla Madeleine Christmas Tree
I like to think of this as equal parts baking and gentle construction. The steps take you from batter to baked madeleines, then into a calm, creative assembly session where the coating and placement matter more than speed. Keep a relaxed pace so the madeleines cool properly and the coating sets nicely before you start stacking.
- Preheat the oven to 180 C / 350 F and lightly grease 2 x 12-hole madeleine moulds with softened Kerrygold butter. Brush the area in between the indentations in case the batter spills over the edges.: As the oven warms, you will notice a gentle, dry heat that readies the air for even baking, helping the little cakes rise predictably. Greasing the moulds with softened butter creates a slightly slick surface so the batter releases easily; I brush the area between the indentations too, since batter can run and stick in those thin channels. If you do not grease thoroughly, the undersides can cling and tear when unmoulding, so take the extra moment. A common mistake is putting cold batter into undergreased pans, which can cause uneven browning; make sure the pans feel warm to the touch from the oven when you slide them in.
- In a large bowl add the flour, baking powder, and sugar and give it a mix. Then add the eggs, vanilla, honey, and melted butter and using a whisk mix until you have a smooth batter.: You will smell the faint grain of the flour and the sweet edge of the caster sugar as you blend dry ingredients, which helps distribute the leavening evenly. I whisk them briefly to aerate the mixture, which contributes to a lighter sponge once combined with the eggs . Mixing the dry ingredients first prevents pockets of baking powder that could create strange, uneven domes. Beware of overworking at this stage; excessive whisking after you add wet ingredients can develop gluten and toughen the crumb.
- Scoop out about a dessert spoonful per mould.: The moment the eggs hit the bowl, the batter starts to come together and you can hear a soft whisking sound as air incorporates. The melted butter and honey lend a glossy sheen, and the aroma of vanilla becomes more pronounced. I aim for a batter that is smooth and slightly thick but still pourable. If the melted butter is too hot, it may cook the eggs , so temper by cooling the butter a touch before adding. A common trap is under mixing which leaves streaks of dry flour , so scrape the bowl sides and whisk until uniform.
- Bake for 8 – 10 minutes until golden brown and firm to the touch.: As you spoon batter into each well, you will see it settle with a small mound that spreads gently to the edges, leaving the classic madeleine shape. I use a spoon to control portions so each cake bakes evenly; overfilling will merge shapes and underfilling yields tiny, flat cakes. The visual cue is that each mould should be filled roughly two thirds; too much batter leads to spillage and too little prevents the desired hump. Avoid tapping the mould hard to level, which can collapse the trapped air needed for rise.
- When the madeleines have cooled slightly in the trays, remove them and allow them to cool a little further on a rack.: In the oven, the batter will puff and the surface will shift from pale to a warm, golden tan, releasing a buttery scent. You should see the edges turning slightly darker while the center remains plump; that s the right moment to test by a gentle touch it should spring back. Ovens vary, so watch closely near the end of the window to avoid overbaking which dries the crumb. A frequent mistake is leaving them in too long hoping to brown more, which results in a loss of tenderness, so remove at the first sign of a golden hue.
- Once cool, prepare your melted chocolate.: Cooling in the pan briefly helps the cakes set so they do not collapse, then transferring to a rack lets air circulate and prevents soggy undersides. You will notice steam rising from the still warm cakes, and that slow softening is part of achieving the perfect texture. If you leave them too long in the moulds, condensation can form and make surfaces sticky which interferes with coating later. Be mindful not to handle them roughly while they are hot, since they are delicate and can tear.
- Melt the white chocolate in a double boiler or microwave until smooth. If you are adding food colouring, go ahead and add it now and adjust to get the colour you are looking for.: Melting the white chocolate releases a sweet, creamy aroma and forms a glossy pool ready for coating. Use a gentle heat method so the chocolate becomes smooth and shiny rather than grainy. I prefer a double boiler to control the temperature and avoid scorching; overheating causes the chocolate to seize and lose its sheen. A common pitfall is adding moisture while melting, which curdles the chocolate, so keep utensils dry.
- In order to assemble the madeleines you may need to cut the underside of the cake to flatten the hump. This will allow the madeleines to be positioned flat against the cone.: The visual cue here is a velvety, pourable liquid without lumps, and a soft, clean scent of sweet cocoa butter. If you choose the microwave, do short bursts and stir between intervals to distribute heat evenly. Adding food colouring is optional and should be done once fully melted so it disperses uniformly. If the chocolate becomes too thick, a tiny splash of neutral oil can help, but avoid water which causes graininess.
- Place the madeleines over a baking sheet to catch any dripping chocolate and spoon over the melted chocolate to coat. Allow it to cool and harden.: This adjustment allows each cake to sit flush against the cone, producing a tidier tree silhouette; the sound of a careful slice is soft and the exposed crumb looks tender and moist. I use a small serrated knife and make shallow cuts until the base is level. If you leave the hump intact, the madeleine will wobble on the stick and the arrangement will be uneven. A misstep is cutting too deeply which shortens the cake and reduces visual appeal, so trim conservatively.
- Place your small polystyrene cone on a plate. If necessary add some Prestik underneath to secure it.: When you pour the coating, the white chocolate will cascade over the curved surface, creating a glossy shell that snaps slightly when set. The sound of chocolate settling is a subtle hush, and the sheen indicates temper or melt quality. Work over a lined tray to catch drips and make cleanup simple. Avoid letting the chocolate cool mid pour, which causes uneven coverage, so keep it warm enough to flow smoothly.
- Once the chocolate has hardened, you can assemble the cake. Place toothpicks at a diagonal into the cone pressing most of the stick into the polystyrene. Then place the madeleine on the stick to position it.: As the chocolate sets, it will lose its wet shine and become firm to the touch, sometimes with a faint snap when tapped. Cooling at room temperature is often enough, though a brief stint in a cool room helps speed the process. If you rush by refrigerating too quickly, condensation can form and mar the finish, so cool thoughtfully. A common error is stacking while still tacky, which causes sticking and blemishes.
- Repeat this wrapping the madeleines around the polystyrene cone.: The cone is the backbone of the tree, and when it sits steady on a plate it gives you a firm base to work around. If necessary, add some Prestik underneath to secure it from wobbling as you insert the madeleines . The cone surface should feel dry and clean, otherwise adhesives will not hold properly. If the cone shifts while you work, the alignment will suffer, so stabilize it well before starting.
- Once all the madeleines are in position, you can fill any gaps with Christmas decorations, rosemary or ivy leaves. Place a bow on top for decoration.: Starting near the base, insert toothpicks diagonally into the cone and press most of the stick into the polystyrene so the exposed end supports the cake. You will enjoy the tactile nature of this part as the little cakes nestle into place and the tree begins to take shape. The chocolate coating acts as a little seat, and when balanced correctly the madeleines align into charming rows. Be careful not to push the toothpicks too far through the cakes, which risks cracking them.
- Place toothpicks at a diagonal into the cone pressing most of the stick into the polystyrene: The angle matters because it determines how the madeleines will face outward; I aim for a slight tilt so they overlap like shingles. You can hear a faint pop as the pick enters the cone, and the tactile resistance tells you it s secure. If you position them straight in, the tree will look flat, so the diagonal is key for a rounded profile. A mistake is spacing picks inconsistently, which creates gaps, so plan the rows visually before inserting many.
- Then place the madeleine on the stick to position it: Once perched on a pick, each cake sits like a tiny ornament, and you will see the tree begin to echo real branches. Adjust each piece so edges overlap slightly, creating a cohesive surface. If a madeleine slips, re insert the pick at a slightly different angle to improve hold. Avoid forcing the cake which can split it, instead reposition gently for the best presentation.
- Repeat this wrapping the madeleines around the polystyrene cone: Working upward in concentric rows, the tree fills out with texture and pattern, and you will find a rhythm in placement that is almost meditative. Maintain even spacing for a polished look, and step back occasionally to check symmetry. A typical error is rushing the top rows, leading to awkward small gaps, so take your time and enjoy the process.
- Once all the madeleines are in position, you can fill any gaps with Christmas decorations, rosemary or ivy leaves: Adding greenery and tiny ornaments gives the tree a finished, festive personality and brings contrast to the pale cakes and chocolate. I tuck in sprigs of rosemary for an herby scent and small edible baubles for sparkle. If you leave large gaps, the final silhouette looks patchy, so use decorations thoughtfully to balance the surface. Be mindful that fresh herbs can wilt, so add them just before serving to maintain a lively look.
- Place a bow on top for decoration: The final ribbon crowns the tree and adds a charming focal point, and the soft fabric contrasts nicely with the crisp cakes. Choose a color that complements any added food colouring and secure it gently so it does not touch the edible surface directly. Over attaching can compress the top madeleines, so tie it loosely and remove before serving if needed.
Expert Tips about Chocolate coated Vanilla Madeleine Christmas Tree

I like to think of these tips as tiny tricks that make the whole process feel easy and professional. They come from repeated practice and a few happy accidents that taught me better ways to bake, coat, and assemble.
- Warm the pans slightly before filling so the batter begins to set evenly and you get better shaped humps.
- Measure flour by weight for consistency, since small errors can change texture in delicate cakes like madeleines.
- Use a shallow double boiler to melt chocolate, stirring often to prevent hot spots and maintain a smooth texture.
- Work in batches for coating, coating a few madeleines at a time keeps the chocolate at the right temperature and prevents clumping.
- Plan your layout on the cone before inserting, so spacing is even and the tree looks symmetrical from every angle.
- Store components separately if making ahead, then assemble close to serving time to avoid dryness from prolonged exposure.
What to Serve With Chocolate coated Vanilla Madeleine Christmas Tree
This little centerpiece is best served as a celebratory sweet alongside warm drinks and light finger fare. I often place it at the center of dessert tables, surrounded by small bowls and napkins so guests can help themselves without worrying about utensils. It works well for holiday brunches, festive tea times, and as a finale to a holiday dinner where the table ambience is intimate and casual.
- Warm spiced tea or coffee pairs beautifully, since the hot beverage cuts through the sweetness and highlights the vanilla and butter notes.
- Small bowls of berries for a tart contrast, which brings fresh acidity to counter the rich white chocolate coating.
- Assorted nuts give guests a crunchy option and textural contrast when eaten alongside a tender madeleine.
- Seasonal salads provide a light first course so the tree can shine as the sweet finale at a holiday meal.
- Party occasions such as holiday brunch, afternoon tea, or family gatherings are ideal moments to serve this decorative treat.
- Storage tips include keeping uncoated madeleines in an airtight container at room temperature for up to three days, and assembling the tree as close to serving as possible to prevent drying.
- Seasonal pairings like rosemary garnishes or edible glitter help match the tree to your holiday color scheme and table decor.
FAQ
Conclusion
This Chocolate coated Vanilla Madeleine Christmas Tree is special because it transforms simple buttery mini cakes into a festive edible centerpiece with glossy coatings and playful assembly. Give it a try the next time you want a dessert that doubles as decor, and involve friends or family to make the assembly a shared moment. It s a warm, hands on way to bring cheer to a holiday table and create memories one little cake at a time.

Chocolate coated Vanilla Madeleine Christmas Tree
Equipment
- Madeleine moulds
- Mixing Bowls
- Whisk
- Double boiler or microwave safe bowl
- Cooling rack
- Small polystyrene cone
- Toothpicks
Ingredients
- 150 g plain all-purpose flour Provides the structural base and bulk for the batter, contributing to crumb and texture; sift to remove lumps and ensure even incorporation. Works with eggs and butter to form the tender sponge characteristic of madeleines.
- 1 tsp baking powder Acts as a leavening agent to create lightness and lift in the batter; evenly distribute and avoid overmixing after adding to preserve air. Balances the dense components to produce a delicate rise during baking.
- 150 g caster sugar Adds sweetness and helps with browning and moistness; cream briefly with eggs to dissolve and incorporate aeration. Contributes to the caramelized flavor that enhances the buttery, honeyed profile.
- 4 large free-range eggs Adds structure, moisture and richness while trapping air for a light sponge; beat with sugar until pale and doubled for optimal rise. Provides the main protein network that sets the madeleine shape and texture.
- 160 g Kerrygold salted butter melted Contributes rich buttery flavor and tender mouthfeel while adding moisture and fat; melt gently and cool slightly before folding in to avoid cooking eggs. Salted butter also supplies seasoning that elevates the overall taste.
- 2 Tblsp honey Imparts additional sweetness, moisture and a subtle floral note while aiding tenderness; fold in with melted butter for an even distribution. Enhances flavor complexity and helps keep the madeleines soft after baking.
- 2 tsp vanilla extract Delivers aromatic sweetness and depth, reinforcing the vanilla notes in the batter; add with the wet ingredients to disperse flavor evenly. Complements the honey and butter for a classic vanilla-madeleine profile.
- Small polystyrene cone approximately 27 cm high. Provides a structural support for assembling the tree-shaped decoration and coating process; wrap or cover to prevent crumbs from sticking during decoration. Serves as a temporary form for arranging cooled, chocolate-coated madeleines into a festive tree.
Instructions
- Preheat the oven to 180 C / 350 F and lightly grease 2 x 12-hole madeleine moulds with softened Kerrygold butter. Brush the area in between the indentations in case the batter spills over the edges.: As the oven warms, you will notice a gentle, dry heat that readies the air for even baking, helping the little cakes rise predictably. Greasing the moulds with softened butter creates a slightly slick surface so the batter releases easily; I brush the area between the indentations too, since batter can run and stick in those thin channels. If you do not grease thoroughly, the undersides can cling and tear when unmoulding, so take the extra moment. A common mistake is putting cold batter into undergreased pans, which can cause uneven browning; make sure the pans feel warm to the touch from the oven when you slide them in.
- In a large bowl add the flour, baking powder, and sugar and give it a mix. Then add the eggs, vanilla, honey, and melted butter and using a whisk mix until you have a smooth batter.: You will smell the faint grain of the flour and the sweet edge of the caster sugar as you blend dry ingredients, which helps distribute the leavening evenly. I whisk them briefly to aerate the mixture, which contributes to a lighter sponge once combined with the eggs . Mixing the dry ingredients first prevents pockets of baking powder that could create strange, uneven domes. Beware of overworking at this stage; excessive whisking after you add wet ingredients can develop gluten and toughen the crumb.
- Scoop out about a dessert spoonful per mould.: The moment the eggs hit the bowl, the batter starts to come together and you can hear a soft whisking sound as air incorporates. The melted butter and honey lend a glossy sheen, and the aroma of vanilla becomes more pronounced. I aim for a batter that is smooth and slightly thick but still pourable. If the melted butter is too hot, it may cook the eggs , so temper by cooling the butter a touch before adding. A common trap is under mixing which leaves streaks of dry flour , so scrape the bowl sides and whisk until uniform.
- Bake for 8 – 10 minutes until golden brown and firm to the touch.: As you spoon batter into each well, you will see it settle with a small mound that spreads gently to the edges, leaving the classic madeleine shape. I use a spoon to control portions so each cake bakes evenly; overfilling will merge shapes and underfilling yields tiny, flat cakes. The visual cue is that each mould should be filled roughly two thirds; too much batter leads to spillage and too little prevents the desired hump. Avoid tapping the mould hard to level, which can collapse the trapped air needed for rise.
- When the madeleines have cooled slightly in the trays, remove them and allow them to cool a little further on a rack.: In the oven, the batter will puff and the surface will shift from pale to a warm, golden tan, releasing a buttery scent. You should see the edges turning slightly darker while the center remains plump; that s the right moment to test by a gentle touch it should spring back. Ovens vary, so watch closely near the end of the window to avoid overbaking which dries the crumb. A frequent mistake is leaving them in too long hoping to brown more, which results in a loss of tenderness, so remove at the first sign of a golden hue.
- Once cool, prepare your melted chocolate.: Cooling in the pan briefly helps the cakes set so they do not collapse, then transferring to a rack lets air circulate and prevents soggy undersides. You will notice steam rising from the still warm cakes, and that slow softening is part of achieving the perfect texture. If you leave them too long in the moulds, condensation can form and make surfaces sticky which interferes with coating later. Be mindful not to handle them roughly while they are hot, since they are delicate and can tear.
- Melt the white chocolate in a double boiler or microwave until smooth. If you are adding food colouring, go ahead and add it now and adjust to get the colour you are looking for.: Melting the white chocolate releases a sweet, creamy aroma and forms a glossy pool ready for coating. Use a gentle heat method so the chocolate becomes smooth and shiny rather than grainy. I prefer a double boiler to control the temperature and avoid scorching; overheating causes the chocolate to seize and lose its sheen. A common pitfall is adding moisture while melting, which curdles the chocolate, so keep utensils dry.
- In order to assemble the madeleines you may need to cut the underside of the cake to flatten the hump. This will allow the madeleines to be positioned flat against the cone.: The visual cue here is a velvety, pourable liquid without lumps, and a soft, clean scent of sweet cocoa butter. If you choose the microwave, do short bursts and stir between intervals to distribute heat evenly. Adding food colouring is optional and should be done once fully melted so it disperses uniformly. If the chocolate becomes too thick, a tiny splash of neutral oil can help, but avoid water which causes graininess.
- Place the madeleines over a baking sheet to catch any dripping chocolate and spoon over the melted chocolate to coat. Allow it to cool and harden.: This adjustment allows each cake to sit flush against the cone, producing a tidier tree silhouette; the sound of a careful slice is soft and the exposed crumb looks tender and moist. I use a small serrated knife and make shallow cuts until the base is level. If you leave the hump intact, the madeleine will wobble on the stick and the arrangement will be uneven. A misstep is cutting too deeply which shortens the cake and reduces visual appeal, so trim conservatively.
- Place your small polystyrene cone on a plate. If necessary add some Prestik underneath to secure it.: When you pour the coating, the white chocolate will cascade over the curved surface, creating a glossy shell that snaps slightly when set. The sound of chocolate settling is a subtle hush, and the sheen indicates temper or melt quality. Work over a lined tray to catch drips and make cleanup simple. Avoid letting the chocolate cool mid pour, which causes uneven coverage, so keep it warm enough to flow smoothly.
- Once the chocolate has hardened, you can assemble the cake. Place toothpicks at a diagonal into the cone pressing most of the stick into the polystyrene. Then place the madeleine on the stick to position it.: As the chocolate sets, it will lose its wet shine and become firm to the touch, sometimes with a faint snap when tapped. Cooling at room temperature is often enough, though a brief stint in a cool room helps speed the process. If you rush by refrigerating too quickly, condensation can form and mar the finish, so cool thoughtfully. A common error is stacking while still tacky, which causes sticking and blemishes.
- Repeat this wrapping the madeleines around the polystyrene cone.: The cone is the backbone of the tree, and when it sits steady on a plate it gives you a firm base to work around. If necessary, add some Prestik underneath to secure it from wobbling as you insert the madeleines . The cone surface should feel dry and clean, otherwise adhesives will not hold properly. If the cone shifts while you work, the alignment will suffer, so stabilize it well before starting.
- Once all the madeleines are in position, you can fill any gaps with Christmas decorations, rosemary or ivy leaves. Place a bow on top for decoration.: Starting near the base, insert toothpicks diagonally into the cone and press most of the stick into the polystyrene so the exposed end supports the cake. You will enjoy the tactile nature of this part as the little cakes nestle into place and the tree begins to take shape. The chocolate coating acts as a little seat, and when balanced correctly the madeleines align into charming rows. Be careful not to push the toothpicks too far through the cakes, which risks cracking them.
- Place toothpicks at a diagonal into the cone pressing most of the stick into the polystyrene: The angle matters because it determines how the madeleines will face outward; I aim for a slight tilt so they overlap like shingles. You can hear a faint pop as the pick enters the cone, and the tactile resistance tells you it s secure. If you position them straight in, the tree will look flat, so the diagonal is key for a rounded profile. A mistake is spacing picks inconsistently, which creates gaps, so plan the rows visually before inserting many.
- Then place the madeleine on the stick to position it: Once perched on a pick, each cake sits like a tiny ornament, and you will see the tree begin to echo real branches. Adjust each piece so edges overlap slightly, creating a cohesive surface. If a madeleine slips, re insert the pick at a slightly different angle to improve hold. Avoid forcing the cake which can split it, instead reposition gently for the best presentation.
- Repeat this wrapping the madeleines around the polystyrene cone: Working upward in concentric rows, the tree fills out with texture and pattern, and you will find a rhythm in placement that is almost meditative. Maintain even spacing for a polished look, and step back occasionally to check symmetry. A typical error is rushing the top rows, leading to awkward small gaps, so take your time and enjoy the process.
- Once all the madeleines are in position, you can fill any gaps with Christmas decorations, rosemary or ivy leaves: Adding greenery and tiny ornaments gives the tree a finished, festive personality and brings contrast to the pale cakes and chocolate. I tuck in sprigs of rosemary for an herby scent and small edible baubles for sparkle. If you leave large gaps, the final silhouette looks patchy, so use decorations thoughtfully to balance the surface. Be mindful that fresh herbs can wilt, so add them just before serving to maintain a lively look.
- Place a bow on top for decoration: The final ribbon crowns the tree and adds a charming focal point, and the soft fabric contrasts nicely with the crisp cakes. Choose a color that complements any added food colouring and secure it gently so it does not touch the edible surface directly. Over attaching can compress the top madeleines, so tie it loosely and remove before serving if needed.
Notes
- Warm the pans slightly before filling so the batter begins to set evenly and you get better shaped humps.
- Measure flour by weight for consistency, since small errors can change texture in delicate cakes like madeleines.
- Use a shallow double boiler to melt chocolate, stirring often to prevent hot spots and maintain a smooth texture.
- Work in batches for coating, coating a few madeleines at a time keeps the chocolate at the right temperature and prevents clumping.
- Plan your layout on the cone before inserting, so spacing is even and the tree looks symmetrical from every angle.
- Store components separately if making ahead, then assemble close to serving time to avoid dryness from prolonged exposure.