Chicken and Biscuits Casserole
Chicken and Biscuits Casserole is a dish I come back to when I want comfort that feeds a crowd and soothes a busy weeknight.
Growing up, my neighborhood potlucks always featured a bubbling, golden topped casserole that disappeared faster than any other dish. Years later I recreated that memory in my own kitchen, layering a creamy, herb studded filling with pillowy biscuits that brown just so on top. Every time I tuck into a warm dish, I remember leaning over the stove while the house filled with the scent of sautéed onion and butter, and how the steam fogged up the windows as the family gathered round.
I have a few little rituals now that make the process feel like second nature. I like using roasted chicken for texture, and grating frozen butter into the flour to create a tender, flaky biscuit. When the casserole comes out of the oven and I brush the tops with melted butter, that glossy finish signals the exact moment to call everyone. It is a recipe that invites conversation, seconds, and the kind of slow satisfied chewing that tells you a dish was worth the effort.
Recipe Snapshot
1 hr 40 mins
30 mins
70 mins
Hard
450 kcal
American
Gluten-Free, Low FODMAP
Dinner
biscuit cutter 3¼-inch, 9×13-inch baking dish
Why This Chicken and Biscuits Casserole Hits Different
Hearty homestyle satisfaction
I love how Chicken and Biscuits Casserole gives you a full meal in one pan, with a rich filling and a tender blanket of biscuits. The texture contrast between creamy filling and the slightly crisp biscuit top is exactly the kind of comforting balance I crave on chilly evenings. I always feel like I am serving nostalgia, but with simple modern technique.
Make ahead friendly
One reason I come back to this dish is that you can prepare most of the filling a day in advance. I often have the filling ready to go in the fridge, which means when guests arrive I only need to top it with fresh biscuits and bake. That flexibility is a lifesaver when I am juggling work and family obligations.
Built for feeding a group
The recipe scales well and fits a 9×13-inch baking dish, so I can easily double or halve it depending on the crowd. It feels generous without being fussy, and it holds heat so everyone can serve themselves at their own pace. When entertaining, I appreciate recipes that let me be present rather than chained to the stove.
Flavor layering
I adore the way roasting the chicken and sautéing mushrooms and onion builds deep savory notes. Adding bouillon to the broth intensifies the base without overpowering the delicate creamy finish. Fresh Italian parsley brightens each bite so the casserole never tastes heavy or flat.
Textural biscuit magic
The biscuit technique matters. Grating partially frozen butter into the flour and working the dough briefly creates flaky layers. I find this produces a light, tender topping that still develops golden brown color in the oven, which makes the dish feel special and homey at once.
What You Need for Chicken and Biscuits Casserole
These ingredients are selected to build deep savory flavor, creamy mouthfeel, and a tender biscuit crown. The star players are the roasted chicken for chew and protein, the stock and bouillon for savory depth, and the frozen grated butter combined with cold buttermilk for biscuit lift. Vegetables and herbs add freshness and texture so every spoonful is balanced.
- 5 cups chicken broth See NOTES: Provide savory liquid and depth to the casserole, forming the base for the sauce and helping cook other ingredients; simmer to concentrate flavor and meld components into a cohesive filling.
- 2 chicken bouillon cubes: Add concentrated chicken flavor and umami to boost the broth richness; dissolve completely to evenly season the casserole without adding extra liquids.
- 3 cups chicken roasted, cut into bite-sized pieces: Contribute bulk, texture, and protein to the dish by providing tender, bite–sized pieces that soak up sauce; fold in near the end to keep meat moist and prevent overcooking.
- 6 tablespoon unsalted butter: Impart rich, buttery flavor and help sauté vegetables; melt to create a flavorful base for the roux and to develop a glossy sauce when combined with flour.
- 1 cup onion chopped: Add aromatic sweetness and structure when chopped and sautéed; cook until softened to release sugars and build savory complexity in the filling.
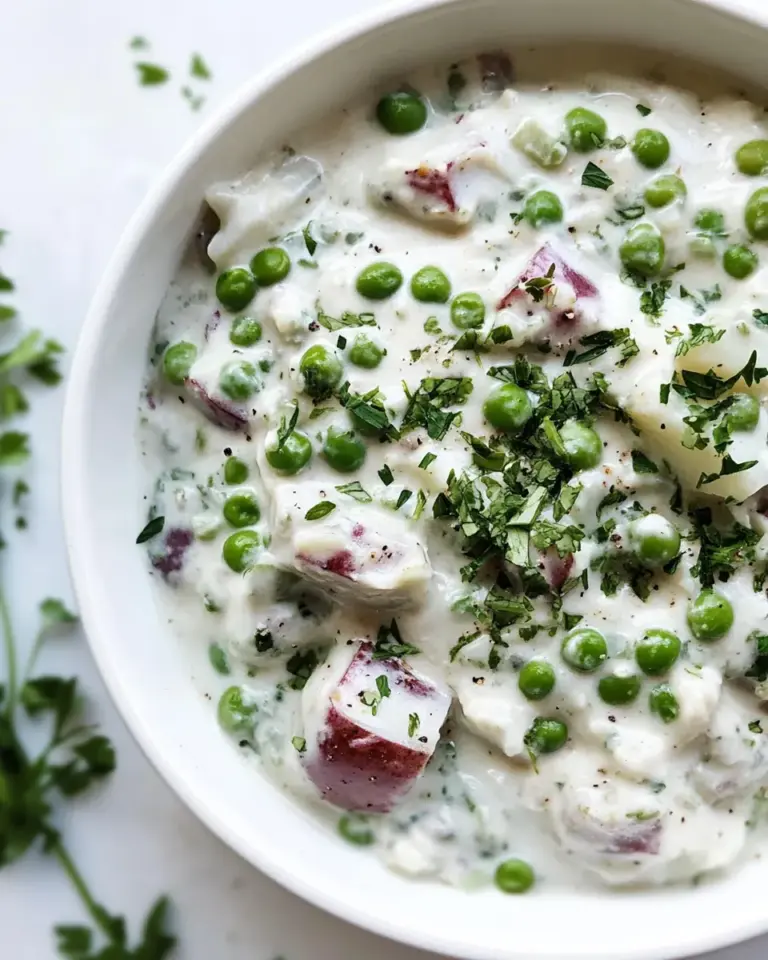
- 1 cup carrots thinly sliced: Provide subtle sweetness, color, and a tender bite when thinly sliced and cooked; simmer until just tender so carrots retain pleasant texture within the casserole.
- 8 oz mushrooms sliced: Introduce earthy, savory umami and meaty texture when sliced and sautéed; cook until moisture evaporates to concentrate flavor and integrate with the sauce.
- 1/2 cup all-purpose flour: Thicken the sauce by forming a roux with butter and absorbing liquids to create body and stability; whisk thoroughly to avoid lumps and achieve a smooth filling.
- 1/2 cup heavy cream: Enrich the sauce with creaminess and a silkier mouthfeel while adding fat for flavor balance; stir in after thickening to adjust consistency and richness.
- 1/2 cup sweet peas frozen: Contribute pops of color, sweetness, and tender bite when added frozen; fold into the sauce so peas heat through without becoming mushy.
- 1/4 cup Italian parsley fresh, chopped, plus extra for garnish: Add fresh herbaceous brightness and a clean finish when chopped; sprinkle through the filling and reserve extra for garnish to lift heavy flavors.
- 1 1/2 teaspoon Kosher salt: Season the casserole with balanced salinity and enhance other flavors; measure carefully to suit broth concentration and personal taste.
- 1 teaspoon black pepper: Provide warm, subtle heat and aromatic depth when ground and added; adjust to taste to avoid overpowering the dish while rounding savory notes.
- 1/2 cup unsalted butter 1 stick: Supply additional richness and flavor when melted into batters or layers; incorporate to enrich dough and contribute tender flakiness in biscuits.
- 2 1/4 cups self-rising flour preferably Lily's: Offer structure and leavening in the biscuit topping, giving a tender crumb and rise; mix gently to preserve the self–rising properties for light, fluffy biscuits.
- 1 cup buttermilk cold: Add acidity and tang while contributing moistness to the biscuit dough; keep cold to activate buttermilk’s role in tenderizing and reacting with self–rising flour.
- 2 tablespoon unsalted butter melted: Moisten the biscuit dough and add buttery flavor when melted; brush or fold into dough as specified to create a golden, crisp biscuit exterior.
Chicken and Biscuits Casserole Instructions
I like to think of assembling this casserole as a rhythm, moving from roasting to simmering then finishing with biscuits. The following steps walk you through each stage with sensory cues so you can tell when each component is ready, and small troubleshooting notes to keep you on track.
- Put two sticks of butter in the freezer (you'll only use half of each stick). You'll need to remove them from the freezer about 15 minutes before you start preparing the biscuits.: A cool, faint buttery smell will persist while the sticks chill, and the texture firms up making them easier to grate. Cold butter is essential so the grated pieces stay separate and create layers in the biscuit dough; if the butter softens it will smear into the flour and produce dense biscuits. If you forgot to freeze them, pop them into the coldest part of your freezer for at least 20 minutes to recover.
- Brush oil over two skin-on, bone-in chicken breasts and season with salt and pepper. Roast at 350°F until the internal temperature reaches 165°F. Once cool enough to handle, remove the skin and then cut out the meat. Cut into bite-sized pieces. Set aside. Or, use rotisserie chicken.: As you rub oil over the chicken and season it, the skin becomes slightly tacky and the salt penetrates the surface, promising deep roast flavor. Roasting at 350°F until the internal temperature hits 165°F yields golden skin and succulent meat; using a thermometer prevents overcooking, which can dry the meat. If you only see pale skin after the roast, broil for a minute or two while watching closely to achieve more color.
- Add the broth to a pan and crumble in the bouillon cubes. Heat the broth over medium-low heat.: Pouring warm chicken broth into a pan releases a light savory steam that carries bouillon aroma; crumbling the cubes ensures they dissolve evenly. Keeping the heat at medium-low helps the bouillon melt and blend without sudden reduction. If granules persist, whisk briskly and warm slightly to dissolve completely.
- Melt the butter in a large pot over medium heat. Add the onions and carrots and sauté, stirring often, until soft, about 5 minutes. Add the sliced mushrooms and sauté until they are soft and beginning to release liquid, about another 4 to 6 minutes.: When the butter liquefies it begins to scent the kitchen with a toasty, slightly nutty aroma; adding chopped onion and sliced carrots then creates a soft sizzling sound as moisture releases. Sauté until the vegetables are soft and translucent, about 5 minutes, then add mushrooms and cook until they soften and exude liquid. Cooking slowly prevents the vegetables from browning too quickly, which would alter the desired gentle sweetness. If you see the edges catching, lower the heat and stir more frequently.
- Stir in the flour and cook, stirring often, for another 1 to 2 minutes.: The flour will absorb the butter and vegetable juices, forming a slightly pasty roux that smells faintly toasty once it cooks. This brief cook time removes raw flour taste and ensures the final sauce has a smooth body. If you do not cook the flour enough, the sauce may taste grainy or floury after adding liquid.
- Gradually and carefully add the warm stock to the pot, whisking constantly. Continue stirring until all lumps are gone. Simmer for a few minutes.: As you pour the warm stock into the roux, the mixture will hiss softly and then turn from a paste into a smooth, glossy sauce when whisked. Whisking prevents lumps and encourages an even thickening. If you add stock too quickly or while the pot is extremely hot, you risk forming stubborn pockets of uncooked flour; pour slowly and whisk through each addition.
- Stir in the cream and cook for another couple of minutes.: Adding the heavy cream transforms the sauce into a silkier, richer texture and a pale creamy sheen develops. A gentle simmer helps the sauce thicken slightly while concentrating flavor. Keep the heat moderate so the cream does not separate or scorch; if you see tiny oily patches, lower the heat and stir until cohesion returns.
- Stir in the chicken, peas, parsley, salt, and pepper. Simmer, stirring often, for about 15 minutes. Taste and add a pinch more salt, if needed. The filling should thicken to the point that it coats the back of your spatula. Set aside.: When the diced roasted chicken hits the warm sauce, steam rises and the filling comes together, studded with green peas and flecks of fresh Italian parsley . Simmer about 15 minutes until the filling thickens enough to coat the back of a spatula. Taste for seasoning and adjust with a pinch more salt if needed. If the filling is too thin, continue simmering gently; if it becomes overly thick, stir in a splash of reserved warm broth.
- Grate the cold butter with a box grater onto a cutting board. To make this easier, grate just half of each partially frozen stick of butter.: The action of grating partially frozen butter creates small, cold shards that look like coarse snow on the board. Tossing these into the flour lets each piece stay distinct, yielding flaky pockets in the biscuit. If the butter becomes tacky during grating, return it to the freezer briefly to firm up again.
- Place the flour in a large bowl and quickly toss it with the grated butter. Place in the freezer for 15 minutes.: As you work the grated butter into the self–rising flour , the mixture develops a pebbly texture, and you can already imagine the light layers those bits will create. Chilling the mixture for about 15 minutes helps the fat remain cold before adding buttermilk . If you skip chilling, the biscuit dough may become gummy and lose flakiness.
- Use a wooden spoon to work the cold buttermilk into the flour/butter mixture. It will be a shaggy (loose) dough.: Stirring with a wooden spoon yields a shaggy, loose dough that smells faintly tangy from the buttermilk . The dough will not come together completely at this stage, and that texture is desirable. Overworking the dough will develop gluten and toughen the biscuits, so mix just until combined.
- Turn the dough out onto a floured surface. Use your hands to quickly knead the dough until mostly cohesive (it will still be a bit shaggy).: The dough feels cool and slightly sticky; a light dusting of flour prevents sticking while you knead it quickly to a mostly cohesive mass. Kneading briefly tightens the structure but leaves some shaggy bits for tenderness. If you press too much, the biscuits can become dense rather than tender.
- Roll the dough into an 8×10-inch rectangle. Use a bench scraper or a large knife to cut the rectangle into fourths. Stack the quarters on top of each other and again roll the dough into an 8×10-inch square. Repeat one more time.: Rolling reveals layers and you will see seams where the dough can be folded; cutting into fourths, stacking and rolling again builds flakiness. Repeat this fold and roll cycle one more time to create visible layers. If the dough warms or the butter softens too much while working, chill it for a few minutes before continuing.
- Use a biscuit/cookie cutter to cut the dough into three biscuits. Roll the scraps into another square and cut out two more biscuits. Use the remaining dough to create one last biscuit; you should have 6 biscuits. Place the biscuits in a cake pan and place them in the freezer for 15 minutes.: The cut edges should be clean and the dough will show neat circular biscuits; gathering scraps and rerolling yields the remaining biscuits until you have six. Place them in a cake pan and freeze for 15 minutes so they hold shape in the oven. If your cutter drags, dip it in flour between cuts to keep edges sharp.
- Preheat the oven to 450°F.: A hot oven gives biscuits a fast initial rise and a golden crust. You should feel a warm, dry blast when you open the oven; ensure racks are positioned so the casserole will sit in the center. If the oven is not fully preheated, biscuits may spread rather than rise properly.
- If the filling has cooled off, reheat over medium heat until heated through. Transfer the warm filling into a 9×13-inch baking dish.: Warming the filling returns aroma and loosens it so it can be spread into the baking dish; you will see steam and small bubbles at the edges when it is ready. Transfer the warm filling into a 9×13-inch baking dish . Avoid overheating which can reduce moisture and make the final casserole dry.
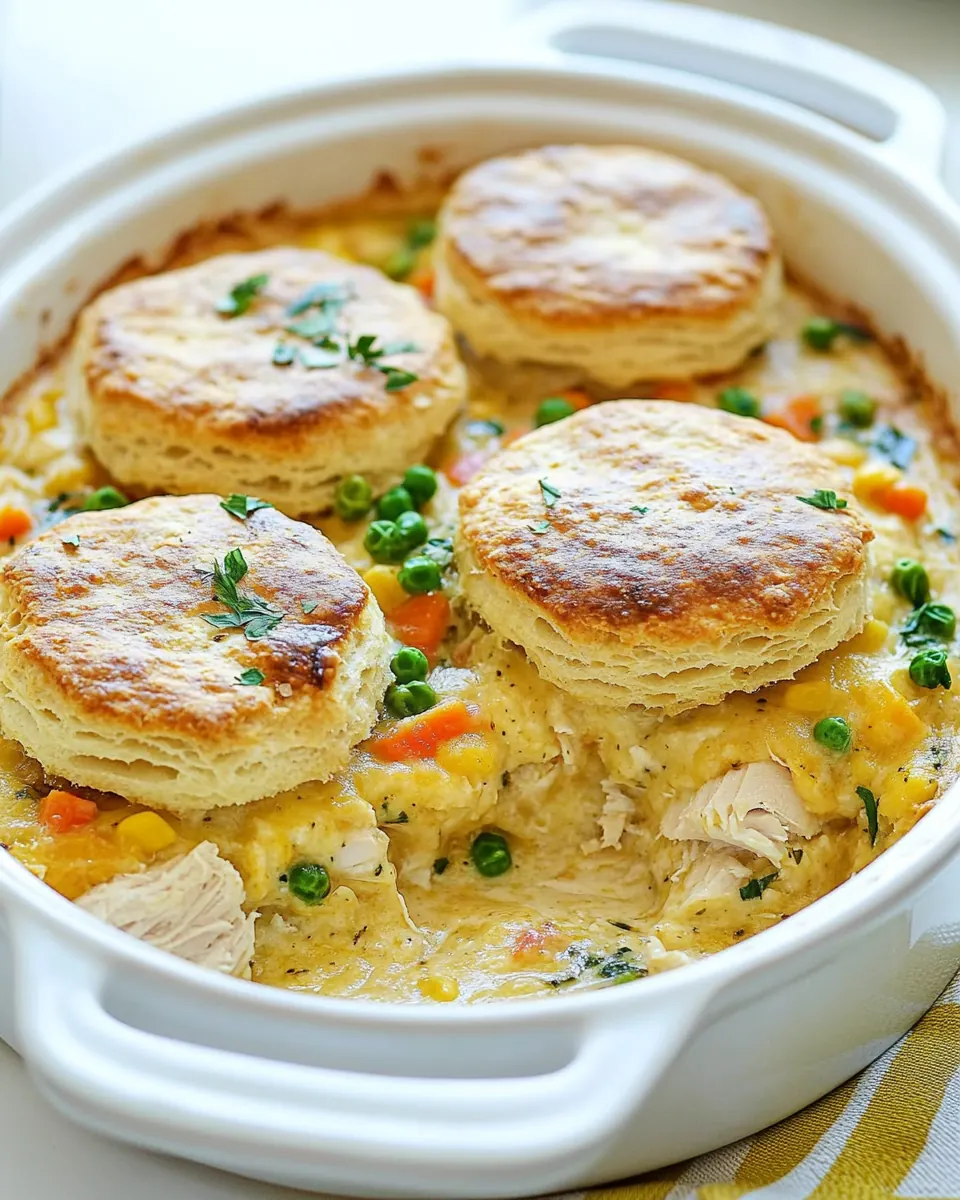
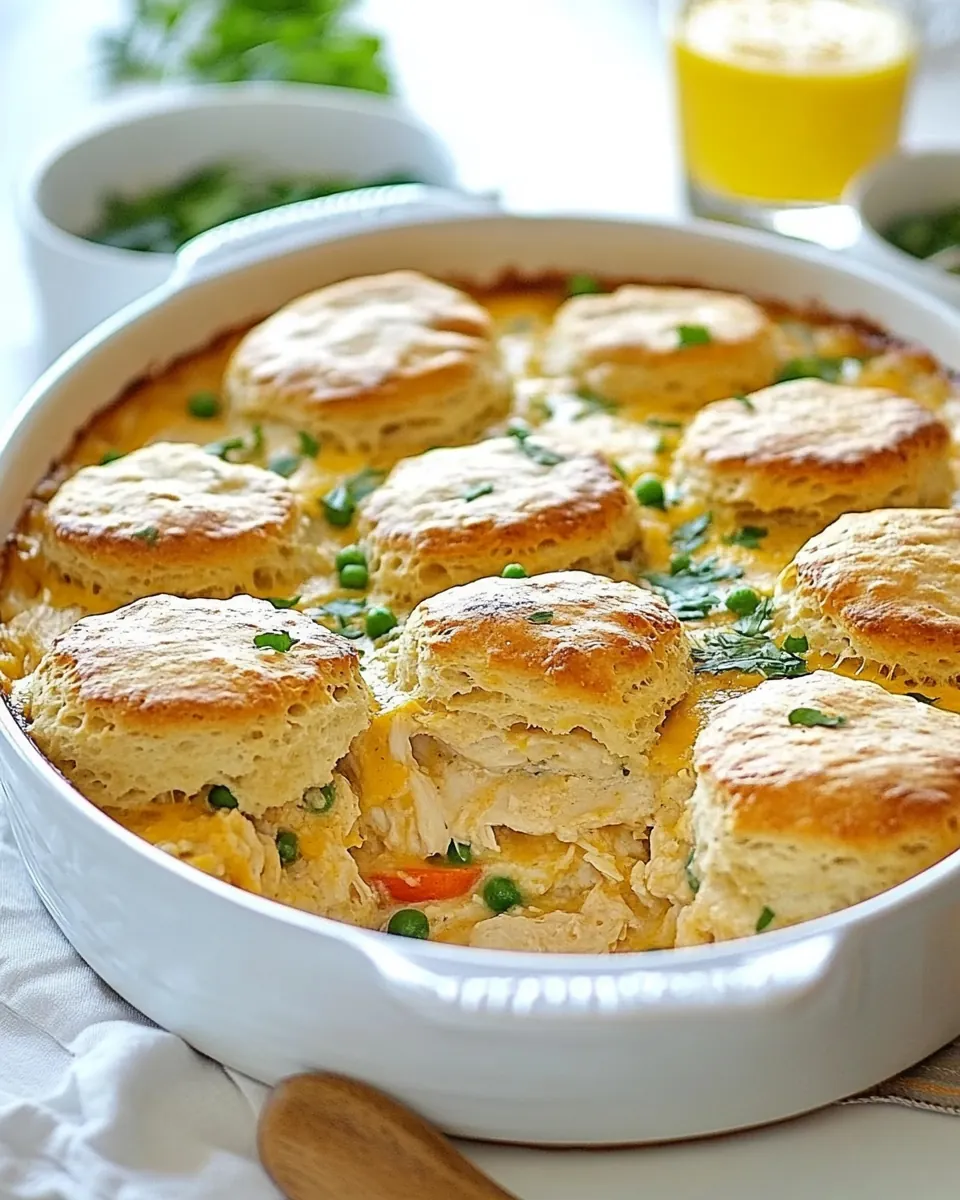
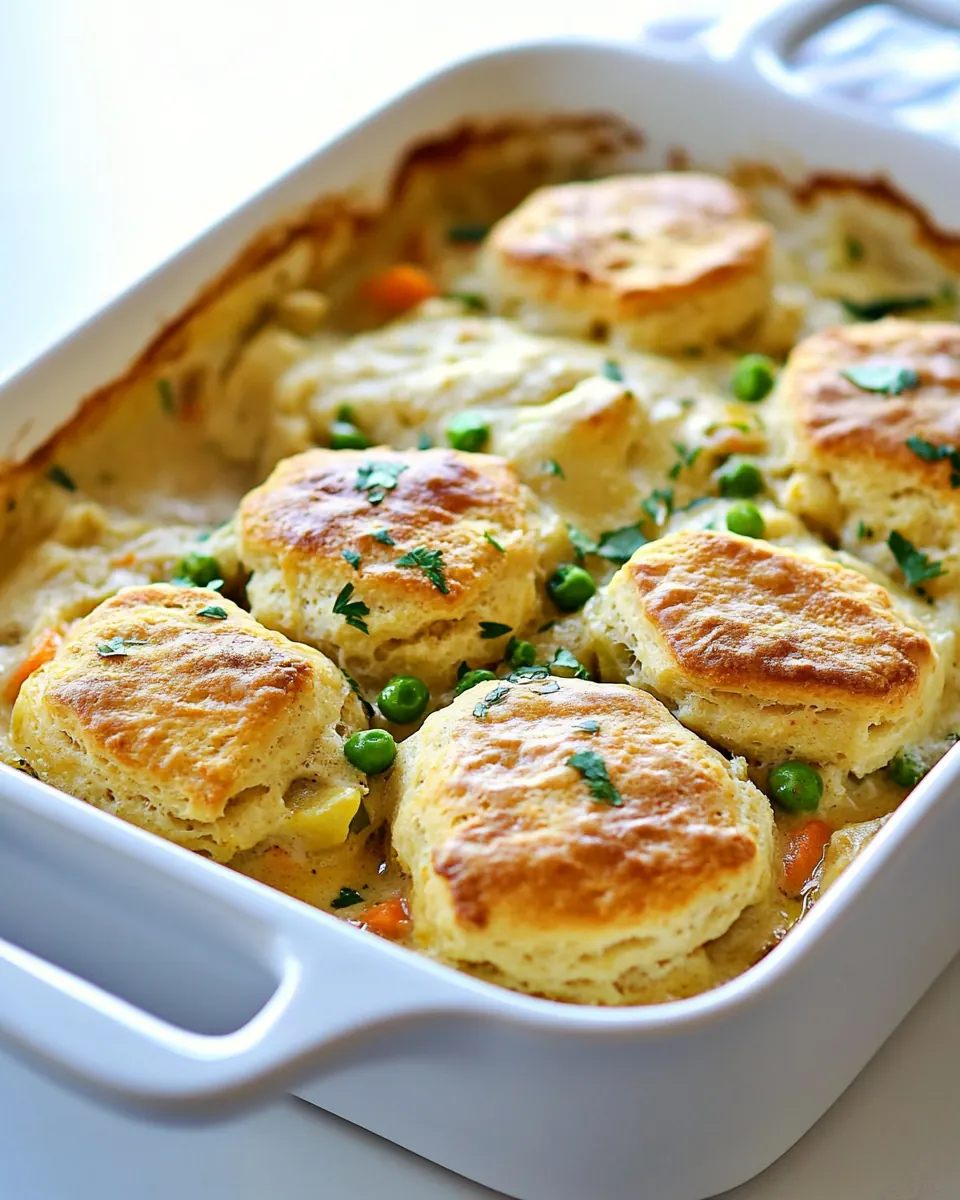
- Remove the biscuits from the freezer and space them evenly over the filling. Brush melted butter over the tops of each biscuit.: The cold biscuits resting on hot filling create contrast and the tops will steam slightly as they bake, promoting tender interiors. Brush melted butter over the tops for color. If biscuits shift while placing them, press gently to secure so they do not topple during baking.
- Bake for 15 to 20 minutes, or until the tops are golden brown, turning the dish around halfway through baking.: In the oven you will hear a faint crackle as steam pushes through the dough and the surface browns to a rich hue; I turn the dish halfway to ensure even color. The biscuits should feel springy and a skewer inserted into a biscuit comes out clean. If the tops brown too quickly, tent loosely with foil to allow the centers to finish cooking.
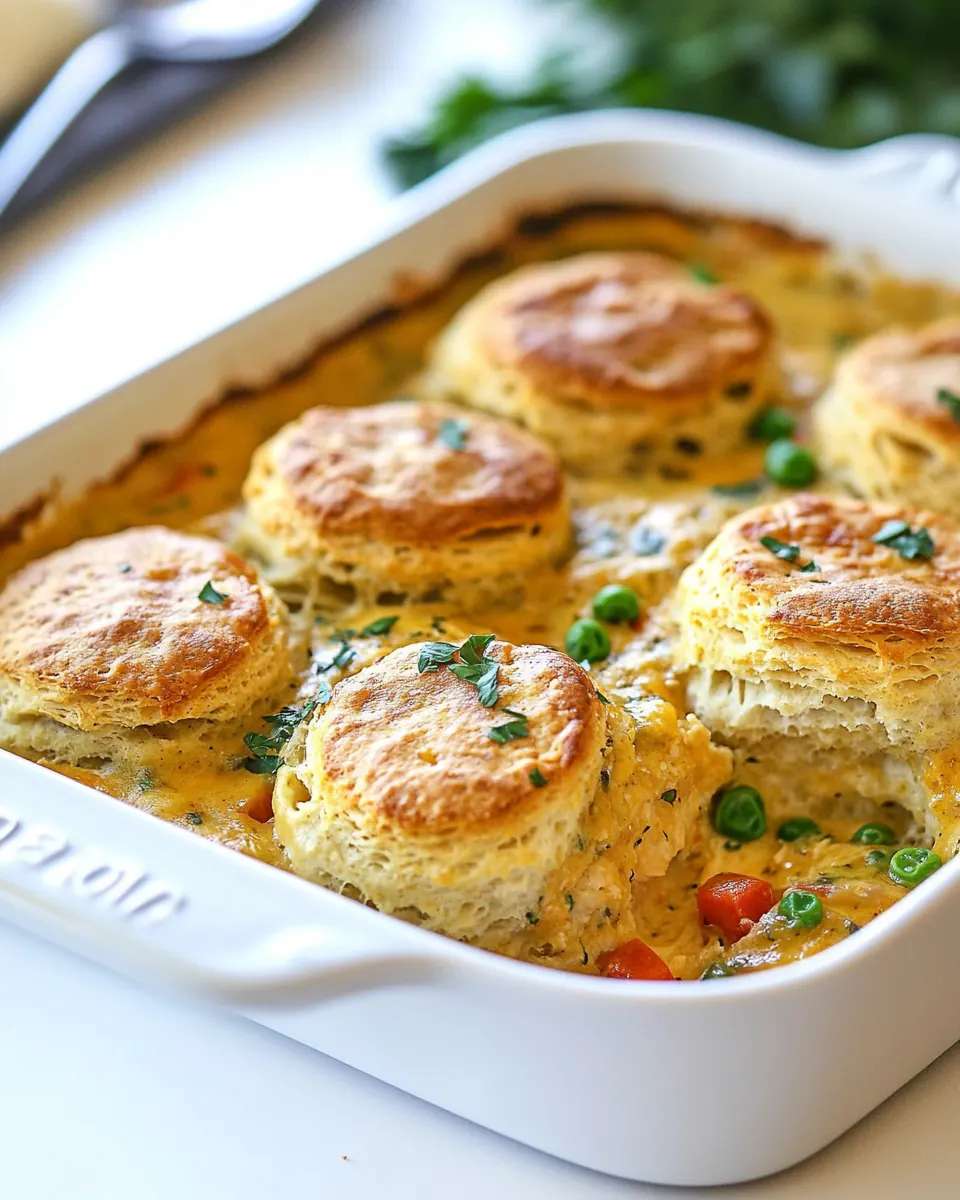
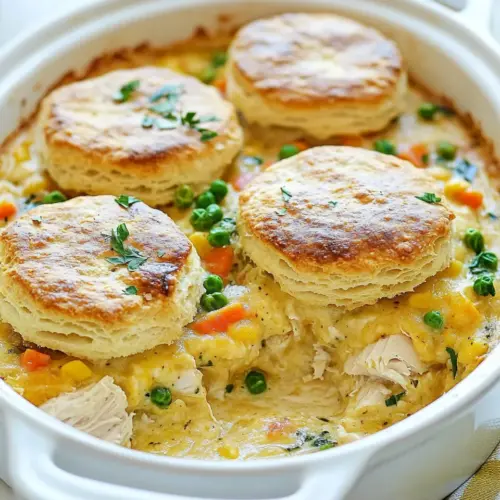
- Remove from the oven and brush more melted butter over the tops of each biscuit. Let the casserole rest for 10 minutes before serving. Serve hot, garnish with chopped parsley, if desired.: Brushing immediately gives a glossy finish and a burst of buttery aroma; let the casserole rest for about 10 minutes so the filling settles and slices hold their shape. Garnish with chopped Italian parsley if desired. Cutting into the hot casserole too soon can cause the filling to run and the presentation to suffer.
Variations to Try
If you like a little twist, these variations let you adapt texture and flavor without changing the comforting core of the dish. Below I expand ideas into practical steps so you can pick one that suits your pantry and mood.
- Shortcut with store bought biscuits Use high quality refrigerated biscuits in place of the homemade dough to save time and still get a warm, tender topping that browns nicely in the oven.
- Use rotisserie chicken Swap roasted chicken for shredded rotisserie chicken to save time and add extra seasoned flavor in the filling.
- Make it lighter Use reduced fat cream or decrease the amount slightly, while increasing simmer time to concentrate flavor so you keep a rich mouthfeel without as much fat.
- Double the vegetables Add an extra cup of thinly sliced carrots and mushrooms to increase texture and make the casserole heartier for family style meals.
- Herb forward Increase the fresh Italian parsley and add more freshly ground black pepper for a brighter, more aromatic profile that cuts through the richness.
- Make ahead the filling Prepare the filling up to a day in advance, refrigerate, then top with biscuits and bake when ready to serve to save time on the day of your meal.
Serving Options for Chicken and Biscuits Casserole
This casserole is versatile at the table, working for casual family dinners or holiday gatherings. The serving ideas below range from simple accompaniments to ways to store and reheat leftovers so you get the best results each time.
- Serve warm from the oven Present the casserole straight from the oven with a small bowl of extra chopped Italian parsley for garnish so guests can add brightness.
- Pair with a crisp salad A crisp green salad dressed lightly balances the creamy texture of the casserole and adds fresh contrast to the meal.
- Family dinner This is a perfect main for a cozy weeknight dinner where everyone can scoop their portion and enjoy second helpings easily.
- Holiday table Offer this casserole as a comforting side or main during holiday meals, where its make ahead potential helps with kitchen timing.
- Storage tips Cool leftover casserole to room temperature, then refrigerate for up to 3 days in an airtight container; reheat in a moderate oven to maintain biscuit texture rather than microwaving.
- Seasonal pairing In winter, serve with roasted root vegetables or a citrus salad to brighten the plate and complement the rich filling.
FAQ
Conclusion
This Chicken and Biscuits Casserole stands out because it marries a creamy, savory filling with tender, flaky biscuits for a deeply comforting result. Give it a try when you want a satisfying one pan meal that feels homemade and generous, and you will likely find it becoming a requested favorite. The technique rewards a little attention, but the make ahead options and hearty flavor make it a practical, delightful dish to serve family and friends.
Chicken and Biscuits Casserole
Equipment
- biscuit cutter 3¼-inch
- 9x13-inch Baking Dish
Ingredients
- 5 cups chicken broth See NOTES Provide savory liquid and depth to the casserole, forming the base for the sauce and helping cook other ingredients; simmer to concentrate flavor and meld components into a cohesive filling.
- 2 chicken bouillon cubes Add concentrated chicken flavor and umami to boost the broth richness; dissolve completely to evenly season the casserole without adding extra liquids.
- 3 cups chicken roasted, cut into bite-sized pieces Contribute bulk, texture, and protein to the dish by providing tender, bite-sized pieces that soak up sauce; fold in near the end to keep meat moist and prevent overcooking.
- 6 tablespoon unsalted butter Impart rich, buttery flavor and help sauté vegetables; melt to create a flavorful base for the roux and to develop a glossy sauce when combined with flour.
- 1 cup onion chopped Add aromatic sweetness and structure when chopped and sautéed; cook until softened to release sugars and build savory complexity in the filling.
- 1 cup carrots thinly sliced Provide subtle sweetness, color, and a tender bite when thinly sliced and cooked; simmer until just tender so carrots retain pleasant texture within the casserole.
- 8 oz mushrooms sliced Introduce earthy, savory umami and meaty texture when sliced and sautéed; cook until moisture evaporates to concentrate flavor and integrate with the sauce.
- 1/2 cup all-purpose flour Thicken the sauce by forming a roux with butter and absorbing liquids to create body and stability; whisk thoroughly to avoid lumps and achieve a smooth filling.
- 1/2 cup heavy cream Enrich the sauce with creaminess and a silkier mouthfeel while adding fat for flavor balance; stir in after thickening to adjust consistency and richness.
- 1/2 cup sweet peas frozen Contribute pops of color, sweetness, and tender bite when added frozen; fold into the sauce so peas heat through without becoming mushy.
- 1/4 cup Italian parsley fresh, chopped, plus extra for garnish Add fresh herbaceous brightness and a clean finish when chopped; sprinkle through the filling and reserve extra for garnish to lift heavy flavors.
- 1 1/2 teaspoon Kosher salt Season the casserole with balanced salinity and enhance other flavors; measure carefully to suit broth concentration and personal taste.
- 1 teaspoon black pepper Provide warm, subtle heat and aromatic depth when ground and added; adjust to taste to avoid overpowering the dish while rounding savory notes.
- 1/2 cup unsalted butter 1 stick Supply additional richness and flavor when melted into batters or layers; incorporate to enrich dough and contribute tender flakiness in biscuits.
- 2 1/4 cups self-rising flour preferably Lily's Offer structure and leavening in the biscuit topping, giving a tender crumb and rise; mix gently to preserve the self-rising properties for light, fluffy biscuits.
- 1 cup buttermilk cold Add acidity and tang while contributing moistness to the biscuit dough; keep cold to activate buttermilk’s role in tenderizing and reacting with self-rising flour.
- 2 tablespoon unsalted butter melted Moisten the biscuit dough and add buttery flavor when melted; brush or fold into dough as specified to create a golden, crisp biscuit exterior.
Instructions
- Put two sticks of butter in the freezer (you'll only use half of each stick). You'll need to remove them from the freezer about 15 minutes before you start preparing the biscuits.: A cool, faint buttery smell will persist while the sticks chill, and the texture firms up making them easier to grate. Cold butter is essential so the grated pieces stay separate and create layers in the biscuit dough; if the butter softens it will smear into the flour and produce dense biscuits. If you forgot to freeze them, pop them into the coldest part of your freezer for at least 20 minutes to recover.
- Brush oil over two skin-on, bone-in chicken breasts and season with salt and pepper. Roast at 350°F until the internal temperature reaches 165°F. Once cool enough to handle, remove the skin and then cut out the meat. Cut into bite-sized pieces. Set aside. Or, use rotisserie chicken.: As you rub oil over the chicken and season it, the skin becomes slightly tacky and the salt penetrates the surface, promising deep roast flavor. Roasting at 350°F until the internal temperature hits 165°F yields golden skin and succulent meat; using a thermometer prevents overcooking, which can dry the meat. If you only see pale skin after the roast, broil for a minute or two while watching closely to achieve more color.
- Add the broth to a pan and crumble in the bouillon cubes. Heat the broth over medium-low heat.: Pouring warm chicken broth into a pan releases a light savory steam that carries bouillon aroma; crumbling the cubes ensures they dissolve evenly. Keeping the heat at medium-low helps the bouillon melt and blend without sudden reduction. If granules persist, whisk briskly and warm slightly to dissolve completely.
- Melt the butter in a large pot over medium heat. Add the onions and carrots and sauté, stirring often, until soft, about 5 minutes. Add the sliced mushrooms and sauté until they are soft and beginning to release liquid, about another 4 to 6 minutes.: When the butter liquefies it begins to scent the kitchen with a toasty, slightly nutty aroma; adding chopped onion and sliced carrots then creates a soft sizzling sound as moisture releases. Sauté until the vegetables are soft and translucent, about 5 minutes, then add mushrooms and cook until they soften and exude liquid. Cooking slowly prevents the vegetables from browning too quickly, which would alter the desired gentle sweetness. If you see the edges catching, lower the heat and stir more frequently.
- Stir in the flour and cook, stirring often, for another 1 to 2 minutes.: The flour will absorb the butter and vegetable juices, forming a slightly pasty roux that smells faintly toasty once it cooks. This brief cook time removes raw flour taste and ensures the final sauce has a smooth body. If you do not cook the flour enough, the sauce may taste grainy or floury after adding liquid.
- Gradually and carefully add the warm stock to the pot, whisking constantly. Continue stirring until all lumps are gone. Simmer for a few minutes.: As you pour the warm stock into the roux, the mixture will hiss softly and then turn from a paste into a smooth, glossy sauce when whisked. Whisking prevents lumps and encourages an even thickening. If you add stock too quickly or while the pot is extremely hot, you risk forming stubborn pockets of uncooked flour; pour slowly and whisk through each addition.
- Stir in the cream and cook for another couple of minutes.: Adding the heavy cream transforms the sauce into a silkier, richer texture and a pale creamy sheen develops. A gentle simmer helps the sauce thicken slightly while concentrating flavor. Keep the heat moderate so the cream does not separate or scorch; if you see tiny oily patches, lower the heat and stir until cohesion returns.
- Stir in the chicken, peas, parsley, salt, and pepper. Simmer, stirring often, for about 15 minutes. Taste and add a pinch more salt, if needed. The filling should thicken to the point that it coats the back of your spatula. Set aside.: When the diced roasted chicken hits the warm sauce, steam rises and the filling comes together, studded with green peas and flecks of fresh Italian parsley . Simmer about 15 minutes until the filling thickens enough to coat the back of a spatula. Taste for seasoning and adjust with a pinch more salt if needed. If the filling is too thin, continue simmering gently; if it becomes overly thick, stir in a splash of reserved warm broth.
- Grate the cold butter with a box grater onto a cutting board. To make this easier, grate just half of each partially frozen stick of butter.: The action of grating partially frozen butter creates small, cold shards that look like coarse snow on the board. Tossing these into the flour lets each piece stay distinct, yielding flaky pockets in the biscuit. If the butter becomes tacky during grating, return it to the freezer briefly to firm up again.
- Place the flour in a large bowl and quickly toss it with the grated butter. Place in the freezer for 15 minutes.: As you work the grated butter into the self-rising flour , the mixture develops a pebbly texture, and you can already imagine the light layers those bits will create. Chilling the mixture for about 15 minutes helps the fat remain cold before adding buttermilk . If you skip chilling, the biscuit dough may become gummy and lose flakiness.
- Use a wooden spoon to work the cold buttermilk into the flour/butter mixture. It will be a shaggy (loose) dough.: Stirring with a wooden spoon yields a shaggy, loose dough that smells faintly tangy from the buttermilk . The dough will not come together completely at this stage, and that texture is desirable. Overworking the dough will develop gluten and toughen the biscuits, so mix just until combined.
- Turn the dough out onto a floured surface. Use your hands to quickly knead the dough until mostly cohesive (it will still be a bit shaggy).: The dough feels cool and slightly sticky; a light dusting of flour prevents sticking while you knead it quickly to a mostly cohesive mass. Kneading briefly tightens the structure but leaves some shaggy bits for tenderness. If you press too much, the biscuits can become dense rather than tender.
- Roll the dough into an 8×10-inch rectangle. Use a bench scraper or a large knife to cut the rectangle into fourths. Stack the quarters on top of each other and again roll the dough into an 8×10-inch square. Repeat one more time.: Rolling reveals layers and you will see seams where the dough can be folded; cutting into fourths, stacking and rolling again builds flakiness. Repeat this fold and roll cycle one more time to create visible layers. If the dough warms or the butter softens too much while working, chill it for a few minutes before continuing.
- Use a biscuit/cookie cutter to cut the dough into three biscuits. Roll the scraps into another square and cut out two more biscuits. Use the remaining dough to create one last biscuit; you should have 6 biscuits. Place the biscuits in a cake pan and place them in the freezer for 15 minutes.: The cut edges should be clean and the dough will show neat circular biscuits; gathering scraps and rerolling yields the remaining biscuits until you have six. Place them in a cake pan and freeze for 15 minutes so they hold shape in the oven. If your cutter drags, dip it in flour between cuts to keep edges sharp.
- Preheat the oven to 450°F.: A hot oven gives biscuits a fast initial rise and a golden crust. You should feel a warm, dry blast when you open the oven; ensure racks are positioned so the casserole will sit in the center. If the oven is not fully preheated, biscuits may spread rather than rise properly.
- If the filling has cooled off, reheat over medium heat until heated through. Transfer the warm filling into a 9×13-inch baking dish.: Warming the filling returns aroma and loosens it so it can be spread into the baking dish; you will see steam and small bubbles at the edges when it is ready. Transfer the warm filling into a 9×13-inch baking dish . Avoid overheating which can reduce moisture and make the final casserole dry.
- Remove the biscuits from the freezer and space them evenly over the filling. Brush melted butter over the tops of each biscuit.: The cold biscuits resting on hot filling create contrast and the tops will steam slightly as they bake, promoting tender interiors. Brush melted butter over the tops for color. If biscuits shift while placing them, press gently to secure so they do not topple during baking.
- Bake for 15 to 20 minutes, or until the tops are golden brown, turning the dish around halfway through baking.: In the oven you will hear a faint crackle as steam pushes through the dough and the surface browns to a rich hue; I turn the dish halfway to ensure even color. The biscuits should feel springy and a skewer inserted into a biscuit comes out clean. If the tops brown too quickly, tent loosely with foil to allow the centers to finish cooking.
- Remove from the oven and brush more melted butter over the tops of each biscuit. Let the casserole rest for 10 minutes before serving. Serve hot, garnish with chopped parsley, if desired.: Brushing immediately gives a glossy finish and a burst of buttery aroma; let the casserole rest for about 10 minutes so the filling settles and slices hold their shape. Garnish with chopped Italian parsley if desired. Cutting into the hot casserole too soon can cause the filling to run and the presentation to suffer.
Notes
- Shortcut with store bought biscuits Use high quality refrigerated biscuits in place of the homemade dough to save time and still get a warm, tender topping that browns nicely in the oven.
- Use rotisserie chicken Swap roasted chicken for shredded rotisserie chicken to save time and add extra seasoned flavor in the filling.
- Make it lighter Use reduced fat cream or decrease the amount slightly, while increasing simmer time to concentrate flavor so you keep a rich mouthfeel without as much fat.
- Double the vegetables Add an extra cup of thinly sliced carrots and mushrooms to increase texture and make the casserole heartier for family style meals.
- Herb forward Increase the fresh Italian parsley and add more freshly ground black pepper for a brighter, more aromatic profile that cuts through the richness.
- Make ahead the filling Prepare the filling up to a day in advance, refrigerate, then top with biscuits and bake when ready to serve to save time on the day of your meal.