Cherry Clafoutis
Cherry Clafoutis has a way of taking me back to a sunlit kitchen table where my grandmother would set down a warm skillet and everyone would gather close to grab a slice before it cooled.
That first sentence sounds sentimental because this dish is that kind of simple pleasure, a recipe that balances rustic fruit with a tender, custardy batter. I remember the ritual of pitting cherries while humming along to whatever record was on, and how the aroma of baking cream and eggs would pull neighbors through the door. Over the years I’ve adjusted small things, but the heart of the dessert remains a generous scatter of cherries tucked into a creamy pour that puffs slightly in the oven and settles into a delicate, almost-flan texture.
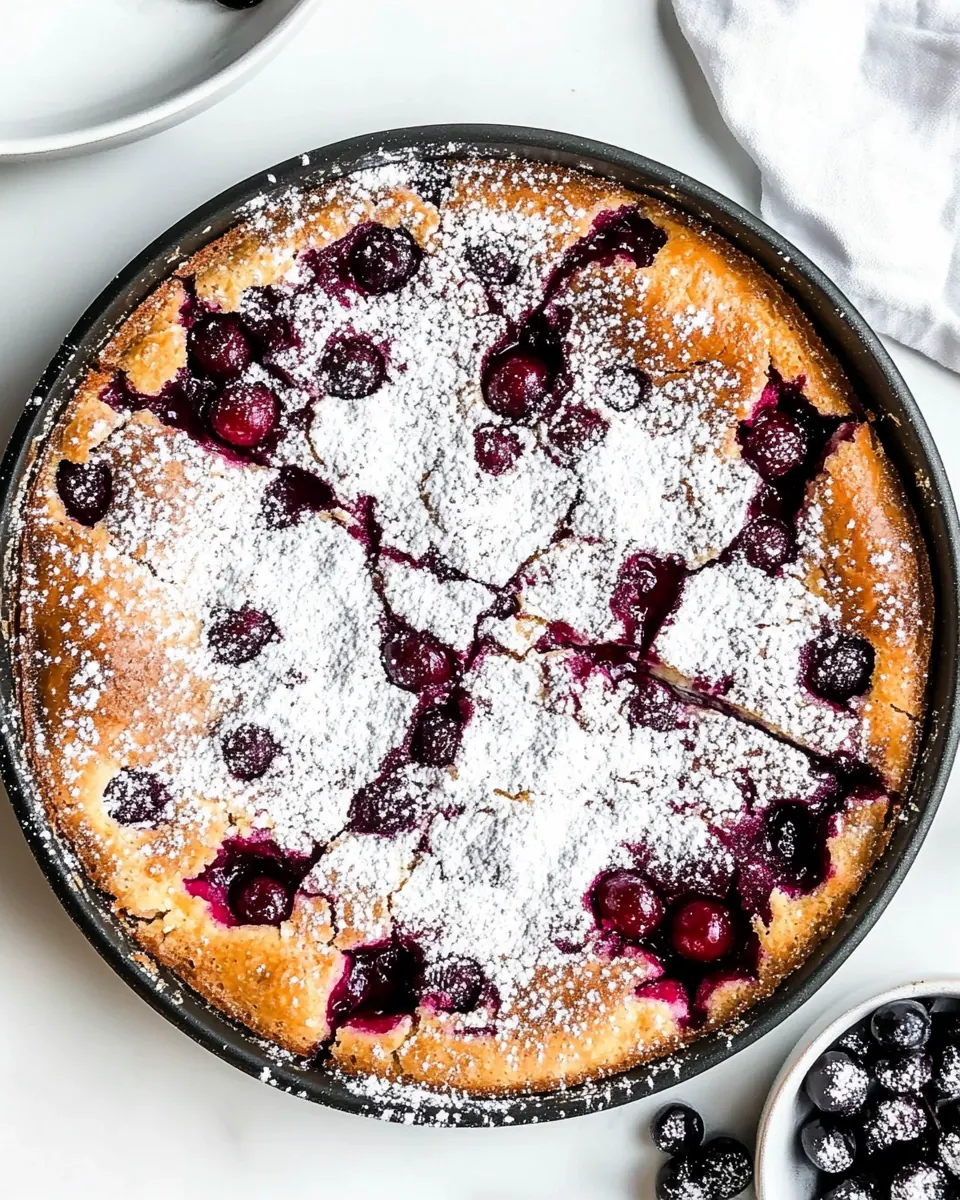
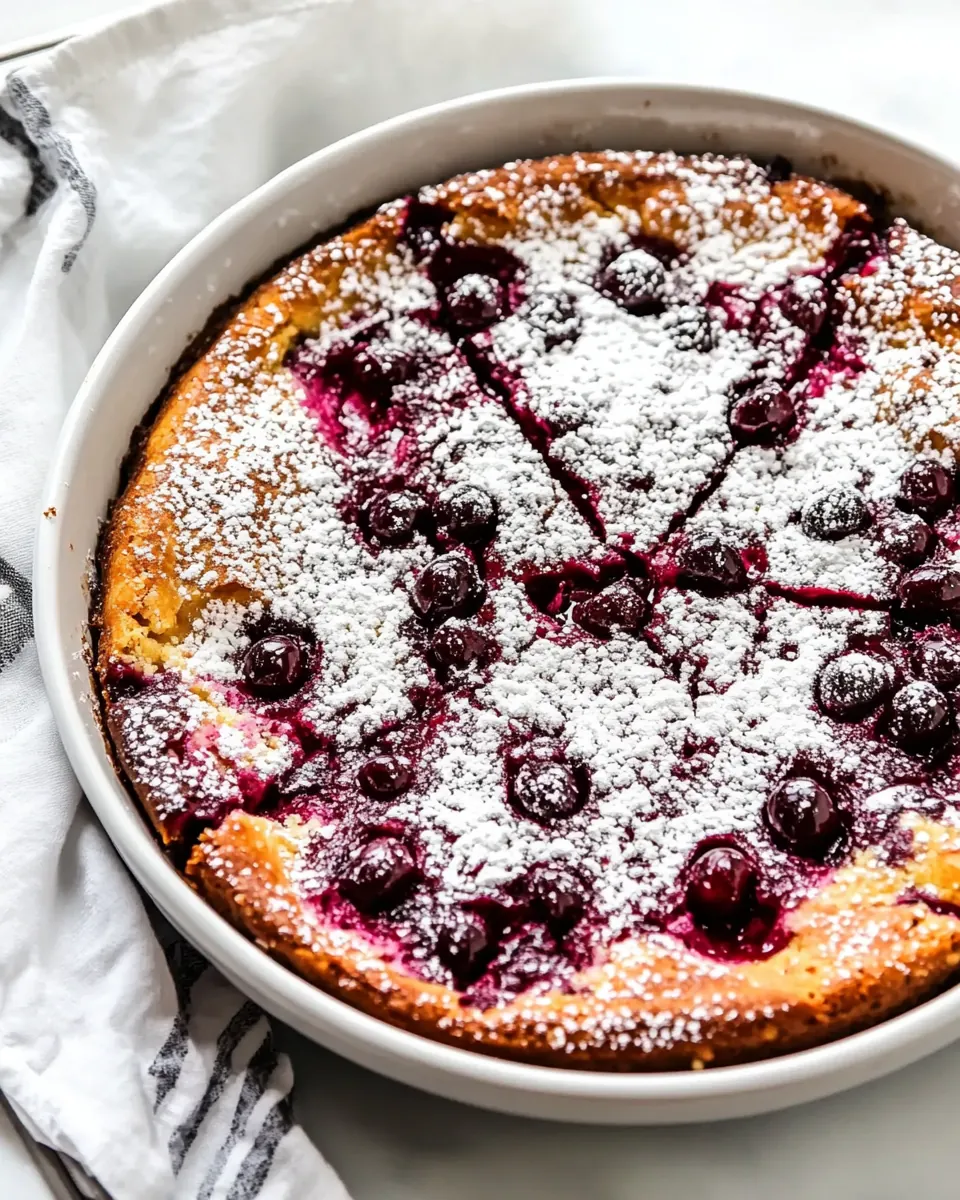
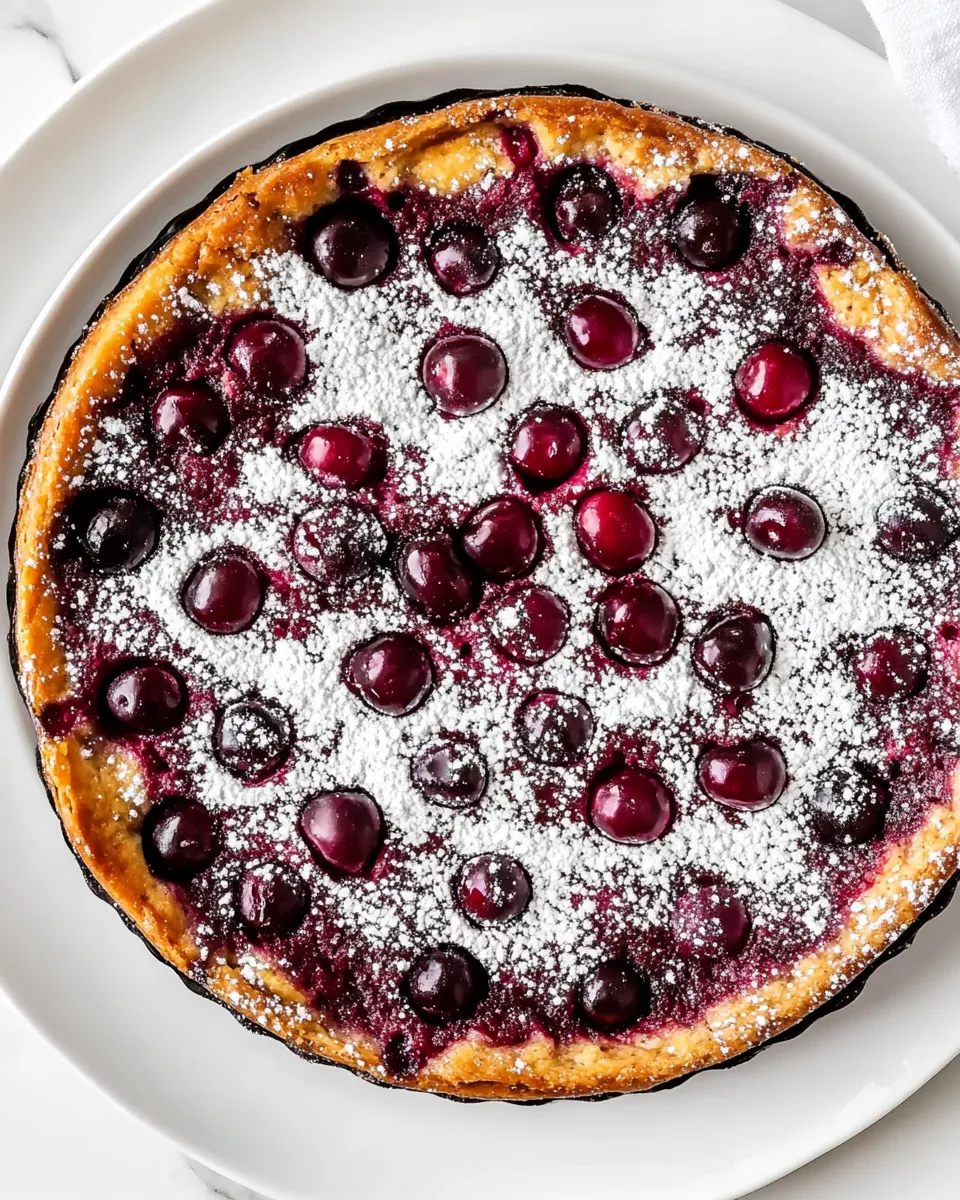
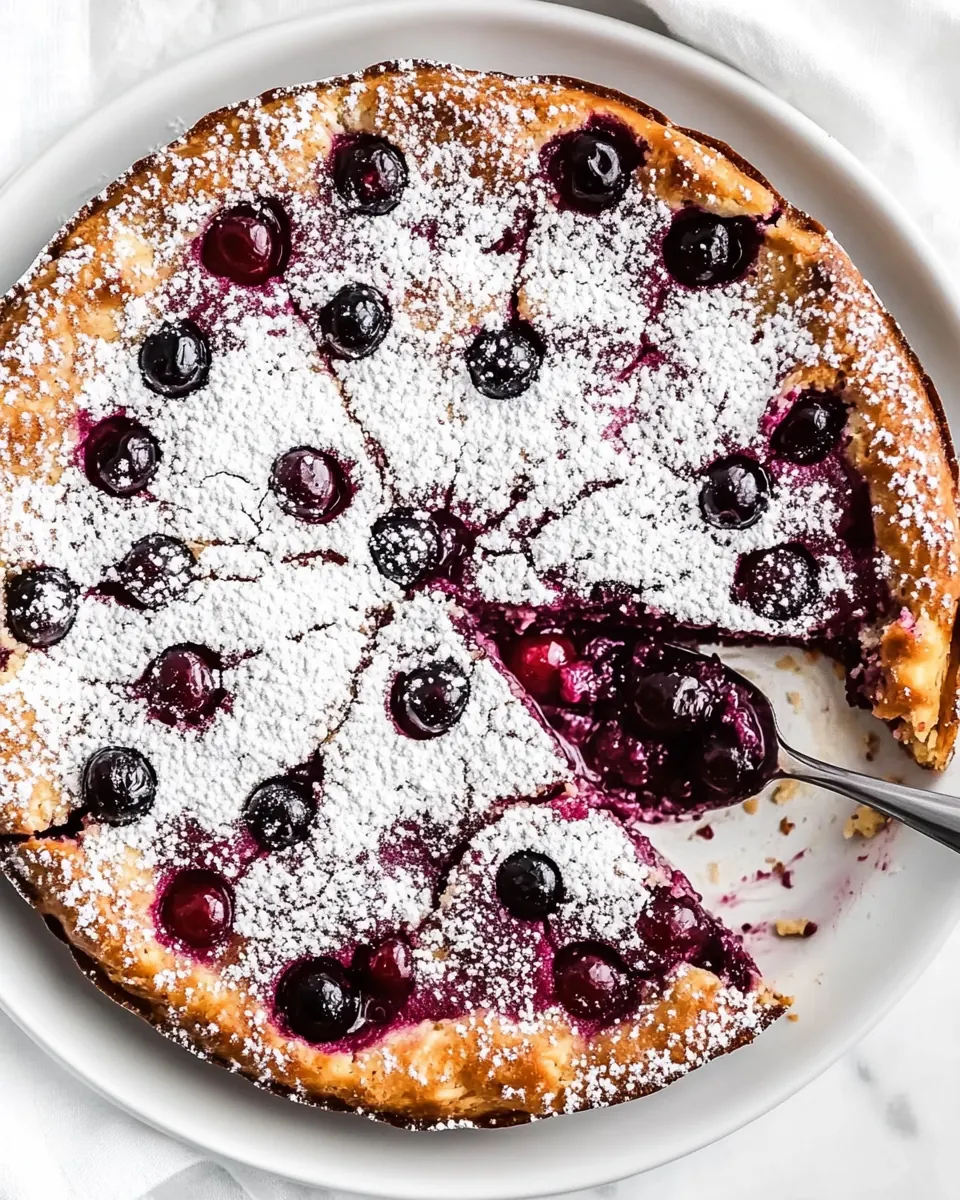
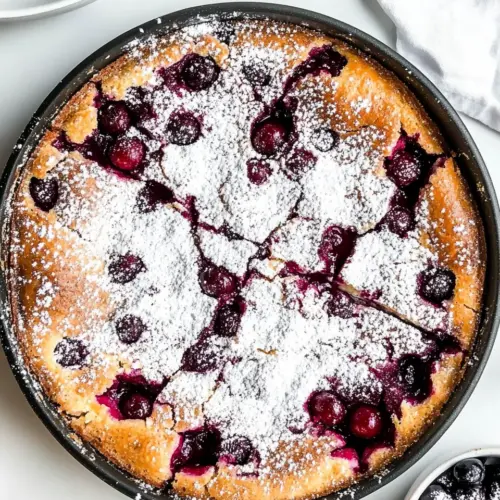
Every time I make Cherry Clafoutis for company I find conversation slows, because people are busy deciding whether to take another bite. The texture is the charm here, silky yet with the occasional pop of a cherry, and the dusting of powdered sugar adds a quiet, snowy finish. I like serving it straight from the skillet so guests can see the golden rim and the glossy fruit inside. There is comfort in its rustic imperfection, and I often find myself tweaking minor details, like using a cast iron skillet to get a crisper edge or letting the batter rest a little to smooth out any bubbles.
Recipe Snapshot
60 mins
15 mins
45 mins
Medium
290 kcal
French
Gluten-Free, Low FODMAP
Desserts
Cherry Pitter, 12 inch Cast Iron Skillet
Why You’ll Love This Cherry Clafoutis
It is wonderfully simple
I love that Cherry Clafoutis relies on a handful of pantry staples, yet rewards you with something that feels special. You do not need complicated techniques, which is perfect when I want to bake something impressive without fuss. The batter comes together quickly, and the payoff is a dessert that looks like you spent much more time on it.
Fresh fruit is the star
When summer cherries are at their peak, their brightness and subtle tartness lift the custard, and I always reach for the ripest cherries. Their natural sweetness and juice become pockets of flavor that contrast beautifully with the creamy base. I find that the visual appeal of whole cherries peeking from the batter adds a rustic, joyful note to the presentation.
Texture that feels both tender and rustic
The custardy interior of Cherry Clafoutis is soft and almost silky, while the edges that meet the hot skillet can develop a slight chew and golden color. That contrast between tender center and caramelized rim is something I look for every time. It gives each bite a little variety, and I enjoy how the mouthfeel changes as it cools and the batter settles.
Very adaptable to small changes
I appreciate how forgiving the recipe is. Whether you use half and half or a slightly richer cream, or whether you choose to bake in a cast iron skillet or a ceramic dish, the core result remains comforting. That flexibility lets me tailor the clafoutis to what I have on hand, without losing the essence of the dessert.
Effortless entertaining
Finally, Cherry Clafoutis is perfect for sharing. It feels homey and elegant at once, which makes it an ideal ending to a casual dinner or a small celebration. I love bringing it to gatherings because it travels well and can be served warm or at room temperature, and people always ask for the recipe.
Everything You Need for Cherry Clafoutis
These ingredients are deliberately simple, and each plays a defined role in creating the custardy texture and bright fruit presence I adore. The cherries bring juiciness and tartness, the flour and eggs set the structure, sugar sweetens and helps with browning, and the half and half makes the batter luxuriously creamy. Together they create a balance of silky interior and gently caramelized edges.
- 1 pound cherries (pitted): Provide sweet, tart fruit and juicy texture that form the base of the clafoutis; pit and layer evenly in the baking dish so their juices infuse the batter during baking. Gently toss with a little sugar if very tart to balance flavor and prevent excessive sinking. Serve warm or at room temperature so the cherries remain plump and slightly jammy within the custard.
- 1/2 cup all-purpose flour: Bind and give structure to the batter while contributing a tender crumb and slight chew; whisk thoroughly with the eggs and sugar to avoid lumps for a smooth, pourable custard. Measure accurately for consistent thickness and to ensure the clafoutis sets properly without becoming too dense.
- 1/4 teaspoons salt: Enhance overall flavor by balancing sweetness and highlighting other ingredients; dissolve into the dry ingredients or mix with the wet components to distribute evenly. Use sparingly to avoid over-salting the custard while allowing other flavors to shine.
- 1/2 cups sugar: Sweeten the batter and aid in browning, providing a caramelized top and tender texture when baked; dissolve fully with the eggs to prevent graininess. Adjust amount slightly if cherries are very sweet, keeping balance between fruit and custard.
- 1 teaspoon vanilla extract: Add aromatic depth and warmth, complementing the cherries with a familiar vanilla fragrance; stir into the liquid portion so the flavor infuses the entire custard. Use pure extract for best flavor impact and avoid over-concentration which can become cloying.
- 4 eggs: Structure the custard by incorporating air and setting the batter as it bakes; beat until combined but avoid excessive whipping which can cause a rubbery texture. Use at room temperature for better emulsification with the dairy and flour.
- 1 1/2 cups half and half: Provide richness and creaminess to the custard base, contributing to a silky mouthfeel and helping the dish set with a soft, pudding-like consistency. Warm slightly before mixing to prevent shocking the eggs and to blend smoothly into the batter.
- powdered sugar: Lightly dust the finished clafoutis to add a delicate sweetness and an attractive presentation contrast against the baked surface; sprinkle just before serving to avoid melting into the warm custard. Use a fine sieve or shaker for an even, subtle coating that enhances visual appeal.
- 1 tablespoon butter (softened, for buttering the dish): Grease the baking dish to prevent sticking and promote easy removal of the clafoutis after baking; spread evenly to coat corners and sides for uniform release. Use softened butter at room temperature so it spreads smoothly without tearing the batter when poured in.
How to Prepare Cherry Clafoutis
This recipe is straightforward but benefits from attention to small details. I like to follow the sequence of prepping fruit, warming the dairy, blending, and baking so each element contributes to the final texture and flavor. Below I expand on each direction with sensory cues, reasons behind the method, and common pitfalls to avoid so you feel confident at every stage.
- Prep the cherries: Preheat the oven to 375℉. Remove the stems, wash and dry, then pit all your cherries. I find it is much easier to use a cherry pitter versus doing this with knife.: Preheat the oven to 375℉ : The warm, slightly sweet scent of the kitchen changes as the oven comes up to temperature, signaling it's time to move quickly. When you remove stems, wash, dry, and pit the cherries , you should feel the taut skin give beneath your fingers, and the flesh should be firm but not hard. Using a cherry pitter preserves the fruit's shape and avoids cutting into the flesh, which would release extra juice that can thin the batter. A common mistake is leaving cherries too wet, which adds steam and can make the center underbaked; always pat them dry before arranging. If you do not pit thoroughly, stray pits will ruin the experience for anyone biting into one, so double check your work.
- Make the batter: Bring the half and half to a boil then remove from heat. Stir in the vanilla. Let the cream cool for about 5 minutes before proceeding. You can use either a blender or a hand mixer for this step. It's important for the batter to be smooth and well blended. Add the cream, eggs, sugar, vanilla, flour, and salt to your bowl or blender. Mix until there are no more lumps.: Bring the half and half to a boil then remove from heat : The aroma of warmed dairy is comforting and helps the sugar dissolve more readily when you mix. As the half and half approaches a boil you will see tiny bubbles form along the edges, and once removed from heat it will still be hot enough to slightly temper the eggs without cooking them. Stir in the vanilla now so its fragrance infuses the liquid, and let the cream cool about 5 minutes to avoid scrambling when mixed with eggs. A blender or hand mixer will create a uniform, silky batter, which is important because lumps of flour can bake into grainy pockets. Avoid rushing and adding hot cream directly to eggs without cooling a bit, that can curdle the eggs and ruin the texture.
- Assemble and bake the clafoutis: Butter the skillet and arrange the cherries. Pour the batter into the skillet over the cherries. Bake for about 45 minutes, or until fully cooked. Dust with powdered sugar and serve.: Stir in the vanilla : Vanilla warms the base with a fragrant note that melds with the cream as it cools. You will notice a gentle perfume rise from the bowl, hinting at the cozy flavor to come. The reason this step matters is that aromatic compounds in vanilla dissolve better in warm liquid, distributing evenly. A typical error here is using too much liquid temperature, which can toughen the eggs; allow the cream to rest briefly so it is hot but not scalding. If your vanilla is artificial or overly strong, it can overpower the delicate cherries , so measure carefully.
- Make the batter: Let the cream cool for about 5 minutes before proceeding : Cooling the cream slightly reduces the risk of scrambling the eggs, and it gives the warmth needed to integrate flavors without cooking proteins. During this short pause you might notice a faint steam rising that almost carries the vanilla with it, a small sensory hint the batter will be fragrant. Skipping this resting period can lead to tiny cooked egg bits in your mixture, which will affect both texture and appearance. Keep the cream warm but not boiling to maintain the smooth result you want.
- Make the batter: You can use either a blender or a hand mixer for this step : Mixing in a blender yields an ultra-smooth batter with a slightly aerated quality, while a hand mixer gives you more control and less air, which can result in a denser, creamier set. Listen for a steady, even whir that indicates thorough blending; the batter should look glossy and homogeneous with no lumps. The choice affects the final mouthfeel, so pick the method that suits your preference, but always scrape down the sides to avoid unincorporated streaks. A mistake people make is overbeating, which introduces too much air and can cause excessive puffing and then quick collapse during cooling.
- Make the batter: It's important for the batter to be smooth and well blended : Smoothness ensures that when baked, the custard sets evenly without gritty pockets. The visual cue is a shiny surface with a ribbon-like consistency when poured, and you should hear a soft hum from your blender or mixer rather than clanking. Texture carries through to the finished dish, giving you that tender, slightly custard like bite. If you notice lumps, pass the mixture through a fine sieve to remove them; failing to do so results in an uneven bake and less refined mouthfeel.
- Make the batter: Add the cream, eggs, sugar, vanilla, flour, and salt to your bowl or blender : When these components come together the batter will thicken slightly and take on a pale, creamy hue. The eggs give body and richness, the sugar dissolves into the warm cream, and the flour provides gentle structure. As you combine them, you may catch a faint sweet aroma with a hint of nuttiness from the flour. One pitfall is adding dry flour straight into hot liquid without mixing, which causes clumps; instead, add gradually and blend until fully incorporated for a uniform texture.
- Make the batter: Mix until there are no more lumps : The final batter should be velvety and free of visible flour specs. Pour a small ribbon and watch how it falls back into the bowl; it should be smooth and consistent. This step ensures the clafoutis bakes evenly and yields the signature custardy interior. If you detect any stubborn lumps, use a whisk or a quick pulse in the blender to smooth them out. Overlooking this can leave gritty bits that distract from the delicate texture you are aiming for.
- Assemble and bake the clafoutis: Butter the skillet and arrange the cherries : Rubbing softened butter across the skillet releases a warm buttery scent and ensures the edges brown attractively. As you scatter the pitted cherries , notice how they nestle slightly into the buttered surface; this contact encourages caramelization at the edges where fruit meets pan. Arrange them evenly so each slice will have fruit through it, and avoid overcrowding, which can make the center too moist. A common issue is not buttering the dish well enough, causing sticking and loss of the pretty crust when serving.
- Assemble and bake the clafoutis: Pour the batter into the skillet over the cherries : The batter will flow around the cherries , creating glossy pockets of fruit throughout. Visually, the batter should cover the fruit, leaving some cherries peeking out. This distribution ensures there are no dry spots in the finished clafoutis. If you notice the batter is unusually thin, check that you measured the flour properly; too little flour yields an overly loose set that may not hold when sliced.
- Assemble and bake the clafoutis: Bake for about 45 minutes, or until fully cooked : As it bakes the kitchen fills with an enveloping warmth and a sweet dairy aroma. Look for a golden top that is set and slightly puffed, with the center no longer jiggling like loose custard. The edges will darken a touch and pull away from the pan, creating those desirable slightly crisp ridges. One common mistake is opening the oven repeatedly, which can cause the clafoutis to deflate; trust the time and check near the end. If the top browns too quickly, tent with foil to finish cooking without burning.
- Assemble and bake the clafoutis: Dust with powdered sugar and serve : The final touch of powdered sugar gives a soft, snowy finish and a delicate sweet note that complements the cherries . It enhances the visual appeal and creates a slight textural contrast on the surface. Serve warm or at room temperature from the skillet to showcase the golden edges and glossy fruit. Avoid adding powdered sugar too early, as it will dissolve into the warm surface and lose its decorative effect.
Recipe Tips about Cherry Clafoutis
I like to keep a short list of practical tips at the ready when making Cherry Clafoutis. These help maintain texture, flavor, and presentation so the final skillet looks as inviting as it tastes. Below I expand on techniques and small adjustments that consistently improve the result.
- Choose ripe but firm cherries. Overripe fruit can become mushy and release too much juice during baking, which can make the center of the clafoutis loose. Firm, ripe cherries hold their shape and give pleasant bursts of flavor without collapsing into the batter.
- Dry the cherries thoroughly. Excess water from washing will steam in the oven and may prevent the custard from setting uniformly. Pat each cherry with a towel and let them rest briefly so surface moisture evaporates before arranging in the skillet.
- Warm the dairy gently. Bringing the half and half just to a simmer extracts more aroma from the vanilla and helps dissolve sugar. Let it cool for a few minutes to avoid cooking the eggs when combined, which preserves the smooth texture.
- Use a blender for ultra smooth batter. If you prefer the silkiest texture, a quick blend eliminates lumps and aerates slightly, which can yield a lighter set. Just avoid overblending to reduce excessive puffing and collapse.
- Butter the pan generously. A thin layer of softened butter prevents sticking and encourages attractive browning at the edges, making it easier to serve neat slices directly from the skillet.
- Let it rest before dusting with sugar. Allow the clafoutis to cool briefly so powdered sugar remains on the surface rather than melting away, which keeps the finish visually appealing.
How to Serve Cherry Clafoutis
Serving Cherry Clafoutis is all about showcasing its rustic charm and tender texture. I often present it straight from the skillet to emphasize the golden rim and visible fruit, and I vary how I serve it depending on the occasion. Below are thoughtful serving ideas, seasonal pairings, storage notes, and suggestions for different meals where it shines.
- Serve warm or at room temperature. Warm slices have the most pronounced creaminess and soft texture, while room temperature provides a firmer, sliceable custard. Both ways please guests, so pick what suits your service timing.
- Present straight from the skillet. Bringing the cast iron or baking dish to the table emphasizes the homemade aspect and keeps edges intact. It creates a cozy, family style presentation that invites sharing.
- Light dusting of powdered sugar. Right before serving, sift a light layer of powdered sugar across the top to add a delicate sweetness and attractive finish that photographs beautifully if you want to share the moment.
- Occasions to serve it. This recipe works for brunch, dessert after a relaxed dinner, or as a pleasant treat during Ramadan evenings when a gentle, comforting dessert is welcome. Its simplicity makes it suitable for small gatherings and casual celebrations alike.
- Storage and reheating. Store leftovers in an airtight container in the fridge for up to 3 to 4 days. Reheat gently in short bursts in the microwave or cover with foil and warm in the oven at 350℉ for 5 to 10 minutes until warm. This helps preserve texture rather than drying it out.
- Seasonal pairings. In summer, let the cherries shine with light accompaniments such as a simple fruit salad. In cooler months, serve alongside a warm cup of tea or coffee to contrast the custard’s creaminess with a tannic beverage.
FAQ
Conclusion
Cherry Clafoutis is special because it takes minimal ingredients and yields a dessert that is both homey and elegant. Its creamy custard and pockets of juicy cherries create a comforting contrast of textures and flavors. I encourage you to give it a try, whether for a relaxed brunch or as a warm finish to a dinner with friends. It is forgiving, adaptable, and always earns compliments, so once you make it a few times you will find the small tweaks that make it uniquely yours.
Cherry Clafoutis
Equipment
- Cherry Pitter
- 12-inch Cast Iron Skillet
Ingredients
- 1 pound cherries (pitted) Provide sweet, tart fruit and juicy texture that form the base of the clafoutis; pit and layer evenly in the baking dish so their juices infuse the batter during baking. Gently toss with a little sugar if very tart to balance flavor and prevent excessive sinking. Serve warm or at room temperature so the cherries remain plump and slightly jammy within the custard.
- 1/2 cup all-purpose flour Bind and give structure to the batter while contributing a tender crumb and slight chew; whisk thoroughly with the eggs and sugar to avoid lumps for a smooth, pourable custard. Measure accurately for consistent thickness and to ensure the clafoutis sets properly without becoming too dense.
- 1/4 teaspoons salt Enhance overall flavor by balancing sweetness and highlighting other ingredients; dissolve into the dry ingredients or mix with the wet components to distribute evenly. Use sparingly to avoid over-salting the custard while allowing other flavors to shine.
- 1/2 cups sugar Sweeten the batter and aid in browning, providing a caramelized top and tender texture when baked; dissolve fully with the eggs to prevent graininess. Adjust amount slightly if cherries are very sweet, keeping balance between fruit and custard.
- 1 teaspoon vanilla extract Add aromatic depth and warmth, complementing the cherries with a familiar vanilla fragrance; stir into the liquid portion so the flavor infuses the entire custard. Use pure extract for best flavor impact and avoid over-concentration which can become cloying.
- 4 eggs Structure the custard by incorporating air and setting the batter as it bakes; beat until combined but avoid excessive whipping which can cause a rubbery texture. Use at room temperature for better emulsification with the dairy and flour.
- 1 1/2 cups half and half Provide richness and creaminess to the custard base, contributing to a silky mouthfeel and helping the dish set with a soft, pudding-like consistency. Warm slightly before mixing to prevent shocking the eggs and to blend smoothly into the batter.
- powdered sugar Lightly dust the finished clafoutis to add a delicate sweetness and an attractive presentation contrast against the baked surface; sprinkle just before serving to avoid melting into the warm custard. Use a fine sieve or shaker for an even, subtle coating that enhances visual appeal.
- 1 tablespoon butter (softened, for buttering the dish) Grease the baking dish to prevent sticking and promote easy removal of the clafoutis after baking; spread evenly to coat corners and sides for uniform release. Use softened butter at room temperature so it spreads smoothly without tearing the batter when poured in.
Instructions
- Prep the cherries: Preheat the oven to 375℉. Remove the stems, wash and dry, then pit all your cherries. I find it is much easier to use a cherry pitter versus doing this with knife.: Preheat the oven to 375℉ : The warm, slightly sweet scent of the kitchen changes as the oven comes up to temperature, signaling it's time to move quickly. When you remove stems, wash, dry, and pit the cherries , you should feel the taut skin give beneath your fingers, and the flesh should be firm but not hard. Using a cherry pitter preserves the fruit's shape and avoids cutting into the flesh, which would release extra juice that can thin the batter. A common mistake is leaving cherries too wet, which adds steam and can make the center underbaked; always pat them dry before arranging. If you do not pit thoroughly, stray pits will ruin the experience for anyone biting into one, so double check your work.
- Make the batter: Bring the half and half to a boil then remove from heat. Stir in the vanilla. Let the cream cool for about 5 minutes before proceeding. You can use either a blender or a hand mixer for this step. It's important for the batter to be smooth and well blended. Add the cream, eggs, sugar, vanilla, flour, and salt to your bowl or blender. Mix until there are no more lumps.: Bring the half and half to a boil then remove from heat : The aroma of warmed dairy is comforting and helps the sugar dissolve more readily when you mix. As the half and half approaches a boil you will see tiny bubbles form along the edges, and once removed from heat it will still be hot enough to slightly temper the eggs without cooking them. Stir in the vanilla now so its fragrance infuses the liquid, and let the cream cool about 5 minutes to avoid scrambling when mixed with eggs. A blender or hand mixer will create a uniform, silky batter, which is important because lumps of flour can bake into grainy pockets. Avoid rushing and adding hot cream directly to eggs without cooling a bit, that can curdle the eggs and ruin the texture.
- Assemble and bake the clafoutis: Butter the skillet and arrange the cherries. Pour the batter into the skillet over the cherries. Bake for about 45 minutes, or until fully cooked. Dust with powdered sugar and serve.: Stir in the vanilla : Vanilla warms the base with a fragrant note that melds with the cream as it cools. You will notice a gentle perfume rise from the bowl, hinting at the cozy flavor to come. The reason this step matters is that aromatic compounds in vanilla dissolve better in warm liquid, distributing evenly. A typical error here is using too much liquid temperature, which can toughen the eggs; allow the cream to rest briefly so it is hot but not scalding. If your vanilla is artificial or overly strong, it can overpower the delicate cherries , so measure carefully.
- Make the batter: Let the cream cool for about 5 minutes before proceeding : Cooling the cream slightly reduces the risk of scrambling the eggs, and it gives the warmth needed to integrate flavors without cooking proteins. During this short pause you might notice a faint steam rising that almost carries the vanilla with it, a small sensory hint the batter will be fragrant. Skipping this resting period can lead to tiny cooked egg bits in your mixture, which will affect both texture and appearance. Keep the cream warm but not boiling to maintain the smooth result you want.
- Make the batter: You can use either a blender or a hand mixer for this step : Mixing in a blender yields an ultra-smooth batter with a slightly aerated quality, while a hand mixer gives you more control and less air, which can result in a denser, creamier set. Listen for a steady, even whir that indicates thorough blending; the batter should look glossy and homogeneous with no lumps. The choice affects the final mouthfeel, so pick the method that suits your preference, but always scrape down the sides to avoid unincorporated streaks. A mistake people make is overbeating, which introduces too much air and can cause excessive puffing and then quick collapse during cooling.
- Make the batter: It's important for the batter to be smooth and well blended : Smoothness ensures that when baked, the custard sets evenly without gritty pockets. The visual cue is a shiny surface with a ribbon-like consistency when poured, and you should hear a soft hum from your blender or mixer rather than clanking. Texture carries through to the finished dish, giving you that tender, slightly custard like bite. If you notice lumps, pass the mixture through a fine sieve to remove them; failing to do so results in an uneven bake and less refined mouthfeel.
- Make the batter: Add the cream, eggs, sugar, vanilla, flour, and salt to your bowl or blender : When these components come together the batter will thicken slightly and take on a pale, creamy hue. The eggs give body and richness, the sugar dissolves into the warm cream, and the flour provides gentle structure. As you combine them, you may catch a faint sweet aroma with a hint of nuttiness from the flour. One pitfall is adding dry flour straight into hot liquid without mixing, which causes clumps; instead, add gradually and blend until fully incorporated for a uniform texture.
- Make the batter: Mix until there are no more lumps : The final batter should be velvety and free of visible flour specs. Pour a small ribbon and watch how it falls back into the bowl; it should be smooth and consistent. This step ensures the clafoutis bakes evenly and yields the signature custardy interior. If you detect any stubborn lumps, use a whisk or a quick pulse in the blender to smooth them out. Overlooking this can leave gritty bits that distract from the delicate texture you are aiming for.
- Assemble and bake the clafoutis: Butter the skillet and arrange the cherries : Rubbing softened butter across the skillet releases a warm buttery scent and ensures the edges brown attractively. As you scatter the pitted cherries , notice how they nestle slightly into the buttered surface; this contact encourages caramelization at the edges where fruit meets pan. Arrange them evenly so each slice will have fruit through it, and avoid overcrowding, which can make the center too moist. A common issue is not buttering the dish well enough, causing sticking and loss of the pretty crust when serving.
- Assemble and bake the clafoutis: Pour the batter into the skillet over the cherries : The batter will flow around the cherries , creating glossy pockets of fruit throughout. Visually, the batter should cover the fruit, leaving some cherries peeking out. This distribution ensures there are no dry spots in the finished clafoutis. If you notice the batter is unusually thin, check that you measured the flour properly; too little flour yields an overly loose set that may not hold when sliced.
- Assemble and bake the clafoutis: Bake for about 45 minutes, or until fully cooked : As it bakes the kitchen fills with an enveloping warmth and a sweet dairy aroma. Look for a golden top that is set and slightly puffed, with the center no longer jiggling like loose custard. The edges will darken a touch and pull away from the pan, creating those desirable slightly crisp ridges. One common mistake is opening the oven repeatedly, which can cause the clafoutis to deflate; trust the time and check near the end. If the top browns too quickly, tent with foil to finish cooking without burning.
- Assemble and bake the clafoutis: Dust with powdered sugar and serve : The final touch of powdered sugar gives a soft, snowy finish and a delicate sweet note that complements the cherries . It enhances the visual appeal and creates a slight textural contrast on the surface. Serve warm or at room temperature from the skillet to showcase the golden edges and glossy fruit. Avoid adding powdered sugar too early, as it will dissolve into the warm surface and lose its decorative effect.
Notes
- Choose ripe but firm cherries. Overripe fruit can become mushy and release too much juice during baking, which can make the center of the clafoutis loose. Firm, ripe cherries hold their shape and give pleasant bursts of flavor without collapsing into the batter.
- Dry the cherries thoroughly. Excess water from washing will steam in the oven and may prevent the custard from setting uniformly. Pat each cherry with a towel and let them rest briefly so surface moisture evaporates before arranging in the skillet.
- Warm the dairy gently. Bringing the half and half just to a simmer extracts more aroma from the vanilla and helps dissolve sugar. Let it cool for a few minutes to avoid cooking the eggs when combined, which preserves the smooth texture.
- Use a blender for ultra smooth batter. If you prefer the silkiest texture, a quick blend eliminates lumps and aerates slightly, which can yield a lighter set. Just avoid overblending to reduce excessive puffing and collapse.
- Butter the pan generously. A thin layer of softened butter prevents sticking and encourages attractive browning at the edges, making it easier to serve neat slices directly from the skillet.
- Let it rest before dusting with sugar. Allow the clafoutis to cool briefly so powdered sugar remains on the surface rather than melting away, which keeps the finish visually appealing.