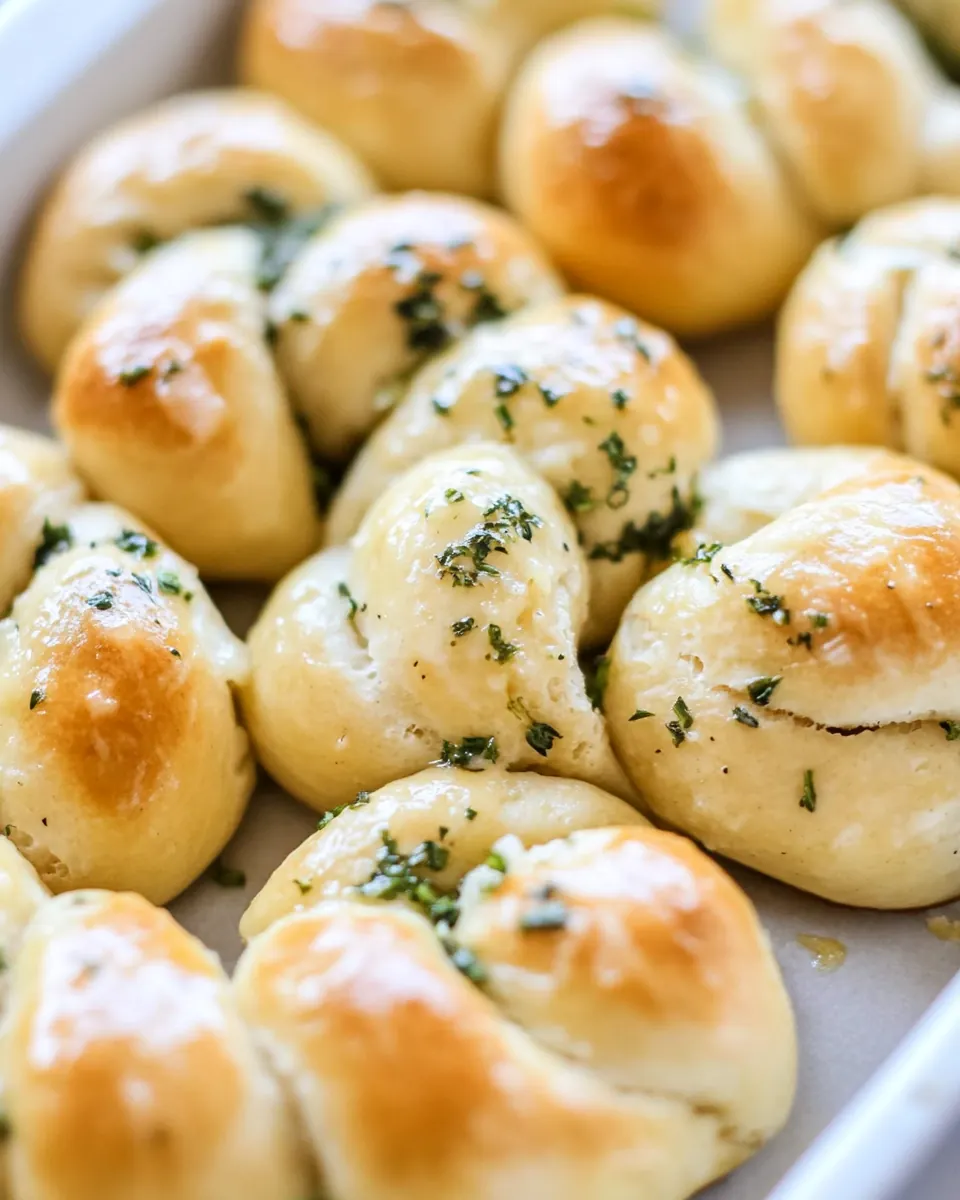
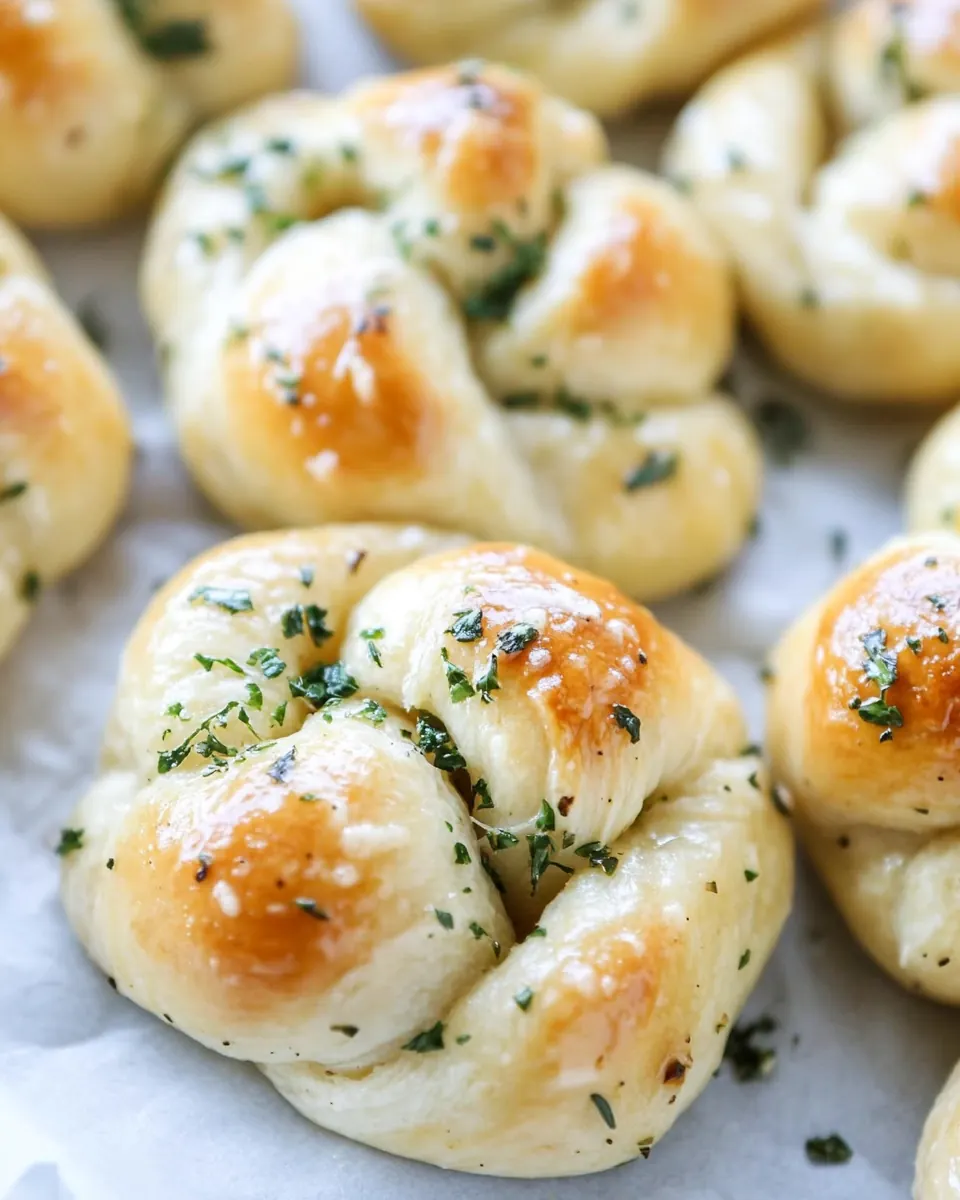
Brown Butter Herb Garlic Knots
Brown Butter Herb Garlic Knots are the kind of warm, savory little treasures I reach for when I want something comforting but a bit fancy at the same time.
Years ago I brought a batch of these to a windy fall potluck and watched them disappear faster than I could say “seconds”. The memory of that evening still lingers, the way the kitchen smelled like browned butter and garlic, and how people kept coming back for one more knot. I remember standing by the oven, flipping a knot onto a plate for a guest and feeling absolutely smug about how simple dough and a bold garnish could win a room.
At home I make them when guests drop by unexpectedly, or when I want to pair something buttery and aromatic with a simple soup. The texture is what hooks me first, the soft interior with threads of buttery aroma, and the slightly crisped exterior that holds a glossy herb coating. Making Brown Butter Herb Garlic Knots is one of those rituals I enjoy, each fold and twist promising little bites of comfort.
Recipe Snapshot
1 hr 55 mins
90 mins
25 mins
Medium
150 kcal
Italian
Gluten-Free, Low FODMAP
Appetizers
Large bowl, Spoon, Rolling pin, Baking sheet, Parchment paper, Saucepan
Why This Brown Butter Herb Garlic Knots Is a Winner
Irresistible flavor layering
I love how the flavors stack in Brown Butter Herb Garlic Knots. The nuttiness from the butter turning mahogany adds an almost toasty backbone, while the garlic sings bright and savory. Herbs like basil and oregano bring a sun warmed note that balances the richness, so every bite feels deliberate and comforting.
Texture that surprises
What I find most satisfying is the contrast between the tender crumb and the lightly crisp exterior. When you tear one open, the interior gives in softly, and you get those little ribbons of steam and aroma. It makes these knots a joy to eat hot from the oven, and they still hold up if you rewarm them later.
Great for gathering
I often make a double batch because these are crowd friendly. They travel well to potlucks, and they pair beautifully with soups, salads or as a side for a casual dinner. They are easy to serve family style, and people love tearing them apart, which creates a warm, communal vibe I always aim for.
Technique that elevates
The brown butter step might seem like a small flourish, but it transforms ordinary garlic knots into something memorable. Browning the butter concentrates flavor and adds those toasty notes that a plain brushed oil does not. I think of it as the secret handshake that tells your guests you cared enough to make something special.
Flexible and forgiving
I appreciate how forgiving the dough is. It tolerates a bit of variation in flour or rise time, so if your kitchen is cool or you are slightly rushed, you can still get excellent results. That ease paired with a standout finish makes these knots a keeper in my rotation.
Brown Butter Herb Garlic Knots Shopping List
These ingredients are designed to work together to create a simple, aromatic bread that shines because of technique. The dough is a straightforward yeast base that gives structure and chew, while the brown butter herb topping is the personality. Key players are the all purpose flour that gives the bulk, the yeast that gives life and lift, and the butter plus fresh herbs that finish each knot with brightness and savory depth.
- 1 1/8 cups warm water, about 100-105 degrees: Hydrate and activate the yeast by providing warm liquid at an ideal temperature, ensuring proper fermentation and dough rise for tender knots. Maintain the specified 100–105°F to avoid killing the yeast or preventing activation, and mix until slightly frothy to confirm activity.
- 3 teaspoons active dry yeast: Activate yeast granules to initiate fermentation and produce carbon dioxide for dough leavening and airy texture. Sprinkle into warm water with honey and allow to bloom until foamy, indicating readiness for mixing with flour.
- 1 1/2 tablespoons honey: Sweeten and feed the yeast, promoting stronger fermentation and contributing subtle flavor to the dough. Dissolve into the warm water so yeast can metabolize the sugars, improving rise and browning during baking.
- 1 1/2 tablespoon olive oil: Enrich the dough with fat for tenderness and improved handling while adding a hint of savory olive flavor. Incorporate into the dough to help with gluten development and create a slightly softer crumb in the finished knots.
- 3 cups all-purpose flour: Provide structure and bulk as the primary dry ingredient, forming the gluten network that traps gas for rise and chew. Measure accurately and combine with yeast mixture to create a pliable dough suitable for shaping into knots.
- 1 teaspoon salt: Balance flavor and strengthen gluten slightly while moderating yeast activity for even fermentation and taste. Dissolve into the dough mixture to enhance overall savory profile and improve texture of the baked knots.
- 1 teaspoon garlic powder: Impart a concentrated garlic note that layers with fresh garlic in the topping, supporting consistent savory seasoning throughout the dough. Blend into the flour to distribute mild garlic flavor without fresh-garlic moisture variability.
- 1 teaspoon dried basil: Add an earthy, sweet herb aroma that complements the garlic and other Mediterranean herbs, enhancing the dough's herbal complexity. Mix into the dough so the dried basil infuses subtle herbal undertones into each knot.
- 1 teaspoon dried oregano: Introduce warm, slightly peppery herb notes that pair with basil and oregano to create a classic Italian seasoning profile. Stir into the dough to ensure uniform herb distribution and cohesive savory character.
- 6 tablespoons unsalted butter: Brown butter to develop nutty, caramelized flavors and use as a luscious coating that enhances aroma and richness on the knots. Melt and brown carefully to avoid burning, then combine with garlic and fresh herbs for brushing.
- 4 garlic cloves, minced: Provide sharp, aromatic garlic punch in the finishing butter mixture, delivering fresh savory intensity that complements the browned butter. Mince finely so it releases flavor quickly when sautéed or mixed into the warm butter.
- 2 tablespoons freshly chopped basil: Contribute bright, sweet herbal freshness to the finishing butter, elevating the overall herbaceous profile and adding visual color. Chop freshly and mix into the warm butter to preserve volatile oils and lively basil notes.
- 1 tablespoon freshly chopped parsley: Bring clean, peppery-green flavor to the herb butter, adding depth and contrast to basil and parsley in the topping. Finely chop and incorporate into the browned butter so its freshness balances the richness.
- 1/2 tablespoon freshly chopped oregano: Introduce concentrated aromatic oregano freshness to the finishing herb mixture, reinforcing Mediterranean flavors in the glaze. Chop lightly and blend into the warm butter to release fragrant oils without overpowering other herbs.
- freshly grated parmesan cheese for topping: Provide salty, umami-rich finishing touch when grated over the warm knots, enhancing overall savory flavor and adding a pleasant granular texture. Sprinkle just before serving so the cheese melts slightly into the buttered surfaces for maximum flavor impact.
Making Brown Butter Herb Garlic Knots
These directions will guide you from a sticky, lively dough to glossy, herb brushed knots. I will walk you through the sensory cues to watch, why each technique matters, and a few troubleshooting notes to keep the process smooth and satisfying.
- In a large bowl, combine the water, yeast, honey and olive oil. Mix with a spoon, then let sit until foamy, about 10 minutes. Add in 2 1/2 cups of the flour, the salt, garlic powder and dried basil and oregano, stirring with a spoon until the dough comes together but it still sticky. Using your hands, form the dough into a ball and work the additional 1/2 cup flour (you don’t need to use all if it is not needed) into the dough, kneading it on a floured surface for a few minutes. Rub the same bowl with olive oil then place the dough inside, turning to coat. Cover with a towel and place in a warm place to rise for about 1 1/2 hours.: The bowl will smell faintly sweet and yeasty as the mixture becomes frothy, signaling active yeast . You want the surface to look bubbly and slightly thickened, not flat, because that foam confirms the yeast is alive and will give the dough lift. If nothing happens, the yeast may be old or the water too hot or too cold. A common mistake is testing with boiling water which kills the yeast ; aim for that pleasantly warm, wrist friendly temperature. Stirring briefly helps dissolve the honey and distributes the olive oil , which will become a subtle richness in the dough. If the mix smells sour or alcohol like, discard and start again because that indicates over fermented or spoiled yeast .
- Preheat oven to 425 degrees F. Line a baking sheet with parchment paper.: Touching the dough at this point should reveal a tacky, cohesive mass that pulls away from the bowl in strands. The scent will be faintly herby from the dried basil and oregano , and the texture is forgiving, allowing you to add more flour later. This texture ensures a tender interior after baking. A frequent error is adding all the flour at once which creates a dry, tough dough; resist that urge and let the dough tell you when it needs more flour.
- After the dough has risen, punch it down and place it back on the floured surface. Using a rolling pin, roll it out into a large thin rectangle or oval. Slice the dough into strips. Take each strip and gently 'tie' it into a knot, placing it on the baking sheet lined with parchment and repeating with the rest of the dough. Place the towel over the knots and let the baking sheet sit in the warm place for 20 minutes.: As you knead, the dough will transition from shaggy to elastic, with a smooth sheen and a subtle spring when pressed. Kneading develops gluten, which gives structure and chew to the knots, so take your time until you get a soft, pliable feel. If the dough sticks badly, sprinkle small amounts of the reserved flour rather than dumping it in. Overkneading will make the dough tight and less tender, so stop once it feels coordinated and slightly tacky.
- Bake the garlic knots for 20 to 25 minutes, or until golden on top. Remove the sheet from the oven and immediately brush the bread with the brown butter herb mixture. If you want, top with some freshly grated cheese. Serve!: Coating the dough with olive oil prevents a crust from forming on its surface during the rise and keeps the dough supple. The bowl should have a thin sheen of oil and the dough should glisten slightly where it touches. This step also adds a faint fruity note to the dough perimeter. A common slip is using too much oil which can pool and make the bottom overly soft, so use just enough to lightly coat.
- Heat a saucepan over medium heat and add the butter. Immediately begin whisking. Stir as it bubbles, and after 2 to 3 minutes or so you should see brown bits appear on the bottom of the pan. Remove from heat immediately and add in the garlic cloves. Continue to whisk for another 30 seconds. Stir in the basil, parsley and oregano.: As it rises, you will see the dough double in size and become airy, with tiny bubbles visible under the surface. The smell will shift to a deeper yeasty aroma. This fermentation time builds flavor and texture, giving the final knots an open, tender crumb. If your kitchen is cool, place the bowl in an oven with just the light on, or near a warm appliance; avoid placing it in direct heat which can speed fermentation too fast and yield off flavors.
- Preheat oven to 425 degrees F. Line a baking sheet with parchment paper: The oven heat will provide rapid steam and oven spring to create a light interior and golden exterior. Lining with parchment paper prevents sticking and helps even browning. As the oven warms you may smell a toasty scent from the heating elements, which promises crisping. Putting the knots into a cold oven is a mistake because they will not spring properly and may end up dense.
- After the dough has risen, punch it down and place it back on the floured surface. Using a rolling pin, roll it out into a large thin rectangle or oval: Punching down releases large gas pockets and gives you a workable dough that will shape evenly. Rolling creates an even thickness which ensures uniform baking, and you will feel the dough relax and spread under the pin. If the dough resists, let it rest for a few minutes to relax the gluten. Overrolling too thin can make the knots bake dry, so aim for a thin but still substantial sheet.
- Slice the dough into strips. Take each strip and gently 'tie' it into a knot, placing it on the baking sheet lined with parchment and repeating with the rest of the dough. Place the towel over the knots and let the baking sheet sit in the warm place for 20 minutes: The shaped knots will puff slightly as they proof, and they should feel light when pressed. This second rest helps produce a tender interior and prevents a dense finished texture. Arrange them with space to allow expansion. A common mistake is tying knots too tightly which prevents even expansion, so keep them relaxed and looped.
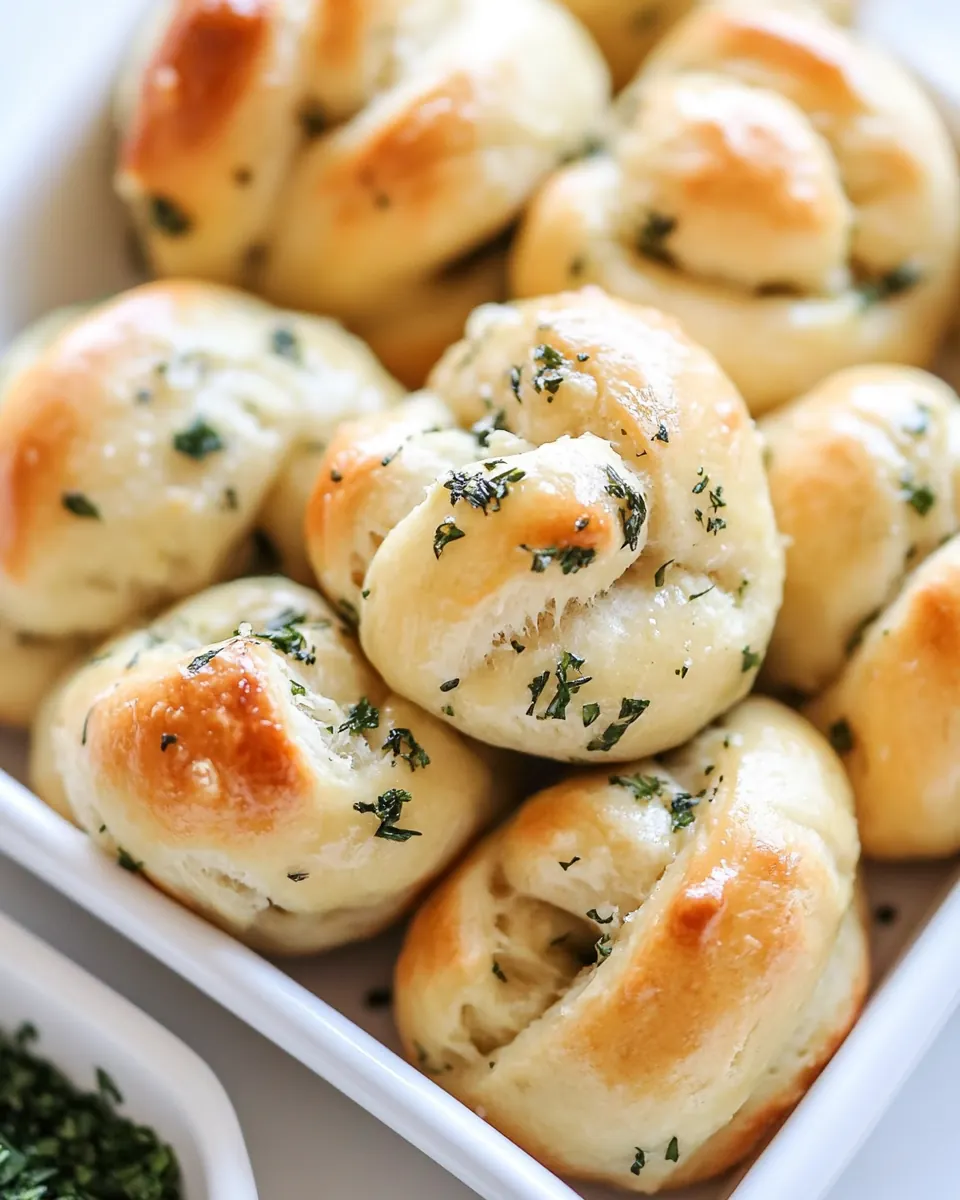
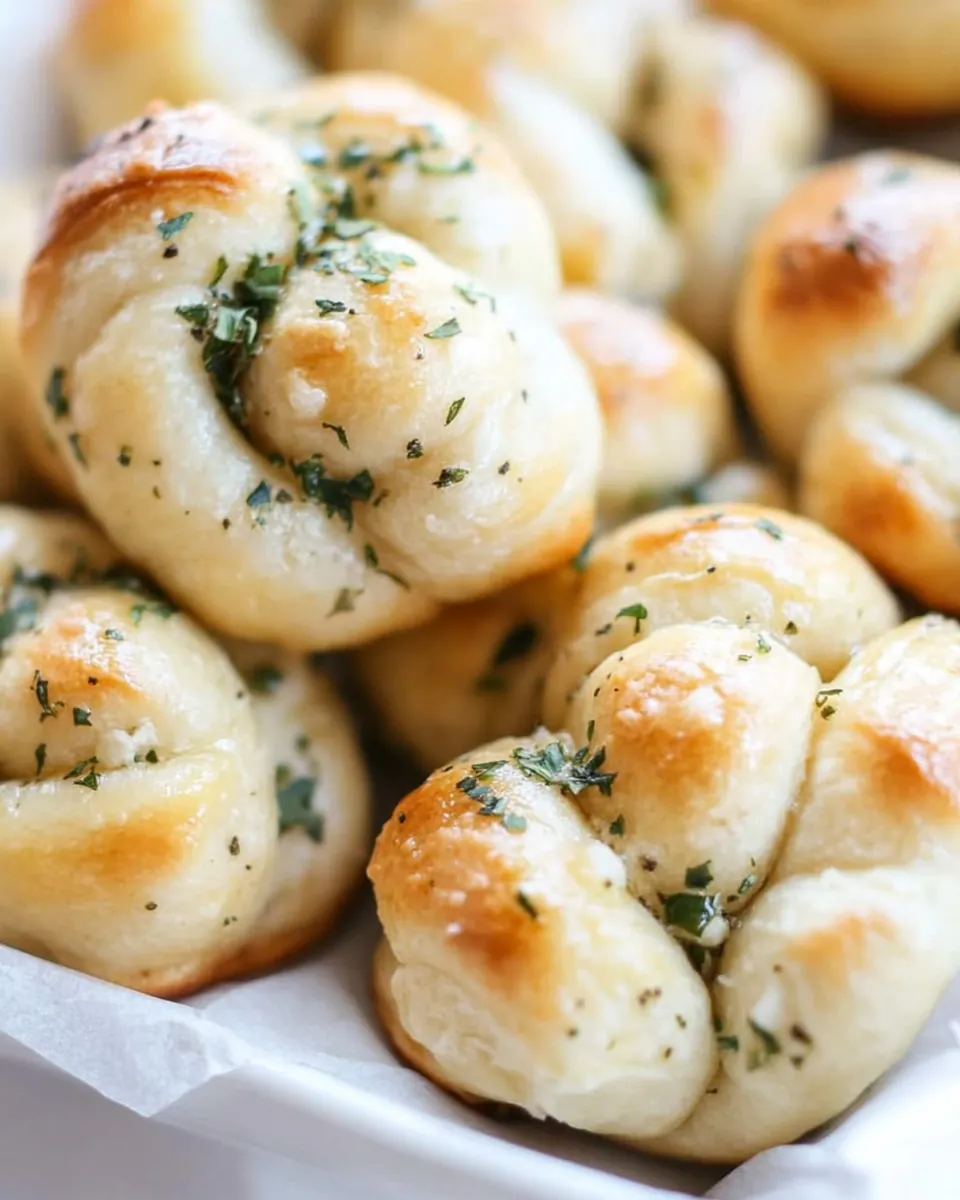
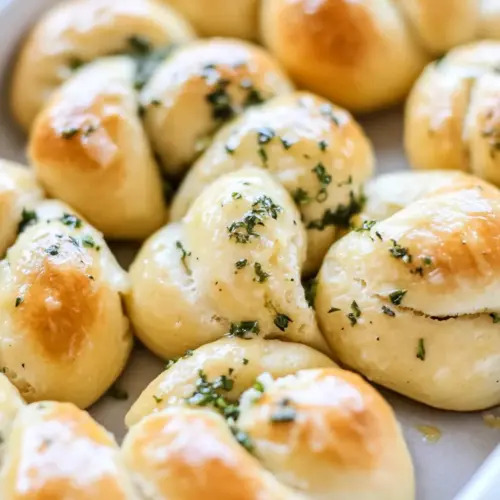
- Bake the garlic knots for 20 to 25 minutes, or until golden on top. Remove the sheet from the oven and immediately brush the bread with the brown butter herb mixture. If you want, top with some freshly grated cheese. Serve: The oven will fill with a nutty, yeasty aroma as the edges caramelize and the tops turn golden. The sound is a quiet crackle as the crust sets, and the surface should look uniformly golden not pale. Brushing immediately with the warm brown butter herb mixture allows the knots to absorb that glossy, savory coating; the heat draws in the flavors. Waiting too long to brush will reduce absorption and lead to a less integrated finish.
- Heat a saucepan over medium heat and add the butter. Immediately begin whisking. Stir as it bubbles, and after 2 to 3 minutes or so you should see brown bits appear on the bottom of the pan. Remove from heat immediately and add in the garlic cloves. Continue to whisk for another 30 seconds. Stir in the basil, parsley and oregano: As the butter heats it will foam, then subside and develop brown flecks that smell toasted and nutty; that aroma is the hallmark of brown butter . Adding the minced garlic off the heat preserves its bright flavor while allowing it to warm slightly, preventing bitter burned garlic . Stirring in the fresh herbs at the end keeps their color and fragrance vibrant, creating a lively, aromatic sauce. Burnt butter smells acrid and must be discarded, so remove the pan the moment you see the brown specks.
Ways to Customize
There are many small adjustments you can make to personalize Brown Butter Herb Garlic Knots. Below are practical, tested ideas I use when I want to shift flavor or adapt to what I have on hand.
- Use extra herbs for a bold finish, increase the fresh basil or parsley in the brown butter to amplify herbal brightness, remembering to add them off heat to preserve color.
- Swap the finishing cheese, if you prefer a stronger umami punch, use a sharper grated cheese sparingly to avoid overpowering the herb balance.
- Adjust the honey, add a touch more if you like a slightly sweeter crust that browns faster, but balance with care so the knots do not become cloying.
- Make them bite sized, cut the strips smaller and tie tighter for party perfect nibbles that bake faster and are great for grazing.
- Double the brown butter, if you love that nutty aroma, increase the butter slightly when making the topping so there is extra to brush as you serve.
- Use a mix of dried and fresh herbs, dried in the dough and fresh in the finishing butter gives both integrated flavor and immediate aromatic lift.
Serving Ideas for Brown Butter Herb Garlic Knots
These knots are versatile, and how you serve them can define the meal. They can be a warm appetizer, a comforting side, or a casual snack. Below are serving ideas, pairings, and storage notes to help you plan an occasion around them.
- As an appetizer, offer a basket of warm knots next to a bowl of herbed olive oil for dipping, letting guests tear and share.
- With soup, serve alongside a hearty bowl where their tender interior complements a brothy or creamy soup for lunch or a cozy dinner.
- For family dinners, place a plate of knots on the table to accompany roasted vegetables and a simple salad, making the meal feel complete.
- Holiday or gathering, they work well at fall or winter gatherings, offering a homey, shareable bread option that pairs with many mains.
- Storage, keep cooled knots in an airtight container for up to 2 days at room temperature, rewarm briefly in a hot oven to restore crispness.
- Seasonal pairing, in fall I pair them with roasted squash and warm soups, while in milder months I match them with lighter salads to balance the richness.
FAQ
Conclusion
What makes these Brown Butter Herb Garlic Knots special is the marriage of simple dough with a toasted, herb studded butter finish that turns everyday bread into something unforgettable. Try them when you want an effortless recipe with an impressive result, whether for a small family dinner or a larger gathering. Once you taste the mellow nuttiness of the browned butter against bright fresh herbs and warm garlic, I think you will find yourself reaching for this recipe often. Pull a few apart while they are still warm and share them with someone you care about, because they are happiest when eaten together.
Brown Butter Herb Garlic Knots
Equipment
- Large Bowl
- Spoon
- Rolling Pin
- Baking Sheet
- Parchment Paper
- Saucepan
Ingredients
- 1 1/8 cups warm water, about 100-105 degrees Hydrate and activate the yeast by providing warm liquid at an ideal temperature, ensuring proper fermentation and dough rise for tender knots. Maintain the specified 100–105°F to avoid killing the yeast or preventing activation, and mix until slightly frothy to confirm activity.
- 3 teaspoons active dry yeast Activate yeast granules to initiate fermentation and produce carbon dioxide for dough leavening and airy texture. Sprinkle into warm water with honey and allow to bloom until foamy, indicating readiness for mixing with flour.
- 1 1/2 tablespoons honey Sweeten and feed the yeast, promoting stronger fermentation and contributing subtle flavor to the dough. Dissolve into the warm water so yeast can metabolize the sugars, improving rise and browning during baking.
- 1 1/2 tablespoon olive oil Enrich the dough with fat for tenderness and improved handling while adding a hint of savory olive flavor. Incorporate into the dough to help with gluten development and create a slightly softer crumb in the finished knots.
- 3 cups all-purpose flour Provide structure and bulk as the primary dry ingredient, forming the gluten network that traps gas for rise and chew. Measure accurately and combine with yeast mixture to create a pliable dough suitable for shaping into knots.
- 1 teaspoon salt Balance flavor and strengthen gluten slightly while moderating yeast activity for even fermentation and taste. Dissolve into the dough mixture to enhance overall savory profile and improve texture of the baked knots.
- 1 teaspoon garlic powder Impart a concentrated garlic note that layers with fresh garlic in the topping, supporting consistent savory seasoning throughout the dough. Blend into the flour to distribute mild garlic flavor without fresh-garlic moisture variability.
- 1 teaspoon dried basil Add an earthy, sweet herb aroma that complements the garlic and other Mediterranean herbs, enhancing the dough's herbal complexity. Mix into the dough so the dried basil infuses subtle herbal undertones into each knot.
- 1 teaspoon dried oregano Introduce warm, slightly peppery herb notes that pair with basil and oregano to create a classic Italian seasoning profile. Stir into the dough to ensure uniform herb distribution and cohesive savory character.
- 6 tablespoons unsalted butter Brown butter to develop nutty, caramelized flavors and use as a luscious coating that enhances aroma and richness on the knots. Melt and brown carefully to avoid burning, then combine with garlic and fresh herbs for brushing.
- 4 garlic cloves, minced Provide sharp, aromatic garlic punch in the finishing butter mixture, delivering fresh savory intensity that complements the browned butter. Mince finely so it releases flavor quickly when sautéed or mixed into the warm butter.
- 2 tablespoons freshly chopped basil Contribute bright, sweet herbal freshness to the finishing butter, elevating the overall herbaceous profile and adding visual color. Chop freshly and mix into the warm butter to preserve volatile oils and lively basil notes.
- 1 tablespoon freshly chopped parsley Bring clean, peppery-green flavor to the herb butter, adding depth and contrast to basil and parsley in the topping. Finely chop and incorporate into the browned butter so its freshness balances the richness.
- 1/2 tablespoon freshly chopped oregano Introduce concentrated aromatic oregano freshness to the finishing herb mixture, reinforcing Mediterranean flavors in the glaze. Chop lightly and blend into the warm butter to release fragrant oils without overpowering other herbs.
- freshly grated parmesan cheese for topping Provide salty, umami-rich finishing touch when grated over the warm knots, enhancing overall savory flavor and adding a pleasant granular texture. Sprinkle just before serving so the cheese melts slightly into the buttered surfaces for maximum flavor impact.
Instructions
- In a large bowl, combine the water, yeast, honey and olive oil. Mix with a spoon, then let sit until foamy, about 10 minutes. Add in 2 1/2 cups of the flour, the salt, garlic powder and dried basil and oregano, stirring with a spoon until the dough comes together but it still sticky. Using your hands, form the dough into a ball and work the additional 1/2 cup flour (you don’t need to use all if it is not needed) into the dough, kneading it on a floured surface for a few minutes. Rub the same bowl with olive oil then place the dough inside, turning to coat. Cover with a towel and place in a warm place to rise for about 1 1/2 hours.: The bowl will smell faintly sweet and yeasty as the mixture becomes frothy, signaling active yeast . You want the surface to look bubbly and slightly thickened, not flat, because that foam confirms the yeast is alive and will give the dough lift. If nothing happens, the yeast may be old or the water too hot or too cold. A common mistake is testing with boiling water which kills the yeast ; aim for that pleasantly warm, wrist friendly temperature. Stirring briefly helps dissolve the honey and distributes the olive oil , which will become a subtle richness in the dough. If the mix smells sour or alcohol like, discard and start again because that indicates over fermented or spoiled yeast .
- Preheat oven to 425 degrees F. Line a baking sheet with parchment paper.: Touching the dough at this point should reveal a tacky, cohesive mass that pulls away from the bowl in strands. The scent will be faintly herby from the dried basil and oregano , and the texture is forgiving, allowing you to add more flour later. This texture ensures a tender interior after baking. A frequent error is adding all the flour at once which creates a dry, tough dough; resist that urge and let the dough tell you when it needs more flour.
- After the dough has risen, punch it down and place it back on the floured surface. Using a rolling pin, roll it out into a large thin rectangle or oval. Slice the dough into strips. Take each strip and gently 'tie' it into a knot, placing it on the baking sheet lined with parchment and repeating with the rest of the dough. Place the towel over the knots and let the baking sheet sit in the warm place for 20 minutes.: As you knead, the dough will transition from shaggy to elastic, with a smooth sheen and a subtle spring when pressed. Kneading develops gluten, which gives structure and chew to the knots, so take your time until you get a soft, pliable feel. If the dough sticks badly, sprinkle small amounts of the reserved flour rather than dumping it in. Overkneading will make the dough tight and less tender, so stop once it feels coordinated and slightly tacky.
- Bake the garlic knots for 20 to 25 minutes, or until golden on top. Remove the sheet from the oven and immediately brush the bread with the brown butter herb mixture. If you want, top with some freshly grated cheese. Serve!: Coating the dough with olive oil prevents a crust from forming on its surface during the rise and keeps the dough supple. The bowl should have a thin sheen of oil and the dough should glisten slightly where it touches. This step also adds a faint fruity note to the dough perimeter. A common slip is using too much oil which can pool and make the bottom overly soft, so use just enough to lightly coat.
- Heat a saucepan over medium heat and add the butter. Immediately begin whisking. Stir as it bubbles, and after 2 to 3 minutes or so you should see brown bits appear on the bottom of the pan. Remove from heat immediately and add in the garlic cloves. Continue to whisk for another 30 seconds. Stir in the basil, parsley and oregano.: As it rises, you will see the dough double in size and become airy, with tiny bubbles visible under the surface. The smell will shift to a deeper yeasty aroma. This fermentation time builds flavor and texture, giving the final knots an open, tender crumb. If your kitchen is cool, place the bowl in an oven with just the light on, or near a warm appliance; avoid placing it in direct heat which can speed fermentation too fast and yield off flavors.
- Preheat oven to 425 degrees F. Line a baking sheet with parchment paper: The oven heat will provide rapid steam and oven spring to create a light interior and golden exterior. Lining with parchment paper prevents sticking and helps even browning. As the oven warms you may smell a toasty scent from the heating elements, which promises crisping. Putting the knots into a cold oven is a mistake because they will not spring properly and may end up dense.
- After the dough has risen, punch it down and place it back on the floured surface. Using a rolling pin, roll it out into a large thin rectangle or oval: Punching down releases large gas pockets and gives you a workable dough that will shape evenly. Rolling creates an even thickness which ensures uniform baking, and you will feel the dough relax and spread under the pin. If the dough resists, let it rest for a few minutes to relax the gluten. Overrolling too thin can make the knots bake dry, so aim for a thin but still substantial sheet.
- Slice the dough into strips. Take each strip and gently 'tie' it into a knot, placing it on the baking sheet lined with parchment and repeating with the rest of the dough. Place the towel over the knots and let the baking sheet sit in the warm place for 20 minutes: The shaped knots will puff slightly as they proof, and they should feel light when pressed. This second rest helps produce a tender interior and prevents a dense finished texture. Arrange them with space to allow expansion. A common mistake is tying knots too tightly which prevents even expansion, so keep them relaxed and looped.
- Bake the garlic knots for 20 to 25 minutes, or until golden on top. Remove the sheet from the oven and immediately brush the bread with the brown butter herb mixture. If you want, top with some freshly grated cheese. Serve: The oven will fill with a nutty, yeasty aroma as the edges caramelize and the tops turn golden. The sound is a quiet crackle as the crust sets, and the surface should look uniformly golden not pale. Brushing immediately with the warm brown butter herb mixture allows the knots to absorb that glossy, savory coating; the heat draws in the flavors. Waiting too long to brush will reduce absorption and lead to a less integrated finish.
- Heat a saucepan over medium heat and add the butter. Immediately begin whisking. Stir as it bubbles, and after 2 to 3 minutes or so you should see brown bits appear on the bottom of the pan. Remove from heat immediately and add in the garlic cloves. Continue to whisk for another 30 seconds. Stir in the basil, parsley and oregano: As the butter heats it will foam, then subside and develop brown flecks that smell toasted and nutty; that aroma is the hallmark of brown butter . Adding the minced garlic off the heat preserves its bright flavor while allowing it to warm slightly, preventing bitter burned garlic . Stirring in the fresh herbs at the end keeps their color and fragrance vibrant, creating a lively, aromatic sauce. Burnt butter smells acrid and must be discarded, so remove the pan the moment you see the brown specks.
Notes
- Use extra herbs for a bold finish, increase the fresh basil or parsley in the brown butter to amplify herbal brightness, remembering to add them off heat to preserve color.
- Swap the finishing cheese, if you prefer a stronger umami punch, use a sharper grated cheese sparingly to avoid overpowering the herb balance.
- Adjust the honey, add a touch more if you like a slightly sweeter crust that browns faster, but balance with care so the knots do not become cloying.
- Make them bite sized, cut the strips smaller and tie tighter for party perfect nibbles that bake faster and are great for grazing.
- Double the brown butter, if you love that nutty aroma, increase the butter slightly when making the topping so there is extra to brush as you serve.
- Use a mix of dried and fresh herbs, dried in the dough and fresh in the finishing butter gives both integrated flavor and immediate aromatic lift.