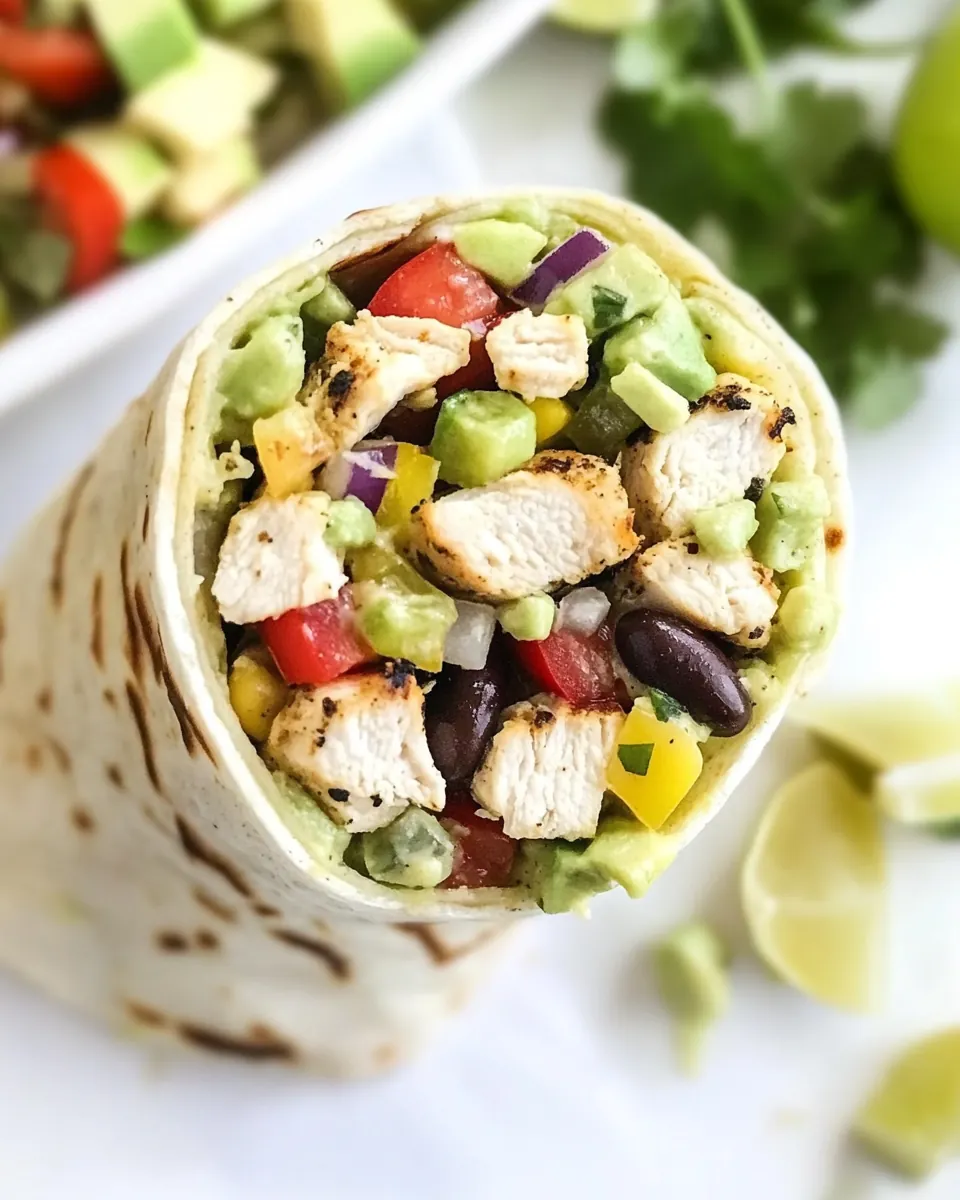
Baja Chicken Wrap
Baja Chicken Wrap has been my go to when I want something bright, handheld, and utterly satisfying after a long day in the kitchen. The first time I made it I was racing the sunset to get dinner on the table, and the combination of citrusy lime juice, smoky cumin, and a quick sear on the chicken turned a rushed meal into a small celebration. I remember the sizzling as the chicken hit the hot pan, and how that scent mingled with garlic and jalapeño to promise bold flavor in every bite.
Since that evening I have played with the assembly many times, learning how each element contributes to the whole. The creamy avocado spread cools the heat from the jalapeños, while the crisp romaine and juicy grape tomatoes add a refreshing crunch that balances the warm, tender chicken. I love how the tangy orange juice in the marinade subtly lifts the profile, making each forkful feel bright and clean.
What keeps bringing me back to this Baja Chicken Wrap is its versatility. I have packed it for picnics, trimmed it for lighter lunches, and served it at casual dinners where everyone can customize their fillings. There is something about wrapping up vibrant ingredients in a soft tortilla that makes meal time feel approachable and fun. Over time I learned little tricks, like letting the chicken rest before slicing, to preserve juices, and blending a sauce that ties everything together. Those small decisions make the difference between a good wrap and one I crave the next day.
Recipe Snapshot
30 mins
10 mins
20 mins
Medium
450 kcal
Mexican
Gluten-Free, Low FODMAP
Dinner
Skillet, Oven, Blender or Food Processor, Zip Top Bag or Covered Container, Instant Read Thermometer
Why You’ll Love This Baja Chicken Wrap
Bold, layered flavor
I love how the Baja Chicken Wrap builds taste in layers. The marinade infuses the chicken with citrus and spice, the sear adds caramelized notes, and the creamy sauce brings it all together. When I bite in, I notice brightness first, heat next, and a cooling finish from the avocado and yogurt sauce. That interplay keeps every mouthful interesting, and I always find myself thinking about the next bite.
Fast but flavorful
We often need dinner on the table fast, and this dish delivers. With a short marinade and a quick sear, you get deeply flavored chicken without hours of prep. I appreciate recipes that reward a little planning but don’t demand an entire afternoon, and this wrap fits that sweet spot. It’s perfect for busy weeknights when you want something more exciting than a sandwich.
Textural contrast
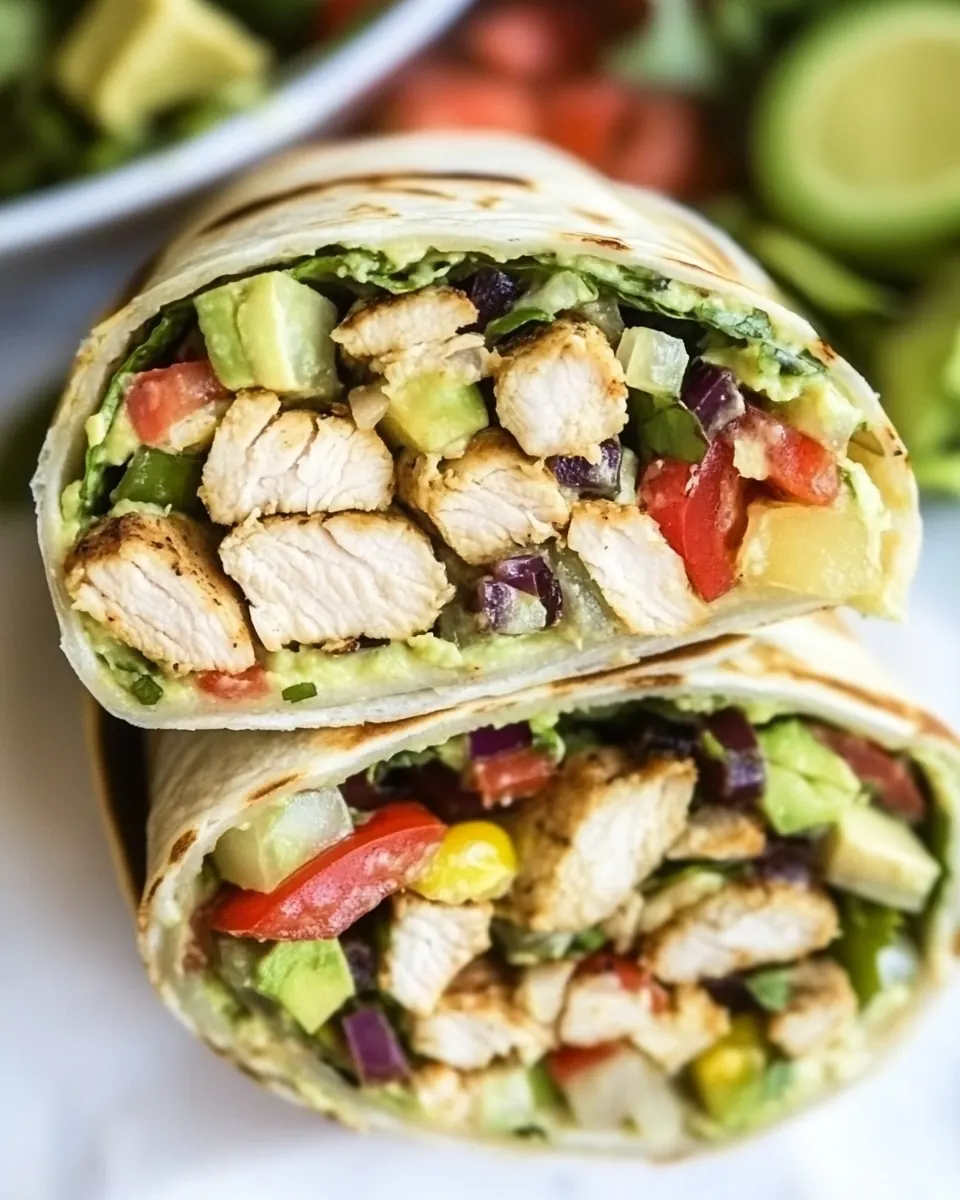
One reason I’m drawn to the Baja Chicken Wrap is the contrast in textures. The tender, juicy chicken contrasts with crisp romaine and firm grape tomatoes, while the smashed avocado and creamy cilantro sauce add silkiness. Those shifts keep the wrap from feeling one dimensional, and they let each ingredient shine in its own way.
Customizable and crowd friendly
I like recipes that adapt to different tastes, and this wrap does that effortlessly. You can dial the jalapeño up or down, swap the tortilla style, or serve components buffet style so everyone builds their own. When I host, people appreciate being able to choose their heat level and fill their wrap exactly how they like it, which makes this a go to for casual gatherings.
Balanced nutrition
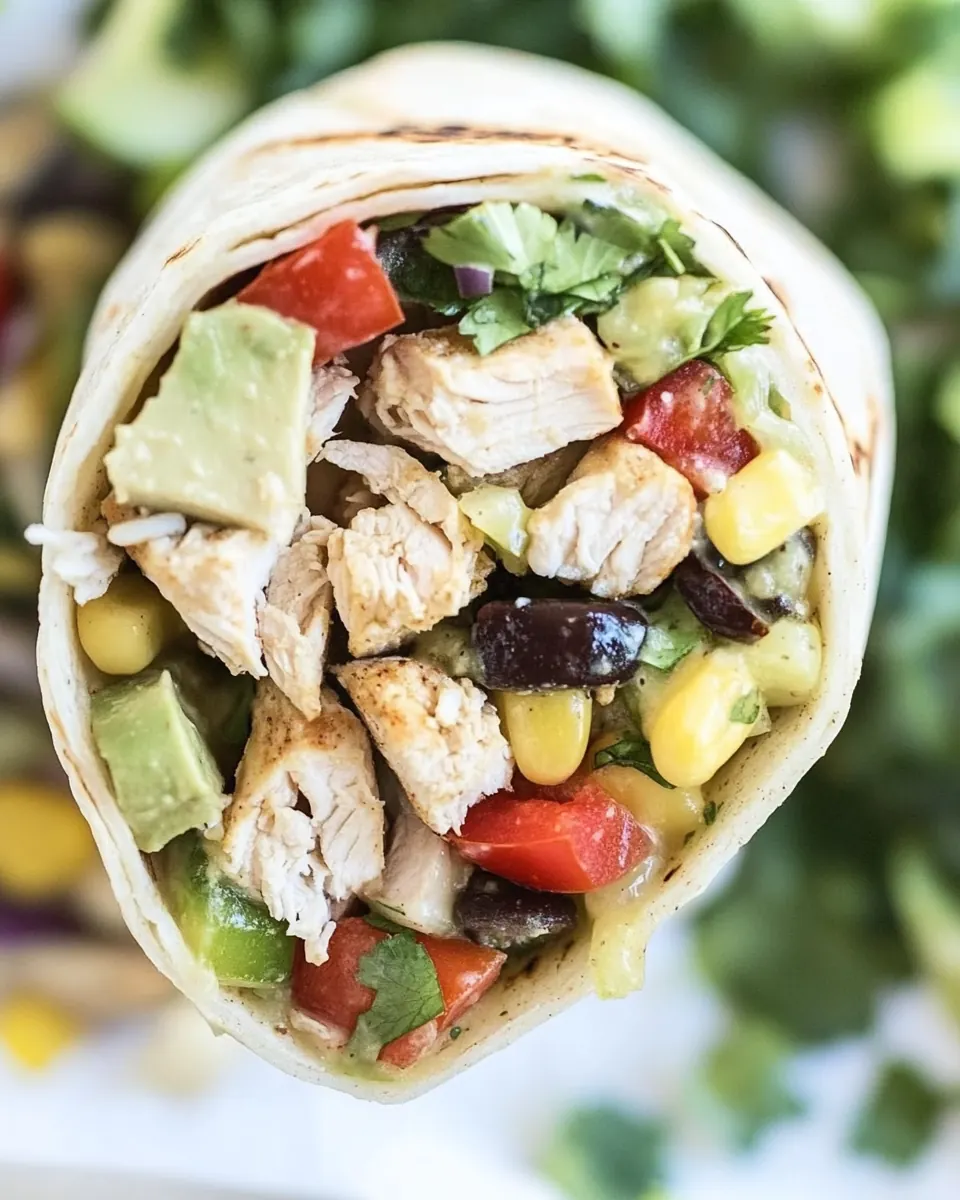
Finally, the Baja Chicken Wrap strikes a satisfying balance of protein, fresh vegetables, and healthy fats. The chicken supplies lean protein, the black bean and corn salsa adds fiber, and the avocado brings creamy, heart healthy fat. For me, meals that taste indulgent but are still reasonably wholesome are the ones I cook again and again.
Everything You Need for Baja Chicken Wrap

These ingredients work in harmony to create a handheld meal that feels both bright and comforting. The key players are the marinated chicken for savory depth, the smashed avocado and creamy cilantro yogurt for richness, and the black bean and corn salsa plus fresh romaine and grape tomatoes for brightness and crunch. Each component has a job, and together they make the wrap balanced and memorable.
- 1 1/2 pounds boneless, skinless chicken breast: Trimmed and flattened to cook evenly, provides lean protein and forms the filling base for the wrap when sliced or shredded.
- 2 tablespoons lime juice, juice of about 2 limes: Squeezed over the chicken to tenderize and add bright acidity, enhancing overall flavor and balancing richness.
- 1/4 cup orange juice, juice of about 1 orange: Pressed into marinades to impart subtle citrus sweetness and depth, helping to tenderize the chicken and complement other flavors.
- 2 jalapeños, sliced: Sliced thin to add a bright, spicy heat and crisp texture that livens the marinade and filling components.
- 4 cloves garlic, minced: Minced to release pungent aromatic compounds that infuse the marinade and sauce with savory depth and complexity.
- 2 teaspoons oregano: Ground and added to the rub to contribute a warm, slightly bitter herbal note that pairs well with citrus and garlic.
- 2 teaspoons cumin: Ground and included in the seasoning to add earthy, warm, and slightly smoky flavors that anchor the marinade.
- 1 teaspoon salt: Sprinkled into the seasoning to enhance and balance savory flavors while helping other spices pop.
- 1/2 teaspoon pepper: Ground and added sparingly to the seasoning to provide a sharp, warming background note that enhances flavor contrast.
- 3 tablespoons cooking oil, divided: Divided between cooking and dressing to sear the chicken and sauté aromatics while adding a neutral fat for cooking.
- 1/2 cup greek yogurt: Thickened and tangy, used to create a creamy sauce or dressing that cools heat and adds a silky texture to the wrap.
- 1/2 cup salsa verde: Blended into the sauce to provide tangy, herbal-chile flavor and brightness that complements the yogurt and cilantro.
- 1/2 cup cilantro, (about 1/2 bunch): Chopped to add fresh, citrusy-herb aroma and bright green flavor that ties together the sauces and garnish.
- 1 tablespoon fresh lime juice, (juice of about 1 lime): Squeezed fresh into the dressing for a final bright acidic lift that sharpens flavors and balances richness.
- 1 clove garlic: Crushed to impart a fresh, assertive garlic bite in dressings or salsas, amplifying savory notes across components.
- 4 large tortillas, (or other wrap): Wrapped around fillings to hold ingredients together and provide a soft, pliable vessel for eating the assembled wrap.
- 1 avocado, smashed: Mashed into a creamy spread to add richness, healthy fats, and a buttery mouthfeel that complements spicy and acidic elements.
- 1 cup black bean and corn salsa, prepared: Mixed in as a hearty, flavorful component to add sweetness, smokiness, and textural contrast from beans and corn.
- 1 heart of romaine, chopped: Chopped to contribute crisp, leafy crunch and mild bitter notes that add freshness and body to every bite.
- 1 cup grape tomatoes, halved: Halved to release juicy sweetness and slight acidity, offering poppable bursts that brighten the assembled wrap.
- 1/4 cup feta cheese: Crumpled over the finished wrap to add salty, tangy, creamy notes and a crumbly texture contrast.
The Process for Making Baja Chicken Wrap
These steps walk you through the marinade, sear, bake, and assembly in a way that brings out bright flavors and satisfying textures. Take your time with sensory cues like sear color and the feel of a rested chicken so the final wrap stays juicy and flavorful.
- Preheat the oven to 350˚F.: Warmth in the oven creates an even finish for the chicken , and you will notice the kitchen gaining a steady warmth that signals readiness. The oven should feel stable, not hot to the point of warping pans; an accurate oven temperature helps ensure the chicken cooks through without drying. If your oven runs hot, consider reducing by a few degrees and check with an instant thermometer to avoid overcooking. Common mistake, rushing the preheat; that can lead to uneven cooking.
- Place the chicken breast in a zip top bag, or covered container. Add the lime juice, orange juice, jalapeno slices, garlic, oregano, cumin, salt, pepper, and half of the cooking oil.: The aroma of citrus and spice will become noticeable as the juices mingle with the chicken , signaling that the meat is starting to absorb flavor. Using a sealed bag ensures full contact between marinade and meat, which helps tenderize and season efficiently. Make sure the chicken lies flat so all surfaces contact the marinade. A frequent error is using too little liquid, which prevents even coating.
- Mix well until the chicken is evenly coated in the marinade. Let marinate in the refrigerator for at least 20 minutes, or up to 3 hours.: You will smell garlic and citrus more strongly after mixing, and the texture of the chicken will begin to feel slightly tacky from the marinade. Short marinating time imparts brightness, while a longer rest deepens flavor. Avoid overmaringting beyond the suggested time, citrus can start to cook the surface and make it mealy.
- Heat the remaining oil in a large oven-safe skillet over medium high heat. Once hot, add the chicken breast to the skillet and let sit on the first side 2-3 minutes without moving to sear. Once a nice golden brown sear has formed, flip the chicken and cook an additional 2-3 minutes.: When the oil is shimmering and slightly smoking, it is ready; adding the chicken then should produce a pronounced sizzle. That sound is a good indicator that the Maillard reaction is happening, creating a flavorful crust. Resist the urge to move the chicken early, or you will lose that caramelized color. A common slip is overcrowding the pan, which causes steaming rather than searing.
- Transfer the skillet to the oven and cook for an additional 10-15 minutes or until chicken reaches 165˚F internal temperature. Note: if you don't have an oven-proof skillet, you can transfer the chicken to a baking sheet or casserole dish, but it may take a couple of extra minutes to cook.: You will see a rich, golden color develop and smell nuttier, toasted notes from the surface. Flipping at the right time preserves juices and crust integrity. The chicken should release easily from the pan when it is ready to turn; if it sticks, wait a little longer. Avoid flipping multiple times, which can prevent a good crust from forming.
- Note: if you don't have an oven-proof skillet, you can transfer the chicken to a baking sheet or casserole dish, but it may take a couple of extra minutes to cook.: if you don't have an oven-proof skillet, you can transfer the chicken to a baking sheet or casserole dish, but it may take a couple of extra minutes to cook. : In the oven the heat circulates around the chicken , finishing it gently so the center cooks without drying. You will hear a lower, even sound as the pan settles, and the aroma will deepen into roasted citrus and spice. Using an instant read thermometer is the most reliable way to avoid under or overcooking. A common mistake is relying on color alone, which can be misleading; always confirm with temperature.
- Let sit 5 minutes, then slice.: if you don't have an oven-proof skillet, you can transfer the chicken to a baking sheet or casserole dish, but it may take a couple of extra minutes to cook. : Switching to a baking sheet changes heat conduction, so expect slightly longer cook time and watch for the first signs of dryness around the edges. The texture may be a touch firmer because of the different heat distribution. To prevent dryness, tent the chicken with foil after it reaches temperature and let it rest briefly. A typical error is leaving it on high heat too long when transferring, which dries the meat.
- Place all sauce ingredients in a blender or food processor and blend until smooth.: Resting is essential, you will notice juices redistribute and the meat relaxes, making slicing easier and juicier. The surface will cool slightly and the aroma will settle into a balanced scent. Slice against the grain for tender pieces that are pleasant to bite into. Rushing the rest can cause the juices to run out and the chicken to be drier.
- Smash the avocado and spread 1/4 of the mixture over each tortilla. Place sliced Baja chicken on top of the avocado.: As the blades whirl you will smell herbaceous cilantro and tangy yogurt melding into a silky sauce. The texture should be smooth and pourable, not thin; if it seems too thick, a splash of water or lime juice will loosen it. This emulsion ties the wrap together, coating ingredients so each bite is cohesive. Over-pureeing can warm the sauce slightly, which may change the fresh profile.
- Layer on the black bean and corn salsa, tomatoes, and romaine.: The avocado layer should feel cool and creamy under your fingers, creating a cushion that prevents the tortilla from becoming soggy. The contrast between the cool avocado and warm chicken is delightful to the palate. Be sure the avocado is well seasoned or it can taste flat against the zesty chicken . A common oversight is using an underripe avocado which lacks creaminess.
- Drizzle the creamy cilantro sauce over the fillings, then sprinkle feta cheese.: As you add these, notice the visual contrast, the pop of tomato color, and the corn kernels that add a sweet crunch. The cold, crisp romaine refreshes the mouth and balances the richer elements, keeping the wrap bright. Distribute ingredients evenly to avoid lumps of one item in a single bite. Overfilling can make wrapping difficult and cause tearing.
- Fold the ends of the tortilla in, then roll tightly. Serve as is, or cut in half.: The sauce should add a cooling, tangy layer that binds the elements while the feta contributes briny pops of saltiness. When drizzled evenly, each bite has a balance of creamy and tangy notes. If the sauce is overly heavy, use less and add more at the table to suit tastes. Too much cheese can overwhelm the fresh flavors.
- Fold the ends of the tortilla in, then roll tightly. Serve as is, or cut in half.: A tight roll keeps everything contained, and when you slice it, the cross section should reveal colorful layers. The wrap should feel substantial but not overstuffed, offering a satisfying handheld meal. If the tortilla resists rolling, warm it briefly to increase pliability. Cutting too soon can cause fillings to spill, so allow a moment for the wrap to settle.
Recipe Variations about Baja Chicken Wrap
This wrap is forgiving and lends itself to a few easy tweaks without losing its identity. Below are practical variations and small adjustments you can try depending on what you have on hand and the flavor direction you prefer.
- Make it smokier: Add a pinch more cumin and char the jalapeños briefly on the skillet before adding to the marinade for a deeper smoky note.
- Extra creamy: Stir a spoonful more greek yogurt into the sauce for a silkier texture and milder tang that mellows the heat.
- Lower the heat: Remove the seeds from the jalapeños before slicing to keep the flavor without as much capsaicin kick.
- Wraplighter: Use whole wheat or low carb tortillas and reduce feta to lower overall calories while retaining texture contrast.
- Batch friendly: Double the marinade and cook extra chicken to have sliced meat ready for several days of quick meals.
Perfect Matches for Baja Chicken Wrap
This wrap pairs well with bright, simple sides and suits many casual occasions. Below I outline serving ideas, occasions, storage tips, and seasonal pairings to help you plan meals around this dish.
- Best side dishes: Serve with a light green salad or extra black bean and corn salsa to echo the wrap flavors without overwhelming the palate.
- Occasions: Great for lunch, easy weeknight dinners, casual entertaining, and summer picnics when fresh produce is at its peak.
- Serving style: Offer the components buffet style so guests can build their own wraps and control the spice and sauce amounts.
- Storage tips: Keep sliced chicken and sauce separate in airtight containers, store tortillas wrapped in foil, and assemble just before serving to avoid sogginess.
- Seasonal pairing: In summer, lean into fresh tomatoes and cilantro; in cooler months, add heartier roasted vegetables while keeping the creamy sauce for balance.
FAQ
Conclusion
The Baja Chicken Wrap stands out because it balances bright citrus, smoky spices, and creamy elements in a handheld format. Give it a try when you want a flavorful, quick meal that still feels thoughtful and composed. I hope this recipe becomes one you reach for when you want something satisfying, colorful, and easy to share with friends or family.

Baja Chicken Wrap
Equipment
- Skillet
- Oven
- Blender or food processor
- Zip Top Bag or Covered Container
- Instant read thermometer
Ingredients
- 1 1/2 pounds boneless, skinless chicken breast Trimmed and flattened to cook evenly, provides lean protein and forms the filling base for the wrap when sliced or shredded.
- 2 tablespoons lime juice, juice of about 2 limes Squeezed over the chicken to tenderize and add bright acidity, enhancing overall flavor and balancing richness.
- 1/4 cup orange juice, juice of about 1 orange Pressed into marinades to impart subtle citrus sweetness and depth, helping to tenderize the chicken and complement other flavors.
- 2 jalapeños, sliced Sliced thin to add a bright, spicy heat and crisp texture that livens the marinade and filling components.
- 4 cloves garlic, minced Minced to release pungent aromatic compounds that infuse the marinade and sauce with savory depth and complexity.
- 2 teaspoons oregano Ground and added to the rub to contribute a warm, slightly bitter herbal note that pairs well with citrus and garlic.
- 2 teaspoons cumin Ground and included in the seasoning to add earthy, warm, and slightly smoky flavors that anchor the marinade.
- 1 teaspoon salt Sprinkled into the seasoning to enhance and balance savory flavors while helping other spices pop.
- 1/2 teaspoon pepper Ground and added sparingly to the seasoning to provide a sharp, warming background note that enhances flavor contrast.
- 3 tablespoons cooking oil, divided Divided between cooking and dressing to sear the chicken and sauté aromatics while adding a neutral fat for cooking.
- 1/2 cup greek yogurt Thickened and tangy, used to create a creamy sauce or dressing that cools heat and adds a silky texture to the wrap.
- 1/2 cup salsa verde Blended into the sauce to provide tangy, herbal-chile flavor and brightness that complements the yogurt and cilantro.
- 1/2 cup cilantro, (about 1/2 bunch) Chopped to add fresh, citrusy-herb aroma and bright green flavor that ties together the sauces and garnish.
- 1 tablespoon fresh lime juice, (juice of about 1 lime) Squeezed fresh into the dressing for a final bright acidic lift that sharpens flavors and balances richness.
- 1 clove garlic Crushed to impart a fresh, assertive garlic bite in dressings or salsas, amplifying savory notes across components.
- 4 large tortillas, (or other wrap) Wrapped around fillings to hold ingredients together and provide a soft, pliable vessel for eating the assembled wrap.
- 1 avocado, smashed Mashed into a creamy spread to add richness, healthy fats, and a buttery mouthfeel that complements spicy and acidic elements.
- 1 cup black bean and corn salsa, prepared Mixed in as a hearty, flavorful component to add sweetness, smokiness, and textural contrast from beans and corn.
- 1 heart of romaine, chopped Chopped to contribute crisp, leafy crunch and mild bitter notes that add freshness and body to every bite.
- 1 cup grape tomatoes, halved Halved to release juicy sweetness and slight acidity, offering poppable bursts that brighten the assembled wrap.
- 1/4 cup feta cheese Crumpled over the finished wrap to add salty, tangy, creamy notes and a crumbly texture contrast.
Instructions
- Preheat the oven to 350˚F.: Warmth in the oven creates an even finish for the chicken , and you will notice the kitchen gaining a steady warmth that signals readiness. The oven should feel stable, not hot to the point of warping pans; an accurate oven temperature helps ensure the chicken cooks through without drying. If your oven runs hot, consider reducing by a few degrees and check with an instant thermometer to avoid overcooking. Common mistake, rushing the preheat; that can lead to uneven cooking.
- Place the chicken breast in a zip top bag, or covered container. Add the lime juice, orange juice, jalapeno slices, garlic, oregano, cumin, salt, pepper, and half of the cooking oil.: The aroma of citrus and spice will become noticeable as the juices mingle with the chicken , signaling that the meat is starting to absorb flavor. Using a sealed bag ensures full contact between marinade and meat, which helps tenderize and season efficiently. Make sure the chicken lies flat so all surfaces contact the marinade. A frequent error is using too little liquid, which prevents even coating.
- Mix well until the chicken is evenly coated in the marinade. Let marinate in the refrigerator for at least 20 minutes, or up to 3 hours.: You will smell garlic and citrus more strongly after mixing, and the texture of the chicken will begin to feel slightly tacky from the marinade. Short marinating time imparts brightness, while a longer rest deepens flavor. Avoid overmaringting beyond the suggested time, citrus can start to cook the surface and make it mealy.
- Heat the remaining oil in a large oven-safe skillet over medium high heat. Once hot, add the chicken breast to the skillet and let sit on the first side 2-3 minutes without moving to sear. Once a nice golden brown sear has formed, flip the chicken and cook an additional 2-3 minutes.: When the oil is shimmering and slightly smoking, it is ready; adding the chicken then should produce a pronounced sizzle. That sound is a good indicator that the Maillard reaction is happening, creating a flavorful crust. Resist the urge to move the chicken early, or you will lose that caramelized color. A common slip is overcrowding the pan, which causes steaming rather than searing.
- Transfer the skillet to the oven and cook for an additional 10-15 minutes or until chicken reaches 165˚F internal temperature. Note: if you don't have an oven-proof skillet, you can transfer the chicken to a baking sheet or casserole dish, but it may take a couple of extra minutes to cook.: You will see a rich, golden color develop and smell nuttier, toasted notes from the surface. Flipping at the right time preserves juices and crust integrity. The chicken should release easily from the pan when it is ready to turn; if it sticks, wait a little longer. Avoid flipping multiple times, which can prevent a good crust from forming.
- Note: if you don't have an oven-proof skillet, you can transfer the chicken to a baking sheet or casserole dish, but it may take a couple of extra minutes to cook.: if you don't have an oven-proof skillet, you can transfer the chicken to a baking sheet or casserole dish, but it may take a couple of extra minutes to cook. : In the oven the heat circulates around the chicken , finishing it gently so the center cooks without drying. You will hear a lower, even sound as the pan settles, and the aroma will deepen into roasted citrus and spice. Using an instant read thermometer is the most reliable way to avoid under or overcooking. A common mistake is relying on color alone, which can be misleading; always confirm with temperature.
- Let sit 5 minutes, then slice.: if you don't have an oven-proof skillet, you can transfer the chicken to a baking sheet or casserole dish, but it may take a couple of extra minutes to cook. : Switching to a baking sheet changes heat conduction, so expect slightly longer cook time and watch for the first signs of dryness around the edges. The texture may be a touch firmer because of the different heat distribution. To prevent dryness, tent the chicken with foil after it reaches temperature and let it rest briefly. A typical error is leaving it on high heat too long when transferring, which dries the meat.
- Place all sauce ingredients in a blender or food processor and blend until smooth.: Resting is essential, you will notice juices redistribute and the meat relaxes, making slicing easier and juicier. The surface will cool slightly and the aroma will settle into a balanced scent. Slice against the grain for tender pieces that are pleasant to bite into. Rushing the rest can cause the juices to run out and the chicken to be drier.
- Smash the avocado and spread 1/4 of the mixture over each tortilla. Place sliced Baja chicken on top of the avocado.: As the blades whirl you will smell herbaceous cilantro and tangy yogurt melding into a silky sauce. The texture should be smooth and pourable, not thin; if it seems too thick, a splash of water or lime juice will loosen it. This emulsion ties the wrap together, coating ingredients so each bite is cohesive. Over-pureeing can warm the sauce slightly, which may change the fresh profile.
- Layer on the black bean and corn salsa, tomatoes, and romaine.: The avocado layer should feel cool and creamy under your fingers, creating a cushion that prevents the tortilla from becoming soggy. The contrast between the cool avocado and warm chicken is delightful to the palate. Be sure the avocado is well seasoned or it can taste flat against the zesty chicken . A common oversight is using an underripe avocado which lacks creaminess.
- Drizzle the creamy cilantro sauce over the fillings, then sprinkle feta cheese.: As you add these, notice the visual contrast, the pop of tomato color, and the corn kernels that add a sweet crunch. The cold, crisp romaine refreshes the mouth and balances the richer elements, keeping the wrap bright. Distribute ingredients evenly to avoid lumps of one item in a single bite. Overfilling can make wrapping difficult and cause tearing.
- Fold the ends of the tortilla in, then roll tightly. Serve as is, or cut in half.: The sauce should add a cooling, tangy layer that binds the elements while the feta contributes briny pops of saltiness. When drizzled evenly, each bite has a balance of creamy and tangy notes. If the sauce is overly heavy, use less and add more at the table to suit tastes. Too much cheese can overwhelm the fresh flavors.
- Fold the ends of the tortilla in, then roll tightly. Serve as is, or cut in half.: A tight roll keeps everything contained, and when you slice it, the cross section should reveal colorful layers. The wrap should feel substantial but not overstuffed, offering a satisfying handheld meal. If the tortilla resists rolling, warm it briefly to increase pliability. Cutting too soon can cause fillings to spill, so allow a moment for the wrap to settle.
Notes
- Make it smokier: Add a pinch more cumin and char the jalapeños briefly on the skillet before adding to the marinade for a deeper smoky note.
- Extra creamy: Stir a spoonful more greek yogurt into the sauce for a silkier texture and milder tang that mellows the heat.
- Lower the heat: Remove the seeds from the jalapeños before slicing to keep the flavor without as much capsaicin kick.
- Wraplighter: Use whole wheat or low carb tortillas and reduce feta to lower overall calories while retaining texture contrast.
- Batch friendly: Double the marinade and cook extra chicken to have sliced meat ready for several days of quick meals.