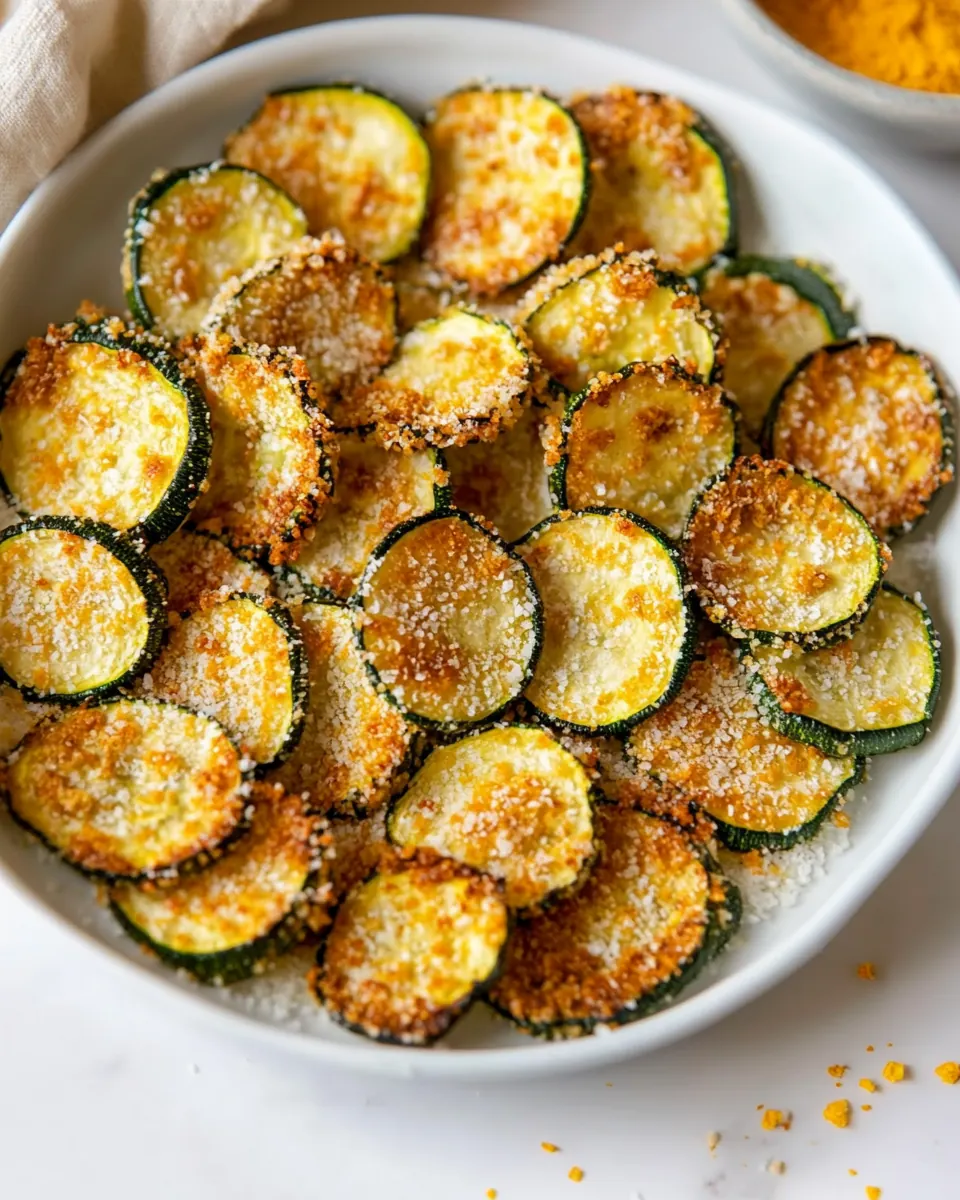
Zucchini Chips
Zucchini Chips have been my go to snack when warm weather hits and the farmers market overflows with glossy green squash.
I remember the first time I turned a pile of zucchini into crispy little coins, my kitchen filled with the toasty scent of browned crumbs and warm, tender squash. I was hungry for something light yet satisfying, something I could pop while catching up with a friend or nibble during a late afternoon work session. The crunch surprised me more than anything, because zucchini seems so soft at first glance, yet when treated right it yields a texture that feels like a worthy substitute for chips without the heaviness. Over a few summers I tweaked the breading mix, played with the seasoning, and learned how a quick pat with a towel and a careful spray of oil makes all the difference.
I like that Zucchini Chips let me serve something a little playful, but genuinely fuss free. I often bring a tray to casual get togethers or set out a bowl when movie night rolls around, and people always ask how they got so crisp. My answer is always about attention to small details, the tactile steps that turn tender zucchini into golden edged treasures. These moments of small kitchen victories are what keep me experimenting, and they remind me cooking is as much about little rituals as it is about big meals.
Recipe Snapshot
35 mins
15 mins
20 mins
Easy
150 kcal
American
Gluten-Free, Vegan
Appetizers
Rimmed baking sheet, Nonstick cooking spray, Wide shallow dish, Whisk, Paper towels
The Charm of This Zucchini Chips
They are surprisingly crunchy
I love how these chips defy expectations. When I bite into a piece, I hear a satisfying crunch that proves the light breading and high oven heat worked together. That crisp texture comes from drying the slices briefly, pressing the coating firmly, and giving them room on the pan so steam does not get trapped.
Speed and simplicity
This recipe shines because it is straightforward. I can have a batch ready in under an hour with minimal fuss. The short ingredient list keeps things approachable, and I appreciate feeding a small crowd without a lot of prep time.
Great for seasonal zucchini
When summer zucchini arrives, this recipe feels essential. It uses the squash at peak freshness, so the inside stays tender and subtly sweet while the exterior crisps to a nutty golden shade.
Customizable flavor profile
We can tweak the seasonings without changing the technique. I sometimes nudge the herbs or swap the cheese for a vegan alternative, and the base method still delivers a crunchy, tasty snack.
Kid friendly and party ready
These are one of my favorite things to put on a casual spread. They’re easy to eat with fingers, pair well with dips, and are a crowd pleaser without being fussy.
Ingredients Overview for Zucchini Chips

These ingredients are intentionally simple, each playing a clear role. The zucchini provides tender, watery brightness, while the dry components form the crisp shell that gives every bite its satisfying texture. The egg acts as glue, helping the breadcrumb mixture cling, and the seasonings lift the overall flavor without overwhelming the squash.
- 2 medium zucchini about 1 pound: Trim and slice into thin rounds to provide the tender, moist base for the chips while offering mild flavor and crunchy edges when baked or fried.
- 1/2 cup Panko breadcrumbs: Coat the zucchini slices with a coarse, crispy texture that browns nicely and adds a light, airy crunch to each chip.
- 1/2 cup white whole wheat flour or all-purpose flour: Create a light, adhesive dredge that helps the breadcrumb mixture stick while contributing a neutral, slightly nutty structure to the coating.
- 1/4 cup finely grated Parmesan cheese: Sprinkle finely to introduce umami and salty richness that enhances overall savory depth and promotes browning of the crust.
- 1/2 teaspoon Italian seasoning: Season the coating with a balanced blend of Mediterranean herbs to impart aromatic, slightly floral notes and a familiar savory profile.
- 1/2 teaspoon kosher salt plus an extra pinch or two: Season and help elevate the overall flavor balance while drawing out moisture slightly and enhancing the savory components of the chips.
- 1/4 teaspoon garlic powder: Add a concentrated savory note that complements the herbs and cheese, contributing subtle roasted garlic flavor without moisture.
- 1/4 teaspoon ground black pepper: Provide a sharp, warming bite and contrast to the other seasonings while brightening flavors and enhancing palate interest.
- 1 large egg: Bind the dry coating to the zucchini, supplying moisture and protein that helps the crust adhere and crisp during cooking.
- Nonstick cooking spray olive oil or canola oil flavored: Lightly mist onto a baking sheet or into the air fryer basket to prevent sticking and encourage even browning without adding heavy oil.
Making This Zucchini Chips
This is the part where comfort meets technique, and patience pays off. The method focuses on careful slicing, thoughtful drying, and staged spraying so the crumbs toast evenly. Follow these steps to get a golden, crisp exterior while keeping the inside soft and tender.
- Place oven racks in the upper and lower thirds of your oven and preheat the oven to 425°F. Coat 2 large, rimmed baking sheets with nonstick spray.: The oven will emit a dry, hot breeze and you may notice a faint warm smell as it climbs to temperature, which is crucial for rapid browning of the crumbs rather than slow steaming of the zucchini. This high heat is what creates a crisp crust quickly while the interior stays tender, so resist the urge to lower the temperature. A common issue at lower heat is soggy coatings that never crisp, so always preheat fully and confirm the racks are in the upper and lower thirds for even air circulation.
- Trim off the ends of the zucchini and cut crosswise into 1/4-inch-thick coins. Spread the sliced zucchini onto paper towels or a dry kitchen towel. Lightly pat dry.: When you lightly coat the pans, you prevent sticking and encourage even browning under each chip. The pans should feel barely slick to the touch, not oily, which ensures the underside crispens without pooling fat. If you skip this, the chips can glue themselves to the pan and lose their crust when you lift them, so give each sheet a careful spray.
- In wide, shallow dish (I use a pie dish) combine the Panko, flour, Parmesan, Italian seasoning, salt, garlic powder, and pepper. In a separate wide-shallow dish briskly whisk the egg until lightly foamy.: The slicing releases a faint grassy aroma and the neat, even coins will cook uniformly, showing golden edges when ready. Place the slices on paper towels and lightly pat them dry to draw surface moisture out, because excess water dilutes the coating and makes the crumbs limp. A common mistake is slicing unevenly, which leads to some pieces overcooking while others remain underdone.
- Place the zucchini in the bowl with the egg, tossing to coat them evenly. Shake off any excess egg, then add them to the bowl with the panko mixture. Coat them with the panko, pressing it on lightly so that it adheres. Arrange the zucchini on the baking sheets, ensuring they do not touch. Repeat with remaining zucchini.: As you stir these dry ingredients, a savory, nutty scent develops from the Parmesan cheese and spices mingling with the crumbs. Use a shallow dish so you can press the zucchini into the mixture easily. Whisking the components ensures an even flavor in every crumb, and if the blend is lumpy the coating will be inconsistent, so take a moment to break up any clumps.
- Lightly coat the exposed sides of the zucchini with the cooking spray. Bake for 10 minutes, then remove from the oven and lightly coat with spray once more. Return to the oven, rotating the pans 180 degrees and switching their positions on the upper and lower racks, then continue baking for 10 additional minutes, until the crumbs are crisp and golden and the insides are tender. Immediately sprinkle with a pinch of additional salt. Serve right away (the chips will soften as they sit).: The whisking introduces air so the egg becomes pale and slightly frothy, which gives a tacky surface for the crumbs to cling to. This frothiness also helps distribute the egg across each slice without leaving thick puddles. Overwhisking is not dangerous but underwhisking can yield uneven adhesion, so achieve a lightly foamy texture.
- Place the zucchini in the bowl with the egg, tossing to coat them evenly: When you coat the slices, you should feel a slickness that tells you the egg is doing its job. Shake off any excess egg before moving the slice to the crumb mixture so the Panko does not become gummy. Press the crumbs on lightly so they adhere, you will hear a faint patting sound as crumbs compress. A pitfall here is overloading a slice with crumbs which creates patches that burn rather than toast evenly.
- Coat them with the panko, pressing it on lightly so that it adheres: Pressing helps the crumbs form a cohesive layer that will crisp rather than fall away during baking. You will see the surface change from wet sheen to textured grain, and the smell will start to hint at roasted breading once baked. Avoid pressing so hard that the coating becomes a paste, which can prevent airflow and lead to soggy spots.
- Arrange the zucchini on the baking sheets, ensuring they do not touch: Spacing is crucial, because touching slices trap steam and prevent crisping; the visual cue you want is each coin sitting alone with air around it. If they crowd, the moisture released will lead to limp chips. If you notice condensation building, give them a little extra space or use an additional sheet.
- Repeat with remaining zucchini: Continue the assembly process methodically so each slice gets equal attention; the rhythm of dipping, shaking, pressing creates consistent results and you will notice the breadcrumb layer look uniform across the batch. Doing this step in small batches helps maintain an even breading and avoids overcrowding the workstation. Rushing here often causes sloppy coating and uneven baking.
- Lightly coat the exposed sides of the zucchini with the cooking spray: A gentle mist will encourage the crumbs to brown and crisp rather than dry out. As the baking begins, the oil will heat and sizzle slightly, producing a toasty aroma. Be careful not to saturate the crumbs, too much spray makes them greasy instead of crunchy.
- Bake for 10 minutes, then remove from the oven and lightly coat with spray once more: At this point you will see the edges just beginning to turn golden and the kitchen fills with a warm toasted scent; re spraying helps ensure the second side finishes crisp. The quick midbake refresh prevents uneven color and promotes thorough browning. A common slip is skipping the midbake spray, which can leave the top pale while the bottom browns.
- Return to the oven, rotating the pans 180 degrees and switching their positions on the upper and lower racks: Rotating and switching is how you compensate for hot spots in the oven and achieve consistent golden coloring on all sheets. You might hear a faint crackle as moisture escapes and the crumbs further toast. Forgetting to rotate can result in one tray being much darker than the other.
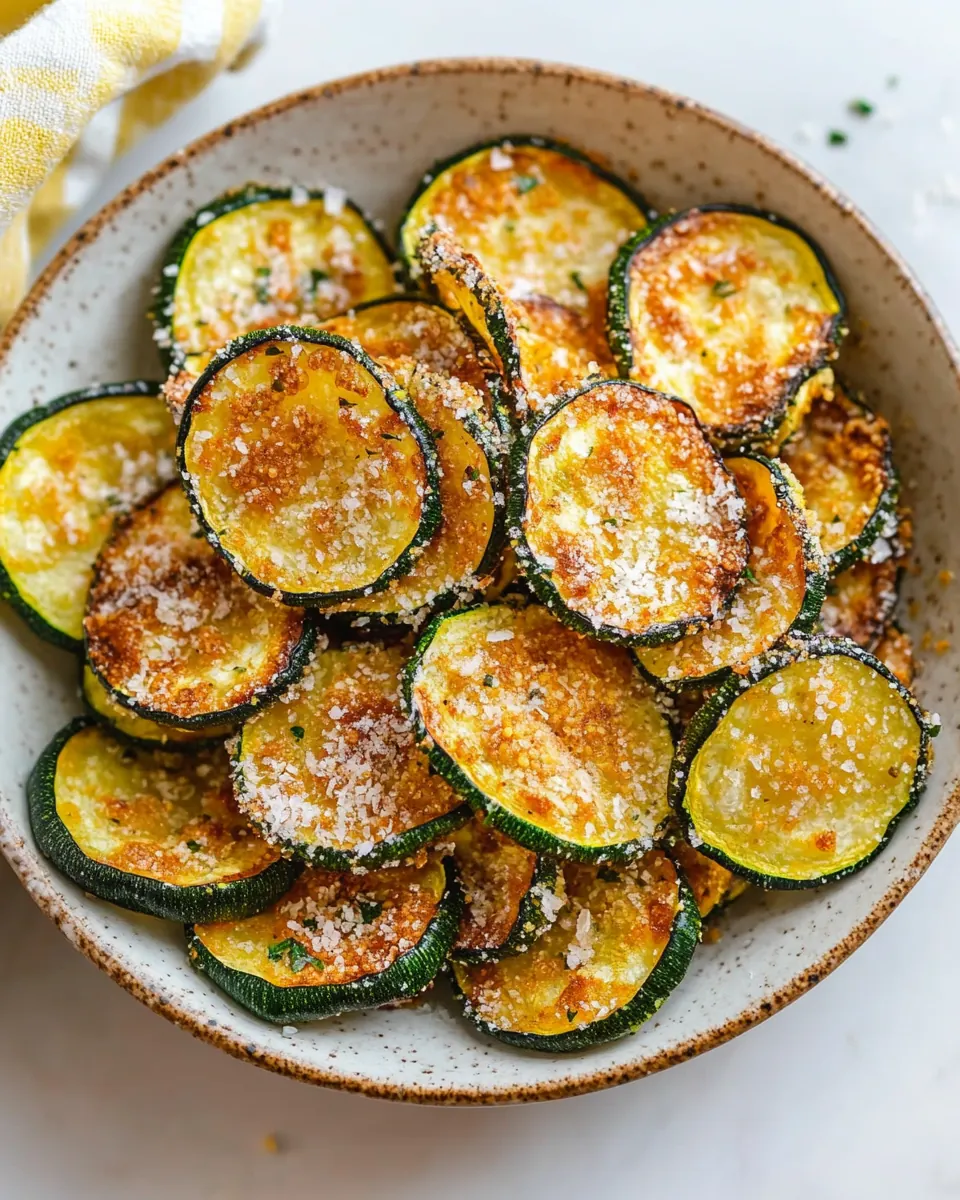
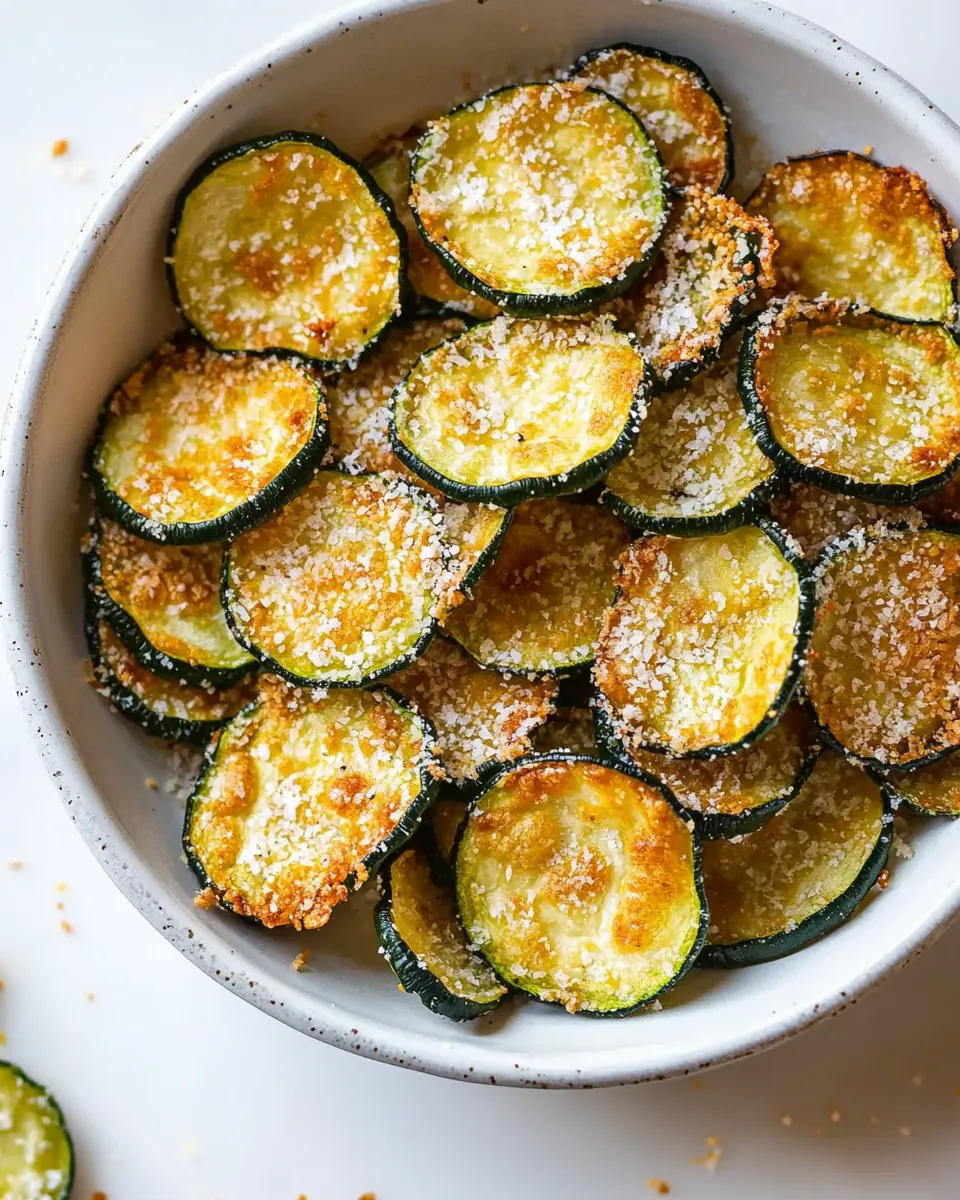
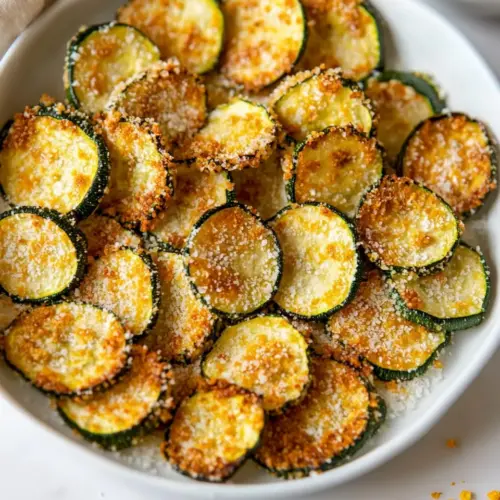
- Continue baking for 10 additional minutes, until the crumbs are crisp and golden and the insides are tender: You will know they are done when the crumbs are uniformly golden brown and the zucchini pierces easily with a fork yet retains some structure; the final aroma should be nutty and warm. This stage solidifies the texture contrast that defines a good chip. Overbaking will dry the zucchini out and underbaking leaves the crumbs soft.
- Immediately sprinkle with a pinch of additional salt: The finishing salt heightens the overall flavors and balances the mild zucchini sweetness. The grains dissolve slightly against the warm crumbs, giving little bursts of seasoning as you bite. If you skip this step the chips may taste flat, so a light final seasoning is recommended.
- Serve right away: Fresh from the oven the chips are at their crispiest, with a warm, toasty mouthfeel and tender center; serving promptly ensures the best texture experience. They will soften over time, so plan to enjoy them soon after baking. A mistake is letting them sit exposed, which makes them lose their crunch quickly.
Substitutions and Tips
There are a few smart swaps and small tricks that keep this recipe flexible without sacrificing texture. Below are practical tips I use when adapting the recipe for diet needs or limited pantry items.
- Make it vegan Use nutritional yeast in place of Parmesan cheese and replace the egg with a flax egg made from flaxseed meal and water as suggested in the notes to maintain adhesion and a savory flavor.
- Choose your flour The recipe accepts white whole wheat or all purpose flour; both add structure to the breading, but whole wheat introduces a slightly nuttier taste if you prefer more depth.
- Don’t skip the midbake spray A light re coating of nonstick cooking spray halfway through encourages even browning on top, preventing pale or unevenly cooked chips.
- Use Panko for crunch Standard breadcrumbs will work, but Panko breadcrumbs produce a much crispier texture due to their larger, flakier particles.
- Work in batches Breading the zucchini in manageable batches keeps the coating consistent and prevents the crumbs from clumping into gloppy bits that will not crisp properly.
- Store properly Keep leftover chips in an airtight container at room temperature for up to two days, as refrigeration speeds softening; reheating briefly in a hot oven or air fryer revives crispness.
Serve This Zucchini Chips With
These chips are great as a casual snack or part of a light meal. Below are serving ideas and pairings that highlight the chips’ crunch and make them suitable for different occasions.
- Serve with dipping sauces Offer a selection like herbed yogurt dip, marinara, or a tangy mustard aioli to add creamy contrast to the crisp exterior.
- Casual gatherings Place a bowl on the snack table during game night or movie viewing; the finger food format makes them easy to share and eat without plates.
- Light lunch plate Arrange with a fresh salad and a hearty grain for a balanced midday meal featuring textures and flavors that complement each other.
- Seasonal occasions These are perfect for summer picnics or potlucks when zucchini is abundant, highlighting the season’s produce in a simple way.
- Storage and reheating Store leftovers in an airtight container at room temperature for up to two days; reheat in a 425°F oven or air fryer to re crisp the coating.
- Kid friendly option Because they are mild but crunchy, kids often enjoy them as a snack, making them a good choice for casual family meals.
FAQ
Conclusion
These Zucchini Chips stand out because they transform humble summer squash into a craveable, crunchy snack that still feels light. The technique of drying, breading, and staging the bake is what gives them their golden edges and tender centers. Give them a try when zucchini is abundant, and you might find yourself reaching for them as an easy appetizer or a portable snack. I hope this recipe becomes one of your quick go to solutions for seasonal produce, bringing a little extra joy to simple bites.
Zucchini Chips
Equipment
- Rimmed Baking Sheet
- Nonstick cooking spray
- Wide shallow dish
- Whisk
- Paper towels
Ingredients
- 2 medium zucchini about 1 pound Trim and slice into thin rounds to provide the tender, moist base for the chips while offering mild flavor and crunchy edges when baked or fried.
- 1/2 cup Panko breadcrumbs Coat the zucchini slices with a coarse, crispy texture that browns nicely and adds a light, airy crunch to each chip.
- 1/2 cup white whole wheat flour or all-purpose flour Create a light, adhesive dredge that helps the breadcrumb mixture stick while contributing a neutral, slightly nutty structure to the coating.
- 1/4 cup finely grated Parmesan cheese Sprinkle finely to introduce umami and salty richness that enhances overall savory depth and promotes browning of the crust.
- 1/2 teaspoon Italian seasoning Season the coating with a balanced blend of Mediterranean herbs to impart aromatic, slightly floral notes and a familiar savory profile.
- 1/2 teaspoon kosher salt plus an extra pinch or two Season and help elevate the overall flavor balance while drawing out moisture slightly and enhancing the savory components of the chips.
- 1/4 teaspoon garlic powder Add a concentrated savory note that complements the herbs and cheese, contributing subtle roasted garlic flavor without moisture.
- 1/4 teaspoon ground black pepper Provide a sharp, warming bite and contrast to the other seasonings while brightening flavors and enhancing palate interest.
- 1 large egg Bind the dry coating to the zucchini, supplying moisture and protein that helps the crust adhere and crisp during cooking.
- Nonstick cooking spray olive oil or canola oil flavored Lightly mist onto a baking sheet or into the air fryer basket to prevent sticking and encourage even browning without adding heavy oil.
Instructions
- Place oven racks in the upper and lower thirds of your oven and preheat the oven to 425°F. Coat 2 large, rimmed baking sheets with nonstick spray.: The oven will emit a dry, hot breeze and you may notice a faint warm smell as it climbs to temperature, which is crucial for rapid browning of the crumbs rather than slow steaming of the zucchini. This high heat is what creates a crisp crust quickly while the interior stays tender, so resist the urge to lower the temperature. A common issue at lower heat is soggy coatings that never crisp, so always preheat fully and confirm the racks are in the upper and lower thirds for even air circulation.
- Trim off the ends of the zucchini and cut crosswise into 1/4-inch-thick coins. Spread the sliced zucchini onto paper towels or a dry kitchen towel. Lightly pat dry.: When you lightly coat the pans, you prevent sticking and encourage even browning under each chip. The pans should feel barely slick to the touch, not oily, which ensures the underside crispens without pooling fat. If you skip this, the chips can glue themselves to the pan and lose their crust when you lift them, so give each sheet a careful spray.
- In wide, shallow dish (I use a pie dish) combine the Panko, flour, Parmesan, Italian seasoning, salt, garlic powder, and pepper. In a separate wide-shallow dish briskly whisk the egg until lightly foamy.: The slicing releases a faint grassy aroma and the neat, even coins will cook uniformly, showing golden edges when ready. Place the slices on paper towels and lightly pat them dry to draw surface moisture out, because excess water dilutes the coating and makes the crumbs limp. A common mistake is slicing unevenly, which leads to some pieces overcooking while others remain underdone.
- Place the zucchini in the bowl with the egg, tossing to coat them evenly. Shake off any excess egg, then add them to the bowl with the panko mixture. Coat them with the panko, pressing it on lightly so that it adheres. Arrange the zucchini on the baking sheets, ensuring they do not touch. Repeat with remaining zucchini.: As you stir these dry ingredients, a savory, nutty scent develops from the Parmesan cheese and spices mingling with the crumbs. Use a shallow dish so you can press the zucchini into the mixture easily. Whisking the components ensures an even flavor in every crumb, and if the blend is lumpy the coating will be inconsistent, so take a moment to break up any clumps.
- Lightly coat the exposed sides of the zucchini with the cooking spray. Bake for 10 minutes, then remove from the oven and lightly coat with spray once more. Return to the oven, rotating the pans 180 degrees and switching their positions on the upper and lower racks, then continue baking for 10 additional minutes, until the crumbs are crisp and golden and the insides are tender. Immediately sprinkle with a pinch of additional salt. Serve right away (the chips will soften as they sit).: The whisking introduces air so the egg becomes pale and slightly frothy, which gives a tacky surface for the crumbs to cling to. This frothiness also helps distribute the egg across each slice without leaving thick puddles. Overwhisking is not dangerous but underwhisking can yield uneven adhesion, so achieve a lightly foamy texture.
- Place the zucchini in the bowl with the egg, tossing to coat them evenly: When you coat the slices, you should feel a slickness that tells you the egg is doing its job. Shake off any excess egg before moving the slice to the crumb mixture so the Panko does not become gummy. Press the crumbs on lightly so they adhere, you will hear a faint patting sound as crumbs compress. A pitfall here is overloading a slice with crumbs which creates patches that burn rather than toast evenly.
- Coat them with the panko, pressing it on lightly so that it adheres: Pressing helps the crumbs form a cohesive layer that will crisp rather than fall away during baking. You will see the surface change from wet sheen to textured grain, and the smell will start to hint at roasted breading once baked. Avoid pressing so hard that the coating becomes a paste, which can prevent airflow and lead to soggy spots.
- Arrange the zucchini on the baking sheets, ensuring they do not touch: Spacing is crucial, because touching slices trap steam and prevent crisping; the visual cue you want is each coin sitting alone with air around it. If they crowd, the moisture released will lead to limp chips. If you notice condensation building, give them a little extra space or use an additional sheet.
- Repeat with remaining zucchini: Continue the assembly process methodically so each slice gets equal attention; the rhythm of dipping, shaking, pressing creates consistent results and you will notice the breadcrumb layer look uniform across the batch. Doing this step in small batches helps maintain an even breading and avoids overcrowding the workstation. Rushing here often causes sloppy coating and uneven baking.
- Lightly coat the exposed sides of the zucchini with the cooking spray: A gentle mist will encourage the crumbs to brown and crisp rather than dry out. As the baking begins, the oil will heat and sizzle slightly, producing a toasty aroma. Be careful not to saturate the crumbs, too much spray makes them greasy instead of crunchy.
- Bake for 10 minutes, then remove from the oven and lightly coat with spray once more: At this point you will see the edges just beginning to turn golden and the kitchen fills with a warm toasted scent; re spraying helps ensure the second side finishes crisp. The quick midbake refresh prevents uneven color and promotes thorough browning. A common slip is skipping the midbake spray, which can leave the top pale while the bottom browns.
- Return to the oven, rotating the pans 180 degrees and switching their positions on the upper and lower racks: Rotating and switching is how you compensate for hot spots in the oven and achieve consistent golden coloring on all sheets. You might hear a faint crackle as moisture escapes and the crumbs further toast. Forgetting to rotate can result in one tray being much darker than the other.
- Continue baking for 10 additional minutes, until the crumbs are crisp and golden and the insides are tender: You will know they are done when the crumbs are uniformly golden brown and the zucchini pierces easily with a fork yet retains some structure; the final aroma should be nutty and warm. This stage solidifies the texture contrast that defines a good chip. Overbaking will dry the zucchini out and underbaking leaves the crumbs soft.
- Immediately sprinkle with a pinch of additional salt: The finishing salt heightens the overall flavors and balances the mild zucchini sweetness. The grains dissolve slightly against the warm crumbs, giving little bursts of seasoning as you bite. If you skip this step the chips may taste flat, so a light final seasoning is recommended.
- Serve right away: Fresh from the oven the chips are at their crispiest, with a warm, toasty mouthfeel and tender center; serving promptly ensures the best texture experience. They will soften over time, so plan to enjoy them soon after baking. A mistake is letting them sit exposed, which makes them lose their crunch quickly.
Notes
- Make it vegan Use nutritional yeast in place of Parmesan cheese and replace the egg with a flax egg made from flaxseed meal and water as suggested in the notes to maintain adhesion and a savory flavor.
- Choose your flour The recipe accepts white whole wheat or all purpose flour; both add structure to the breading, but whole wheat introduces a slightly nuttier taste if you prefer more depth.
- Don’t skip the midbake spray A light re coating of nonstick cooking spray halfway through encourages even browning on top, preventing pale or unevenly cooked chips.
- Use Panko for crunch Standard breadcrumbs will work, but Panko breadcrumbs produce a much crispier texture due to their larger, flakier particles.
- Work in batches Breading the zucchini in manageable batches keeps the coating consistent and prevents the crumbs from clumping into gloppy bits that will not crisp properly.
- Store properly Keep leftover chips in an airtight container at room temperature for up to two days, as refrigeration speeds softening; reheating briefly in a hot oven or air fryer revives crispness.