White Christmas Crinkles
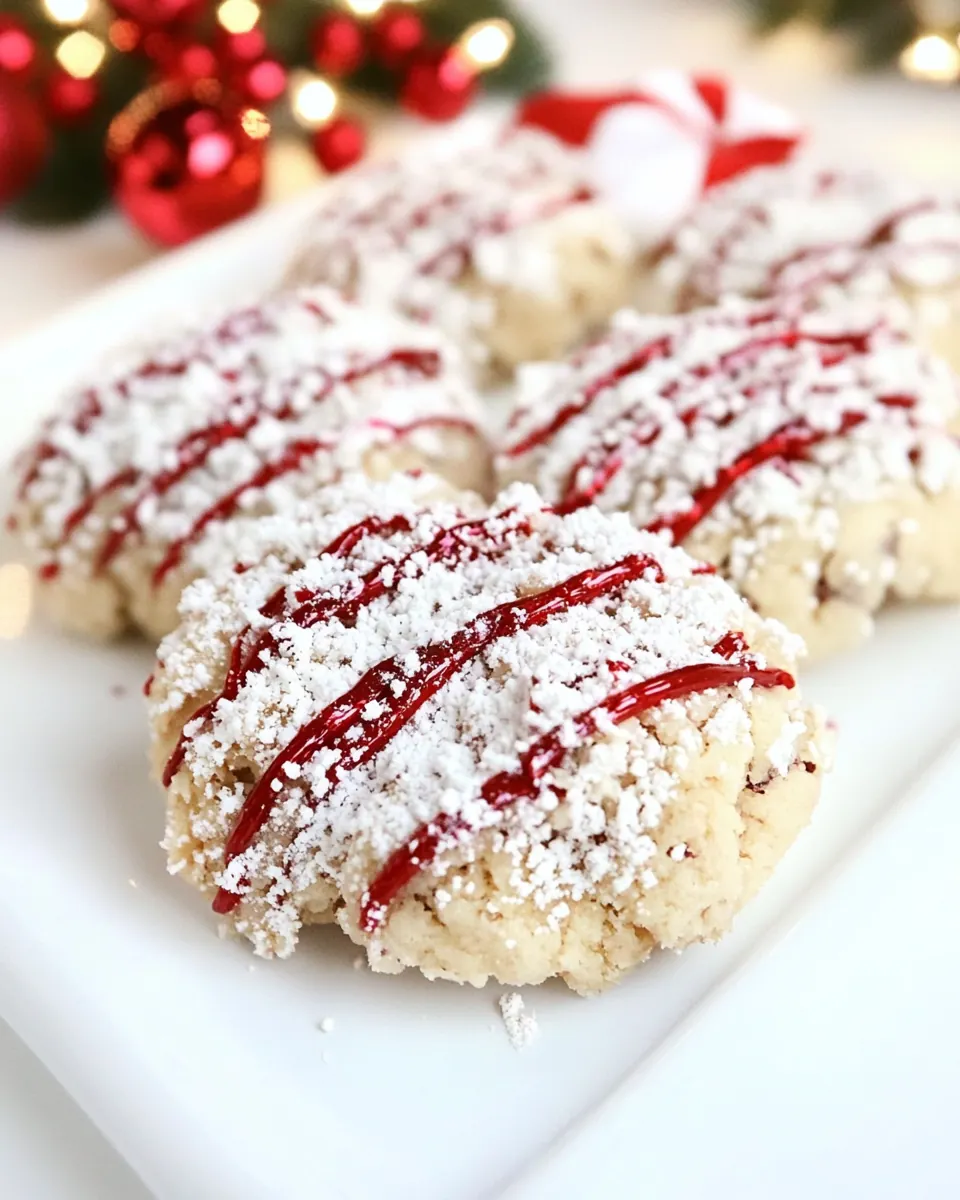
White Christmas Crinkles have been a holiday staple in my kitchen for years, arriving with the scent of crushed candy cane and warm chocolate that instantly signals celebration. The first time I baked them I was racing the clock between wrapping gifts and finishing a playlist, but the aroma stopped me mid task and I knew these cookies belonged on my annual cookie tray. I love how the white baking bar creates a tender, buttery crumb while the chocolate drizzle and candy cane crunch give each bite a playful contrast.
Every holiday season I find a different excuse to make a batch, whether I need a hostess gift or a sweet to leave for neighbors. I remember one snowy evening when I delivered a tin to an elderly neighbor, and she closed her eyes after the first bite, saying they tasted like a childhood memory. That reaction reminded me why I keep this recipe simple and reliable. If you enjoy finishing touches that feel festive but not fussy, you will appreciate how easy White Christmas Crinkles comes together and how stunning they look on a platter.
Recipe Snapshot
50 mins
35 mins
15 mins
Medium
150 kcal
American
Gluten-Free, Low FODMAP
Desserts
Small pan, Electric mixer, Mixing bowls, Cookie sheet, Wire rack, Saucepan
Why This White Christmas Crinkles Is a Winner
They taste festive without fuss
I often need treats that look special but do not demand hours in the kitchen. These cookies manage that balance perfectly, with easy mixing and a few decorative steps that elevate the final look.
Texture contrasts in every bite
The dough is tender thanks to the melted white baking bar and butter, while the drizzle of melted chocolate chips adds a silky note. The crushed candy canes provide a crunchy, refreshing counterpoint that keeps each bite interesting.
Adaptable for gifting and gatherings
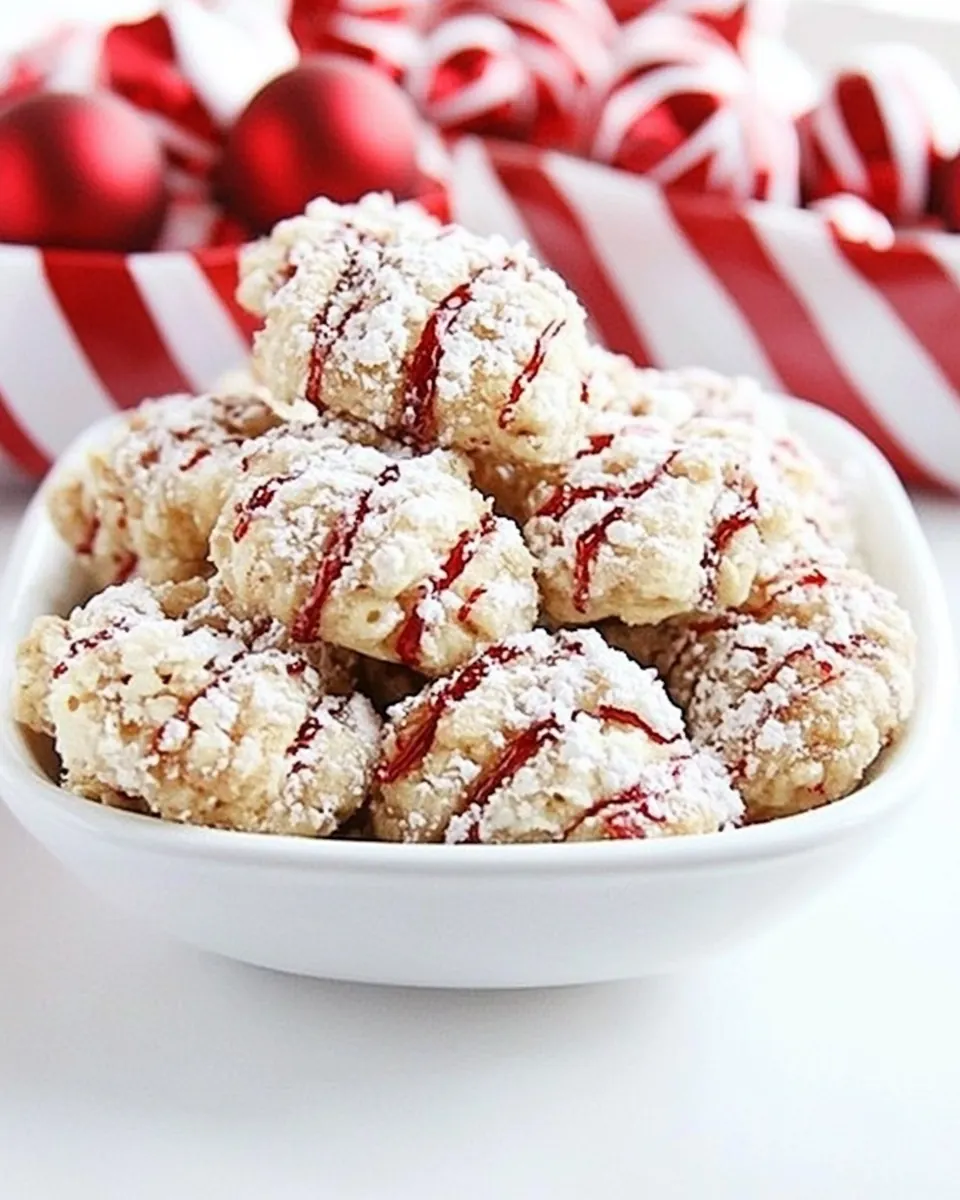
I can double the batch for parties or make a single tray for a cozy night and the cookies always behave. They travel well, stack neatly, and look charming when wrapped in clear cellophane with a ribbon.
Seasonal but versatile
Although I pull them out in winter and for Christmas, the flavor profile is flexible. The combination of white baking bar and a hint of vanilla keeps them approachable, and the candy cane topping can be swapped for other crunchy garnishes if needed.
Reliable technique yields consistent results
I trust the chilling step to firm the dough, which prevents over spreading and produces the classic crinkle shape. Once you follow that simple timing, the results are dependable every time.
Ingredient List for White Christmas Crinkles

These ingredients come together to create a cookie that is at once tender, sweet, and festive. I focus on a few key players: the melted white baking bar for richness, the all purpose flour and baking soda for structure, and the crunchy candy canes for holiday snap. Each item plays a role in texture, flavor, or appearance.
- 4 ounces white baking bar with cocoa butter: Melt and temper to create a smooth, creamy white chocolate coating that provides sweet, buttery cocoa flavor and glossy sheen throughout the cookie surface. Chop finely or melt gently over low heat to avoid seizing, then fold or drizzle as directed to ensure even distribution. Use as the primary white chocolate component to complement the crinkle texture and hold mix-ins together.
- 2 cups all purpose flour: Provide structure and bulk to form the cookie dough, supplying gluten for chewiness and a base for all other flavors to bind into a cohesive batter. Whisk or sift with leavening to ensure even incorporation and avoid pockets of dry flour that could cause uneven texture. Measure accurately by spooning into a cup and leveling for consistent results.
- 1/2 teaspoon baking soda: Leaven gently to create light lift and subtle spread control in the crinkle cookies, reacting with acidic components for fine texture. Dissolve thoroughly into the dry ingredients to prevent bites with concentrated sodium bicarbonate. Use the specified amount to maintain balance between rise and chew.
- 1/3 cup butter, at room temperature: Cream with sugar to incorporate air, yielding a tender, rich crumb and buttery flavor in the cookies. Bring fully to room temperature for optimal creaming performance and to ensure even mixing with sugar and egg. Use measured softened blocks or slices to avoid lumps and promote smooth dough.
- 1 cup granulated white sugar: Sweeten and aid creaming to produce a tender texture and fine crumb while contributing to caramelization and slight crisp edges during baking. Granulated sugar also helps incorporate air when beaten with butter, creating lift and lightness in the final cookie. Measure precisely to control sweetness and spreading behavior.
- 1 large egg: Bind ingredients together, add moisture, and contribute richness and slight structure through proteins that help set the cookie during baking. Beat until incorporated but avoid overmixing to prevent toughening from gluten development. Use a fresh, properly sized egg for consistent moisture and leavening contribution.
- 1/4 cup buttermilk: Add tanginess, moisture, and tenderizing acidity that reacts with baking soda to produce subtle lift and a soft, cakey interior in the crinkles. Ensure proper coldness or room temperature according to recipe steps to maintain dough consistency. Substitute cultures only with appropriate adjustments to acidity if necessary.
- 1 teaspoon vanilla extract: Infuse aromatic sweetness and enhance overall flavor depth with warm, familiar vanilla notes that round out the cookie profile. Stir in during wet ingredient mixing to distribute evenly and ensure each bite carries subtle fragrant complexity. Use pure vanilla extract for best flavor clarity.
- 1/2 cups semi-sweet chocolate chips: Introduce pockets of semi–sweet chocolate for contrast against the white chocolate and crushed candy canes, balancing sweetness with slight bitterness and adding texture. Fold in gently to distribute chips without overmixing the dough, preserving shape and preventing excessive melting. Adjust chip amount for desired chocolate intensity.
- 1 tablespoon shortening: Stabilize and improve texture of melted white chocolate or chips by adding a small amount of shortening to achieve smoother melting and glossier finish. Mix into melted chocolate as needed to prevent graining and facilitate easier dipping or drizzling over cookies. Use sparingly to maintain white chocolate flavor integrity.
- 1/2 cup crushed candy canes: Provide festive peppermint crunch and bright flavor contrast, adding color and crunchy texture when sprinkled or folded into the dough. Crush to the desired size for distribution without overwhelming the cookie, and reserve some for topping to enhance presentation. Avoid introducing moisture when crushing to keep pieces crisp.
- extra sugar, for rolling: Coat exterior for a sparkling finish that creates a crinkle appearance and adds a hint of extra sweetness and slight crunch to the cookie surface. Roll chilled dough balls in sugar before baking to encourage crackling patterns and an attractive sheen. Use fine granulated sugar for even coverage.
Instructions for White Christmas Crinkles
These directions will guide you from melting the white baking bar to adding the final candy cane sprinkle. I like to keep tools and ingredients ready so each step flows smoothly, and I often pause to taste a little of the melted drizzle while I work, just to stay motivated.
- Melt the baking bar in a small pan over low heat, stirring constantly. Set aside.: As the bar softens you will notice a gentle milky aroma and a smooth, velvety texture forming, which signals that the fat is emulsifying properly. Stirring constantly prevents hot spots and keeps the mixture glossy; if you walk away it can scorch quickly, creating a bitter note. A common mistake is using too high heat, which can separate the fat and leave you with a grainy texture, so keep the flame low and be patient. If the mixture looks slightly separated, remove from heat and whisk steadily until smooth, which usually brings it back together. I like to transfer it to a cool bowl to stop cooking and to protect the egg you add later from accidental warming.
- In a small bowl, stir the flour, baking soda and 1/4 teaspoon salt.: When you mix these dry elements you should see a uniform, pale powder, and the salt will dissolve into the flour slightly as you stir. This step ensures even distribution so every bite rises and seasons consistently. If you skip it you risk pockets of baking soda causing uneven puffing. Sifting can help if your flour is clumpy, and measuring accurately keeps the final texture balanced. Avoid overworking the flour now, because it can activate gluten and lead to tougher cookies later.
- In a separate small bowl, beat the butter with an electric mixer at medium speed for 30 seconds. Add 1 cup sugar and beat until well combined. Beat in the melted baking bar, egg, buttermilk, and vanilla. Add the flour mixture; beat until well mixed. Cover, chill dough at least one hour, or until easy to handle.: You will hear a soft whirr as the butter and sugar come together into a creamy blend, and the mixture will lighten slightly in color. After adding the warm melted bar, the batter takes on a silky sheen, and the egg helps bind the elements into a cohesive dough. Chilling is crucial for texture control, it firms the fats and prevents excessive spreading in the oven; without chilling the cookies can flatten out and lose their crinkle charm. A common pitfall is not chilling long enough, which leads to thin, greasy cookies, so aim for at least one hour. If the dough becomes too stiff after chilling, let it relax for a few minutes to scoop easily.
- Preheat the oven to 375 degrees F.: As the oven warms you may catch a faint toasty smell from the heat elements, which is a cue that the baking environment is stabilizing. A properly preheated oven ensures the cookies begin to set immediately, producing the desired base and slight rise. Placing unchilled dough into a cold oven will result in uneven spread and longer bake times, so wait until it reaches the full temperature. Use an oven thermometer if you suspect your oven runs hot or cool, which helps avoid overbaking or underbaking. A frequent error is guessing the temperature, so allow the oven sufficient time to reach 375 degrees F before baking.
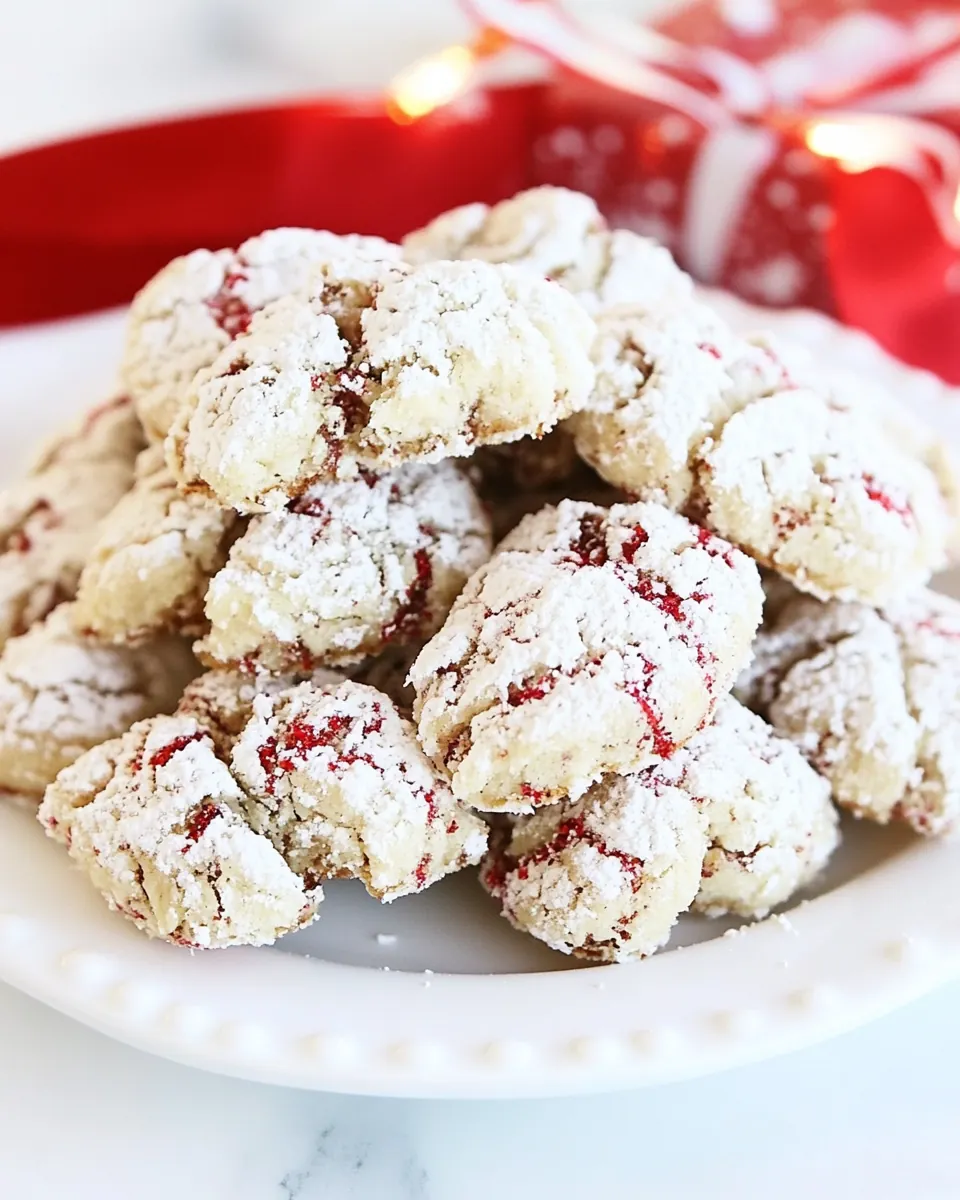
- Shape the dough into 1 inch balls; roll in additional sugar. Place 2-inches apart on an ungreased cookie sheet. Bake for 10 minutes, or until bottoms are light brown. Remove and cool on wire rack.: When you roll the chilled dough into balls you should feel a cool, slightly tender texture that retains its shape; coating in extra sugar gives a sparkling exterior and a slight crispness at the edges. Space the balls well because they will spread slightly and need room to develop a rounded base. While baking listen for a faint crackle as edges set, and watch for the bottoms to take on a light golden hue, which means they are done; the tops may still look soft but they set as they cool. Overbaking will produce dry cookies, so err on the side of slightly underbaked if uncertain. A common mistake is crowding the pan, which leads to merged cookies and uneven baking, so leave adequate gaps.
- Meanwhile, in saucepan, cook and stir chocolate chips and shortening over low heat until melted. Drizzle over cookies and sprinkle with crushed candy.: As the chocolate chips and shortening melt together they form a glossy, pourable sauce with a warm, rich scent that complements the mint of the candy canes . Drizzling while the chocolate is still warm helps it adhere and creates an appealing contrast against the pale cookie. Immediately sprinkle the crushed candy canes so they stick into the chocolate before it sets; this also preserves the bright red flecks. If the chocolate stiffens too quickly, return the pan to very low heat or microwave in short bursts, stirring between intervals to restore fluidity. A common misstep is applying the candy too late, after the chocolate has set, which prevents proper adhesion and results in fallen pieces.
Customization Ideas
If you like to tweak recipes I have a few ways to customize White Christmas Crinkles while keeping their festive spirit. Below are practical ideas that retain the cookies integrity and enhance presentation or flavor.
- Swap the drizzle technique Use a piping bag or a spoon to control how much chocolate chips drizzle each cookie receives, creating clean lines or a delicate web.
- Vary the candy topping Replace crushed candy canes with finely chopped peppermint bark or colored sprinkles for a different festive look while preserving crunch.
- Adjust sweetness Reduce the extra sugar used for rolling if you prefer a less crunchy exterior, this slightly softens the crust and lets the interior shine more.
- Make ahead Prepare and chill the dough a day in advance, keeping it wrapped; this deepens the flavor and makes holiday baking more manageable.
- Microwave melting option Melt the chocolate chips and shortening in short bursts, stirring every 30 seconds to prevent overheating and achieve a smooth drizzle.
What Complements This White Christmas Crinkles
These cookies pair beautifully with warm drinks and make a lovely addition to holiday dessert spreads. Serve them at gatherings, package them as gifts, or enjoy with a simple hot beverage for a quiet treat.
- Hot beverages Pair with a warm cup of cocoa or coffee, the mint crunch and chocolate drizzle harmonize with steamed milk and add a festive note.
- Holiday platters Arrange with other small cookies and candies, the white color and red candy cane flecks provide a striking contrast that reads as festive on the table.
- Gifting Stack in a decorative tin or box, separating layers with parchment; they keep well and present beautifully for hostess gifts during Christmas visits.
- Storage tips Keep in an airtight container at room temperature for up to a week, or freeze individual cookies on a tray before transferring to a freezer bag for longer storage.
- Occasions Ideal for cookie exchanges, seasonal parties, and any winter gathering where a sweet and minty bite is welcome.
FAQ
Conclusion
White Christmas Crinkles stand out because they pair a soft, buttery cookie base with a glossy chocolate drizzle and bright, crunchy candy cane topping for a truly festive bite. If you love seasonal treats that are both pretty and dependable, this recipe is built to deliver consistently satisfying results. Give it a try for your next holiday gathering or as a heartfelt gift, and enjoy the feedback when friends and family taste that perfect combination of tender crumb, rich chocolate, and minty snap.

White Christmas Crinkles
Equipment
- Small Pan
- Electric Mixer
- Mixing Bowls
- Cookie Sheet
- Wire Rack
- Saucepan
Ingredients
- 4 ounces white baking bar with cocoa butter Melt and temper to create a smooth, creamy white chocolate coating that provides sweet, buttery cocoa flavor and glossy sheen throughout the cookie surface. Chop finely or melt gently over low heat to avoid seizing, then fold or drizzle as directed to ensure even distribution. Use as the primary white chocolate component to complement the crinkle texture and hold mix-ins together.
- 2 cups all purpose flour Provide structure and bulk to form the cookie dough, supplying gluten for chewiness and a base for all other flavors to bind into a cohesive batter. Whisk or sift with leavening to ensure even incorporation and avoid pockets of dry flour that could cause uneven texture. Measure accurately by spooning into a cup and leveling for consistent results.
- 1/2 teaspoon baking soda Leaven gently to create light lift and subtle spread control in the crinkle cookies, reacting with acidic components for fine texture. Dissolve thoroughly into the dry ingredients to prevent bites with concentrated sodium bicarbonate. Use the specified amount to maintain balance between rise and chew.
- 1/3 cup butter, at room temperature Cream with sugar to incorporate air, yielding a tender, rich crumb and buttery flavor in the cookies. Bring fully to room temperature for optimal creaming performance and to ensure even mixing with sugar and egg. Use measured softened blocks or slices to avoid lumps and promote smooth dough.
- 1 cup granulated white sugar Sweeten and aid creaming to produce a tender texture and fine crumb while contributing to caramelization and slight crisp edges during baking. Granulated sugar also helps incorporate air when beaten with butter, creating lift and lightness in the final cookie. Measure precisely to control sweetness and spreading behavior.
- 1 large egg Bind ingredients together, add moisture, and contribute richness and slight structure through proteins that help set the cookie during baking. Beat until incorporated but avoid overmixing to prevent toughening from gluten development. Use a fresh, properly sized egg for consistent moisture and leavening contribution.
- 1/4 cup buttermilk Add tanginess, moisture, and tenderizing acidity that reacts with baking soda to produce subtle lift and a soft, cakey interior in the crinkles. Ensure proper coldness or room temperature according to recipe steps to maintain dough consistency. Substitute cultures only with appropriate adjustments to acidity if necessary.
- 1 teaspoon vanilla extract Infuse aromatic sweetness and enhance overall flavor depth with warm, familiar vanilla notes that round out the cookie profile. Stir in during wet ingredient mixing to distribute evenly and ensure each bite carries subtle fragrant complexity. Use pure vanilla extract for best flavor clarity.
- 1/2 cups semi-sweet chocolate chips Introduce pockets of semi-sweet chocolate for contrast against the white chocolate and crushed candy canes, balancing sweetness with slight bitterness and adding texture. Fold in gently to distribute chips without overmixing the dough, preserving shape and preventing excessive melting. Adjust chip amount for desired chocolate intensity.
- 1 tablespoon shortening Stabilize and improve texture of melted white chocolate or chips by adding a small amount of shortening to achieve smoother melting and glossier finish. Mix into melted chocolate as needed to prevent graining and facilitate easier dipping or drizzling over cookies. Use sparingly to maintain white chocolate flavor integrity.
- 1/2 cup crushed candy canes Provide festive peppermint crunch and bright flavor contrast, adding color and crunchy texture when sprinkled or folded into the dough. Crush to the desired size for distribution without overwhelming the cookie, and reserve some for topping to enhance presentation. Avoid introducing moisture when crushing to keep pieces crisp.
- extra sugar, for rolling Coat exterior for a sparkling finish that creates a crinkle appearance and adds a hint of extra sweetness and slight crunch to the cookie surface. Roll chilled dough balls in sugar before baking to encourage crackling patterns and an attractive sheen. Use fine granulated sugar for even coverage.
Instructions
- Melt the baking bar in a small pan over low heat, stirring constantly. Set aside.: As the bar softens you will notice a gentle milky aroma and a smooth, velvety texture forming, which signals that the fat is emulsifying properly. Stirring constantly prevents hot spots and keeps the mixture glossy; if you walk away it can scorch quickly, creating a bitter note. A common mistake is using too high heat, which can separate the fat and leave you with a grainy texture, so keep the flame low and be patient. If the mixture looks slightly separated, remove from heat and whisk steadily until smooth, which usually brings it back together. I like to transfer it to a cool bowl to stop cooking and to protect the egg you add later from accidental warming.
- In a small bowl, stir the flour, baking soda and 1/4 teaspoon salt.: When you mix these dry elements you should see a uniform, pale powder, and the salt will dissolve into the flour slightly as you stir. This step ensures even distribution so every bite rises and seasons consistently. If you skip it you risk pockets of baking soda causing uneven puffing. Sifting can help if your flour is clumpy, and measuring accurately keeps the final texture balanced. Avoid overworking the flour now, because it can activate gluten and lead to tougher cookies later.
- In a separate small bowl, beat the butter with an electric mixer at medium speed for 30 seconds. Add 1 cup sugar and beat until well combined. Beat in the melted baking bar, egg, buttermilk, and vanilla. Add the flour mixture; beat until well mixed. Cover, chill dough at least one hour, or until easy to handle.: You will hear a soft whirr as the butter and sugar come together into a creamy blend, and the mixture will lighten slightly in color. After adding the warm melted bar, the batter takes on a silky sheen, and the egg helps bind the elements into a cohesive dough. Chilling is crucial for texture control, it firms the fats and prevents excessive spreading in the oven; without chilling the cookies can flatten out and lose their crinkle charm. A common pitfall is not chilling long enough, which leads to thin, greasy cookies, so aim for at least one hour. If the dough becomes too stiff after chilling, let it relax for a few minutes to scoop easily.
- Preheat the oven to 375 degrees F.: As the oven warms you may catch a faint toasty smell from the heat elements, which is a cue that the baking environment is stabilizing. A properly preheated oven ensures the cookies begin to set immediately, producing the desired base and slight rise. Placing unchilled dough into a cold oven will result in uneven spread and longer bake times, so wait until it reaches the full temperature. Use an oven thermometer if you suspect your oven runs hot or cool, which helps avoid overbaking or underbaking. A frequent error is guessing the temperature, so allow the oven sufficient time to reach 375 degrees F before baking.
- Shape the dough into 1 inch balls; roll in additional sugar. Place 2-inches apart on an ungreased cookie sheet. Bake for 10 minutes, or until bottoms are light brown. Remove and cool on wire rack.: When you roll the chilled dough into balls you should feel a cool, slightly tender texture that retains its shape; coating in extra sugar gives a sparkling exterior and a slight crispness at the edges. Space the balls well because they will spread slightly and need room to develop a rounded base. While baking listen for a faint crackle as edges set, and watch for the bottoms to take on a light golden hue, which means they are done; the tops may still look soft but they set as they cool. Overbaking will produce dry cookies, so err on the side of slightly underbaked if uncertain. A common mistake is crowding the pan, which leads to merged cookies and uneven baking, so leave adequate gaps.
- Meanwhile, in saucepan, cook and stir chocolate chips and shortening over low heat until melted. Drizzle over cookies and sprinkle with crushed candy.: As the chocolate chips and shortening melt together they form a glossy, pourable sauce with a warm, rich scent that complements the mint of the candy canes . Drizzling while the chocolate is still warm helps it adhere and creates an appealing contrast against the pale cookie. Immediately sprinkle the crushed candy canes so they stick into the chocolate before it sets; this also preserves the bright red flecks. If the chocolate stiffens too quickly, return the pan to very low heat or microwave in short bursts, stirring between intervals to restore fluidity. A common misstep is applying the candy too late, after the chocolate has set, which prevents proper adhesion and results in fallen pieces.
Notes
- Swap the drizzle technique Use a piping bag or a spoon to control how much chocolate chips drizzle each cookie receives, creating clean lines or a delicate web.
- Vary the candy topping Replace crushed candy canes with finely chopped peppermint bark or colored sprinkles for a different festive look while preserving crunch.
- Adjust sweetness Reduce the extra sugar used for rolling if you prefer a less crunchy exterior, this slightly softens the crust and lets the interior shine more.
- Make ahead Prepare and chill the dough a day in advance, keeping it wrapped; this deepens the flavor and makes holiday baking more manageable.
- Microwave melting option Melt the chocolate chips and shortening in short bursts, stirring every 30 seconds to prevent overheating and achieve a smooth drizzle.