Best Brownies Recipe
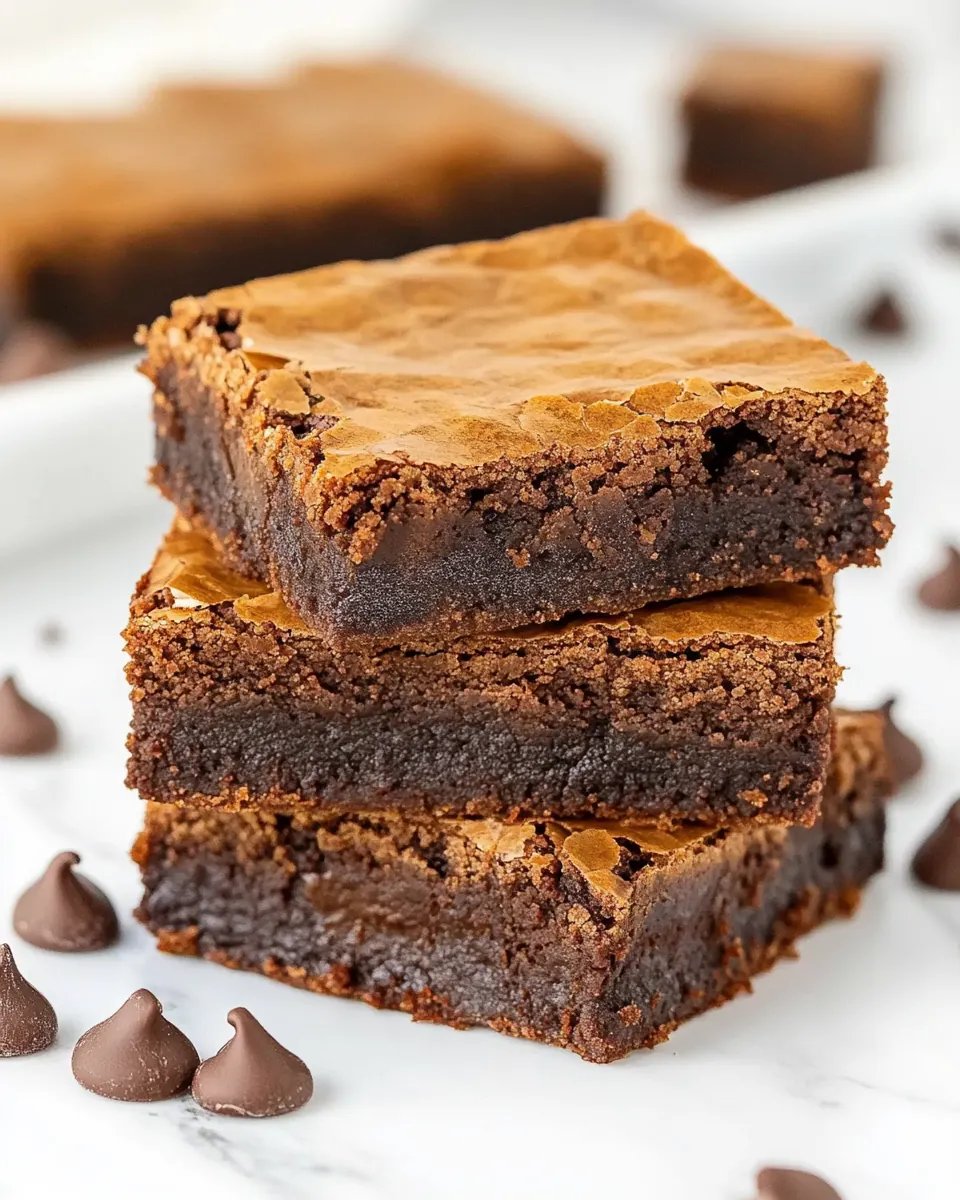
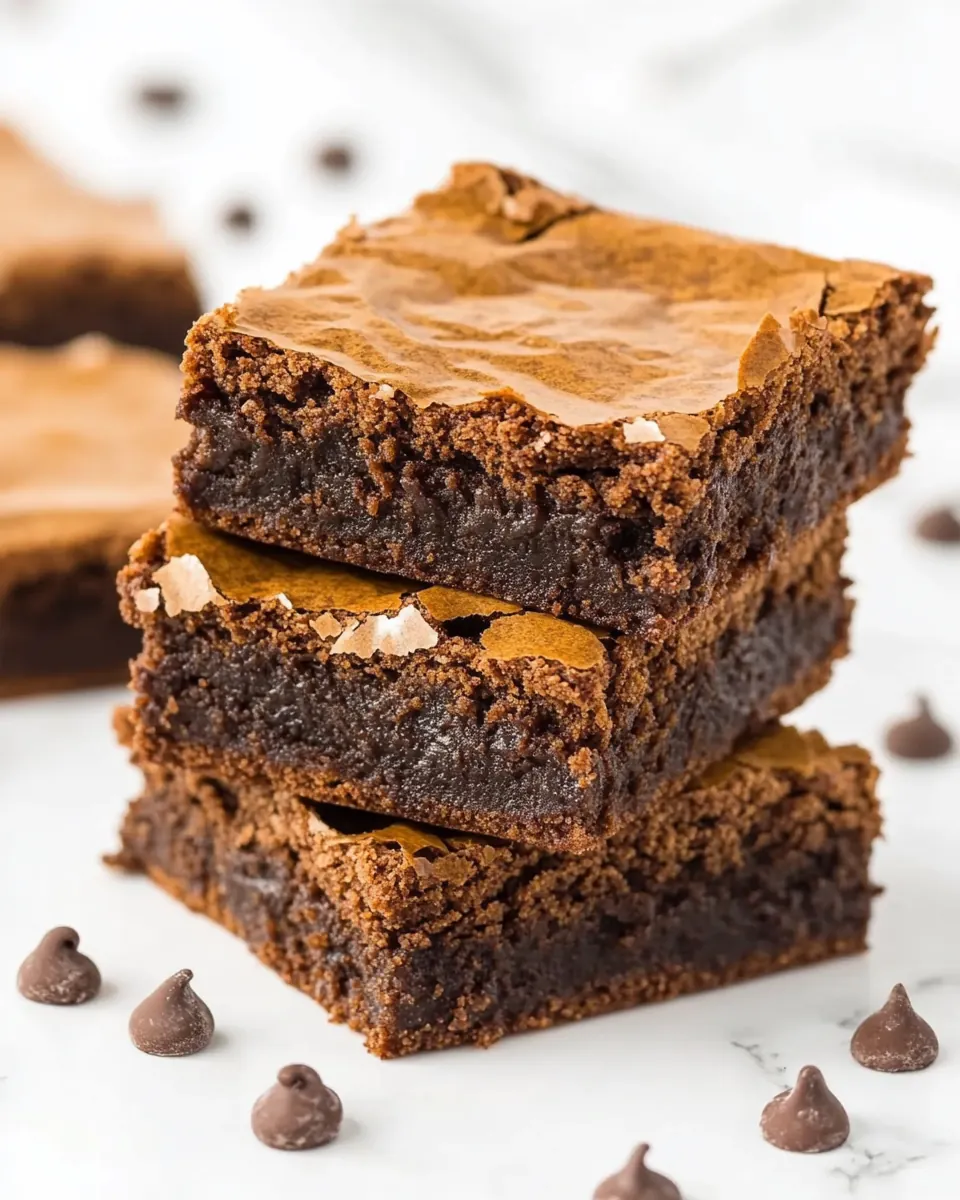
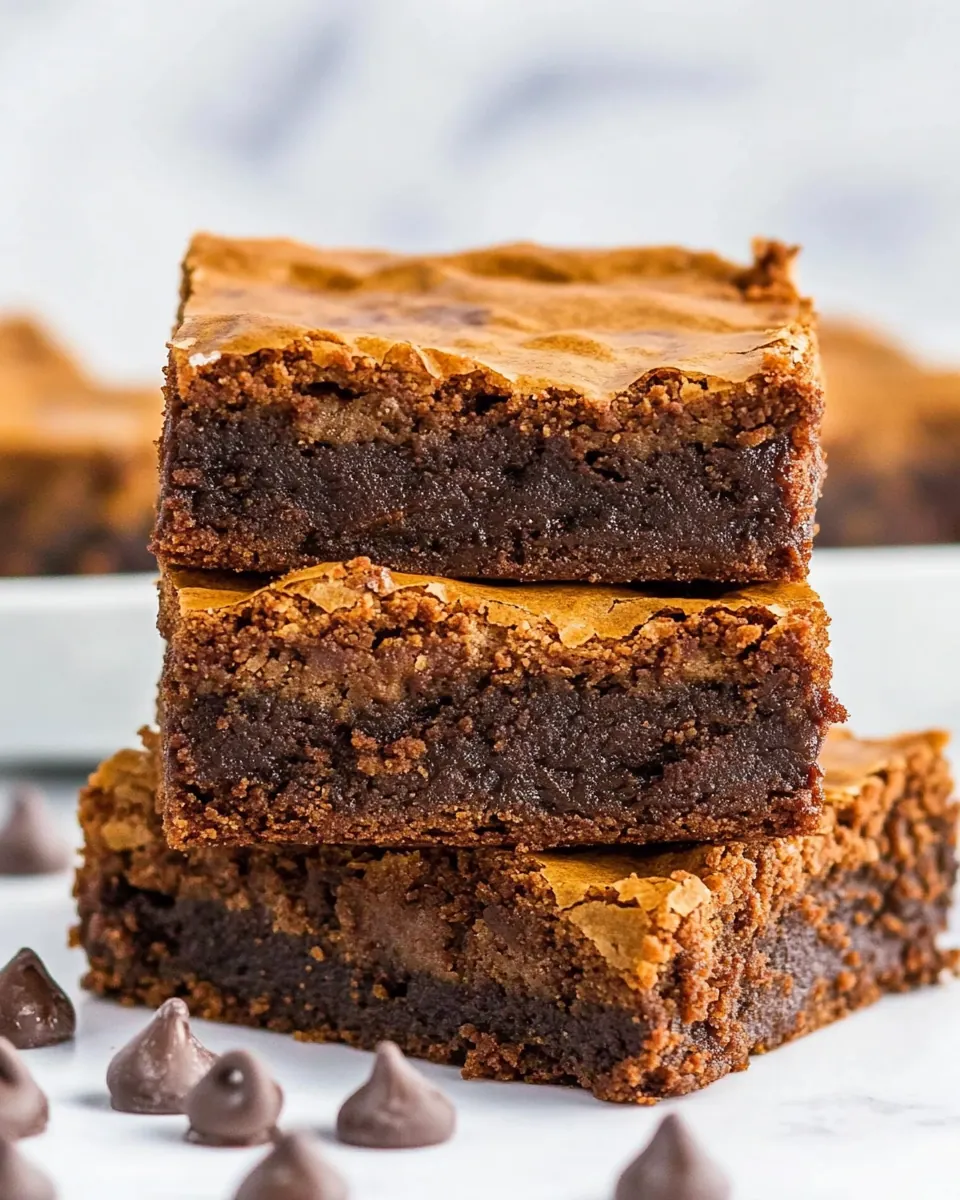
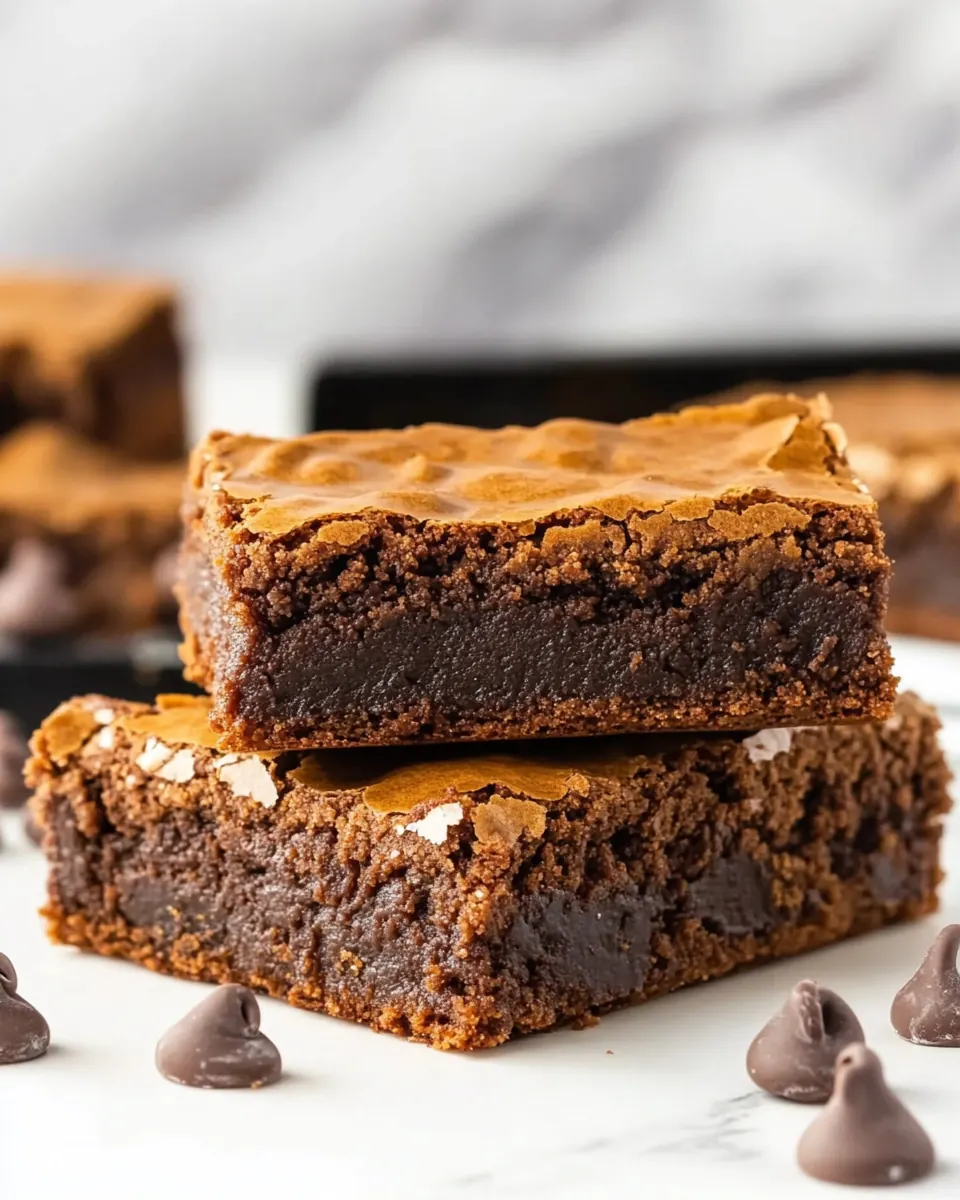
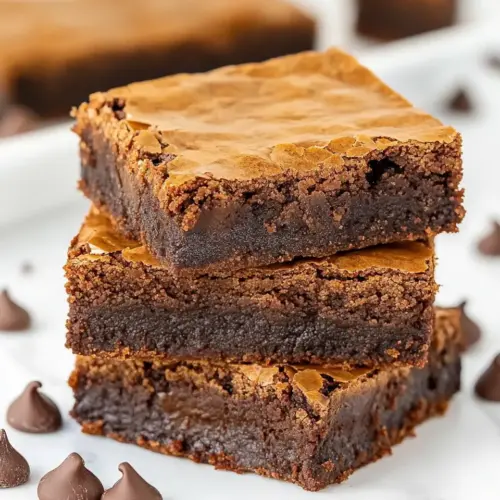
Best Brownies Recipe is the sort of treat I turn to when I want something comforting, chocolatey, and reliably impressive without fuss. The first time I made these I was racing the clock before guests arrived, and the way the kitchen filled with a warm, chocolate aroma made everyone gather around the oven. I remember lifting the pan and seeing a glossy, crackled top that promised a fudgy interior, and that moment of slicing through to reveal a tender crumb is one I still chase.
Over the years I have adjusted small details the recipe hands me, and each tweak taught me how the simplest ingredients can combine to make something greater than the sum of its parts. These brownies are the reason I keep a block of semisweet chocolate in the pantry at all times, and they are the dessert I bring to potlucks when I want to look like I planned ahead. They travel well, they slice cleanly when cooled, and they reward impatience with sheer indulgence when you sneak a warm corner straight from the pan.
Recipe Snapshot
48 mins
20 mins
28 mins
Medium
250 kcal
American
Gluten-Free, Low FODMAP
Desserts
8 x 8-inch baking pan, Parchment paper, Saucepan, Medium bowl, Wire rack
The Beauty of This Best Brownies Recipe
Rich, dependable chocolate flavor
I adore how Best Brownies Recipe uses both chopped semisweet chocolate and semi-sweet chocolate chips so the chocolate presence is layered. The chopped chocolate melts into a glossy batter giving depth, while the chips create pockets of molten chocolate, so each bite varies in intensity.
Perfect fudgy texture
These brownies balance 3 large eggs and melted unsalted butter to create a dense, slightly gooey interior. I like that the recipe avoids overworking the batter, which preserves that fudge like quality rather than producing cakey results.
Simple pantry ingredients
Everything here is likely already in your kitchen, including all purpose flour, granulated white sugar, and light brown sugar. That accessibility means you can make them on a whim for an unexpected guest or a weeknight dessert.
Subtle flavor enhancements
The addition of unsweetened cocoa powder and a touch of instant espresso powder amplifies the chocolate notes without turning the brownies into coffee dessert. I often find that tiny, well chosen ingredients like that lift the whole bake.
Reliable technique for home bakers
The method is straightforward, from melting butter and chocolate together to gently folding in the dry mix. For home cooks like me who value consistent results, that simplicity is priceless, and it makes this recipe a go to for both beginners and more experienced bakers.
What’s In This Best Brownies Recipe
These ingredients are intentionally focused and classic. I think of them as a team where each member has a clear job. The chocolates provide depth and pockets of gooeyness, the sugars control sweetness and texture, the eggs bring structure and richness, and the small amount of flour and cocoa powder set the frame without making the brownies cakey. Together they create a fudgy, flavorful bar that slices well when cool and tastes irresistible warm.
- 3/4 cup all purpose flour: Provides structure and bulk to the batter; combines with cocoa and eggs to create the crumb and gluten framework that holds the brownie together. Sifts easily into the mixture to prevent lumps and overmixing, which keeps brownies tender. Balances moisture absorption from fats and liquids for proper texture.
- 1 tablespoon unsweetened cocoa powder: Adds deep chocolate flavor and intensified cocoa notes without adding sweetness; enhances overall chocolate complexity. Dissolves quickly into the batter and works with espresso powder to amplify chocolate taste. Helps thin batter slightly and contributes to a richer color.
- 1/4 teaspoons salt: Enhances and balances sweetness while strengthening chocolate flavors; seasonally adjusts taste by counteracting excessive sugar. Sprinkled in measured amounts to ensure proper chemical balance and to heighten other flavors. Aids in controlling fermentation and interaction with leavening if used.
- 1/2 cup (1 stick) unsalted butter: Provides rich fat and contributes to a tender, moist crumb; melts into the batter to create a glossy, fudgy texture when combined with chocolate. Can be browned slightly for a nutty, caramelized flavor or used at room temperature for easy creaming with sugars. Helps carry flavors like vanilla and chocolate throughout the brownies.
- 3/4 teaspoon instant espresso powder: Intensifies chocolate flavors and adds subtle bitter, roasted notes; enhances depth without making brownies taste like coffee. Dissolves into wet ingredients to boost the perception of chocolate richness and complexity. Used sparingly to avoid overt coffee flavor while highlighting cocoa.
- 5 ounces semisweet chocolate, finely chopped: Contributes intense, concentrated chocolate richness and smooth texture when melted; forms the backbone of fudgy, decadent brownies. Melts into the butter to create a cohesive chocolate base and provides glossy finish to the batter. Finely chopping ensures even melting and prevents graininess.
- 3/4 cup granulated white sugar: Sweetens the batter while helping create structure and a crisp top crust through sugar caramelization. Dissolves into the wet ingredients to influence moisture and crumbliness of the finished brownies. Also aids in creating desirable chewiness and shine.
- 1/4 cup packed light brown sugar: Adds moisture, depth of flavor, and caramel-like notes from its molasses content; complements granulated sugar to produce a complex sweetness. Softly packs into measuring cup to ensure accurate sugar-to-moisture ratio for proper texture. Contributes to a tender, slightly fudgy center.
- 3 large eggs: Provides leavening lift, structure, and richness; eggs bind ingredients together and set as they cook to create the brownie’s internal network. Beaten eggs incorporate air and help achieve desired density depending on mixing technique. Also contribute moisture, color, and emulsification of fats.
- 1 teaspoon vanilla extract: Adds aromatic sweetness and rounds out flavors; enhances the overall perception of chocolate and balances bitterness. Stirred into the batter to distribute evenly and elevate the profile of other ingredients. Small quantity ensures warmth without overpowering the chocolate.
- 3/4 cups semi-sweet chocolate chips: Introduces concentrated pockets of melted chocolate that create texture and bursts of flavor; contributes additional chocolate intensity and gooeyness when warmed. Folded into the batter near the end to preserve shape and ensure melty centers. Also adds visual appeal and contrast in each bite.
The Process for Making Best Brownies Recipe
These steps are straightforward, but the magic is in small details like melting gently and avoiding over baking. I approach the process patiently, paying attention to visual and tactile cues so the brownies turn out fudgy rather than dry. Read each step fully, and set up your mise en place before you begin.
- Preheat the oven to 350°F. Butter an 8 x 8-inch square baking pan. Line with parchment paper and butter the parchment too.: The kitchen fills with warmth and a faint scent of metal as the oven racks heat, which ensures even rising and consistent texture. Knowing your oven's true temperature matters, because a hot oven can overcook the edges before the center sets. A common mistake here is not calibrating the oven, so use an oven thermometer if you are unsure. When the oven reaches temperature the sound of the fan and the gentle hum give you confidence the environment is ready.
- In a medium bowl, sift together the flour, cocoa powder, and salt; set aside.: Rubbing the pan with unsalted butter creates a nonstick layer that helps the parchment adhere, and it contributes a tiny amount of flavor at the edges. If the butter is uneven, parts of the parchment can lift during baking. Avoid using too little grease, because it makes removal difficult later; too much is not ideal either. The visual cue to watch is an even sheen across the pan.
- In a large saucepan, combine the butter and espresso. Place the pan over low heat and stir until the butter has melted. Add the chocolate, and stir constantly until the mixture is smooth, about 2 minutes. Remove from heat, and stir in both sugars until well combined.: Parchment ensures clean removal and sharp edges when you slice the brownies, and butter on top of the parchment prevents sticking while adding a subtle richness. If the parchment is wrinkled, smooth it so the batter settles evenly; wrinkles can create uneven baking. A common misstep is skipping parchment which makes the brownies tear when removed, so take the extra minute for neat slices.
- Add the eggs and vanilla and continue stirring until well incorporated and the mixture no longer appears grainy. Sift the flour mixture over the batter, and stir until just combined. Stir in the chocolate chips.: Sifting aerates and removes lumps so the dry mix disperses evenly into the batter, preventing streaks of dry flour or cocoa. The sound is a soft, fine patter, and the color becomes a uniform cocoa tone. If you skip sifting, you might end up with small pockets of dry ingredients, which show as floury bits in the finished bake. Use a whisk if you do not have a sifter to achieve a similar result.
- Pour the batter into the prepared pan; smooth the top with the back of a wooden spoon or a spatula. Bake until a toothpick inserted in the center comes out with a few moist crumbs, 28 to 30 minutes. Be sure not to over-bake. Let the brownies cool completely on a wire rack. Cut into 9 brownies.: As the unsalted butter warms, it releases a nutty fragrance and creates a glossy pool of fat. The tiny granules of instant espresso powder dissolve quickly and the mixture smells deeper and more chocolate forward. Watch closely because butter can separate if overheated. Stirring gently over low heat keeps the emulsion stable, and the visual cue is an even, shimmering mixture.
- Place the pan over low heat and stir until the butter has melted: Gentle heat prevents scorching and preserves the butter's sweet, toasty notes. You should see a smooth, golden liquid and feel it warm through the pan. A common mistake is using high heat which can brown the butter and alter the intended flavor profile. Maintain a low flame and stir until fully melted for a silky base.
- Add the chocolate and stir constantly until the mixture is smooth: As you add the finely chopped semisweet chocolate , the pan releases a decadent chocolate aroma and the pieces begin to disappear into a glossy, velvety ganache like texture. Continuous stirring prevents clumping and ensures the heat is evenly distributed. If you stop stirring, chunks can remain and scorch; the cue that you are done is a smooth, lump free shine across the surface, typically after about two minutes.
- Remove from heat and stir in both sugars until well combined: Off the heat, the melted chocolate accepts the granulated white sugar and light brown sugar , and the mixture becomes slightly grainy before the sugars dissolve. This step moderates temperature so the eggs can be added without scrambling. A frequent error is adding eggs to hot chocolate, which cooks them; cool the chocolate for a moment so that warmth remains but is not scalding. The texture should be cohesive and glossy when the sugars are integrated.
- Add the eggs and vanilla and continue stirring until well incorporated: As you beat in the 3 large eggs and vanilla extract , the batter takes on a silkier viscosity and a richer sheen. The stirring action produces a slightly elastic pull, indicating good emulsion between fats and eggs. If you add eggs too quickly or to very hot chocolate, they can scramble; the prevention is gentle mixing and moderate temperature. The batter should look smooth and no longer grainy when this step is successful.
- Sift the flour mixture over the batter and stir until just combined: Sifting the dry mix over the wet prevents clumps and allows gentle folding, preserving moisture and fudginess. Stir only until the streaks of flour disappear, because over mixing activates gluten and leads to a tougher crumb. The visual cue is a uniform, glossy batter with no pockets of dry mix. Avoid the common mistake of over stirring which ruins the tender texture.
- Stir in the chocolate chips: Folding in the semi–sweet chocolate chips introduces melty pockets that will soften during baking and add seductive bursts of chocolate. Folding gently keeps air pockets controlled and maintains density. If you over fold, you might deflate the batter slightly, affecting the final texture; aim for an even distribution without excessive stirring. You should see chips suspended throughout the batter evenly.
- Pour the batter into the prepared pan and smooth the top: Spreading the batter with the back of a wooden spoon or a spatula creates an even surface that bakes uniformly. The batter will settle into the corners and the top should be level with slight gloss. If the batter is lumpy, it can bake unevenly, so smooth it carefully. The look you want is an even, slightly shiny top ready for baking.
- Bake until a toothpick inserted in the center comes out with a few moist crumbs: As the pan bakes, the edges will pull slightly from the sides and the top will develop a thin crackled skin, releasing a warm, chocolate scent into the kitchen. Bake for 28 to 30 minutes, watching closely because ovens vary. A common mistake is relying solely on time rather than visual cues; test with a toothpick and aim for a few moist crumbs not wet batter. The center should still feel slightly soft when gently pressed.
- Be sure not to over-bake: Over baking dries the interior and kills that desirable fudgy texture, producing a more cake like result. Remove when the edges are set and the center yields slightly to touch. If you wait until the toothpick is clean, the brownies will be too dry. The sensory cue is a still warm center with a soft, fudgy give.
- Let the brownies cool completely on a wire rack: Cooling firms the crumb and allows clean slicing, while the aroma continues to mellow. The brownies will set from the residual heat, and cutting too soon can cause tearing. Patience here rewards you with tidy squares and neat textures. Cooling on a wire rack prevents condensation from forming under the pan, which can make the bottom soggy.
- Cut into 9 brownies: Slicing into an even 3 by 3 grid produces nine generous squares that showcase the crackled top and gooey interior. Use a sharp knife and wipe it between cuts for clean edges. A common error is cutting while still warm which produces ragged pieces; wait until fully cool for best presentation. Each piece should reveal a moist interior and a glossy top.
Helpful Hints
I like to gather everything and read the steps first, because brownies respond to a calm, attentive process. These hints expand on small choices that make a big difference, from how to chop chocolate to the best way to slice neat squares.
- Measure flour correctly by spooning it into the cup and leveling it off, as packing can add too much and dry out the brownies.
- Calibrate your oven with a thermometer to avoid over or under baking, which affects texture dramatically.
- Chop chocolate finely so it melts uniformly when combined with the butter, creating a smooth, glossy batter.
- Fold gently after adding the dry mix to prevent gluten development and keep a fudgy, dense interior.
- Test for doneness with a toothpick and remove when a few moist crumbs cling to it, rather than waiting for a clean pick.
- Cool completely before slicing to ensure tidy, clean squares and to let the texture set properly.
Serve This Best Brownies Recipe With
These brownies are versatile and welcome at casual gatherings or special moments. I often serve them warm with a scoop of ice cream or cool and neat on a dessert platter. Below are detailed serving ideas and storage tips so you can match the occasion and preserve freshness.
- Casual gatherings: Arrange Best Brownies Recipe on a simple platter for potlucks or coffee breaks, letting guests grab squares easily.
- Warm and indulgent: Serve warmed squares with a scoop of cold ice cream for contrast in temperature and texture, the warm chocolate melting into the cream.
- Gift worthy: Stack cooled brownies separated by parchment in a box for a thoughtful homemade gift that travels well.
- Storage: Keep brownies in an airtight container at room temperature for up to three days, or refrigerate to extend life; bring to room temperature before serving for the best texture.
- Occasions: These are great for birthdays, casual dinners, or any time you want a dependable chocolate dessert that pleases a crowd.
FAQ
Conclusion
What makes this recipe special is its reliable combination of melted chocolate, sugars, and eggs that deliver a truly fudgy interior and a glossy, crackled top. Give these brownies a try the next time you want a straightforward, impressive chocolate dessert, because small attentions in technique yield big differences. I hope you enjoy baking them and sharing the warm aroma and rich flavor with friends and family.
Best Brownies Recipe
Equipment
- 8 x 8-inch baking pan
- Parchment Paper
- Saucepan
- Medium Bowl
- Wire Rack
Ingredients
- 3/4 cup all purpose flour Provides structure and bulk to the batter; combines with cocoa and eggs to create the crumb and gluten framework that holds the brownie together. Sifts easily into the mixture to prevent lumps and overmixing, which keeps brownies tender. Balances moisture absorption from fats and liquids for proper texture.
- 1 tablespoon unsweetened cocoa powder Adds deep chocolate flavor and intensified cocoa notes without adding sweetness; enhances overall chocolate complexity. Dissolves quickly into the batter and works with espresso powder to amplify chocolate taste. Helps thin batter slightly and contributes to a richer color.
- 1/4 teaspoons salt Enhances and balances sweetness while strengthening chocolate flavors; seasonally adjusts taste by counteracting excessive sugar. Sprinkled in measured amounts to ensure proper chemical balance and to heighten other flavors. Aids in controlling fermentation and interaction with leavening if used.
- 1/2 cup (1 stick) unsalted butter Provides rich fat and contributes to a tender, moist crumb; melts into the batter to create a glossy, fudgy texture when combined with chocolate. Can be browned slightly for a nutty, caramelized flavor or used at room temperature for easy creaming with sugars. Helps carry flavors like vanilla and chocolate throughout the brownies.
- 3/4 teaspoon instant espresso powder Intensifies chocolate flavors and adds subtle bitter, roasted notes; enhances depth without making brownies taste like coffee. Dissolves into wet ingredients to boost the perception of chocolate richness and complexity. Used sparingly to avoid overt coffee flavor while highlighting cocoa.
- 5 ounces semisweet chocolate, finely chopped Contributes intense, concentrated chocolate richness and smooth texture when melted; forms the backbone of fudgy, decadent brownies. Melts into the butter to create a cohesive chocolate base and provides glossy finish to the batter. Finely chopping ensures even melting and prevents graininess.
- 3/4 cup granulated white sugar Sweetens the batter while helping create structure and a crisp top crust through sugar caramelization. Dissolves into the wet ingredients to influence moisture and crumbliness of the finished brownies. Also aids in creating desirable chewiness and shine.
- 1/4 cup packed light brown sugar Adds moisture, depth of flavor, and caramel-like notes from its molasses content; complements granulated sugar to produce a complex sweetness. Softly packs into measuring cup to ensure accurate sugar-to-moisture ratio for proper texture. Contributes to a tender, slightly fudgy center.
- 3 large eggs Provides leavening lift, structure, and richness; eggs bind ingredients together and set as they cook to create the brownie’s internal network. Beaten eggs incorporate air and help achieve desired density depending on mixing technique. Also contribute moisture, color, and emulsification of fats.
- 1 teaspoon vanilla extract Adds aromatic sweetness and rounds out flavors; enhances the overall perception of chocolate and balances bitterness. Stirred into the batter to distribute evenly and elevate the profile of other ingredients. Small quantity ensures warmth without overpowering the chocolate.
- 3/4 cups semi-sweet chocolate chips Introduces concentrated pockets of melted chocolate that create texture and bursts of flavor; contributes additional chocolate intensity and gooeyness when warmed. Folded into the batter near the end to preserve shape and ensure melty centers. Also adds visual appeal and contrast in each bite.
Instructions
- Preheat the oven to 350°F. Butter an 8 x 8-inch square baking pan. Line with parchment paper and butter the parchment too.: The kitchen fills with warmth and a faint scent of metal as the oven racks heat, which ensures even rising and consistent texture. Knowing your oven's true temperature matters, because a hot oven can overcook the edges before the center sets. A common mistake here is not calibrating the oven, so use an oven thermometer if you are unsure. When the oven reaches temperature the sound of the fan and the gentle hum give you confidence the environment is ready.
- In a medium bowl, sift together the flour, cocoa powder, and salt; set aside.: Rubbing the pan with unsalted butter creates a nonstick layer that helps the parchment adhere, and it contributes a tiny amount of flavor at the edges. If the butter is uneven, parts of the parchment can lift during baking. Avoid using too little grease, because it makes removal difficult later; too much is not ideal either. The visual cue to watch is an even sheen across the pan.
- In a large saucepan, combine the butter and espresso. Place the pan over low heat and stir until the butter has melted. Add the chocolate, and stir constantly until the mixture is smooth, about 2 minutes. Remove from heat, and stir in both sugars until well combined.: Parchment ensures clean removal and sharp edges when you slice the brownies, and butter on top of the parchment prevents sticking while adding a subtle richness. If the parchment is wrinkled, smooth it so the batter settles evenly; wrinkles can create uneven baking. A common misstep is skipping parchment which makes the brownies tear when removed, so take the extra minute for neat slices.
- Add the eggs and vanilla and continue stirring until well incorporated and the mixture no longer appears grainy. Sift the flour mixture over the batter, and stir until just combined. Stir in the chocolate chips.: Sifting aerates and removes lumps so the dry mix disperses evenly into the batter, preventing streaks of dry flour or cocoa. The sound is a soft, fine patter, and the color becomes a uniform cocoa tone. If you skip sifting, you might end up with small pockets of dry ingredients, which show as floury bits in the finished bake. Use a whisk if you do not have a sifter to achieve a similar result.
- Pour the batter into the prepared pan; smooth the top with the back of a wooden spoon or a spatula. Bake until a toothpick inserted in the center comes out with a few moist crumbs, 28 to 30 minutes. Be sure not to over-bake. Let the brownies cool completely on a wire rack. Cut into 9 brownies.: As the unsalted butter warms, it releases a nutty fragrance and creates a glossy pool of fat. The tiny granules of instant espresso powder dissolve quickly and the mixture smells deeper and more chocolate forward. Watch closely because butter can separate if overheated. Stirring gently over low heat keeps the emulsion stable, and the visual cue is an even, shimmering mixture.
- Place the pan over low heat and stir until the butter has melted: Gentle heat prevents scorching and preserves the butter's sweet, toasty notes. You should see a smooth, golden liquid and feel it warm through the pan. A common mistake is using high heat which can brown the butter and alter the intended flavor profile. Maintain a low flame and stir until fully melted for a silky base.
- Add the chocolate and stir constantly until the mixture is smooth: As you add the finely chopped semisweet chocolate , the pan releases a decadent chocolate aroma and the pieces begin to disappear into a glossy, velvety ganache like texture. Continuous stirring prevents clumping and ensures the heat is evenly distributed. If you stop stirring, chunks can remain and scorch; the cue that you are done is a smooth, lump free shine across the surface, typically after about two minutes.
- Remove from heat and stir in both sugars until well combined: Off the heat, the melted chocolate accepts the granulated white sugar and light brown sugar , and the mixture becomes slightly grainy before the sugars dissolve. This step moderates temperature so the eggs can be added without scrambling. A frequent error is adding eggs to hot chocolate, which cooks them; cool the chocolate for a moment so that warmth remains but is not scalding. The texture should be cohesive and glossy when the sugars are integrated.
- Add the eggs and vanilla and continue stirring until well incorporated: As you beat in the 3 large eggs and vanilla extract , the batter takes on a silkier viscosity and a richer sheen. The stirring action produces a slightly elastic pull, indicating good emulsion between fats and eggs. If you add eggs too quickly or to very hot chocolate, they can scramble; the prevention is gentle mixing and moderate temperature. The batter should look smooth and no longer grainy when this step is successful.
- Sift the flour mixture over the batter and stir until just combined: Sifting the dry mix over the wet prevents clumps and allows gentle folding, preserving moisture and fudginess. Stir only until the streaks of flour disappear, because over mixing activates gluten and leads to a tougher crumb. The visual cue is a uniform, glossy batter with no pockets of dry mix. Avoid the common mistake of over stirring which ruins the tender texture.
- Stir in the chocolate chips: Folding in the semi-sweet chocolate chips introduces melty pockets that will soften during baking and add seductive bursts of chocolate. Folding gently keeps air pockets controlled and maintains density. If you over fold, you might deflate the batter slightly, affecting the final texture; aim for an even distribution without excessive stirring. You should see chips suspended throughout the batter evenly.
- Pour the batter into the prepared pan and smooth the top: Spreading the batter with the back of a wooden spoon or a spatula creates an even surface that bakes uniformly. The batter will settle into the corners and the top should be level with slight gloss. If the batter is lumpy, it can bake unevenly, so smooth it carefully. The look you want is an even, slightly shiny top ready for baking.
- Bake until a toothpick inserted in the center comes out with a few moist crumbs: As the pan bakes, the edges will pull slightly from the sides and the top will develop a thin crackled skin, releasing a warm, chocolate scent into the kitchen. Bake for 28 to 30 minutes, watching closely because ovens vary. A common mistake is relying solely on time rather than visual cues; test with a toothpick and aim for a few moist crumbs not wet batter. The center should still feel slightly soft when gently pressed.
- Be sure not to over-bake: Over baking dries the interior and kills that desirable fudgy texture, producing a more cake like result. Remove when the edges are set and the center yields slightly to touch. If you wait until the toothpick is clean, the brownies will be too dry. The sensory cue is a still warm center with a soft, fudgy give.
- Let the brownies cool completely on a wire rack: Cooling firms the crumb and allows clean slicing, while the aroma continues to mellow. The brownies will set from the residual heat, and cutting too soon can cause tearing. Patience here rewards you with tidy squares and neat textures. Cooling on a wire rack prevents condensation from forming under the pan, which can make the bottom soggy.
- Cut into 9 brownies: Slicing into an even 3 by 3 grid produces nine generous squares that showcase the crackled top and gooey interior. Use a sharp knife and wipe it between cuts for clean edges. A common error is cutting while still warm which produces ragged pieces; wait until fully cool for best presentation. Each piece should reveal a moist interior and a glossy top.
Notes
- Measure flour correctly by spooning it into the cup and leveling it off, as packing can add too much and dry out the brownies.
- Calibrate your oven with a thermometer to avoid over or under baking, which affects texture dramatically.
- Chop chocolate finely so it melts uniformly when combined with the butter, creating a smooth, glossy batter.
- Fold gently after adding the dry mix to prevent gluten development and keep a fudgy, dense interior.
- Test for doneness with a toothpick and remove when a few moist crumbs cling to it, rather than waiting for a clean pick.
- Cool completely before slicing to ensure tidy, clean squares and to let the texture set properly.