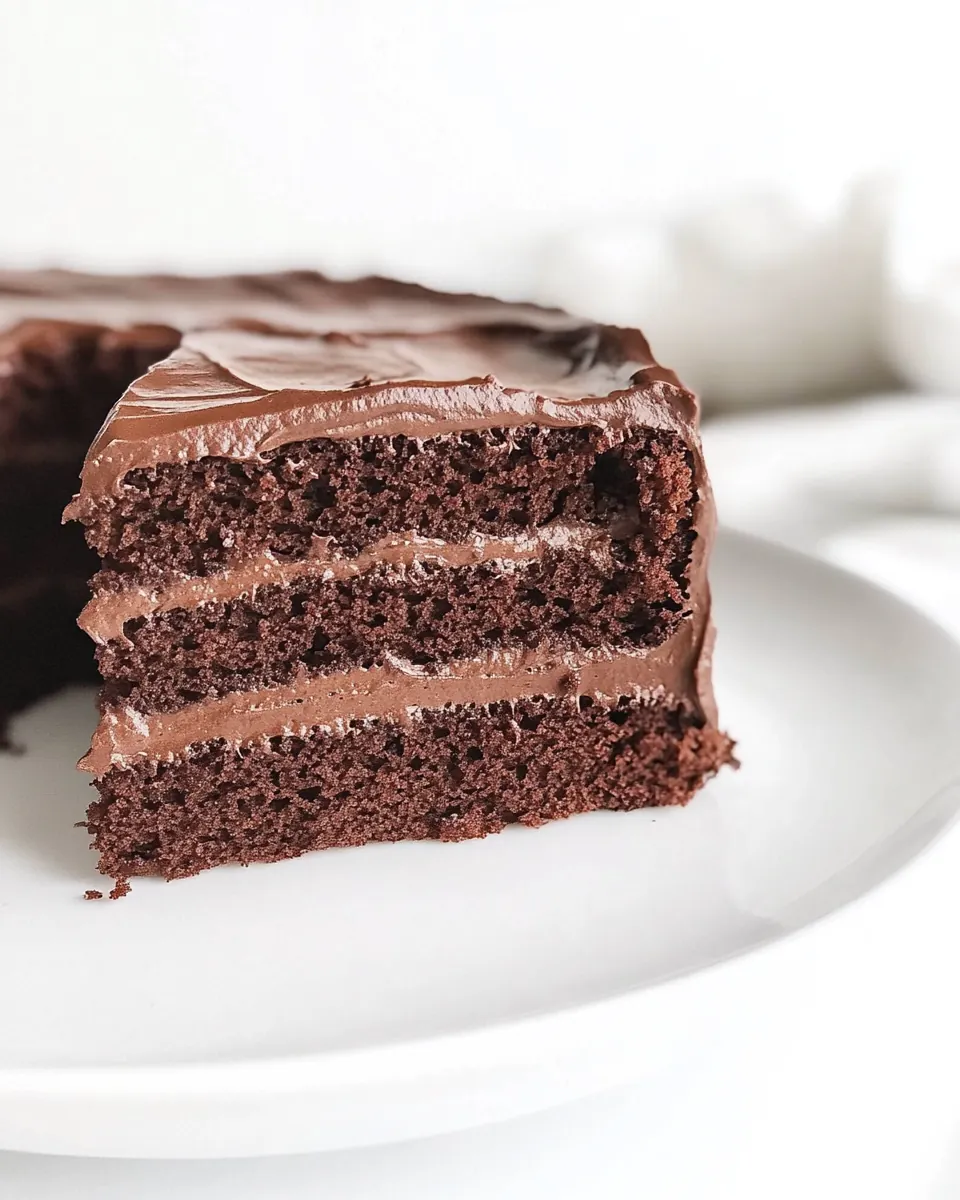
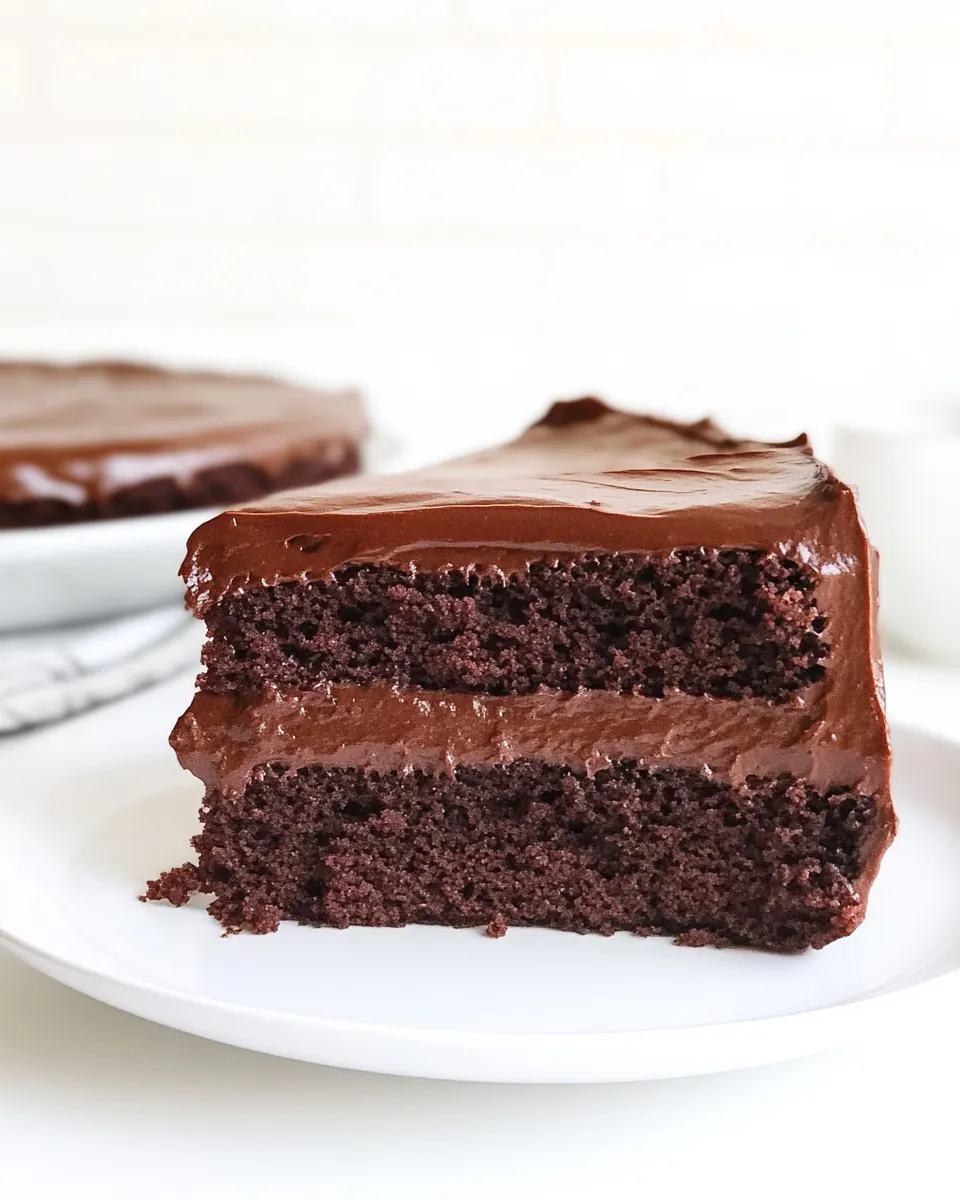
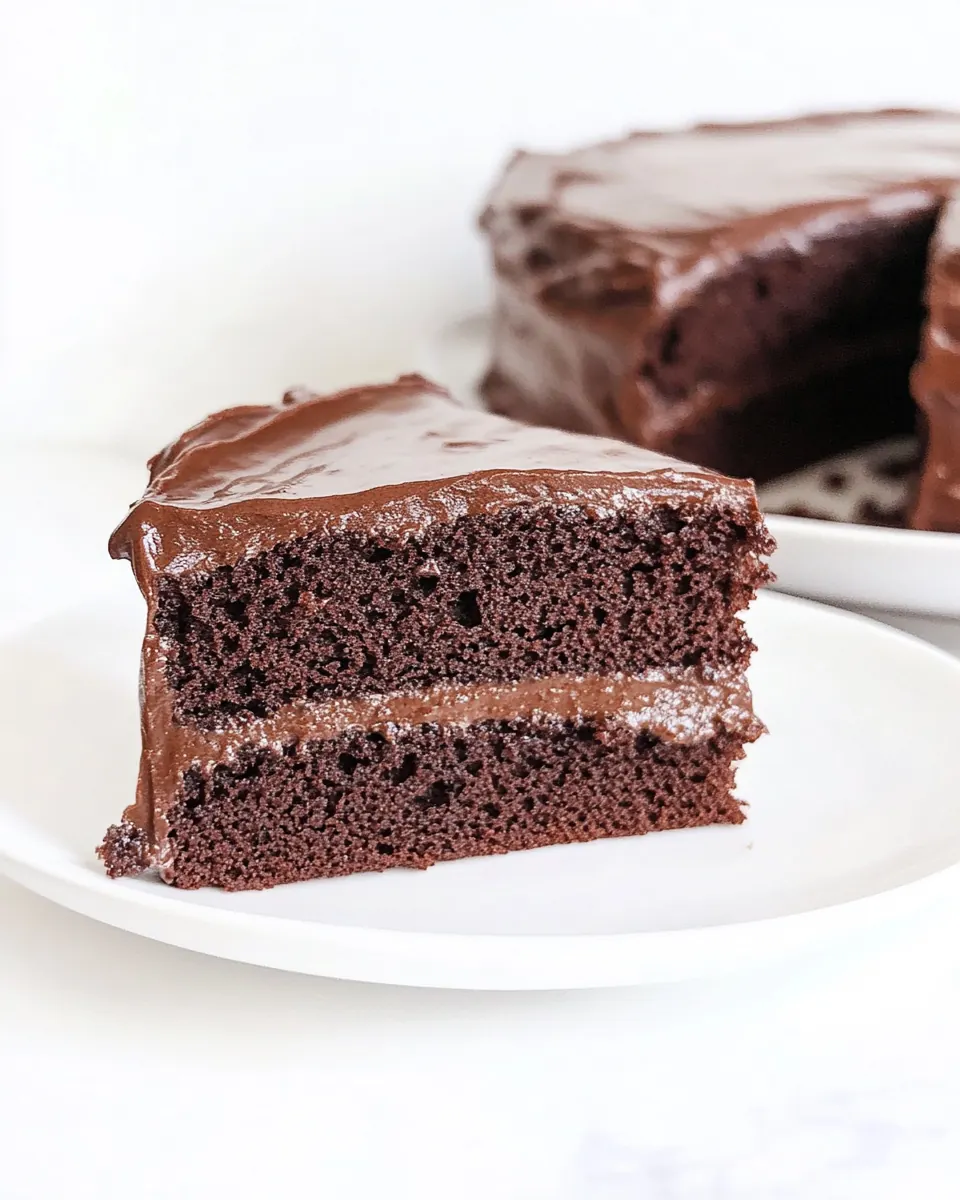
Vegan Gluten Free Chocolate Cake
Vegan Gluten Free Chocolate Cake has been one of those comforting recipes I reach for when I want to celebrate a small win without dragging out a complicated bake. The very first time I made this cake, it was for a friend who had just finished a marathon of night shifts, and I wanted to bring something that felt indulgent yet thoughtful. I remember the warm kitchen air filling with the deep cocoa aroma while I stirred the batter, and how everyone paused mid conversation when the cake came out of the oven, steam still rising from the cracked surface.
I have a soft spot for bakes that are forgiving yet precise, which is why this Vegan Gluten Free Chocolate Cake sits in my regular rotation. It uses a small handful of pantry-stable ingredients, and every time I measure the almond flour or sift the cacao, I appreciate how each element plays a clear role in texture and flavor. Over several test runs I learned subtle things, like how the batter should look silkier than some conventional cakes, and how cooling fully changes the crumb from slightly tender to reliably sliceable.
Recipe Snapshot
55 mins
15 mins
40 mins
Medium
250 kcal
Vegan
Vegan, Gluten-Free
Desserts
Oven, Mixing bowl, Whisk, Cake pan, Parchment paper
Why You’ll Love This Vegan Gluten Free Chocolate Cake
1. Purely plant based, without compromise
I love that this Vegan Gluten Free Chocolate Cake proves vegan bakes can still feel luxurious. The combination of almond flour and starches gives a tender crumb while remaining entirely dairy free, so you get a rich mouthfeel without any animal products. I find this makes it perfect for gatherings where guests have varied diets, because it never feels like a scaled back dessert.
2. Reliable gluten free texture
Gluten free baking can be fussy, yet this recipe balances starches and nut flour in a way that keeps the cake moist and cohesive. I learned to trust the ratio; the starches provide just enough structure while the almond flour keeps the bite pleasantly soft. When I want to impress someone new to gluten free treats, this cake is my go to because it almost always delivers a clean slice and a satisfying crumb.
3. Simple pantry ingredients
I appreciate how few specialty items are needed, and most of them I keep on hand. Things like cacao powder, maple syrup, and coconut oil are staples in my kitchen, so whipping this up on short notice is realistic. It’s the kind of recipe I turn to when I want to celebrate without a grocery run, and that convenience makes me make it more often.
4. Friendly for different pan sizes and occasions
One of the things I like most is the flexibility in pan choices. You can bake it in smaller layered pans for a party, or one larger pan for a casual dessert. I’ve used it for birthdays, cozy dinners, and as a take along to midday meet ups. It adapts gracefully, and I often tweak the presentation rather than the cake itself.
5. Balanced chocolate flavor
The recipe centers on cacao for a deep, true chocolate taste, never too sweet or masked. I find the maple syrup adds a gentle caramel note while the cacao provides that bittersweet edge I love. Together they create a dessert that feels thoughtful and not overbearing, which is why I keep returning to it when I want chocolate that tastes grown up.
Ingredients Overview for Vegan Gluten Free Chocolate Cake

These ingredients are chosen to create a delicate, moist crumb without gluten or animal products. The key players are the almond flour which lends richness and a tender texture, the trio of starches which build structure in place of gluten, and the cacao powder which supplies concentrated chocolate flavor. The liquid trio of warm water, melted coconut oil, and maple syrup brings the batter together, while the baking powder and salt fine tune rise and flavor.
- 1 1/4 cups blanched almond flour (146 grams): Provide a tender, moist crumb and a subtle nutty flavor while serving as the primary dry base for the cake; contributes healthy fats and helps mimic wheat flour structure in gluten-free baking.
- 1/2 cup potato starch (87 grams): Improve structure and help absorb moisture, yielding a lighter texture when combined with other starches; works in tandem with almond flour to create a balanced gluten-free crumb.
- 1/4 cup tapioca starch (34 grams): Add chewiness and binding ability while lightening the overall texture; helps provide elasticity and a delicate lift in the absence of gluten.
- 2/3 cup cacao powder (60 grams): Deliver deep chocolate flavor and color while contributing a dry, intense cocoa backbone; helps give the cake its signature chocolate taste and pairs with sweeteners for balance.
- 2 teaspoons baking powder (10 grams): Act as a chemical leavening agent to provide lift and volume by producing gas during baking; helps compensate for the lack of gluten strength in this vegan batter.
- 1/2 teaspoon fine sea salt (4 grams): Enhance overall flavor by balancing sweetness and strengthening the effectiveness of leavening; also helps to slightly tenderize the crumb by moderating protein interactions.
- 1/4 cup warm water (56 grams): Contribute necessary hydration to dissolve dry ingredients and activate leavening; helps adjust batter consistency for proper mixing and baking performance.
- 1/4 cup melted coconut oil (53 grams): Supply fat for richness, moisture, and tenderness while helping to carry flavor; solidifies slightly at room temperature to create a pleasant mouthfeel in the finished cake.
- 1 cup maple syrup (at room temperature; 320 grams): Provide sweetness, moisture, and gentle acidity that can interact with leavening agents; acts as the primary liquid sweetener and contributes to the cake’s tender texture.
- 2 teaspoons vanilla extract (10 grams): Impart aromatic flavor depth and enhance perceived sweetness; rounds out the batter with warm, familiar notes that complement chocolate.
How to Assemble Vegan Gluten Free Chocolate Cake
This cake comes together with straightforward mixing and careful attention to texture. The directions are designed so you can focus on sensory cues rather than timers alone, helping you recognize when the batter and bake are exactly right. Below I expand each step with detailed sensory notes, reasons why the action matters, and common pitfalls to avoid.
- Preheat the oven to 350ºF and prepare your cake pan(s). You can use two 6-inch pans or one 8-inch round or square pan. Spray the pan(s) lightly with oil, then line the bottom with parchment paper for easy cake removal later.: As the oven warms, you will notice the kitchen gradually taking on a faint warmth and you may smell a hint of dry heat when the racks start to glow. Proper preheating ensures the cake begins rising immediately when placed inside, which helps build an even crumb and prevents an overly dense center. I line the bottom with parchment and lightly oil the sides, which promotes an easy release and keeps the exterior from tearing when you remove the cake. A common mistake is opening the oven door to check too often, which can cause uneven rise, so resist peeking for at least the first half of the bake time.
- In a large bowl, combine the almond flour, potato starch, tapioca starch, cacao powder, baking powder, and salt. Use a whisk to stir well and break up any clumps.: When you whisk these dry ingredients, you should see a uniform, powdery mixture with a deep, chocolatey hue. Whisking breaks up clumps and aerates the mixture slightly, aiding lift and consistent texture. I like to sift or vigorously whisk the cacao because it can clump, and those dry lumps would create pockets of intense flavor or dry bits in the finished cake. Avoid using a mixer at this stage, over agitation can warm the fat components later when combined, affecting final texture.
- To the dry ingredients, add in the water, coconut oil, maple syrup, and vanilla. Whisk again, until the batter is smooth. Pour the batter into the prepared cake pans, dividing it evenly if using the two 6-inch pans.: As the liquids join the dry mix, smell the first bright notes of maple and a subtle coconut sweetness, and watch the batter transform into a glossy, smooth ribbon when you lift your whisk. This viscosity is the right sign that the starches have hydrated and the fats have evenly distributed. Whisk until smooth with no visible streaks of dry powder, scraping the bowl to ensure uniformity. A troubleshooting tip: if the batter looks overly thin, check your measures; too much liquid will make the cake overly flat and require a longer bake.
- Bake at 350ºF until the cake has fully risen in the center, and is slightly cracked around the edges. This takes about 35 minutes for the two 6-inch cake pans, and 40 to 45 minutes in the 8-inch cake pan. (If using a glass or ceramic baking dish, it might even take a little longer.): Pouring should feel effortless as the batter flows with a satin sheen. Even division ensures uniform baking and consistent rise for layered assembly or serving. Tap the pans gently on the counter once to release air bubbles and to settle the batter, watching small bubbles rise and disappear. The main mistake here is uneven distribution, which causes one layer to cook faster and potentially overbrown; I use a kitchen scale or eyeball equal portions by sight to avoid that.
- Allow the cake to cool completely before removing from the pan and frosting. This cake will keep well when tightly covered on the counter for up to 24 hours, but for the best shelf life you can store it in an airtight container in the fridge for up to a week.: During baking you will notice a deep chocolate scent intensifying and a slight crackle at the pan edges as the top sets. For two 6 inch pans expect around 35 minutes, whereas an 8 inch may take 40 to 45 minutes, and glass dishes often need more time because they retain heat. The correct doneness shows a firm center that springs back gently, and a toothpick inserted near the center comes out with a few moist crumbs. Avoid overbaking which dries the crumb; if the edges brown quickly but the center is still unset, lower the oven heat by 10 to 15 degrees and continue to monitor.
- Allow the cake to cool completely before removing from the pan and frosting: Cooling is when the crumb finishes setting and the crumb firms enough to slice cleanly. You will feel residual warmth still in the pans, and the aroma becomes steadier, not as sharp as in the hot bake. If you try to unmold while warm, the cake can break or compress, so patience matters. A common mistake is frosting while warm, which causes frosting to melt and slide; wait until the cake is at room temperature before applying any frosting or fillings.
Helpful Hints
I like to keep a small list of reliable tips that make this cake effortless. These pointers come from repeated bakes and help you avoid the little errors that can change texture or flavor. Read them before you begin so you can set up and bake with confidence.
- Measure carefully: Spoon and level the almond flour and starches to ensure accurate texture and avoid a dense outcome.
- Warm liquids: Use room temperature maple syrup and slightly warm water to help the melted coconut oil blend without seizing.
- Refresh leavening: If your baking powder is older than six months, replace it to maintain reliable rise.
- Pan prep matters: Lightly oil and line pans with parchment for an easy release and intact edges when unmolding.
- Watch the center: Check for a springy center and moist crumbs on a toothpick rather than relying on time alone, since pan material affects bake time.
Serve This Vegan Gluten Free Chocolate Cake With
This cake is versatile on the table, pairing well with light accompaniments and working for many occasions. Whether you slice it for a casual coffee break or dress it up for a small celebration, these serving ideas will help you present it beautifully. Below I outline specific serving suggestions, storage notes, and ideal occasions.
- Simple dusting for casual serving: A light sprinkle of sifted cacao powder or a dusting of powdered sugar over the top keeps it effortless and elegant for everyday dessert.
- Layered for birthdays: Use the two 6 inch pans to build a layered cake, adding a thin smear of vegan frosting between layers and around the exterior for a celebratory look.
- Accompaniments for sharing: Serve slices with a scoop of plant based ice cream or a spoonful of coconut cream to complement the chocolate notes for weekend gatherings.
- Occasions and timing: Works well for afternoon tea, birthday celebrations, or as a Ramadan dessert after Iftar, since it is filling yet not overly sweet.
- Storage basics: Keep the cake in an airtight container at room temperature for up to 24 hours for best texture, or refrigerate for up to a week; bring back to room temperature before serving for softer crumb.
- Seasonal pairing: In cooler months, pair with warm spiced tea; in warmer weather, present with chilled fruit for contrast in temperature and acidity.
FAQ
Conclusion
This Vegan Gluten Free Chocolate Cake stands out for its deep chocolate flavor and reliably tender crumb, all without gluten or animal products. Give it a try when you want a dessert that feels indulgent yet simple to prepare, and you might find it becomes a go to for celebrations and quiet evenings alike. I hope it brings the same warm, chocolatey comfort to your table that it has to mine.

Vegan Gluten Free Chocolate Cake
Equipment
- Oven
- Mixing Bowl
- Whisk
- Cake pan
- Parchment Paper
Ingredients
- 1 1/4 cups blanched almond flour (146 grams) Provide a tender, moist crumb and a subtle nutty flavor while serving as the primary dry base for the cake; contributes healthy fats and helps mimic wheat flour structure in gluten-free baking.
- 1/2 cup potato starch (87 grams) Improve structure and help absorb moisture, yielding a lighter texture when combined with other starches; works in tandem with almond flour to create a balanced gluten-free crumb.
- 1/4 cup tapioca starch (34 grams) Add chewiness and binding ability while lightening the overall texture; helps provide elasticity and a delicate lift in the absence of gluten.
- 2/3 cup cacao powder (60 grams) Deliver deep chocolate flavor and color while contributing a dry, intense cocoa backbone; helps give the cake its signature chocolate taste and pairs with sweeteners for balance.
- 2 teaspoons baking powder (10 grams) Act as a chemical leavening agent to provide lift and volume by producing gas during baking; helps compensate for the lack of gluten strength in this vegan batter.
- 1/2 teaspoon fine sea salt (4 grams) Enhance overall flavor by balancing sweetness and strengthening the effectiveness of leavening; also helps to slightly tenderize the crumb by moderating protein interactions.
- 1/4 cup warm water (56 grams) Contribute necessary hydration to dissolve dry ingredients and activate leavening; helps adjust batter consistency for proper mixing and baking performance.
- 1/4 cup melted coconut oil (53 grams) Supply fat for richness, moisture, and tenderness while helping to carry flavor; solidifies slightly at room temperature to create a pleasant mouthfeel in the finished cake.
- 1 cup maple syrup (at room temperature; 320 grams) Provide sweetness, moisture, and gentle acidity that can interact with leavening agents; acts as the primary liquid sweetener and contributes to the cake’s tender texture.
- 2 teaspoons vanilla extract (10 grams) Impart aromatic flavor depth and enhance perceived sweetness; rounds out the batter with warm, familiar notes that complement chocolate.
Instructions
- Preheat the oven to 350ºF and prepare your cake pan(s). You can use two 6-inch pans or one 8-inch round or square pan. Spray the pan(s) lightly with oil, then line the bottom with parchment paper for easy cake removal later.: As the oven warms, you will notice the kitchen gradually taking on a faint warmth and you may smell a hint of dry heat when the racks start to glow. Proper preheating ensures the cake begins rising immediately when placed inside, which helps build an even crumb and prevents an overly dense center. I line the bottom with parchment and lightly oil the sides, which promotes an easy release and keeps the exterior from tearing when you remove the cake. A common mistake is opening the oven door to check too often, which can cause uneven rise, so resist peeking for at least the first half of the bake time.
- In a large bowl, combine the almond flour, potato starch, tapioca starch, cacao powder, baking powder, and salt. Use a whisk to stir well and break up any clumps.: When you whisk these dry ingredients, you should see a uniform, powdery mixture with a deep, chocolatey hue. Whisking breaks up clumps and aerates the mixture slightly, aiding lift and consistent texture. I like to sift or vigorously whisk the cacao because it can clump, and those dry lumps would create pockets of intense flavor or dry bits in the finished cake. Avoid using a mixer at this stage, over agitation can warm the fat components later when combined, affecting final texture.
- To the dry ingredients, add in the water, coconut oil, maple syrup, and vanilla. Whisk again, until the batter is smooth. Pour the batter into the prepared cake pans, dividing it evenly if using the two 6-inch pans.: As the liquids join the dry mix, smell the first bright notes of maple and a subtle coconut sweetness, and watch the batter transform into a glossy, smooth ribbon when you lift your whisk. This viscosity is the right sign that the starches have hydrated and the fats have evenly distributed. Whisk until smooth with no visible streaks of dry powder, scraping the bowl to ensure uniformity. A troubleshooting tip: if the batter looks overly thin, check your measures; too much liquid will make the cake overly flat and require a longer bake.
- Bake at 350ºF until the cake has fully risen in the center, and is slightly cracked around the edges. This takes about 35 minutes for the two 6-inch cake pans, and 40 to 45 minutes in the 8-inch cake pan. (If using a glass or ceramic baking dish, it might even take a little longer.): Pouring should feel effortless as the batter flows with a satin sheen. Even division ensures uniform baking and consistent rise for layered assembly or serving. Tap the pans gently on the counter once to release air bubbles and to settle the batter, watching small bubbles rise and disappear. The main mistake here is uneven distribution, which causes one layer to cook faster and potentially overbrown; I use a kitchen scale or eyeball equal portions by sight to avoid that.
- Allow the cake to cool completely before removing from the pan and frosting. This cake will keep well when tightly covered on the counter for up to 24 hours, but for the best shelf life you can store it in an airtight container in the fridge for up to a week.: During baking you will notice a deep chocolate scent intensifying and a slight crackle at the pan edges as the top sets. For two 6 inch pans expect around 35 minutes, whereas an 8 inch may take 40 to 45 minutes, and glass dishes often need more time because they retain heat. The correct doneness shows a firm center that springs back gently, and a toothpick inserted near the center comes out with a few moist crumbs. Avoid overbaking which dries the crumb; if the edges brown quickly but the center is still unset, lower the oven heat by 10 to 15 degrees and continue to monitor.
- Allow the cake to cool completely before removing from the pan and frosting: Cooling is when the crumb finishes setting and the crumb firms enough to slice cleanly. You will feel residual warmth still in the pans, and the aroma becomes steadier, not as sharp as in the hot bake. If you try to unmold while warm, the cake can break or compress, so patience matters. A common mistake is frosting while warm, which causes frosting to melt and slide; wait until the cake is at room temperature before applying any frosting or fillings.
Notes
- Measure carefully: Spoon and level the almond flour and starches to ensure accurate texture and avoid a dense outcome.
- Warm liquids: Use room temperature maple syrup and slightly warm water to help the melted coconut oil blend without seizing.
- Refresh leavening: If your baking powder is older than six months, replace it to maintain reliable rise.
- Pan prep matters: Lightly oil and line pans with parchment for an easy release and intact edges when unmolding.
- Watch the center: Check for a springy center and moist crumbs on a toothpick rather than relying on time alone, since pan material affects bake time.