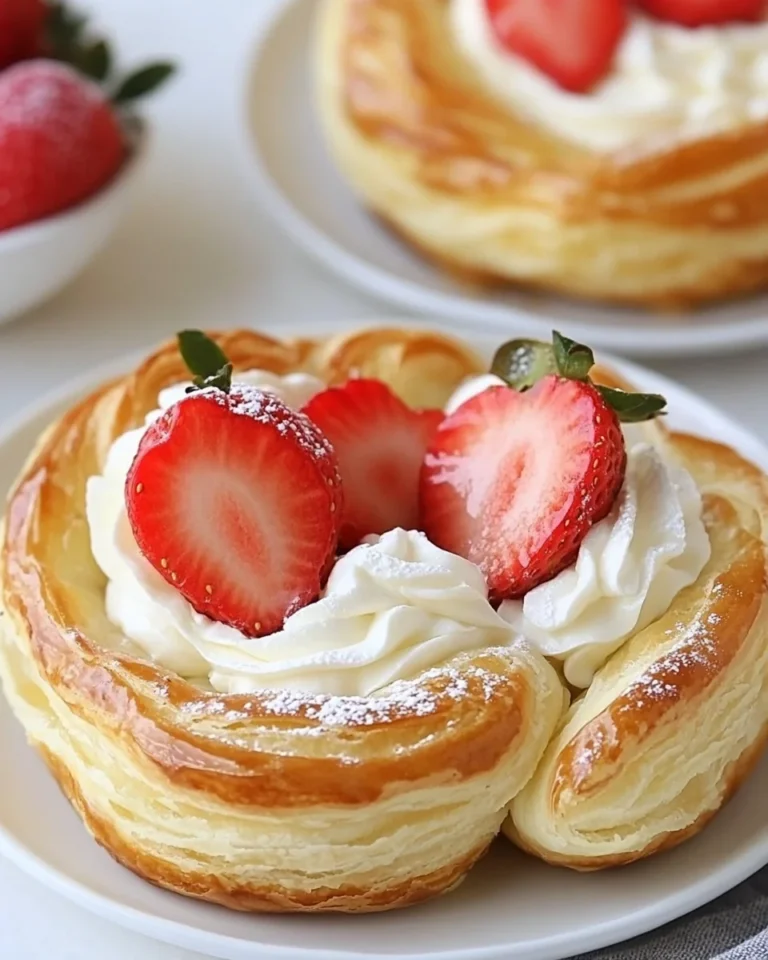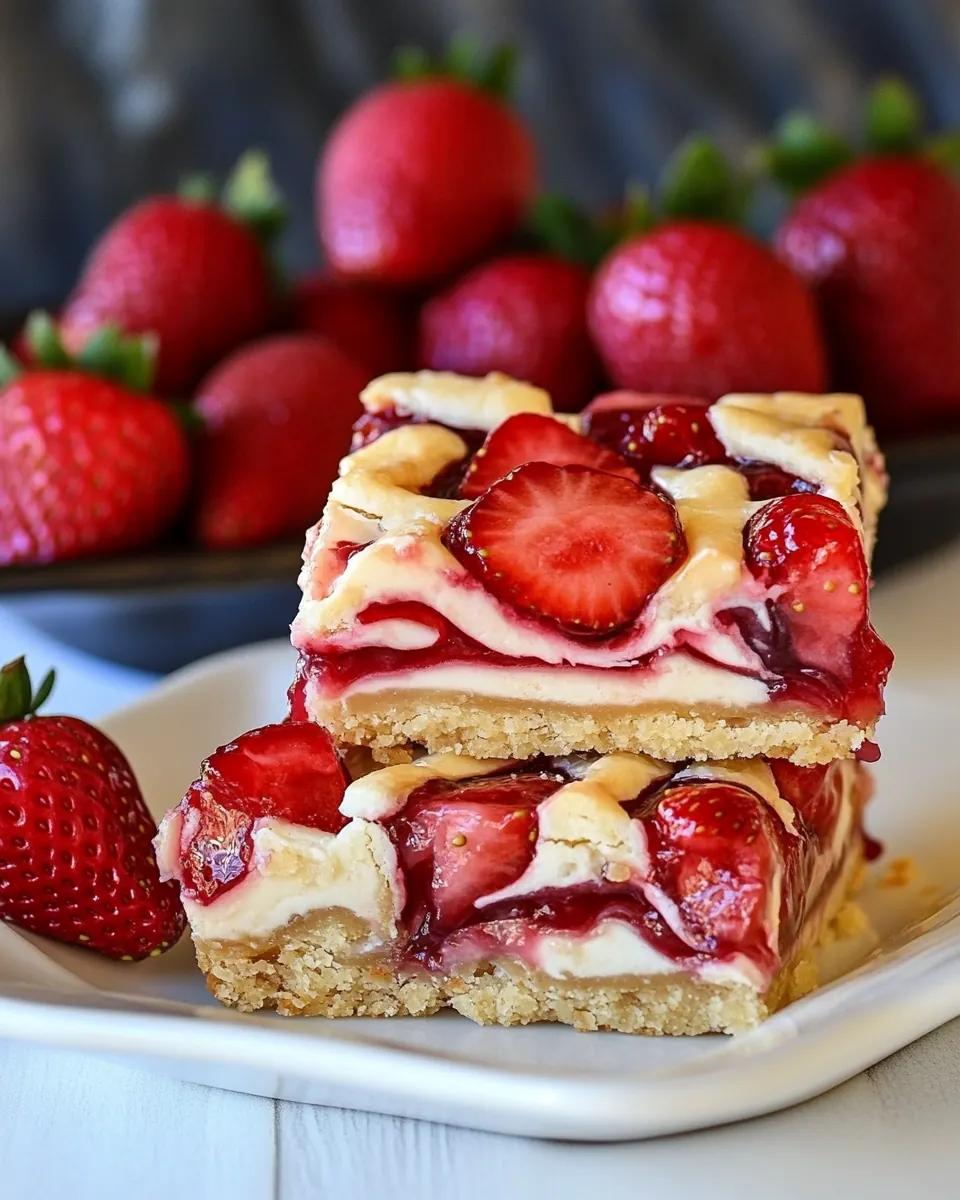
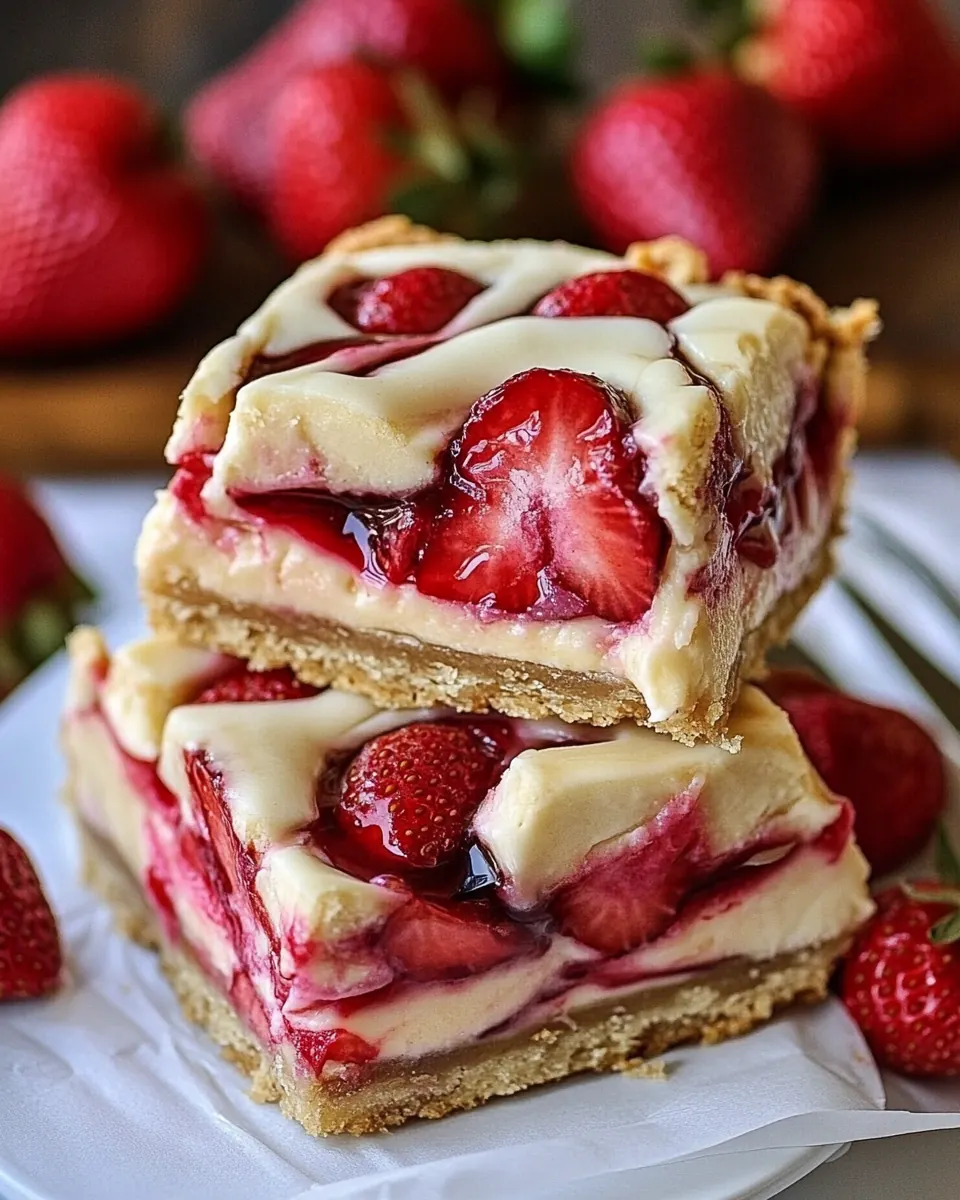
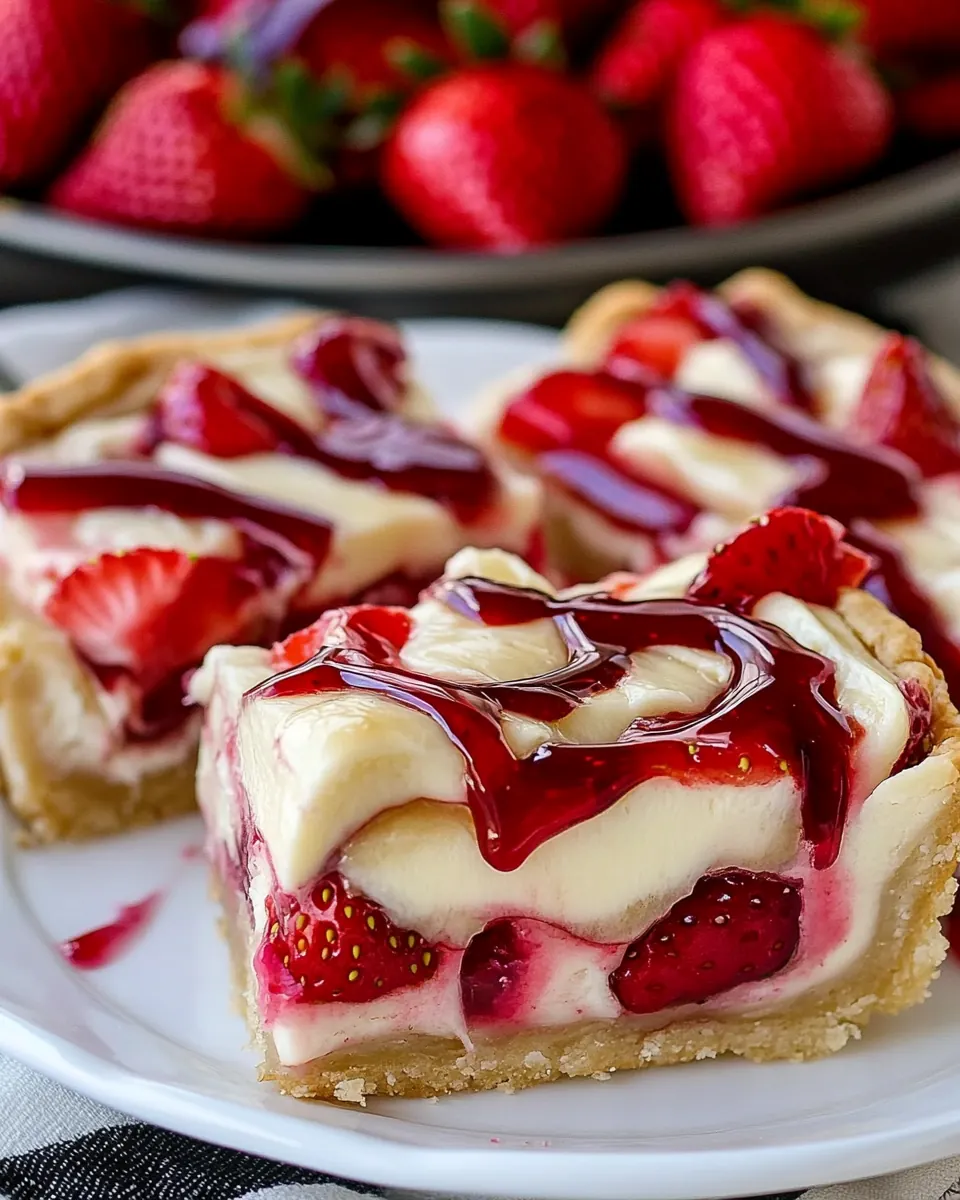
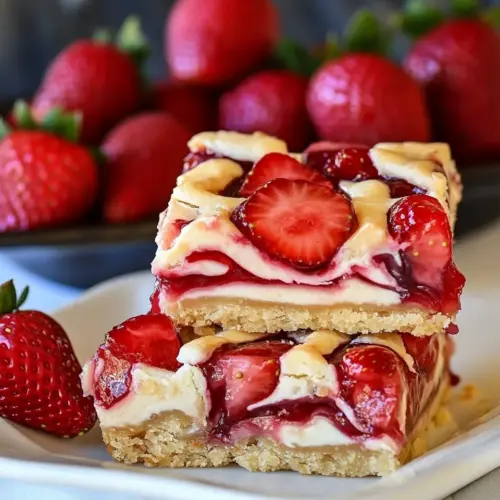
Strawberry Pie Bars
Strawberry Pie Bars are the kind of dessert I reach for when friends text that they are on their way and I have just enough time to pull something unmistakably homey together.
Years ago I stumbled into this recipe on a rainy summer afternoon, flour dusting my countertops, and the smell of warm butter filling the house as the oven hummed. I remember tearing open a can of bright strawberry pie filling and thinking how its glossy chunks would be perfect tucked into a soft, tender crust. That first tray disappeared in a single evening, and I kept the recipe because it taught me a simple truth, that uncomplicated ingredients can produce something unexpectedly comforting.
Since then I have adapted the timing, learned how to spot the perfect golden edges, and started glazing the bars only when they are cool so the topping stays crisp. I like serving these at summer potlucks, where the strawberry pie filling breaks through the buttery base with every bite, and people always ask for the recipe. I love how the combination of textures comes together, and how easy it is to scale for a crowd.
Recipe Snapshot
1 hr 20 mins
20 mins
60 mins
Medium
250 kcal
American
Gluten-Free, Low FODMAP
Desserts
Jelly roll pan, Mixer, Offset spatula
The Best Thing About This Strawberry Pie Bars
Simple Ingredients, Big Impact
I adore recipes that rely on pantry staples yet deliver big flavor. With Strawberry Pie Bars you get the richness of butter and the bright, jammy pop of strawberry pie filling. It is a reminder that technique matters more than complexity, and that a well mixed dough and the right bake time make all the difference.
Perfect for Entertaining
I’ve served these at backyard gatherings and casual tea times, and they always travel well. You can slice them into small squares, stack them on a platter, and people will nibble them all afternoon. I love that they feed a crowd without the stress of assembling at the last minute.
Texture Play
What excites me most is the contrast between the dense, buttery base and the glossy, slightly saucy strawberry pie filling. That interplay keeps every bite interesting. If you pay attention to the visual cues, the crust will be tender but structured, and the topping will stay delightfully gooey.
Flexible and Forgiving
This recipe is forgiving for bakers of all levels. I have taught friends who rarely bake and they come away confident. Small variations in mixing speed or oven differences do not ruin the result, as long as you watch for the telltale signs of doneness.
Finish Makes It Shine
The simple glaze lifts these bars from good to memorable. I learned to wait until the bars are cool before glazing so the surface keeps its slight chew. That finishing touch makes them look cared for, and it is a tiny step that rewards you and your guests.
Ingredients to Make Strawberry Pie Bars
I believe good baking starts with respect for each component. These ingredients are straightforward, and each plays a clear role. The butter brings richness and tenderness, the sugar sweetens and helps with texture, while the eggs bind everything together and give structure. The flour and salt balance moisture and flavor, and the canned strawberry pie filling provides the bright fruit notes that define the bars. The glaze is optional, but it adds a glossy finish and a touch of extra sweetness.
- 1 c. butter softened: Cream together to create a tender, rich base for the crust and crumb while helping other ingredients blend evenly; softened texture ensures proper aeration and smooth mixing without lumps.
- 2 c. sugar: Sweeten the batter and provide structure and moisture; granulated sugar also helps with browning and caramelization during baking for a golden finish.
- 4 eggs: Beat until incorporated to provide lift, richness, and structure; eggs emulsify fats and liquids, improving texture and binding the dough into a cohesive bar.
- 1 tsp vanilla extract: Enhance flavor with warm, familiar notes and help round out the sweetness; vanilla extract complements fruit and almond flavors throughout the bars.
- 1/4 tsp almond extract: Add a delicate, nutty aroma that complements the vanilla and strawberry filling; a small amount intensifies overall flavor complexity without overpowering.
- 3 c. flour: Provide the primary bulk and structure to the dough; flour forms the gluten network that determines the bars’ crumb and firmness when combined with fats and liquids.
- 1 tsp salt: Balance flavor and stabilize the dough by enhancing sweetness and controlling yeast or leavening action if present; salt also tightens gluten for better texture.
- 2 cans 21 ounce Lucky Leaf strawberry pie filling: Supply the sweet, fruity filling and moisture for the bars; canned strawberry pie filling offers consistency, sweetness, and ready-made fruit pieces for convenience.
- Glaze: Drizzle or spread to add shine, extra sweetness, and a finishing touch; glaze enhances appearance and provides a slight contrast in texture to the baked bars.
- 1 c. powdered sugar: Provide smooth sweetness for the glaze and help it set when mixed with liquid; powdered sugar dissolves quickly to create a glossy finish.
- 1/2 tsp vanilla extract: Contribute depth and familiar flavor notes to the glaze and pair with almond for a layered taste; vanilla extract in glaze mirrors flavors used in the batter.
- 1/2 tsp almond extract: Bolster the glaze with a light nutty accent that echoes the batter’s flavor profile; a small amount of almond extract intensifies the overall aroma of the topping.
- 2 tbsp milk: Thin and smooth the glaze to a pourable consistency while adding subtle creaminess; milk helps achieve the desired thickness for easy drizzling or spreading.
Cooking Method for Strawberry Pie Bars

These instructions are written to guide you step by step while keeping the process relaxed and intuitive. I walk you through texture and sensory cues so you can trust what your eyes and hands tell you. Pay attention to how the batter looks as it comes together, and watch for the oven cues that signal a perfectly baked bar.
- Cream butter and sugar together. Add eggs, beating after each addition. Mix in extracts. Add flour and salt. Mix until well combined.: When you cream the butter and sugar , you should notice the mixture turn paler and slightly fluffy with tiny air bubbles that catch the light. The sound is silent but the texture changes under your spoon, becoming smoother and more spreadable. This step is crucial because those incorporated air pockets help create a tender crumb. If the butter feels greasy or the mixture looks separated, it means the butter was too warm or overworked, so chill it briefly and re-whip. A common issue is undercreaming, which leaves the sugar grainy and hinders proper rise; take a few extra minutes until it loosens and lightens.
- Spread 3 cups of the batter in a greased jelly roll pan. Spread pie filling on top of dough. Drop remaining dough by tablespoonfuls on top of strawberry pie topping.: As you add the eggs one at a time, the batter will become glossier and slightly thinner each time, and you will see the mixture smooth out, indicating good emulsion. The rhythm of adding and beating ensures the eggs incorporate evenly and build structure. If the batter looks curdled or broken, a tablespoon of the batter warmed and whisked into the mix can help re-emulsify it. Avoid adding all the eggs at once, which risks separation and a coarse texture.
- Bake at 350 degrees for 45-60 minutes or until toothpick comes out clean. Cool.: Stirring in the vanilla extract and almond extract releases a fragrant aroma that lifts the whole batter and gives gentle complexity. The scent should be noticeable but not sharp; it acts as a flavor bridge. If the extracts are added earlier they may dissipate in heat, so adding them after the eggs helps preserve aroma. Be mindful not to overdo concentrated extracts, as they can quickly dominate the balance.
- Combine glaze ingredients and drizzle over bars. If serving the next day wait and do this before serving or the bars will be a bit soggy!: When you fold in the flour and salt , expect the batter to thicken and become more dough like, losing some of its glossy sheen. The flour gives body and the salt sharpens the flavors. Combine gently until no streaks of flour remain, because overmixing develops gluten and makes the bars tough. A typical mistake is vigorous mixing, which produces a chewy texture rather than a tender bite.
- Mix until well combined: Once everything is incorporated the batter should be uniform, slightly dense, and hold together when scooped. The surface will be smooth, and you should be able to press a finger into it without it collapsing completely. This cohesion matters because it lets the base support the strawberry pie filling without sinking. If the mixture seems crumbly, a teaspoon of milk can help bind it. Overhydrating will make spreading difficult, so add liquids cautiously.
- Spread 3 cups of the batter in a greased jelly roll pan: Spread the measured amount of batter evenly across the prepared pan so the base bakes uniformly; you want a consistent thickness to ensure even baking. The batter may resist smooth spreading, so use slightly damp hands or an offset spatula to coax it into corners. Look for a smooth, slightly dimpled surface as your visual cue. If the layer is uneven, the edges will brown faster than the center, leading to inconsistent texture.
- Spread pie filling on top of dough: Spoon the canned strawberry pie filling across the base and use a spatula to gently smooth it into an even layer, taking care not to press too hard or you will embed the filling into the dough. The filling should appear shiny and vibrant, with visible fruit pieces. This contrast in moisture is what makes the bars sing. If you spread too vigorously, the filling can mix into the base and you will lose the distinct layers; be gentle.
- Drop remaining dough by tablespoonfuls on top of strawberry pie topping: Dotting the remaining dough over the filling gives a rustic, patchwork top that bakes into little islands of buttery crust. These peaks brown and add delightful textural contrast. Try to space the dollops evenly so the filling peeks through in each square. A misstep here is trying to completely cover the filling, which removes contrast and can create an overly dense top layer.
- Bake at 350 degrees for 45 to 60 minutes or until toothpick comes out clean: While baking, the kitchen will fill with a warm, buttery aroma and the edges should turn a light golden brown. The center may still look slightly glossy from the filling, but a clean toothpick from the dough portions indicates doneness. Ovens vary, so check around the 45 minute mark and every 5 to 10 minutes after. If your top is browning too quickly, tent loosely with foil. Underbaking leaves a gummy center while overbaking dries the bars out.
- Cool: ing allows the filling to set and the bars to firm up so they slice cleanly, and the residual heat quiets bubbling sugars. You will notice the aroma shift from raw dough to baked sweetness as it cools. Rushing to cut them while hot often causes the filling to run and the slices to be messy, so be patient and allow adequate cooling time.
- Combine glaze ingredients and drizzle over bars: When you mix the powdered sugar , vanilla extract , almond extract , and milk , the glaze should be smooth and pourable, not too thin. Drizzle it in a back and forth motion to create an even decorative finish. If the glaze is too thick, add tiny amounts of milk until it flows; too thin and it will run off the bars. A frequent error is glazing too early which causes the glaze to soak in and make the top soggy, so wait until the bars are fully cool unless serving the next day as noted.
Tips and Variations
Here are practical notes and variations I use when making Strawberry Pie Bars. They cover texture, timing, and presentation so you can adapt the recipe to your kitchen and taste.
- Chill the dough if warm, if your kitchen is hot and the batter feels too soft, pop the bowl in the refrigerator for 10 to 15 minutes so it firms up and is easier to spread, preventing a greasy outcome.
- Even spreading trick, dampen an offset spatula or your fingertips slightly when smoothing the base so the batter glides without sticking, producing a uniform layer that bakes evenly.
- Protect the top, if the bars are browning too quickly, tent them with foil partway through baking to allow the center to finish without burning the edges.
- Make ahead option, you can bake the bars a day ahead and wait to glaze until just before serving to keep the top crisp and attractive for guests.
- Slicing tip, chill the baked and cooled bars in the fridge for 30 minutes before cutting for cleaner slices, and use a sharp knife wiped between cuts for neat squares.
Serve This Strawberry Pie Bars With
These bars shine in casual gatherings and summer parties. I often assemble a simple spread and let guests help themselves, because the bars are easy to plate and pair well with light accompaniments.
- Casual picnic, serve cooled bars on a platter with napkins for an easy outdoor dessert that travels well and is mess friendly.
- Afternoon tea, pair small squares with hot tea or coffee, the buttery base and fruity filling balancing a warm cup.
- Potluck favorite, these bars feed a crowd without fuss, stack them on a tray for guests to grab and enjoy between other dishes.
- Storage, keep in an airtight container in the refrigerator for up to five days, glazewell is best done just before serving to maintain texture.
- Occasions, they are ideal for summer gatherings, casual brunches, or anytime you need a make ahead dessert that travels and pleases a crowd.
FAQ
Conclusion
These Strawberry Pie Bars stand out for their balance of a buttery, tender base and bright, glossy strawberry topping, finished with a simple glaze that ties everything together. Give them a try when you want an easy, crowd pleasing dessert that still feels homemade and thoughtful. I hope you enjoy the process as much as the result, and that they become one of your go to recipes for gatherings and casual afternoons alike.
Strawberry Pie Bars
Equipment
- Jelly Roll Pan
- Mixer
- Offset Spatula
Ingredients
- 1 c. butter softened Cream together to create a tender, rich base for the crust and crumb while helping other ingredients blend evenly; softened texture ensures proper aeration and smooth mixing without lumps.
- 2 c. sugar Sweeten the batter and provide structure and moisture; granulated sugar also helps with browning and caramelization during baking for a golden finish.
- 4 eggs Beat until incorporated to provide lift, richness, and structure; eggs emulsify fats and liquids, improving texture and binding the dough into a cohesive bar.
- 1 tsp vanilla extract Enhance flavor with warm, familiar notes and help round out the sweetness; vanilla extract complements fruit and almond flavors throughout the bars.
- 1/4 tsp almond extract Add a delicate, nutty aroma that complements the vanilla and strawberry filling; a small amount intensifies overall flavor complexity without overpowering.
- 3 c. flour Provide the primary bulk and structure to the dough; flour forms the gluten network that determines the bars’ crumb and firmness when combined with fats and liquids.
- 1 tsp salt Balance flavor and stabilize the dough by enhancing sweetness and controlling yeast or leavening action if present; salt also tightens gluten for better texture.
- 2 cans 21 ounce Lucky Leaf strawberry pie filling Supply the sweet, fruity filling and moisture for the bars; canned strawberry pie filling offers consistency, sweetness, and ready-made fruit pieces for convenience.
- Glaze Drizzle or spread to add shine, extra sweetness, and a finishing touch; glaze enhances appearance and provides a slight contrast in texture to the baked bars.
- 1 c. powdered sugar Provide smooth sweetness for the glaze and help it set when mixed with liquid; powdered sugar dissolves quickly to create a glossy finish.
- 1/2 tsp vanilla extract Contribute depth and familiar flavor notes to the glaze and pair with almond for a layered taste; vanilla extract in glaze mirrors flavors used in the batter.
- 1/2 tsp almond extract Bolster the glaze with a light nutty accent that echoes the batter’s flavor profile; a small amount of almond extract intensifies the overall aroma of the topping.
- 2 tbsp milk Thin and smooth the glaze to a pourable consistency while adding subtle creaminess; milk helps achieve the desired thickness for easy drizzling or spreading.
Instructions
- Cream butter and sugar together. Add eggs, beating after each addition. Mix in extracts. Add flour and salt. Mix until well combined.: When you cream the butter and sugar , you should notice the mixture turn paler and slightly fluffy with tiny air bubbles that catch the light. The sound is silent but the texture changes under your spoon, becoming smoother and more spreadable. This step is crucial because those incorporated air pockets help create a tender crumb. If the butter feels greasy or the mixture looks separated, it means the butter was too warm or overworked, so chill it briefly and re-whip. A common issue is undercreaming, which leaves the sugar grainy and hinders proper rise; take a few extra minutes until it loosens and lightens.
- Spread 3 cups of the batter in a greased jelly roll pan. Spread pie filling on top of dough. Drop remaining dough by tablespoonfuls on top of strawberry pie topping.: As you add the eggs one at a time, the batter will become glossier and slightly thinner each time, and you will see the mixture smooth out, indicating good emulsion. The rhythm of adding and beating ensures the eggs incorporate evenly and build structure. If the batter looks curdled or broken, a tablespoon of the batter warmed and whisked into the mix can help re-emulsify it. Avoid adding all the eggs at once, which risks separation and a coarse texture.
- Bake at 350 degrees for 45-60 minutes or until toothpick comes out clean. Cool.: Stirring in the vanilla extract and almond extract releases a fragrant aroma that lifts the whole batter and gives gentle complexity. The scent should be noticeable but not sharp; it acts as a flavor bridge. If the extracts are added earlier they may dissipate in heat, so adding them after the eggs helps preserve aroma. Be mindful not to overdo concentrated extracts, as they can quickly dominate the balance.
- Combine glaze ingredients and drizzle over bars. If serving the next day wait and do this before serving or the bars will be a bit soggy!: When you fold in the flour and salt , expect the batter to thicken and become more dough like, losing some of its glossy sheen. The flour gives body and the salt sharpens the flavors. Combine gently until no streaks of flour remain, because overmixing develops gluten and makes the bars tough. A typical mistake is vigorous mixing, which produces a chewy texture rather than a tender bite.
- Mix until well combined: Once everything is incorporated the batter should be uniform, slightly dense, and hold together when scooped. The surface will be smooth, and you should be able to press a finger into it without it collapsing completely. This cohesion matters because it lets the base support the strawberry pie filling without sinking. If the mixture seems crumbly, a teaspoon of milk can help bind it. Overhydrating will make spreading difficult, so add liquids cautiously.
- Spread 3 cups of the batter in a greased jelly roll pan: Spread the measured amount of batter evenly across the prepared pan so the base bakes uniformly; you want a consistent thickness to ensure even baking. The batter may resist smooth spreading, so use slightly damp hands or an offset spatula to coax it into corners. Look for a smooth, slightly dimpled surface as your visual cue. If the layer is uneven, the edges will brown faster than the center, leading to inconsistent texture.
- Spread pie filling on top of dough: Spoon the canned strawberry pie filling across the base and use a spatula to gently smooth it into an even layer, taking care not to press too hard or you will embed the filling into the dough. The filling should appear shiny and vibrant, with visible fruit pieces. This contrast in moisture is what makes the bars sing. If you spread too vigorously, the filling can mix into the base and you will lose the distinct layers; be gentle.
- Drop remaining dough by tablespoonfuls on top of strawberry pie topping: Dotting the remaining dough over the filling gives a rustic, patchwork top that bakes into little islands of buttery crust. These peaks brown and add delightful textural contrast. Try to space the dollops evenly so the filling peeks through in each square. A misstep here is trying to completely cover the filling, which removes contrast and can create an overly dense top layer.
- Bake at 350 degrees for 45 to 60 minutes or until toothpick comes out clean: While baking, the kitchen will fill with a warm, buttery aroma and the edges should turn a light golden brown. The center may still look slightly glossy from the filling, but a clean toothpick from the dough portions indicates doneness. Ovens vary, so check around the 45 minute mark and every 5 to 10 minutes after. If your top is browning too quickly, tent loosely with foil. Underbaking leaves a gummy center while overbaking dries the bars out.
- Cool: ing allows the filling to set and the bars to firm up so they slice cleanly, and the residual heat quiets bubbling sugars. You will notice the aroma shift from raw dough to baked sweetness as it cools. Rushing to cut them while hot often causes the filling to run and the slices to be messy, so be patient and allow adequate cooling time.
- Combine glaze ingredients and drizzle over bars: When you mix the powdered sugar , vanilla extract , almond extract , and milk , the glaze should be smooth and pourable, not too thin. Drizzle it in a back and forth motion to create an even decorative finish. If the glaze is too thick, add tiny amounts of milk until it flows; too thin and it will run off the bars. A frequent error is glazing too early which causes the glaze to soak in and make the top soggy, so wait until the bars are fully cool unless serving the next day as noted.
Notes
- Chill the dough if warm, if your kitchen is hot and the batter feels too soft, pop the bowl in the refrigerator for 10 to 15 minutes so it firms up and is easier to spread, preventing a greasy outcome.
- Even spreading trick, dampen an offset spatula or your fingertips slightly when smoothing the base so the batter glides without sticking, producing a uniform layer that bakes evenly.
- Protect the top, if the bars are browning too quickly, tent them with foil partway through baking to allow the center to finish without burning the edges.
- Make ahead option, you can bake the bars a day ahead and wait to glaze until just before serving to keep the top crisp and attractive for guests.
- Slicing tip, chill the baked and cooled bars in the fridge for 30 minutes before cutting for cleaner slices, and use a sharp knife wiped between cuts for neat squares.