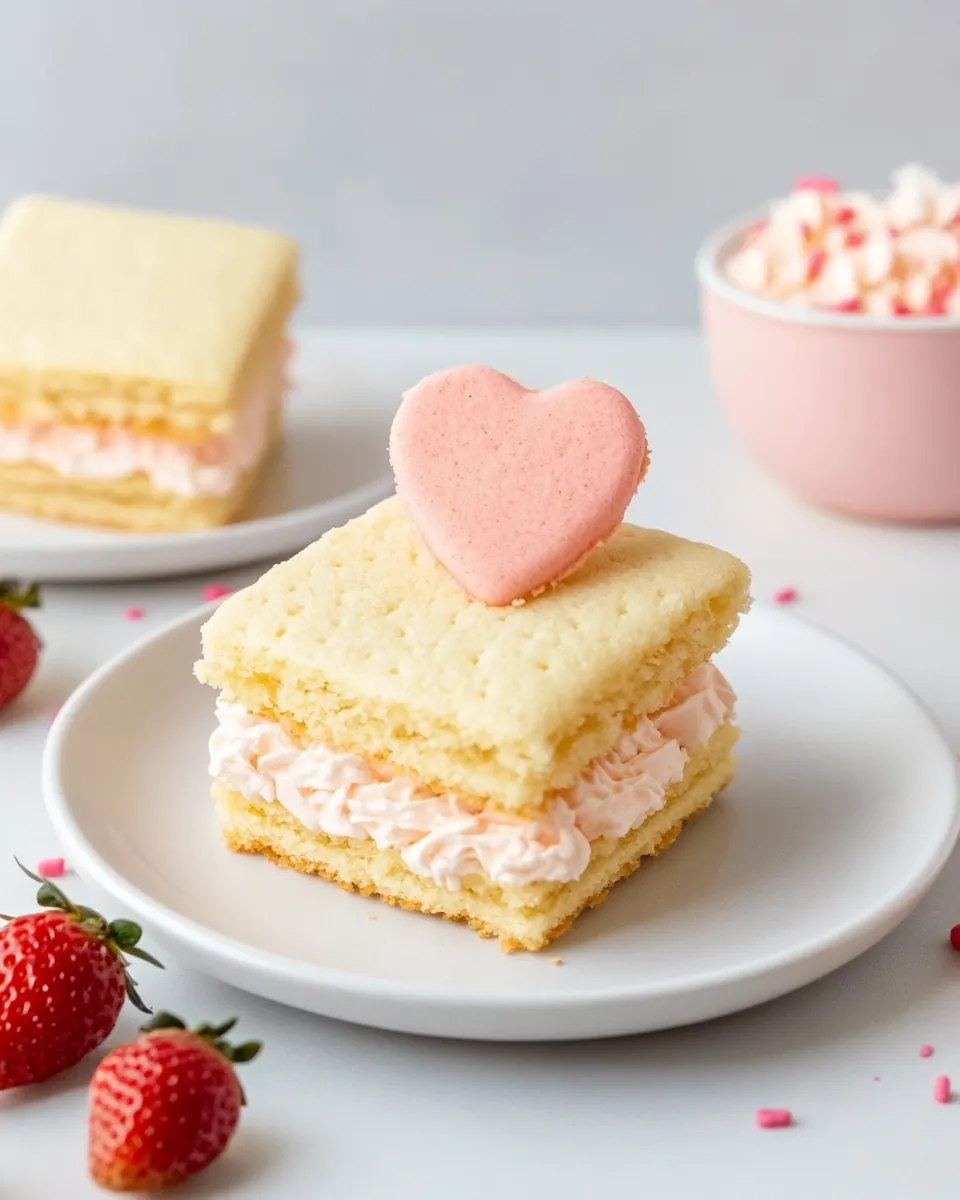
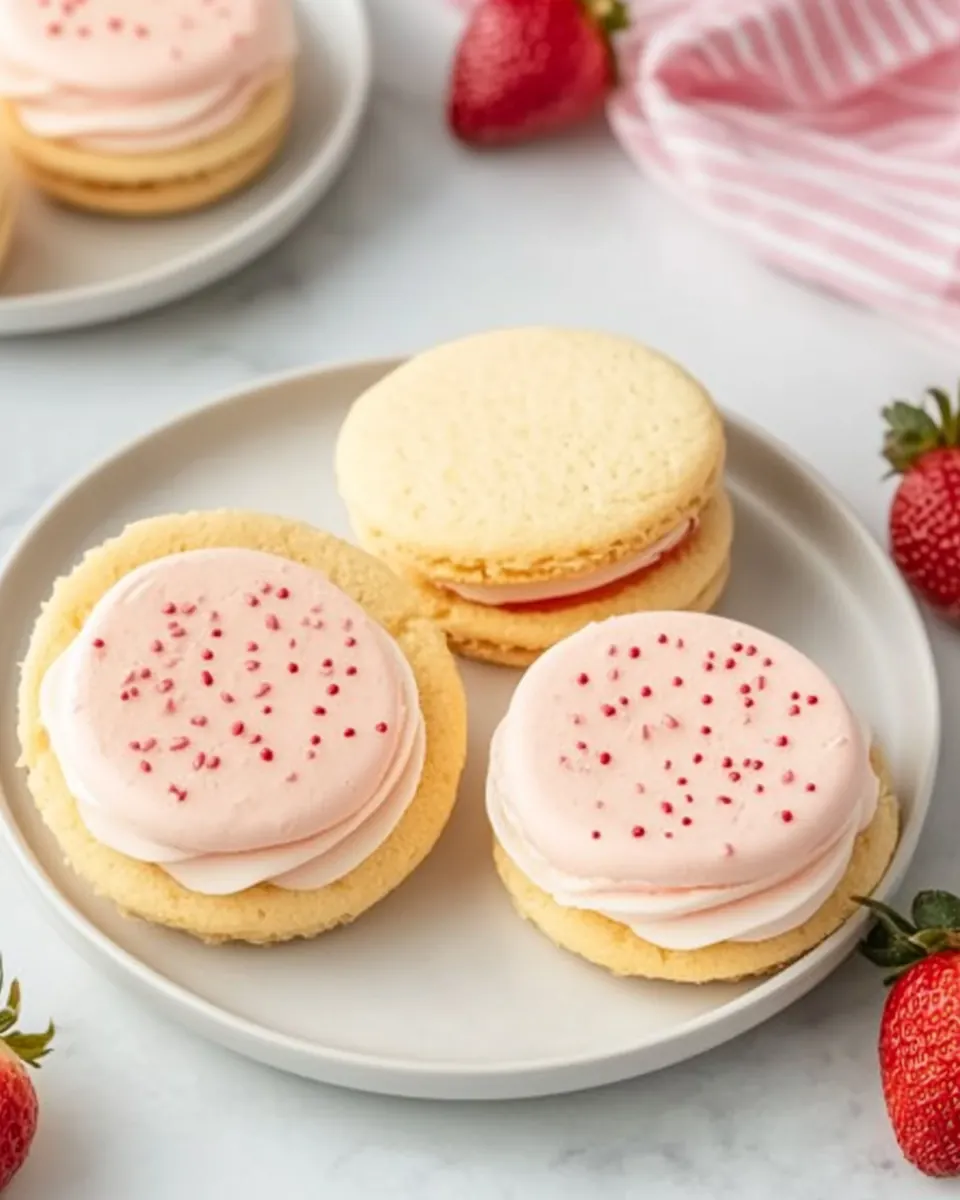
Strawberry Cream Wafer Cookies
Strawberry Cream Wafer Cookies began as a kitchen experiment that turned into a family ritual for me, the sort of recipe I reach for when I want something crisp, sweet, and a little nostalgic. The first time I made these, I was chasing the memory of a bakery treat from my childhood, the delicate wafer that snapped with a quiet, satisfying sound and the soft strawberry filling that followed. I remember the light flour dusted on the counter and the tiny pink smudge on my finger as I sampled the buttercream.
After that day I found myself making batches between errands and on rainy afternoons, sharing them with neighbors and keeping a tin hidden for late night snacks. I love how the cookie feels almost like a delicate toy to assemble, each pairing offering a small moment of joy. Over time I learned tricks that keep the wafers tender and pale, and how to coax a creamy, not-too-sweet filling that tastes like ripe berries without being cloying.
Recipe Snapshot
39 mins
30 mins
9 mins
Medium
150 kcal
American
Gluten-Free, Low FODMAP
Desserts
Stand mixer, Paddle attachment, Cookie cutter, Thin metal spatula, Wire rack, Mixing bowls, Piping bag
The Beauty of This Strawberry Cream Wafer Cookies
They are endlessly charming
I adore Strawberry Cream Wafer Cookies because they look fancy yet feel completely approachable. When I bring a box to a gathering people assume they were purchased, and I get to savor that proud moment when I admit they came from my own kitchen. The delicate shapes and pale edges make them perfect for gifting, tea time, or a small celebration.
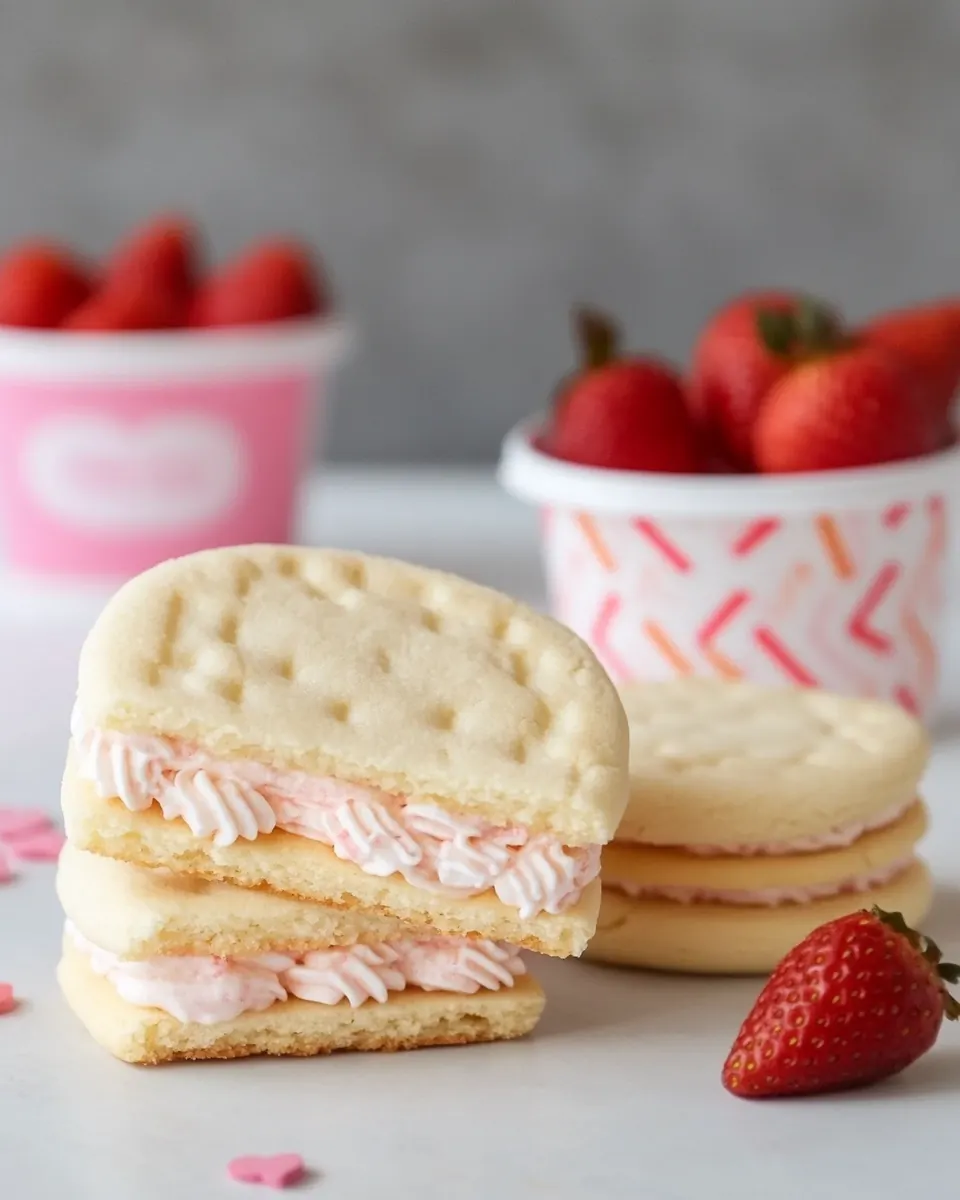
Texture contrast is everything
These cookies win on contrast. The crisp, thin wafer gives a light snap, while the strawberry buttercream offers a plush, creamy center. I focus on thickness when rolling so the wafers are thin enough to be crisp, yet sturdy enough to sandwich without cracking. That textural interplay keeps every bite interesting and balanced.
Simple pantry ingredients, big payoff
I love that most of what you need are basics like all purpose flour and butter. Few recipes reward you as much for small effort. Once you master the dough chill time and rolling technique, the rest is quick, and the yield is generous. This makes them a practical choice when you want to impress but do not want to fuss for hours.
Customizable and forgiving
These wafers invite small tweaks. I often adjust the strawberry extract quantity to dial up fragrance or add a touch of color with a few drops of gel food coloring. The filling is forgiving, so if it’s a little loose you can chill it to firm up, and if it is a bit thick you can add a teaspoon of heavy whipping cream to smooth it without losing flavor.
Great for make ahead and gifting
I appreciate how well these cookies freeze and keep their shape and flavor when stored correctly. I’ll make big batches before a holiday or party, separate layers with parchment, and pop them in the freezer. They thaw quickly and still have that fresh baked quality that delights everyone who opens the tin.
Ingredients You’ll Need for Strawberry Cream Wafer Cookies
These ingredients are intentionally straightforward. The list leans on a few key players: all purpose flour builds the tender wafer structure, butter provides richness and crispness, and the combination of powdered sugar with strawberry extract creates a creamy, flavorful filling. Each item plays a clear role, and together they produce a cookie that is light, delicate, and irresistibly pink.
- 2 cups all-purpose flour: Provide structure and bulk to the cookie dough, creating a tender but sturdy crumb; sifted or spooned into the cup, it ensures even mixing and proper hydration with fats and liquids. Adjusting the flour amount slightly can change cookie thickness and texture during baking.
- 1 cup unsalted butter softened to room temperature: Add richness and help create a delicate, melt-in-your-mouth texture by coating flour proteins and trapping air when creamed with sugar; softened to room temperature ensures smooth incorporation and prevents greasy lumps. Contributes buttery flavor and helps cookies spread evenly in the oven.
- 1/3 cup heavy whipping cream: Contribute moisture and lightness to the dough while enhancing tenderness; heavy cream supplies fat and liquid that helps bind dry ingredients and creates a softer crumb. Also aids in achieving a pliable dough for shaping and helps lift the wafer slightly.
- 1/2 cup granulated sugar: Provide sweetness and aid in creaming with butter to incorporate air, which contributes to a lighter texture; granulated sugar also affects spread and browning during baking. Even distribution during creaming helps achieve an even crumb and desired cookie crispness.
- 1/2 cup unsalted butter softened to room temperature: Supply additional fat and richness to the filling or dough depending on use; softened to room temperature ensures smooth creaming with sugar and prevents graininess. Adds a creamy mouthfeel and helps stabilize the structure of the cookie or filling.
- 1 1/2 cups powdered sugar: Sweeten and stabilize the filling or dough with a fine texture that dissolves easily, creating a smooth, silky consistency; powdered sugar also helps thicken and set creams and fillings. Sifting prevents lumps and ensures an even, glossy finish.
- 1 tablespoon strawberry extract: Impart concentrated strawberry flavor without adding moisture, giving the filling or dough a pronounced berry aroma; a tablespoon provides noticeable fruitiness in a small volume. Helps achieve consistent flavor intensity throughout the cookies.
- a few drops of pink or red food coloring I use Americolor gel “Electric Pink”: Provide vibrant color for an appealing pink hue with just a few drops, using gel food coloring to avoid altering dough consistency; control amount to reach desired shade without affecting flavor. Gel formulas give strong pigmentation with minimal added liquid.
Preparation Steps for Strawberry Cream Wafer Cookies
I like to approach the baking process with calm focus, so I prepare my tools and chill time before starting. This helps me move through rolling, cutting, and baking with fewer interruptions, and keeps the dough at the ideal temperature so the wafers stay pale and tender.
- In the bowl of a stand mixer, mix flour, butter, and whipping cream until combined. Cover and refrigerate for at least 2 hours.: The smell at this stage is faint and comforting, a subtle mix of butter and flour, and the texture should be cohesive but not wet. Using a paddle attachment keeps the mixing gentle so the dough remains tender, and you will see it come together into a soft ball. One common mistake is overmixing, which tightens the gluten and makes the wafers tough, so stop as soon as the pieces bind. If the dough seems crumbly add a splash more heavy whipping cream , and if it is too soft chill until firm to the touch to make rolling manageable.
- Preheat oven to 375°F. Add sugar to a separate small bowl and set aside.: Chilling quiets the butter and solidifies fats so the dough rolls thin and holds shape. After refrigeration the dough feels cool and slightly firm, which makes cutting clean shapes easier and prevents spreading in the oven. A frequent error is skimping on chill time, which leads to misshapen wafers and sticky dough. If you are short on time freeze for 30 to 45 minutes instead, but watch closely when rolling because colder dough can crack if too stiff.
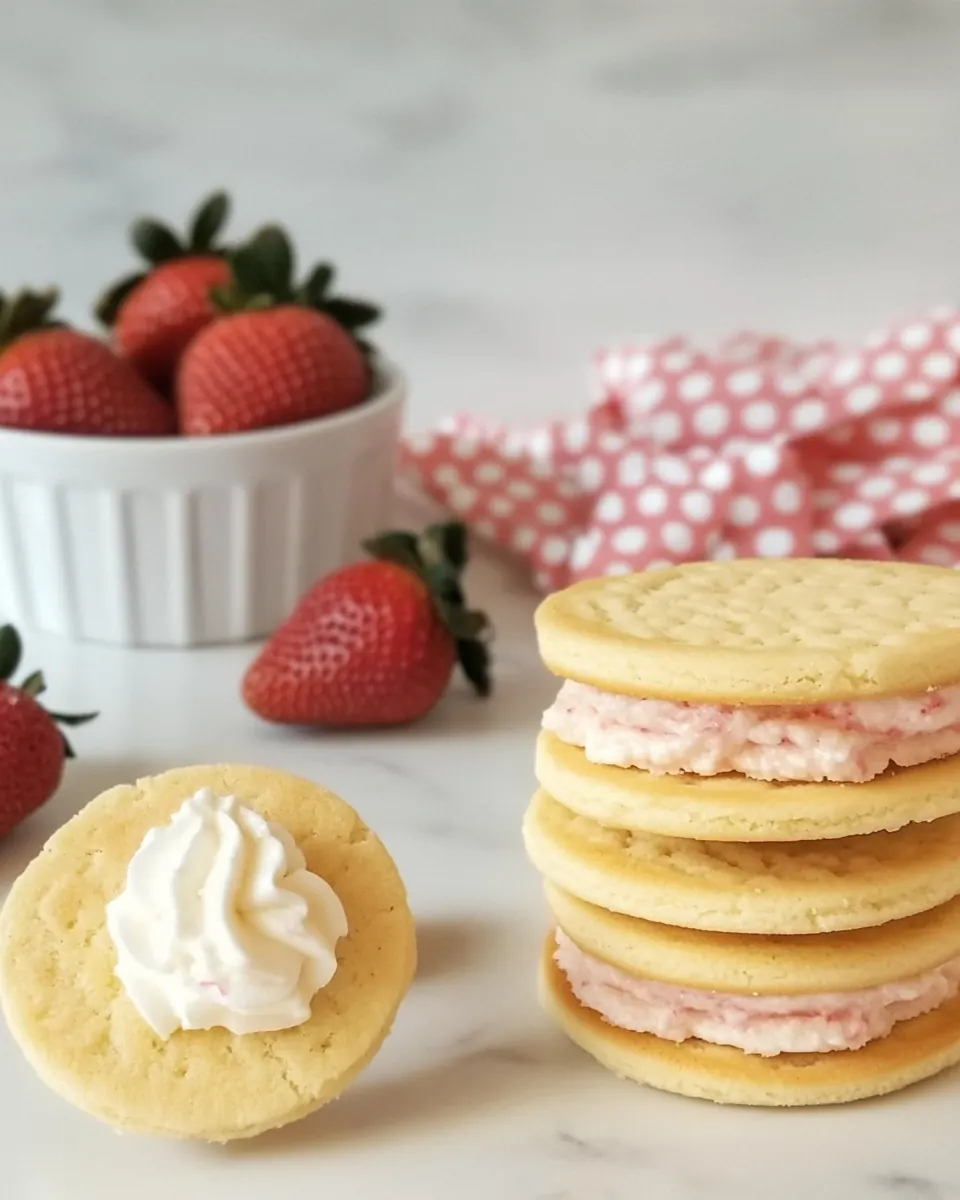
- Take about one-third of the cookie dough out of the refrigerator, keeping remaining dough refrigerated. On a lightly floured surface, roll out dough to a 1/8" to 3/16" thickness. Cut into hearts or circles with a cookie cutter that is about 1 1/2" wide. Work swiftly, as the dough softens quickly as it warms. With a thin metal spatula, transfer dough wafers to the sugar, turning them over so that sugar adheres to each side – the dough will be tender. Then place dough wafers on an ungreased cookie sheet, about 1" apart.: You will notice the warm oven smell that signals baking is about to begin, and a properly preheated oven ensures even baking and pale edges. Set the rack in the center for balanced heat and allow the temperature to stabilize before baking the first sheet. A mistake is placing the tray in a not fully heated oven, which alters bake time and can cause uneven texture. Use an oven thermometer if your oven tends to run hot or cool, and adjust as needed to maintain the target temperature.
- Prick each dough wafer with a fork 3-4 times. Repeat with the rest of the dough, rerolling scraps as needed. After rerolling the dough more than once, the dough will start to lose its shape faster when rolled out and baked, so try to get as many cut-outs as possible out of each initial rolling.: Having the granulated sugar ready keeps the workflow smooth, and it will adhere to the cold wafers for a light coating. The sugar adds a faint crunch and pleasant shimmer, and preparing it ahead prevents the dough from warming while you search for ingredients. Do not skip this step, because rolling cut shapes in sugar immediately after cutting helps them keep a neat exterior. If the sugar becomes clumped, break it up before using to ensure even coating.
- Bake 7 to 9 minutes, or just until set. Do not let them brown. Let cool a bit on the pan to set, then transfer to a wire rack to cool completely.: Working with a portion at a time keeps the remainder cool and easier to roll later. As you handle the dough the surface warms and becomes more pliable, which is perfect for rolling to a paper thin thickness. A common pitfall is removing all the dough at once, which causes stickiness and lost shapes as the dough warms. Keep the unused dough wrapped and chilled until you need it.
- In the bowl of a stand mixer, beat butter until smooth and fluffy, about 2 minutes. Add powdered sugar and strawberry extract, and beat until smooth and fluffy again, another minute or two. Add a little bit of pink/red food coloring, and mix to combine.: The visual cue is a nearly translucent sheet that still holds its shape. Light flour on the surface prevents sticking without adding grit. Rolling smoothly with even pressure yields uniform wafers that bake evenly; uneven thickness results in some pieces overbaking while others remain underdone. If the dough resists, chill it briefly and resume rolling to avoid tearing.
- Add strawberry buttercream filling to a piping bag fitted with a medium plain tip – or just cut off the end of the piping bag, omit the tip. Pipe a single layer of buttercream onto the back side of one cookie. Top with another cookie and press gently to secure. (You can also just spoon the filling onto the cookie. This gives a more casual appearance.): When you press the cutter through the dough you should hear a clean, soft sound and see crisp edges. The 1 1/2" size is ideal for sandwiching with the cream, and consistent sizing helps baking time remain predictable. A mistake is pressing and twisting, which can seal the edges and prevent proper rise or texture; press straight down and lift carefully. Use a thin metal spatula to gently transfer shapes so they do not stretch.
- Work swiftly, as the dough softens quickly as it warms: The dough will become tacky if left on the counter, and working quickly keeps the cut shapes sharp. Speed helps maintain the delicate structure and prevents excess spreading in the oven. If the dough softens too much, chill the cut sheets briefly before transferring to the cookie sheet. One common error is lingering while cutting many shapes at once, which leads to misshapen wafers and sticky handling.
- With a thin metal spatula, transfer dough wafers to the sugar, turning them over so that sugar adheres to each side: The tactile sensation is satisfying as the granulated sugar clings to the dough, creating a faint sparkle. This step protects the wafer surface and gives a hint of crunch that contrasts with the filling. If you press too hard you may distort the shape, so be gentle and precise. If the sugar does not stick, the dough may be too warm, so chill the cutouts briefly and try again.
- Then place dough wafers on an ungreased cookie sheet, about 1" apart: The visual cue is a neat row of pale discs with sugar glinting on top, spaced so hot air circulates and prevents sticking. Leaving them ungreased helps achieve a pale bottom and gentle snap. Crowding the pan is a common mistake that causes edges to join, so keep spacing consistent. Rotate pans halfway through baking if your oven has hot spots to maintain even color.
- Prick each dough wafer with a fork 3 to 4 times: The tiny pricks let steam escape and keep the wafer flat and delicate, with a gentle texture rather than puffing. You will see small perforations that prevent bubble formation and ensure an even snap. Overpricking can cause breakage when transferring, so aim for a few evenly spaced tines. If you forget this step the wafers may blister or become unevenly textured during baking.
- Repeat with the rest of the dough, rerolling scraps as needed: The scraps will become denser with handling, so aim to maximize cutouts on each initial roll for best shape retention. As you reroll more than once the dough softens and is prone to losing crisp edges, so chill the dough between rerolls if necessary. A common issue is overworking scraps, which produces tougher wafers, so keep rerolls to a minimum and combine into new batches of chilled dough.
- After rerolling the dough more than once, the dough will start to lose its shape faster when rolled out and baked, so try to get as many cut outs as possible out of each initial rolling: You will notice that subsequent rolls make edges rounder and less defined, which impacts the final appearance. Prioritize thin, efficient first rolls to preserve crisp edges and attractive shapes. If you must reroll repeatedly, chill the dough between attempts to maintain structure. Avoid excessive kneading, which toughens the dough and reduces the delicate texture.
- Bake 7 to 9 minutes, or just until set: The oven aroma turns sweeter, and the wafers remain pale with no browning, which is the key visual cue. They should feel set to the touch but not hard, and the edges will look firm without color. A frequent mistake is baking until golden, which ruins the tender snap; remove them as soon as they are set. Let them rest on the sheet briefly to firm up before moving to a rack for complete cooling.
- Do not let them brown: Browning indicates overbaking and will change the delicate texture and flavor. Aim for a uniformly pale surface, and if your oven runs hot reduce the temperature slightly and watch closely. A tip is to rotate the pan midway through the bake to prevent uneven color. If browning occurs, reduce time by a minute or two on the next batch and use an oven thermometer to verify temperature accuracy.
- Let cool a bit on the pan to set, then transfer to a wire rack to cool completely: The wafers stabilize as they cool, and the wire rack allows air to circulate so they become crisp rather than soggy. Listen for the faint click as they cool, a sign of setting structure. Moving them too soon can cause breakage, while leaving them too long on a hot pan may soften the bottoms. Allow full cooling before assembling to keep the filling from melting.
- In the bowl of a stand mixer, beat butter until smooth and fluffy, about 2 minutes: The butter will lighten in color and develop a creamy texture, with a soft, almost whipped aroma. Properly beaten butter holds air that makes the filling light, and beating until smooth avoids lumps in the final cream. Underbeating gives a dense filling, while overbeating can make it too soft, so aim for a smooth, billowy texture.
- Add powdered sugar and strawberry extract, and beat until smooth and fluffy again, another minute or two: You will hear the mixer tone change as the sugar integrates, and the mixture will smell distinctly fruity and sweet. This step builds structure and sweetness without graininess, yielding a pipeable filling. A common mistake is adding all the sugar at once, which can send clouds of sugar everywhere; add gradually and scrape down the bowl to ensure even mixing.
- Add a little bit of pink or red food coloring and mix to combine: The visual change is immediate, the filling taking on a soft blush that promises the strawberry flavor within. Gel color minimizes any effect on texture, and little goes a long way, so start small. Overcoloring can make the filling look artificial, so add incrementally until satisfied. If the color is uneven, scrape and mix gently until uniform.
- Add strawberry buttercream filling to a piping bag fitted with a medium plain tip or just cut off the end of the piping bag, omit the tip: The filling should pipe smoothly, forming a consistent disc on the wafer back; if it drags or clumps the buttercream may need a quick beat to restore silkiness. Using a bag helps control the amount and creates neat sandwiches, while spooning gives a charming, rustic look. If the filling is too soft, chill briefly to firm it for cleaner piping.
- Pipe a single layer of buttercream onto the back side of one cookie: The sensation is precise, as the cream forms a soft mound that yields slightly when the top cookie is set. Keep the amount modest so the filling does not spill out, and a single layer ensures a pleasant balance of wafer to cream. Overfilling creates messy sandwiches and clumpy texture, so aim for a small even dollop that covers the center without touching edges.
- Top with another cookie and press gently to secure: You will feel a slight give as the two wafers meet the filling, and the sandwich should look tidy with a thin seam of pastel cream peeking out. Pressing too hard will flatten the filling and risk cracking the wafers, while too light a touch can lead to separation. If you want a rustic look, spoon the filling and simply set the top cookie without pressing firmly.
Pro Tips and Tweaks
I like to share practical, hands on advice that makes the entire process smoother and more enjoyable. Below are tips I use every time to get consistent wafers and silky filling, whether I am baking for company or a quiet afternoon snack.
- Save chilling time by preparing the dough the night before and letting it rest in the refrigerator overnight. This deep chill improves flavor and makes rolling easier the next day.
- Use an oven thermometer if your oven is older or unpredictable. That small investment ensures you bake at the intended 375°F and prevents accidental browning.
- Work on a cool surface such as a marble slab or a lightly floured board to keep the dough from warming too quickly while rolling.
- Test bake one sheet first so you can adjust time for your oven. Because these wafers are thin, a minute or two makes a big difference.
- Sift powdered sugar into the buttercream to avoid any lumps and achieve a glossy, smooth filling that pipes beautifully.
- Freeze assembled cookies briefly before packing them to keep the filling firm and prevent smudging during transport.
How to Enjoy Strawberry Cream Wafer Cookies
These cookies work well for many occasions and are easy to present beautifully. Whether you are serving them at a small brunch or packing them for a picnic, they have a delicate appeal that suits informal and celebratory settings.
- Tea time Serve these with a pot of light tea or herbal infusion, the crisp wafer and creamy filling pairing well with subtle teas rather than heavy blends.
- Party platter Arrange on a white platter with small clusters of fresh fruit to echo the strawberry notes, and they make an elegant addition to dessert spreads.
- Gift box Layer with parchment in a tin or box for a thoughtful homemade gift that travels well when chilled or frozen.
- Occasions Perfect for spring gatherings, baby showers, bridal showers, or anytime you want a pretty, bite sized dessert.
- Storage Keep in an airtight container at room temperature for up to three days, or freeze in layers separated by parchment for longer storage. Thaw gently at room temperature before serving.
- Seasonal pairing These feel especially right during spring when berries are in mind, and they complement light floral desserts or citrus sweets nicely.
FAQ
Conclusion
These Strawberry Cream Wafer Cookies stand out for their delicate texture and bright, creamy filling, offering a bakery quality treat made with simple ingredients. Give them a try when you want a pretty, shareable dessert that feels special yet is completely approachable. Make a batch, tuck them into a tin, and enjoy the small ritual of assembling and sharing these sweet little sandwiches with friends and family, they always bring smiles.
Strawberry Cream Wafer Cookies
Equipment
- Stand mixer
- Paddle attachment
- Cookie Cutter
- Thin metal spatula
- Wire Rack
- Mixing Bowls
- Piping Bag
Ingredients
- 2 cups all-purpose flour Provide structure and bulk to the cookie dough, creating a tender but sturdy crumb; sifted or spooned into the cup, it ensures even mixing and proper hydration with fats and liquids. Adjusting the flour amount slightly can change cookie thickness and texture during baking.
- 1 cup unsalted butter softened to room temperature Add richness and help create a delicate, melt-in-your-mouth texture by coating flour proteins and trapping air when creamed with sugar; softened to room temperature ensures smooth incorporation and prevents greasy lumps. Contributes buttery flavor and helps cookies spread evenly in the oven.
- 1/3 cup heavy whipping cream Contribute moisture and lightness to the dough while enhancing tenderness; heavy cream supplies fat and liquid that helps bind dry ingredients and creates a softer crumb. Also aids in achieving a pliable dough for shaping and helps lift the wafer slightly.
- 1/2 cup granulated sugar Provide sweetness and aid in creaming with butter to incorporate air, which contributes to a lighter texture; granulated sugar also affects spread and browning during baking. Even distribution during creaming helps achieve an even crumb and desired cookie crispness.
- 1/2 cup unsalted butter softened to room temperature Supply additional fat and richness to the filling or dough depending on use; softened to room temperature ensures smooth creaming with sugar and prevents graininess. Adds a creamy mouthfeel and helps stabilize the structure of the cookie or filling.
- 1 1/2 cups powdered sugar Sweeten and stabilize the filling or dough with a fine texture that dissolves easily, creating a smooth, silky consistency; powdered sugar also helps thicken and set creams and fillings. Sifting prevents lumps and ensures an even, glossy finish.
- 1 tablespoon strawberry extract Impart concentrated strawberry flavor without adding moisture, giving the filling or dough a pronounced berry aroma; a tablespoon provides noticeable fruitiness in a small volume. Helps achieve consistent flavor intensity throughout the cookies.
- a few drops of pink or red food coloring I use Americolor gel “Electric Pink” Provide vibrant color for an appealing pink hue with just a few drops, using gel food coloring to avoid altering dough consistency; control amount to reach desired shade without affecting flavor. Gel formulas give strong pigmentation with minimal added liquid.
Instructions
- In the bowl of a stand mixer, mix flour, butter, and whipping cream until combined. Cover and refrigerate for at least 2 hours.: The smell at this stage is faint and comforting, a subtle mix of butter and flour, and the texture should be cohesive but not wet. Using a paddle attachment keeps the mixing gentle so the dough remains tender, and you will see it come together into a soft ball. One common mistake is overmixing, which tightens the gluten and makes the wafers tough, so stop as soon as the pieces bind. If the dough seems crumbly add a splash more heavy whipping cream , and if it is too soft chill until firm to the touch to make rolling manageable.
- Preheat oven to 375°F. Add sugar to a separate small bowl and set aside.: Chilling quiets the butter and solidifies fats so the dough rolls thin and holds shape. After refrigeration the dough feels cool and slightly firm, which makes cutting clean shapes easier and prevents spreading in the oven. A frequent error is skimping on chill time, which leads to misshapen wafers and sticky dough. If you are short on time freeze for 30 to 45 minutes instead, but watch closely when rolling because colder dough can crack if too stiff.
- Take about one-third of the cookie dough out of the refrigerator, keeping remaining dough refrigerated. On a lightly floured surface, roll out dough to a 1/8" to 3/16" thickness. Cut into hearts or circles with a cookie cutter that is about 1 1/2" wide. Work swiftly, as the dough softens quickly as it warms. With a thin metal spatula, transfer dough wafers to the sugar, turning them over so that sugar adheres to each side – the dough will be tender. Then place dough wafers on an ungreased cookie sheet, about 1" apart.: You will notice the warm oven smell that signals baking is about to begin, and a properly preheated oven ensures even baking and pale edges. Set the rack in the center for balanced heat and allow the temperature to stabilize before baking the first sheet. A mistake is placing the tray in a not fully heated oven, which alters bake time and can cause uneven texture. Use an oven thermometer if your oven tends to run hot or cool, and adjust as needed to maintain the target temperature.
- Prick each dough wafer with a fork 3-4 times. Repeat with the rest of the dough, rerolling scraps as needed. After rerolling the dough more than once, the dough will start to lose its shape faster when rolled out and baked, so try to get as many cut-outs as possible out of each initial rolling.: Having the granulated sugar ready keeps the workflow smooth, and it will adhere to the cold wafers for a light coating. The sugar adds a faint crunch and pleasant shimmer, and preparing it ahead prevents the dough from warming while you search for ingredients. Do not skip this step, because rolling cut shapes in sugar immediately after cutting helps them keep a neat exterior. If the sugar becomes clumped, break it up before using to ensure even coating.
- Bake 7 to 9 minutes, or just until set. Do not let them brown. Let cool a bit on the pan to set, then transfer to a wire rack to cool completely.: Working with a portion at a time keeps the remainder cool and easier to roll later. As you handle the dough the surface warms and becomes more pliable, which is perfect for rolling to a paper thin thickness. A common pitfall is removing all the dough at once, which causes stickiness and lost shapes as the dough warms. Keep the unused dough wrapped and chilled until you need it.
- In the bowl of a stand mixer, beat butter until smooth and fluffy, about 2 minutes. Add powdered sugar and strawberry extract, and beat until smooth and fluffy again, another minute or two. Add a little bit of pink/red food coloring, and mix to combine.: The visual cue is a nearly translucent sheet that still holds its shape. Light flour on the surface prevents sticking without adding grit. Rolling smoothly with even pressure yields uniform wafers that bake evenly; uneven thickness results in some pieces overbaking while others remain underdone. If the dough resists, chill it briefly and resume rolling to avoid tearing.
- Add strawberry buttercream filling to a piping bag fitted with a medium plain tip – or just cut off the end of the piping bag, omit the tip. Pipe a single layer of buttercream onto the back side of one cookie. Top with another cookie and press gently to secure. (You can also just spoon the filling onto the cookie. This gives a more casual appearance.): When you press the cutter through the dough you should hear a clean, soft sound and see crisp edges. The 1 1/2" size is ideal for sandwiching with the cream, and consistent sizing helps baking time remain predictable. A mistake is pressing and twisting, which can seal the edges and prevent proper rise or texture; press straight down and lift carefully. Use a thin metal spatula to gently transfer shapes so they do not stretch.
- Work swiftly, as the dough softens quickly as it warms: The dough will become tacky if left on the counter, and working quickly keeps the cut shapes sharp. Speed helps maintain the delicate structure and prevents excess spreading in the oven. If the dough softens too much, chill the cut sheets briefly before transferring to the cookie sheet. One common error is lingering while cutting many shapes at once, which leads to misshapen wafers and sticky handling.
- With a thin metal spatula, transfer dough wafers to the sugar, turning them over so that sugar adheres to each side: The tactile sensation is satisfying as the granulated sugar clings to the dough, creating a faint sparkle. This step protects the wafer surface and gives a hint of crunch that contrasts with the filling. If you press too hard you may distort the shape, so be gentle and precise. If the sugar does not stick, the dough may be too warm, so chill the cutouts briefly and try again.
- Then place dough wafers on an ungreased cookie sheet, about 1" apart: The visual cue is a neat row of pale discs with sugar glinting on top, spaced so hot air circulates and prevents sticking. Leaving them ungreased helps achieve a pale bottom and gentle snap. Crowding the pan is a common mistake that causes edges to join, so keep spacing consistent. Rotate pans halfway through baking if your oven has hot spots to maintain even color.
- Prick each dough wafer with a fork 3 to 4 times: The tiny pricks let steam escape and keep the wafer flat and delicate, with a gentle texture rather than puffing. You will see small perforations that prevent bubble formation and ensure an even snap. Overpricking can cause breakage when transferring, so aim for a few evenly spaced tines. If you forget this step the wafers may blister or become unevenly textured during baking.
- Repeat with the rest of the dough, rerolling scraps as needed: The scraps will become denser with handling, so aim to maximize cutouts on each initial roll for best shape retention. As you reroll more than once the dough softens and is prone to losing crisp edges, so chill the dough between rerolls if necessary. A common issue is overworking scraps, which produces tougher wafers, so keep rerolls to a minimum and combine into new batches of chilled dough.
- After rerolling the dough more than once, the dough will start to lose its shape faster when rolled out and baked, so try to get as many cut outs as possible out of each initial rolling: You will notice that subsequent rolls make edges rounder and less defined, which impacts the final appearance. Prioritize thin, efficient first rolls to preserve crisp edges and attractive shapes. If you must reroll repeatedly, chill the dough between attempts to maintain structure. Avoid excessive kneading, which toughens the dough and reduces the delicate texture.
- Bake 7 to 9 minutes, or just until set: The oven aroma turns sweeter, and the wafers remain pale with no browning, which is the key visual cue. They should feel set to the touch but not hard, and the edges will look firm without color. A frequent mistake is baking until golden, which ruins the tender snap; remove them as soon as they are set. Let them rest on the sheet briefly to firm up before moving to a rack for complete cooling.
- Do not let them brown: Browning indicates overbaking and will change the delicate texture and flavor. Aim for a uniformly pale surface, and if your oven runs hot reduce the temperature slightly and watch closely. A tip is to rotate the pan midway through the bake to prevent uneven color. If browning occurs, reduce time by a minute or two on the next batch and use an oven thermometer to verify temperature accuracy.
- Let cool a bit on the pan to set, then transfer to a wire rack to cool completely: The wafers stabilize as they cool, and the wire rack allows air to circulate so they become crisp rather than soggy. Listen for the faint click as they cool, a sign of setting structure. Moving them too soon can cause breakage, while leaving them too long on a hot pan may soften the bottoms. Allow full cooling before assembling to keep the filling from melting.
- In the bowl of a stand mixer, beat butter until smooth and fluffy, about 2 minutes: The butter will lighten in color and develop a creamy texture, with a soft, almost whipped aroma. Properly beaten butter holds air that makes the filling light, and beating until smooth avoids lumps in the final cream. Underbeating gives a dense filling, while overbeating can make it too soft, so aim for a smooth, billowy texture.
- Add powdered sugar and strawberry extract, and beat until smooth and fluffy again, another minute or two: You will hear the mixer tone change as the sugar integrates, and the mixture will smell distinctly fruity and sweet. This step builds structure and sweetness without graininess, yielding a pipeable filling. A common mistake is adding all the sugar at once, which can send clouds of sugar everywhere; add gradually and scrape down the bowl to ensure even mixing.
- Add a little bit of pink or red food coloring and mix to combine: The visual change is immediate, the filling taking on a soft blush that promises the strawberry flavor within. Gel color minimizes any effect on texture, and little goes a long way, so start small. Overcoloring can make the filling look artificial, so add incrementally until satisfied. If the color is uneven, scrape and mix gently until uniform.
- Add strawberry buttercream filling to a piping bag fitted with a medium plain tip or just cut off the end of the piping bag, omit the tip: The filling should pipe smoothly, forming a consistent disc on the wafer back; if it drags or clumps the buttercream may need a quick beat to restore silkiness. Using a bag helps control the amount and creates neat sandwiches, while spooning gives a charming, rustic look. If the filling is too soft, chill briefly to firm it for cleaner piping.
- Pipe a single layer of buttercream onto the back side of one cookie: The sensation is precise, as the cream forms a soft mound that yields slightly when the top cookie is set. Keep the amount modest so the filling does not spill out, and a single layer ensures a pleasant balance of wafer to cream. Overfilling creates messy sandwiches and clumpy texture, so aim for a small even dollop that covers the center without touching edges.
- Top with another cookie and press gently to secure: You will feel a slight give as the two wafers meet the filling, and the sandwich should look tidy with a thin seam of pastel cream peeking out. Pressing too hard will flatten the filling and risk cracking the wafers, while too light a touch can lead to separation. If you want a rustic look, spoon the filling and simply set the top cookie without pressing firmly.
Notes
- Save chilling time by preparing the dough the night before and letting it rest in the refrigerator overnight. This deep chill improves flavor and makes rolling easier the next day.
- Use an oven thermometer if your oven is older or unpredictable. That small investment ensures you bake at the intended 375°F and prevents accidental browning.
- Work on a cool surface such as a marble slab or a lightly floured board to keep the dough from warming too quickly while rolling.
- Test bake one sheet first so you can adjust time for your oven. Because these wafers are thin, a minute or two makes a big difference.
- Sift powdered sugar into the buttercream to avoid any lumps and achieve a glossy, smooth filling that pipes beautifully.
- Freeze assembled cookies briefly before packing them to keep the filling firm and prevent smudging during transport.