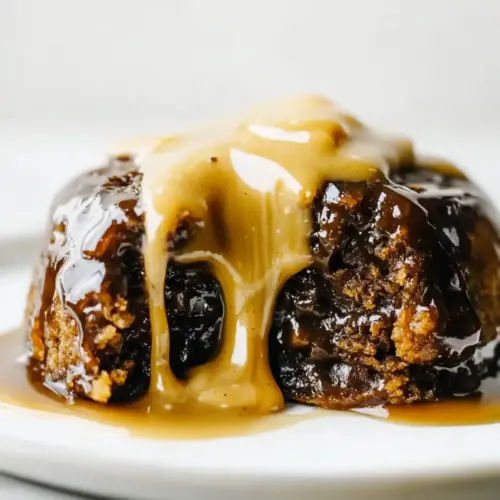
Sticky Toffee Pudding
Sticky Toffee Pudding has been my comfort dessert for rainy evenings and cozy gatherings, and the first sentence here is honest about how it hooked me with its warm, molasses sweet aroma. I still remember the first time I spooned through the tender crumb and tasted the sticky toffee sauce, how the steam rose and the room felt suddenly calmer. That moment made me a little reckless with dessert priorities, and I began testing different date textures, baking times, and sauce thicknesses until I found the balance I love.
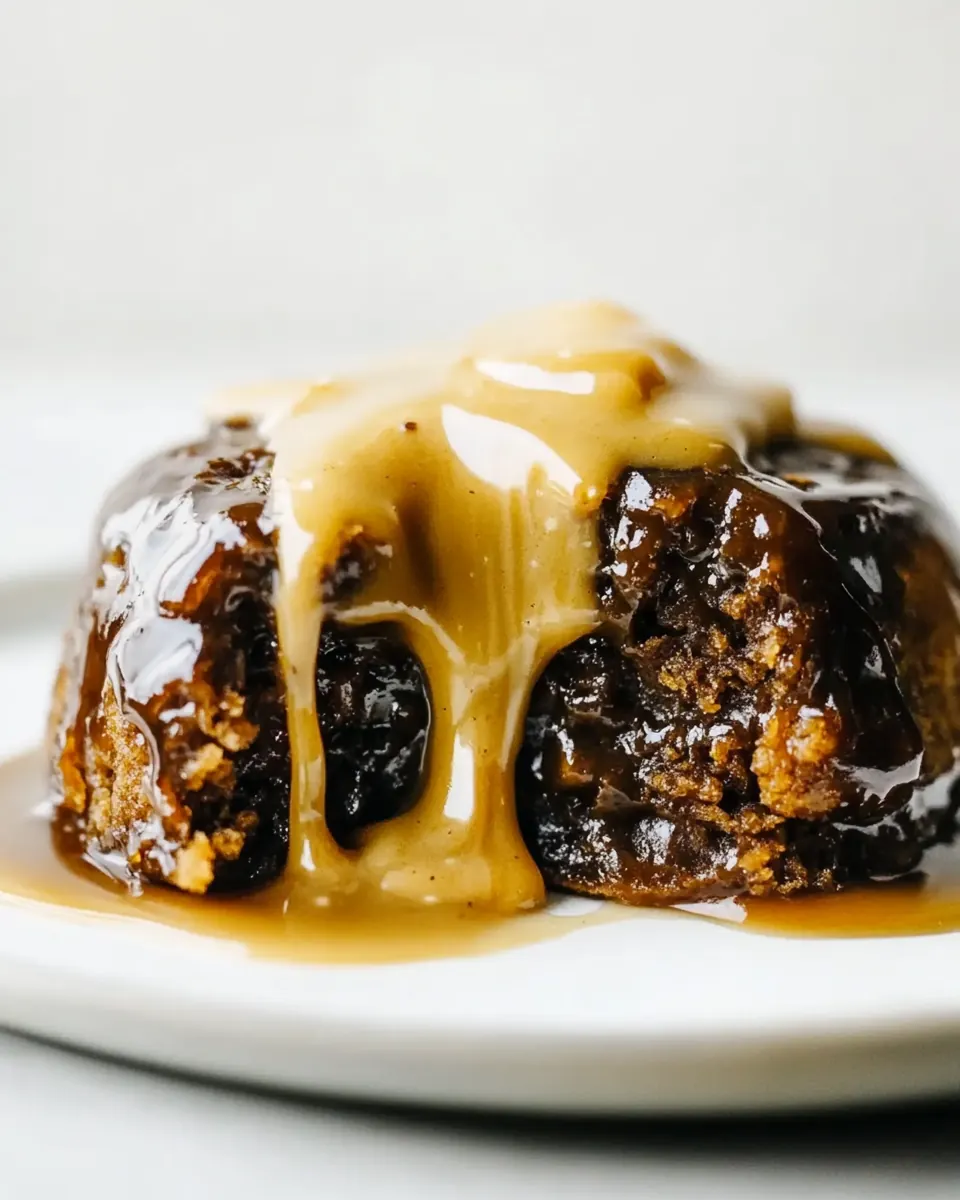
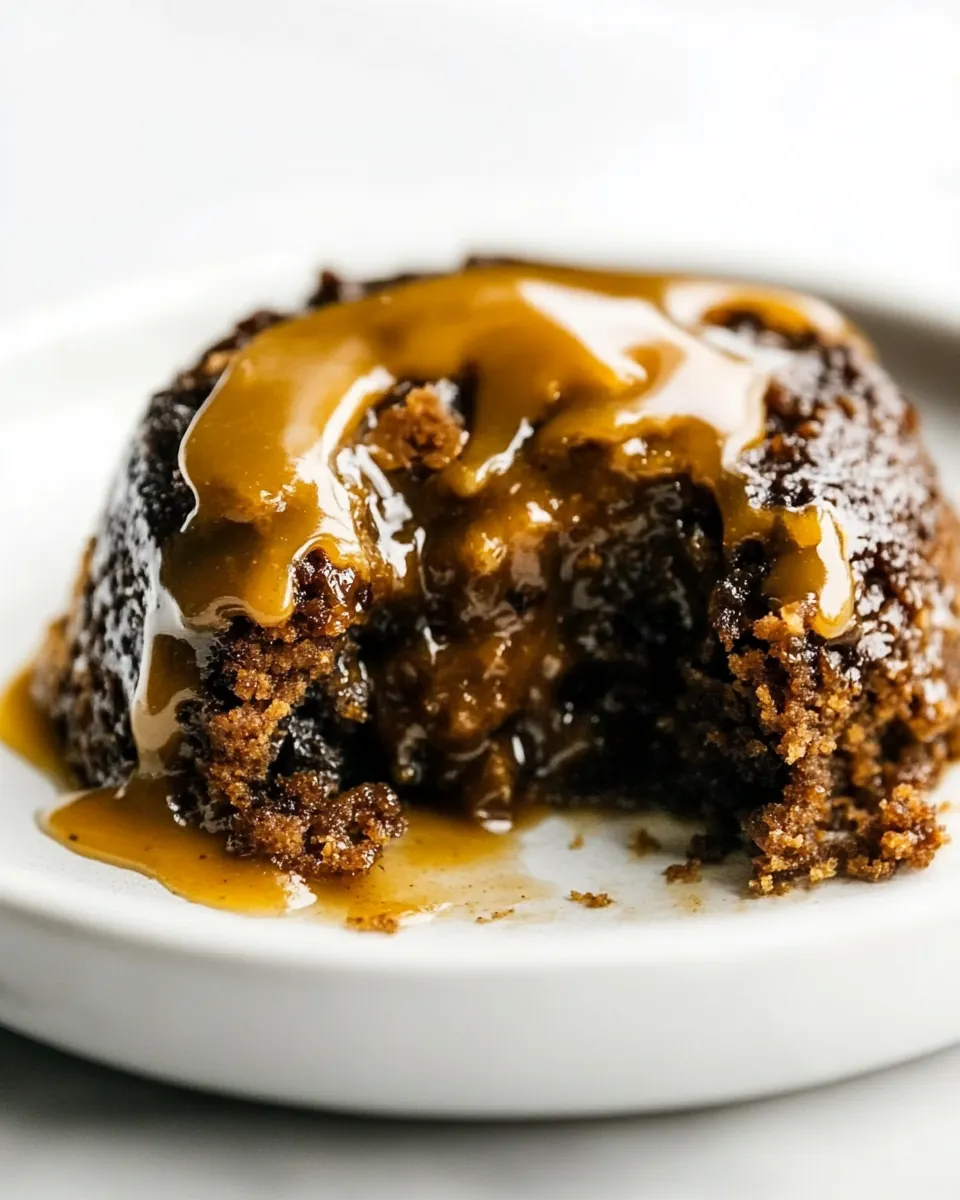
Over the years, I learned to treat Sticky Toffee Pudding like a humble ritual, one that rewards attention to small details. I’ll tell you candidly, I prefer ramekins because they create that perfect contrast between the gently caramelized rim and the soft center. When I make it for friends, I watch their eyes when the sauce bubbles up the sides, and I always get the same satisfied silence that only happens with really good dessert.
Recipe Snapshot
1 hr 30 mins
45 mins
45 mins
Medium
450 kcal
American
Gluten-Free, Low FODMAP
Desserts
Oven, Ramekins, Saucepan, Stand mixer, Food processor
Why This Sticky Toffee Pudding Is So Good
Deep, comforting flavor that feels home made
I love how Sticky Toffee Pudding leans into the natural sweetness of dates rather than relying on overt sugar notes. The result is a rounded, almost caramel like taste that feels cozy and familiar. I often say the dessert tastes like a warm blanket on a cold night, and that is not an exaggeration. The pudding’s moist crumb and the toffee sauce’s glossy sheen combine to make every bite indulgent without being cloying.
Textural contrast that sings
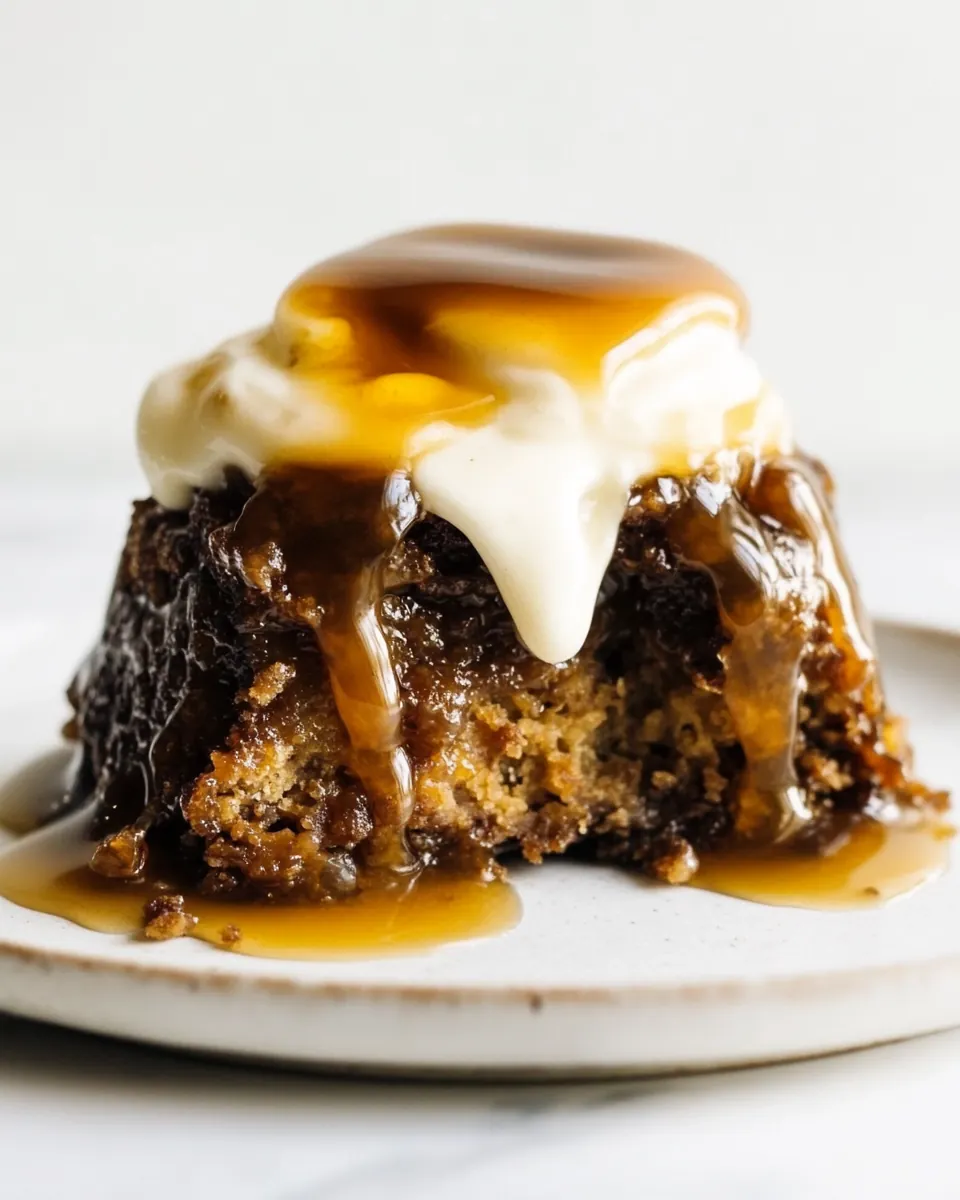
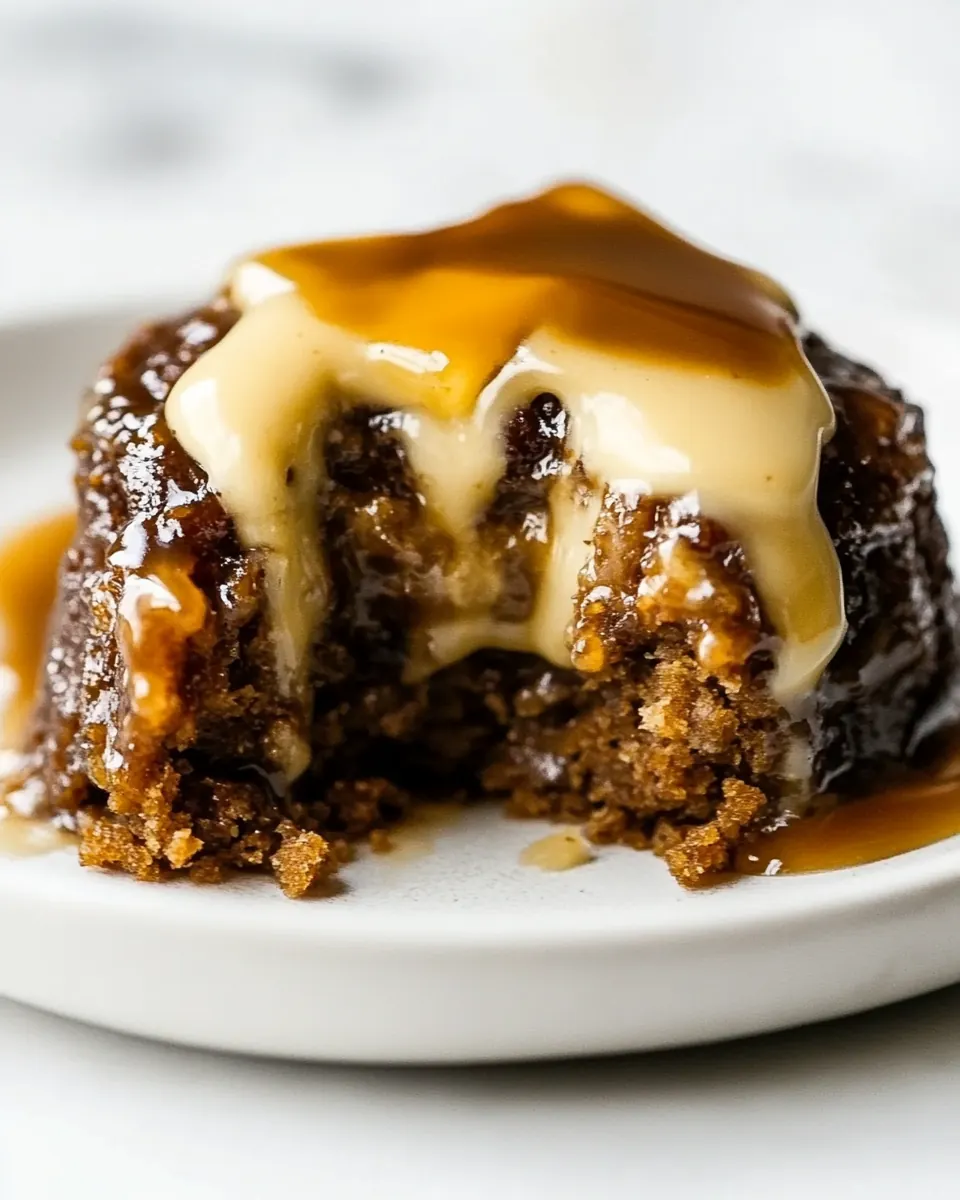
There is a beautiful interplay in this recipe between the soft, tender cake and the viscous, silky toffee sauce. When you spoon into the ramekin, you get a moment of resistance followed by a plush, yielding center. I think that contrast is what keeps people coming back for seconds. It also makes plating simple, because the cake holds shape while the sauce pools enticingly.
Ingredient simplicity with big payoff
I adore recipes that do a lot with a little, and this one is exactly that. The stars are common pantry staples like all purpose flour, brown sugar, and butter, alongside dates which bring an intense, natural sweetness. These few ingredients collaborate to create complexity, which is why I often nudge home bakers to trust the method more than chasing exotic additions.
Flexible and forgiving for make ahead plans
One reason I keep this recipe in my back pocket is how well it adapts to timing needs. You can prepare the cakes ahead of time and finish them with warm sauce later, which is perfect for hosting. I personally make the cakes earlier in the day, then rewarm and finish them before guests arrive. The pudding’s structure and the sauce’s resilience make it a stress free dessert for entertaining.
A crowd pleaser with elegant presentation
Finally, Sticky Toffee Pudding looks more refined than it is difficult to make. Serving the pudding warm from ramekins with a spoonful of sauce spooned over the top feels elevated, yet everyone recognizes it as comforting. I love how a simple sprinkle of sea salt or a dollop of whipped cream transforms it into a memorable finish to a meal.
Main Ingredients for Sticky Toffee Pudding
These ingredients form a simple, effective team that produces both tender cake and glossy sauce. The pudding relies on moisture rich dates to give depth, while the combination of butter and brown sugar builds caramel notes. The flour and chemical leaveners give enough lift for a light crumb that still feels dense and satisfying.
- 6 ounces dates: Chopped and softened to provide natural sweetness and a sticky, caramelized base that enriches the pudding’s texture and flavor; soak or simmer to fully plump for best integration into the batter.
- 1 cup water: Gently simmered to rehydrate dried fruits and dissolve sugars, forming a flavorful liquid that adds moisture and helps create a smooth date purée; reserve some of the cooking liquid for the batter if needed.
- 1 1/4 cups all-purpose flour: Sifted and combined to create the cake’s structure and tender crumb; balances liquid and leavening for a soft, moist sponge when measured accurately.
- 1 teaspoon baking powder: Whisked into the dry mixture to contribute lift and lightness by producing gas bubbles during baking; ensures the pudding rises evenly when fresh and active.
- 1/2 teaspoon baking soda: Dissolved into the batter to react with acids in the recipe, helping create additional lift and a fine, tender texture in the finished pudding.
- 1/2 teaspoon salt: Measured and mixed with the dry ingredients to regulate overall flavor, strengthen dough structure slightly, and enhance other tastes without overwhelming sweetness.
- 1/4 cup unsalted butter: Softened and creamed with sugar to incorporate fat for richness, tenderness, and moisture; contributes to the cake’s melt-in-the-mouth quality and helps carry flavor.
- 1 cup brown sugar packed: Creamed with butter to add deep molasses notes and sweetness, creating a moist crumb and contributing to the pudding’s caramel-like background flavor.
- 1 teaspoon vanilla extract: Added for aromatic warmth and to amplify sweetness, enhancing the dessert’s overall flavor profile with a rounded, familiar vanilla note.
- 2 large eggs: Beaten and folded into the batter to provide structure, richness, and leavening through trapped air; eggs also emulsify fats and liquids for a uniform texture.
- 1 cup light brown sugar: Simmered into the toffee sauce to intensify caramel flavors and deepen sweetness; contributes a complex, molasses-forward taste for drizzling over the pudding.
- 1 1/2 cups heavy cream: Heated and combined with sugar and butter to form a silky, luxurious toffee sauce that adds moisture, richness, and a creamy mouthfeel when served warm.
- 1/2 cup unsalted butter: Melted into the hot sauce and batter for additional richness and a smooth, buttery finish; balances sweetness and helps create a glossy sauce.
- 1/2 cup light corn syrup: Stirred into the caramel sauce to increase viscosity and add a light, sweet sheen that prevents crystallization while contributing subtle corn–syrup sweetness.
- 1/2 teaspoon vanilla extract: Added to both batter and sauce for aromatic enhancement and to round out flavors, providing a sweet, floral note that harmonizes with caramel and dates.
Step by Step Guide for Sticky Toffee Pudding
This method walks you through building the cake, preparing the sauce, and finishing the puddings in ramekins. I’ll guide you through sensory cues and common pitfalls so each ramekin turns out tender and saucy.
- Preheat the oven to 350 degrees Fahrenheit. Butter 6 1/2 cup ramekins and dust lightly with flour.: You should notice the oven warming and a gentle, dry heat filling the cavity, which primes the environment so the puddings bake evenly. The tactile action of buttering and flouring the ramekins creates a subtle barrier, helping the cakes release cleanly while encouraging a slightly crisper edge where the batter meets the ceramic. If the ramekins are too cold when you fill them, the batter may cling oddly, so make sure they are at room temperature. A common mistake is overflouring, which can leave a powdery residue; tap out the excess so you get an even, thin coating that helps release without affecting texture.
- In a small saucepan, simmer 6 ounces dates and 1 cup water together over medium-low heat for about 15 minutes, until the dates are nice and soft. Transfer them to a food processor and blend until smooth.: As the dates simmer, the kitchen fills with a warm, caramel like scent and the mixture will become glossy and thick. The gentle bubbling signals that the water is extracting the natural sugars and softening the fruit, which is essential for a velvety puree. Processing the mixture yields a smooth paste that folds evenly into the batter, preventing stringy pockets of fruit. Avoid boiling aggressively, which can cause the dates to stick and scorch, imparting a bitter note. If the puree seems too runny, let it cool a bit to thicken before blending, and scrape down the sides to ensure an even texture.
- In a small bowl, whisk together 1 1/4 cups all-purpose flour, 1 teaspoon baking powder, 1/2 teaspoon baking soda and 1/2 teaspoon salt. In the bowl of a stand mixer, use the paddle attachment to beat together 1/4 cup unsalted butter and 1 cup brown sugar until combined. Add in 2 large eggs and 1 teaspoon vanilla extract. Scrape down the sides and the bottom of the bowl and add the date puree and beat until incorporated. With the mixer on low, add in the dry ingredients.: The sound of the paddle beating the butter and brown sugar becomes a soft whisper as they cream, turning pale and slightly fluffy, which signals proper aeration for a tender crumb. Adding the eggs one at a time lets the mixture emulsify, resulting in a smooth, cohesive batter. Folding in the dry mix on low prevents overworking the all purpose flour , so the cake stays soft. A frequent error is overmixing at this stage, which creates a tougher crumb; stop mixing as soon as the streaks of flour disappear. Use a scraper to ensure there are no pockets of dry ingredients at the bottom, and the batter should look glossy with a uniform texture before you portion it out.
- Divide the batter evenly into the six ramekins. Bake for 30-35 minutes, or until a toothpick inserted in the center comes out clean. While the cakes are in the oven, prepare the toffee sauce. Let the cakes cool slightly before using a serrated knife to trim the tops of the cakes level with the rim of the ramekins. Invert them onto a wire cooling rack and clean out the ramekins. Give them a quick spray of cooking spray (one with flour works best) and spoon about a tablespoon of toffee sauce into each ramekin. Put the cakes back in the ramekins and bake for about 8-10 minutes, until the sauce is bubbling up the sides. Allow to cool for 2 minutes before inverting them out of the ramekins again.: When the oven crackles and a sweet, toffee like fragrance starts to drift, check for a golden top and slight spring back. The toothpick test confirms doneness without overbaking, which preserves moisture. Trimming the tops creates a level surface so the sauce sits in the ramekin and can bubble up evenly, producing that signature sticky edge. Inverting onto a rack helps the cakes release gently; you should hear a soft pop when they come free if the pans were well prepared. Avoid overbaking, which dries the cake and makes the texture crumbly rather than plush. When reheating after adding sauce, watch the ramekins closely so the sauce reaches a lively bubble but does not scorch, and allow a brief rest so the cakes set slightly before flipping out.
- Serve the cake warm (either shortly after baking, or gently rewarmed if they are made ahead of time) with extra toffee sauce and whipped cream, ice cream, or a sprinkle of sea salt.: The moment you spoon into a warm ramekin, the sauce should be glossy and the cake steaming slightly, releasing a concentrated aroma of caramel and dates . Serving warm maximizes contrast between the sauce and the tender crumb, and a cool dollop of ice cream provides an irresistible temperature play. I recommend a light sprinkle of flaky sea salt to elevate the sweetness and create lively tension on the palate. A typical mistake is serving the cakes too cold, which dulls the sauce and flattens the flavor. If you rewarm them, do it gently so the crumb doesn’t dry out, watching for steam and bubbling to judge readiness.
- If preparing the cakes ahead of time, remove them from the ramekins and store them in an airtight container. Warm each cake in the microwave for about 30 seconds before proceeding with putting the toffee sauce in the ramekins and heating them in the oven. Be sure to gently warm the toffee sauce before using.: Preparing ahead is a real life saver when hosting, and properly stored cakes retain their moisture and shape. When you microwave briefly, you’re bringing back tenderness without overcooking the crumb. Warming the toffee sauce makes it pourable and helps it meld with the cake during the finishing bake. Avoid overheating in the microwave which can dry the cake or cause the sauce to split. Reheating gradually and monitoring texture ensures the final result is as close as possible to freshly baked puddings.
- In a medium saucepan, combine 1 cup light brown sugar, 1 1/2 cups heavy cream, 1/2 cup unsalted butter, and 1/2 cup light corn syrup. Heat over medium until boiling. Lower the heat to medium-low and simmer, stirring frequently, for about 15-20 minutes until it begins to take on a deep amber color. Remove from the heat and stir in 1/2 teaspoon vanilla extract. Set aside to cool slightly before spooning into the ramekins and serving.: As the sauce begins to simmer, you’ll hear a steady, gentle bubbling and smell an intensified caramel scent, which signals sugar transformation. The mixture will thicken gradually and deepen in color, turning from pale to a warm amber that coats the back of a spoon, which is the visual cue to remove it from the heat. Frequent stirring prevents scorching and ensures an even, silky texture. If you skip stirring, the sauce can seize or burn, producing a grainy result. Stirring in the vanilla extract off heat preserves its fragrance and completes the sauce with a rounded aroma. Let it cool slightly so it holds on to the cake without immediately soaking through the crumb.
Ways to Adapt This Recipe
This section offers practical adaptations and creative ideas to personalize Sticky Toffee Pudding. I cover make ahead tricks, plating variations, and gentle technique swaps that keep the core flavors intact.
- Make ahead convenience — Bake the puddings fully, cool them, and store in an airtight container for up to two days. When you are ready to serve, warm them briefly in the microwave and finish with hot toffee sauce in the oven to revive that bubbling top.
- Sauce consistency control — If your toffee sauce seems too thin, simmer it a little longer to concentrate and thicken. Conversely, if it becomes too thick, whisk in a splash of warm heavy cream to loosen it without diluting flavor.
- Ramekin swap — If you do not have 1 1/2 cup capacity ramekins, use slightly larger or smaller dishes and adjust bake time by a few minutes, watching for the toothpick test and spring back to determine doneness.
- Presentation upgrade — For a refined finish, spoon extra toffee sauce over the inverted puddings and scatter a tiny pinch of flaky sea salt on top to balance sweetness and highlight the sauce’s buttered notes.
- Serving temperature variations — Serve warm with a cold scoop of ice cream for contrast, or allow the pudding to cool slightly and pair with softly whipped cream for a creamier mouthfeel that mellows the sauce’s intensity.
Serving Ideas for Sticky Toffee Pudding
Sticky Toffee Pudding is versatile for intimate dinners or festive gatherings. Below are serving concepts, pairings, and storage pointers to help you present it beautifully and store it safely.
- Classic warm plating — Invert each ramekin onto a small dessert plate, then spoon warm toffee sauce over the top so it pools around the base. Add a small quenelle of whipped cream to contrast the warm sauce.
- With ice cream — Serve the pudding warm alongside a scoop of cold ice cream for a delightful temperature contrast, which enhances the velvetiness of the sauce and the tender crumb.
- For dinner parties — Finish the puddings in the oven with the sauce bubbling, then bring them straight to the table for a dramatic, communal moment. Provide small spoons so guests can dig into the center and enjoy the molten sauce.
- Occasion tailoring — This pudding is perfect for winter gatherings, holiday evenings, or after a cozy weeknight supper. Its warming flavors make it especially suited to colder seasons and celebratory dinners where you want comfort with presence.
- Storage guidance — Store cooled cakes, without sauce, in an airtight container for up to two days in the refrigerator. Rewarm gently and add freshly warmed toffee sauce before serving to maintain texture and flavor.
- Make ahead timeline — Prepare the cakes a day in advance, then assemble and finish with sauce on the day you plan to serve, which reduces last minute work while preserving the dessert’s fresh appeal.
- Seasonal pairing — In winter, pair with a warm spice tea or lightly spiced coffee to complement the dessert’s caramel and date notes, enhancing the cozy mood of the meal.
FAQ
Conclusion
Sticky Toffee Pudding shines because it combines a tender, date infused cake with a glossy, buttery toffee sauce that delivers warmth and comfort. I encourage you to give it a try, especially on a chilly evening when a rich, caramel forward dessert feels just right. It is forgiving to prepare ahead, dramatic to serve, and consistently well received, making it a reliable recipe to have in your repertoire.
Sticky Toffee Pudding
Equipment
- Oven
- Ramekins
- Saucepan
- Stand mixer
- Food Processor
Ingredients
- 6 ounces dates Chopped and softened to provide natural sweetness and a sticky, caramelized base that enriches the pudding’s texture and flavor; soak or simmer to fully plump for best integration into the batter.
- 1 cup water Gently simmered to rehydrate dried fruits and dissolve sugars, forming a flavorful liquid that adds moisture and helps create a smooth date purée; reserve some of the cooking liquid for the batter if needed.
- 1 1/4 cups all-purpose flour Sifted and combined to create the cake’s structure and tender crumb; balances liquid and leavening for a soft, moist sponge when measured accurately.
- 1 teaspoon baking powder Whisked into the dry mixture to contribute lift and lightness by producing gas bubbles during baking; ensures the pudding rises evenly when fresh and active.
- 1/2 teaspoon baking soda Dissolved into the batter to react with acids in the recipe, helping create additional lift and a fine, tender texture in the finished pudding.
- 1/2 teaspoon salt Measured and mixed with the dry ingredients to regulate overall flavor, strengthen dough structure slightly, and enhance other tastes without overwhelming sweetness.
- 1/4 cup unsalted butter Softened and creamed with sugar to incorporate fat for richness, tenderness, and moisture; contributes to the cake’s melt-in-the-mouth quality and helps carry flavor.
- 1 cup brown sugar packed Creamed with butter to add deep molasses notes and sweetness, creating a moist crumb and contributing to the pudding’s caramel-like background flavor.
- 1 teaspoon vanilla extract Added for aromatic warmth and to amplify sweetness, enhancing the dessert’s overall flavor profile with a rounded, familiar vanilla note.
- 2 large eggs Beaten and folded into the batter to provide structure, richness, and leavening through trapped air; eggs also emulsify fats and liquids for a uniform texture.
- 1 cup light brown sugar Simmered into the toffee sauce to intensify caramel flavors and deepen sweetness; contributes a complex, molasses-forward taste for drizzling over the pudding.
- 1 1/2 cups heavy cream Heated and combined with sugar and butter to form a silky, luxurious toffee sauce that adds moisture, richness, and a creamy mouthfeel when served warm.
- 1/2 cup unsalted butter Melted into the hot sauce and batter for additional richness and a smooth, buttery finish; balances sweetness and helps create a glossy sauce.
- 1/2 cup light corn syrup Stirred into the caramel sauce to increase viscosity and add a light, sweet sheen that prevents crystallization while contributing subtle corn-syrup sweetness.
- 1/2 teaspoon vanilla extract Added to both batter and sauce for aromatic enhancement and to round out flavors, providing a sweet, floral note that harmonizes with caramel and dates.
Instructions
- Preheat the oven to 350 degrees Fahrenheit. Butter 6 1/2 cup ramekins and dust lightly with flour.: You should notice the oven warming and a gentle, dry heat filling the cavity, which primes the environment so the puddings bake evenly. The tactile action of buttering and flouring the ramekins creates a subtle barrier, helping the cakes release cleanly while encouraging a slightly crisper edge where the batter meets the ceramic. If the ramekins are too cold when you fill them, the batter may cling oddly, so make sure they are at room temperature. A common mistake is overflouring, which can leave a powdery residue; tap out the excess so you get an even, thin coating that helps release without affecting texture.
- In a small saucepan, simmer 6 ounces dates and 1 cup water together over medium-low heat for about 15 minutes, until the dates are nice and soft. Transfer them to a food processor and blend until smooth.: As the dates simmer, the kitchen fills with a warm, caramel like scent and the mixture will become glossy and thick. The gentle bubbling signals that the water is extracting the natural sugars and softening the fruit, which is essential for a velvety puree. Processing the mixture yields a smooth paste that folds evenly into the batter, preventing stringy pockets of fruit. Avoid boiling aggressively, which can cause the dates to stick and scorch, imparting a bitter note. If the puree seems too runny, let it cool a bit to thicken before blending, and scrape down the sides to ensure an even texture.
- In a small bowl, whisk together 1 1/4 cups all-purpose flour, 1 teaspoon baking powder, 1/2 teaspoon baking soda and 1/2 teaspoon salt. In the bowl of a stand mixer, use the paddle attachment to beat together 1/4 cup unsalted butter and 1 cup brown sugar until combined. Add in 2 large eggs and 1 teaspoon vanilla extract. Scrape down the sides and the bottom of the bowl and add the date puree and beat until incorporated. With the mixer on low, add in the dry ingredients.: The sound of the paddle beating the butter and brown sugar becomes a soft whisper as they cream, turning pale and slightly fluffy, which signals proper aeration for a tender crumb. Adding the eggs one at a time lets the mixture emulsify, resulting in a smooth, cohesive batter. Folding in the dry mix on low prevents overworking the all purpose flour , so the cake stays soft. A frequent error is overmixing at this stage, which creates a tougher crumb; stop mixing as soon as the streaks of flour disappear. Use a scraper to ensure there are no pockets of dry ingredients at the bottom, and the batter should look glossy with a uniform texture before you portion it out.
- Divide the batter evenly into the six ramekins. Bake for 30-35 minutes, or until a toothpick inserted in the center comes out clean. While the cakes are in the oven, prepare the toffee sauce. Let the cakes cool slightly before using a serrated knife to trim the tops of the cakes level with the rim of the ramekins. Invert them onto a wire cooling rack and clean out the ramekins. Give them a quick spray of cooking spray (one with flour works best) and spoon about a tablespoon of toffee sauce into each ramekin. Put the cakes back in the ramekins and bake for about 8-10 minutes, until the sauce is bubbling up the sides. Allow to cool for 2 minutes before inverting them out of the ramekins again.: When the oven crackles and a sweet, toffee like fragrance starts to drift, check for a golden top and slight spring back. The toothpick test confirms doneness without overbaking, which preserves moisture. Trimming the tops creates a level surface so the sauce sits in the ramekin and can bubble up evenly, producing that signature sticky edge. Inverting onto a rack helps the cakes release gently; you should hear a soft pop when they come free if the pans were well prepared. Avoid overbaking, which dries the cake and makes the texture crumbly rather than plush. When reheating after adding sauce, watch the ramekins closely so the sauce reaches a lively bubble but does not scorch, and allow a brief rest so the cakes set slightly before flipping out.
- Serve the cake warm (either shortly after baking, or gently rewarmed if they are made ahead of time) with extra toffee sauce and whipped cream, ice cream, or a sprinkle of sea salt.: The moment you spoon into a warm ramekin, the sauce should be glossy and the cake steaming slightly, releasing a concentrated aroma of caramel and dates . Serving warm maximizes contrast between the sauce and the tender crumb, and a cool dollop of ice cream provides an irresistible temperature play. I recommend a light sprinkle of flaky sea salt to elevate the sweetness and create lively tension on the palate. A typical mistake is serving the cakes too cold, which dulls the sauce and flattens the flavor. If you rewarm them, do it gently so the crumb doesn’t dry out, watching for steam and bubbling to judge readiness.
- If preparing the cakes ahead of time, remove them from the ramekins and store them in an airtight container. Warm each cake in the microwave for about 30 seconds before proceeding with putting the toffee sauce in the ramekins and heating them in the oven. Be sure to gently warm the toffee sauce before using.: Preparing ahead is a real life saver when hosting, and properly stored cakes retain their moisture and shape. When you microwave briefly, you’re bringing back tenderness without overcooking the crumb. Warming the toffee sauce makes it pourable and helps it meld with the cake during the finishing bake. Avoid overheating in the microwave which can dry the cake or cause the sauce to split. Reheating gradually and monitoring texture ensures the final result is as close as possible to freshly baked puddings.
- In a medium saucepan, combine 1 cup light brown sugar, 1 1/2 cups heavy cream, 1/2 cup unsalted butter, and 1/2 cup light corn syrup. Heat over medium until boiling. Lower the heat to medium-low and simmer, stirring frequently, for about 15-20 minutes until it begins to take on a deep amber color. Remove from the heat and stir in 1/2 teaspoon vanilla extract. Set aside to cool slightly before spooning into the ramekins and serving.: As the sauce begins to simmer, you’ll hear a steady, gentle bubbling and smell an intensified caramel scent, which signals sugar transformation. The mixture will thicken gradually and deepen in color, turning from pale to a warm amber that coats the back of a spoon, which is the visual cue to remove it from the heat. Frequent stirring prevents scorching and ensures an even, silky texture. If you skip stirring, the sauce can seize or burn, producing a grainy result. Stirring in the vanilla extract off heat preserves its fragrance and completes the sauce with a rounded aroma. Let it cool slightly so it holds on to the cake without immediately soaking through the crumb.
Notes
- Make ahead convenience — Bake the puddings fully, cool them, and store in an airtight container for up to two days. When you are ready to serve, warm them briefly in the microwave and finish with hot toffee sauce in the oven to revive that bubbling top.
- Sauce consistency control — If your toffee sauce seems too thin, simmer it a little longer to concentrate and thicken. Conversely, if it becomes too thick, whisk in a splash of warm heavy cream to loosen it without diluting flavor.
- Ramekin swap — If you do not have 1 1/2 cup capacity ramekins, use slightly larger or smaller dishes and adjust bake time by a few minutes, watching for the toothpick test and spring back to determine doneness.
- Presentation upgrade — For a refined finish, spoon extra toffee sauce over the inverted puddings and scatter a tiny pinch of flaky sea salt on top to balance sweetness and highlight the sauce’s buttered notes.
- Serving temperature variations — Serve warm with a cold scoop of ice cream for contrast, or allow the pudding to cool slightly and pair with softly whipped cream for a creamier mouthfeel that mellows the sauce’s intensity.