
Strawberry Meyer Lemon Tart
Strawberry Meyer Lemon Tart is one of those recipes that instantly takes me back to an early spring afternoon when the air smelled faintly of citrus and the market was overflowing with strawberries.
I remember bringing home a bag of Meyer lemons and deciding to test how their floral, slightly sweeter tang would play with a thin layer of strawberry jam. The first time I cut into the chilled tart, the crust gave a delicate snap and the filling quivered just enough to promise silkiness. That moment, with a forkful that mixed tart lemon with bright strawberry notes, convinced me this combination was worth sharing at every gathering I host.
Over time I refined the crust so it would be tender yet sturdy, and adjusted the lemon and sugar balance so the filling sets silky, not rubbery. I like to top mine with halved fresh strawberries for a pop of color and texture. Friends always ask for the recipe, and I tell them it is deceptively elegant, yet approachable for home bakers who enjoy a little technique. Whether you are baking for a festive brunch, a light dessert after a heavy meal, or simply to celebrate the season, this tart feels celebratory without fuss.
Recipe Snapshot
1 hr 40 mins
60 mins
40 mins
Medium
250 kcal
American
Gluten-Free, Low FODMAP
Desserts
Food processor, Tart pan, Parchment paper, Baking sheet, Fine mesh strainer, Medium saucepan, Wire rack
Why This Strawberry Meyer Lemon Tart Hits Different
Bright seasonal flavor
I love this tart because the Strawberry Meyer Lemon Tart captures spring in every bite. The Meyer lemons bring a floral sweetness that softens the citrus snap you’d get from regular lemons, while the strawberry jam adds a rounded fruit backbone. It’s the kind of dessert that tastes like sunshine, and I never skip the fresh strawberries on top because they amplify that seasonal feeling.
Contrast of textures
The interplay between the flaky crust and the creamy curd is what keeps me coming back. The crust is tender and slightly crumbly, providing a pleasant textural contrast to the smooth, custardy filling. When you bite through the crisp edge into the velvet filling, you get a satisfying balance, and that makes serving this tart at dinner parties feel special.
Approachable technique, impressive result
I appreciate recipes that teach you a technique and reward you with a showstopper. With the Strawberry Meyer Lemon Tart, the steps are classic pastry work, but nothing here is intimidating. A short chill for the dough, a gentle tempering of eggs while cooking the filling, and a patient chill to set the tart, and you will end up with something that looks like it belongs in a bakery window.
Flexible for company
This tart adapts to occasions. Make it a day ahead and slice it straight from the fridge for a picnic, or serve it as a finale to a relaxed dinner. The light sweetness and bright acid make it a forgiving partner for coffee, tea, or even a simple sparkling non alcoholic beverage. I often find guests reaching for seconds.
Visual appeal and simplicity
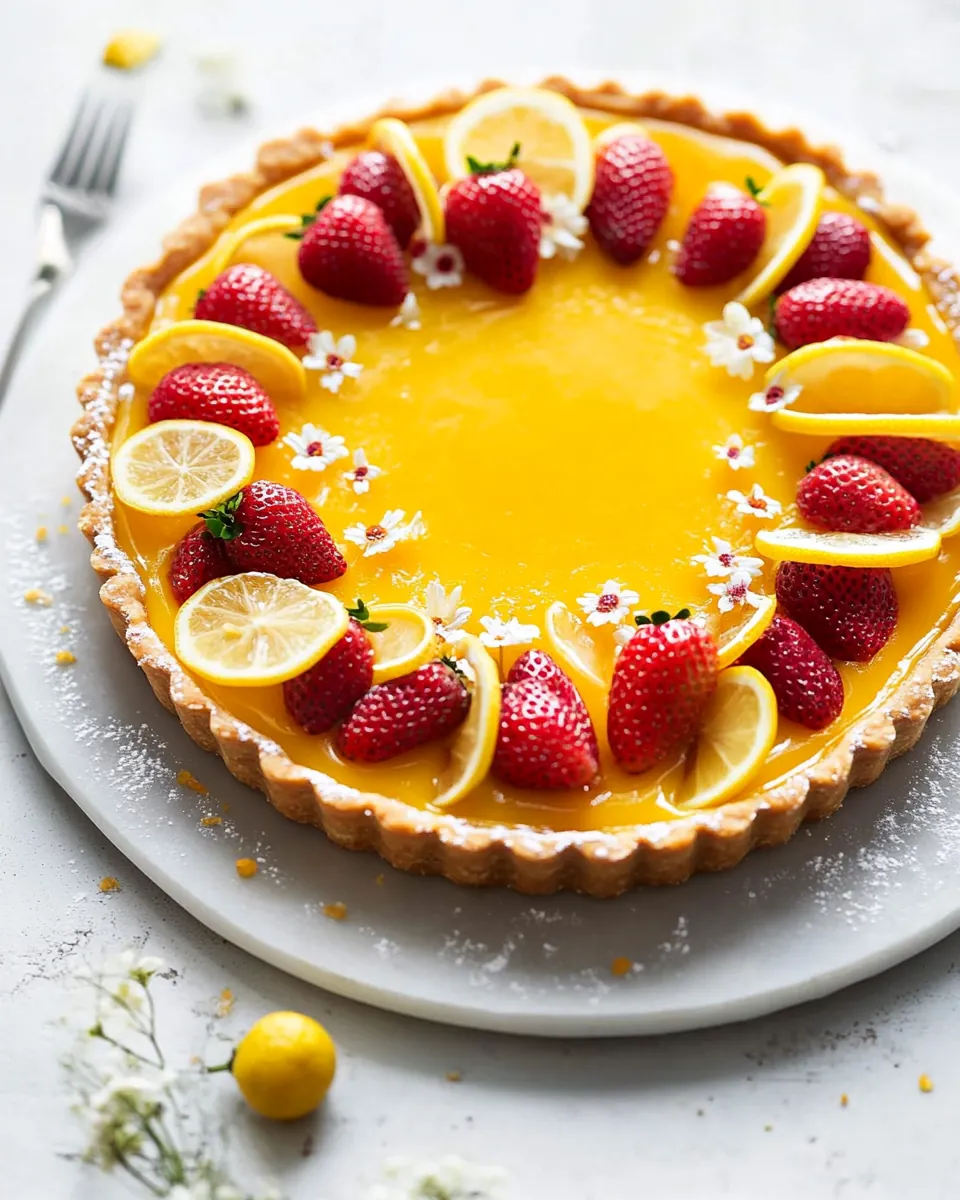
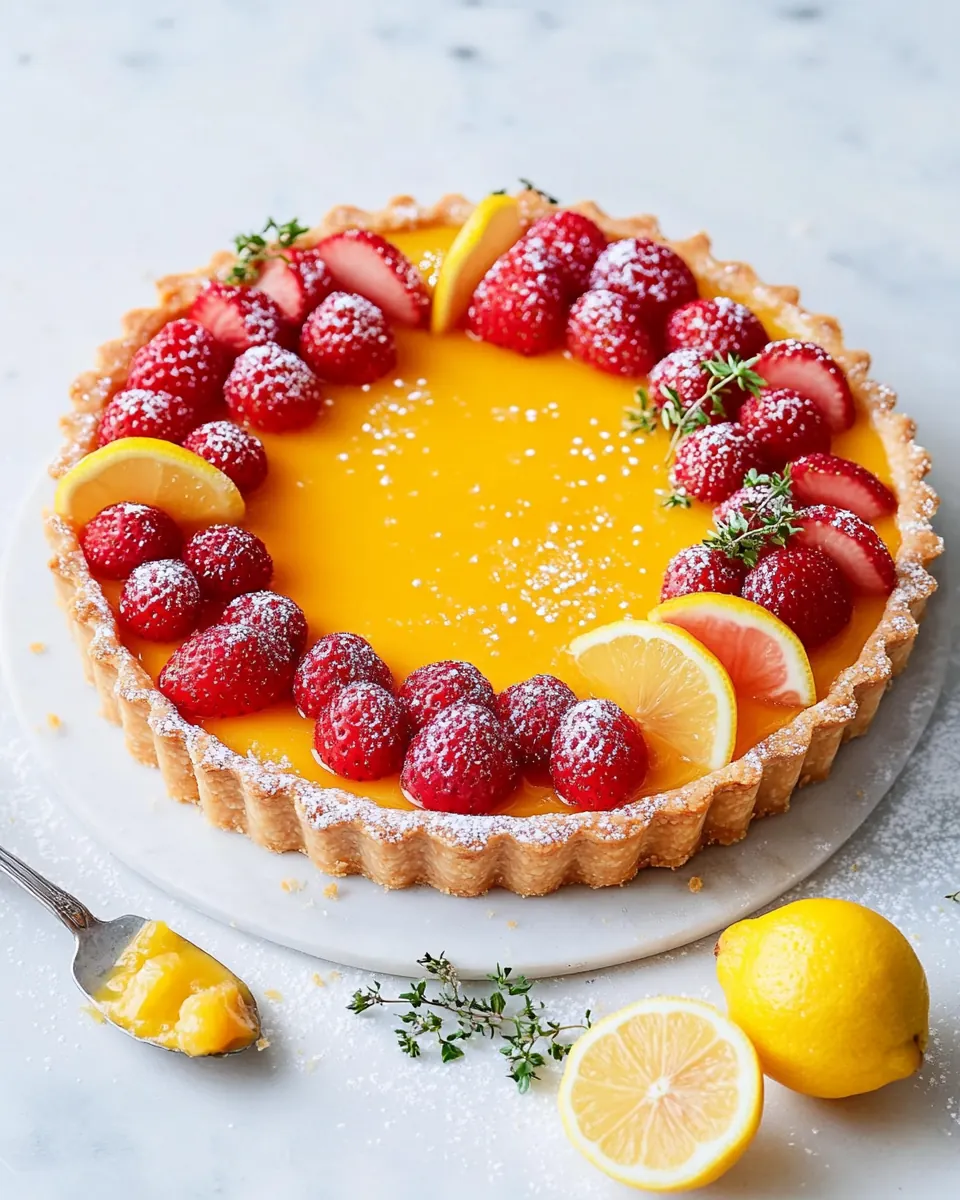
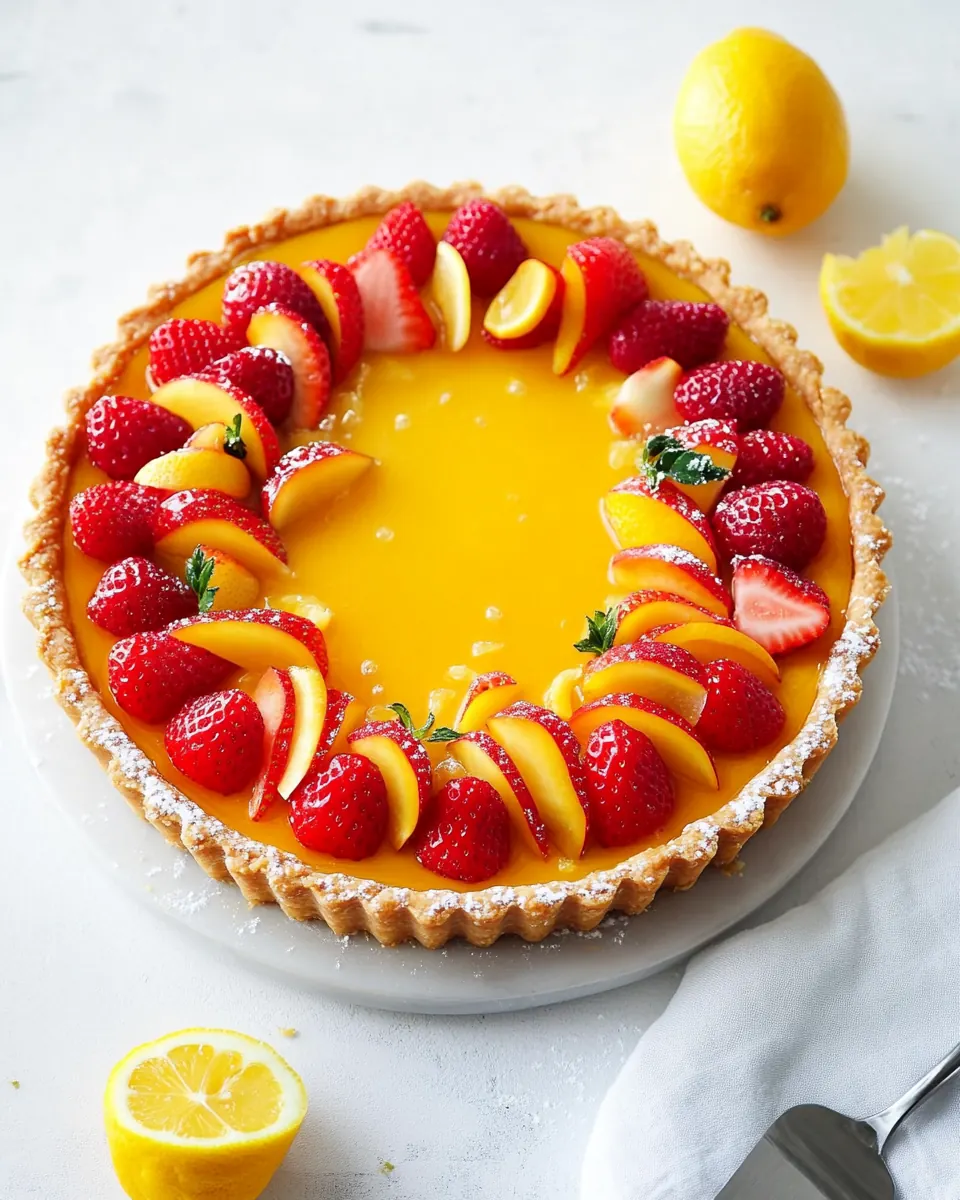
Finally, I adore how the Strawberry Meyer Lemon Tart photographs and presents. The glossy lemon custard sitting above a thin jam layer and the halos of fresh strawberries make it visually arresting. It looks more complicated than it is, which is the best kind of recipe in my book.
What Goes Into Strawberry Meyer Lemon Tart
I think of these ingredients as a small, harmonious orchestra. The pastry flour, a touch of sugar, and cold butter form the structure, while lemon zest and juice bring brightness that ties everything together. The filling relies on eggs and sugar to build custard silkiness, with butter and cream rounding the edges. A thin layer of strawberry jam adds fruit depth and a pretty visual separation between crust and curd.
- 1 1/2 cup 188 g all-purpose flour: Combine to form the base of the tart crust, providing structure and tenderness; sift or whisk first to ensure even distribution. Use measured weight for consistency and handle minimally to avoid developing too much gluten, which would toughen the crust.
- 3 tablespoons 24 g powdered sugar: Add delicate sweetness and a hint of texture to the pastry crust; it also helps slightly tenderize the dough. Sift into the flour before cutting in butter to prevent lumps and maintain a fine, sandy texture for a flaky crust.
- 1 tablespoon lemon zest, from 1 large lemon: Infuse bright citrus aroma and essential oils into the crust for vibrant lemon flavor; finely grate only the yellow outer layer to avoid bitterness. Mix into the dry ingredients so the zest disperses evenly and lifts the overall citrus profile of the tart.
- 1/4 teaspoon fine sea salt: Enhance and balance flavors while strengthening the dough's seasoning profile; fine crystals distribute more uniformly. Sprinkle into the flour mixture so salt complements sweetness and bright citrus notes without concentrating in one spot.
- 9 tablespoons 113 g unsalted butter, cold, cut into cubes: Incorporate fat for richness, flakiness, and tenderness in the crust; keep cold to prevent excess gluten development. Cut into cubes and quickly work into the flour until pea-sized pieces remain to create pockets that yield a tender, flaky texture when baked.
- 1 tablespoon lemon juice, from 1/2 large lemon: Provide acidity and a clean lemon tang to activate the crust's flavor; use freshly squeezed for best brightness. Add with minimal liquid to bring the dough together while preserving its crumbly, shortcrust consistency.
- 2 to 3 tablespoons ice water, as needed: Bind the dough just enough to form a cohesive pastry without making it soggy; add gradually and chill the dough if needed. Use only as much as required to bring the mixture together into a tidy ball that can be rolled and pressed into the tart pan.
- 5 tablespoons 100 g strawberry jam: Contribute concentrated strawberry flavor and natural sweetness to the tart base or filling; spread thinly to prevent sogginess. Warm slightly for easy spreading and apply a thin layer to the prebaked crust to create a fruity barrier and flavor contrast.
- 6 large egg yolks: Provide richness, color, and custard body to the lemon filling; separate yolks for a silkier, more stable curd. Whisk thoroughly with sugar and citrus elements to ensure smooth incorporation and prevent graininess in the finished curd.
- 2 large eggs: Add structure and additional richness to the filling while helping with setting and texture; whole eggs introduce both white and yolk components. Beat together with yolks and sugar to create a cohesive custard base that will thicken when cooked.
- 1 scant cup/190 g granulated sugar, preferably organic: Sweeten and stabilize the lemon custard while aiding in cook-off and thickening; use measured weight for reliable results. Dissolve with the eggs and citrus during gentle cooking to create a smooth, glossy curd with balanced sweetness.
- 1/4 cup Meyer lemon zest, from 4 to 5 lemons: Deliver concentrated Meyer lemon oil and fragrance to the curd, providing floral, less-acidic lemon character. Finely grate and incorporate directly into the egg-sugar mixture so the aromatic oils permeate the filling for depth of flavor.
- 5 ounces 140 g fresh squeezed Meyer lemon juice, from 4 to 5 lemons: Supply bright, sweet-tart Meyer lemon juice as the primary acid and liquid for the curd; fresh–squeezed yields optimal flavor. Add gradually to tempered eggs while whisking constantly to prevent curdling and to build a silky, set custard.
- 1/4 teaspoon fine sea salt: Balance and enhance the filling's flavors while controlling seasoning; fine salt integrates seamlessly. Stir into the lemon mixture to moderate sweetness and accentuate the citrus and strawberry notes without noticeable grittiness.
- 4 tablespoons 56 g unsalted butter, cut into pieces: Enrich and smooth the lemon curd by adding butter for gloss, body, and silkiness; cut into pieces for even melting. Incorporate off-heat or into a warm custard slowly to emulsify and prevent separation, producing a velvety texture.
- 3 tablespoons 45 g heavy cream, chilled: Lighten and add creaminess to the custard while softening the finish; keep chilled before use to maintain stability. Stir in at the end of cooking to adjust mouthfeel and lend a subtle richness without diluting the lemon intensity.
- fresh strawberries, for topping: Garnish and provide fresh fruit contrast with natural acidity, texture, and color; choose ripe, firm berries for best presentation. Slice or arrange whole on top of the tart just before serving to preserve freshness and visual appeal.
The Process for Making Strawberry Meyer Lemon Tart
These steps guide you from raw ingredients to a glossy chilled tart. I like to keep my mise en place organized because the filling comes together quickly once heated. Work patiently with the crust, chill when instructed, and be attentive while cooking the curd for a silky result.
- To prepare the crust, place flour, sugar, lemon zest, and salt in the bowl of a food processor and pulse until combined. Sprinkle cubes of butter over top. Pulse until broken up into pea-sized pieces; drizzle in lemon juice and 2 tablespoons water and pulse one or two more times or until evenly moistened; add additional water, a tablespoon at a time, as needed. Dough will still be crumbly, but should come together when pinched with your fingers. (You can also do this by hand in a mixing bowl with a pastry cutter if you prefer).: Warmth carries scent, so you should notice the bright, perfumed aroma of the lemon zest as you pulse the dry ingredients . The sound will be intermittent, a quick chopping hum as the bowl reduces the flour and powdered sugar to a uniform mix. This step matters because it evenly distributes the citrus and salt so every bite of crust tastes balanced. A common mistake is overworking at this stage, which can heat the mixture and start softening the butter once added, so pulse in short bursts and keep the processor cold if you can. You'll want a homogeneous base before adding the butter , so scrape the bowl once and confirm there are no large pockets of zest or sugar.
- Dump dough onto a clean tea towel or piece of plastic wrap; lift up sides and twist into a bundle to press the dough together. Knead once or twice if needed to bring it together into a uniform ball (If using a rectangle tart pan, shape the dough into a rough rectangle instead of a round disk). Wrap tightly in plastic wrap and refrigerate for at least 1 hour or overnight.: At this stage you will see small pea-shaped bits of cold butter suspended in the dry mix, which is the visual cue for perfect pastry texture. Those little flecks create flaky layers when baked, so keep the butter cold and avoid fully incorporating it. As you drizzle in the lemon juice and ice water , note how the dough transforms from dusty to slightly clumping; the scent will shift to a brighter citrus note. The why is simple, the tiny pieces of butter melt during baking and create pockets that yield a tender crust. One frequent error is adding too much water which makes a sticky, tough dough; add water slowly and stop when the dough holds when pinched between fingers.
- On a lightly floured surface or pastry cloth, roll dough to a rectangle or circle about 2 to 3 inches larger than the size/shape of your tart pan. Gently drape the dough into the tart pan, easing it into the corners (try not to stretch it). Trim off rough edges. Place in the freezer for 15 to 30 minutes until firm.: When you dump the mixture out, you'll feel a cool, slightly tacky dough; the action of folding into a bundle helps distribute moisture without warming the butter . The tactile feedback is important, you want it to cohere but not be smooth. Kneading more than necessary will develop flour proteins and toughen the crust, so one or two folds are enough. This step ensures the dough is uniform and ready to chill. People sometimes overwork here trying to fully combine every bit, which can result in a dense crust rather than flaky layers.
- Preheat oven to 375 degrees F. Line frozen crust with a crumpled piece of parchment paper; fill with weights (granulated sugar is my favorite pie weight, rice or beans work as well).: As the dough chills the butter firms back up and the water hydrates the flour , resulting in a dough that rolls without tearing. You will notice the aroma calm and the texture become more manageable. Chilling also relaxes any gluten developed during handling, preventing shrinkage during blind baking. If you skip or shorten this rest, the crust may shrink or become tough, so be patient and plan ahead.
- Place on a baking sheet (in case it leaks), and bake for about 20 minutes or until edges are puffed and appear set. Remove parchment lining and weights. Return crust to oven for 5 to 10 minutes more until edges just start to brown and bottom is no longer raw looking. Place on a wire rack to cool slightly while you prepare the filling.: Rolling should be done with light pressure so the butter stays cold and the dough remains flaky. When you drape it into the pan avoid pulling the edges, because stretched pastry will spring back while baking and shrink. The quick blast in the freezer firms the butter so the crust keeps its shape during initial baking. Visual cues include a smooth surface and even thickness. A common slip is stretching while fitting which leads to gaps or uneven thickness, so gently ease the dough into position instead of tugging.
- To make filling, in a bowl, rub lemon zest together with sugar until fragrant and evenly distributed.: The oven heat will immediately set the crust's edges, which is why starting with a cold crust matters. Using a crumpled parchment helps the liner sit snugly, and weights prevent the base from puffing excessively. You may hear faint crackles as the butter heats, and visually the edges will begin to firm and slightly rise. This technique avoids a bubbly, misshapen shell, and people sometimes skip weights which leads to an unevenly baked bottom.
- In a medium saucepan, whisk together the eggs and egg yolks. Whisk in the sugar, followed by the lemon juice and salt. Add the butter and cook over medium-low heat, stirring constantly, until the mixture thickens slightly and coats the back of a spoon (about 170 degrees on an instant-read thermometer). Pour the mixture through a fine-mesh strainer; stir in the heavy cream.: As the crust bakes you will notice the edges turning pale gold and the base losing its wet sheen; these are signs it is ready for the next step. Removing the weights lets the bottom brown a little, creating flavor and structure. The smell will be faintly toasty and buttery. Cooling on a wire rack prevents steam from softening the crust. The mistake here is underbaking which leaves a raw tasting center, so look for a dry matte finish and a gentle browning at the edge.
- Spread strawberry jam in a thin, even layer in the bottom of cooled tart crust. Pour the lemon mixture on top, filling to within about 1/4-inch from the top of the crust (the filling won't rise or puff much, so fill it as full as you can while still being able to move it without spilling).: Rubbing the Meyer lemon zest into the granulated sugar releases essential oils and perfumes the entire filling. You will smell an immediate floral citrus aroma that indicates flavor is well incorporated. This matters because it infuses the sweetness with real lemon character rather than relying solely on juice. A common misstep is using pre zested or dried zest which lacks the bright aromatic oils, so always zest fresh and rub it in by hand until evenly colored and fragrant.
- Bake until the edges are set but the center still jiggles when shaken, about 15 minutes. Remove from oven and allow to cool completely to room temperature, then refrigerate for at least 2 hours or overnight, until ready to slice and serve. Top with fresh strawberries before serving.: As you cook the curd you will feel the temperature rise and hear a soft simmer; the texture transitions from runny to velvety as proteins set. Constant stirring prevents the eggs from curdling and distributes heat evenly, and the curd will coat a spoon when it reaches the right stage, which is your chief sensory cue. Straining removes any tiny cooked bits for a glassy finish, and whisking in cold heavy cream softens the temperature and adds silk. A typical error is cooking too quickly which yields grainy curd, so keep the heat moderate and stir without ceasing.
- Spread strawberry jam in a thin even layer in the bottom of cooled tart crust Pour the lemon mixture on top filling to within about 1/4 inch from the top of the crust: The thin strawberry jam layer provides a fruity barrier that keeps the filling from leaching into the crust and adds flavor contrast. You should feel the gentle resistance as you spread the jam, and visually it should be uniform and not clumped. Pouring the curd in slowly prevents bubbles and ensures an even set; the filling will glisten as it settles. Overfilling risks spillage during baking so leave the recommended clearance.
- Bake until the edges are set but the center still jiggles when shaken about 15 minutes Remove from oven and allow to cool completely to room temperature then refrigerate for at least 2 hours or overnight until ready to slice and serve Top with fresh strawberries before serving: During this final bake, the edges will firm while the center keeps a delicate wobble, indicating a creamy interior once chilled. After cooling, refrigeration completes the set and deepens flavor, and the tart will slice neatly once chilled. Fresh strawberries added just before serving offer bright acidity and a pleasant textural counterpoint. A common mistake is overbaking, which yields a dry, rubbery filling, so rely on the jiggle test rather than time alone.
Making Adjustments
This short introduction explains practical tweaks and variations that preserve the integrity of the Strawberry Meyer Lemon Tart. Below are useful adjustments for texture balance, sweetness level, and timing that I use in my kitchen.
- Reduce sugar in the filling: If you prefer a less sweet result, cut the granulated sugar by up to 10 percent, but keep an eye on the set because sugar influences the custard’s texture; too little can lead to a slightly less stable curd.
- Chill time flexibility: You can refrigerate the dough overnight for convenience, which deepens flavor and makes the pastry easier to roll; however, avoid leaving it longer than 48 hours to prevent drying.
- Jam placement: Spread the strawberry jam thinly to avoid interfering with the curd setting, and warm the jam slightly if it is too stiff so it spreads evenly without tearing the crust.
- Testing doneness: Use the center jiggle as your guide rather than relying solely on the clock; remember the filling continues to set as it cools and chills.
- Fresh fruit topping: Choose ripe but firm strawberries and add them just before serving to preserve texture and color; if preparing in advance, wait to top to avoid moisture seeping into the tart.
Best Served With
This tart pairs well with light accompaniments and fits a variety of occasions. Here are serving ideas and storage notes to help you present it beautifully and keep it fresh.
- Serve slightly chilled: Present the Strawberry Meyer Lemon Tart straight from the refrigerator so the filling is firm and slices cleanly, making for an elegant plate.
- Afternoon tea or brunch: This tart is lovely for a spring brunch table next to simple pastries and a pot of tea, providing a bright, citrus forward counterpoint.
- Dessert after a rich meal: Because the tart is bright and not overly heavy, it makes a refreshing end to a heavier dinner without overwhelming the palate.
- Seasonal occasions: The combination of Meyer lemon and strawberry makes this ideal for spring gatherings, garden parties, or holiday brunches during milder months.
- Storage: Keep the tart refrigerated for up to 3 days, covered lightly with plastic wrap, and avoid freezing as the texture of the curd changes when thawed.
- Presentation tip: Arrange halved strawberries concentrically on top and dust a little powdered sugar just before serving for a classic, bakery style look.
FAQ
Conclusion
This tart stands out for its sunny Meyer lemon character married with a delicate strawberry layer, offering a balance of bright acid and sweet fruit. Give the steps a calm, attentive rhythm and you will be rewarded with a glossy, silky filling and a tender, buttery crust. Try it for a spring gathering, a special brunch, or any time you want an elegant yet approachable dessert. I find the simple rituals of chilling, gentle cooking, and fresh topping make the difference between good and memorable.
Strawberry Meyer Lemon Tart
Equipment
- Food Processor
- Tart Pan
- Parchment Paper
- Baking Sheet
- Fine-mesh strainer
- Medium Saucepan
- Wire Rack
Ingredients
- 1 1/2 cup 188 g all-purpose flour Combine to form the base of the tart crust, providing structure and tenderness; sift or whisk first to ensure even distribution. Use measured weight for consistency and handle minimally to avoid developing too much gluten, which would toughen the crust.
- 3 tablespoons 24 g powdered sugar Add delicate sweetness and a hint of texture to the pastry crust; it also helps slightly tenderize the dough. Sift into the flour before cutting in butter to prevent lumps and maintain a fine, sandy texture for a flaky crust.
- 1 tablespoon lemon zest, from 1 large lemon Infuse bright citrus aroma and essential oils into the crust for vibrant lemon flavor; finely grate only the yellow outer layer to avoid bitterness. Mix into the dry ingredients so the zest disperses evenly and lifts the overall citrus profile of the tart.
- 1/4 teaspoon fine sea salt Enhance and balance flavors while strengthening the dough's seasoning profile; fine crystals distribute more uniformly. Sprinkle into the flour mixture so salt complements sweetness and bright citrus notes without concentrating in one spot.
- 9 tablespoons 113 g unsalted butter, cold, cut into cubes Incorporate fat for richness, flakiness, and tenderness in the crust; keep cold to prevent excess gluten development. Cut into cubes and quickly work into the flour until pea-sized pieces remain to create pockets that yield a tender, flaky texture when baked.
- 1 tablespoon lemon juice, from 1/2 large lemon Provide acidity and a clean lemon tang to activate the crust's flavor; use freshly squeezed for best brightness. Add with minimal liquid to bring the dough together while preserving its crumbly, shortcrust consistency.
- 2 to 3 tablespoons ice water, as needed Bind the dough just enough to form a cohesive pastry without making it soggy; add gradually and chill the dough if needed. Use only as much as required to bring the mixture together into a tidy ball that can be rolled and pressed into the tart pan.
- 5 tablespoons 100 g strawberry jam Contribute concentrated strawberry flavor and natural sweetness to the tart base or filling; spread thinly to prevent sogginess. Warm slightly for easy spreading and apply a thin layer to the prebaked crust to create a fruity barrier and flavor contrast.
- 6 large egg yolks Provide richness, color, and custard body to the lemon filling; separate yolks for a silkier, more stable curd. Whisk thoroughly with sugar and citrus elements to ensure smooth incorporation and prevent graininess in the finished curd.
- 2 large eggs Add structure and additional richness to the filling while helping with setting and texture; whole eggs introduce both white and yolk components. Beat together with yolks and sugar to create a cohesive custard base that will thicken when cooked.
- 1 scant cup/190 g granulated sugar, preferably organic Sweeten and stabilize the lemon custard while aiding in cook-off and thickening; use measured weight for reliable results. Dissolve with the eggs and citrus during gentle cooking to create a smooth, glossy curd with balanced sweetness.
- 1/4 cup Meyer lemon zest, from 4 to 5 lemons Deliver concentrated Meyer lemon oil and fragrance to the curd, providing floral, less-acidic lemon character. Finely grate and incorporate directly into the egg-sugar mixture so the aromatic oils permeate the filling for depth of flavor.
- 5 ounces 140 g fresh squeezed Meyer lemon juice, from 4 to 5 lemons Supply bright, sweet-tart Meyer lemon juice as the primary acid and liquid for the curd; fresh-squeezed yields optimal flavor. Add gradually to tempered eggs while whisking constantly to prevent curdling and to build a silky, set custard.
- 1/4 teaspoon fine sea salt Balance and enhance the filling's flavors while controlling seasoning; fine salt integrates seamlessly. Stir into the lemon mixture to moderate sweetness and accentuate the citrus and strawberry notes without noticeable grittiness.
- 4 tablespoons 56 g unsalted butter, cut into pieces Enrich and smooth the lemon curd by adding butter for gloss, body, and silkiness; cut into pieces for even melting. Incorporate off-heat or into a warm custard slowly to emulsify and prevent separation, producing a velvety texture.
- 3 tablespoons 45 g heavy cream, chilled Lighten and add creaminess to the custard while softening the finish; keep chilled before use to maintain stability. Stir in at the end of cooking to adjust mouthfeel and lend a subtle richness without diluting the lemon intensity.
- fresh strawberries, for topping Garnish and provide fresh fruit contrast with natural acidity, texture, and color; choose ripe, firm berries for best presentation. Slice or arrange whole on top of the tart just before serving to preserve freshness and visual appeal.
Instructions
- To prepare the crust, place flour, sugar, lemon zest, and salt in the bowl of a food processor and pulse until combined. Sprinkle cubes of butter over top. Pulse until broken up into pea-sized pieces; drizzle in lemon juice and 2 tablespoons water and pulse one or two more times or until evenly moistened; add additional water, a tablespoon at a time, as needed. Dough will still be crumbly, but should come together when pinched with your fingers. (You can also do this by hand in a mixing bowl with a pastry cutter if you prefer).: Warmth carries scent, so you should notice the bright, perfumed aroma of the lemon zest as you pulse the dry ingredients . The sound will be intermittent, a quick chopping hum as the bowl reduces the flour and powdered sugar to a uniform mix. This step matters because it evenly distributes the citrus and salt so every bite of crust tastes balanced. A common mistake is overworking at this stage, which can heat the mixture and start softening the butter once added, so pulse in short bursts and keep the processor cold if you can. You'll want a homogeneous base before adding the butter , so scrape the bowl once and confirm there are no large pockets of zest or sugar.
- Dump dough onto a clean tea towel or piece of plastic wrap; lift up sides and twist into a bundle to press the dough together. Knead once or twice if needed to bring it together into a uniform ball (If using a rectangle tart pan, shape the dough into a rough rectangle instead of a round disk). Wrap tightly in plastic wrap and refrigerate for at least 1 hour or overnight.: At this stage you will see small pea-shaped bits of cold butter suspended in the dry mix, which is the visual cue for perfect pastry texture. Those little flecks create flaky layers when baked, so keep the butter cold and avoid fully incorporating it. As you drizzle in the lemon juice and ice water , note how the dough transforms from dusty to slightly clumping; the scent will shift to a brighter citrus note. The why is simple, the tiny pieces of butter melt during baking and create pockets that yield a tender crust. One frequent error is adding too much water which makes a sticky, tough dough; add water slowly and stop when the dough holds when pinched between fingers.
- On a lightly floured surface or pastry cloth, roll dough to a rectangle or circle about 2 to 3 inches larger than the size/shape of your tart pan. Gently drape the dough into the tart pan, easing it into the corners (try not to stretch it). Trim off rough edges. Place in the freezer for 15 to 30 minutes until firm.: When you dump the mixture out, you'll feel a cool, slightly tacky dough; the action of folding into a bundle helps distribute moisture without warming the butter . The tactile feedback is important, you want it to cohere but not be smooth. Kneading more than necessary will develop flour proteins and toughen the crust, so one or two folds are enough. This step ensures the dough is uniform and ready to chill. People sometimes overwork here trying to fully combine every bit, which can result in a dense crust rather than flaky layers.
- Preheat oven to 375 degrees F. Line frozen crust with a crumpled piece of parchment paper; fill with weights (granulated sugar is my favorite pie weight, rice or beans work as well).: As the dough chills the butter firms back up and the water hydrates the flour , resulting in a dough that rolls without tearing. You will notice the aroma calm and the texture become more manageable. Chilling also relaxes any gluten developed during handling, preventing shrinkage during blind baking. If you skip or shorten this rest, the crust may shrink or become tough, so be patient and plan ahead.
- Place on a baking sheet (in case it leaks), and bake for about 20 minutes or until edges are puffed and appear set. Remove parchment lining and weights. Return crust to oven for 5 to 10 minutes more until edges just start to brown and bottom is no longer raw looking. Place on a wire rack to cool slightly while you prepare the filling.: Rolling should be done with light pressure so the butter stays cold and the dough remains flaky. When you drape it into the pan avoid pulling the edges, because stretched pastry will spring back while baking and shrink. The quick blast in the freezer firms the butter so the crust keeps its shape during initial baking. Visual cues include a smooth surface and even thickness. A common slip is stretching while fitting which leads to gaps or uneven thickness, so gently ease the dough into position instead of tugging.
- To make filling, in a bowl, rub lemon zest together with sugar until fragrant and evenly distributed.: The oven heat will immediately set the crust's edges, which is why starting with a cold crust matters. Using a crumpled parchment helps the liner sit snugly, and weights prevent the base from puffing excessively. You may hear faint crackles as the butter heats, and visually the edges will begin to firm and slightly rise. This technique avoids a bubbly, misshapen shell, and people sometimes skip weights which leads to an unevenly baked bottom.
- In a medium saucepan, whisk together the eggs and egg yolks. Whisk in the sugar, followed by the lemon juice and salt. Add the butter and cook over medium-low heat, stirring constantly, until the mixture thickens slightly and coats the back of a spoon (about 170 degrees on an instant-read thermometer). Pour the mixture through a fine-mesh strainer; stir in the heavy cream.: As the crust bakes you will notice the edges turning pale gold and the base losing its wet sheen; these are signs it is ready for the next step. Removing the weights lets the bottom brown a little, creating flavor and structure. The smell will be faintly toasty and buttery. Cooling on a wire rack prevents steam from softening the crust. The mistake here is underbaking which leaves a raw tasting center, so look for a dry matte finish and a gentle browning at the edge.
- Spread strawberry jam in a thin, even layer in the bottom of cooled tart crust. Pour the lemon mixture on top, filling to within about 1/4-inch from the top of the crust (the filling won't rise or puff much, so fill it as full as you can while still being able to move it without spilling).: Rubbing the Meyer lemon zest into the granulated sugar releases essential oils and perfumes the entire filling. You will smell an immediate floral citrus aroma that indicates flavor is well incorporated. This matters because it infuses the sweetness with real lemon character rather than relying solely on juice. A common misstep is using pre zested or dried zest which lacks the bright aromatic oils, so always zest fresh and rub it in by hand until evenly colored and fragrant.
- Bake until the edges are set but the center still jiggles when shaken, about 15 minutes. Remove from oven and allow to cool completely to room temperature, then refrigerate for at least 2 hours or overnight, until ready to slice and serve. Top with fresh strawberries before serving.: As you cook the curd you will feel the temperature rise and hear a soft simmer; the texture transitions from runny to velvety as proteins set. Constant stirring prevents the eggs from curdling and distributes heat evenly, and the curd will coat a spoon when it reaches the right stage, which is your chief sensory cue. Straining removes any tiny cooked bits for a glassy finish, and whisking in cold heavy cream softens the temperature and adds silk. A typical error is cooking too quickly which yields grainy curd, so keep the heat moderate and stir without ceasing.
- Spread strawberry jam in a thin even layer in the bottom of cooled tart crust Pour the lemon mixture on top filling to within about 1/4 inch from the top of the crust: The thin strawberry jam layer provides a fruity barrier that keeps the filling from leaching into the crust and adds flavor contrast. You should feel the gentle resistance as you spread the jam, and visually it should be uniform and not clumped. Pouring the curd in slowly prevents bubbles and ensures an even set; the filling will glisten as it settles. Overfilling risks spillage during baking so leave the recommended clearance.
- Bake until the edges are set but the center still jiggles when shaken about 15 minutes Remove from oven and allow to cool completely to room temperature then refrigerate for at least 2 hours or overnight until ready to slice and serve Top with fresh strawberries before serving: During this final bake, the edges will firm while the center keeps a delicate wobble, indicating a creamy interior once chilled. After cooling, refrigeration completes the set and deepens flavor, and the tart will slice neatly once chilled. Fresh strawberries added just before serving offer bright acidity and a pleasant textural counterpoint. A common mistake is overbaking, which yields a dry, rubbery filling, so rely on the jiggle test rather than time alone.
Notes
- Reduce sugar in the filling: If you prefer a less sweet result, cut the granulated sugar by up to 10 percent, but keep an eye on the set because sugar influences the custard's texture; too little can lead to a slightly less stable curd.
- Chill time flexibility: You can refrigerate the dough overnight for convenience, which deepens flavor and makes the pastry easier to roll; however, avoid leaving it longer than 48 hours to prevent drying.
- Jam placement: Spread the strawberry jam thinly to avoid interfering with the curd setting, and warm the jam slightly if it is too stiff so it spreads evenly without tearing the crust.
- Testing doneness: Use the center jiggle as your guide rather than relying solely on the clock; remember the filling continues to set as it cools and chills.
- Fresh fruit topping: Choose ripe but firm strawberries and add them just before serving to preserve texture and color; if preparing in advance, wait to top to avoid moisture seeping into the tart.