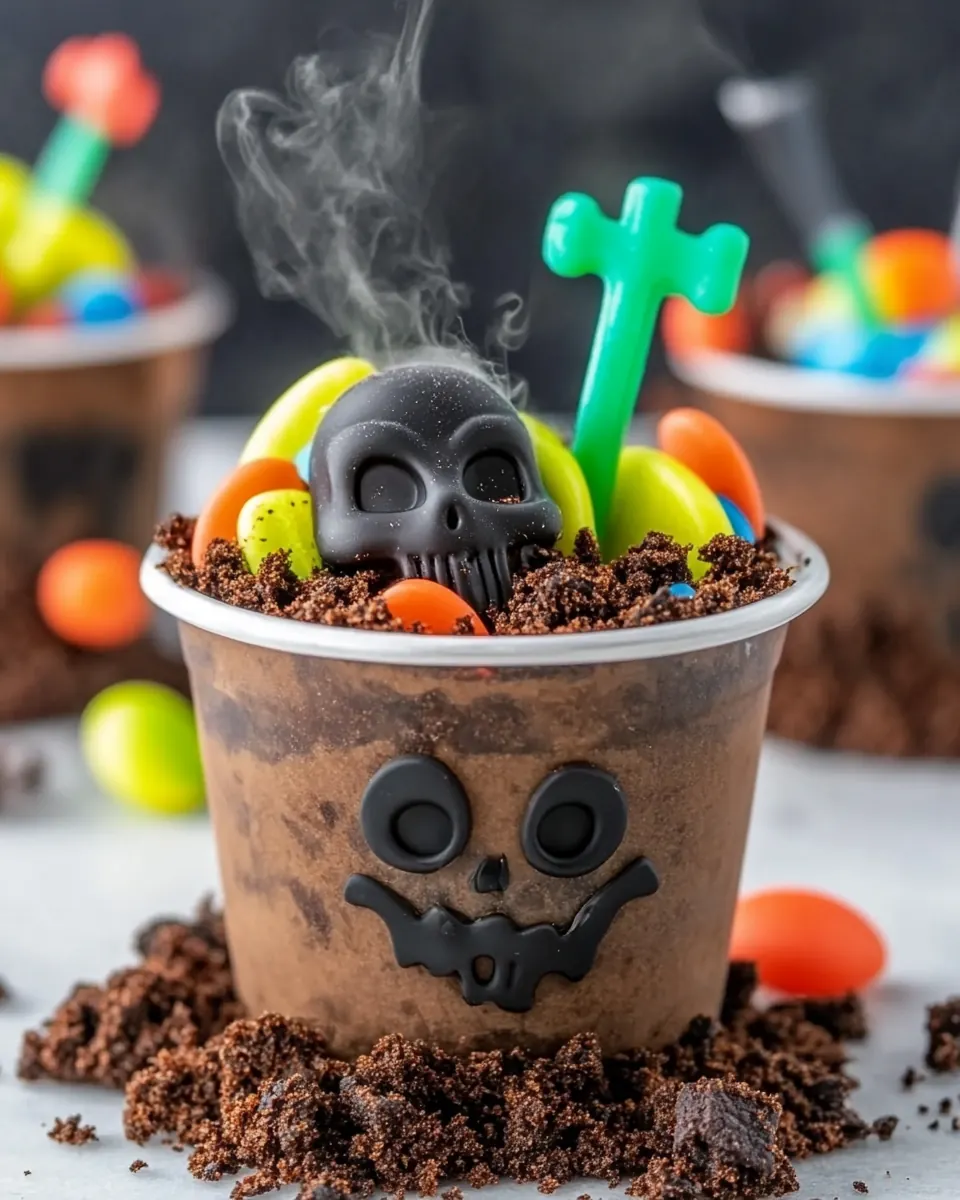
Spooky Graveyard Dirt Cups
Spooky Graveyard Dirt Cups were the first thing I made for my little neighborhood Halloween gathering the year my youngest decided he wanted a haunted dessert table.
I remember standing at the counter, stirring a bowl of velvety chocolate pudding while my son insisted the gummy worms needed to be extra squiggly, and that memory is how this recipe lives in my kitchen. The crunchy cookie crumbs, pillowy whipped topping, and playful candy decorations make these cups absurdly easy to assemble and endlessly fun to customize. Over the years I have refined the assembly so the pudding holds its shape, the cookie crumbs stay crisp on top, and the chocolate-dipped Milano cookies look sufficiently eerie as tombstones and ghosts.
When I serve Spooky Graveyard Dirt Cups, people smile first, then ask for the recipe. I love that they bring out the kid in all of us, while still being simple enough for last minute party prep. Whether you are hosting a class party or a cozy evening with friends, these cups require very little fuss and deliver a lot of personality. You can make the pudding ahead, crush the cookies while watching a movie, and let the decorating become a shared activity. This dessert never fails to stir up a little nostalgia and a lot of excitement.
Recipe Snapshot
25 mins
10 mins
15 mins
Medium
300 kcal
American
Keto, Gluten-Free
Desserts
Large Mixing Bowl, Measuring cups and spoons, Whisk, Silicone spatula, Food Processor, Clear party cups, Pastry or frosting bag
Why This Spooky Graveyard Dirt Cups Hits Different
They are ridiculously easy to make
I like recipes that respect my time, and Spooky Graveyard Dirt Cups are perfect when I need a quick, impressive dessert. With just a few simple steps the base comes together in minutes, and most of the work is playful decorating. I often make the pudding while I set the table, and come back to assemble the cups without feeling rushed.
Textural contrast that wins every crowd
The mashup of creamy pudding, airy whipped topping, and crunchy crushed cookies gives every bite a satisfying contrast. I love how the cookie crumbs mimic soil, while the soft pudding layers prevent the cups from feeling dry. That balance makes these cups feel indulgent without being heavy.
Totally customizable for any spooky vibe
One reason I keep coming back to this recipe is the decorating flexibility. Use different candies, swap cookie types, or add extra chocolate drizzle to suit your theme. For family events I go whimsical with gummy worms, and for teen parties I make the chocolate tombstones more detailed. It adapts to whatever mood I want to set.
Great for making memories with helpers
Kids and adults alike enjoy the assembly, so these cups double as an activity. I often set out crushed cookies, gummy worms, and cookies for decorating, and let helpers assemble their own. It’s an easy way to include little hands in the kitchen and create a lively atmosphere.
Reliable and forgiving
This recipe tolerates small mistakes, which I appreciate. If the pudding sets a little faster, a gentle fold of the whipped topping brings it back. If crumbs get too fine, they still make great soil. I can typically rescue a misstep with small adjustments, and that reliability makes it a go to for celebrations.
What You’ll Need for Spooky Graveyard Dirt Cups
The philosophy behind these ingredients is simplicity and play. A creamy base forms the backbone, while crunchy and chewy additions supply contrast and visual charm. The key players are the instant chocolate pudding for fast structure, milk to hydrate it smoothly, cloud like whipped topping for lightness, and crushed chocolate sandwich cookies to create the signature dirt texture that makes the presentation so fun.
- 4 cups milk: Combine and heat gently or use cold as directed to create the liquid base that activates instant pudding and blends with dairy for a creamy texture; provides moisture and helps set the dessert when chilled. Adjust temperature slightly depending on pudding package instructions to ensure proper thickening and smoothness for layered cups.
- 2 boxes instant chocolate pudding mix 3.4 ounces: Dissolve quickly into milk to form the chocolate custard layer, supplying rich cocoa flavor and a silky mouthfeel that contrasts with crunchy toppings. Use as the primary structural element that sets into a firm layer when refrigerated and binds other components together.
- 8 ounces whipped topping (like cool whip) Can also use whipped cream. Soften on the counter if frozen.: Fold gently into prepared pudding to add light, airy volume and a silky, creamy finish while balancing sweetness; offers a smooth, cloud-like texture that elevates the dessert. Soften if frozen to make whipping and incorporation easier, ensuring even distribution throughout the cups.
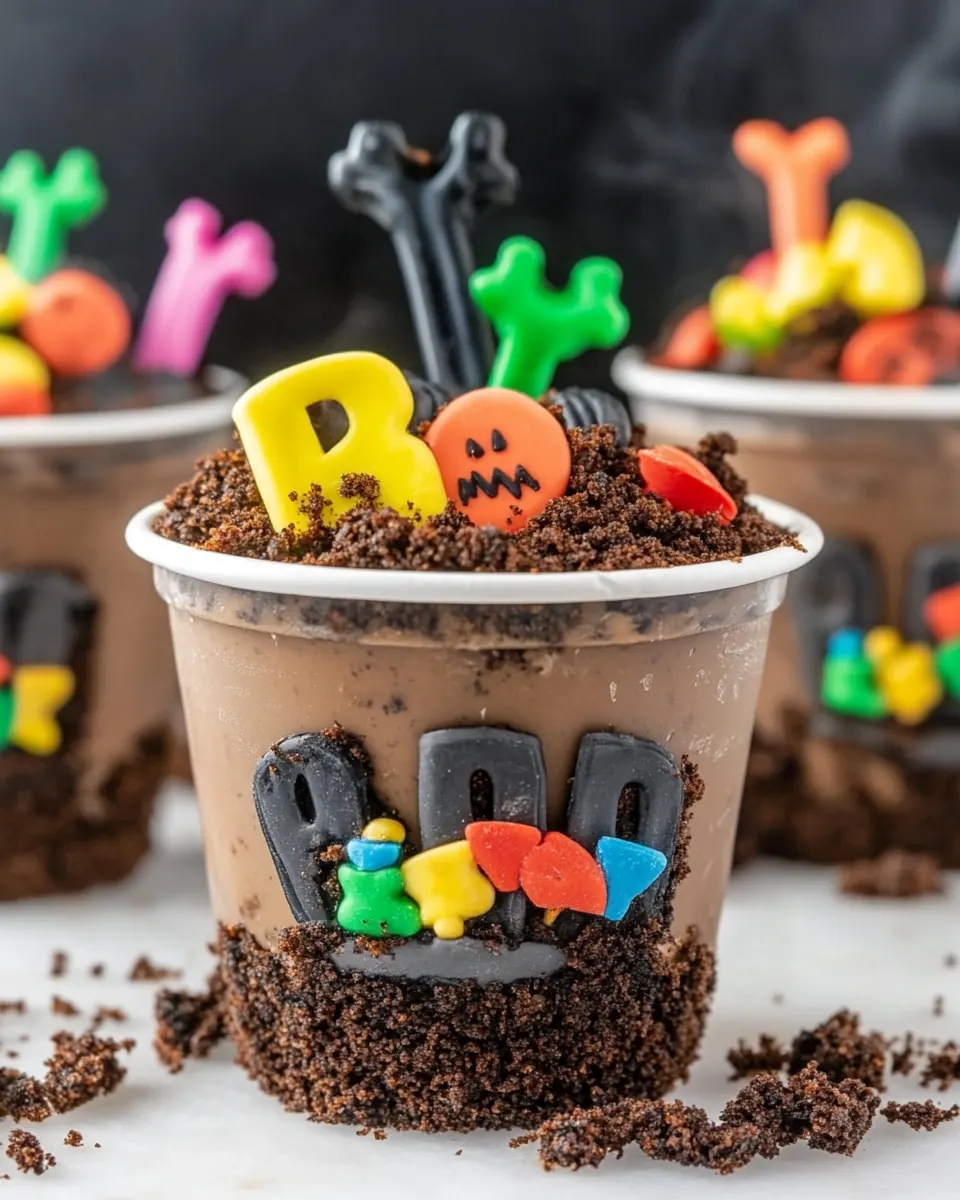
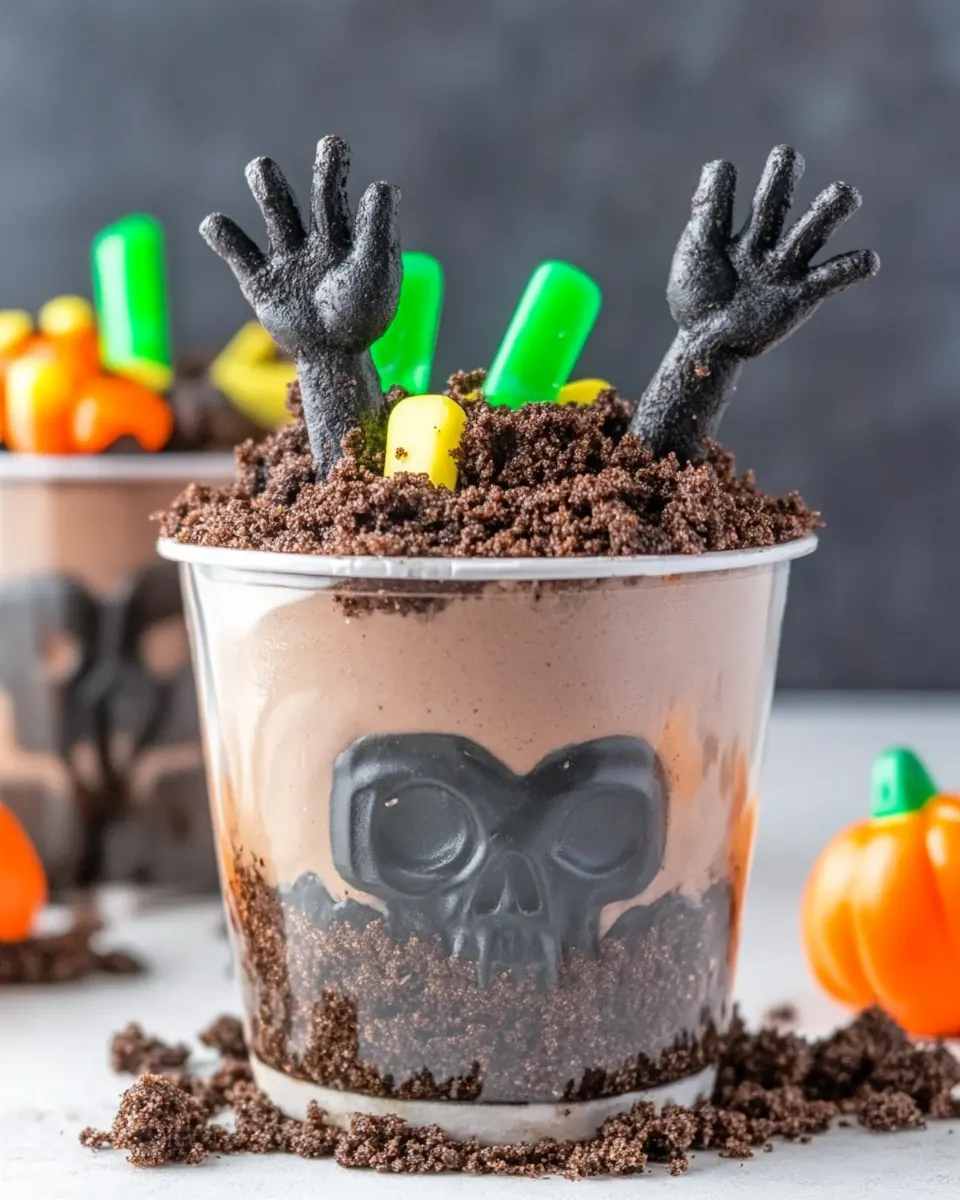
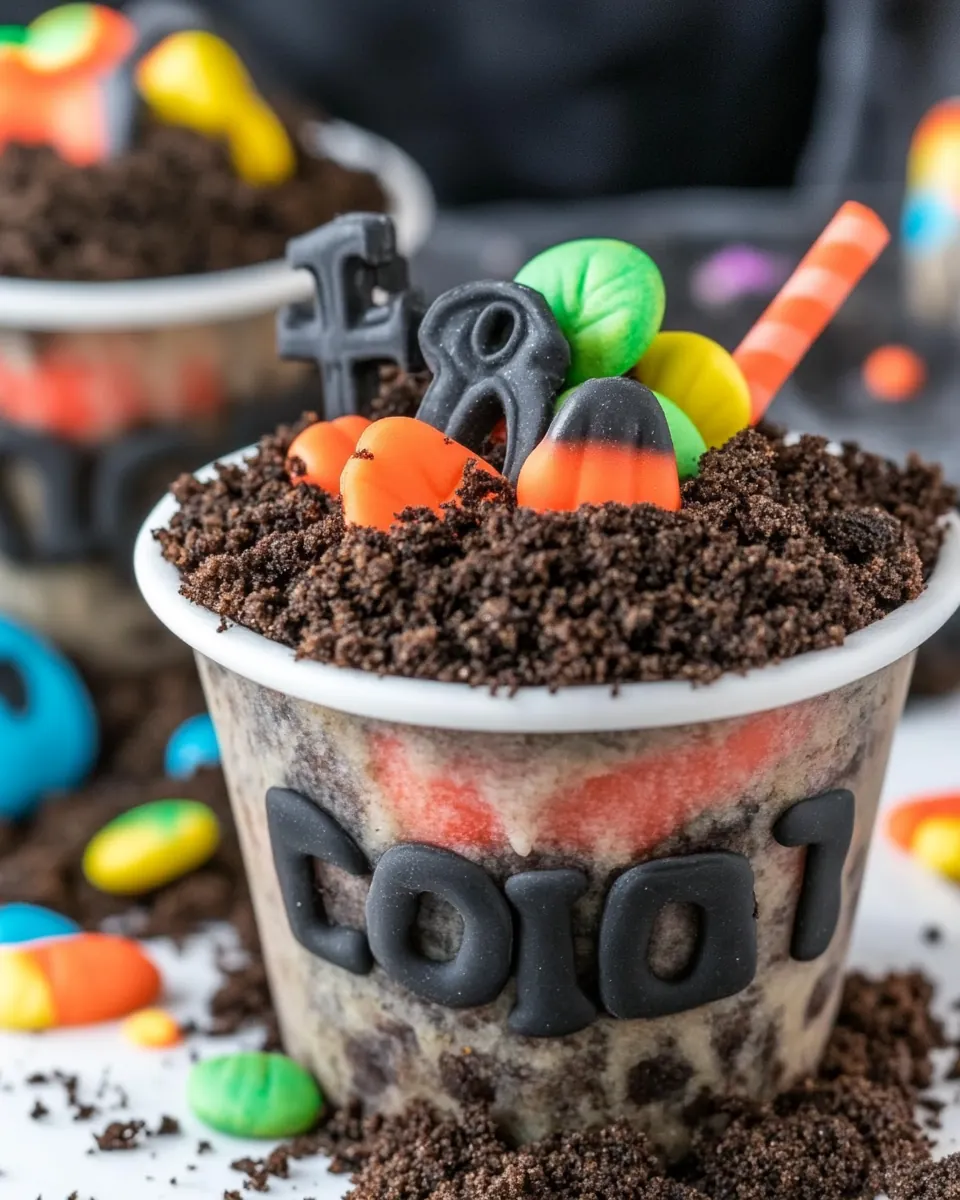
- 12 chocolate sandwich cookies (like Oreos) crushed: Crush finely to create the signature ‘dirt’ topping that provides crunchy texture and deep chocolate flavor; sprinkle between or atop layers for authentic visual effect. Reserve some coarse crumbs for added contrast and press lightly to form a realistic graveyard surface.
- 16 gummy worms 2-3 gummy worms per cup: Place partially into each cup to mimic worms crawling through the dirt and to add chewy, fruity bursts of flavor that contrast with chocolate elements. Distribute evenly across servings so each portion has 2–3 pieces, enhancing the playful presentation.
- 8 Milano cookies or other long light-colored flat cookie: Break into tombstone shapes or leave whole to emulate upright grave markers, contributing a crisp, buttery contrast to softer layers; arrange behind gummy worms for authentic spooky decor. Use long, light–colored cookies for best visibility against the dark crumb topping.
- 1/2 cup chocolate chips (optional): Scatter or melt into layers for concentrated pockets of intense chocolate and additional texture; complement the pudding and crumbs with bursts of semi-sweet flavor. Use sparingly if desired to avoid overly dense sweetness, balancing the dessert’s overall profile.
- 1 tablespoon coconut oil (optional): Melt optionally to create a glossy chocolate drizzle or combine with chips to achieve a smoother melted consistency, aiding in decorating and adhesion of sprinkles or cookies. Use coconut oil carefully to thin chocolate without altering the flavor profile significantly.
- Bone Shaped Sprinkles (optional): Garnish atop the dirt layer to enhance the graveyard theme with shaped accents that add a crunchy, festive touch and visual interest. Sprinkle lightly so shapes remain distinguishable against the dark cookie crumbs.
Spooky Graveyard Dirt Cups Instructions
These instructions will guide you through building playful, polished dirt cups that hold together and look festive. I like to prepare components in stages so assembly feels effortless. Read each step before you begin, and set aside the decorations so you can decorate quickly once the cups are chilled.
- Put cold milk and pudding in a large bowl. Mix with a whisk until fully dissolves.: The moment you whisk the milk and instant chocolate pudding mix together you will notice the mixture thicken and the chocolate aroma intensify, a comforting cue that you are on the right track. Use a whisk and mix briskly to dissolve all powder lumps, scraping the sides so every bit hydrates. The texture should go from grainy to smooth and glossy; if you still taste powder, keep whisking in short bursts. One common mistake is adding hot liquid, which can change the thickening behavior, so always start cold. This foundation matters because a smooth pudding creates a creamy mouthfeel that contrasts with the crumb topping.
- Place the pudding in the refrigerator for about 10 minutes, or until it begins to thicken and set just a little.: Chilling the pudding slightly helps it begin to thicken, making it easier to fold in the whipped topping . During this short rest you will notice the surface become firmer to the touch and the aroma deepen, which signals readiness. Avoid leaving it too long where it fully sets, because then folding in the topping will be difficult and could create lumps. A typical pitfall is skipping this rest and getting a runnier final texture, so set a timer to keep things on schedule. This step ensures your final cups maintain distinct layers rather than blending together.
- Fold in softened whipped topping into the chocolate pudding, mixing well.: When you fold, use a gentle motion so the air in the whipped topping stays trapped, yielding a light, mousse like consistency. Start by dolloping the topping onto the chilled pudding, then use a rubber spatula to lift from the bottom and fold over repeatedly until uniform. You should hear quiet, smooth swooshing sounds as the mixture becomes cohesive, and visually it should look silky and slightly aerated. Overmixing will deflate the mixture and make it dense, so stop as soon as the color and texture are even. The reason this matters is the fluffy filling provides contrast with the crunchy crumbs and keeps the cups from tasting too heavy.
- Layer the pudding evenly between the cups. Place in the refrigerator for 20 minutes to chill and set further.: When spooning the mixture into your clear cups aim for even distribution so each serving looks consistent, and take a moment to level the top with the back of a spoon for a neat surface. The sound of filling hitting the cup is soft and wet, and visually the cups will start to look very inviting. If the filling seems too runny, return the cups to the fridge for a few minutes before continuing. A common mistake is overfilling and leaving no room for the crumb topping and decorations, so leave a bit of space at the top. Even layering helps create the classic layered effect when you serve them.
- Crush cookies in a food processor or in a strong zip top bag. If using a bag you can use your hands, a rolling pin or even a heavy canned food item to gently roll over and crush the cookies.: Crushing the chocolate sandwich cookies releases their aroma and creates the soil like texture that defines these cups. In a processor pulse until you have a mix of fine crumbs and small chunks, which gives the best mouthfeel. If using a bag and rolling pin, you will hear satisfying crunches as the cookies break down beneath the pin; be patient and pulse your pressure for varied sizes. Beware of pulverizing them into dust, which can compact and feel pasty; keep some larger bits for interest. This step is crucial because the crumb texture contrasts the creamy filling and makes each bite interesting.
- Place the chocolate and coconut oil in a medium size microwave safe bowl. Melt chocolate and coconut oil in the microwave at half power, stirring every 30 seconds until smooth. Then add to a small pastry bag or zip-top bag. Cut a small hole in the tip of the bag then use to decorate Milano cookies like gravestones and ghosts. Place the cookies in the refrigerator for 5-10 minutes so the chocolate sets up.: Melting the chocolate chips with a bit of coconut oil softens the chocolate for piping details, and the aroma becomes warm and intoxicating as it melts. Heat at half power and stir every 30 seconds until smooth and glossy, watching carefully to prevent scorching. The melted chocolate should flow like a thick ribbon when you lift the spoon, which indicates it will pipe cleanly. One frequent mistake is overheating, which can seize the chocolate into a grainy mess, so remove it while a few small lumps remain, then stir to melt them with residual heat. This silky chocolate is what allows you to decorate crisp Milano cookies into spooky tombstones and ghosts.
- Sprinkle chocolate cookie crumbs on top of each dirt pie cup evenly. Press the bottom half of the Milano cookie ghosts and gravestones into each cup.: As you stir, you will notice the chocolate go from lumpy to satiny, releasing an intense cocoa scent that signals it's ready. Transfer the chocolate into a small pastry or zip top bag, and snip a tiny corner for piping. When you pipe, the chocolate should emerge as a clean line that holds shape on the cookie surface. If the chocolate is too thick, warm it very briefly and stir again; if too thin, chill a touch to thicken. A common error is cutting too large a hole which results in runaway drips, so start small and enlarge if needed. Properly tempered chocolate decorations will set firm in the fridge and create defined shapes for your graveyard scene.
- Add gummy worms and bone sprinkles to decorate, then enjoy!: Using a bag gives you control when decorating the Milano cookies, and you'll hear a soft squeeze sound as the chocolate glides onto the cookie surface. Pipe simple tombstone outlines and ghost features, and if you want crisp lines, practice on parchment first. Place the decorated cookies in the refrigerator for five to ten minutes so the chocolate sets, and the surface will go from glossy to firm to the touch. Avoid leaving them at room temperature where the chocolate can smear, and do not stack the cookies while the chocolate is still wet. This ensures your gravestones stand upright and keep their detail once inserted into the cups.
- Sprinkle chocolate cookie crumbs on top of each dirt pie cup evenly: The act of sprinkling creates a soft dusting that mimics freshly turned soil, and visually it's the step that turns a simple pudding into a graveyard scene. Press the crumbs gently to ensure they adhere without sinking into the filling, and distribute them so every cup looks balanced. If you have extra crumbs, reserve them in an airtight container for another use. A mistake I sometimes see is piling too many crumbs which can overwhelm the filling, so aim for a thin, even layer. This final textural layer is what gives each bite a crunchy contrast to the smooth pudding beneath.
- Press the bottom half of the Milano cookie ghosts and gravestones into each cup: Insert the decorated Milano cookies at a slight angle, so they stand and look like tiny monuments. You will hear a slight sinking sound as the base meets the filling, which indicates they are secure. If a cookie seems unstable, add an extra dab of pudding behind it to support the base. Avoid inserting unchilled chocolate pieces which can slide or tip; chill them first so they are firm. Proper placement makes the presentation feel intentional and spooky.
- Add gummy worms and bone sprinkles to decorate, then enjoy: The final touches are playful and tactile, as the gummy worms wiggle into the crumbs and the little sprinkles add color and whimsy. Arrange the candies so they peek out in different directions for maximum effect. If you are prepping ahead, add the candies just before serving to prevent sticky candies from absorbing moisture. One common misstep is overdecorating which can hide the layers, so aim for a balanced, fun look. Once finished, the cups are ready to share and savor.
Tips and Variations
These tips will help you personalize Spooky Graveyard Dirt Cups and troubleshoot common issues. I often tweak the decorations and assembly order depending on the crowd, and these variations keep the recipe fresh each year.
- Use crushed cookies for texture Crush the chocolate sandwich cookies to a mix of fine and coarse bits so each bite has contrast; pulse in short bursts rather than running the processor continuously to avoid dust.
- Swap whipped topping cautiously If you choose whipped cream instead of whipped topping, whip to soft peaks and fold gently so it does not deflate and make the filling runny.
- Practice chocolate piping Pipe chocolate details onto parchment first, this gives you steady hands and helps avoid mistakes on the actual Milano cookies.
- Chill decorated cookies Place the decorated Milano cookies in the fridge for five to ten minutes so the chocolate sets firm, which prevents slumping when inserted into the cups.
- Assemble just before serving for best texture If you make these ahead, keep the crumb topping separate and add it right before serving to maintain crunch and visual appeal.
How to Enjoy Spooky Graveyard Dirt Cups
These cups are versatile and festive, ideal for parties and family gatherings. I like to serve them chilled so the layers stay distinct, and they pair well with light savory bites if you want to build a full menu. They also travel well for class parties if you transport the components separately and assemble on arrival.
- Serve chilled Keep the cups refrigerated until the last minute so the structure holds and the pudding stays creamy.
- Party platter style Arrange cups on a large tray with extra crushed cookies and candy bowls nearby so guests can customize their own.
- Occasions Perfect for Halloween parties, school events, or any themed get together where a playful dessert fits the mood.
- Storage tips Store assembled cups in an airtight container in the refrigerator for up to two days; add gummy candies just before serving to preserve texture.
- Seasonal pairings Pair with simple finger sandwiches or a light punch for a balanced spread that keeps the dessert as the star.
FAQ
Conclusion
What makes this recipe special is how effortlessly it turns simple pantry items into a whimsical, crowd pleasing dessert. The combination of smooth pudding, airy whipped topping, and crunchy cookie crumbs creates a texture play that both kids and adults adore, while the decorating step makes it an interactive treat. I hope you give these Spooky Graveyard Dirt Cups a try at your next Halloween gathering; they are quick to assemble, forgiving to make, and guaranteed to bring smiles. Have fun with the decorations, involve helpers if you like, and enjoy the stories that come with serving a dessert this charming.

Spooky Graveyard Dirt Cups
Equipment
- Large Mixing Bowl
- Measuring Cups and Spoons
- Whisk
- Silicone spatula
- Food Processor
- Clear party cups
- Pastry or frosting bag
Ingredients
- 4 cups milk Combine and heat gently or use cold as directed to create the liquid base that activates instant pudding and blends with dairy for a creamy texture; provides moisture and helps set the dessert when chilled. Adjust temperature slightly depending on pudding package instructions to ensure proper thickening and smoothness for layered cups.
- 2 boxes instant chocolate pudding mix 3.4 ounces Dissolve quickly into milk to form the chocolate custard layer, supplying rich cocoa flavor and a silky mouthfeel that contrasts with crunchy toppings. Use as the primary structural element that sets into a firm layer when refrigerated and binds other components together.
- 8 ounces whipped topping (like cool whip) Can also use whipped cream. Soften on the counter if frozen. Fold gently into prepared pudding to add light, airy volume and a silky, creamy finish while balancing sweetness; offers a smooth, cloud-like texture that elevates the dessert. Soften if frozen to make whipping and incorporation easier, ensuring even distribution throughout the cups.
- 12 chocolate sandwich cookies (like Oreos) crushed Crush finely to create the signature ‘dirt’ topping that provides crunchy texture and deep chocolate flavor; sprinkle between or atop layers for authentic visual effect. Reserve some coarse crumbs for added contrast and press lightly to form a realistic graveyard surface.
- 16 gummy worms 2-3 gummy worms per cup Place partially into each cup to mimic worms crawling through the dirt and to add chewy, fruity bursts of flavor that contrast with chocolate elements. Distribute evenly across servings so each portion has 2–3 pieces, enhancing the playful presentation.
- 8 Milano cookies or other long light-colored flat cookie Break into tombstone shapes or leave whole to emulate upright grave markers, contributing a crisp, buttery contrast to softer layers; arrange behind gummy worms for authentic spooky decor. Use long, light-colored cookies for best visibility against the dark crumb topping.
- 1/2 cup chocolate chips optional Scatter or melt into layers for concentrated pockets of intense chocolate and additional texture; complement the pudding and crumbs with bursts of semi-sweet flavor. Use sparingly if desired to avoid overly dense sweetness, balancing the dessert’s overall profile.
- 1 tablespoon coconut oil optional Melt optionally to create a glossy chocolate drizzle or combine with chips to achieve a smoother melted consistency, aiding in decorating and adhesion of sprinkles or cookies. Use coconut oil carefully to thin chocolate without altering the flavor profile significantly.
- Bone Shaped Sprinkles optional Garnish atop the dirt layer to enhance the graveyard theme with shaped accents that add a crunchy, festive touch and visual interest. Sprinkle lightly so shapes remain distinguishable against the dark cookie crumbs.
Instructions
- Put cold milk and pudding in a large bowl. Mix with a whisk until fully dissolves.: The moment you whisk the milk and instant chocolate pudding mix together you will notice the mixture thicken and the chocolate aroma intensify, a comforting cue that you are on the right track. Use a whisk and mix briskly to dissolve all powder lumps, scraping the sides so every bit hydrates. The texture should go from grainy to smooth and glossy; if you still taste powder, keep whisking in short bursts. One common mistake is adding hot liquid, which can change the thickening behavior, so always start cold. This foundation matters because a smooth pudding creates a creamy mouthfeel that contrasts with the crumb topping.
- Place the pudding in the refrigerator for about 10 minutes, or until it begins to thicken and set just a little.: Chilling the pudding slightly helps it begin to thicken, making it easier to fold in the whipped topping . During this short rest you will notice the surface become firmer to the touch and the aroma deepen, which signals readiness. Avoid leaving it too long where it fully sets, because then folding in the topping will be difficult and could create lumps. A typical pitfall is skipping this rest and getting a runnier final texture, so set a timer to keep things on schedule. This step ensures your final cups maintain distinct layers rather than blending together.
- Fold in softened whipped topping into the chocolate pudding, mixing well.: When you fold, use a gentle motion so the air in the whipped topping stays trapped, yielding a light, mousse like consistency. Start by dolloping the topping onto the chilled pudding, then use a rubber spatula to lift from the bottom and fold over repeatedly until uniform. You should hear quiet, smooth swooshing sounds as the mixture becomes cohesive, and visually it should look silky and slightly aerated. Overmixing will deflate the mixture and make it dense, so stop as soon as the color and texture are even. The reason this matters is the fluffy filling provides contrast with the crunchy crumbs and keeps the cups from tasting too heavy.
- Layer the pudding evenly between the cups. Place in the refrigerator for 20 minutes to chill and set further.: When spooning the mixture into your clear cups aim for even distribution so each serving looks consistent, and take a moment to level the top with the back of a spoon for a neat surface. The sound of filling hitting the cup is soft and wet, and visually the cups will start to look very inviting. If the filling seems too runny, return the cups to the fridge for a few minutes before continuing. A common mistake is overfilling and leaving no room for the crumb topping and decorations, so leave a bit of space at the top. Even layering helps create the classic layered effect when you serve them.
- Crush cookies in a food processor or in a strong zip top bag. If using a bag you can use your hands, a rolling pin or even a heavy canned food item to gently roll over and crush the cookies.: Crushing the chocolate sandwich cookies releases their aroma and creates the soil like texture that defines these cups. In a processor pulse until you have a mix of fine crumbs and small chunks, which gives the best mouthfeel. If using a bag and rolling pin, you will hear satisfying crunches as the cookies break down beneath the pin; be patient and pulse your pressure for varied sizes. Beware of pulverizing them into dust, which can compact and feel pasty; keep some larger bits for interest. This step is crucial because the crumb texture contrasts the creamy filling and makes each bite interesting.
- Place the chocolate and coconut oil in a medium size microwave safe bowl. Melt chocolate and coconut oil in the microwave at half power, stirring every 30 seconds until smooth. Then add to a small pastry bag or zip-top bag. Cut a small hole in the tip of the bag then use to decorate Milano cookies like gravestones and ghosts. Place the cookies in the refrigerator for 5-10 minutes so the chocolate sets up.: Melting the chocolate chips with a bit of coconut oil softens the chocolate for piping details, and the aroma becomes warm and intoxicating as it melts. Heat at half power and stir every 30 seconds until smooth and glossy, watching carefully to prevent scorching. The melted chocolate should flow like a thick ribbon when you lift the spoon, which indicates it will pipe cleanly. One frequent mistake is overheating, which can seize the chocolate into a grainy mess, so remove it while a few small lumps remain, then stir to melt them with residual heat. This silky chocolate is what allows you to decorate crisp Milano cookies into spooky tombstones and ghosts.
- Sprinkle chocolate cookie crumbs on top of each dirt pie cup evenly. Press the bottom half of the Milano cookie ghosts and gravestones into each cup.: As you stir, you will notice the chocolate go from lumpy to satiny, releasing an intense cocoa scent that signals it's ready. Transfer the chocolate into a small pastry or zip top bag, and snip a tiny corner for piping. When you pipe, the chocolate should emerge as a clean line that holds shape on the cookie surface. If the chocolate is too thick, warm it very briefly and stir again; if too thin, chill a touch to thicken. A common error is cutting too large a hole which results in runaway drips, so start small and enlarge if needed. Properly tempered chocolate decorations will set firm in the fridge and create defined shapes for your graveyard scene.
- Add gummy worms and bone sprinkles to decorate, then enjoy!: Using a bag gives you control when decorating the Milano cookies, and you'll hear a soft squeeze sound as the chocolate glides onto the cookie surface. Pipe simple tombstone outlines and ghost features, and if you want crisp lines, practice on parchment first. Place the decorated cookies in the refrigerator for five to ten minutes so the chocolate sets, and the surface will go from glossy to firm to the touch. Avoid leaving them at room temperature where the chocolate can smear, and do not stack the cookies while the chocolate is still wet. This ensures your gravestones stand upright and keep their detail once inserted into the cups.
- Sprinkle chocolate cookie crumbs on top of each dirt pie cup evenly: The act of sprinkling creates a soft dusting that mimics freshly turned soil, and visually it's the step that turns a simple pudding into a graveyard scene. Press the crumbs gently to ensure they adhere without sinking into the filling, and distribute them so every cup looks balanced. If you have extra crumbs, reserve them in an airtight container for another use. A mistake I sometimes see is piling too many crumbs which can overwhelm the filling, so aim for a thin, even layer. This final textural layer is what gives each bite a crunchy contrast to the smooth pudding beneath.
- Press the bottom half of the Milano cookie ghosts and gravestones into each cup: Insert the decorated Milano cookies at a slight angle, so they stand and look like tiny monuments. You will hear a slight sinking sound as the base meets the filling, which indicates they are secure. If a cookie seems unstable, add an extra dab of pudding behind it to support the base. Avoid inserting unchilled chocolate pieces which can slide or tip; chill them first so they are firm. Proper placement makes the presentation feel intentional and spooky.
- Add gummy worms and bone sprinkles to decorate, then enjoy: The final touches are playful and tactile, as the gummy worms wiggle into the crumbs and the little sprinkles add color and whimsy. Arrange the candies so they peek out in different directions for maximum effect. If you are prepping ahead, add the candies just before serving to prevent sticky candies from absorbing moisture. One common misstep is overdecorating which can hide the layers, so aim for a balanced, fun look. Once finished, the cups are ready to share and savor.
Notes
- Use crushed cookies for texture Crush the chocolate sandwich cookies to a mix of fine and coarse bits so each bite has contrast; pulse in short bursts rather than running the processor continuously to avoid dust.
- Swap whipped topping cautiously If you choose whipped cream instead of whipped topping, whip to soft peaks and fold gently so it does not deflate and make the filling runny.
- Practice chocolate piping Pipe chocolate details onto parchment first, this gives you steady hands and helps avoid mistakes on the actual Milano cookies.
- Chill decorated cookies Place the decorated Milano cookies in the fridge for five to ten minutes so the chocolate sets firm, which prevents slumping when inserted into the cups.
- Assemble just before serving for best texture If you make these ahead, keep the crumb topping separate and add it right before serving to maintain crunch and visual appeal.