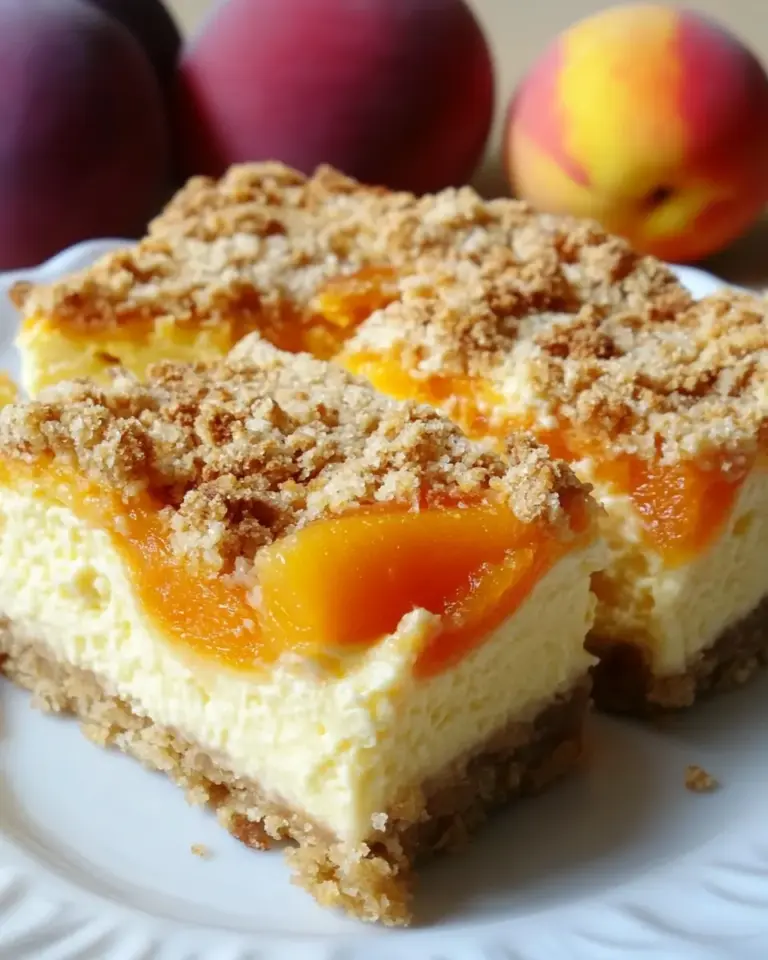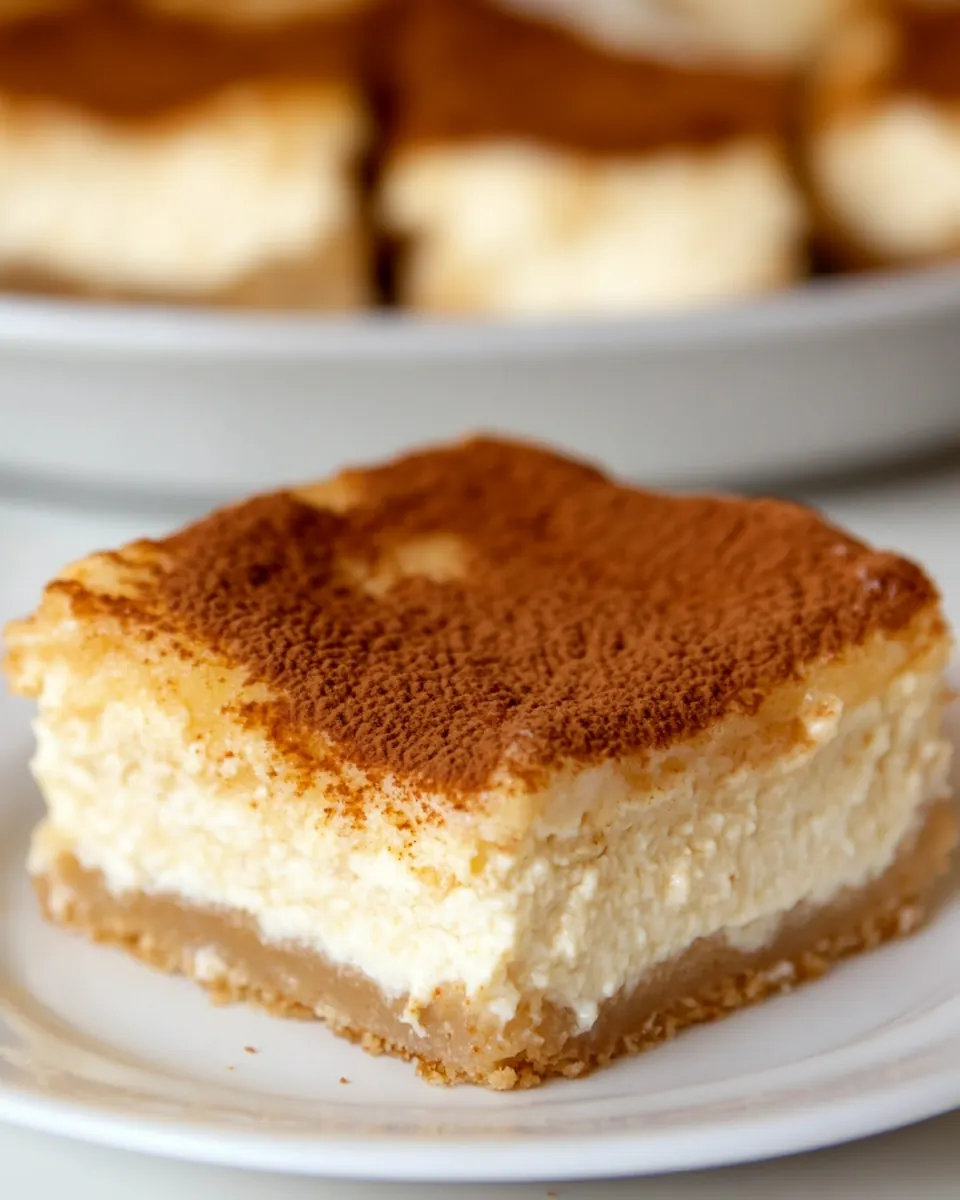
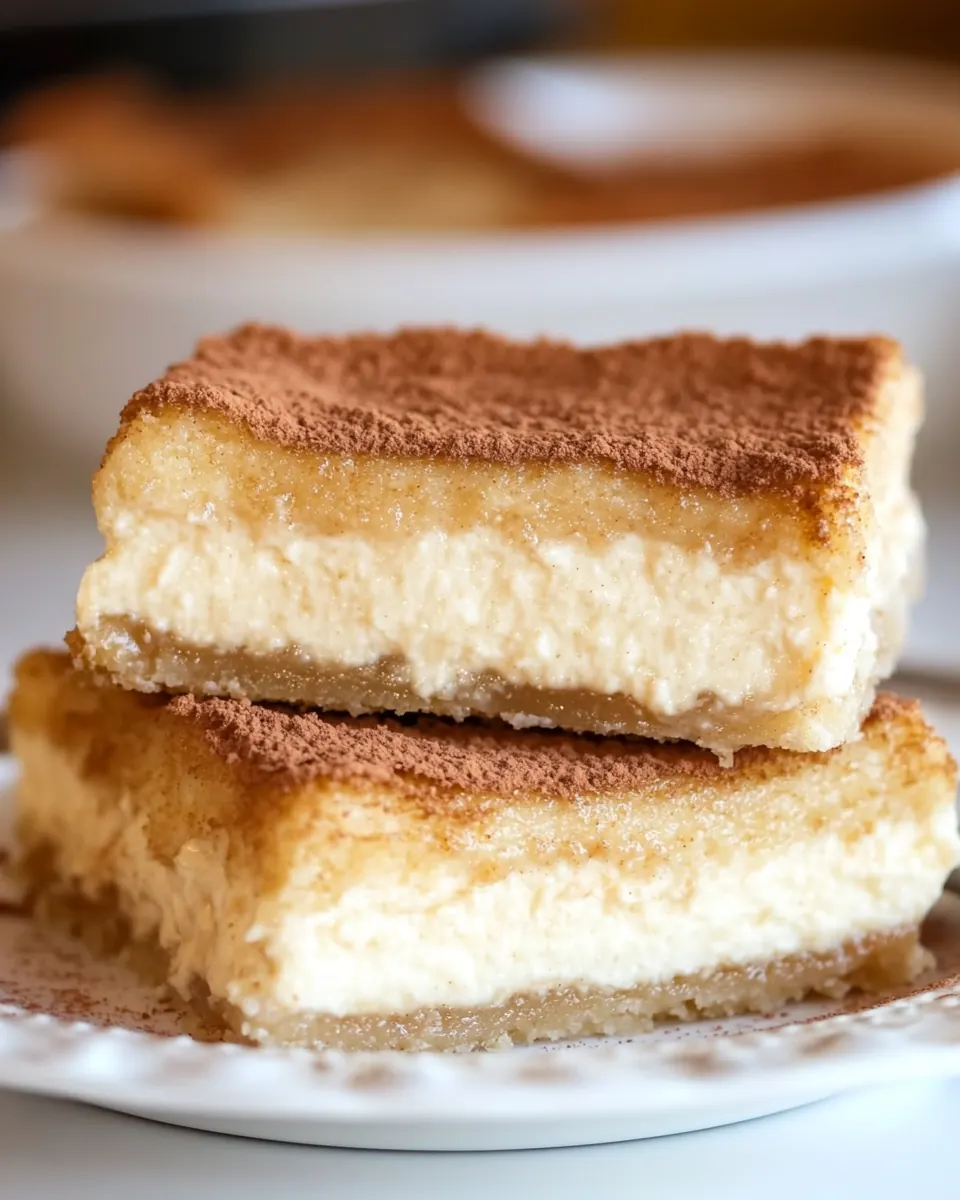
Sopapilla Cheesecake Bars
Sopapilla Cheesecake Bars are one of those nostalgic treats that always makes me smile the moment I take the pan out of the fridge. I still remember bringing these to a neighborhood potluck years ago, the tray disappearing faster than I expected, and the mix of creamy cream cheese and cinnamon sugar crumbs on my fingers long after the party ended. That first bake taught me how simple comfort can be when good, straightforward ingredients are treated with a bit of care.
I like to make a batch when I want to impress without complicating my afternoon. The contrast between a pillowy crescent rolls crust and a tangy, velvety cream cheese filling feels both fancy and homey. I often change one small thing depending on mood, and each version brings something slightly new to the table. Friends always ask for the recipe, and I love watching their faces the first time they taste the cinnamon sugar top and the chilled, rich layer beneath.
Recipe Snapshot
35 mins
10 mins
25 mins
Easy
200 kcal
American
Gluten-Free, Low FODMAP
Desserts
9×13 baking pan, oven, food processor or hand mixer, spatula, brush for butter
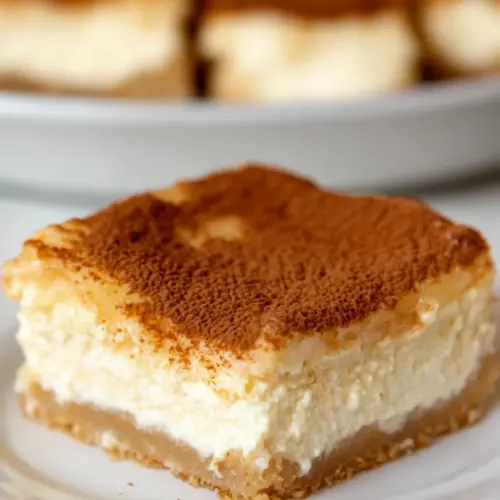
Why This Sopapilla Cheesecake Bars Shines
Comfort food that travels well
I love that Sopapilla Cheesecake Bars are sturdy enough to transport to picnics and potlucks, yet delicate enough to feel special. When I slice them cold, the layers hold and present beautifully, making them a reliable choice whenever I need something both portable and impressive.
Simple ingredients, big payoff
We use pantry staples like cream cheese, crescent rolls, and a bit of sugar to build complex flavor and texture. That minimal approach means anyone can whip these up on a weekday evening without a long shopping list. I often encourage readers to appreciate how modest ingredients can produce a dessert that tastes like you spent hours on it.
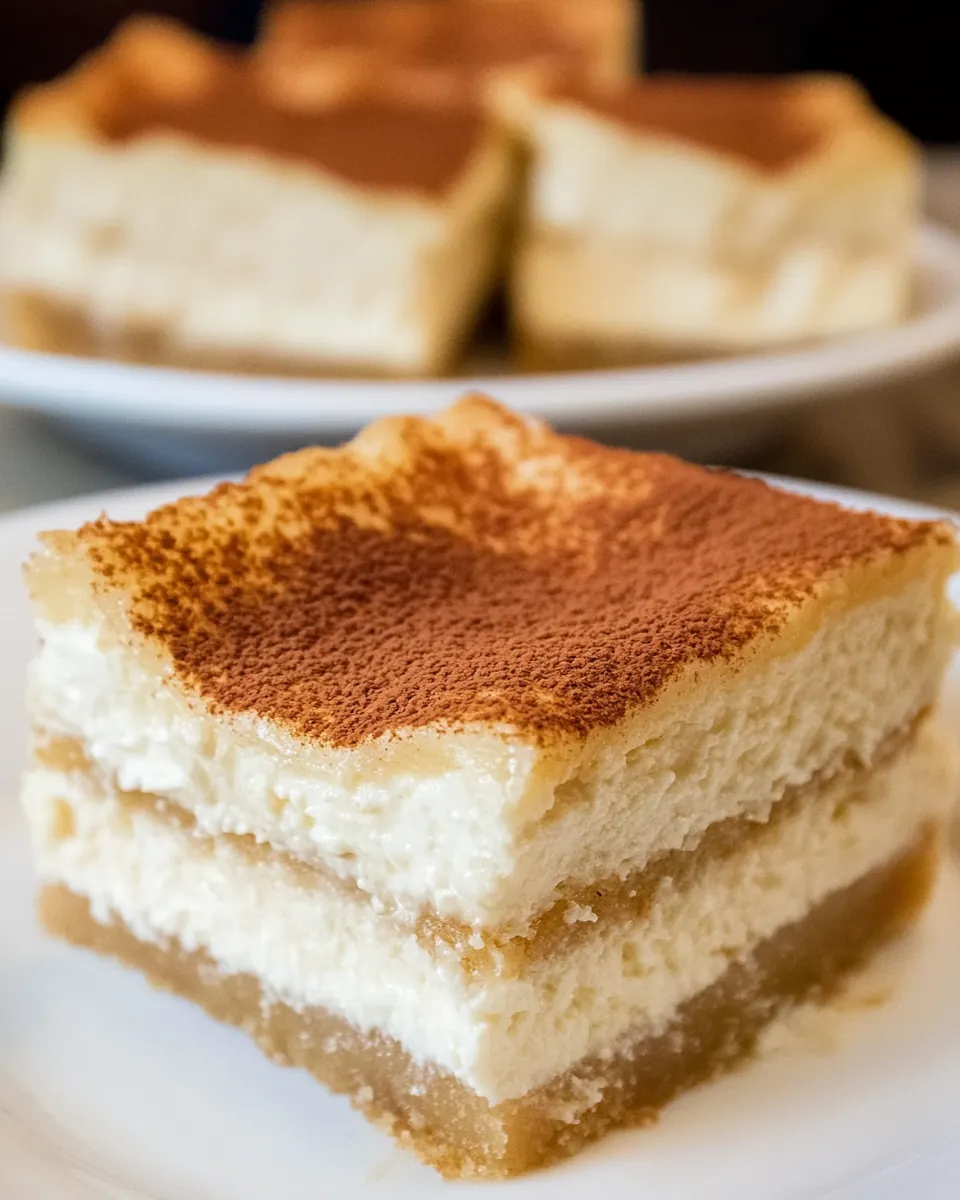
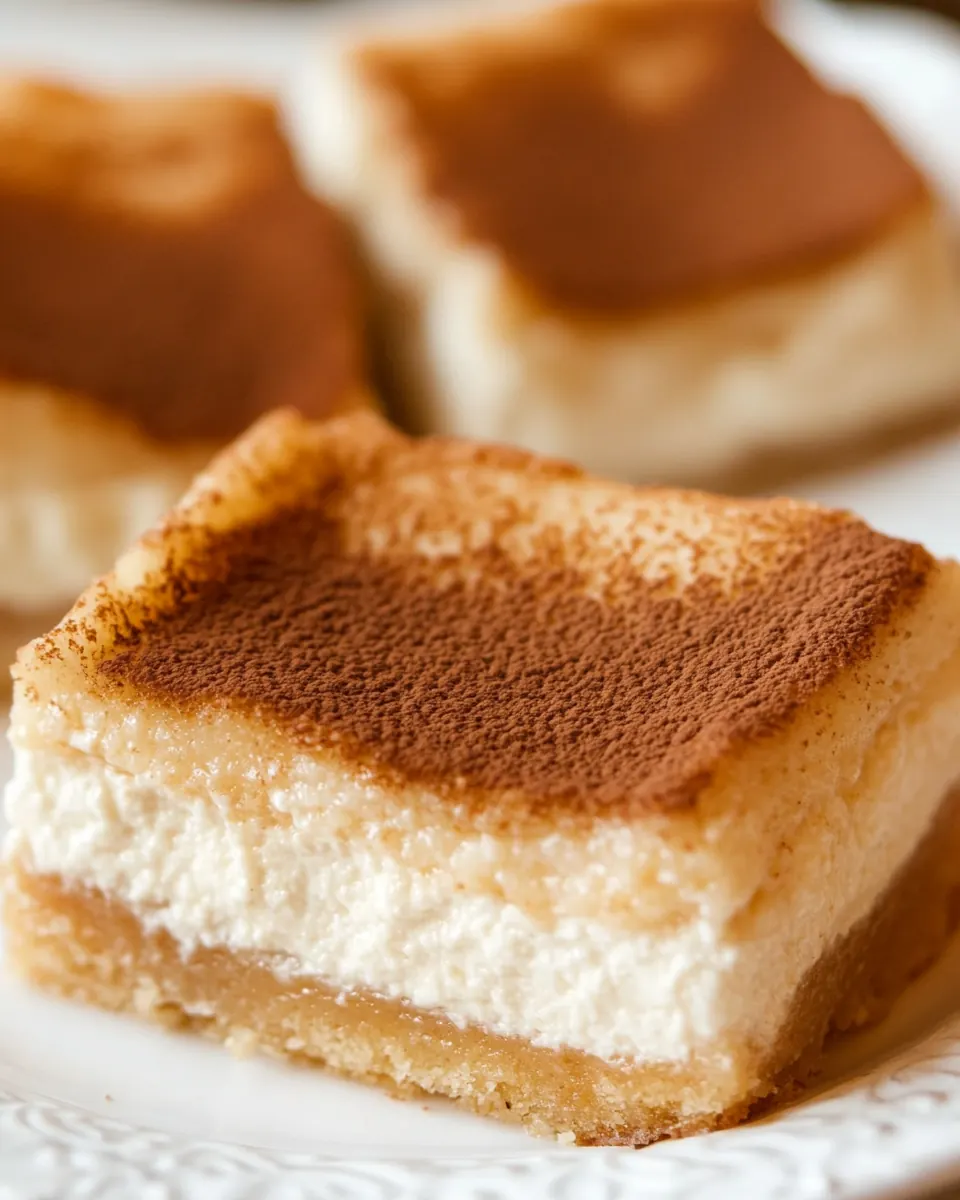
Textural delight
The magic here is in contrasts. A golden, slightly crisp top layer, a smooth and creamy center, and a thin tender bottom crust give a bite that keeps you coming back. I always notice how the cinnamon scent fills the kitchen while they bake, and that aroma becomes part of the memory of serving them.
Flexible and forgiving
One of my favorite things is that this recipe forgives small mistakes. If the top sheet tears, pressing it back together works fine. If your filling needs a bit more sweetness or tang, you can nudge it with what you have. I like recipes that let you adapt without wrecking the final result, and these bars are exactly that.
Great for make ahead
I often make these a day ahead because chilling improves their texture. They slice cleaner and develop a firmer mouthfeel after a few hours in the fridge, which makes them perfect for planning dessert for gatherings. That convenience makes them a regular in my baking rotation.
Ingredients You’ll Need for Sopapilla Cheesecake Bars
These ingredients come together to create a balanced dessert where texture and flavor support each other. The creamy cream cheese filling provides tang and body, while the crescent rolls form a tender, slightly flaky casing. A touch of cornstarch or almond flour stabilizes the filling, and cinnamon sugar on top gives the final, nostalgic crunch. Each item plays a clear role in delivering that classic sopapilla inspired experience.
- 24 oz cream cheese (for vegan, see note above): Soften and blend to create a rich, tangy cheesecake layer that provides structure and creamy texture to the bars; bring to room temperature for easier mixing and to prevent lumps when combined with sweeteners and eggs or stabilizers.
- 2 cans refrigerated crescent rolls (16 oz total): Unroll and press into a baking pan to form the flaky top and bottom crust layers; work quickly to keep layers chilled so they bake into golden, buttery sheets that encase the filling.
- 1 3/4 cup plain yogurt, sour cream, or coconut cream: Add moisture and a mild tang to lighten the filling while contributing to creaminess; choose plain yogurt, sour cream, or coconut cream based on desired flavor and fat content for stability and tenderness.
- 1 1/2 tsp pure vanilla extract: Enhance and deepen overall flavor with warm, aromatic notes; incorporate into the filling to balance sweetness and complement the cream cheese and cinnamon flavors.
- 3/4 cups sweetener of choice: Sweeten the filling to taste while helping create a smooth, cohesive texture; select a preferred sweetener to control sweetness intensity and final browning of the crust.
- 2 1/2 tbsp cornstarch, or 5 tbsp almond flour: Thicken and stabilize the filling so it sets properly as it bakes, preventing runniness; choose cornstarch for neutral thickening or almond flour for a gluten-free texture and subtle nutty note.
- 3 tbsp melted butter or coconut oil: Brush or incorporate to promote browning and add a rich, mellow fat that contributes to flakiness and mouthfeel in the crust; use melted butter for classic flavor or coconut oil for a dairy-free option.
- 1 tsp cinnamon: Impart warm spice and iconic sopapilla flavor across the filling and crust; sprinkle or mix in to provide a cinnamon-sweet profile that pairs with sugar topping.
- 1/3 cups sugar or granulated erythritol: Dust over the baked bars to create a sweet, crystalline coating that mimics traditional sopapilla topping; use sugar for classic sweetness or granulated erythritol for a lower-calorie alternative.
How to Make Sopapilla Cheesecake Bars
I like to approach these bars with a calm, steady rhythm so nothing gets rushed. The technique is straightforward, but attention during assembly and baking ensures the best texture. Follow each step and take a moment to notice the sensory cues described below, they will guide you to success.
- Roll out crescent dough. Place one of the sheets on the bottom of a 9×13 baking pan. Preheat oven to 350 F. With a food processor or hand mixer, blend the cream cheese, yogurt, cornstarch, vanilla, and sweetener until completely smooth. Spread evenly into the pan. Carefully place the remaining crescent roll sheet on top. (Watch the step-by-step recipe video above. It's okay if the sheet falls apart! Press back together as much as you can.) Spread butter on top, sprinkle on the cinnamon sugar, and bake 25 minutes. Without opening the oven, turn off the heat and let sit in the closed oven for an additional 10 minutes. Let cool completely before cutting. I like to refrigerate the pan (once it's cooled) for a few hours, or loosely covered with a towel overnight, because the bars firm up considerably once cooled.: As you unroll the crescent rolls , you will feel the soft, pillowy dough and hear a faint rustle as the sheets unfurl; this tactile moment signals the start of assembly. Lightly press seams and edges so the sheet forms a continuous layer, which helps prevent gaps in the crust. If the dough tears, press pieces back together gently rather than stretching, because overworking will cause toughness. A common mistake is handling the dough with warm hands, which makes it sticky, so cool your hands or work on a lightly floured surface.
- Place one of the sheets on the bottom of a 9×13 baking pan: When the sheet sits in the pan, smooth it with your fingertips so the corners meet the pan edges; the dough should lay flat and even. The thin crust will bake into a tender base that supports the filling, so ensure there are no large air pockets. Avoid stretching the dough to fit, which can make it spring back while baking. If the dough bunches, gently adjust it rather than pulling, as pulling changes its structure and can result in uneven baking.
- Preheat oven to 350 F: You will notice the kitchen temperature steadying as the oven warms, and the correct preheat sets up reliable browning and texture. A fully preheated oven ensures the filling sets evenly and the top crisps just right. Skipping preheat often yields underbaked centers or uneven rise, which is why I always wait for the oven to reach temperature before putting the pan in.
- With a food processor or hand mixer, blend the cream cheese, yogurt, cornstarch, vanilla, and sweetener until completely smooth: As you blend, the mixture transforms from lumpy to silky, releasing a faint tangy dairy aroma that signals proper homogenization. Smoothness is key for an elegant mouthfeel, so scrape the bowl and continue until no lumps remain. Overmixing at high speed for too long can warm the filling, making it runny, so pulse and check frequently. A typical error is using cold cream cheese which leaves unblended lumps, so let it soften before mixing.
- Spread evenly into the pan: The filling should glide onto the base and flatten with a spatula into a level layer that will set uniformly. Visual cues include a glossy surface and no visible lumps; texturally it should be thick but spreadable. If you see pockets of loose liquid, that indicates under-thickening, and the bars may be softer after baking. Be gentle when spreading so you do not tear the bottom dough with the edge of the spatula.
- Carefully place the remaining crescent roll sheet on top: As you lower the top sheet, you will hear a soft whisper of dough meeting filling, and you may notice the top stretching slightly. Place it with a light touch and press seams together where needed to form a cohesive top crust. It is normal for the sheet to break in places, and pressing it back together yields an attractive rustic finish. Avoid forcing a single perfect sheet if it resists, since aggressive manipulation will toughen the pastry.
- Press back together as much as you can: Feeling along the surface, press edges and breaks to create a continuous top layer that will brown evenly. This step helps the cinnamon sugar stay on the surface rather than slipping into the filling. Gentle pressure is all you need; heavy pressing squeezes filling out and can create thin spots. A frequent misstep is over-pressing, which reduces the airy quality of the top.
- Spread butter on top: Brushing the melted butter across the top creates a glossy base for the cinnamon sugar to stick and encourages even browning. You will see the pastry take on a slightly deeper hue as the fat mellows the surface, and the scent of warm butter rises. If the butter is too hot when applied, it can melt into the dough and make it soggy, so cool the butter briefly before brushing.
- Sprinkle on the cinnamon sugar: The moment you dust the top with the cinnamon and sugar mixture, the kitchen will fill with a warm spice perfume that hints at the finished dessert. Spray the sugar evenly to ensure every slice gets that sweet crisp top. Clumping the sugar in one spot leads to uneven caramelization, so distribute it uniformly. Overdoing the sugar can create a very hard crust that cracks when cut, so measure carefully.
- Bake 25 minutes: While baking, the top will turn golden and the edges may puff slightly, giving audible little cracks as the crust sets. The cream cheese center should not quake violently when the pan is nudged, indicating it is approaching set. If the edges brown too quickly, tent with foil, because excessive top browning results in burnt sugar flavors. A typical error is underestimating oven hot spots, so rotate the pan halfway through if your oven runs unevenly.
- Without opening the oven, turn off the heat and let sit in the closed oven for an additional 10 minutes: This resting phase allows residual heat to finish setting the filling gently, preventing abrupt temperature shifts that cause cracking. You may notice the steam settling and the top calming as it firms. Opening the oven immediately can invite rapid cooling and texture collapse, so resist the urge to peek. If the oven is very hot, leaving it closed too long can overcook, so stick to the suggested time.
- Let cool completely before cutting: Cooling transforms the filling from soft to sliceable, and as it cools you will see the glossy surface dull into a stable matte finish. Chilled bars slice much cleaner and develop a firmer bite, so patience here improves presentation. Cutting too early causes messy edges and filling oozing, which is a common disappointment.
- Refrigerate the pan for a few hours or loosely covered overnight: After it reaches room temperature, chilling solidifies the layers so that each piece holds its shape and the flavors meld. The texture will taste more cohesive and the cream cheese flavor will feel integrated rather than sharp. Avoid sealing tightly while still warm as condensation can soften the top; a loose cover is best. A mistake I see is skipping chill time, which leaves bars too soft to serve attractively.
Tips and Tricks about Sopapilla Cheesecake Bars
I like to keep a few practical habits when making Sopapilla Cheesecake Bars, because small details yield much better results. These tips reflect tricks I use often, from texture control to cooling strategy.
- Room temperature is key, let the cream cheese sit out for about 20 to 30 minutes so it blends smoothly without lumps.
- Gentle handling, when working with the crescent rolls, press seams instead of stretching to maintain a tender crust.
- Check sweetness, taste the filling before baking and adjust the sweetener to suit your preference, since different sweeteners vary in intensity.
- Even cinnamon sugar, mix the cinnamon and sugar thoroughly and sprinkle through a small sieve for consistent coverage.
- Cool fully, allow the bars to reach room temperature before refrigerating, which prevents condensation from softening the top.
Perfect Matches for Sopapilla Cheesecake Bars
This dessert pairs well with simple accompaniments and fits many occasions. I enjoy serving these bars for brunch, after dinner, or as a sweet treat during celebrations. Below are ideas for serving, storage, and occasions where these bars shine.
- Brunch spread, pair a tray of Sopapilla Cheesecake Bars with coffee and fresh fruit for a relaxed late morning gathering where the bars offer a sweet counterpoint to savory items.
- Potluck favorite, these bars travel well, making them a reliable option for picnics, work parties, or community events where easy slicing and serving matter.
- Holiday dessert, serve chilled slices after a family meal; they fit casual holiday tables and offer a homey, comforting finish to a feast.
- Make ahead, bake the day before and refrigerate to allow flavors to meld and the texture to firm, this makes serving stress free on the day of your event.
- Storage tips, keep the pan covered loosely in the fridge for up to five days, or freeze individual slices wrapped tightly for longer storage.
FAQ
Conclusion
What makes these bars special is their lovely contrast of textures and surprisingly simple ingredient list, delivering a dessert that feels both homey and elegant. Give them a try when you want an easy make ahead treat that looks like you took extra time, and enjoy watching them disappear at your next gathering. They are forgiving, adaptable, and a delightful reminder that satisfying desserts do not have to be complicated.
Sopapilla Cheesecake Bars
Equipment
- 9×13 baking pan
- Oven
- food processor or hand mixer
- Spatula
- brush for butter
Ingredients
- 24 oz cream cheese (for vegan, see note above) Soften and blend to create a rich, tangy cheesecake layer that provides structure and creamy texture to the bars; bring to room temperature for easier mixing and to prevent lumps when combined with sweeteners and eggs or stabilizers.
- 2 cans refrigerated crescent rolls (16 oz total) Unroll and press into a baking pan to form the flaky top and bottom crust layers; work quickly to keep layers chilled so they bake into golden, buttery sheets that encase the filling.
- 1 3/4 cup plain yogurt, sour cream, or coconut cream Add moisture and a mild tang to lighten the filling while contributing to creaminess; choose plain yogurt, sour cream, or coconut cream based on desired flavor and fat content for stability and tenderness.
- 1 1/2 tsp pure vanilla extract Enhance and deepen overall flavor with warm, aromatic notes; incorporate into the filling to balance sweetness and complement the cream cheese and cinnamon flavors.
- 3/4 cups sweetener of choice Sweeten the filling to taste while helping create a smooth, cohesive texture; select a preferred sweetener to control sweetness intensity and final browning of the crust.
- 2 1/2 tbsp cornstarch, or 5 tbsp almond flour Thicken and stabilize the filling so it sets properly as it bakes, preventing runniness; choose cornstarch for neutral thickening or almond flour for a gluten-free texture and subtle nutty note.
- 3 tbsp melted butter or coconut oil Brush or incorporate to promote browning and add a rich, mellow fat that contributes to flakiness and mouthfeel in the crust; use melted butter for classic flavor or coconut oil for a dairy-free option.
- 1 tsp cinnamon Impart warm spice and iconic sopapilla flavor across the filling and crust; sprinkle or mix in to provide a cinnamon-sweet profile that pairs with sugar topping.
- 1/3 cups sugar or granulated erythritol Dust over the baked bars to create a sweet, crystalline coating that mimics traditional sopapilla topping; use sugar for classic sweetness or granulated erythritol for a lower-calorie alternative.
Instructions
- Roll out crescent dough. Place one of the sheets on the bottom of a 9×13 baking pan. Preheat oven to 350 F. With a food processor or hand mixer, blend the cream cheese, yogurt, cornstarch, vanilla, and sweetener until completely smooth. Spread evenly into the pan. Carefully place the remaining crescent roll sheet on top. (Watch the step-by-step recipe video above. It's okay if the sheet falls apart! Press back together as much as you can.) Spread butter on top, sprinkle on the cinnamon sugar, and bake 25 minutes. Without opening the oven, turn off the heat and let sit in the closed oven for an additional 10 minutes. Let cool completely before cutting. I like to refrigerate the pan (once it's cooled) for a few hours, or loosely covered with a towel overnight, because the bars firm up considerably once cooled.: As you unroll the crescent rolls , you will feel the soft, pillowy dough and hear a faint rustle as the sheets unfurl; this tactile moment signals the start of assembly. Lightly press seams and edges so the sheet forms a continuous layer, which helps prevent gaps in the crust. If the dough tears, press pieces back together gently rather than stretching, because overworking will cause toughness. A common mistake is handling the dough with warm hands, which makes it sticky, so cool your hands or work on a lightly floured surface.
- Place one of the sheets on the bottom of a 9×13 baking pan: When the sheet sits in the pan, smooth it with your fingertips so the corners meet the pan edges; the dough should lay flat and even. The thin crust will bake into a tender base that supports the filling, so ensure there are no large air pockets. Avoid stretching the dough to fit, which can make it spring back while baking. If the dough bunches, gently adjust it rather than pulling, as pulling changes its structure and can result in uneven baking.
- Preheat oven to 350 F: You will notice the kitchen temperature steadying as the oven warms, and the correct preheat sets up reliable browning and texture. A fully preheated oven ensures the filling sets evenly and the top crisps just right. Skipping preheat often yields underbaked centers or uneven rise, which is why I always wait for the oven to reach temperature before putting the pan in.
- With a food processor or hand mixer, blend the cream cheese, yogurt, cornstarch, vanilla, and sweetener until completely smooth: As you blend, the mixture transforms from lumpy to silky, releasing a faint tangy dairy aroma that signals proper homogenization. Smoothness is key for an elegant mouthfeel, so scrape the bowl and continue until no lumps remain. Overmixing at high speed for too long can warm the filling, making it runny, so pulse and check frequently. A typical error is using cold cream cheese which leaves unblended lumps, so let it soften before mixing.
- Spread evenly into the pan: The filling should glide onto the base and flatten with a spatula into a level layer that will set uniformly. Visual cues include a glossy surface and no visible lumps; texturally it should be thick but spreadable. If you see pockets of loose liquid, that indicates under-thickening, and the bars may be softer after baking. Be gentle when spreading so you do not tear the bottom dough with the edge of the spatula.
- Carefully place the remaining crescent roll sheet on top: As you lower the top sheet, you will hear a soft whisper of dough meeting filling, and you may notice the top stretching slightly. Place it with a light touch and press seams together where needed to form a cohesive top crust. It is normal for the sheet to break in places, and pressing it back together yields an attractive rustic finish. Avoid forcing a single perfect sheet if it resists, since aggressive manipulation will toughen the pastry.
- Press back together as much as you can: Feeling along the surface, press edges and breaks to create a continuous top layer that will brown evenly. This step helps the cinnamon sugar stay on the surface rather than slipping into the filling. Gentle pressure is all you need; heavy pressing squeezes filling out and can create thin spots. A frequent misstep is over-pressing, which reduces the airy quality of the top.
- Spread butter on top: Brushing the melted butter across the top creates a glossy base for the cinnamon sugar to stick and encourages even browning. You will see the pastry take on a slightly deeper hue as the fat mellows the surface, and the scent of warm butter rises. If the butter is too hot when applied, it can melt into the dough and make it soggy, so cool the butter briefly before brushing.
- Sprinkle on the cinnamon sugar: The moment you dust the top with the cinnamon and sugar mixture, the kitchen will fill with a warm spice perfume that hints at the finished dessert. Spray the sugar evenly to ensure every slice gets that sweet crisp top. Clumping the sugar in one spot leads to uneven caramelization, so distribute it uniformly. Overdoing the sugar can create a very hard crust that cracks when cut, so measure carefully.
- Bake 25 minutes: While baking, the top will turn golden and the edges may puff slightly, giving audible little cracks as the crust sets. The cream cheese center should not quake violently when the pan is nudged, indicating it is approaching set. If the edges brown too quickly, tent with foil, because excessive top browning results in burnt sugar flavors. A typical error is underestimating oven hot spots, so rotate the pan halfway through if your oven runs unevenly.
- Without opening the oven, turn off the heat and let sit in the closed oven for an additional 10 minutes: This resting phase allows residual heat to finish setting the filling gently, preventing abrupt temperature shifts that cause cracking. You may notice the steam settling and the top calming as it firms. Opening the oven immediately can invite rapid cooling and texture collapse, so resist the urge to peek. If the oven is very hot, leaving it closed too long can overcook, so stick to the suggested time.
- Let cool completely before cutting: Cooling transforms the filling from soft to sliceable, and as it cools you will see the glossy surface dull into a stable matte finish. Chilled bars slice much cleaner and develop a firmer bite, so patience here improves presentation. Cutting too early causes messy edges and filling oozing, which is a common disappointment.
- Refrigerate the pan for a few hours or loosely covered overnight: After it reaches room temperature, chilling solidifies the layers so that each piece holds its shape and the flavors meld. The texture will taste more cohesive and the cream cheese flavor will feel integrated rather than sharp. Avoid sealing tightly while still warm as condensation can soften the top; a loose cover is best. A mistake I see is skipping chill time, which leaves bars too soft to serve attractively.
Notes
- Room temperature is key, let the cream cheese sit out for about 20 to 30 minutes so it blends smoothly without lumps.
- Gentle handling, when working with the crescent rolls, press seams instead of stretching to maintain a tender crust.
- Check sweetness, taste the filling before baking and adjust the sweetener to suit your preference, since different sweeteners vary in intensity.
- Even cinnamon sugar, mix the cinnamon and sugar thoroughly and sprinkle through a small sieve for consistent coverage.
- Cool fully, allow the bars to reach room temperature before refrigerating, which prevents condensation from softening the top.