S’mores Rice Krispie Treats
S’mores Rice Krispie Treats are one of those recipes I turn to when I want to chase down a memory from summer nights without leaving the kitchen. The first time I made these, I was determined to recreate that toasted marshmallow and melted chocolate moment but in a pan of chewy cereal bars. I remember humming while I melted butter and marshmallows on the stove, the air filling with a sweet, toasty scent that immediately made the house feel cozy.
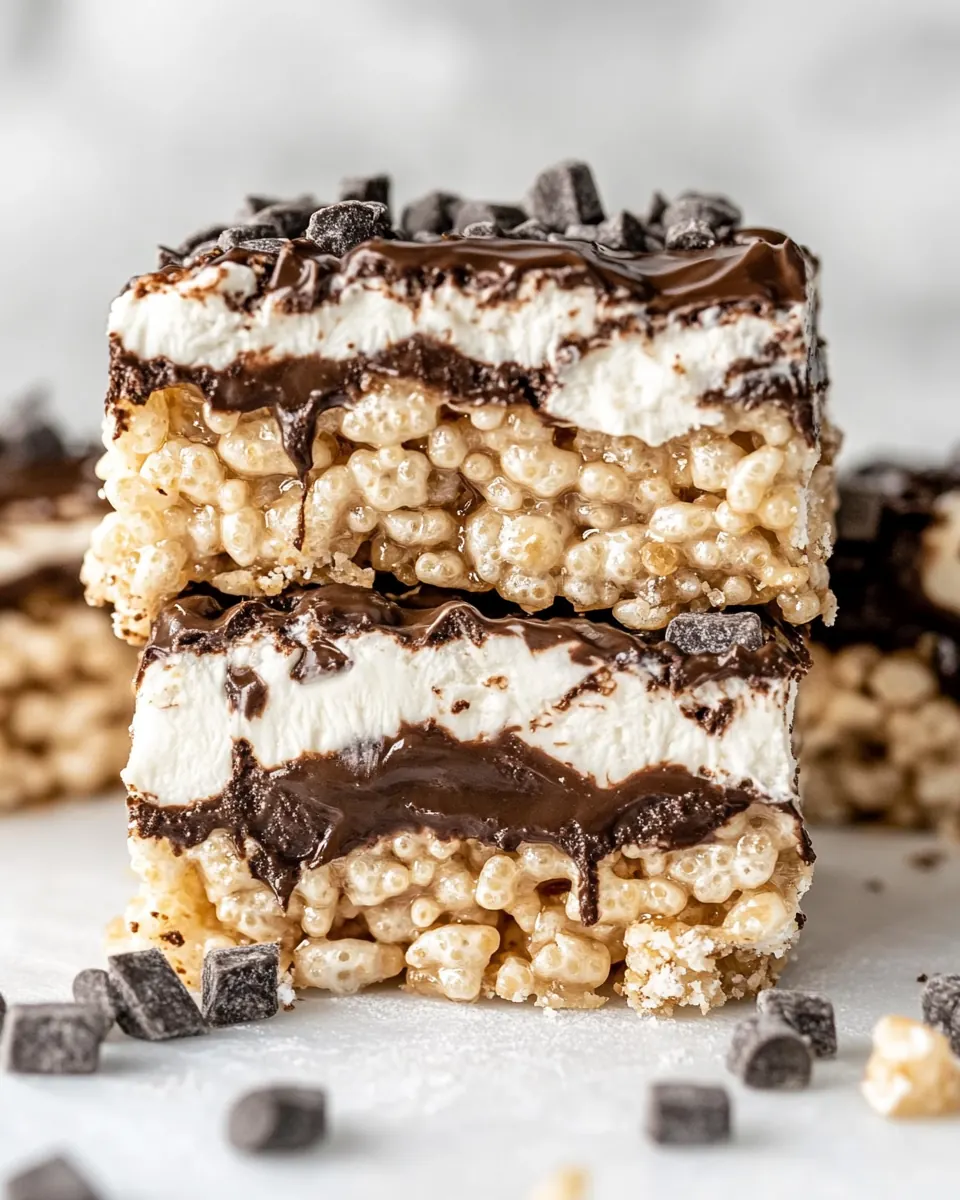
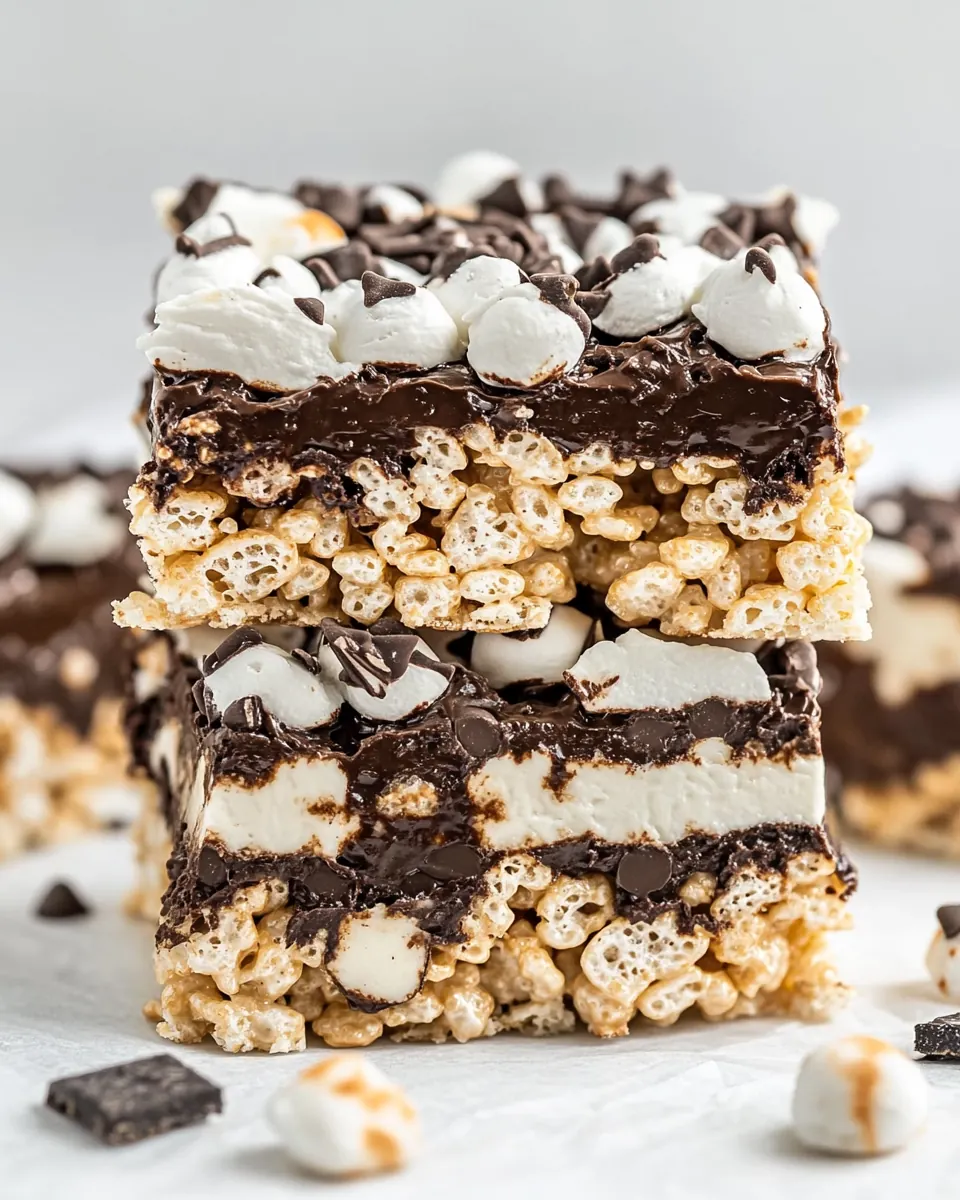
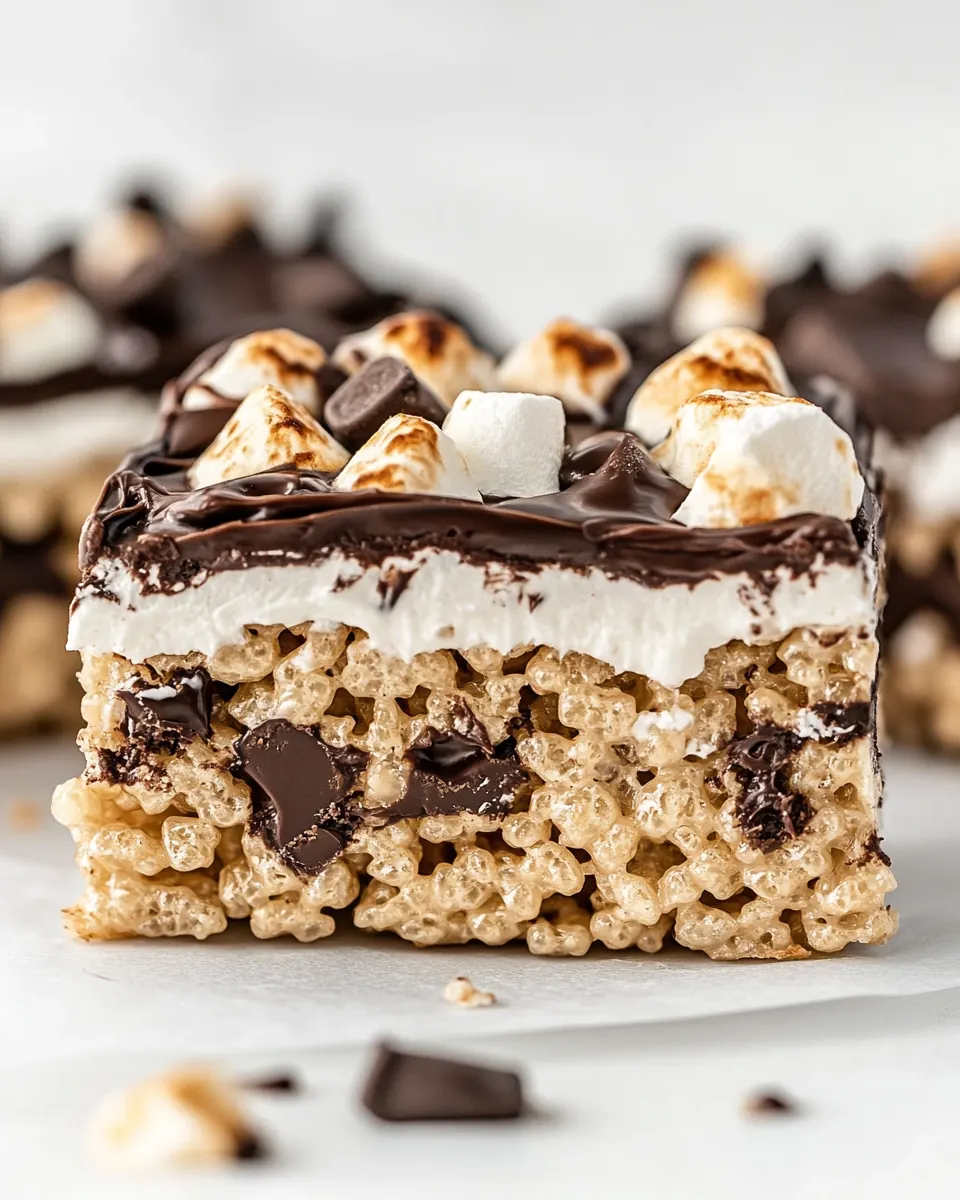
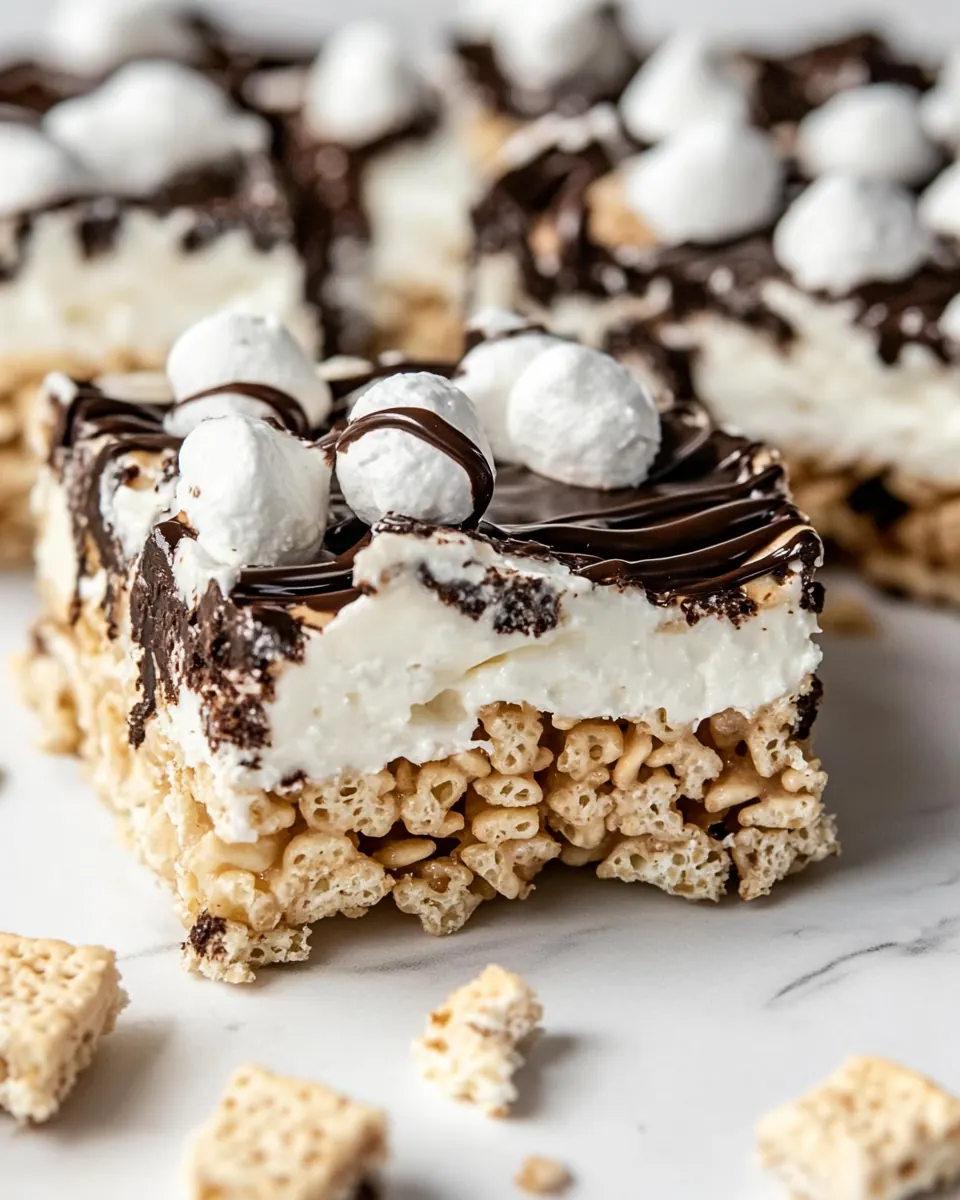
Over the years I have adjusted the layers until the balance felt just right, and these bars now show up at bake sales, casual get togethers, and whenever I need something that will please kids and grown ups alike. What I love most is how playful the recipe is, you get the crunchy snap of Rice Krispies Cereal, the crunchy graham layer, and gooey pockets of mini marshmallows and chocolate chips. Each bite is textural and nostalgic, and the assembly invents its own small theater of melting, spreading, and drizzling.
I’ve learned to be relaxed about exactness here, but there are small tricks that make a big difference. For instance, melting chocolate gently preserves that glossy shine, and pressing the cereal firmly into the pan gives neat bars that slice cleanly. I usually double check that my marshmallows are fresh and my cereal is crisp; stale ingredients dull the whole experience. If you enjoy recipes that bring people together around a shared sweet moment, you’ll find these bars impossible to resist.
Recipe Snapshot
50 mins
30 mins
20 mins
Medium
180 kcal
American
Gluten-Free, Low FODMAP
Desserts
Large pot, Microwave safe bowl, 9×13-inch pan, Foil or parchment, Spatula
Why Try This S’mores Rice Krispie Treats
1. Familiar, but elevated
I love that S’mores Rice Krispie Treats take three childhood staples and combine them into a single, elevated bar. The familiar flavors make this an instant crowd pleaser, while the layered approach gives a slightly grown up texture that keeps people coming back for seconds.
2. Textural contrast
One reason I adore these bars is the interplay between the airy crunch of Rice Krispies Cereal, the crisp bite of Graham crackers, and the gooey mini marshmallows. That contrast is what turns a simple sweet into a memorable treat.
3. Simple, forgiving technique
We all appreciate recipes that forgive a little haste. Melting butter and marshmallows into a sticky, glossy binder is straightforward, and the assembly moves quickly. If you keep the heat gentle and press the mixture firmly, you almost can not go wrong.
4. Customizable chocolate profile
I always appreciate flexibility, and these bars let you choose your favorite chocolate chips. You can shift the chocolate intensity easily, and the recipe works with semi sweet, milk, or even flavored chips if you prefer a twist.
5. Crowd friendly and portable
These bars are brilliant for sharing. They hold up well at parties, pack neatly for picnics, and freeze for future snacking. I regularly make a pan ahead of time, because they store and travel so well.
What Goes Into S’mores Rice Krispie Treats
These ingredients are a study in complementary simplicity. Each player has a distinct role: one provides crunch, one provides chew, and one brings chocolate intensity. Together they create a layered bar that feels both nostalgic and thoughtfully constructed.
- 6 cups (158 g) Rice Krispies Cereal: Provide light, crispy cereal structure and crunchy texture that forms the base of the treats when combined with melted marshmallows. Help absorb sweet binder and maintain a pleasant chew while keeping bars airy and not overly dense.
- 15 ounces (425 g) mini marshmallows, divided: Contribute sticky, sweet binder properties when melted to hold the cereal together; dividing allows some to be melted in and some to be sprinkled for extra gooey pockets. Add classic marshmallow flavor and a soft, chewy contrast to the crunchy cereal and chocolate.
- 5 tablespoons (70 g) unsalted butter: Supply rich, creamy fat that melts smoothly into the marshmallows, improving texture and preventing the mixture from becoming tough or dry. Add a subtle buttery flavor and help the marshmallow binder spread evenly through the cereal.
- 1 teaspoon (15 ml) vanilla extract: Enhance overall flavor with a warm, sweet aromatic note that complements chocolate and marshmallow; stir in after melting to preserve its delicate aroma. Provide depth and balance to the sweetness without adding moisture or changing texture.
- 4 cups (680 g) chocolate chips, divided: Provide intense chocolate flavor and melted pockets of richness; dividing allows some to be melted into the mixture and some reserved for topping or stirring in for texture. Add decadent taste and create contrast with the cereal and marshmallow sweetness.
- 8 (approx) Graham crackers (full sheets): Serve as crunchy sandwich pieces or crushed mix-ins that supply familiar graham flavor and slight caramelized sweetness; approximate count indicates typical package amount for recipe scale. Offer a classic s'mores element and textural contrast when broken into pieces or layered on top.
How to Make S’mores Rice Krispie Treats
Making these bars is a comfortable, rhythmic process. You will move from measuring to melting to pressing and finally to layering, and the kitchen will fill with warm, toasty scents that are hard to resist. Keep your tools close, and have a timer handy for precise melting stages.
- Line a 9×13-inch pan with foil or parchment and spray with nonstick cooking spray.: The prepared pan sets the stage; the foil or parchment makes lifting the set bars effortless and the nonstick spray prevents sticking. You should notice the smooth gleam of the liner as you press it into the pan, and it helps the finished bars release cleanly. A common mistake is skipping the spray, which can make removal tear the treats; take a moment to secure the liner and lightly coat it.
- Measure out cereal and place in a large bowl.: Having the Rice Krispies Cereal pre measured prevents frantic scooping while the marshmallow mixture is hot. The cereal will look fluffy and pale, and measuring into a large bowl gives plenty of room for stirring without spills. Avoid compacting the cereal when measuring, which can lead to dense bars.
- Measure out 10 ounces (1 package) mini marshmallows and set aside.: Separating the portion of mini marshmallows reserved for topping ensures a smooth assembly flow. These reserved marshmallows stay dry until layered, ready to create those toasty pockets. If you skip this step, you might melt all the marshmallows and lose the signature gooey bits on top.
- Melt the butter in a large pot over medium low heat.: Melt unsalted butter gently until just liquid, you will notice a soft, nutty aroma but no browning. Using medium low heat keeps the butter from separating or getting too hot before the marshmallows are added. A common issue is overheating, which can make the marshmallow mixture grainy.
- Add the marshmallows and stir until melted. Remove from heat and stir in vanilla extract.: As you stir the marshmallows into the warm butter, watch them collapse into a glossy cloud and hear the faint bubbling as they soften. Work quickly and remove from heat when smooth. Off heat, stir in the vanilla extract so the flavor stays bright. If you overcook the marshmallows, they can seize and become tough, so keep the heat low and the stirring steady.
- Add cereal and stir to coat with the marshmallow mixture. Immediately pour into prepared pan.: Pour the marshmallow binder over the Rice Krispies Cereal and fold until every flake looks glossy. The cereal will steam slightly as it absorbs the binder, and the mixture should hold together when squeezed. If you undercoat the cereal you will get crumbly bars, so be thorough but gentle to avoid crushing the cereal.
- Press firmly to compact. Tip: spray wax paper with nonstick cooking spray so you can press without it sticking to your hands.: Transfer the glossy mixture into the lined pan and spread it evenly; it will still be hot and malleable. You will feel the warmth through the spatula and see the sticky sheen as you level the surface. Work quickly so the mixture sets evenly; waiting too long makes pressing difficult and uneven.
- Melt 1 1/2 cups chocolate chips in a microwave-safe bowl (heat on 50% power for 1 minute, stir, then continue heating in 30 second increments until melted and smooth). Spread the chocolate in an even layer over the cereal treats. Layer with the graham crackers.: Using a piece of sprayed wax paper or a lightly oiled spatula, press the mixture down until it is tightly packed and even. The pressure helps the bars slice cleanly later and removes air pockets. You should hear a slight compacting sound and see the surface smooth out. One mistake is pressing with bare hands, which leads to sticking; use the wax paper or spatula.
- Melt 1 1/2 cups chocolate chips in a microwave-safe bowl (heat on 50% power for 1 minute, stir, then continue heating in 30 second increments until melted and smooth). Spread the chocolate in an even layer over the graham crackers. Immediately top with remaining mini marshmallows.: Melt the first portion of chocolate chips gently in the microwave at half power, stirring frequently until glossy and smooth. Spread a thin, even chocolate layer over the compacted cereal base; it will set to a satiny sheen. Arrange the full sheet Graham crackers on top while the chocolate is still tacky so they adhere. If the chocolate cools too much before you spread, it will thicken and not layer evenly.
- Melt remaining 1 cup chocolate chips in a microwave-safe bowl (heat on 50% power for 30 seconds, stir, then continue heating in 30 second increments until melted and smooth). Place melted chocolate in a small Ziploc bag and cut off one tip – drizzle over marshmallows.: Melt the next portion of chocolate chips the same way and spread it over the graham cracker layer, creating another glossy chocolate blanket. Immediately sprinkle on the reserved mini marshmallows , pressing them lightly so they stick. The marshmallows will soften against the warm chocolate forming little pockets of goo. If you wait too long the marshmallows will not adhere and may roll off.
- Let set until firm then slice into bars. Store in an airtight container for up to 3 days. To freeze, let cool completely then cut into bars and wrap each individual bar in wax paper and freeze in an airtight container for up to 3 months.: Melt the last cup of chocolate chips until silky, transfer to a small plastic bag, cut a tiny corner, and drizzle a decorative pattern over the marshmallows. The thin ribbons of chocolate add visual contrast and an extra hit of chocolate in every bite. Be careful with the drizzle temperature, if too hot it can cause the marshmallows to collapse.
- Let set until firm then slice into bars: Allow the assembled pan to cool at room temperature until everything firms up, you will notice the chocolate lose its glossy wobble and the marshmallows become tender but set. Slice into 24 bars with a sharp knife for clean edges. If you try to cut too soon the layers will smear, so patience yields neater bars. Store in an airtight container for up to 3 days, or freeze individually wrapped for longer storage.
Recipe Notes about S’mores Rice Krispie Treats
These notes collect practical ideas I use whenever I make a pan. Small adjustments can make a big difference in texture and presentation, and these tips will help you get consistent results whether you are feeding a crowd or making a quick treat for the family.
- Freshness matters Be sure to use fresh Rice Krispies Cereal and mini marshmallows as stale ingredients can lead to dry or grainy texture.
- Chocolate temperature Melt chocolate chips gently at medium low power or in short bursts at 50 percent power to maintain a glossy finish and to avoid grainy, seized chocolate.
- Pressing technique Use sprayed wax paper or a silicone spatula when pressing the cereal mixture into the pan to prevent sticking and to achieve an even density for clean slicing.
- Layer timing Spread each chocolate layer while it is warm and tacky, so the Graham crackers and marshmallows adhere properly without sliding.
- Storage Store the bars in an airtight container at room temperature for up to 3 days, or freeze individually wrapped for up to 3 months to preserve texture and flavor.
Best Served With
These bars are versatile and travel well, making them perfect for casual gatherings. Serving them thoughtfully enhances the experience, whether it’s a snack for kids or a sweet finish for an outdoor meal.
- Casual parties Serve S’mores Rice Krispie Treats on a platter at backyard parties or potlucks for easy grabbing and sharing.
- Lunchbox treat Wrap individual bars in wax paper and add to lunch boxes for a nostalgic dessert that travels well.
- Picnic pairing Pair with bottled cold beverages for an outdoor afternoon snack since the bars are sturdy and portable.
- Seasonal occasions These work for summer barbecues or winter indoor gatherings, keeping the s’mores spirit alive all year.
- Storage notes Keep in an airtight container at room temperature for short term storage, or freeze wrapped bars for longer keeping; thaw at room temperature before serving.
FAQ
Conclusion
These S’mores Rice Krispie Treats are special because they capture the classic campfire trio of marshmallows, chocolate, and graham crackers in a tidy, shareable bar. They are easy to assemble yet deliver satisfying layers of texture that feel both nostalgic and slightly indulgent. Give them a try when you need a dessert that travels well, disappears fast at gatherings, and brings a bit of playful comfort to any table. I hope you enjoy the sticky, chocolatey results as much as I do.

S'mores Rice Krispie Treats
Equipment
- Large Pot
- Microwave-safe Bowl
- 9×13-inch pan
- Foil or parchment
- Spatula
Ingredients
- 6 cups (158 g) Rice Krispies Cereal Provide light, crispy cereal structure and crunchy texture that forms the base of the treats when combined with melted marshmallows. Help absorb sweet binder and maintain a pleasant chew while keeping bars airy and not overly dense.
- 15 ounces (425 g) mini marshmallows, divided Contribute sticky, sweet binder properties when melted to hold the cereal together; dividing allows some to be melted in and some to be sprinkled for extra gooey pockets. Add classic marshmallow flavor and a soft, chewy contrast to the crunchy cereal and chocolate.
- 5 tablespoons (70 g) unsalted butter Supply rich, creamy fat that melts smoothly into the marshmallows, improving texture and preventing the mixture from becoming tough or dry. Add a subtle buttery flavor and help the marshmallow binder spread evenly through the cereal.
- 1 teaspoon (15 ml) vanilla extract Enhance overall flavor with a warm, sweet aromatic note that complements chocolate and marshmallow; stir in after melting to preserve its delicate aroma. Provide depth and balance to the sweetness without adding moisture or changing texture.
- 4 cups (680 g) chocolate chips, divided Provide intense chocolate flavor and melted pockets of richness; dividing allows some to be melted into the mixture and some reserved for topping or stirring in for texture. Add decadent taste and create contrast with the cereal and marshmallow sweetness.
- 8 (approx) Graham crackers (full sheets) Serve as crunchy sandwich pieces or crushed mix-ins that supply familiar graham flavor and slight caramelized sweetness; approximate count indicates typical package amount for recipe scale. Offer a classic s'mores element and textural contrast when broken into pieces or layered on top.
Instructions
- Line a 9×13-inch pan with foil or parchment and spray with nonstick cooking spray.: The prepared pan sets the stage; the foil or parchment makes lifting the set bars effortless and the nonstick spray prevents sticking. You should notice the smooth gleam of the liner as you press it into the pan, and it helps the finished bars release cleanly. A common mistake is skipping the spray, which can make removal tear the treats; take a moment to secure the liner and lightly coat it.
- Measure out cereal and place in a large bowl.: Having the Rice Krispies Cereal pre measured prevents frantic scooping while the marshmallow mixture is hot. The cereal will look fluffy and pale, and measuring into a large bowl gives plenty of room for stirring without spills. Avoid compacting the cereal when measuring, which can lead to dense bars.
- Measure out 10 ounces (1 package) mini marshmallows and set aside.: Separating the portion of mini marshmallows reserved for topping ensures a smooth assembly flow. These reserved marshmallows stay dry until layered, ready to create those toasty pockets. If you skip this step, you might melt all the marshmallows and lose the signature gooey bits on top.
- Melt the butter in a large pot over medium low heat.: Melt unsalted butter gently until just liquid, you will notice a soft, nutty aroma but no browning. Using medium low heat keeps the butter from separating or getting too hot before the marshmallows are added. A common issue is overheating, which can make the marshmallow mixture grainy.
- Add the marshmallows and stir until melted. Remove from heat and stir in vanilla extract.: As you stir the marshmallows into the warm butter, watch them collapse into a glossy cloud and hear the faint bubbling as they soften. Work quickly and remove from heat when smooth. Off heat, stir in the vanilla extract so the flavor stays bright. If you overcook the marshmallows, they can seize and become tough, so keep the heat low and the stirring steady.
- Add cereal and stir to coat with the marshmallow mixture. Immediately pour into prepared pan.: Pour the marshmallow binder over the Rice Krispies Cereal and fold until every flake looks glossy. The cereal will steam slightly as it absorbs the binder, and the mixture should hold together when squeezed. If you undercoat the cereal you will get crumbly bars, so be thorough but gentle to avoid crushing the cereal.
- Press firmly to compact. Tip: spray wax paper with nonstick cooking spray so you can press without it sticking to your hands.: Transfer the glossy mixture into the lined pan and spread it evenly; it will still be hot and malleable. You will feel the warmth through the spatula and see the sticky sheen as you level the surface. Work quickly so the mixture sets evenly; waiting too long makes pressing difficult and uneven.
- Melt 1 1/2 cups chocolate chips in a microwave-safe bowl (heat on 50% power for 1 minute, stir, then continue heating in 30 second increments until melted and smooth). Spread the chocolate in an even layer over the cereal treats. Layer with the graham crackers.: Using a piece of sprayed wax paper or a lightly oiled spatula, press the mixture down until it is tightly packed and even. The pressure helps the bars slice cleanly later and removes air pockets. You should hear a slight compacting sound and see the surface smooth out. One mistake is pressing with bare hands, which leads to sticking; use the wax paper or spatula.
- Melt 1 1/2 cups chocolate chips in a microwave-safe bowl (heat on 50% power for 1 minute, stir, then continue heating in 30 second increments until melted and smooth). Spread the chocolate in an even layer over the graham crackers. Immediately top with remaining mini marshmallows.: Melt the first portion of chocolate chips gently in the microwave at half power, stirring frequently until glossy and smooth. Spread a thin, even chocolate layer over the compacted cereal base; it will set to a satiny sheen. Arrange the full sheet Graham crackers on top while the chocolate is still tacky so they adhere. If the chocolate cools too much before you spread, it will thicken and not layer evenly.
- Melt remaining 1 cup chocolate chips in a microwave-safe bowl (heat on 50% power for 30 seconds, stir, then continue heating in 30 second increments until melted and smooth). Place melted chocolate in a small Ziploc bag and cut off one tip – drizzle over marshmallows.: Melt the next portion of chocolate chips the same way and spread it over the graham cracker layer, creating another glossy chocolate blanket. Immediately sprinkle on the reserved mini marshmallows , pressing them lightly so they stick. The marshmallows will soften against the warm chocolate forming little pockets of goo. If you wait too long the marshmallows will not adhere and may roll off.
- Let set until firm then slice into bars. Store in an airtight container for up to 3 days. To freeze, let cool completely then cut into bars and wrap each individual bar in wax paper and freeze in an airtight container for up to 3 months.: Melt the last cup of chocolate chips until silky, transfer to a small plastic bag, cut a tiny corner, and drizzle a decorative pattern over the marshmallows. The thin ribbons of chocolate add visual contrast and an extra hit of chocolate in every bite. Be careful with the drizzle temperature, if too hot it can cause the marshmallows to collapse.
- Let set until firm then slice into bars: Allow the assembled pan to cool at room temperature until everything firms up, you will notice the chocolate lose its glossy wobble and the marshmallows become tender but set. Slice into 24 bars with a sharp knife for clean edges. If you try to cut too soon the layers will smear, so patience yields neater bars. Store in an airtight container for up to 3 days, or freeze individually wrapped for longer storage.
Notes
- Freshness matters Be sure to use fresh Rice Krispies Cereal and mini marshmallows as stale ingredients can lead to dry or grainy texture.
- Chocolate temperature Melt chocolate chips gently at medium low power or in short bursts at 50 percent power to maintain a glossy finish and to avoid grainy, seized chocolate.
- Pressing technique Use sprayed wax paper or a silicone spatula when pressing the cereal mixture into the pan to prevent sticking and to achieve an even density for clean slicing.
- Layer timing Spread each chocolate layer while it is warm and tacky, so the Graham crackers and marshmallows adhere properly without sliding.
- Storage Store the bars in an airtight container at room temperature for up to 3 days, or freeze individually wrapped for up to 3 months to preserve texture and flavor.