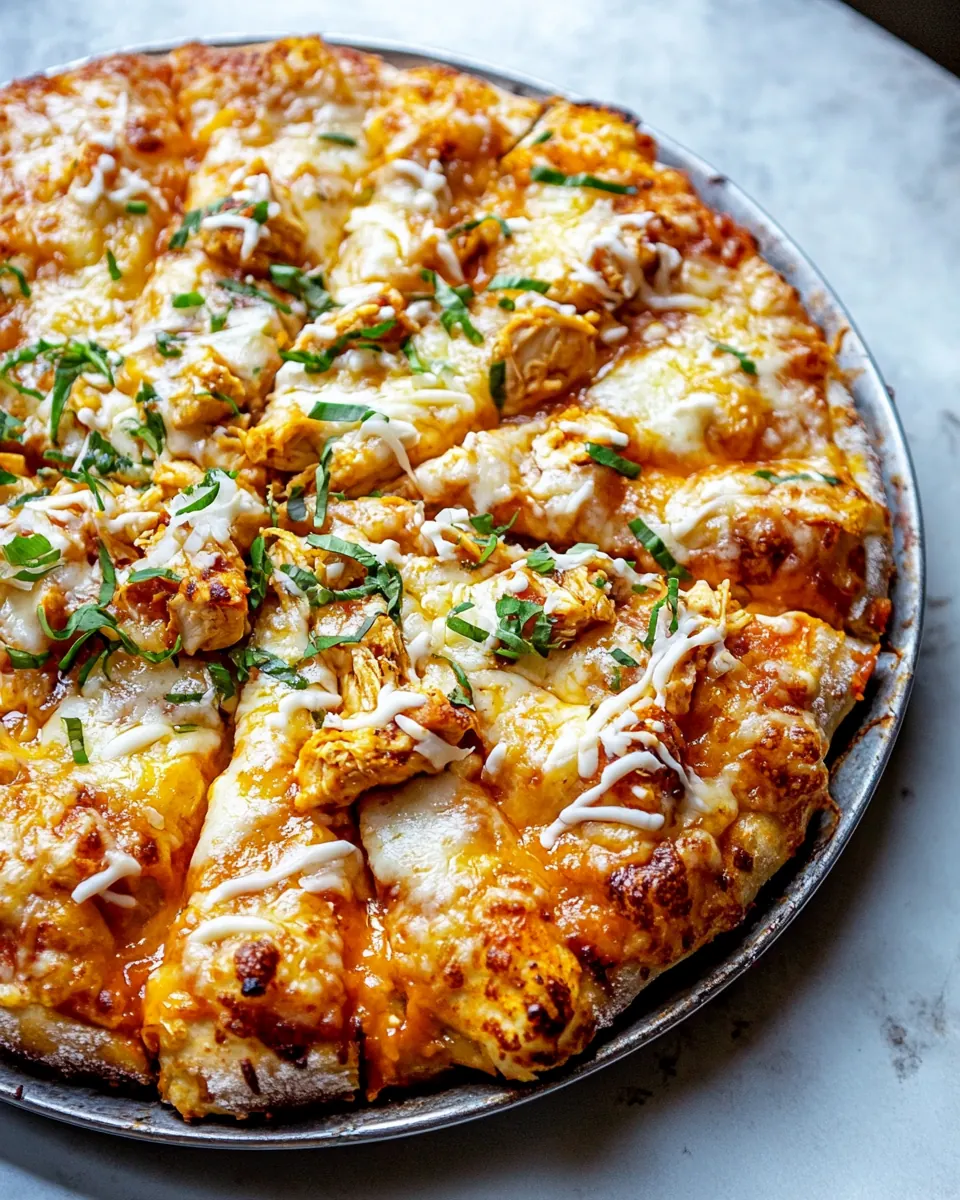
Skillet Crispy Cheese Buffalo Chicken Pizza
Skillet Crispy Cheese Buffalo Chicken Pizza is the kind of recipe I reach for when I want something bold, a little messy, and utterly satisfying; the first time I made it I was chasing that perfect crispy crust with bubbling, spicy cheese on top and it instantly became a crowd pleaser at my dinner table.
I remember the night clearly, the kitchen was warm, a cast iron skillet was still faintly seasoned from a previous meal, and I had leftover chicken that begged to be reimagined. I grabbed the dough, dusted my hands with flour, and pressed it into the skillet while the house filled with the smell of warm dough and garlic. As the cheese began to melt and brown, the buffalo aroma lifted, and everyone gathered, impatient but excited.
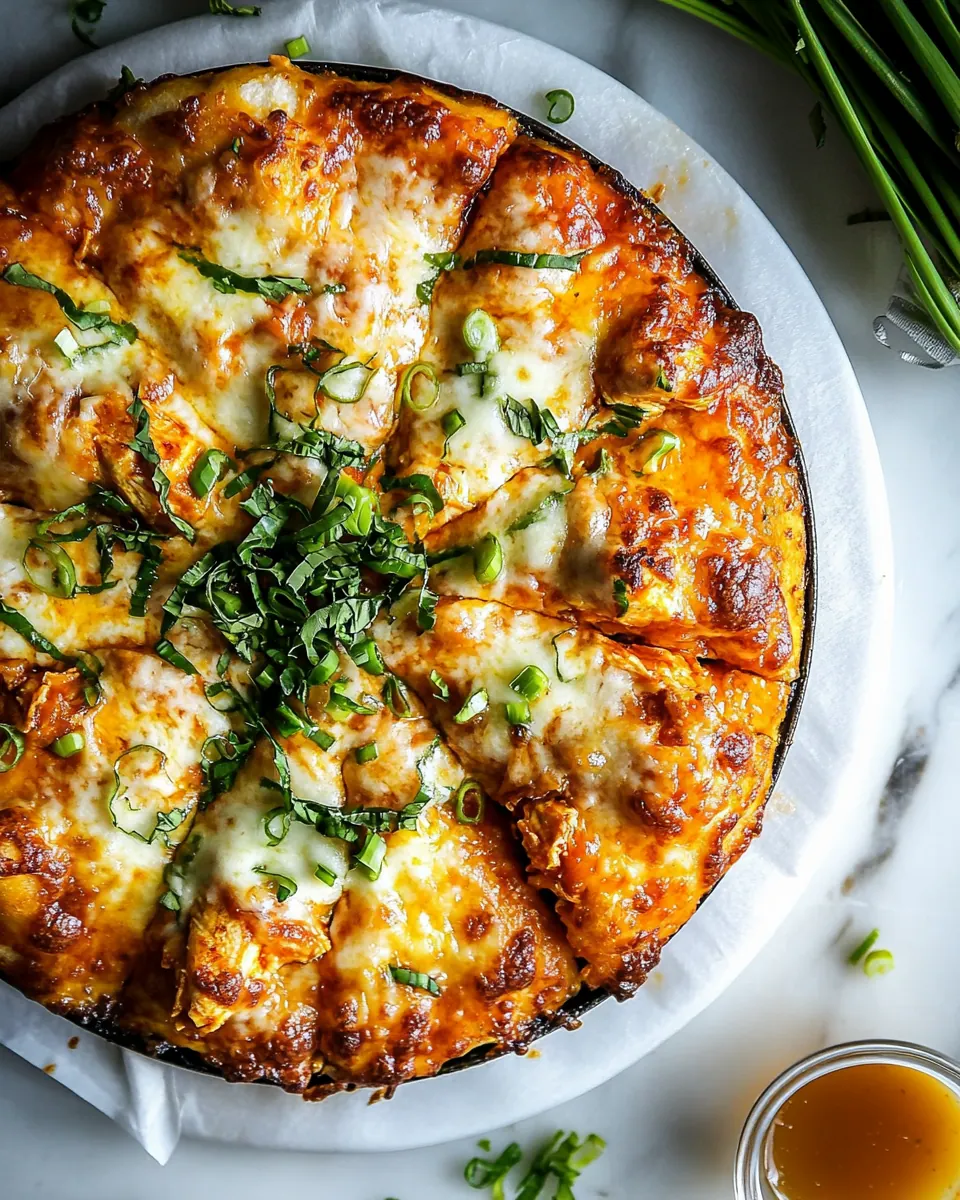
There is something almost theatrical about sliding a skillet into a screaming hot oven and then peeling it out when everything is glossy and crisp. We ended up tearing into slices straight from the pan, passing around ranch and extra buffalo to customize each bite. It felt informal, fun, and just the kind of food memory I like to make with friends and family.
Over time I’ve learned small tricks that make this version consistently great; from letting the dough rest in the skillet to layering cheeses for both melt and crisp, each choice plays a role. If you love bold flavors and crunchy edges, this dish will earn a spot in your regular rotation.
Recipe Snapshot
40 mins
15 mins
25 mins
Easy
420 kcal
American
Keto, Gluten-Free
Dinner
Cast iron skillet, Oven, Mixing bowl
What Sets This Skillet Crispy Cheese Buffalo Chicken Pizza Apart
Bold contrast of textures
I adore how Skillet Crispy Cheese Buffalo Chicken Pizza pairs a crunchy, skillet crisped crust with molten, stretchy cheese on top. The contrast between a golden, almost fried bottom and the gooey, blistered topping keeps every bite interesting. I pay close attention to heat and pan prep so that the crust gets that welcome crackle while the cheeses bubble without burning.
Layered spicy and creamy flavors
This pizza balances bright, tangy buffalo sauce with cooling ranch dressing and optional blue cheese for sharpness. I like how the buffalo hits you first and the dairy tones it down just enough, so each slice tastes complete. I often tweak the sauce ratio to suit company, because one person may want a straight heat hit while another prefers a gentler tang.
Speedy weeknight winner
Because the assembly is straightforward and most components can be prepped ahead, this recipe feels like a treat on a busy evening. I can use leftover chicken and shred it quickly, toss together the herb and garlic mix, and in less than an hour have a restaurant style pie. The method rewards good mise en place, which I always encourage for faster, calmer cooking.
Versatile and forgiving
I love that this pizza adapts to what you already have: use different herbs, swap cheeses lightly, or make the sauces ahead. The cast iron technique is forgiving too, giving you leeway with timing while still delivering a professional result. If something runs long in the oven, the crust still holds up and the flavors deepen.
Great for sharing and customizing
This is the sort of recipe where everyone gets to personalize their slice. I often set out extra buffalo sauce, ranch dressing, and chopped scallions so guests can finish their pizza exactly how they like it. It makes dinner social, relaxed, and a little playful.
Main Ingredients for Skillet Crispy Cheese Buffalo Chicken Pizza

The philosophy behind these ingredients is simple: build focused layers that each contribute texture and flavor. The dough forms the foundation and must crisp up against the cast iron for contrast. Cheeses are chosen to offer a mix of melt, creaminess, and browning. The chicken carries the sauce, while the buffalo sauce and ranch dressing create a bright, creamy, and spicy duet. Fresh herbs and garlic add brightness that keeps the pie from feeling one dimensional.
- 1 pound pizza dough, at room temperature: Bring to room temperature and stretch gently to form the pizza base, providing the chewy crust needed to hold toppings and crisp in a skillet.
- 1 cup cooked shredded chicken: Shred finely and toss with sauce so the meat distributes evenly; supplies protein and texture while soaking up buffalo flavor for every bite.
- 1/2 cup buffalo sauce (homemade sauce in notes): Coat the shredded chicken and drizzle over the dough to deliver spicy tang and moisture, acting as the primary flavor driver for the pizza.
- 1/2 cup fresh cilantro, basil, or parsley, chopped: Chop finely and scatter over the finished pizza to add bright, herbal freshness that balances the richness and heat from the buffalo sauce.
- 2 cloves garlic, grated: Grate and mix into sauces or sprinkle lightly to infuse aromatic depth and a subtle savory bite that complements the cheeses and chicken.
- chili flakes: Sprinkle sparingly to add concentrated heat and visual interest; provides optional smoky heat and enhances the overall spiciness of the pizza.
- 1/3 cup ranch dressing (homemade sauce in notes): Drizzle in ribbons or dollops to lend cool, creamy tang that mellows buffalo heat and creates a creamy contrast to the cheeses.
- 1/4 cup crumbled blue cheese () (optional): Crumble and distribute as an optional pungent, salty accent that offers a sharp, creamy counterpoint to the spicy buffalo flavors.
- 1 cup shredded whole milk provolone: Shred and layer generously to create a melty, slightly elastic cheese layer that contributes creaminess and excellent stretchiness when baked.
- 1 cup shredded cheddar cheese: Shred and scatter for sharp, savory flavor and golden browning; adds pronounced cheesiness and complements the other melting cheeses.
- 1/2 cup shredded whole milk mozzarella cheese: Shred and distribute to create gooey melt and mild milky richness that helps bind the toppings together and contributes to overall creaminess.
- 1/4 cup chopped scallions: Chop and sprinkle after baking to add a mild oniony crunch and fresh green color that brightens each slice with subtle bite.
How to Prepare Skillet Crispy Cheese Buffalo Chicken Pizza
These steps guide you through turning simple components into a blistered, crunchy skillet pizza. Read through before you begin so the oven timing and assembly feel seamless. Keep your sauces and cheeses close at hand for fast layering.
- Position the oven rack in the upper 1/3 portion of your oven. Preheat the oven to 500° F. for at least 30 minutes before baking, preferably 1-2 hours ahead. Place the pizza dough in a lightly oiled 10-12 inch cast iron skillet. Gently press the dough until it covers most of the skillet. Cover and let sit for 30 minutes or up to 2 hours. In a bowl, combine the fresh herbs, grated garlic, and a pinch of chili flakes. To assemble, grab the dough and top with provolone and blue cheese. Drizzle with the ranch and then some of the buffalo sauce. Layer on the chicken and more buffalo sauce. Sprinkle the garlicky herbs over the chicken, then add the cheddar and mozzarella cheese. Slide into the preheated oven and bake for 15 minutes; rotate the pan, and bake another 3-5 minutes or until the crust is golden and the cheese has melted and is crispy. Top the pizza with scallions, additional buffalo sauce and/or ranch. ENJOY!: As the oven preheats, you will notice how positioning affects browning, with the upper third encouraging quicker top browning and cheese blistering. The heat radiates from above and below, so placing the rack a bit higher helps the cheese develop those appealing browned spots while the bottom continues to crisp against the hot skillet. You should smell a warm, toasty note as the oven approaches temperature, and you may hear faint ticking as the elements cycle. Why it matters, the elevated rack promotes mozzarella and cheddar browning without overcooking the crust. Common mistake, don't place the rack too low or the top will remain pale while the bottom burns.
- Preheat the oven to 500° F for at least 30 minutes before baking, preferably 1 to 2 hours ahead: A very hot oven and a thoroughly heated cast iron skillet create the dramatic sear the crust needs. When the skillet is screaming hot, the dough hitting the surface will sizzle audibly and release a toasty aroma almost immediately. That initial sizzle is a cue that the pan is hot enough to start forming a golden, crisp base. If you rush this step, the dough will sit in the pan and slowly heat through, leading to a denser, less crisp crust. Avoid common error, do not skip the long preheat; even small ovens benefit from patience here.
- Place the pizza dough in a lightly oiled 10 to 12 inch cast iron skillet: When the dough meets the oiled skillet you should feel it slide and settle, and the oil creates a protective layer that encourages browning rather than sticking. Press gently with your fingertips so the dough spreads evenly across the skillet, feeling for thin spots that might tear. This tactile moment tells you how relaxed the dough is; if it snaps back, give it more rest. A frequent issue is using too much flour while pressing, which can make the bottom dry; oil is a better ally here.
- Gently press the dough until it covers most of the skillet: A gentle, consistent pressure will coax the dough outward without tearing it, creating an even bed for toppings. You will notice the dough stretching and the surface smoothing under your palms, and a light rim forming at the edge. The goal is an even thickness so the skillet can crisp the bottom while the center cooks through. Overstretching leads to thin weak spots that can break once topped. A small hole can be patched by pinching a bit of dough from the edge and pressing it over.
- Cover and let sit for 30 minutes or up to 2 hours: Resting the dough in the skillet lets it relax and develop subtle air pockets, which become little pockets of chewiness after baking. During this time you may smell a faint yeasty scent as the dough proofs, and it will gently puff. The rest period also makes the dough easier to top and reduces spring back when you add cheeses. Beware of leaving it too long at warm room temperature, which can over proof and weaken structure, making the crust collapse in spots when baked.
- In a bowl, combine the fresh herbs, grated garlic, and a pinch of chili flakes: Mixing these aromatics creates a fragrant topping layer that brightens every bite. When you grate the garlic , volatile oils are released and the aroma becomes immediate and piercing, while the herbs add green, lively notes. The chili flakes provide a background warmth that ties to the buffalo sauce. This herb mixture prevents the pizza from tasting monotonous and adds visual flecks across the surface. One trap is letting the garlic sit too long mixed with salt, which can draw out moisture and become bitter; prepare it close to assembly.
- To assemble, grab the dough and top with provolone and blue cheese: As you layer cheeses, you will see them soften and begin to meld into a glossy blanket that will brown in the oven. The provolone acts as a melt base, while the crumbled blue cheese offers sharp, salty pops. The cheeses should be distributed so every slice has a balance of both. Visual cue, you want an even spread that still leaves room for the other ingredients. Common mistake, piling all cheese in the center can lead to a heavy, underbaked middle.
- Drizzle with the ranch and then some of the buffalo sauce: The interplay of creamy ranch dressing and spicy buffalo sauce forms pockets of contrasting flavor. When drizzled in moderation, the sauces bead on the cheeses and later bake into small glossy spots. The smell becomes tangy and complex, and you will see color variation where the buffalo pools. Avoid dousing the dough, as excess liquid will prevent crisping; a light hand ensures both flavor and texture succeed.
- Layer on the chicken and more buffalo sauce: Adding the shredded chicken now distributes protein across the pie; the pieces should be in small, even fragments so every bite is saucy and not dry. Tossing the chicken in a little buffalo before topping helps the meat meld into the cheese. You may hear slight settling sounds as the toppings compact. The mistake to watch for, large clumps of chicken create pockets that do not heat evenly and can result in a cold bite.
- Sprinkle the garlicky herbs over the chicken, then add the cheddar and mozzarella cheese: Layering the herbs before the final cheeses ensures their aroma infuses the toppings during baking. Adding cheddar and mozzarella on top creates a multi textured melt with golden spots and stretchy strings. As the oven heat hits, you will see the cheeses turn from matte to glossy, then bubble and brown. Resist the urge to open the oven too early, which can interrupt browning and cause heat loss; peek only when the recommended time approaches.
- Slide into the preheated oven and bake for 15 minutes then rotate the pan, and bake another 3 to 5 minutes or until the crust is golden and the cheese has melted and is crispy: Baking at very high heat produces an audible and aromatic transformation, with popping cheese edges and a deep golden rim. The rotation helps achieve even browning because home ovens often have hot spots. Visual cues to look for include bubbles in the cheese that are beginning to brown and a fragrant toasty scent. If the crust is still pale after the time, give it a few extra minutes but watch closely to prevent burning. A common error is underbaking due to low oven temperature; confirm your oven is at the full 500° F and the skillet was hot.
- Top the pizza with scallions, additional buffalo sauce and or ranch: Finishing touches add crunch and bright flavor contrast; the cool scallions and extra drizzle refresh the palate against hot, melty cheese. You will notice a pop of green and a fresh onion perfume when the pizza is sliced. Serve immediately so textures remain at their peak. Avoid letting the pizza sit too long, which will soften the crust and mute the top freshness.
How to Switch It Up

This section offers practical ways to vary the Skillet Crispy Cheese Buffalo Chicken Pizza without losing what makes it special. Each tip below starts with a focused idea and then expands into how and why to use it in your cooking.
- Try different herb finishes: Swap between cilantro, basil, or parsley at the end to vary the brightness. Cilantro gives a citrusy lift, basil adds sweet aromatic notes, and parsley offers a clean green finish. Each herb pairs differently with the buffalo chill, so pick based on the mood you want.
- Adjust the buffalo to ranch ratio: If you like more heat, increase buffalo and reduce ranch before baking, or keep ranch on the side for dipping. The balance determines whether the pizza feels zesty or creamy, so taste and tweak according to your guests.
- Use a blend of cheeses for texture: Combining provolone for melt, mozzarella for stretch, and cheddar for bite gives complex texture and flavor; distribute them so no single cheese dominates. Freshly shredding them improves melt and avoids anti caking residues.
- Pre toss the chicken in sauce: Coating the shredded chicken lightly with buffalo ensures the meat carries flavor and stays moist while baking. This step prevents dry pockets and integrates the spice into the protein.
- Finish with fresh scallions and extra sauce: Add chopped scallions for crunch and color after baking, and offer extra buffalo and ranch so diners can customize each slice. Cold toppings contrast nicely with hot melty cheese.
- Control oven heat for desired crust: If you prefer a softer crust, reduce oven temp slightly and extend bake time; for maximum crisp, stick to a very hot oven and shorter bake. Know your oven’s hot spots and adjust placement accordingly.
Perfect Matches for Skillet Crispy Cheese Buffalo Chicken Pizza
This pizza is versatile for many occasions and pairs beautifully with simple sides and serving styles. Serve it hot from the skillet for a casual family meal, or portion onto boards for a party where guests can top their slices.
- Side salad: A crisp green salad with a light vinaigrette complements the spicy, rich pizza and provides a refreshing contrast.
- Vegetable crudités: Sliced carrots, celery, and cucumber are classic companions with buffalo flavors and offer crunch and cooling between bites.
- Game night: Serve this pizza for informal gatherings where finger food and sharable plates make socializing easy.
- Weeknight dinner: Because assembly is quick, it’s an excellent easy weeknight dinner that feels indulgent without long prep.
- Storage tips: Cool completely, then store in an airtight container in the refrigerator for up to three days; reheat in a hot skillet to revive crispness rather than microwaving which softens the crust.
- Seasonal pairings: In cooler months serve with heartier sides like roasted vegetables; in warmer months, pair with light, herb forward salads to keep the meal balanced.
FAQ
Conclusion
What makes this pizza special is the satisfying contrast between a skillet crisped crust and molten, browned cheeses layered with tangy buffalo and creamy ranch, all held together by tender shredded chicken. Give it a try the next time you want a social, flavorful meal that feels indulgent without lengthy prep. It’s forgiving, versatile, and perfect for sharing, so have your sauces and scallions ready and enjoy the fun of customizing each slice.

Skillet Crispy Cheese Buffalo Chicken Pizza
Equipment
- Cast-Iron Skillet
- Oven
- Mixing Bowl
Ingredients
- 1 pound pizza dough, at room temperature Bring to room temperature and stretch gently to form the pizza base, providing the chewy crust needed to hold toppings and crisp in a skillet.
- 1 cup cooked shredded chicken Shred finely and toss with sauce so the meat distributes evenly; supplies protein and texture while soaking up buffalo flavor for every bite.
- 1/2 cup buffalo sauce (homemade sauce in notes) Coat the shredded chicken and drizzle over the dough to deliver spicy tang and moisture, acting as the primary flavor driver for the pizza.
- 1/2 cup fresh cilantro, basil, or parsley, chopped Chop finely and scatter over the finished pizza to add bright, herbal freshness that balances the richness and heat from the buffalo sauce.
- 2 cloves garlic, grated Grate and mix into sauces or sprinkle lightly to infuse aromatic depth and a subtle savory bite that complements the cheeses and chicken.
- chili flakes Sprinkle sparingly to add concentrated heat and visual interest; provides optional smoky heat and enhances the overall spiciness of the pizza.
- 1/3 cup ranch dressing (homemade sauce in notes) Drizzle in ribbons or dollops to lend cool, creamy tang that mellows buffalo heat and creates a creamy contrast to the cheeses.
- 1/4 cup crumbled blue cheese (optional) Crumble and distribute as an optional pungent, salty accent that offers a sharp, creamy counterpoint to the spicy buffalo flavors.
- 1 cup shredded whole milk provolone Shred and layer generously to create a melty, slightly elastic cheese layer that contributes creaminess and excellent stretchiness when baked.
- 1 cup shredded cheddar cheese Shred and scatter for sharp, savory flavor and golden browning; adds pronounced cheesiness and complements the other melting cheeses.
- 1/2 cup shredded whole milk mozzarella cheese Shred and distribute to create gooey melt and mild milky richness that helps bind the toppings together and contributes to overall creaminess.
- 1/4 cup chopped scallions Chop and sprinkle after baking to add a mild oniony crunch and fresh green color that brightens each slice with subtle bite.
Instructions
- Position the oven rack in the upper 1/3 portion of your oven. Preheat the oven to 500° F. for at least 30 minutes before baking, preferably 1-2 hours ahead. Place the pizza dough in a lightly oiled 10-12 inch cast iron skillet. Gently press the dough until it covers most of the skillet. Cover and let sit for 30 minutes or up to 2 hours. In a bowl, combine the fresh herbs, grated garlic, and a pinch of chili flakes. To assemble, grab the dough and top with provolone and blue cheese. Drizzle with the ranch and then some of the buffalo sauce. Layer on the chicken and more buffalo sauce. Sprinkle the garlicky herbs over the chicken, then add the cheddar and mozzarella cheese. Slide into the preheated oven and bake for 15 minutes; rotate the pan, and bake another 3-5 minutes or until the crust is golden and the cheese has melted and is crispy. Top the pizza with scallions, additional buffalo sauce and/or ranch. ENJOY!: As the oven preheats, you will notice how positioning affects browning, with the upper third encouraging quicker top browning and cheese blistering. The heat radiates from above and below, so placing the rack a bit higher helps the cheese develop those appealing browned spots while the bottom continues to crisp against the hot skillet. You should smell a warm, toasty note as the oven approaches temperature, and you may hear faint ticking as the elements cycle. Why it matters, the elevated rack promotes mozzarella and cheddar browning without overcooking the crust. Common mistake, don't place the rack too low or the top will remain pale while the bottom burns.
- Preheat the oven to 500° F for at least 30 minutes before baking, preferably 1 to 2 hours ahead: A very hot oven and a thoroughly heated cast iron skillet create the dramatic sear the crust needs. When the skillet is screaming hot, the dough hitting the surface will sizzle audibly and release a toasty aroma almost immediately. That initial sizzle is a cue that the pan is hot enough to start forming a golden, crisp base. If you rush this step, the dough will sit in the pan and slowly heat through, leading to a denser, less crisp crust. Avoid common error, do not skip the long preheat; even small ovens benefit from patience here.
- Place the pizza dough in a lightly oiled 10 to 12 inch cast iron skillet: When the dough meets the oiled skillet you should feel it slide and settle, and the oil creates a protective layer that encourages browning rather than sticking. Press gently with your fingertips so the dough spreads evenly across the skillet, feeling for thin spots that might tear. This tactile moment tells you how relaxed the dough is; if it snaps back, give it more rest. A frequent issue is using too much flour while pressing, which can make the bottom dry; oil is a better ally here.
- Gently press the dough until it covers most of the skillet: A gentle, consistent pressure will coax the dough outward without tearing it, creating an even bed for toppings. You will notice the dough stretching and the surface smoothing under your palms, and a light rim forming at the edge. The goal is an even thickness so the skillet can crisp the bottom while the center cooks through. Overstretching leads to thin weak spots that can break once topped. A small hole can be patched by pinching a bit of dough from the edge and pressing it over.
- Cover and let sit for 30 minutes or up to 2 hours: Resting the dough in the skillet lets it relax and develop subtle air pockets, which become little pockets of chewiness after baking. During this time you may smell a faint yeasty scent as the dough proofs, and it will gently puff. The rest period also makes the dough easier to top and reduces spring back when you add cheeses. Beware of leaving it too long at warm room temperature, which can over proof and weaken structure, making the crust collapse in spots when baked.
- In a bowl, combine the fresh herbs, grated garlic, and a pinch of chili flakes: Mixing these aromatics creates a fragrant topping layer that brightens every bite. When you grate the garlic , volatile oils are released and the aroma becomes immediate and piercing, while the herbs add green, lively notes. The chili flakes provide a background warmth that ties to the buffalo sauce. This herb mixture prevents the pizza from tasting monotonous and adds visual flecks across the surface. One trap is letting the garlic sit too long mixed with salt, which can draw out moisture and become bitter; prepare it close to assembly.
- To assemble, grab the dough and top with provolone and blue cheese: As you layer cheeses, you will see them soften and begin to meld into a glossy blanket that will brown in the oven. The provolone acts as a melt base, while the crumbled blue cheese offers sharp, salty pops. The cheeses should be distributed so every slice has a balance of both. Visual cue, you want an even spread that still leaves room for the other ingredients. Common mistake, piling all cheese in the center can lead to a heavy, underbaked middle.
- Drizzle with the ranch and then some of the buffalo sauce: The interplay of creamy ranch dressing and spicy buffalo sauce forms pockets of contrasting flavor. When drizzled in moderation, the sauces bead on the cheeses and later bake into small glossy spots. The smell becomes tangy and complex, and you will see color variation where the buffalo pools. Avoid dousing the dough, as excess liquid will prevent crisping; a light hand ensures both flavor and texture succeed.
- Layer on the chicken and more buffalo sauce: Adding the shredded chicken now distributes protein across the pie; the pieces should be in small, even fragments so every bite is saucy and not dry. Tossing the chicken in a little buffalo before topping helps the meat meld into the cheese. You may hear slight settling sounds as the toppings compact. The mistake to watch for, large clumps of chicken create pockets that do not heat evenly and can result in a cold bite.
- Sprinkle the garlicky herbs over the chicken, then add the cheddar and mozzarella cheese: Layering the herbs before the final cheeses ensures their aroma infuses the toppings during baking. Adding cheddar and mozzarella on top creates a multi textured melt with golden spots and stretchy strings. As the oven heat hits, you will see the cheeses turn from matte to glossy, then bubble and brown. Resist the urge to open the oven too early, which can interrupt browning and cause heat loss; peek only when the recommended time approaches.
- Slide into the preheated oven and bake for 15 minutes then rotate the pan, and bake another 3 to 5 minutes or until the crust is golden and the cheese has melted and is crispy: Baking at very high heat produces an audible and aromatic transformation, with popping cheese edges and a deep golden rim. The rotation helps achieve even browning because home ovens often have hot spots. Visual cues to look for include bubbles in the cheese that are beginning to brown and a fragrant toasty scent. If the crust is still pale after the time, give it a few extra minutes but watch closely to prevent burning. A common error is underbaking due to low oven temperature; confirm your oven is at the full 500° F and the skillet was hot.
- Top the pizza with scallions, additional buffalo sauce and or ranch: Finishing touches add crunch and bright flavor contrast; the cool scallions and extra drizzle refresh the palate against hot, melty cheese. You will notice a pop of green and a fresh onion perfume when the pizza is sliced. Serve immediately so textures remain at their peak. Avoid letting the pizza sit too long, which will soften the crust and mute the top freshness.
Notes
- Try different herb finishes: Swap between cilantro, basil, or parsley at the end to vary the brightness. Cilantro gives a citrusy lift, basil adds sweet aromatic notes, and parsley offers a clean green finish. Each herb pairs differently with the buffalo chill, so pick based on the mood you want.
- Adjust the buffalo to ranch ratio: If you like more heat, increase buffalo and reduce ranch before baking, or keep ranch on the side for dipping. The balance determines whether the pizza feels zesty or creamy, so taste and tweak according to your guests.
- Use a blend of cheeses for texture: Combining provolone for melt, mozzarella for stretch, and cheddar for bite gives complex texture and flavor; distribute them so no single cheese dominates. Freshly shredding them improves melt and avoids anti caking residues.
- Pre toss the chicken in sauce: Coating the shredded chicken lightly with buffalo ensures the meat carries flavor and stays moist while baking. This step prevents dry pockets and integrates the spice into the protein.
- Finish with fresh scallions and extra sauce: Add chopped scallions for crunch and color after baking, and offer extra buffalo and ranch so diners can customize each slice. Cold toppings contrast nicely with hot melty cheese.
- Control oven heat for desired crust: If you prefer a softer crust, reduce oven temp slightly and extend bake time; for maximum crisp, stick to a very hot oven and shorter bake. Know your oven’s hot spots and adjust placement accordingly.