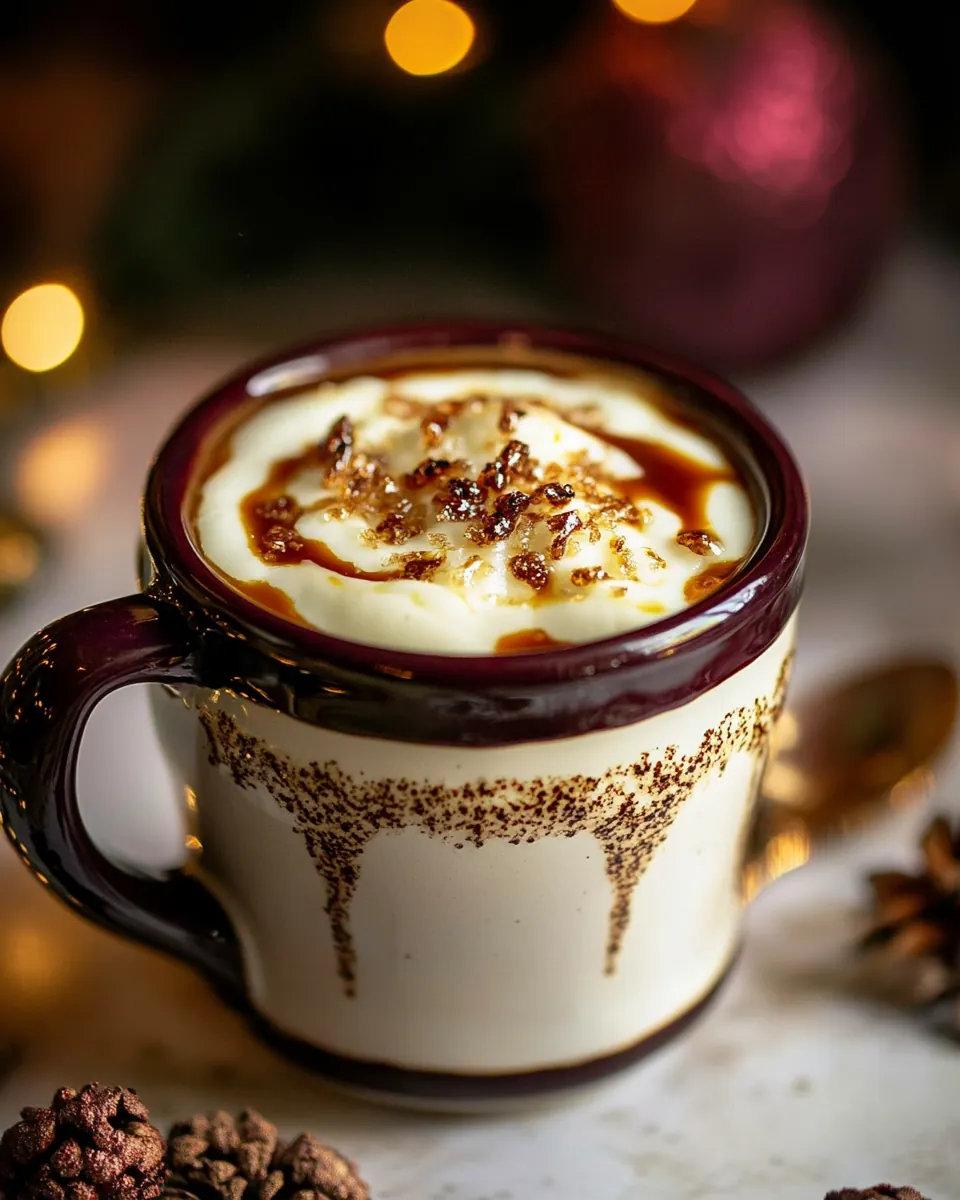
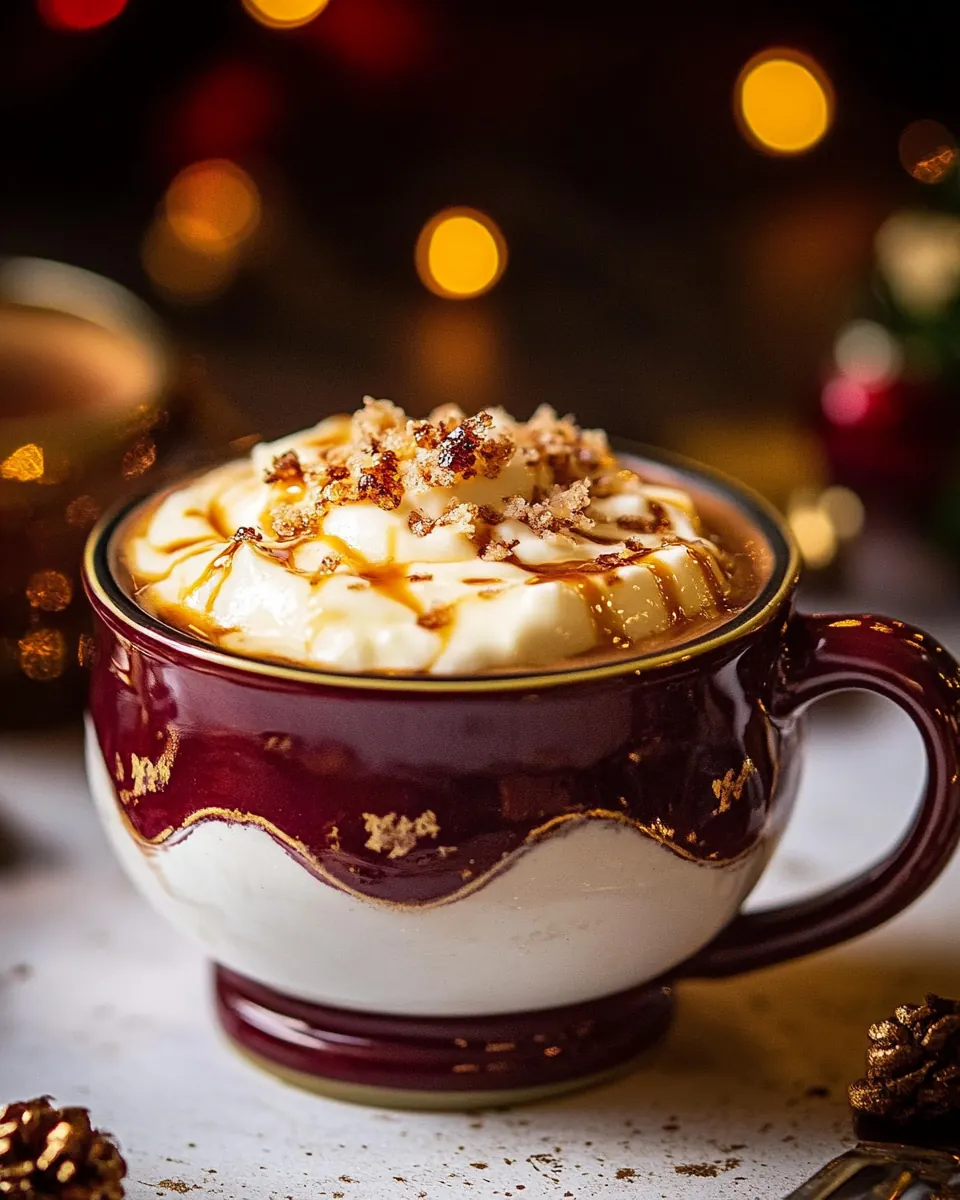
Salted Caramel Brulee Latte
Salted Caramel Brulee Latte is the kind of cozy pick me up I reach for on crisp mornings when I want a little treat that still feels grown up. The first time I made it, I was chasing the memory of a coffee shop moment, determined to nail that crackly brûlée topping and the warm, caramel kissed milk that made each sip feel indulgent without being over the top.
I remember standing at my stove with the windows steamed slightly from the heat, stirring the sugar until it melted into a deep amber and flooded the kitchen with a nutty, almost toasty perfume. There is something quietly ritualistic about spooning shards of caramel into warm milk, then whisking until the surface shimmers and froths.
For me, Salted Caramel Brulee Latte became a weekend ceremony and an easy way to make ordinary mornings feel special. I love how the flaky sea salt cuts through the sweetness, and how the whipped cream adds that soft, pillowy finish. It is also wonderfully flexible, so whether I am using whole milk, a creamy coconut milk, or another nut milk, the drink keeps its soulful charm.
Recipe Snapshot
30 mins
15 mins
15 mins
Easy
350 kcal
American
Gluten-Free, Low FODMAP
Desserts
Medium pot, Heat proof spatula, Baking sheet, Parchment paper, Small whisk, Mugs
The Beauty of This Salted Caramel Brulee Latte
Bold, balanced flavor
I adore how the Salted Caramel Brulee Latte balances sweet and savory. The caramel brings deep, toasted sugar notes, and the flaky sea salt lifts the whole drink so it never becomes cloying. When I sip it slowly, I notice layers rather than a single blast of sugar.
Textural contrast that sings
The touch of crunchy caramel shards against the smooth, foamy milk and pillowy whipped cream creates a delightful mouthfeel. I like providing contrast in desserts and drinks, and this recipe gives that crunchy versus creamy interplay in every cup.
Adaptable to preference
I often switch the milk for a plant based option and still get a luxuriously creamy result. You can also vary the strength of the espresso or brewed black coffee to suit your caffeine tolerance or flavor preference, so it works for many mornings or cozy afternoons.
Simple, impressive technique
Caramelizing sugar and torching or cracking shards may sound fancy, but I find the method approachable. Once you taste homemade caramel folded into steaming milk, you see why it is worth the little extra attention. Guests are always impressed, and you get a moment of calm craftsmanship in an otherwise busy day.
Perfect for gifting and gatherings
I like making a batch of burnt caramel shards to tuck into jars as a small gift, or to set out when friends drop by. The recipe scales easily, and the aroma fills the kitchen with comforting notes that make people pause and smile.
What Goes Into Salted Caramel Brulee Latte
These ingredients are all about building layers of flavor and texture. The key players are the granulated sugar that becomes golden caramel, the pinch of flaky sea salt that pulls the sweetness into focus, the creamy milk that carries the caramel flavor, and the bold caffeine element from espresso or black coffee. Each item has a simple job and they work together to create a luxurious cup.
- 3/4 cup granulated sugar: Caramelize granulated sugar over medium heat to create a rich, crunchy brûlée topping and a base for salted caramel; carefully monitor color to avoid burning and stir gently until amber. Use most of it to coat ramekins or to sprinkle atop the latte for an indulgent hardened crust, reserving a small amount if needed to sweeten the drink itself.
- flaky sea salt: Enhance add a small pinch of flaky sea salt to balance sweetness and intensify caramel and coffee flavors; sprinkle lightly so the salt crystals provide occasional bursts of briny contrast. Use on top of the brûlée layer or blended into the latte to create the signature salted caramel profile without overwhelming the beverage.
- 2 cups whole milk, coconut milk, or other nut milk: Steam or heat whole milk, coconut milk, or another nut milk to provide a creamy, frothy base that carries the caramel and coffee flavors; choose milk according to desired richness and texture. Froth to produce microfoam for latte art and to create a silky mouthfeel that complements the brûlée topping.
- 2 3 tablespoons caramel sauce, homemade or store-bought: Sweeten add 2–3 tablespoons of caramel sauce to build concentrated caramel flavor; stir into the hot milk so it melts evenly and infuses the drink. Use homemade for deeper complexity or store–bought for convenience, adjusting quantity to taste for desired sweetness and viscosity.
- 1 teaspoon vanilla extract: Flavor add a teaspoon of vanilla extract to deepen aromatic complexity and round out the caramel and coffee notes; incorporate into the milk or caramel mixture for even distribution. Use pure vanilla for the best aroma, which helps lift the overall warmth of the latte without adding sweetness.
- 3 4 shots espresso, or 1/2 cup brewed black coffee: Brew pull 3–4 shots of espresso or prepare 1/2 cup brewed black coffee to provide a strong, bitter backbone that balances the sweet caramel and creamy milk. Pour hot into the prepared caramel–milk mixture so the roast character cuts through richness and creates a classic latte structure.
- whipped cream, for serving (homemade recipe in notes): Garnish top with whipped cream for serving to add light, airy richness and a visual finishing touch; spoon or pipe over the latte before adding a brûlée crust. Optionally torch a thin layer of sugar atop the cream for a caramelized finish, enhancing texture and presentation.
The Method for Salted Caramel Brulee Latte

This recipe moves from making a crunchy caramel shard to marrying that caramel with steaming milk and bright espresso or black coffee. The following steps guide you through sensory cues and troubleshooting so the final cups are rich, balanced, and visually tempting.
- Line a baking sheet with parchment paper. In a medium pot, cook the sugar over medium heat, stirring occasionally with a heat-proof spatula until the sugar has melted and turns a golden caramel, about 8 minutes. Remove from the heat and carefully pour the caramel onto the prepared baking sheet. Spread in a thin, even layer and sprinkle with flaky sea salt. Let sit 5 minutes. Once hardened, crush the caramel into small pieces/shards with the back of a spoon. Combine the milk, caramel, and a pinch of salt in a medium pot and bring to a simmer, heat until steaming. Add the vanilla. Using a small whisk or a fork, whisk until frothy. Remove from the heat. Divide the espresso between 2 mugs. Pour over the caramel milk. Top with whipped cream and a sprinkle of caramel brûlée. Drink up!: The parchment prevents the molten caramel from sticking as it cools into shards. You should notice a smooth surface ready to catch the caramel, which will make breaking it off simple. A common mistake is skipping the parchment, which makes cleaning difficult and can shatter the caramel into too small pieces.
- In a medium pot, cook the sugar over medium heat, stirring occasionally with a heat proof spatula until the sugar has melted and turns a golden caramel about 8 minutes: As the sugar melts you will first see granules liquefy then start to deepen into amber. The aroma shifts from sweet to nutty, almost toasted. Stir gently and steadily, scraping the sides so no crystals remain. Watch closely because sugar can go from golden to burnt quickly. If it smokes or smells acrid, it has gone too far and you should start over.
- Remove from the heat and carefully pour the caramel onto the prepared baking sheet: When you lift the pot from the heat, the bubbling calms and the liquid caramel becomes glossy. Pour in a steady stream to avoid splattering. The surface should settle into a thin sheet, and you will hear a faint sizzling as it contacts the cool paper. Avoid touching it until it firms, hot sugar will cause severe burns.
- Spread in a thin, even layer and sprinkle with flaky sea salt: Use the back of a spoon to spread quickly and evenly so the shards are uniform. The sea salt will glisten and adhere to the warm caramel, creating a visual cue that the flavor contrast is locked in. If you leave the layer too thick it will take longer to cool and be harder to break into desired pieces.
- Let sit 5 minutes: During these minutes the caramel transforms from a viscous sheet to a firm, glass like layer. You will notice it lose its glossy jiggle and become solid. Rushing this step can trap heat and make shards bend instead of snapping, so be patient and let it set completely.
- Once hardened crush the caramel into small pieces shards with the back of a spoon: The cracking sound is part of the joy here, and the texture you create will add that brûlée effect. Aim for a mix of tiny shards and slightly larger pieces so some melt into the drink and some remain crunchy. Take care to use a cloth barrier or hold the sheet steady, shards can fly when struck too forcefully.
- Combine the milk caramel and a pinch of salt in a medium pot and bring to a simmer heat until steaming: When the milk warms the caramel begins to dissolve, and the kitchen will fill with a decadent, toffee like scent. Steam should rise and small bubbles will appear at the edges, signaling the right temperature. Avoid a rolling boil since that can scald the milk and change the texture.
- Add the vanilla: Adding the vanilla after the heat is lowered preserves its aromatic profile, making the drink smell richer and more layered. Stir gently so the vanilla disperses evenly. The wrong moment to add it is during full boil which can diminish its brightness.
- Using a small whisk or a fork whisk until frothy: Vigorous whisking introduces air, creating a silky foam that feels luxurious on the tongue. You will see a glossy, frothy layer form on top and will hear a light, airy sound as bubbles break. Over whisking will dissipate the foam, so stop when you reach a smooth, silky froth.
- Remove from the heat: Taking the pot off the stove prevents further concentration and ensures the flavors remain balanced. The warm milk will continue to meld with the caramel for a minute off heat. Leaving it on can thicken it too much or cause scorching.
- Divide the espresso between 2 mugs: Freshly brewed espresso offers the bitter backbone that offsets sweetness. Pouring the hot brew into warmed mugs helps maintain temperature. If you pour into cold cups the drink will cool too quickly and lose aromatic intensity.
- Pour over the caramel milk: As the warm, caramel infused milk meets the concentrated espresso , you will see pretty swirls and steam rising. The mix should smell rich and inviting and the color will deepen to a latte like tan. If the textures separate, whisk gently in the mug to recombine.
- Top with whipped cream and a sprinkle of caramel brulee: The cool, airy whipped cream sits on top like a cloud, and a final scattering of the crushed caramel adds sparkle and crunch. The contrast of temperatures and textures is what makes each sip interesting. Beware of piling too much whipped cream, which can overpower the drink and mask the caramel notes.
- Drink up: Enjoy slowly so you can savor the progression from crunchy sweet to creamy bitter. Each mouthful reveals different balances, and the last sips often contain the best mix of melted caramel and coffee. A common mistake is rushing which means you miss the sensory crescendo this drink offers.
Helpful Hints

These tips will help you get the most from your Salted Caramel Brulee Latte. Each hint focuses on technique, timing, or small tweaks that elevate the drink. Read through them before you start so you are calm and prepared at the stove.
- Heavy pan matters: A heavy bottom saucepan helps the granulated sugar melt evenly and prevents localized scorching which ruins the caramel flavor.
- Control the heat: Cook the sugar over medium heat so you can watch the color change to a deep golden amber without burning it quickly.
- Use room temperature milk: Room temperature milk integrates with the caramel more smoothly and warms evenly, avoiding sudden curdling or scalding.
- Warm the cups: Preheating your mugs keeps the latte hotter longer and preserves the delicate froth when assembling.
- Make shards ahead: Prepare a batch of caramel shards and store in an airtight container for up to two weeks to save time on busy mornings.
- Adjust coffee strength: Start with the suggested amount of espresso or brewed black coffee and tweak in future batches to match your taste preferences.
Serving Ideas for Salted Caramel Brulee Latte
The Salted Caramel Brulee Latte is excellent as a morning treat, an afternoon pick me up, or a cozy beverage for gatherings. Serve it with simple pastries or as part of a dessert style coffee service. Below are serving suggestions, storage tips, and seasonal pairings that highlight how versatile this drink can be.
- Casual breakfast pairing: Serve alongside warm croissants or buttery scones so the flaky pastry complements the caramel and salt contrasts in the latte.
- Afternoon treat: Offer with a small plate of shortbread or biscotti, the simple buttery cookies balance the drink without competing with the caramel notes.
- Dessert board addition: Add the latte to a dessert board with dark chocolate pieces and fresh fruit to offer variety of textures and flavors to guests.
- Holiday beverage: This works well for cooler seasons and festive gatherings, use it as a non alcoholic signature drink for fall or winter events.
- Storage tips: Store extra crushed caramel shards in an airtight container at room temperature to keep them crisp. Keep any leftover warm caramel milk refrigerated and reheat gently, whisking to refresh foam.
- Seasonal twist: For autumn, pair with pumpkin spiced treats and for winter, present it with lightly spiced cookies to echo warming flavors.
FAQ
Conclusion
The Salted Caramel Brulee Latte is special because it marries crunchy caramel shards with velvety milk and bold coffee for a multi textured sip. You get a sweet toasted caramel depth balanced by flaky sea salt and bright coffee notes, making each cup feel curated. I hope you try this at home and pause to enjoy the process, from melting sugar to that satisfying crack of caramel. It is a small ritual that rewards attention and turns an ordinary moment into something a little celebratory.

Salted Caramel Brulee Latte
Equipment
- Medium Pot
- Heat proof spatula
- Baking Sheet
- Parchment Paper
- Small whisk
- Mugs
Ingredients
- 3/4 cup granulated sugar Caramelize granulated sugar over medium heat to create a rich, crunchy brûlée topping and a base for salted caramel; carefully monitor color to avoid burning and stir gently until amber. Use most of it to coat ramekins or to sprinkle atop the latte for an indulgent hardened crust, reserving a small amount if needed to sweeten the drink itself.
- flaky sea salt Enhance add a small pinch of flaky sea salt to balance sweetness and intensify caramel and coffee flavors; sprinkle lightly so the salt crystals provide occasional bursts of briny contrast. Use on top of the brûlée layer or blended into the latte to create the signature salted caramel profile without overwhelming the beverage.
- 2 cups whole milk, coconut milk, or other nut milk Steam or heat whole milk, coconut milk, or another nut milk to provide a creamy, frothy base that carries the caramel and coffee flavors; choose milk according to desired richness and texture. Froth to produce microfoam for latte art and to create a silky mouthfeel that complements the brûlée topping.
- 2 -3 tablespoons caramel sauce, homemade or store-bought Sweeten add 2–3 tablespoons of caramel sauce to build concentrated caramel flavor; stir into the hot milk so it melts evenly and infuses the drink. Use homemade for deeper complexity or store-bought for convenience, adjusting quantity to taste for desired sweetness and viscosity.
- 1 teaspoon vanilla extract Flavor add a teaspoon of vanilla extract to deepen aromatic complexity and round out the caramel and coffee notes; incorporate into the milk or caramel mixture for even distribution. Use pure vanilla for the best aroma, which helps lift the overall warmth of the latte without adding sweetness.
- 3 -4 shots espresso, or 1/2 cup brewed black coffee Brew pull 3–4 shots of espresso or prepare 1/2 cup brewed black coffee to provide a strong, bitter backbone that balances the sweet caramel and creamy milk. Pour hot into the prepared caramel-milk mixture so the roast character cuts through richness and creates a classic latte structure.
- whipped cream, for serving (homemade recipe in notes) Garnish top with whipped cream for serving to add light, airy richness and a visual finishing touch; spoon or pipe over the latte before adding a brûlée crust. Optionally torch a thin layer of sugar atop the cream for a caramelized finish, enhancing texture and presentation.
Instructions
- Line a baking sheet with parchment paper. In a medium pot, cook the sugar over medium heat, stirring occasionally with a heat-proof spatula until the sugar has melted and turns a golden caramel, about 8 minutes. Remove from the heat and carefully pour the caramel onto the prepared baking sheet. Spread in a thin, even layer and sprinkle with flaky sea salt. Let sit 5 minutes. Once hardened, crush the caramel into small pieces/shards with the back of a spoon. Combine the milk, caramel, and a pinch of salt in a medium pot and bring to a simmer, heat until steaming. Add the vanilla. Using a small whisk or a fork, whisk until frothy. Remove from the heat. Divide the espresso between 2 mugs. Pour over the caramel milk. Top with whipped cream and a sprinkle of caramel brûlée. Drink up!: The parchment prevents the molten caramel from sticking as it cools into shards. You should notice a smooth surface ready to catch the caramel, which will make breaking it off simple. A common mistake is skipping the parchment, which makes cleaning difficult and can shatter the caramel into too small pieces.
- In a medium pot, cook the sugar over medium heat, stirring occasionally with a heat proof spatula until the sugar has melted and turns a golden caramel about 8 minutes: As the sugar melts you will first see granules liquefy then start to deepen into amber. The aroma shifts from sweet to nutty, almost toasted. Stir gently and steadily, scraping the sides so no crystals remain. Watch closely because sugar can go from golden to burnt quickly. If it smokes or smells acrid, it has gone too far and you should start over.
- Remove from the heat and carefully pour the caramel onto the prepared baking sheet: When you lift the pot from the heat, the bubbling calms and the liquid caramel becomes glossy. Pour in a steady stream to avoid splattering. The surface should settle into a thin sheet, and you will hear a faint sizzling as it contacts the cool paper. Avoid touching it until it firms, hot sugar will cause severe burns.
- Spread in a thin, even layer and sprinkle with flaky sea salt: Use the back of a spoon to spread quickly and evenly so the shards are uniform. The sea salt will glisten and adhere to the warm caramel, creating a visual cue that the flavor contrast is locked in. If you leave the layer too thick it will take longer to cool and be harder to break into desired pieces.
- Let sit 5 minutes: During these minutes the caramel transforms from a viscous sheet to a firm, glass like layer. You will notice it lose its glossy jiggle and become solid. Rushing this step can trap heat and make shards bend instead of snapping, so be patient and let it set completely.
- Once hardened crush the caramel into small pieces shards with the back of a spoon: The cracking sound is part of the joy here, and the texture you create will add that brûlée effect. Aim for a mix of tiny shards and slightly larger pieces so some melt into the drink and some remain crunchy. Take care to use a cloth barrier or hold the sheet steady, shards can fly when struck too forcefully.
- Combine the milk caramel and a pinch of salt in a medium pot and bring to a simmer heat until steaming: When the milk warms the caramel begins to dissolve, and the kitchen will fill with a decadent, toffee like scent. Steam should rise and small bubbles will appear at the edges, signaling the right temperature. Avoid a rolling boil since that can scald the milk and change the texture.
- Add the vanilla: Adding the vanilla after the heat is lowered preserves its aromatic profile, making the drink smell richer and more layered. Stir gently so the vanilla disperses evenly. The wrong moment to add it is during full boil which can diminish its brightness.
- Using a small whisk or a fork whisk until frothy: Vigorous whisking introduces air, creating a silky foam that feels luxurious on the tongue. You will see a glossy, frothy layer form on top and will hear a light, airy sound as bubbles break. Over whisking will dissipate the foam, so stop when you reach a smooth, silky froth.
- Remove from the heat: Taking the pot off the stove prevents further concentration and ensures the flavors remain balanced. The warm milk will continue to meld with the caramel for a minute off heat. Leaving it on can thicken it too much or cause scorching.
- Divide the espresso between 2 mugs: Freshly brewed espresso offers the bitter backbone that offsets sweetness. Pouring the hot brew into warmed mugs helps maintain temperature. If you pour into cold cups the drink will cool too quickly and lose aromatic intensity.
- Pour over the caramel milk: As the warm, caramel infused milk meets the concentrated espresso , you will see pretty swirls and steam rising. The mix should smell rich and inviting and the color will deepen to a latte like tan. If the textures separate, whisk gently in the mug to recombine.
- Top with whipped cream and a sprinkle of caramel brulee: The cool, airy whipped cream sits on top like a cloud, and a final scattering of the crushed caramel adds sparkle and crunch. The contrast of temperatures and textures is what makes each sip interesting. Beware of piling too much whipped cream, which can overpower the drink and mask the caramel notes.
- Drink up: Enjoy slowly so you can savor the progression from crunchy sweet to creamy bitter. Each mouthful reveals different balances, and the last sips often contain the best mix of melted caramel and coffee. A common mistake is rushing which means you miss the sensory crescendo this drink offers.
Notes
- Heavy pan matters: A heavy bottom saucepan helps the granulated sugar melt evenly and prevents localized scorching which ruins the caramel flavor.
- Control the heat: Cook the sugar over medium heat so you can watch the color change to a deep golden amber without burning it quickly.
- Use room temperature milk: Room temperature milk integrates with the caramel more smoothly and warms evenly, avoiding sudden curdling or scalding.
- Warm the cups: Preheating your mugs keeps the latte hotter longer and preserves the delicate froth when assembling.
- Make shards ahead: Prepare a batch of caramel shards and store in an airtight container for up to two weeks to save time on busy mornings.
- Adjust coffee strength: Start with the suggested amount of espresso or brewed black coffee and tweak in future batches to match your taste preferences.