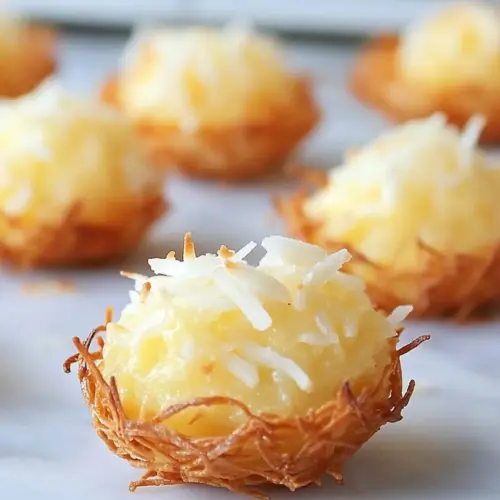
Coconut Macaroon Nests
Coconut Macaroon Nests are one of those recipes I reach for when I want something playful and nostalgic all at once. The first time I made them I was chasing an Easter memory from childhood, when tiny chocolate eggs were more exciting than the big things we saved up for. I remember standing by the counter, feeling the warm, sticky coconut mixture between my fingers as I shaped each little cup, thinking how a simple idea can feel so special.
Over the years I learned small tricks that make these nests shine. I started by gently cooking the egg whites and granulated sugar with sweetened coconut flakes, coaxing out a toasted aroma that fills the kitchen and hints at the texture to come. The almond note lifts the whole bite, while two mini chocolate eggs tucked in the center add a pop of color and nostalgia. I like to serve these at brunches and neighborhood potlucks because they travel well, and people always ask for the recipe.
Recipe Snapshot
60 mins
20 mins
40 mins
Medium
150 kcal
American
Gluten-Free, Low FODMAP
Desserts
Heavy saucepan, Mini muffin tin, Measuring spoon, Oven
Why We Love This Coconut Macaroon Nests
Comforting Texture That Pops
I adore how the combination of softly cooked egg whites and coconut flakes yields a nest that is crisp at the edges and tender inside. You get that satisfying contrast when you bite into one, the toasted coconut flavor coming through without feeling cloying.
Quick, Festive Presentation
I love that these nests look like they took hours to create, yet they come together with minimal fuss. Topping each with two mini chocolate eggs turns a simple cookie into a festive party piece, and the visual payoff always wins smiles.
Minimal Ingredients, Maximum Impact
There are only a handful of ingredients to manage, which is why I reach for this recipe when I want something reliable. Each item has a clear job: the granulated sugar sweetens and stabilizes, the egg whites bind, and the coconut flakes bring texture and flavor.
Hands On, But Relaxed
I enjoy the tactile process of pressing the mixture into mini muffin tins. It feels creative without requiring precision, and that hands on touch makes every batch feel personal. If you like projects that reward a little attention, these are for you.
Versatile for Occasions
We often make these for spring gatherings, but they work just as well for casual afternoons or dessert trays. They hold up well on a platter, travel easily, and pair beautifully with light coffee or tea. I always recommend making a double batch if you have a crowd.
Ingredients You’ll Need for Coconut Macaroon Nests
These ingredients are all about balance. The eggs and granulated sugar form a sticky, stabilizing base, while the sweetened coconut flakes provide bulk and flavor. Small touches like almond extract and vanilla extract round out the aromatics, and a pinch of salt keeps the sweetness from feeling flat. The cooking spray helps the nests release cleanly, and the mini Cadbury chocolate eggs finish each cup with a cheerful center.
- 3/4 cup from 5 large egg whites: Whisked to soft peaks, provides structure and lift to the macaroons while creating a light, airy texture; beaten egg whites also help bind the coconut and sugar together as they set during baking.
- 6 tbsp granulated sugar: Added gradually to stabilize the meringue and sweeten the mixture, melts slightly during baking to create chewy centers and a glossy exterior that helps brown the tops.
- 10 oz sweetened coconut flakes, I used Baker's: Folded into the whipped egg whites and sugar to supply the primary bulk and chewy texture; sweetened coconut flakes contribute flavor, chew, and the characteristic coconut aroma.
- 1/2 tsp almond extract: Added for a concentrated nutty, floral note that complements the coconut and enhances overall flavor complexity; a small amount brightens the finished cookies without overpowering them.
- 1/4 tsp vanilla extract: Included for warm, familiar sweetness and aromatic depth that rounds out the almond extract; a touch of vanilla enhances flavor harmony throughout the macaroons.
- pinch of salt: Sprinkled into the mixture to balance sweetness and heighten flavor contrast; a pinch of salt also helps stabilize the meringue and sharpen the overall taste.
- cooking spray: Used to lightly coat the baking tray or muffin tins so the nests release cleanly after baking, preventing sticking and preserving the shape and underside texture of each macaroon.
- 72 mini Cadbury chocolate eggs: Placed into the cooled coconut nests to serve as a decorative and flavorful centerpiece; the mini chocolate eggs add visual appeal, contrast in texture, and a sweet chocolate finish.
Recipe Directions for Coconut Macaroon Nests
These directions walk you through a simple, tactile process that rewards patience. The key is to build a sticky, cohesive mixture and then shape it into little cups that bake to a golden finish. Take your time with the stovetop step, because that is when flavor and texture develop.
- In a heavy saucepan combine egg whites, sugar and coconut flakes and cook over medium-low heat, stirring frequently until all the ingredients combine together, about 12 minutes. The mixture should be sticky and moist, not dry.: Warmth transforms these raw components into a cohesive, sticky mass, and during this time you will notice a gentle toasty aroma as the coconut softens and the granulated sugar starts to dissolve into the egg whites . Listen for a soft simmer rather than a vigorous boil, you want small, consistent bubbles not a roar, which prevents curdling. The texture should be tacky and moist, clinging together when pressed between fingers; if it seems dry, reduce heat and add a splash of water to bring it back. A common mistake here is rushing the heat, which can make the mixture grainy or overcooked. Stir constantly to ensure even cooking and to avoid hot spots that could brown the coconut too quickly.
- Remove from heat and stir in the almond and vanilla extracts.: The pan will still feel warm, and adding the almond extract and vanilla extract releases a fragrant steam that melds with the coconut scent. This step layers aromatic complexity into the nests, and for the best result work quickly so the extracts disperse evenly before the mixture cools. If you wait too long, the extracts will not integrate as well and pockets of stronger flavor can form. One pitfall is adding too much extract, which can make the flavor sharp and artificial, so measure carefully.
- Set aside and let it cool 10 minutes, should be warm.: Cooling slightly firms the mix and makes it workable, and during this rest you will feel the sticky mass change from fluid to tacky. Warm but not hot is ideal, because it lets you press the mixture without burning your fingers, and allows the structure to hold in the muffin tin. If the mixture is too hot, the nests will slump and lose shape; if it cools too long and becomes stiff, it will not press smoothly. To troubleshoot, if it cools too much, return briefly to low heat for a few moments to regain pliability, stirring constantly.
- Preheat the oven to 300°F. Spray a nonstick mini muffin tin with oil.: Preheating ensures even, gentle baking so the nests crisp slowly instead of browning too fast. The 300°F temperature creates a steady environment where moisture escapes evenly, allowing the coconut to toast without burning. Lightly spray the tin so the nests release cleanly; too much oil can make the bottoms greasy, while too little causes sticking. A common error is skipping preheating, which leads to uneven bake and poor texture.
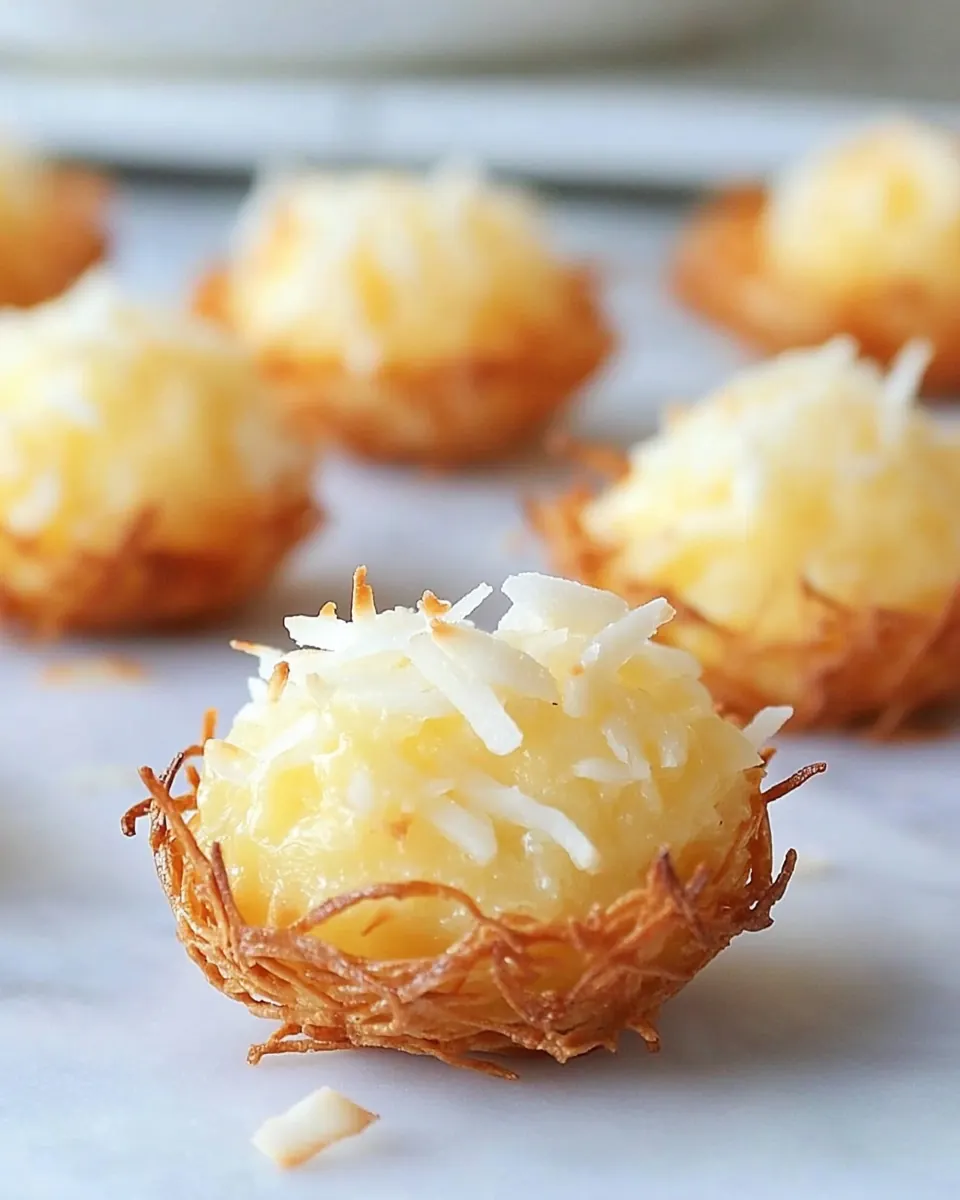
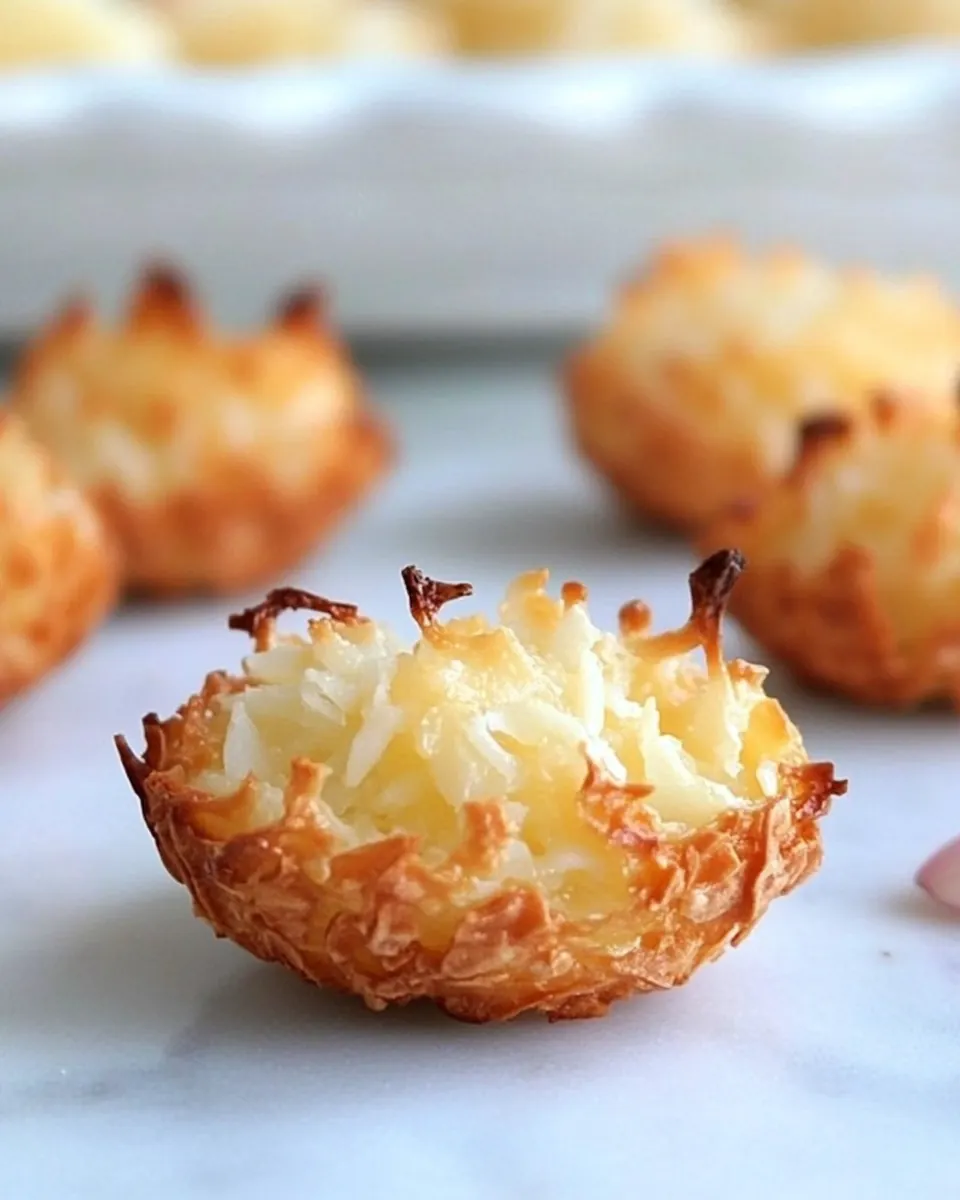
- Drop heaping tablespoons into the tin, lightly press mixture into the bottom and up the sides of the tin to make "nests" with the back of the measuring spoon.: As you press, you will feel the mixture give and hold shape. The visual cue is a smooth, even cup with a slightly compacted base and a textured rim from the coconut. Press firmly enough so the sides adhere, but not so firmly that the nests become overly dense; they should retain some air to crisp properly. Watch for inconsistent sizes, because uneven nests bake at different rates. If one side looks thin, gently reinforce it so the egg sits snugly later.
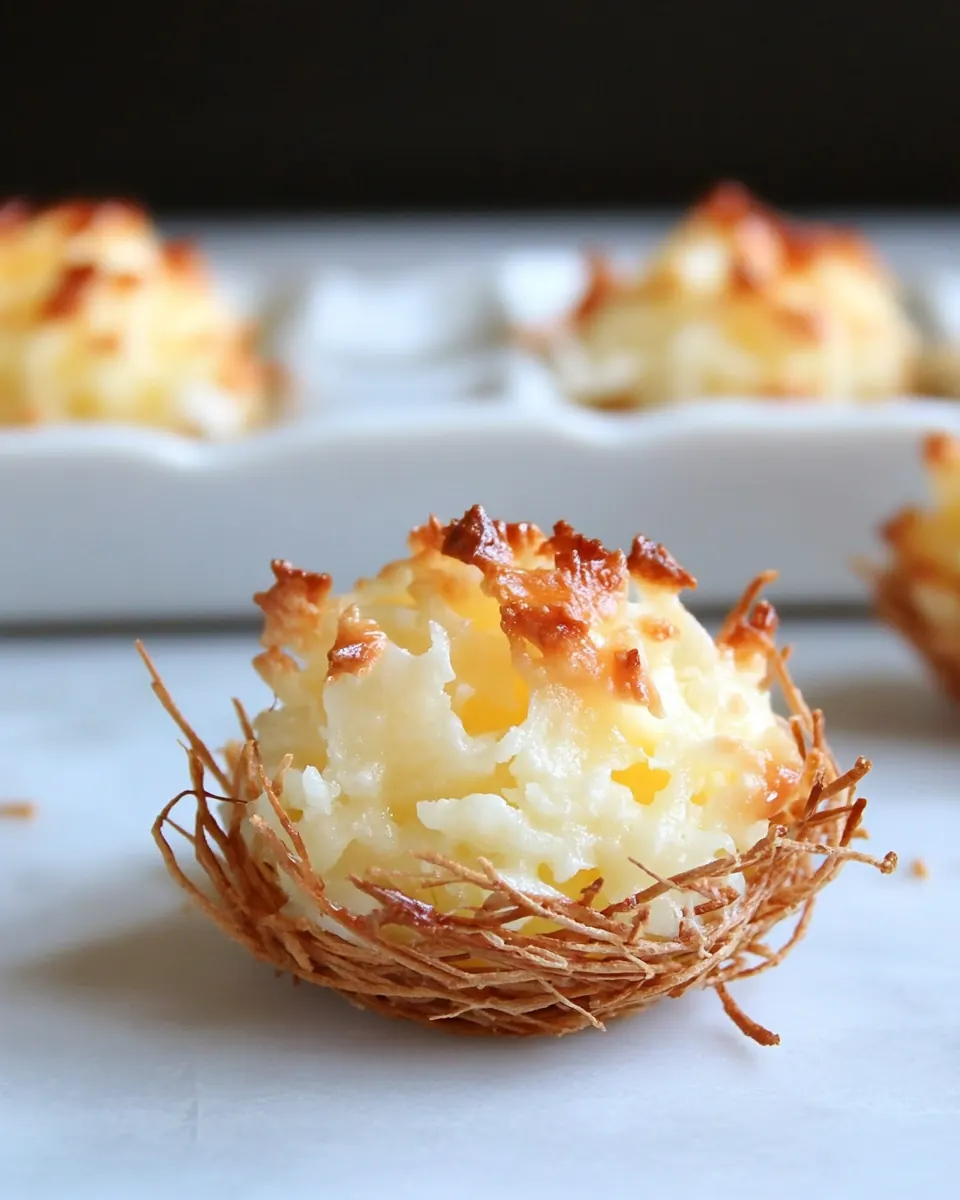
- Bake 22 to 25 minutes, or until golden.: During baking the scent will shift from warm coconut to a nutty amber note, and you will see the edges take on a light golden color while the centers stay slightly pale. The nests should feel set to the touch and hold their shape. Baking too long will dry them out and darken the coconut, while underbaking leaves them too soft to lift. A typical trap is opening the oven frequently which cools the chamber and prolongs bake time, so check only near the end of the suggested window.
- Let it cool 10 minutes, then carefully remove from the tin.: Cooling lets the nests stabilize so they release neatly. You may hear a faint crackle as steam leaves, and the bottoms will firm up. Use a small offset spatula or a gentle twist to ease them out; forcing them can break the delicate sides. If a nest sticks, warm the tin briefly in the oven for a minute to loosen the bond, then try again. The common mistake here is impatience, pulling them out too soon which causes crumbling.
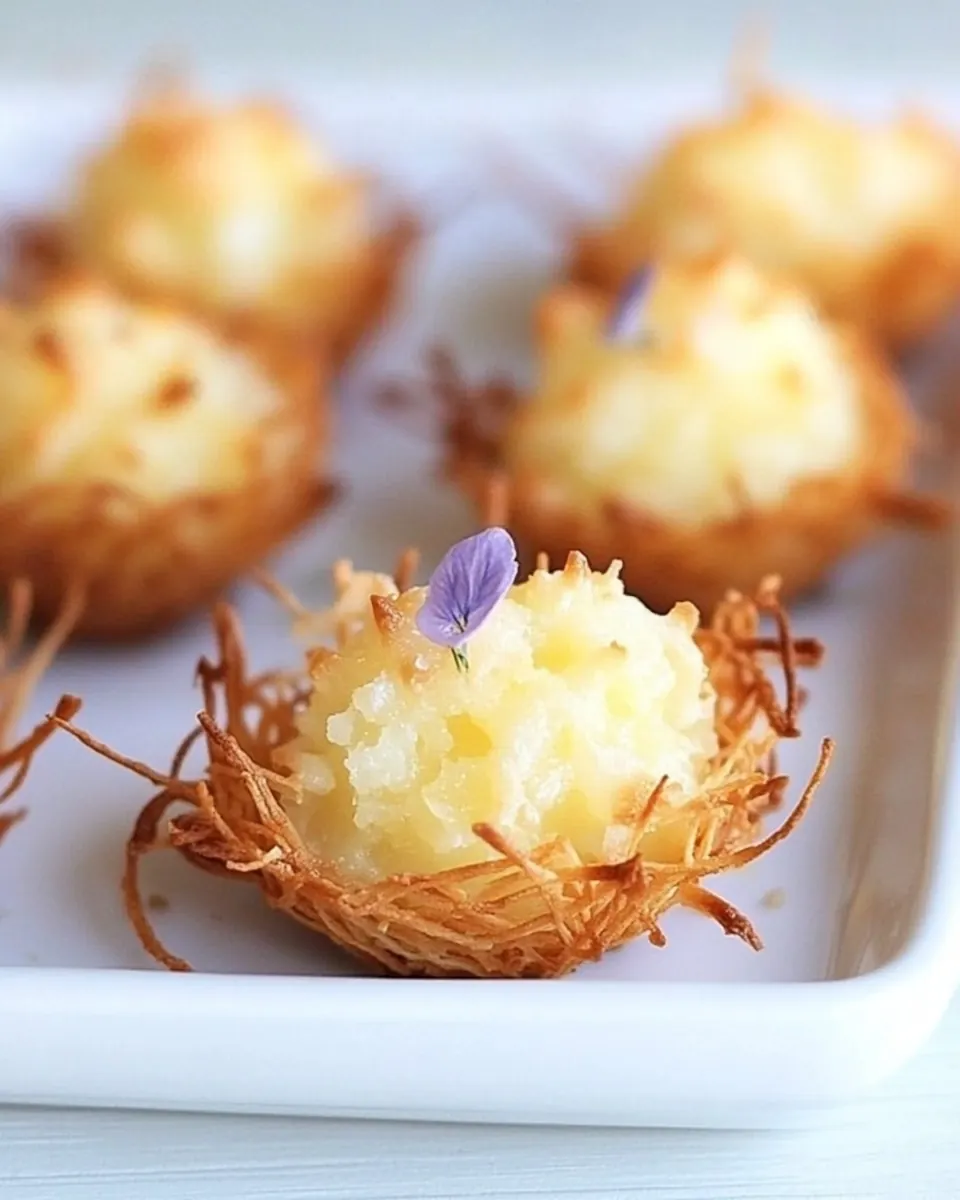
- Arrange the nests and top each with two mini chocolate eggs.: The final step is visual and textural pleasure, placing two mini Cadbury chocolate eggs in the warm centers so they nestle in slightly. The contrast between toasted coconut and creamy chocolate is immediate, and the eggs add a glossy focal point. If the nests have cooled completely they will still accept the eggs, but if you want the eggs to sink a touch, place them on while the nests are still slightly warm. Avoid piling on extras that overpower the delicate coconut structure.
Tips and Tricks about Coconut Macaroon Nests
These tips will help you get consistent texture and beautiful presentation. They focus on timing, handling, and small technique shifts that make the nests more reliable and flavorful.
- Measure Carefully Use precise measuring for the sweetened coconut flakes and granulated sugar so the balance of moisture and sweetness is right.
- Low and Slow on the Stove Cook the mixture over medium low heat to allow the sugar to dissolve and the coconut to soften without burning.
- Warm but Workable Wait about ten minutes after cooking so the mix is warm rather than hot, which makes shaping safe and effective.
- Even Portions Use a small scoop or spoon to portion the mixture for uniform nests that bake evenly.
- Gentle Release If nests stick, warm the pan briefly and use a thin spatula to ease them out cleanly.
Serve This Coconut Macaroon Nests With
These nests make a bright addition to seasonal spreads and dessert platters. They pair well with light beverages and fit spring gatherings especially well. Use a decorative platter and consider presentation accents for holiday serving.
- Brunch Buffet Arrange the nests on a tiered stand alongside fruit and light pastries for a festive brunch offering.
- Tea Time Serve with small cups of tea or coffee, the toasted coconut and chocolate work well with light roasts and floral teas.
- Party Tray Add the nests to a dessert board with fresh berries and small cookies for an assorted presentation that travels well.
- Storage Tips Store in an airtight container at room temperature for up to three days, stacking with parchment between layers to prevent sticking.
- Seasonal Pairing These are ideal for spring occasions such as Easter, but they also brighten picnic dessert boxes and casual get togethers.
FAQ
Conclusion
These Coconut Macaroon Nests stand out for their combination of toasted coconut texture and a sweet chocolate surprise, making them a charming, easy dessert. Give them a try if you want something that looks festive but is straightforward to prepare, especially for spring gatherings or casual get togethers. They are satisfying without being fussy, and the simple, hands on method makes them a pleasure to make and to share with friends and family.
Coconut Macaroon Nests
Equipment
- Heavy saucepan
- Mini Muffin Tin
- Measuring Spoon
- Oven
Ingredients
- 3/4 cup from 5 large egg whites Whisked to soft peaks, provides structure and lift to the macaroons while creating a light, airy texture; beaten egg whites also help bind the coconut and sugar together as they set during baking.
- 6 tbsp granulated sugar Added gradually to stabilize the meringue and sweeten the mixture, melts slightly during baking to create chewy centers and a glossy exterior that helps brown the tops.
- 10 oz sweetened coconut flakes, I used Baker's Folded into the whipped egg whites and sugar to supply the primary bulk and chewy texture; sweetened coconut flakes contribute flavor, chew, and the characteristic coconut aroma.
- 1/2 tsp almond extract Added for a concentrated nutty, floral note that complements the coconut and enhances overall flavor complexity; a small amount brightens the finished cookies without overpowering them.
- 1/4 tsp vanilla extract Included for warm, familiar sweetness and aromatic depth that rounds out the almond extract; a touch of vanilla enhances flavor harmony throughout the macaroons.
- pinch of salt Sprinkled into the mixture to balance sweetness and heighten flavor contrast; a pinch of salt also helps stabilize the meringue and sharpen the overall taste.
- cooking spray Used to lightly coat the baking tray or muffin tins so the nests release cleanly after baking, preventing sticking and preserving the shape and underside texture of each macaroon.
- 72 mini Cadbury chocolate eggs Placed into the cooled coconut nests to serve as a decorative and flavorful centerpiece; the mini chocolate eggs add visual appeal, contrast in texture, and a sweet chocolate finish.
Instructions
- In a heavy saucepan combine egg whites, sugar and coconut flakes and cook over medium-low heat, stirring frequently until all the ingredients combine together, about 12 minutes. The mixture should be sticky and moist, not dry.: Warmth transforms these raw components into a cohesive, sticky mass, and during this time you will notice a gentle toasty aroma as the coconut softens and the granulated sugar starts to dissolve into the egg whites . Listen for a soft simmer rather than a vigorous boil, you want small, consistent bubbles not a roar, which prevents curdling. The texture should be tacky and moist, clinging together when pressed between fingers; if it seems dry, reduce heat and add a splash of water to bring it back. A common mistake here is rushing the heat, which can make the mixture grainy or overcooked. Stir constantly to ensure even cooking and to avoid hot spots that could brown the coconut too quickly.
- Remove from heat and stir in the almond and vanilla extracts.: The pan will still feel warm, and adding the almond extract and vanilla extract releases a fragrant steam that melds with the coconut scent. This step layers aromatic complexity into the nests, and for the best result work quickly so the extracts disperse evenly before the mixture cools. If you wait too long, the extracts will not integrate as well and pockets of stronger flavor can form. One pitfall is adding too much extract, which can make the flavor sharp and artificial, so measure carefully.
- Set aside and let it cool 10 minutes, should be warm.: Cooling slightly firms the mix and makes it workable, and during this rest you will feel the sticky mass change from fluid to tacky. Warm but not hot is ideal, because it lets you press the mixture without burning your fingers, and allows the structure to hold in the muffin tin. If the mixture is too hot, the nests will slump and lose shape; if it cools too long and becomes stiff, it will not press smoothly. To troubleshoot, if it cools too much, return briefly to low heat for a few moments to regain pliability, stirring constantly.
- Preheat the oven to 300°F. Spray a nonstick mini muffin tin with oil.: Preheating ensures even, gentle baking so the nests crisp slowly instead of browning too fast. The 300°F temperature creates a steady environment where moisture escapes evenly, allowing the coconut to toast without burning. Lightly spray the tin so the nests release cleanly; too much oil can make the bottoms greasy, while too little causes sticking. A common error is skipping preheating, which leads to uneven bake and poor texture.
- Drop heaping tablespoons into the tin, lightly press mixture into the bottom and up the sides of the tin to make "nests" with the back of the measuring spoon.: As you press, you will feel the mixture give and hold shape. The visual cue is a smooth, even cup with a slightly compacted base and a textured rim from the coconut. Press firmly enough so the sides adhere, but not so firmly that the nests become overly dense; they should retain some air to crisp properly. Watch for inconsistent sizes, because uneven nests bake at different rates. If one side looks thin, gently reinforce it so the egg sits snugly later.
- Bake 22 to 25 minutes, or until golden.: During baking the scent will shift from warm coconut to a nutty amber note, and you will see the edges take on a light golden color while the centers stay slightly pale. The nests should feel set to the touch and hold their shape. Baking too long will dry them out and darken the coconut, while underbaking leaves them too soft to lift. A typical trap is opening the oven frequently which cools the chamber and prolongs bake time, so check only near the end of the suggested window.
- Let it cool 10 minutes, then carefully remove from the tin.: Cooling lets the nests stabilize so they release neatly. You may hear a faint crackle as steam leaves, and the bottoms will firm up. Use a small offset spatula or a gentle twist to ease them out; forcing them can break the delicate sides. If a nest sticks, warm the tin briefly in the oven for a minute to loosen the bond, then try again. The common mistake here is impatience, pulling them out too soon which causes crumbling.
- Arrange the nests and top each with two mini chocolate eggs.: The final step is visual and textural pleasure, placing two mini Cadbury chocolate eggs in the warm centers so they nestle in slightly. The contrast between toasted coconut and creamy chocolate is immediate, and the eggs add a glossy focal point. If the nests have cooled completely they will still accept the eggs, but if you want the eggs to sink a touch, place them on while the nests are still slightly warm. Avoid piling on extras that overpower the delicate coconut structure.
Notes
- Measure Carefully Use precise measuring for the sweetened coconut flakes and granulated sugar so the balance of moisture and sweetness is right.
- Low and Slow on the Stove Cook the mixture over medium low heat to allow the sugar to dissolve and the coconut to soften without burning.
- Warm but Workable Wait about ten minutes after cooking so the mix is warm rather than hot, which makes shaping safe and effective.
- Even Portions Use a small scoop or spoon to portion the mixture for uniform nests that bake evenly.
- Gentle Release If nests stick, warm the pan briefly and use a thin spatula to ease them out cleanly.