Pizza Sliders
Pizza Sliders came into my weeknight rotation the minute I realized dinner did not have to be complicated to feel celebratory. I remember the first time I pulled a tray of these from the oven, the house buzzing with after-school chatter, and the scent of bubbling mozzarella cheese and warm pizza sauce drifting through the rooms. It felt like a mini pizza party that required almost no ceremony, just good bread and familiar toppings.
Over the years I have made these for game nights, a hurried family dinner, and even a lazy Sunday brunch reimagined with leftover toppings. What I love most is how forgiving the recipe is, and how the little details, like brushing the tops with herb butter, turn simple ingredients into something that feels homemade and slightly indulgent. When you bite through the soft top roll into the gooey interior, you get that contrast of textures that keeps everyone coming back for more.
Recipe Snapshot
30 mins
5 mins
25 mins
Easy
350 kcal
American
Keto, Gluten-Free
Dinner
9×9 or 7×11 inch baking pan/sheet
Why Try This Pizza Sliders
They are effortless crowd pleasers
I always reach for Pizza Sliders when I need something that feeds many without fuss. The assembly is quick, and because everything is layered in a single pan, cleanup is minimal. When guests arrive hungry, these vanish fast, which tells me they hit the sweet spot between comfort food and party fare.
Perfectly portable and shareable
Hands down the best thing about these sliders is how easy they are to pick up and eat. I love serving them at gatherings where people are mingling. They hold together well, and the size makes them ideal for sampling along with other small bites.
Customizable without losing the base
I enjoy the flexibility. The formula of Hawaiian Rolls, pizza sauce, mozzarella cheese, and pepperoni is a reliable template. From there I can swap or add toppings while keeping the assembly and timing the same, which is a big win when I am juggling hungry kids and a million other things.
Comfort in every bite
There is a nostalgic quality to these sliders, they taste like shared kitchen moments. The warm, buttery tops and the melty, stringy mozzarella cheese make each bite cozy and satisfying. When I want to recreate that diner or game-night feel at home, this recipe is my go to.
Fast and forgiving baking
The oven time is short enough to be practical, yet long enough to meld flavors and toast the tops to a gentle golden brown. Even if your timing is off by a few minutes, the sliders are resilient, which is why I keep this recipe in heavy rotation.
What You Need for Pizza Sliders
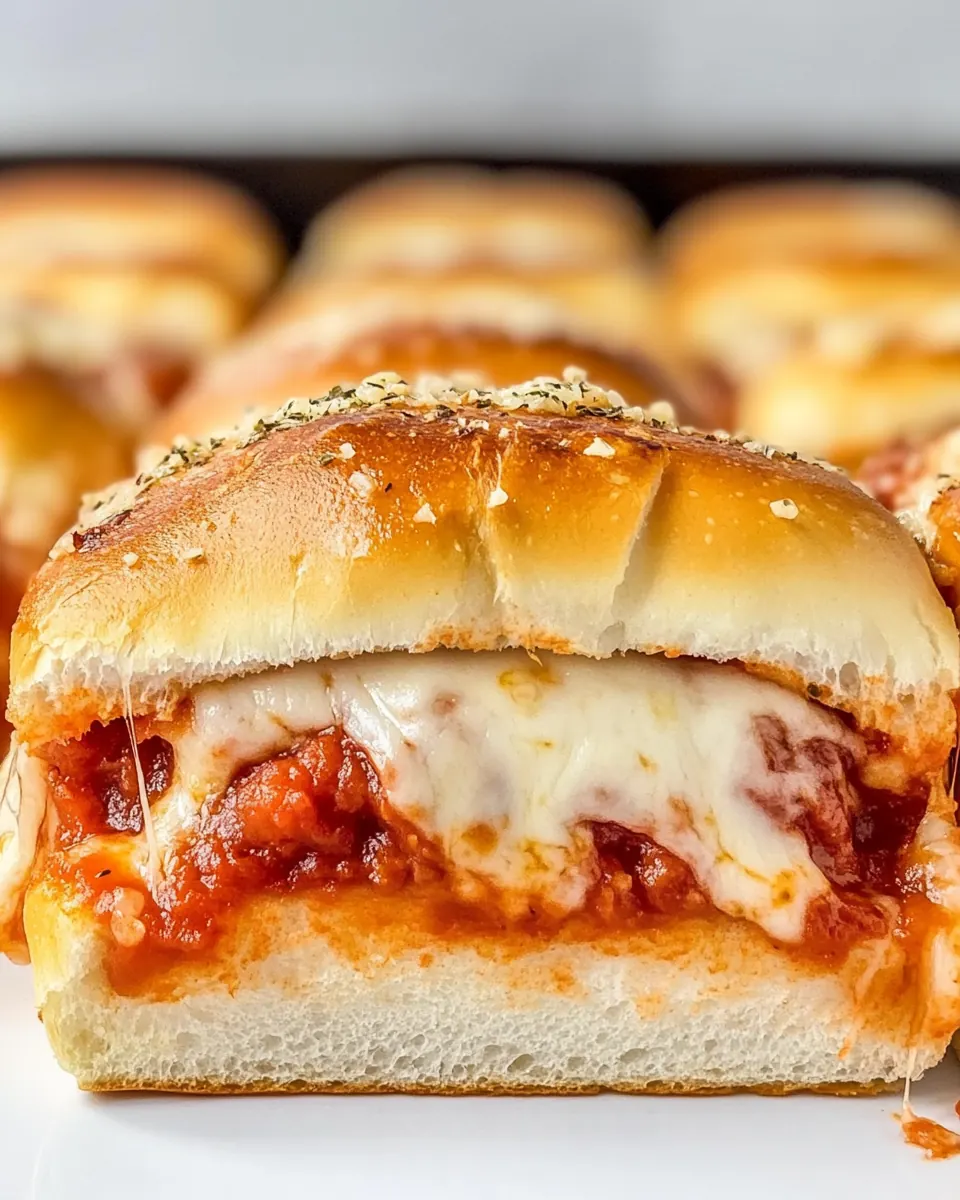
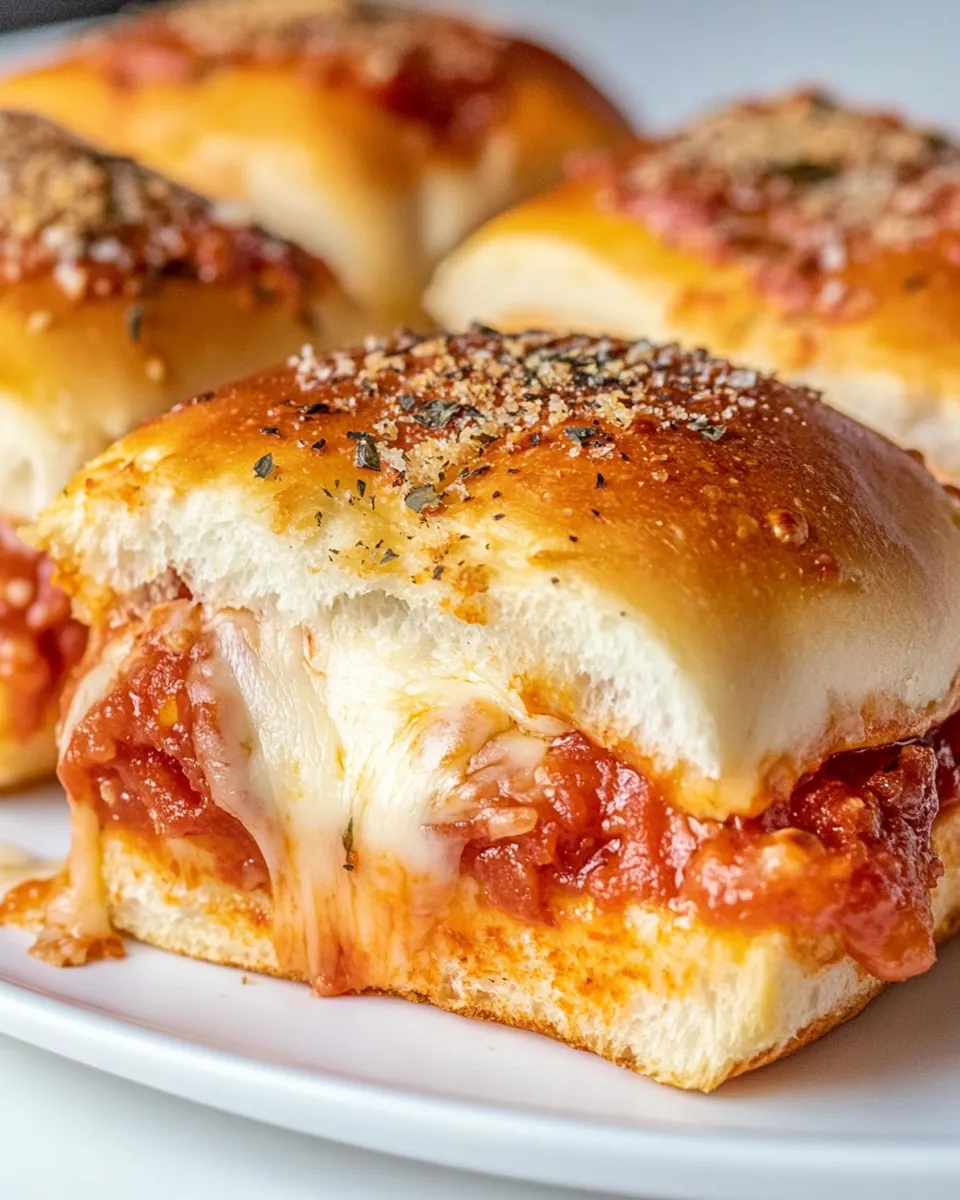
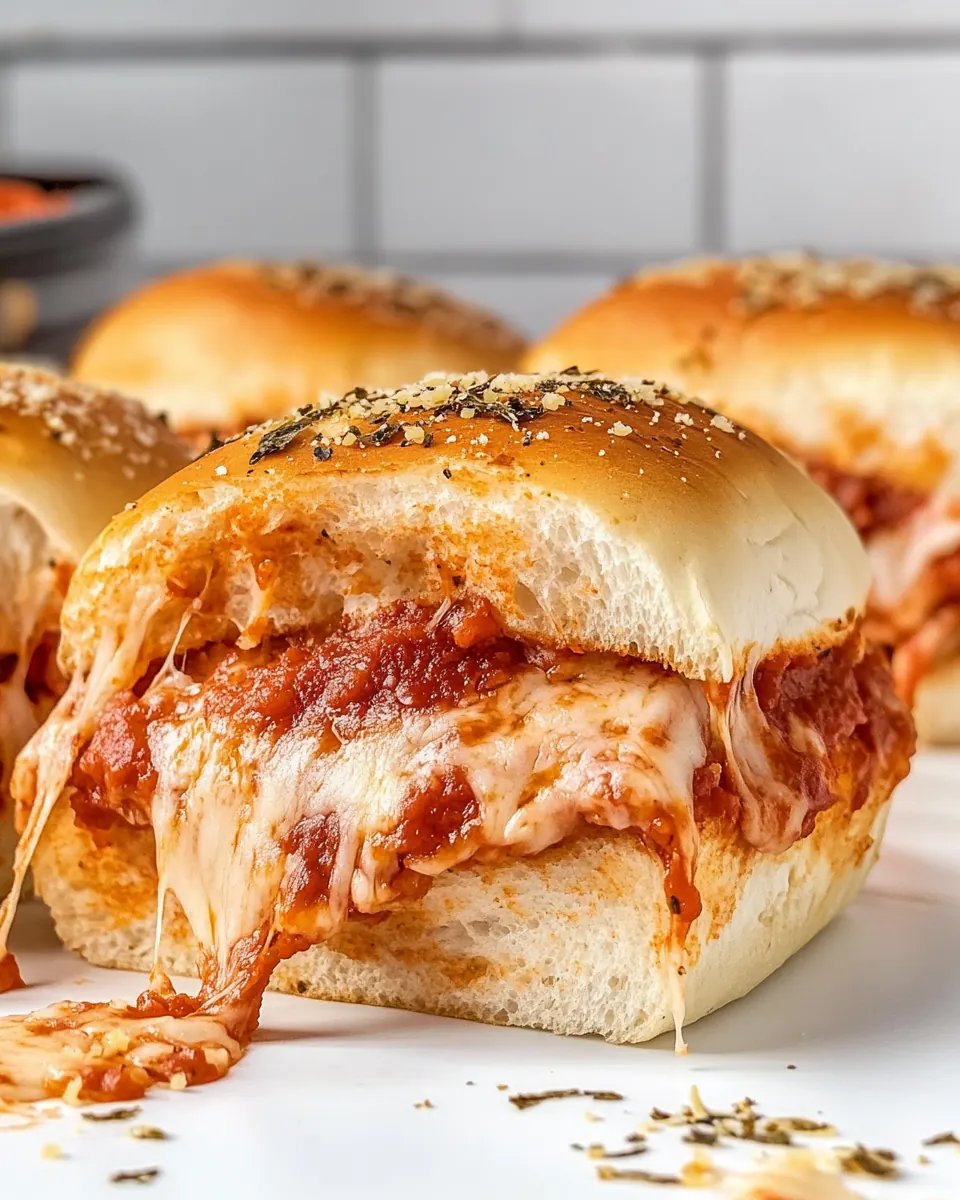
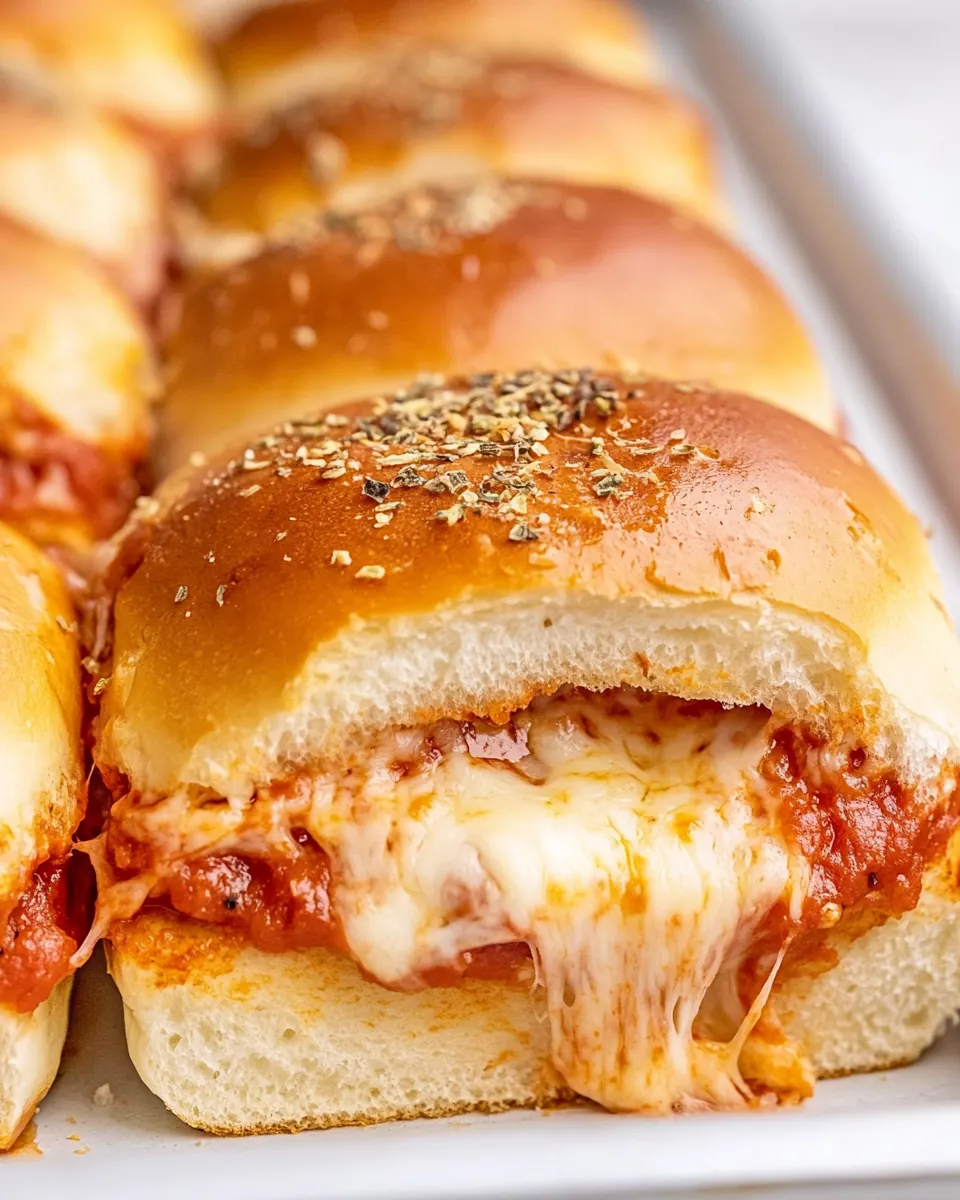
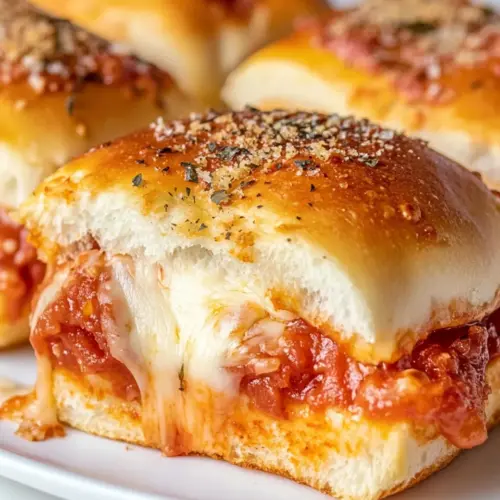
These ingredients are straightforward and work together because each plays a distinct role. The Hawaiian Rolls provide a soft but sturdy vessel, the pizza sauce brings acidity and herb notes, while the mozzarella cheese supplies the melty, stringy texture that defines pizza. Pepperoni adds savory, slightly greasy pockets of flavor, and the butter with Italian seasoning gives a glossy, aromatic finish that toasts beautifully in the oven.
- 12 Hawaiian Rolls see note 1: Provide a soft, slightly sweet base for the sliders that holds fillings together and creates pull-apart buns once baked. Offer a tender crumb that soaks up butter and seasonings while maintaining structure under cheese and pepperoni.
- 2 cups shredded mozzarella cheese low-moisture: Add melty, stretchy texture and mild, creamy flavor that binds toppings and creates that classic pizza cheese pull. Brown lightly under heat to contribute to overall appearance and mouthfeel of each slider.
- 1 cup pizza sauce: Provide concentrated tomato flavor and savory seasoning to coat the rolls and complement cheese and pepperoni. Add moisture and tang that balance richness from butter and cheese while infusing each bite with familiar pizza taste.
- 24 slices (5-6 ounces) pepperoni: Contribute savory, spicy, and slightly oily slices that deliver traditional pepperoni flavor and meaty texture to each slider. Layer evenly to ensure bold flavor and a satisfying bite in every piece.
- 1/2 cup butter melted: Impart rich butteriness that soaks into the buns, promoting browning and a glossy finish when baked. Serve as the vehicle for Italian seasoning to distribute herb flavor across the assembled sliders.
- 2 teaspoons Italian seasoning: Deliver a fragrant blend of dried herbs that brightens and seasons the butter topping for the sliders. Sprinkle over buttered rolls to infuse Mediterranean notes that complement tomato sauce, cheese, and pepperoni.
Recipe Directions for Pizza Sliders
I like to think of the directions as a short ritual that turns pantry staples into something celebratory. The sequence is straightforward, but the little cues matter, like when the tops reach a glossy, golden color or when the cheese just begins to bubble. Follow these steps, stay present, and you will be rewarded with perfectly baked sliders.
- Preheat the oven to 350°F/180°C, and grease a 9×9 or 7×11 inch baking pan/sheet (if you don’t have either, then use 9×13).: When you open the oven and feel the steady warmth, the kitchen starts to change, a soft anticipation sets in that primes you for baking. A properly preheated oven ensures even rising and predictable browning, so take a moment to let it reach the set temperature; the air should feel warm and consistent if you hold your hand briefly near the door, but not too hot to touch. Greasing the pan prevents the slider bottoms from sticking, allowing for a clean release and intact presentation, and the metal of a 9×9 pan encourages gentle conductivity for the cheese to melt evenly. Common mistake to avoid here is skipping preheat or rushing the oven; that can lead to uneven browning or undercooked interiors. If you smell anything acrid as it preheats, double check there is nothing leftover in the oven that could burn.
- In a small bowl, combine melted butter and Italian seasoning.: The aroma of warmed butter marrying with dried herbs releases a warm, savory perfume that sets the tone for the topping. Mixing them allows the herbs to hydrate slightly, which helps them adhere to the roll tops and bloom in the oven, producing a toasty, fragrant crust. I like to whisk until the herbs are evenly distributed so there are no clumps, and you can taste a small dab to ensure the seasoning level is right; remember the pepperoni and mozzarella cheese also bring salt, so adjust conservatively. A common error is overheating the butter so it browns too much, giving a nutty or burnt flavor; keep it just melted and warm, not sizzling.
- Slice the rolls in half using serrated knife to separate the tops from the bottoms.: The sound of the serrated knife sawing through soft Hawaiian Rolls is satisfying, and doing this carefully keeps the tops intact so they form a neat lid once assembled. Slice with a gentle sawing motion to avoid compressing the bread, and take your time to ensure even halves; uneven slices can lead to some sliders having too much bread or too much filling. If the knife presses down and smashes the roll, the crumb will become dense and won’t absorb the sauce properly. Arrange the bottoms in the pan as soon as they are separated to keep them from drying out.
- Place the bottom of the rolls in the pan. Layer half of the cheese, all of the pizza sauce, and then layer the pepperoni. Top with the remaining cheese. Cover with the top buns.: In this stage the visual cues matter, you should see an even blanket of mozzarella cheese hugging the rolls, with glossy pizza sauce in between and neat circles of pepperoni peeking through. The cheese below helps create a cushion that prevents the sauce from soaking directly into the roll bottoms, preserving texture. The pepperoni will release some flavorful oils as it warms, which blend into the cheese and sauce, giving concentrated pockets of savory taste. A frequent misstep is overloading the sauce which leads to soggy bread; apply sauce sparingly and evenly. Also make sure the layers are uniform so every sandwich heats at the same rate.
- Brush the herb butter mixture over the tops, cover with foil and bake for 15 minutes. Remove the foil, and bake uncovered for 10 more minutes or until done/golden brown. Watch the sliders so they don’t burn.: Brushing the warm, herb infused butter onto the tops creates a glossy sheen that promotes even browning and herb aroma. Once covered with foil, the steam trapped inside helps the fillings meld and the cheese begin to melt without the tops overbrowning too quickly. You should hear a very gentle hiss of trapped steam as the pan heats, and the kitchen will start smelling faintly of toasted herbs and butter. A common pitfall is skipping the foil which can cause the tops to brown too fast while the centers remain cool. Be careful not to let the butter pool unevenly, or some areas will brown more than others.
- Remove the foil, and bake uncovered for 10 more minutes or until done/golden brown. Watch the sliders so they don’t burn.: This final uncovered bake is where the tops crisp and the mozzarella cheese becomes bubbly and slightly golden at the edges. Look for a warm, golden brown color on the buns and small bubbling spots of cheese; that visual cue means the sliders are ready. The scent will deepen into a toasty, slightly caramelized note from the buttered tops, and the pepperoni edges may crisp slightly which adds textural contrast. A typical mistake is leaving them too long which can dry the rolls and make the cheese overly dark; stay nearby during this stage and aim for a gentle, even golden finish. Once out of the oven, let them rest a minute to set, then slice and serve warm.
Customization Ideas
These ideas help you adapt the base formula while keeping the assembly and bake time the same. Small swaps or additions can shift the mood from classic game night to a brunch style snack, without complicating the process.
- Swap the rolls: Use dinner rolls if you cannot find Hawaiian Rolls, choose ones that are soft and slightly sweet to mimic the original texture.
- Cheese variation: Try substituting part of the mozzarella cheese with provolone for a deeper flavor while maintaining a great melt.
- Lighten the butter: Brush sparingly or mix with a touch of olive oil to reduce richness while still promoting browning.
- Pepperoni alternatives: Leave out the pepperoni for a vegetarian-friendly version, or add cooked vegetables in the same spot for variety.
- Make ahead: Assemble and cover with foil, then refrigerate before baking; add a few extra minutes to the bake time when cooking from chilled.
- Storage and reheating: Store leftovers in an airtight container in the fridge for two to three days, and reheat in the oven or air fryer to regain crispness.
What to Serve With Pizza Sliders
These sliders stand well alongside a range of sides and fit many occasions. Whether you are serving them at a casual lunch, a game night, or a family dinner, the right companions can elevate the spread and create a balanced plate. Here are thoughtful serving ideas and practical storage notes to make the experience seamless.
- Light salad: Pair with a crisp green salad to cut through the richness and add freshness to the plate, making the meal feel lighter for lunch or dinner.
- Vegetable sticks: Offer carrot and celery sticks or sliced bell peppers for crunch and a colorful contrast that guests can nibble between sliders.
- Dipping options: Serve extra pizza sauce or a garlic butter dip for dunking, which enhances the experience and provides more seasoning with each bite.
- Occasions: These are perfect for informal gatherings like game nights, casual parties, or weekend lunches where people graze and chat.
- Kid friendly: Slice into smaller portions for little hands, and arrange on a platter with fruit to round out a child friendly meal.
- Seasonal pairing: In cooler months, serve with a warm soup; in warmer weather, pair with chilled sides like coleslaw or a simple tomato cucumber salad.
- Storage tips: Keep leftovers covered in the fridge for up to two to three days, and reheat in the oven or an air fryer to restore the toasted top and melty center.
- Presentation: Serve directly from the pan for a rustic feel, or slice and arrange neatly on a platter for a more polished look.
- Feeding a crowd: Multiply the recipe and bake in larger pans like a 9×13 if needed, keeping the same layering logic to maintain texture and flavor.
- Serving sizes: Cut each slider so guests can take one or two, depending on appetite and whether there are other dishes on the table.
FAQ
Conclusion
These Pizza Sliders are special because they turn simple pantry items into a shareable, comforting bite with minimal effort. The combination of soft rolls, melting cheese, savory pepperoni, and herb brushed tops creates a nostalgic flavor that works for casual gatherings or quick family dinners. Give them a try the next time you want something that feels celebratory without a lot of prep, and enjoy how quickly they become a go to in your rotation.
Pizza Sliders
Equipment
- 9×9 or 7×11 inch baking pan/sheet
Ingredients
- 12 Hawaiian Rolls see note 1 Provide a soft, slightly sweet base for the sliders that holds fillings together and creates pull-apart buns once baked. Offer a tender crumb that soaks up butter and seasonings while maintaining structure under cheese and pepperoni.
- 2 cups shredded mozzarella cheese low-moisture Add melty, stretchy texture and mild, creamy flavor that binds toppings and creates that classic pizza cheese pull. Brown lightly under heat to contribute to overall appearance and mouthfeel of each slider.
- 1 cup pizza sauce Provide concentrated tomato flavor and savory seasoning to coat the rolls and complement cheese and pepperoni. Add moisture and tang that balance richness from butter and cheese while infusing each bite with familiar pizza taste.
- 24 slices (5-6 ounces) pepperoni Contribute savory, spicy, and slightly oily slices that deliver traditional pepperoni flavor and meaty texture to each slider. Layer evenly to ensure bold flavor and a satisfying bite in every piece.
- 1/2 cup butter melted Impart rich butteriness that soaks into the buns, promoting browning and a glossy finish when baked. Serve as the vehicle for Italian seasoning to distribute herb flavor across the assembled sliders.
- 2 teaspoons Italian seasoning Deliver a fragrant blend of dried herbs that brightens and seasons the butter topping for the sliders. Sprinkle over buttered rolls to infuse Mediterranean notes that complement tomato sauce, cheese, and pepperoni.
Instructions
- Preheat the oven to 350°F/180°C, and grease a 9×9 or 7×11 inch baking pan/sheet (if you don’t have either, then use 9×13).: When you open the oven and feel the steady warmth, the kitchen starts to change, a soft anticipation sets in that primes you for baking. A properly preheated oven ensures even rising and predictable browning, so take a moment to let it reach the set temperature; the air should feel warm and consistent if you hold your hand briefly near the door, but not too hot to touch. Greasing the pan prevents the slider bottoms from sticking, allowing for a clean release and intact presentation, and the metal of a 9×9 pan encourages gentle conductivity for the cheese to melt evenly. Common mistake to avoid here is skipping preheat or rushing the oven; that can lead to uneven browning or undercooked interiors. If you smell anything acrid as it preheats, double check there is nothing leftover in the oven that could burn.
- In a small bowl, combine melted butter and Italian seasoning.: The aroma of warmed butter marrying with dried herbs releases a warm, savory perfume that sets the tone for the topping. Mixing them allows the herbs to hydrate slightly, which helps them adhere to the roll tops and bloom in the oven, producing a toasty, fragrant crust. I like to whisk until the herbs are evenly distributed so there are no clumps, and you can taste a small dab to ensure the seasoning level is right; remember the pepperoni and mozzarella cheese also bring salt, so adjust conservatively. A common error is overheating the butter so it browns too much, giving a nutty or burnt flavor; keep it just melted and warm, not sizzling.
- Slice the rolls in half using serrated knife to separate the tops from the bottoms.: The sound of the serrated knife sawing through soft Hawaiian Rolls is satisfying, and doing this carefully keeps the tops intact so they form a neat lid once assembled. Slice with a gentle sawing motion to avoid compressing the bread, and take your time to ensure even halves; uneven slices can lead to some sliders having too much bread or too much filling. If the knife presses down and smashes the roll, the crumb will become dense and won’t absorb the sauce properly. Arrange the bottoms in the pan as soon as they are separated to keep them from drying out.
- Place the bottom of the rolls in the pan. Layer half of the cheese, all of the pizza sauce, and then layer the pepperoni. Top with the remaining cheese. Cover with the top buns.: In this stage the visual cues matter, you should see an even blanket of mozzarella cheese hugging the rolls, with glossy pizza sauce in between and neat circles of pepperoni peeking through. The cheese below helps create a cushion that prevents the sauce from soaking directly into the roll bottoms, preserving texture. The pepperoni will release some flavorful oils as it warms, which blend into the cheese and sauce, giving concentrated pockets of savory taste. A frequent misstep is overloading the sauce which leads to soggy bread; apply sauce sparingly and evenly. Also make sure the layers are uniform so every sandwich heats at the same rate.
- Brush the herb butter mixture over the tops, cover with foil and bake for 15 minutes. Remove the foil, and bake uncovered for 10 more minutes or until done/golden brown. Watch the sliders so they don’t burn.: Brushing the warm, herb infused butter onto the tops creates a glossy sheen that promotes even browning and herb aroma. Once covered with foil, the steam trapped inside helps the fillings meld and the cheese begin to melt without the tops overbrowning too quickly. You should hear a very gentle hiss of trapped steam as the pan heats, and the kitchen will start smelling faintly of toasted herbs and butter. A common pitfall is skipping the foil which can cause the tops to brown too fast while the centers remain cool. Be careful not to let the butter pool unevenly, or some areas will brown more than others.
- Remove the foil, and bake uncovered for 10 more minutes or until done/golden brown. Watch the sliders so they don’t burn.: This final uncovered bake is where the tops crisp and the mozzarella cheese becomes bubbly and slightly golden at the edges. Look for a warm, golden brown color on the buns and small bubbling spots of cheese; that visual cue means the sliders are ready. The scent will deepen into a toasty, slightly caramelized note from the buttered tops, and the pepperoni edges may crisp slightly which adds textural contrast. A typical mistake is leaving them too long which can dry the rolls and make the cheese overly dark; stay nearby during this stage and aim for a gentle, even golden finish. Once out of the oven, let them rest a minute to set, then slice and serve warm.
Notes
- Swap the rolls: Use dinner rolls if you cannot find Hawaiian Rolls, choose ones that are soft and slightly sweet to mimic the original texture.
- Cheese variation: Try substituting part of the mozzarella cheese with provolone for a deeper flavor while maintaining a great melt.
- Lighten the butter: Brush sparingly or mix with a touch of olive oil to reduce richness while still promoting browning.
- Pepperoni alternatives: Leave out the pepperoni for a vegetarian-friendly version, or add cooked vegetables in the same spot for variety.
- Make ahead: Assemble and cover with foil, then refrigerate before baking; add a few extra minutes to the bake time when cooking from chilled.
- Storage and reheating: Store leftovers in an airtight container in the fridge for two to three days, and reheat in the oven or air fryer to regain crispness.